
L19WA91 - Television AOC - Free user manual and instructions
Find the device manual for free L19WA91 AOC in PDF.


| Product Type | LCD Television |
| Brand | AOC |
| Model | L19WA91 |
| Screen Size | 19 inches (48 cm) |
| Display Resolution | 1366 x 768 pixels |
| Aspect Ratio | 16:9 |
| Dimensions (with stand) | 45.0 x 33.0 x 18.0 cm |
| Dimensions (without stand) | 45.0 x 28.5 x 8.5 cm |
| Weight (with stand) | 3.2 kg |
| Power Consumption (typical) | 30 W |
| Power Supply | 100-240 V, 50/60 Hz |
| Inputs | HDMI, VGA, Composite (AV), USB |
| Outputs | Headphone jack |
| Remote Control | Included (batteries not included) |
| Built-in Speakers | 2 x 3 W |
| Tuner | Analog & Digital (DVB-T) |
| Operating Temperature | 5°C to 35°C |
| Cleaning Instructions | Wipe with a soft dry cloth; do not use liquid cleaners |
| Safety Warnings | Do not expose to moisture; avoid direct sunlight; ensure proper ventilation |
| Spare Parts Availability | Remote control, power adapter, stand available from authorized service centers |
| Repairability | Repairs should be carried out by qualified personnel only |
| User Manual | Available for download in multiple languages |
Frequently Asked Questions - L19WA91 AOC
User questions about L19WA91 AOC
0 question about this device. Answer the ones you know or ask your own.
Ask a new question about this device
Download the instructions for your Television in PDF format for free! Find your manual L19WA91 - AOC and take your electronic device back in hand. On this page are published all the documents necessary for the use of your device. L19WA91 by AOC.
USER MANUAL L19WA91 AOC
IMPORTANT SAFETY INSTRUCTIONS ....1
Read before operating equipment....1
Compliance Information 3
CE Conformity for European Countries....3
Declaration of RoHS Compliance....4
PREPARATION....6
Before installation....6
Package contents....7
Installation of batteries ....7
TV INSTALLATION 8
Mount the TV stand 8
TV connectors 8
Wall mounting....9
Remove the TV stand for wall mounting 9
Connect the device....11
Rear connections 11
Side connections....13
Power connection....14
Turning the LCD TV on 14
First time installation....15
Control panel buttons 16
Remote control functions....17
Picture format....18
TV menu 19
OSD Settings....19
Picture 20
Sound 21
TV....22
TV/Channels....23
Features 24
Parental 26
Other information....27
Troubleshooting....27
Glossary 28
Specifications 29
IMPORTANT SAFETY INSTRUCTIONS
Read before operating equipment
- Read these instructions.
- Keep these instructions.
- Heed all warnings.
- Follow all instructions.
- Do not use this apparatus near water.
- Clean only with a dry cloth.
- Do not block any of the ventilation openings. Install in accordance with the manufacturers instructions.
- Do not install near any heat sources such as radiators, heat registers, stoves, or other apparatus (including amplifiers) that produce heat.
- Do not defeat the safety purpose of the polarized or grounding-type plug. A polarized plug has two blades with one wider than the other. A grounding type plug has two blades and a third grounding prong. The wide blade or the third prong is provided for your safety. When the provided plug does not fit into your outlet, consult an electrician for replacement of the obsolete outlet.
- Protect the power cord from being walked on or pinched particularly at plugs, convenience receptacles, and the point where they exit from the apparatus.
- Only use attachments/accessories specified by the manufacturer.

- Use only with a cart, stand, tripod, bracket, or table specified by the manufacturer, or sold with the apparatus. When a cart is used, use caution when moving the cart/apparatus combination to avoid injury from tip-over.
- Unplug this apparatus during lightning storms or when unused for long periods of time.
- Refer all servicing to qualified service personnel. Servicing is required when the apparatus has been damaged in any way, such as power-supply cord or plug is damaged, liquid has been spilled or objects have fallen into apparatus, the apparatus has been exposed to rain or moisture, does not operate normally, or has been dropped.
- Apparatus shall not be exposed to dripping or splashing and no objects fill with liquids, such as vases, shall be placed on the apparatus.
- To reduce the risk of electric shock, do not remove the cover of the apparatus. Refer any servicing to appointed service personnel.
- The readily operable appliance coupler will serve as the disconnecting device of this apparatus.
- The apparatus must be connected to a mains socket outlet with a protected earthed connection.
-
Used or discharged batteries must be properly disposed of or recycled in compliance with all applicable laws. For detailed information, contact your local solid waste disposal authority.
-
When purchased or used in different countries, use an appropriate power cable which is compliant with local laws and regulations.
- To prevent injury, this apparatus must be securely attached to the floor/wall in accordance with the installation instructions
- Do not install this equipment in a confined space such a book case or similar unit.
- No naked flame sources, such as lighted candles, should be placed on the apparatus.
- For ventilation, leave at least 4" to 6" free all around the TV. Do not place the TV on a carpet.
- The equipment shall not be exposed to dripping or splashing.
- The equipment shall not be exposed to rain or moisture and objects filled with liquids, such as vases, shall be placed on the apparatus.
- The apparatus must be connected to a mains socket outlet with a protected earthed connection.
- The device is not intended for use at visual display work places acc. BildscharbV.
- The appliance coupler is used as the disconnect device of this apparatus, the disconnect device shall remain readily operable.
- Excessive sound pressure from earphones and headphones can cause hearing loss. Adjustment of the equalizer to maximum increases the earphones and headphones output voltage and therefore the sound pressure level.


The lightning flash with an equilateral triangle is intended to alert the user to the presence of uninsulated "DANGEROUS VOLTAGE" within the product's enclosure that may be of sufficient magnitude to constitute a risk of electrical shock to persons.
The exclamation point within an equilateral triangle is intended to alert the user to the important operating and maintenance (servicing) instructions in the literature accompanying the appliance.
CAUTION
These servicing instructions are for use by qualified service personnel only. To reduce the risks of electric shock do not perform any servicing other than that contained in the operating instructions unless you are qualified to do so.
Disposal of Waste Equipment by Users in Private Household in the European Union

This symbol on the product or on its packaging indicates that this product must not be disposed of with your other household waste. Instead, it is your responsibility to dispose of your waste equipment by handing it over to a designated collection point for the recycling of waste electrical and electronic equipment. The separate collection and recycling of your waste equipment at the time of disposal will help to conserve natural
resources and ensure that it is recycled in a manner that protects human health and the environment. For more information about where you can drop off your waste equipment for recycling, please contact your local city office, your household waste disposal service or the shop where you purchased the product.
CE marking

The shipped version of this device complies with the requirements of EEC directives 2004/108/EC "Electromagnetic compatibility" and 2006/95/EC "Low voltage directive".

Manufactured under licence from Dolby Laboratories. 'Dolby' and the double-D Symbol DRe trademarks of Dolby Laboratories.
Declaration of RoHS Compliance
This product has been designed and manufactured in compliance with Directive 2002/95/EC of the European Parliament and the Council on restriction of the use of certain hazardous substances in electrical and electronic equipment (RoHS Directive) and is deemed to comply with the maximum concentration values issued by the European Technical Adaptation Committee (TAC) as shown below:
| Substance | Proposed Maximum Concentration | Actual Concentration |
| Lead (Pb) 0.1% < 0.1% | ||
| Mercury (Hg) 0.1% < 0.1% | ||
| Cadmium (Cd) 0.01% < 0.01% | ||
| Hexavalent Chromium ( Cr^6+ ) 0.1% < 0.1% | ||
| Polybrominated biphenyls (PBB) | 0.1% < 0.1% | |
| Polybrominated biphenyl ethers (PBDE) | 0.1% < 0.1% |
Certain components of products as stated above are exempted under the Annex of the RoHS Directives as noted below:
Examples of exempted components are:
- Mercury in compact fluorescent lamps not exceeding 5 mg per lamp and in other lamps not specifically mentioned in the Annex of RoHS Directive.
- Lead in glass of cathode ray tubes, electronic components, fluorescent tubes, and electronic ceramic parts (e.g. piezoelectronic devices).
- Lead in high temperature type solders (i.e. lead-based alloys containing 85% by weight or more lead).
- Lead as an allotting element in steel containing up to 0.35% lead by weight, aluminium containing up to 0.4% lead by weight and as a cooper alloy containing up to 4% lead by weight.

LCD panel
The LCD panel used in this product is made of glass. Therefore, it can break when the product is dropped or impacted upon by other objects.
The LCD panel is a very high technology product, giving you finely detailed pictures. Occasionally, a few non-active pixels may appear on the screen as a fixed point of blue, green or red. This does not affect the performance of your product.
In order to ensure long performance of your set and reduce the risk of screen burning, please observe the following precautions.
- Does not display still image (still computer and video game images, logos. pictures, text and images displayed in 4:3) for extended periods of time.
- Use a screen saver when using a computer.
PREPARATION
Before installation
- Place the TV on a solid surface.

- Ensure that the TV is placed in a position to allow free flow of air.
- Do not cover the ventilation openings on the back cover.
• To prevent any unsafe situations, no naked flame sources, such as lighted candles, should be placed on or in the vicinity. -
Avoid heat, direct sunlight and exposure to rain or water.
• The equipment shall not be exposed to dripping or splashing. -
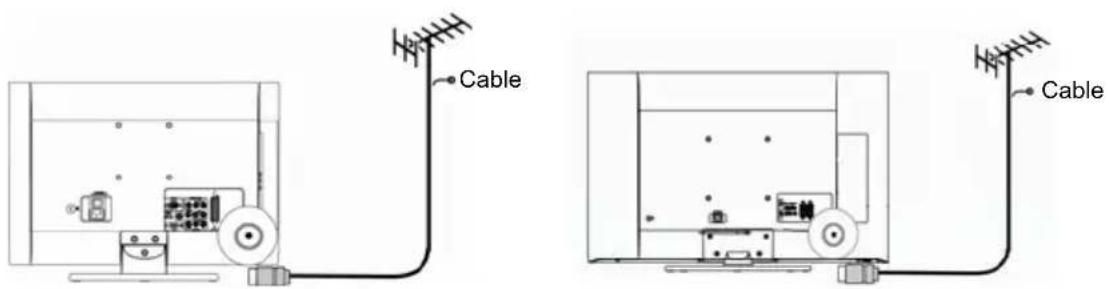
Insert the aerial plug firmly into the aerial socket
ANT IN 75Ω at the back of the TV.
For 19"/22" model: For 26"/32"/42" model:
PREPARATION
Package contents
Please verify that you received the following items with your package contents:

- LCD TV
- Base
- Remote control with batteries
- User's Manual
- Quick Setup Guide
- Power cord
Installation of batteries

natural_image
Two technical line drawings of a remote control panel with arrows indicating movement (no text or symbols)- Insert two AAA batteries into Remote control. Make sure + and - are facing the proper direction.
- Replace the cover.
* If the remote control will not be used for a long time, remove the batteries to avoid remote control damage.
TV INSTALLATION TV Overview
Mount the TV stand
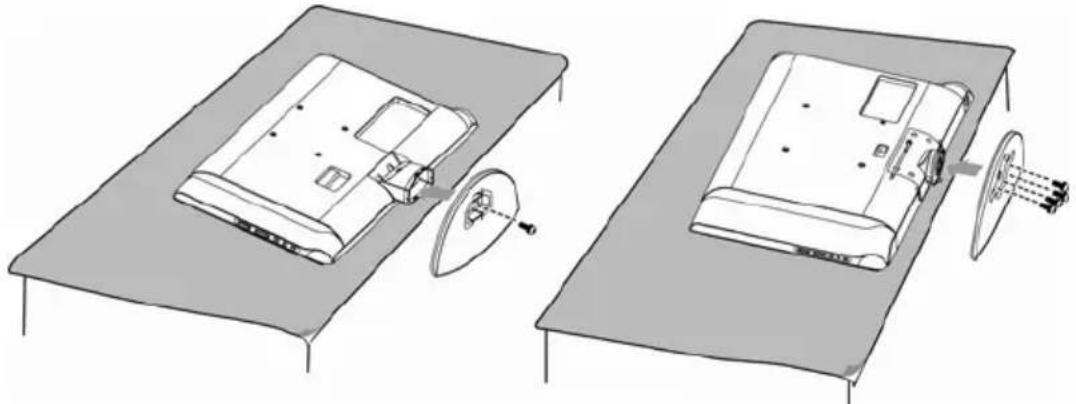
For 19"/22" model: For 26"/32"/42" model:
natural_image
Technical line drawing showing two views of a device with a lid and fan assembly (no text or symbols)- Place the TV face down on a soft and flat surface to prevent any damage and scratch to the screen.
- Carefully align and insert the Base to the stand.
- Insert the screws to the bottom of the base and tighten the base to the stand.
TV connectors


• Light Sensor: Detecting the ambient light to adjust the contrast and brightness automatically for comforting viewing. (32"/42" only)
- Power Switch: The TV is not completely powered off in standby mode. To turn off the TV, please turn off the power switch.
TV INSTALLATION TV Overview
Wall mounting
| TV screen size (inches) | VESA-compatible wall bracket (millimeters) (W x H) | Screw type | Unit without base weight |
| 19" 100 x 100 mm Metric 4 x 10 mm 3.7 kg | |||
| 22" 100 x 100 mm Metric 4 x 10 mm 4.6 kg | |||
| 26" 200 x 100 mm Metric 4 x 10 mm 7.0 kg | |||
| 32" 200 x 200 mm Metric 6 x 10 mm 10.9 kg | |||
| 42" 200 x 200 mm Metric 6 x 10 mm 18.6 kg |
Note:
• The wall mount bracket and the screws are not included.
- Please keep your TV at least 2.36 inches (60 mm) from the wall to prevent cable interference.
- For your safety, please use only with UL listed wall mount bracket with minimum weight of the TV without stand.
Remove the TV stand for wall mounting
For 19"/22" model:

natural_image
Diagram showing two views of a device with labeled parts, one magnified and one closed (no text or symbols present)- Remove the screws holding your TV to the stand.
- Pull up the stand base from the hinge to remove the stand base from your TV.
- Secure the wall mount bracket to the back of your TV using four M4 screws.
TV INSTALLATION TV Overview
Remove the TV stand for wall mounting
For 26"/32" model:

natural_image
Technical illustration of a mechanical assembly with two views showing internal components (no text or symbols)- Remove the screws holding your TV to the stand.
- Pull up the stand base from the hinge to remove the stand base from your TV.
-
Secure the wall mount bracket to the back of your TV using the four screws.
-
For 26" model: Using four M4 screws to secure the wall mount bracket.
- For 32" model: Using four M6 screws to secure the wall mount bracket.
For 42" model:
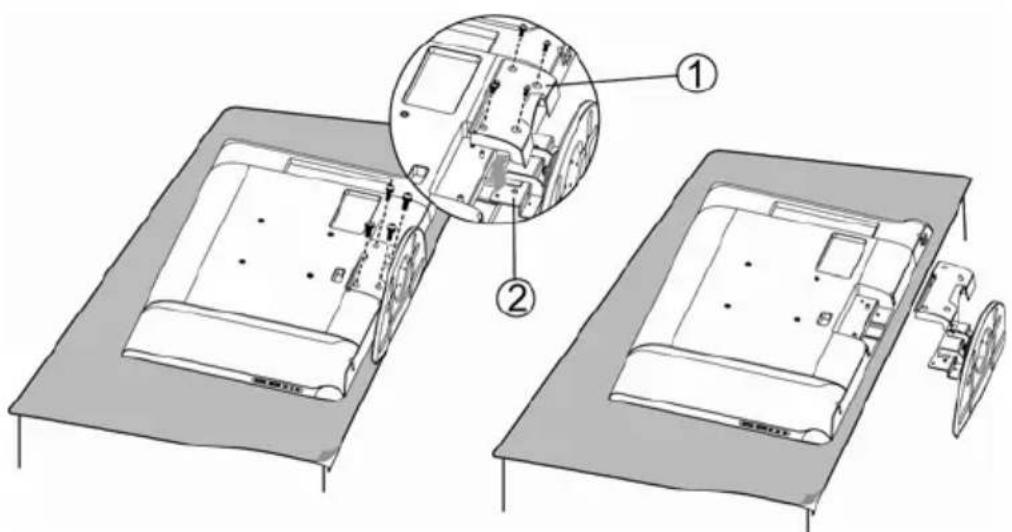
- Loosen the screws on the back of the stand and remove the back cover of the stand.
- Pull up the stand base from the hinge to remove the stand base from your TV.
- Secure the wall mount bracket to the back of your TV using four M6 screws.
TV INSTALLATION Connect the device
Rear connections
For 19"/22" model:
TV


| Port Functions | ||
| 1 | Tuner Input | Connects to TV RF signals (antenna/CATV). |
| 2 | SCART (EXT 1) | Full SCART, which transmits RGB, S-Video and CVBS in, and monitor out. |
| 3 | Component Video and L/R Audio Input | The YPbPr video signal can be used if connecting through the component video port. For example Progressive Scan DVD payers, Hi-scale HDTV Decoders, and satellite receivers, obtain video with maximum resolution using YPbPr and L/R audio signals. |
| 4 | Composite Video and L/R Audio Input | The video signal can be used if connecting through the composite video port and L/R audio signals. |
| 5 | SPDIF Output (Digital audio out) | SPDIF is highly recommended for high quality digital sound output. |
| 6 | HDMI | High Definition Multimedia InterfaceConnect to devices with digital signals and can be used with PC or HDTV video signals. |
| 7 | PC IN | Connect to VGA analog signals sources. PC audio supports 3.5mm Jack. |
TV INSTALLATION Connect the device
Rear connections
For 26"/32"/42" model:
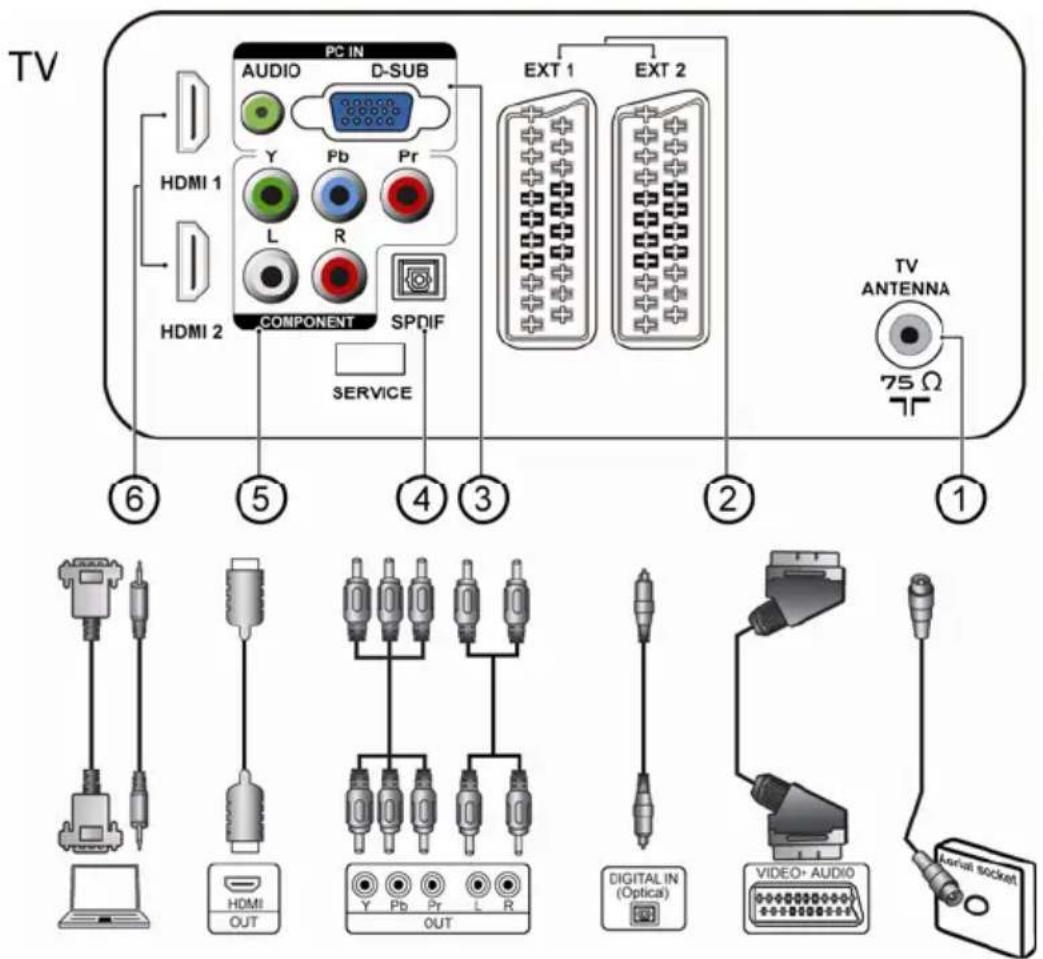
| Port Functions | ||
| 1 | Tuner Input | Connects to TV RF signals (antenna/CATV). |
| 2 | SCART(EXT 1 / EXT 2) | EXT 1: Full SCART, which transmits RGB, S-Video and CVBS in and monitor out.EXT 2: Half SCART, which transmits S-Video or CVBS in and monitor out. |
| 3 | PC IN | Connect to VGA analog signals sources. PC audio supports 3.5mm Jack. |
| 4 | SPDIF Output(Digital audio out)(optional) | SPDIF is highly recommended for high quality digital sound output. |
| 5 | Component Videoand L/R Audio Input | The YPbPr video signal can be used if connecting through the component video port. For example Progressive Scan DVD payers, Hi-scale HDTV Decoders, and satellite receivers, obtain video with maximum resolution using YPbPr and L/R audio signals. |
| 6 | HDMI 1 / HDMI 2 | High Definition Multimedia InterfaceConnect to devices with digital signals and can be used with PC or HDTV video signals. |
TV INSTALLATION Connect the device
Side connections
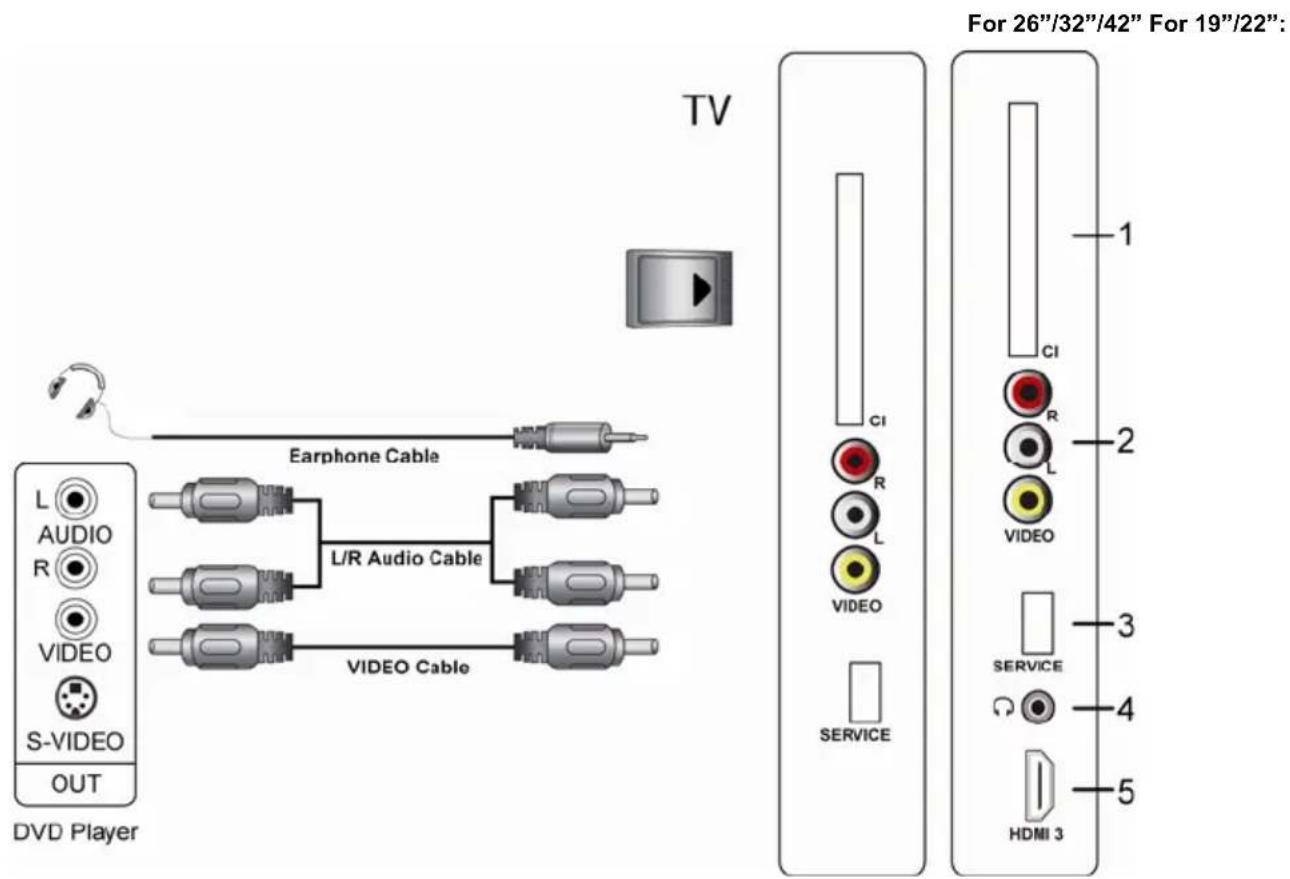
| Port Functions | ||
| 1 | COMMON INTERFACE | Function when PC Card or ExpressCard is in COMMON INTERFACE slot of the set. Please refer to your plug-in card manual for detail information. |
| 2 | AV IN (Composite Audio/Video) | The composite audio and video provide a basic connection from the DVD player or other device. |
| 3 | SERVICE | For technician service only. |
| 4 | Earphone Output (26"/32"/42" only) | Connect to headphones (16Ω or 32Ω). |
| 5 | HDMI 3 (26"/32"/42" only) | High Definition Multimedia InterfaceConnect to devices with digital signals and can be used with PC or HDTV video signals. |
TV INSTALLATION Connect the device
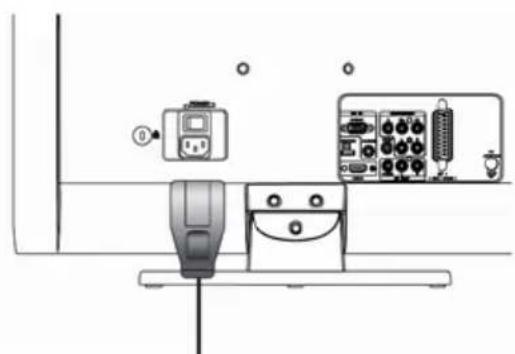
Power connection
Attach the AC power cord to the LCD TV and plug into an appropriate wall outlet.
For 19"/22" model:
For 26"/32"/42" model:
natural_image
Diagram of a device setup with labeled components and wiring (no readable text or symbols)
natural_image
Technical line drawing of a mechanical device with no visible text or symbolsAC 220-240V 50/60Hz
Power outlets differ from region to region.
* Do not insert the power plug in a wall socket before all connections are firm.
Turning the LCD TV on
Turn on the power switch on TV as shown on page 8. Press the button at the side of the TV or press the button on the remote control to turn on the power or enter standby mode.

Power indicator status
Green: Power on
Red: Standby
* Due to unstable local voltage, there will occasionally be a delay in POWER ON when the LCD TV is switched on.
TV INSTALLATION Connect the device
First time installation
After unpacking and plugging in your new LCD TV, please proceed with the following steps to set-up your
TV. If you do not run this set-up function, your LCD TV may not operate properly.

flowchart
graph TD
    A["Initial Setup"] --> B["Welcome to use the Wizard for Initial Setup 1"]
    A --> C["Please press [OK"] to start the wizard.]
    A --> D["Next"]
    E["Initial Setup"] --> F["Language: English, Deutsch, Français, Italiano, Español, Portuguía, Nederland"]
    E --> G["Next"]
    E --> H["Select"]
    E --> I["Next"]
    E --> J["Next"]
    K["Initial Setup"] --> L["Channel Scan"]
    L --> M["First, please correct antenna. Scan"]
    L --> N["Skip Scan"]
    O["Initial Setup"] --> P["Channel Scan"]
    P --> Q["Start channel scan now 7"]
    P --> R["If you skip this step, the channel scan could be performed at Menu."]
    P --> S["95"]
    P --> T["Back"]
    P --> U["Select"]
    P --> V["Next"]
    P --> W["Next"]
    X["Initial Setup"] --> Y["The channel scan may take a while to complete."]
    X --> Z["Status: Scanning, Analog Channels: 0, Digital Channels: 12"]
    X --> AA["32%"]
    X --> AB["Cancel"]
- The initial setup display will appear on the screen when the TV is turned on for the first time.
- Press the OK Button on the remote control to proceed with the installation.
- Use the Up or Down navigation buttons to select your language. Then press the Right or OK Button to continue.
- Use the Up or Down navigation buttons to select your country. Then press the Right or OK Button to continue or the Left Button to go back.
- Select Scan to start channel scan or select Skip Scan to skip this step.
Note: If you skip this step, the channel scan could be performed in Menu.
- System searching may take few minutes to complete.
NOTE: If you cannot find this screen, you may press MENU on the remote control. Select the Reset Default in Features menu.
- If Both ATV and DTV services exist, the ATV channels will start from 900s. If DTV service is not available, ATV channels will start from 1.
TV INSTALLATION Control panel buttons

| Button | Functions |
| VOL(FUNCTION < / >) | Use these two buttons to adjust the volume.In OSD (On-Screen Display) mode, use those two bottoms to switch the selection left and right. |
| CH(FUNCTION ∧ / ∨) | Use these buttons to switch between programmed channels.In OSD mode, use those two buttons to switch the selection up and down. |
| MENU | Use this button to display and adjust the features in the On-Screen-Display (OSD). Use the four arrow keys (channel and volume adjustments) to navigate the menu options. |
| INPUT Use this button to toggle between video input sources. | |
| POWER | Use this button to switches your LCD TV on/off. |
TV INSTALLATION Remote control functions


POWER
Press to turn the LCD TV on or enter standby mode.

MUTE
Press to toggle audio on and off. You can also press VOL +/- to restore the previous volume level.

INPUT LIST
Press repeatedly to choose the various input sources.
0-9 DIGIT BUTTONS
To select a TV channel directly.
EPG
Press this key to display electronic program guide in TV mode.

RETURN
Press to display the previous selected TV channel.

RATIO
Change the aspect ratio; please refer to Picture format section.
MENU/EXIT
Press to display or close the on-screen menu.
VOL + / -
Press to adjust the volume.
CH + / -
Press to select the channel.
Navigation Ring
Press to adjust or confirm the various function items on the menu.
FAV
Press to display a list of all channels marked as favorite. Add or remove a channel in the favorite channels list of the TV.
CH LIST
Press to display a list of channels and input sources.
I/II
Select Stereo, Dual 1, Dual 2, or Mono for ATV channel. Select Audio language for DTV channel.
SLEEP
Press to turn the LCD TV off within an amount of time. (10-120 minutes)
USB (optional)
Press to display the multimedia selection screen.
AUDIO
Press to set the LCD TV to a predefined sound setting. Music / Speech / Personal
VIDEO
Press to set the LCD TV to a predefined picture setting. Standard / Vivid / Movie / Eco / Personal
INFO
Press to display the current signal status, including input source/channel audio mode.
TELETEXT
(Designed for Europe PAL/SECAM/DVB-T system only)
TELETEXT
Press this button to activate Teletext. Press again to turn off Teletext.
MIX
Press this button to activate Teletext with TV.
SIZE
Press this button to change the font size: Full screen, Top half and Bottom half.
SUBPAGE
Display the sub page (when available).
INDEX
Press this button to return to page 100 or the index page; and then press 0 to 9. The teletext page will be numbered and added to the page you select or the secondary item.
SUBTITLE
- In TV mode: Press to turn the subtitle on or off.
- In Text mode: Press it to select the next page marked as a subtitle page and request it as the display page.
HOLD
Press this button to stop the scrolling of pages.
The text decoder stops receiving data.
REVEAL
Reveal hidden information such as answers to a quiz. Press Reveal to display hidden information such as answers to a quiz or MHEG CANCEL function.
R/G/Y/B (Colour button)
Press buttons to select the pictures with various colours of text. Different channels display different functions.
TV INSTALLATION Remote control functions
Picture format
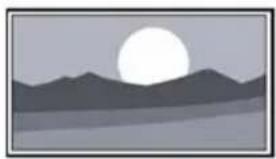
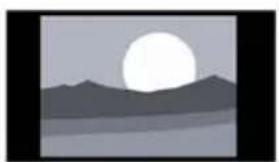
Press the RATIO button on the remote control to select the picture format.
- Auto: The DTV and HDMI input will automatically display the correct format, while ATV and SCART will be set.
• Normal: Displays the classic 4:3 format.
• Zoom 1: Scales the classic 4:3 format to 14:9.
• Zoom 2: Scales the classic 4:3 format to 16:9.
• Wide: Stretches the classic 4:3 format to 16:9.

natural_image
Simple landscape illustration with a sun, mountains, and water, surrounded by directional arrows (no text or symbols)Auto

natural_image
Silhouette of a full moon over a mountain range with water below (no text or symbols)Zoom 1
natural_image
Silhouette of a full moon over a mountain range with water below (no text or symbols)Wide
natural_image
Silhouette of a full moon over rolling hills under a clear sky (no text or symbols)Normal

natural_image
Silhouette of a mountain range under a full moon, with no text or symbols present.Zoom 2
TV menu Using the advanced menu
OSD Settings
- Press the MENU button on the side of the TV or press the MENU/EXIT button on the remote control to display or close the main menu.
- Use the Navigation Ring to move around to select, adjust or confirm an item in the OSD (On Screen Display) menu.


| Menu | Descriptions |
| Picture | Show more picture modes and functions based on your favourite channels and enables you to adjust the colour and brightness setup. |
| Sound | Provide more audio selections. You can also set the audio environment of the TV. |
| TV | Enable you to adjust special functions for country, audio language and the TV channel. |
| Features | Enable you to adjust settings of the TV channels and language. |
| Parental | Enable you to control special functions for the TV channels. |
TV menu Using the advanced menu
Picture

| Menu | Descriptions |
| Smart Picture | To set the best picture appearance to a predefined picture setting from Standard, Vivid, Movie, Eco, or Personal. |
| Brightness To brighten the dark parts of the picture. | |
| Contrast To sharpen the picture quality. | |
| Colour To add or reduce colour. | |
| Tint To adjust the picture tint. | |
| Sharpness To improve detail. | |
| Colour Temperature To choose between Normal (neutral), Warm (redder), and Cool (bluer). | |
| Advanced Control | |
| Noise Reduction | To filter out and reduces the image noise and improve picture quality.Select the effect degrees from Off, Low, Medium, High, or Auto. |
| Flesh Tone To adjust the skin colour to be more natural. | |
| Back light To make the background colour brighter or darker. | |
| DCR | Dynamic Contrast Ratio (DCR) auto adjusts the brightness of the screen to show more depths in the darker areas. |
| Wisdom Light(32"/42" with light sensor model only) | To enable the light sensor to adjust brightness automatically by detecting ambient light. Set the sensor on or off. |
| HDMI mode(HDMI only) | User can select Auto/graphic/Video mode. Description as following:AutoAutomatic to get device information, device will indicate sending timing is video timing or graphic timing (PC timing).GraphicForce video timing shows as graphic timing, for example: 720p shows 1280x720@60Hz; 1080p shows 1920x1080@60Hz.This mode optimises for PC input.VideoForce graphic timing shows as video timing, for example: 1280x720@60Hz shows 720p; 1920x1080@60Hz shows 1080p.This mode optimises for DVD player, camcorder, and other video appliances inputs. |
TV menu Using the advanced menu
Sound

| Menu | Descriptions |
| Sound Mode | To set the TV to a predefined sound setting from Personal, Music, or Speech. |
| Balance | To adjust the balance between left and right channels. |
| Virtual surround | To add greater depth and dimension to the TV sound. |
| Digital Audio Out | To select the Digital Audio Out from Off, Dolby Digital, or PCM.Tip: When Dolby Digital is selected, make sure the amplifier supports digital audio. |
| SPDIF Delay | SPDIF Delay function will affect SCART/Line out audio also delay at that time.The NorDig HD IRD shall support the possibility to adjust the audio-delay on the SPDIF output (if available) up to 250 ms and it should be adjustable in 10ms steps, as the IRD may have several different user set-ups, resulting in different a/v delays; e.g. the IRD may be connected to several types of external audio-amplifiers and the STB may be connected to several types of external screens. |
| AVL | To eliminate the volume differences between channels and programs and reduce the dynamics of sound. |
| The following functions are only available for digital channels with audio signals. | |
| Type | This function enables you to choose the type of the additional narration during the TV watching from Normal, Hard of Hearing, or Audio Description.Hard of Hearing: This function provides narration to deaf and hard of hearing viewers. |
| Audio description | When the Type is set to “Audio Description”, you can adjust the volume of the audio description. |
TV menu Using the advanced menu
TV

| Menu | Descriptions |
| Country | To select the relevant country. This is the country you are in, or the country whose channels you want to receive if you live near its borders. |
| Audio Carrier (ATV only) | Select Stereo, Dual 1, Dual 2, or Mono for ATV channel. |
| 1st and 2nd Audio | Use this function when two or more audio languages are broadcast. This is the language to be used for digital channels if it is available. |
| Channels | Enter the channels submenu, and choose from Channel Scan, Update Scan, Single RF Scan, Analog Manual Scan, Channel Skip, Channel Sort, Channel Edit, Decoder, and Analog CH Fine Tune. |
TV menu Using the advanced menu
TV/Channels
| Menu | Descriptions |
| Channels | Channel scanChannel Scan will re-tune the television automatically. It is recommended to run the Channel Scan periodically to ensure that all new services are added.Update scanSearch the new channels automatically that are not in the channel list.Single RF Scan (Digital Only)Enter the Single RF Scan in the Channels submenu to scan digital channels.Analog Manual ScanThe television can be tuned-in manually using Analog Manual Scan. Use the number keys to enter the Start Frequency to scan up or scan down.Channel skipTo prevent certain programs from being viewed by pressing CH + / - buttons on the remote control, the program position can be skipped.Tip: The skipped program may not be found by pressing CH + / - buttons but can be access by pressing number buttons directly.Channel sortChange the order of the Channel List.Channel EditEnter the Channel Edit in the channels submenu to edit the channel number and channel name by using the number buttons 0~9.Note: The following RC number-mapping table will not be shown on the TV screen.[zcx8]Available characters1234567890 Decoder (Analog only)Channel Decode support the Canal+ (paid television channel); however, the channel also broadcast some un-encrypted programs. These programs without encryption can be viewed free of charge.Analog CH Fine TuneSelect Analog CH Fine Tune in the Channels submenu to adjust the frequency. Decoder (Analog only)Channel Decode support the Canal+ (paid television channel); however, the channel also broadcast some un-encrypted programs. These programs without encryption can be viewed free of charge.Analog CH Fine TuneSelect Analog CH Fine Tune in the Channels submenu to adjust the frequency. |
TV menu Using the advanced menu
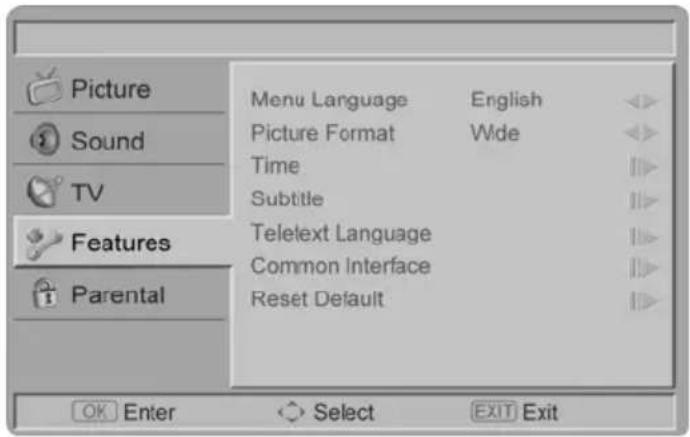
Features
| Menu | Descriptions |
| Menu Language | To select the on-screen display menu language. |
| Picture Format | To select the available display format from Auto, Normal, Native (HDMI only), Wide, Zoom 1, or Zoom2. |
| Time setup | Time ZoneTo select the time zone you are in.TimeTo set the time and date or select auto synchronization.Tip: Before you want to set the time and date by your own, please make sure Auto synchronization is Off.Sleep TimerTo set the TV to turn itself off within a certain time. |
| Subtitle | Analog SubtitleTo display the transmitted subtitle on the screen. Either this text can be permanently displayed (assuming that the service is available in the broadcast) or only when mute is active.Digital SubtitleUse the Digital Subtitle function when two or more subtitle languages are broadcasted. If subtitle data in a selected language is not broadcasted, the default language subtitle will be displayed.Subtitle TypeTo choose the subtitle type from normal or hearing impaired. |
TV menu Using the advanced menu
Features

| Menu | Descriptions |
| Teletext Language | Digital Teletext LanguageTo select the teletext language_DEcode Page LanguageTo set the teletext language to the regional location. |
| Common Interface This menu appears with your CI supplier information. | |
| HDMI Scan Info (HDMI only) | AutomaticSet to underscan or overscan automatically when the video signal is detected.UnderscanWhen the video signal is detected, all active pixels and lines are displayed with or without border.OverscanWhen the video signal is detected, some active pixels and lines at the edges are not displayed. |
| Reset Default To reset | all TV settings to the original factory values. |
TV menu Using the advanced menu
Parental

| Menu | Descriptions |
| Channel Block | To block certain TV channels. |
| Parental Guidance | To control access programs based on their age ratings. All settings apply to digital channels.Note: This function operates according to information from the broadcasting station. Therefore if the signal has no information, this function does not operate. |
| Input Block To disable | the specific external input signals. |
| Set Password | To set or change your password. Please follow the instructions to set it.All member combinations from 0000 to 9999 are valid.Tip: Remember that 5351 is the default Change Password code. If your access code has been changed or you have forgotten the code, you can always get in by inputting the default code. |
| Clear All To clear all the settings in the parental submenu. | |
Other information Troubleshooting
The following table contains the common problems and the solutions to these problems. Please check this list before you contact technicians.
| Problems | Solutions |
| No picture | 1. Connect power cord correctly.2. Turn on power.3. Connect signal cable correctly.4. Press any button on the LCD TV. |
| Abnormal colours Connect signal cable correctly. | |
| Twisted picture | 1. Connect signal cable correctly.2. Please use compatible signal. |
| Picture too dark Adjust brightness and contrast. | |
| Audio only, no images | 1. Please check if input signal is connected correctly.2. TV-RF signal must not be lower than 50dB. |
| Picture only, no audio | 1. Connect signal cable correctly.2. Adjust volume to proper level.3. Connect audio signal cable correctly.4. TV-RF signal must not be lower than 50dB. |
| Cannot use remote control | 1. Please change battery.2. Turn off power for 10 seconds; and then restart power. |
| Cannot receive sufficient channels through antenna | Please use the Channel scan function to increase the number of channels not included in memory. |
| No colours Please adjust the colour setup. | |
| Blinking picture accompanied by ghost image | 1. Check the connection of antenna/signal cable.2. Check if channel is in play mode.3. Press signal source and change input mode. |
| Broken lines or segments | Adjust antenna.Keep the TV away from noise sources, such as automobiles, neon lights, and hair dryers. |
| Certain TV channels are blocked (Hope to acquire some channels) | Please use the Update scan method to add the channels not included in memory. |
| Overlapping images or ghost images | Please use multi-directional outdoor antenna.(If your TV is subject to the influence of nearby mountains or buildings). |
| Cannot use a function If the item you choose turns gray, that item cannot be selected. | |
| Cannot receive programs | Please use the Update scan method to add the channels not included in memory. |
Other information Glossary
Audio / Video Inputs
Located on the rear and the front of the receiver these connectors (RCA phono type plug) are used for the input of audio and video signals. Designed for use with VCRs (or other accessories) in order to receive higher picture resolution and offer sound connection options.
S-Video Input
Allows direct connection of high-resolution video sources, such as a Super VHS videocassette recorder, Laser Disc player, etc. provides improved picture resolution, sharpness, and clarity.
Menu
An on-screen listing of feature controls shown on the TV screen that are made available for user adjustments.
Programming
The procedure of adding or deleting channel numbers into the TV's memory.
In this way the TV' remembers' only the locally available or desired channel numbers and skips over any unwanted channel numbers.
Virtual Surround
Virtual surround audio solutions provide greater listening enjoyment for compressed Internet radio or clear Speech that enhances the users experience and overall satisfaction.
RF
Radio Frequency or modulated signal design used as the carrier for television broadcasts.
Sleep Timer
Function with which you can set a period of time after which the TV should turn itself off.
Other information Specifications
| Model No. | L19WA81L19WA91 | L22WA81L22WA91 | L26WA81L26WA91 | L32WA81L32WA91 | L42HA81L42HA91 |
| DISPLAY | |||||
| Aspect | Ratio | 16:9 | 16:9 | 16:9 | 16:9 |
| Resolution 1360 x 768 1360 x 768 1360 x 768 1360 x 768 1920 x 1080 | |||||
| OSD Language | Bulgarian, Croatian, Czech, Danish, Dutch, English, Finnish, French, German, Greek, Hungarian, Italian, Norwegian, Polish, Portuguese, Rumanian, Russian, Serbian, Slovakian, Slovenian, Spanish, Swedish, Turkish, Irish | ||||
| ENHANCEMENT | |||||
| Sound Output (RMS Watts) | 3 W 3 W 5 W | 10 W 10 W | |||
| Sound Mode Personal, Music, Speech | |||||
| Picture Formats | Auto, Normal, Wide, Zoom 1, Zoom2 | ||||
| Picture Mode Standard, Vivid, Movie, Eco, Personal | |||||
| CONNECTIONS | |||||
| Rear Connectors | Tuner input (75Ω)PC IN: D-SUB and PC AudioComponent Video and L/R Audio input | ||||
| SCART 1SPDIFOutput (Digital audio out)HDMI 1 | SCART 1SPDIFOutput(Digital audio out)HDMI 1 | SCART 1SCART 2SPDIF(Optional)HDMI 1HDMI 2 | SCART 1SCART 2SPDIF(Optional)HDMI 1HDMI 2 | SCART 1SCART 2SPDIF(Optional)HDMI 1HDMI 2 | |
| Side Connectors | COMMON INTERFACEAV In (Composite Audio/Video) | ||||
| - | - | EarphoneOutputHDMI 3 | EarphoneOutputHDMI 3 | EarphoneOutputHDMI 3 | |
| WEIGHT & DIMENSIOIN | |||||
| Product Dimension(W x H x D) | 466 mm344 mm171 mm | 535.4 mm384.1 mm171.0 mm | 659.0 mm488.8 mm232.3 mm | 792.6 mm561.5 mm232.5 mm | 1015.3 mm677.5 mm275.5 mm |
| Net Weight 4.0 kg 4.9 kg 8.47 kg 12.35 kg 21.3 kg | |||||
| POWER | |||||
| Operation (Max.) | 50 W 60 W 120 W 130 W 200 W | ||||
| Standby < 1W | |||||
| Mains Power | AC220-240V50-60 Hz | AC220-240V50-60 Hz | AC220-240V50-60 Hz | AC220-240V50-60 Hz | AC220-240V50-60 Hz |
| Ambient Temperature | 5°C - 35°C | ||||
16:9




- IMPORTANT SAFETY INSTRUCTIONS ....1
- PREPARATION....6
- TV INSTALLATION 8
- TV menu 19
- Other information....27
- IMPORTANT SAFETY INSTRUCTIONS
- Read before operating equipment
- CAUTION
- Disposal of Waste Equipment by Users in Private Household in the European Union
- CE marking
- Declaration of RoHS Compliance
- PREPARATION
- Before installation
- Package contents
- Installation of batteries
- TV INSTALLATION TV Overview
- Mount the TV stand
- TV connectors
- Remove the TV stand for wall mounting
- TV INSTALLATION Connect the device
- Rear connections
- Side connections
- Power connection
- Turning the LCD TV on
- First time installation
- TV INSTALLATION Control panel buttons
- TV INSTALLATION Remote control functions
- POWER
- MUTE
- INPUT LIST
- 0-9 DIGIT BUTTONS
- EPG
- RETURN
- RATIO
- MENU/EXIT
- VOL + / -
- CH + / -
- Navigation Ring
- FAV
- CH LIST
- I/II
- SLEEP
- USB (optional)
- AUDIO
- VIDEO
- INFO
- TELETEXT
- MIX
- SIZE
- SUBPAGE
- INDEX
- SUBTITLE
- HOLD
- REVEAL
- R/G/Y/B (Colour button)
- Picture format
- TV menu Using the advanced menu
- OSD Settings
- Sound
- TV/Channels
- Features
- Parental
- Other information Troubleshooting
- Other information Glossary
- Audio / Video Inputs
- S-Video Input
- Menu
- Programming
- Virtual Surround
- RF
- Sleep Timer
Brand : AOC
Model : L19WA91
Category : Television