
LE19A1321 - Television AOC - Free user manual and instructions
Find the device manual for free LE19A1321 AOC in PDF.


| Product Type | LED TV |
| Brand | AOC |
| Model | LE19A1321 |
| Screen Size (Diagonal) | 19 inches (48.3 cm) |
| Display Resolution | 1366 x 768 pixels |
| Aspect Ratio | 16:9 |
| Brightness | 200 cd/m² |
| Contrast Ratio | 1000:1 (typical) |
| Response Time | 5 ms |
| Dimensions (with stand) | 44.0 x 29.0 x 8.0 cm |
| Weight (with stand) | 3.0 kg |
| Power Consumption (typical) | 30 W |
| Standby Power Consumption | <0.5 W |
| Inputs / Outputs | HDMI (1), VGA (1), USB (1), AV (1), Headphone (1) |
| Supported Video Formats | MPEG, H.264, RMVB, etc. |
| Supported Audio Formats | MP3, AAC, etc. |
| Power Supply | AC 100-240V, 50/60Hz |
| Cleaning | Wipe with soft dry cloth; do not use liquid cleaners |
| Safety | Use only approved power supply; keep away from moisture |
| Repairability | Contact authorized service center; spare parts available |
Frequently Asked Questions - LE19A1321 AOC
User questions about LE19A1321 AOC
0 question about this device. Answer the ones you know or ask your own.
Ask a new question about this device
Download the instructions for your Television in PDF format for free! Find your manual LE19A1321 - AOC and take your electronic device back in hand. On this page are published all the documents necessary for the use of your device. LE19A1321 by AOC.
USER MANUAL LE19A1321 AOC
natural_image
Black-and-white photo of a flat-screen computer monitor with 'AOC' branding on the front panel (no additional text or symbols visible)HDMI TM
HIGH-DEFINITION MULTIMEDIA INTERFACE
This manual provides as an operational guide to user. All statements, technical information, and recommendations in this manual and in any guides or related documents are believed reliable, but the accuracy and completeness thereof are not guaranteed or warranted, and they are not intended to be, nor should they be understood to be, representations or warranties concerning the products described.
Table of Contents
IMPORTANT INFORMATION....3
WARNING 3
CAUTION 3
NOTIFICATION ....3
IMPORTANT SAFETY INFORMATION....3
USAGE INSTRUCTIONS....4
Installation 4
AC Power Cable 4
LCD Screen....5
Wiring 5
Electric Shock 5
Lightning Storms 5
When Not in Use 5
Overloading 5
Optional Equipment 6
Small Accessories 6
Antennas 6
Batteries 6
Cleaning 6
Magnetic Influence 6
Sound 7
Carrying the TV 7
Ventilation....7
Moisture....7
Volume Adjustment 8
Servicing....8
CONTENTS IN THE BOX 9
CONTROLS & CONNECTIONS 10
SET-UP 12
Inserting Batteries into the Remote control 12
Attaching the Base 12
Wall-Mounting 12
CONNECTING TV 13
Cable System or VHF/UHF Antenna System 13
High Definition Interface 13
HDMI Connection 13
Component Signal Connection....13
Composite Signal Connection....14
PC Connection 14
PC INPUT SIGNAL REFERENCE CHART 15
DVI/ PC HDMI INPUT SIGNAL REFERENCE CHART 15
VIDEO INPUT SIGNAL REFERENCE CHART 15
VIDEO SYSTEMS SUPPORTED BY THE TV,VIDEO MODES....15
SWITCHING INPUT SOURCE....16
Language Setting 17
Channel Search....18
Changing Channel/Flashback 19
Changing Volume/Mute 19
Adjust Video Setting 20
Adjust Audio Setting 21
Adjust Channel Setting....22
Adjust PC Setting 23
Setting Adjust 24
USB music and picture playback....25
TROUBLESHOOTING 30
DIMENSIONS & SPECIFICATIONS 31
Important Information
WARNING
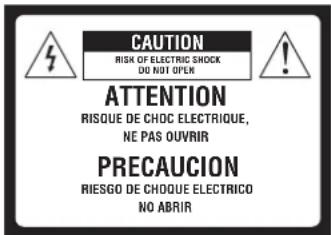
This symbol is intended to alert the user to the presence of insinuated “dangerous voltage” within the TV’s enclosure that may be of sufficient magnitude to constitute a risk of electric shock to persons.

This symbol is intended to alert the user to the presence of important operating and maintenance (servicing) instructions in the literature accompanying the TV.
To reduce the risk of fire or electric shock, do not expose this TV to rain or moisture, the TV shall not be exposed to dripping or splashing and no objects filled with liquids, such as vases, shall be placed on the TV.
CAUTION
To prevent electric shock, do not use this polarized AC plug with an extension cord, receptacle or other outlet unless the blades can be fully inserted to prevent blade exposure.
Use the Wall-Mount bracket or TV stand which was recommended by AOC, and please consult your dealer for detailed information.
Use with other Wall-Mount Bracket or TV stand may cause instability and possibly result in injury.
NOTIFICATION
For details concerning safety precautions, see "Important Safety Instructions" and "Important Usage Instructions" below.
SAFETY: Lamp Disposal
Hg LAMP(S) INSIDE THIS PRODUCT CONTAIN MERCURY AND MUST BE RECYCLED OR DISPOSED OF ACCORDING TO LOCAL, STATE OR FEDERAL LAWS. FOR MORE INFORMATION, CONTACT THE ELECTRONIC INDUSTRIES ALLIANCE AT WWW.EIAE.ORG.
Important Safety Information
1) Read these instructions.
2) Keep these instructions.
3) Heed all warnings.
4) Follow all instructions.
5) Do not use this apparatus near water.
6) Clean only with dry cloth.
7) Do not block any the ventilation openings. Install in accordance with the manufacturer's instructions.
8 ) Do not install near any heat sources such as radiators, heat registers, stoves, or other apparatus (including amplifiers) that produce heat.
9) Do not defeat the safety purpose of the polarized or grounding-type plug. A polarized plug has two blades with one wider than the other. A grounding type plug has two blades and a third grounding prong. The wide blade or the third prong are provided for your safety. If the provided plug does not fit into your outlet, consult an electrician for replacement of the obsolete outlet.
10 ) Protect the power cord from being walked on or pinched particularly at plugs, convenience receptacles, and the point where they exit from the apparatus.
11) Only use attachments/accessories specified by the manufacturer.
12) Use only with a cart, stand, tripod, bracket, or table specified by the manufacturer, or sold with the apparatus. When a cart is used, use caution when moving the cart/apparatus combination to avoid injury from tip-over.

13) Unplug this apparatus during lightning storms or when unused for long periods of time.
14) Refer all servicing to qualified service personnel. Servicing is required when the apparatus has been damaged in any way, such as power-supply cord or plug is damaged, liquid has been spilled or objects have fallen into apparatus, the apparatus has been exposed to rain or moisture, does not operate normally, or has been dropped.
15) If any liquid or solid object should fall inside the cabinet, unplug the TV immediately and have it checked by qualified service personnel before operating it further.
16 ) Avoid operating the TV at temperatures below 32°F (0°C).
17) If the TV is transported directly from a cold to a warm location, or if the room temperature changes suddenly, the picture may be blurred or show poor color due to moisture condensation. In this case, please wait a few hours to let the moisture evaporate before turning on the TV.
18 ) The TV shall be connected to a mains socket outlet with a protective earthing connection.
19) The mains plug or appliance coupler is used as the disconnect device, the disconnect device shall remain readily operable.
20 ) CAUTION – These servicing instructions are for use by qualified service personnel only. To reduce the risk of electric shock, do not perform any servicing other than that contained in the operating instructions unless you are qualified to do so.
Usage Instructions
Installation
Placement
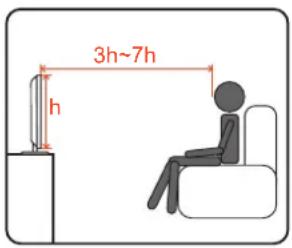
It is recommended to watch the TV at a distance of 3 -7 times which of the screen height, and in moderate brightness. Watching the TV for too long or in a dark room may cause eye fatigue. To obtain a clear picture, do not expose the screen to direct illumination or direct sunlight. It is recommended to use spot lighting directed down from the ceiling or to cover the windows that face the screen with opaque drapery. It is desirable to install the TV in a room where the floor and walls are not of a reflective material.
To prevent the TV from toppling over and causing injury, take measurement to secure the TV to a wall or stand.
The TV should be installed near an easily accessible AC power outlet.
Observe the following in placing the TV. Otherwise the TV may fall from the stand or Wall-Mount, causing damage or serious injury.
- Place the TV on a stable, level surface.
- Do not hang anything on the TV. Do not allow children to climb on the TV.
- Do not install the TV in places subject to extreme temperatures, such as in direct sunlight, near a radiator, or near a heating vent or exposed to direct air conditioning.
• Never place the TV in hot, oily, humidor excessively dusty places. - Do not install the TV where insects may enter.
- Do not install the TV where it may be exposed to mechanical vibration.
- Do not install the TV in a location where it may protrude, such as on or behind a pillar, or where you might bump your head on it. Otherwise, it may result in injury.
Outdoor Use
Do not install this TV outdoors. If the TV is exposed to rain, it may result in a fire or an electric shock. Do not expose the TV to direct sunlight, it may heat up and become damaged.
Vehicle, Ships and Other Vessels
• Do not install this TV in a vehicle.
- Bumping of the vehicle may cause the TV to fall down and cause injury.
- Do not install this TV in a ship or vessel. If the TV is exposed to seawater, it may cause a fire or damage the TV.
Medical institutions
- Do not place this TV in a place where medical equipment is in use.
- The interference may cause a malfunction of both TV and the medical equipment.
Attachments
Do not use attachments not recommended by the manufacturer, as they may cause hazards.
Wall-Mount
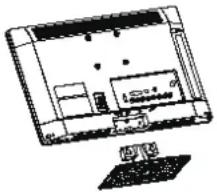
Wall-Mount installation requires the use of a Wall-Mount Bracket. When installing or removing the TV, using a Wall-Mount Bracket, be sure to use qualified contractors. If not properly secured during installation or removal from the Wall-Mount Bracket, the TV may fall and cause serious injury.
For use only with UL Listed Wall Mount Bracket with suitable weight/load. please refer to page 31.
Observe the following when installing the TV using a Wall-Mount bracket.
natural_image
Line drawing of a computer monitor with an open screen and a small display stand (no text or symbols)
- Be sure to follow the operating instructions supplied with the Wall-Mount bracket when installing the TV.
- Be sure to attach the brackets supplied with the Wall-Mount bracket.
- Don't hang the TV from the ceiling. It may fall and cause serious injury.
AC Power Cable
- Use the AC power cord specified by AOC and suitable for the voltage where you use it.
- The plug is designed, for safety purposes, to fit into the wall outlet only one way. If you are unable to insert the plug fully into the outlet, contact your dealer.
- If you will not be using the TV for several days, disconnect the power by pulling the plug itself. Never pull on the cord.
- When disconnecting AC power cord, the power cord should be easily accessible for disconnection.
TV should be installed near an easily accessible power outlet. Do not use a poor fitting outlet. Insert the plug fully into the outlet. If it is loose, it may cause arcing and result in a fire. Contact your electrician to have the outlet changed.
Observe the followings to prevent the AC power cord from being damaged. If the AC power cord is damaged, it may result in a fire or an electric shock. Stop using it and ask your dealer or AOC service center to exchange it.
- Do not place the TV where the power cord is subject to wear or abuse.
- Do not pinch, bend, or twist the cord excessively. The core lines may be bared and cut, causing a short-circuit, and resulting in a fire or an electric shock.

- Do not convert or damage the power cord.
- Do not allow anything to rest on or roll over the power cord.
- Do not move the TV with the power cord plugged in.
- Keep the power cord away from heat sources.
• To unplug power cord, disconnect it from the wall outlet first. - Be sure to grasp the plug when disconnecting the power cord.
- Do not pull the power cord.
- Do not use the supplied AC power cord on any other equipment.
• Use only an original AOC AC power cord, not other brands.
LCD Screen
- Although the LCD screen is made with high-precision technology and has effective pixels of 99.99% or more, black dots or bright points of light (red, blue, or green) may appear constantly on the LCD screen. This is a structural property of the LCD panel and is not a malfunction.
- The LCD screen is made with high-precision technology and to achieve a high level of performance and picture quality, this TV's backlight setting is set to maximize the brightness of the TV. However, uneven brightness may be observed when the LCD TV is viewed in a dark ambient without an input source or a blank screen. This condition is normal and not a malfunction of the TV. Changing the Picture mode, Backlight setting, enabling the Light Sensor, or turning on the Power management will improve this condition.
- Do not expose the LCD screen surface to direct sunlight. Doing so may damage the LCD panel.
- Do not push or scratch the LCD screen, or place objects on top of the TV. The image may be uneven or the LCD panel may be damaged.
- If the TV is used in a cold place, a smear may occur in the picture or the picture may become dark. This does not indicate a failure. These phenomena improve as the temperature rises.
- Ghosting may occur when still pictures are displayed continuously. It should disappear after a few moments.
- The screen and cabinet get warm when the TV is in use. This is not a malfunction.
- Avoid spraying insect repellent with volatile material on the screen.
- Avoid prolonged contact with rubber or plastic material.
Broken Pieces
Do not throw anything at the TV. The screen glass may break by the impact and cause serious injury.
If the surface of the TV cracks, do not touch it until you have unplugged the AC power cord. Otherwise electric shock may result.

Handling of broken glass and liquid crystal leakage
If the LCD panel gets damaged, crystalline liquid leakage may occur, or scattered broken glass may result. Do not touch broken glass or crystalline liquid which is toxic, with bare hands as cuts, poisoning or skin irritation may occur. Also, do not let glass fragments or leaked crystalline liquid get into your eyes or mouth. Should either contact your eyes or mouth, rinse the contacted area thoroughly with water and consult your doctor.
Wiring
When connecting cables, be sure to unplug the AC power cord for your safety. Take care not to catch your feet on the cables. It may damage the TV set.

Electric Shock
Do not touch the AC power cord or the TV with a wet hand. If you plug/unplug the AC power cord from the TV with a wet hand, it may cause electric shock.

Lightning Storms
For added protection for this TV during a lightning storm, or when it is left unattended and unused for long periods of time, unplug it from the wall outlet and disconnect the antenna. This will prevent damage to the TV due to lightning and power line surges.

When Not in Use
If you will not be using the TV set for several days, the TV set should be disconnected from the AC power outlet for environmental and safety reasons. The TV set is not disconnected from the AC power source when the TV set is switched off. To disconnect the TV set completely, pull the plug from the AC power outlet.

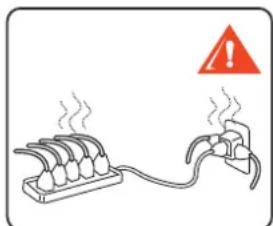
Overloading
This TV set is designed to operate on a 120V AC supply only. Take care not to connect too many appliances to the same AC power outlet as this could result in a fire or an electric shock.
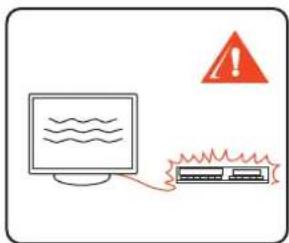
Optional Equipment
Do not install optional equipment too close to the TV set. Keep optional equipment at least 11.875 inches (30 cm) away from the TV set. If a VCR is installed in front of the TV set or beside the TV set, the picture may become distorted. Picture distortion and/or noisy sound may occur if the TV set is positioned in close proximity to any equipment emitting electromagnetic radiation.
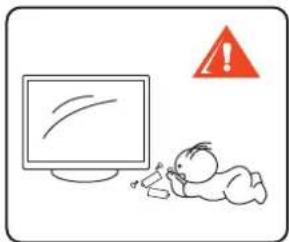
Small Accessories
Keep small accessories out of children's reach.
natural_image
Cartoon illustration of a baby crawling on the floor next to a computer monitor with a warning triangle (no text or symbols)Antennas
Outdoor antenna grounding
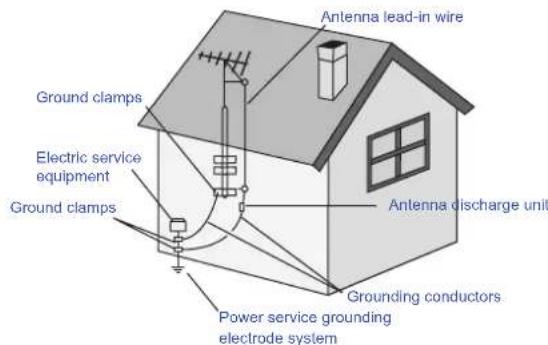
If an outdoor antenna is installed, follow the precautions below. An outdoor antenna system should not be located in the vicinity of overhead power lines or other electric light or power circuits, or where it can come in contact with such power lines or circuits. WHEN INSTALLING AN OUTDOOR ANTENNA SYSTEM, EXTREME CARE SHOULD BE TAKEN TO KEEP FROM CONTACTING SUCH POWER LINES OR CIRCUITS AS CONTACT WITH THEM IS ALMOST INVARIABLY FATAL. Be sure the antenna system is grounded so as to provide some protection against voltage surges and built-up static charges. Section 810 of the National Electrical Code (NEC) in USA and Section 54 of the Canadian Electrical Code in Canada provides information with respect to proper grounding of the mast and supporting structure, grounding of the lead-in wire to an antenna discharge unit, size of grounding conductors, location of antenna discharge unit, connection to grounding electrodes, and requirements for the grounding electrode.
Antenna grounding according to the National Electrical Code, ANSI/NFPA 70.
Antenna lead-in wire
Batteries
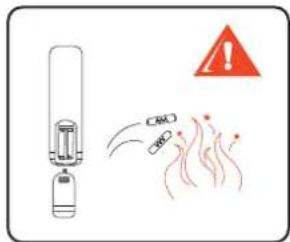
• Do not dispose of batteries in a fire.
- Do not short circuit, disassemble or overheat the batteries.
- Danger of explosion if battery is incorrectly replaced. Replace only with the same or equivalent type.
- The batteries (batteries installed) shall not be exposed to excessive heat such as sunshine, fire or the like.
Disposal of used batteries
To preserve our environment, dispose of used batteries according to your local laws or regulations.
Cleaning
Cleaning the AC power plug
Unplug the AC power plug and clean it regularly. If the plug is covered with dust and it picks up moisture, its insulation may deteriorate and result in a fire.
Cleaning the screen surface/ cabinet of the TV set
• Unplug the AC power cord to avoid electric shock when cleaning.
- Clean the cabinet of the TV with a dry soft cloth. To remove dust from the screen, wipe it gently with a soft cloth. Stubborn stains may be removed with a cloth slightly dampened with a solution of mild soap and warm water. Never use strong solvents such as thinner or benzine for cleaning.
- If using a chemically pretreated cloth, please follow the instruction provided on the package.
- The ventilation holes can accumulate dust over time. To ensure proper ventilation, we recommend removing the dust periodically (once a month) using a vacuum cleaner.

Magnetic Influence
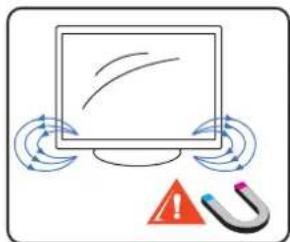
This TV contains a strong magnet in the speaker unit that generates a magnetic field. Keep any items susceptible to magnetic fields away from the speaker.
Sound
If a snapping or popping sound from the TV is continuous or frequent while the TV is operating, unplug the TV and consult your dealer or service technician. It is normal for some TV's to make occasional snapping or popping sounds, particularly when being turned on or off.

Carrying the TV
Carry the TV in the specified manner
To avoid dropping the TV and causing serious injury, be sure to follow these guidelines:
• Before carrying the TV, disconnect all cables.
- Carrying the large size TV requires two or more people.
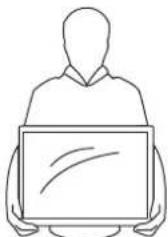
- When you carry the TV, place your hand as illustrated and hold it securely. Do not put stress on the LCD panel.

natural_image
Two silhouettes of two people holding a computer monitor (no text or symbols visible)- When lifting or moving the TV, hold it firmly from the bottom. Place your palm directly under the panel.
natural_image
Simple line drawing of a person sitting on a computer monitor (no text or symbols)- When carrying, do not subject the TV to shocks or vibration, or excessive force.
Ventilation
The slots and openings in the TV are provided for necessary ventilation. To ensure reliable operation of the TV and to protect it from overheating, these slots and openings must never be blocked or covered.
Unless proper ventilation is provided, the TV may gather dust and get dirty. For proper ventilation, observe the following:
• Do not install the TV face up, down or sideways.
- Do not install the TV turned over or upside down.
• Never cover the slots and openings with a cloth or other materials.
- Never block the slots and openings by placing the TV on a bed, sofa, rug or other similar surface.
- Never place the TV in a confined space, such as a bookcase or built-in cabinet, unless proper ventilation is provided.
Leave some space around the TV set as shown below. Otherwise, air-circulation may be inadequate and will cause overheating, which may cause a fire or damage to the TV set.
Install on the wall

Installed with stand
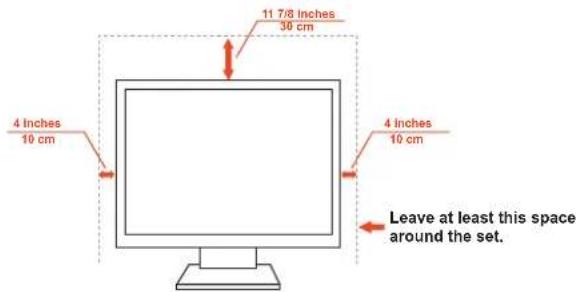

Never install the TV set where Air circulation is blocked.
Objects and ventilation holes
Never push objects of any kind into the TV through the cabinet slots as they may touch dangerous voltage points or short out parts that could result in a fire or an electric shock. Do not place any objects on the TV.
Moisture
Moisture and flammable objects
- The TV must not be exposed to dripping or splashing. Do not place objects filled with liquids, such as vases, on the TV.
- Do not use power-line operated TV sets near water— for example, near a bathtub, washbowl, kitchen sink, or laundry tub, in a wet basement, or near a swimming pool, etc. It may result in a fire or an electric shock.
- Do not let this TV get wet. Never spill liquid of any kind on the TV. If any liquid or solid object does fall through, do not operate the TV. It may result in electric shock or damage to the TV. Have it checked immediately by qualified personnel.
• To prevent fire, keep flammable objects or open flame (e.g. candles) away from the TV.

natural_image
Illustration of a computer monitor above water with a warning triangle indicating caution (no text or symbols)Volume Adjustment
Adjust the volume so as not to trouble your neighbors. Sound carries very easily at night. Therefore, closing the windows or using headphones is suggested.
When using headphones, adjust the volume so as to avoid excessive levels, as hearing damage may result.
Servicing
Do not attempt to service the TV by yourself since opening the cabinet may expose you to dangerous voltage or other hazards. Refer all servicing to qualified service personnel.

natural_image
Illustration of a folder with a screwdriver and lightning bolts, accompanied by a warning symbol (no text or labels)Replacement Parts
When replacement parts are required, be sure the service technician certifies in writing that he/she has used replacement parts specified by the manufacturer that have the same characteristics as the original parts.
Unauthorized substitutions may result in a fire, an electric shock or other hazards.
Safety Check
Upon completion of any service or repairs to the TV, ask the service technician to perform routine safety checks (as specified by the manufacturer) to determine that the TV is in safe operating condition, and to so certify. Ask a qualified service technician to dispose of the TV.
Thank you for purchasing this AOC high-definition television. The quality of the image you see on your AOC TV is only as good as the quality of the signal it receives. To experience the stunning detail of your new AOC TV, you need access to HD programming. Your AOC TV can receive and display HD programming from:
• Over-the-air broadcasting via HD-quality antenna
• HD cable subscription
• HD satellite subscription
- Blu-ray Disc™ player or other external equipment
Contact your cable or satellite provider for information on upgrading to HD programming.
Mobile telephone warning
To avoid disturbances in picture and sound, malfunctioning of your TV or even damage to the TV, keep away your mobile telephone from the TV.
End of life directive
We are paying a lot of attention to produce environmental friendly in green focal areas.
Your new receiver contains materials, which can be recycled and reused.
At the end of its life, specialized companies can dismantle the discarded receiver to concentrate the reusable materials and to minimize the amount of materials to be disposed of.
Please ensure you dispose of your old receiver according to local regulations.
Canadian notice
This Class B digital apparatus meets all requirements of the Canadian Interference Causing Equipment Regulations.
Contents in the Box
After unpack the TV box, please check the TV and all accessories are well presented and undamaged.

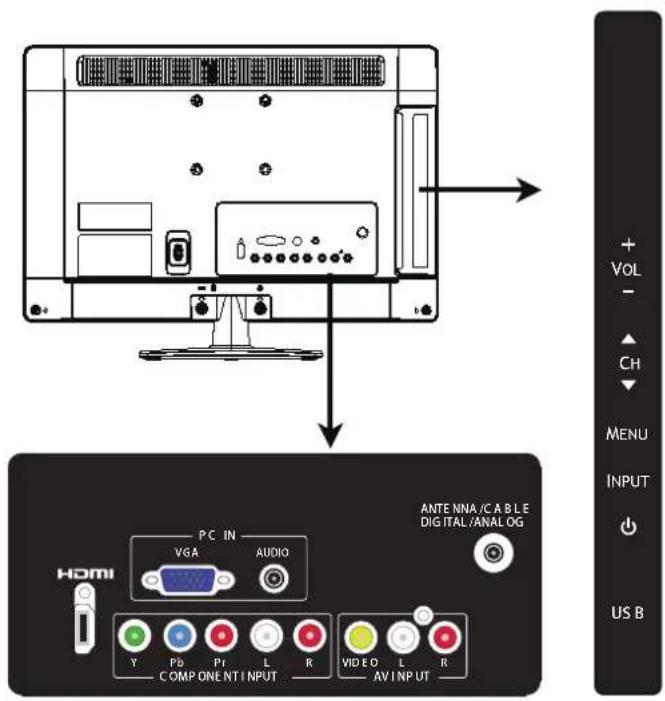
Controls & Connections


| Item Description | |
| Headphone Jack | Connects to your headphones. If your headphones do not match the jack, use a suitable plug adapter (not supplied). While headphones are connected, the TV speakers are muted. |
| AV IN (AV)/L-AUDIO-R | Connects to the COMPOSITE VIDEO output from your video equipment that has COMPOSITE and audio (L/R) jacks can connect audio source to your TV. |
| USB/Service Insert USB storage device to the USB2.0 port to play music (.MP3) and view photo(.JPEG). | |
| HDMI IN | HDMI (High-Definition Multimedia Interface) provides an uncompressed, all-digital audio/video interface between this TV and any HDMI-equipped audio/video equipment, such as a set-top box, DVD player, Blu-ray Disc player, A/V receiver as well as PC. HDMI supports enhanced, or high-definition video, plus digital audio.If the equipment has a DVI jack , connect the DVI jack to the HDMI IN (with DVI-to-HDMI cable or adapter) jack, and connect the audio jack to the PC AUDIO IN jacks of HDMI IN .DVI-to-HDMI cable DVI-to-HDMI adapterHDMI connection is necessary to view 480i, 480p, 720p, 1080i and 1080p formats.Be sure to use only an HDMI cable that bears the HDMI logo. |
| PC IN (VGA/AUDIO) | Connects to a personal computer's video output connector using HD15-HD15 cable (analog RGB). Can also be connected to other analog RGB equipment. See "PC Input Signal Reference Chart" on page 15 for the signals that can be displayed.For some Apple Macintosh computers, it may be necessary to use an adapter (not supplied). If this is the case, connect the adapter to the computer before connecting the HD15-HD15 cable. |
| Component IN(1080p/1080i/720p/480p/480i)/L-AUDIO-R | Connects to your TV's component video (YPbPr ) and audio (L/R) jacks. Component video provides better picture quality than the composite video connections. Component video (YPbPr) connection is necessary to view 480i, 480p, 720p, 1080i and 1080p formats. |
| VHF/UHF/Cable Input | RF (Radio Frequency or modulated signal design used as the carrier for television broadcasts.) input that connects to your Cable or VHF/UHF antenna. |
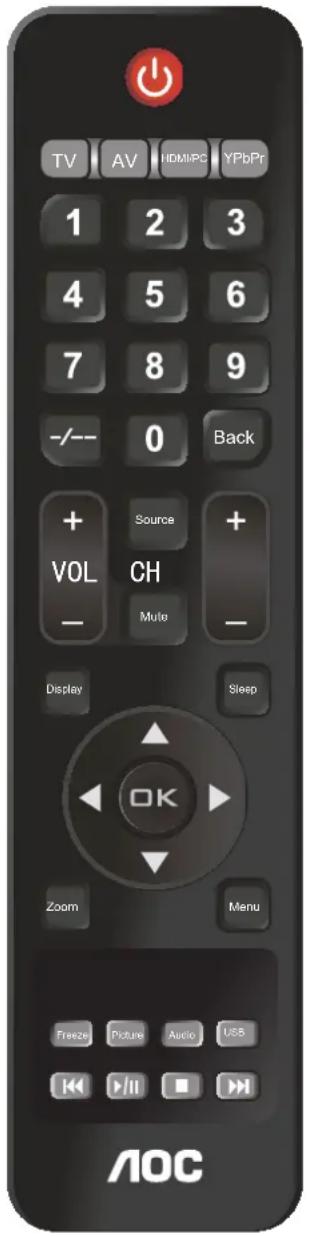
| Button Description | ||
 | POWER | Press to turn on and off the TV. The TV will never completely power off unless it is physically unplugged. |
| TV AV HDMI PC/YPbPr | TV/AV/HDMI/PC/YPbPr | Press TV, AV, HDMI/PC or YPbPr separately to select the input directly. |
 | 0-9 | Press the 0~9 keys respectively to select channel;system change to your selected channel after 3~5 seconds. |
 | -/-- | Press the 0~9 keys and this key to select channels of 1~3 digits. |
 | BACK Press this key to return back to channel watched last time. | |
 | VOL +/- Press to adjust the volume. | |
 | SOURCE Press this key to display list of signal sources. | |
 | MUTE Press to mute the sound. Press again or press VOL+ to restore the sound. | |
| [XXDY] | CH +/- | Press to scan through channels. To scan quickly through channels, press and hold down either + or -. |
| [downed] | ▲/▼◄/► | Move left, up, down or right to select the available option or adjust the setting in OSD menu. |
| OK Press to confirm the selected item or setting. | ||
 | ZOOM | Press this key repeatedly to view available aspect ratios of your TV set. Available ratio values for common signal sources are: wide mode, normal mode,zoom 1,zoom 2; values for computer mode are: normal mode and wide modes. |
 | MENU | Press this key to display all the shortcuts for functions and menus. Items in OSD (On Screen Display) menu may differ in accordance with inputs and contents. |
 | DISPLAY | Press the key once to show channels and / or programs (if available ) related information. The OSD(On Screen Display) menu may disappear after several seconds of time out period. Press it again to close display immediately. |
 | PICTURE | Press this key repeatedly to loop showing available image modes: standard, vivid, personal, movie and eco (power saving) mode.The picture mode related information can also be found in the screen setup menu. |
 | AUDIO | Press this key repeatedly to loop showing available audio modes: standard, music, speech, and personal. The audio mode related information can be found in the audio setup section. |
 | SLEEP | Press this key to setup the waiting interval before your TV set entering the standby mode.(This key is disabled in computer mode.) The auto power off function can be set up in the OSD setup menu. |
 | FREEZE Press this key to freeze the screen.Press it again to cancel freezing. | |
 | USB Press to choose USB source mode. | |
| ■/■/■/■/■ | Keys for "Previous Play / Pause Stop Next". | |
* Multichannel Television Sound (MTS)
The broadcasting standard, which allows stereo sounds to be transmitted with the TV picture.
** Second Audio Program (SAP)
Another or additional audio channel provided for in the Multichannel Television Sound (MTS) broadcast standard. A monaural sound track included within the recorded or video signal (usually containing a second language translation for the displayed program).
Set-Up
Inserting Batteries into the Remote control
Insert two size AAA batteries (supplied) to the diagram inside the battery compartment of the remote control.

natural_image
Diagram showing battery cell arrangement with red arrows indicating direction (no text or symbols)Attaching the Base
IMPORTANT: The Base of the AOC TV must be assembled prior to usage.
- Place the TV set facing down on a soft and flat surface (blanket, foam, cloth, etc.) to prevent any damage to TV set.
- Carefully align and insert the Base to the stand.
- Insert the screws to the bottom of the base and use them to tighten the base to the stand.
- Please refer to the "Important Usage instructions" in the above.

natural_image
Line drawing of a laptop chassis with visible ports and connectors (no text or symbols)
natural_image
Line drawing of a device rear panel with buttons and ports, no text or symbols presentWall-Mounting
Please install on a wall by using a Wall-Mount Bracket (sold separately). Before mounting the TV on a wall, the Table-Top Stand must be removed from the TV. Follow the simple steps below to remove the Table-Top Stand:
- Disconnect all the cables from the TV.
- Gently lay the TV, face down, onto a level and stable surface covered with a thick and soft cloth. Make sure the Table-Top Stand is hanging over the edge.
- Remove the screws as shown in the illustration for your model and pull the Table-Top Stand out.
- Do not remove any other screws from the TV.
- Do not remove the Table-Top Stand for any reason other than to Wall-Mount the TV.
- Be sure to store the removed screws and Table-Top Stand in a safe place until you are ready to reattach the Table-Top Stand. Keep the screws away from small children.
- For bracket installation, refer to the instruction guide provided by the Wall-Mount Bracket model for your TV. Sufficient expertise is required in installing this TV, especially to determine the strength of the wall for withstanding the TV's weight.
- For product protection and safety reasons, AOC strongly recommends that you use the Wall-Mount Bracket model designed for your TV and the Wall-Mounting of your TV should be performed by AOC dealer or licensed contractor.

natural_image
Technical line drawing of a device rear panel with internal components and a separate view showing a component (no text or symbols present)
natural_image
Line drawing of a device rear panel with buttons and ports (no text or symbols)Note: 75 mm x 75 mm wall nount bracket &M4 screws is not included. Please contact your local distributor.
Connecting TV
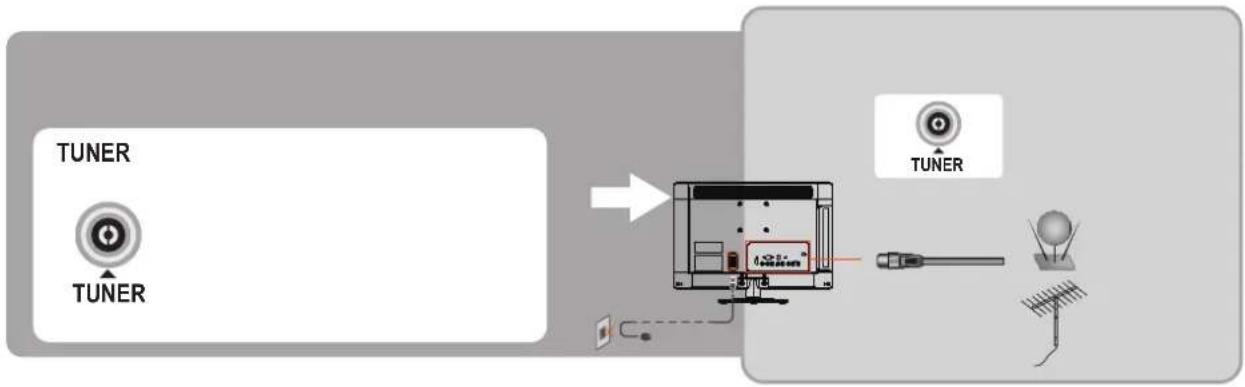
Cable System or VHF/UHF Antenna System
You can enjoy standard-definition and high-definition digital programming (if available in your area), along with standard-definition analog programming.
It is strongly recommended that you connect the antenna/cable input using a 75-ohm coaxial cable to receive optimum picture quality. A 300-ohm twin lead cable can be easily affected by radio frequency interference, resulting in signal degradation.
Cable or VHF/UHF(or VHF only)


flowchart
graph LR
    A["TUNER"] --> B["Device with antenna"]
    C["TUNER"] --> D["Output"]
    style A fill:#f9f,stroke:#333
    style B fill:#ccf,stroke:#333
    style C fill:#cfc,stroke:#333
    style D fill:#fcc,stroke:#333
High Definition Interface
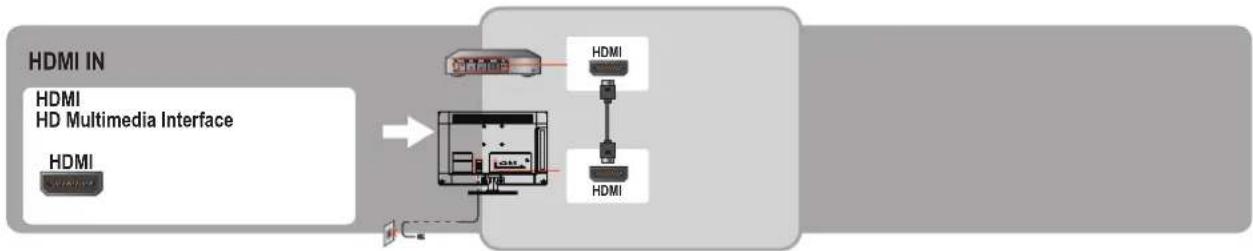
You can enjoy high-definition programming by subscribing to a high-definition cable service or a high-definition satellite service. For the best possible picture, make sure you connect this equipment to your TV via the HDMI or component video (with audio) input on the back of your TV.
HDMI Connection
flowchart
graph LR
    A["HDMI IN"] --> B["HD Multimedia Interface"]
    B --> C["Output"]
    D["HDMI"] --> E["Device 1"]
    E --> F["Device 2"]
    F --> G["Device 3"]
    G --> H["Device 4"]
    H --> I["Device 5"]
    I --> J["Device 6"]
    J --> K["Device 7"]
    K --> L["Device 8"]
    L --> M["Device 9"]
    M --> N["Device 10"]
If the equipment has a DVI jack and not an HDMI jack, connect the DVI jack to the HDMI IN (with DVI-to-HDMI cable or adapter) jack and connect the audio jack to the PC AUDIO IN jacks.
Component Signal Connection

flowchart
graph LR
    A["Component IN"] --> B["Component Video Input"]
    B --> C["Output Audio"]
    C --> D["Output Audio"]
Composite Signal Connection

flowchart
graph LR
    A["AV IN"] --> B["Device 1"]
    B --> C["Device 2"]
    C --> D["Device 3"]
    D --> E["Device 4"]
    E --> F["Output"]
    style A fill:#f9f,stroke:#333
    style F fill:#bbf,stroke:#333
PC Connection
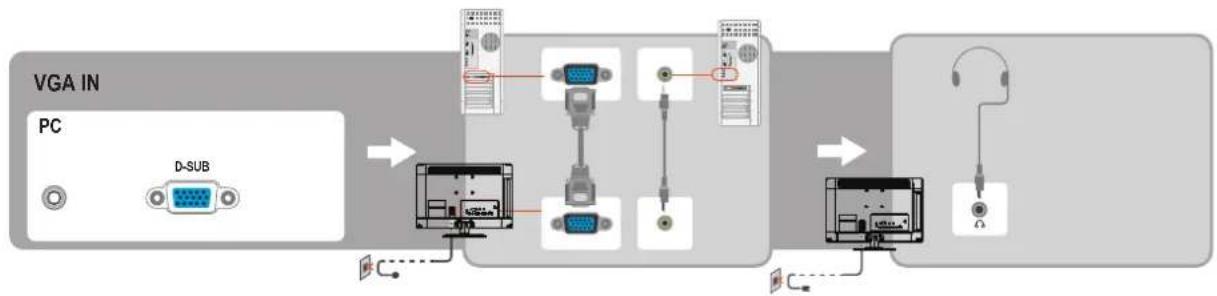
Use the TV as a monitor for your PC shown below with the HD15 to HD15 connection. This TV can also be connected to a PC with DVI or HDMI output. (Refer to the separate Quick Start Guide.)
flowchart
graph LR
    A["PC"] --> B["D-SUB"]
    B --> C["Interface Interface"]
    C --> D["Device 1"]
    C --> E["Device 2"]
    C --> F["Device 3"]
    C --> G["Device 4"]
    C --> H["Device 5"]
    C --> I["Device 6"]
    C --> J["Device 7"]
    C --> K["Device 8"]
    C --> L["Device 9"]
    C --> M["Device 10"]
    C --> N["Device 11"]
    C --> O["Device 12"]
- Connect the PC IN jack to the PC using the HD15-HD15 cable with ferrite core (analog RGB) and audio cable.
- If the PC is connected to the TV and no signal has been input from the PC for more than 30 seconds, the TV enters the standby mode automatically.
PC Input Signal Reference Chart
Connect a computer to your TV set and set up the computer output signal in accordance with table below.
| Default computer mode | |||
| Standard | Resolution Horizontal Frequency (kHz) | Vertical Frequency(Hz) | |
| VGA 720 x 400 31.327 69.617 | |||
| SVGA 800 x 600 37.879 60.317 | |||
| XGA 1024 x 768 48.363 60.004 | |||
| WXGA 1360 x 768* 47.72 59.799 | |||
*Recommended resolution
DVI/ PC HDMI Input Signal Reference Chart
- When DVI port is being used: connect the DVI port of video device to your TV set with a DVI-to-HDMI line and set up the output signal of the video device in accordance with table below.
- When HDMI port is being used: connect the HDMI ports of your computer and TV set with one HDMI wire and set up the output signal of the video device in accordance with table below.
| Default computer Mode | |||
| Standard Resolution Horizontal Frequency (kHz) Vertical Frequency(Hz) | |||
| VGA 640 x 480 | 37.879 | 60.317 | |
| VGA 720 x 400 | 31.327 | 69.617 | |
| SVGA | 800 x 600 | 37.879 | 60.317 |
| XGA | 1024 x 768 | 48.363 | 60.004 |
| SXGA | 1280 x 1024 | 63.981 | 60.020 |
| WXGA | 1360x 768* 47.72 | 59.799 | |
*Recommended resolution
Video Input Signal Reference Chart
- Connect the component signal or HDMI port of video device to your TV set and set up the output signal of the video device in accordance with table below.
- If your computer display card supports signals of video format then you can set up following output signal.
| Default Component or HDMI Mode | |||
| Standard | Resolution | Horizontal Frequency (kHz) | Vertical Frequency (Hz) |
| SD | 720 x 480i 15.734 | 60 | |
| SD | 720 x 480p | 31.5 | 60 |
| SD | 720 x 576i 15.625 | 50 | |
| SD | 720 x 576p | 31.25 | 50 |
| HD | 1280 x 720p | 37.5 | 50 |
| HD | 1280 x 720p | 45 | 60 |
| HD 1920 x 1080i | 28.125 | 50 | |
| HD 1920 x 1080i 33.75 | 60 | ||
| FHD | 1920 x 1080p | 56.25 | 50 |
| FHD | 1920 x 1080p 67.5 | 60 | |
Video systems supported by the TV, video modes
NTSC M, PAL M, PAL N.
Standard Definition Interface
You can also enjoy traditional program by using a DVD player or VCR Player. Connect this equipment to your TV via the Composite Input on the back of your TV.
Switching Input Source
On AOC TV, you can choose signal source on the remote control directly, or Press "source" to choose the signal source on the display menu.
- When choosing signal source on the remote control directly: Press the following keys to switch input source.

- When using "Source" key to choose signal source:

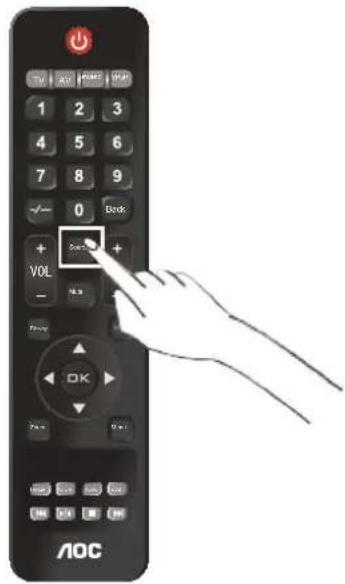
| 1 |  | Press Source key and its menu display. |
| 2 Press |  | ▲/▼ to select input sources of TV、AV、YPbPr、HDMI、VGA、USB. |
| 3 Press |  er. er. |
Language Setting

| 1 |  | Press the Menu key to display the main menu. |
| 2 |  | Press ▲/▼ to select “SETTING”, and press OK. |
| 3 |  | Press ▲/▼ to select the Menu Language. |
| 4 |  | Press ◀/► to select following languages: English、Francouzsky、Español. |
| 5 |  | Press Menu key to exit. |
Channel Search

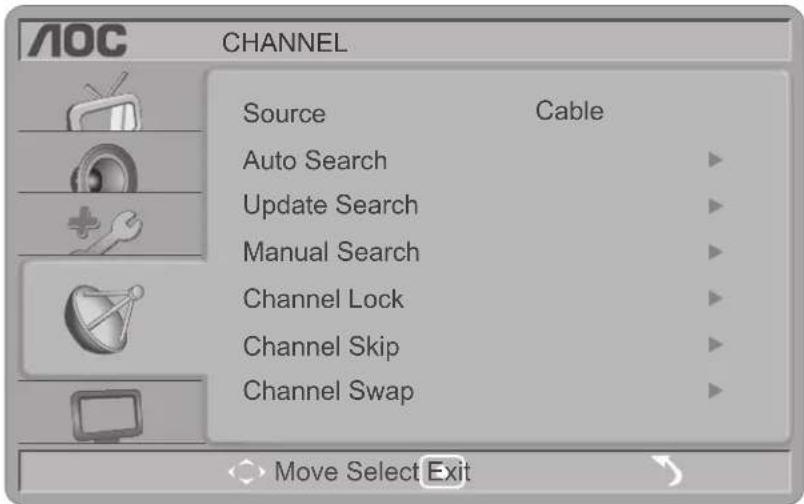
| 1 |  | Press Menu key and the Menu screen displays. |
| 2 |  | Press ▲/▼ to select “CHANNEL”, then press OK. |
| 3 Press |  elect Auto Search, then press OK. elect Auto Search, then press OK. |
Changing Channel/Flashback
On AOC TV, you can change channel on the remote control directly, or press CH ▲/▼ in the left downside corner of TV to choose the channel.
- Press the number keys directly to change the channel.

- Press back to go to the previous view.

Changing Volume/Mute
- Press Vol key to adjust volume.

- Press mute to mute the TV.
Adjust Video Setting
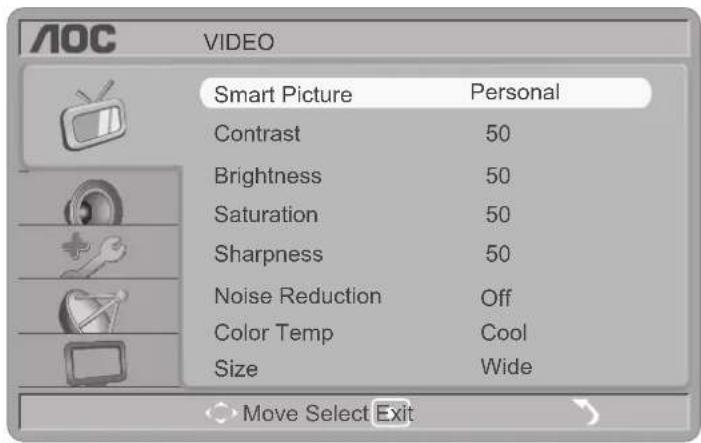
| 1 | Menu | Press Menu key and the Menu screen displays. |
| 2 |  | Press ▲/▼ to select “VIDEO”, then press OK. |
| 3 |  | Press ▲/▼ to select image setup: Smart Picture, Contrast, Brightness, Saturation, Sharpness, Noise Reduction, Color Temp, Size, then press OK to enter the selection menu. |
| 4 |  | Press ◀/► to adjust to desired values. |
| 5 | — | Press Menu key to exit. |
| Items Description | ||
| Smart Picture | Vivid Enhanced contrast and sharpness. | |
| Standard Standard screen settings are for home entertainment. | ||
| Eco Weakening the background light to save power. | ||
| Movie For watching motion pictures. Suitable for watching in environments like theaters. | ||
| Personal Special mode customized by users. | ||
| Contrast Increases or decreases picture contrast. | ||
| Brightness Brightens or darkens the picture. | ||
| Saturation Increases or decreases color saturation. | ||
| Sharpness Video sharpness adjustment. | ||
| Noise Reduction Reduces the noise level of connected equipment, and the VHF/UHF/CABLE input. | ||
| Color Temp | Cool Gives the white colors a bluish tint. | |
| Warm Gives the white colors a reddish tint. | ||
| Normal Gives the white color a nature tint. | ||
| User In PC mode,the user can define the tint for white colors. | ||
| Size | Available settings for general signal sources mode are: Normal、Wide、Zoom 1、Zoom 2.Available settings for computer sources mode are: Normal、Wide.You can use the "Zoom" button of the remote controller to select aspect ratio. | |
| *All the imported screen modes can be adjusted by the Picture button of the remote controller to change directly. | ||
Adjust Audio Setting

| 1 | Menu | Press Menu key and the Menu screen displays. |
| 2 |  | Press ▲/▼ to select “AUDIO”, then press OK. |
| 3 |  | Press▲/▼ to select sound mode settings: Smart Sound, Bass, Treble, Balance, Sound Mode, AVL, then press OK. |
| 4 |  | Press ◀/► to adjust. |
| 5 | Menu | Press Menu key to exit. |
| Items Description | |
| Smart Sound | Standard: For conversation contents. |
| Music: Enhances treble and bass. | |
| Speech: Enhances the treble and keep the bass at medium level. | |
| Personal: Enhances the bass and keep the treble at medium level. | |
| The sound mode can be set up by using the Audio button of your remote controller. | |
| Bass Increases or decreases lower-pitched sounds. | |
| Treble Increases or decreases higher-pitched sounds. | |
| Balance Balance the sound out of the left and right speakers. | |
| Sound Mode Setting for sound effect mode: mono or stereo. | |
| AVL Activate auto volume adjustment. | |
Adjust Channel Setting
This setup is available in TV mode only.

| 1 | Menu | Press Menu key and the Menu screen displays. |
| 2 |  | Press ▲/▼ to select "CHANNEL" , then press OK. |
| 3 |  | Press ▲/▼ to select options for scanning channels: Source, Auto Search, Update Search, Manual Search, Channel Lock, Channel Skip, Channel Swap, then press OK to enter selection mode. |
| 4 |  | Press ◀/► to adjust. |
| 5 | Menu | Press Menu key to exit. |
| Items | Description |
| Source | Select the mode of TV tuning mode as Cable or Air. |
| Auto Search | Create list of available stations in your TV set automatically.1. Select the Auto Search option.2. Press OK or ▶ to start auto scanning. Stations found by scanning function are recorded in your TV set.3. Press Menu key to end auto program scanning.4. Stations found by scanning will be overwritten by next auto scanning. |
| Update Search Update | the list of stations found by previous scanning. |
| Manual Search | Press and hold the ▶ key for 3 seconds until your TV set entering the manual scan mode.Stations found by manual scanning are saved in predefined channel numbers. |
| Channel Lock You are | required to enter a valid password before viewing programs of channels being locked. |
| Channel Skip | Channels with value of ON to this setting will be skipped when the program ◀/▶ keys are pressed. |
| Channel Swap Triger | switch to given channel. |
Adjust PC Setting
This setup is available in computer mode.
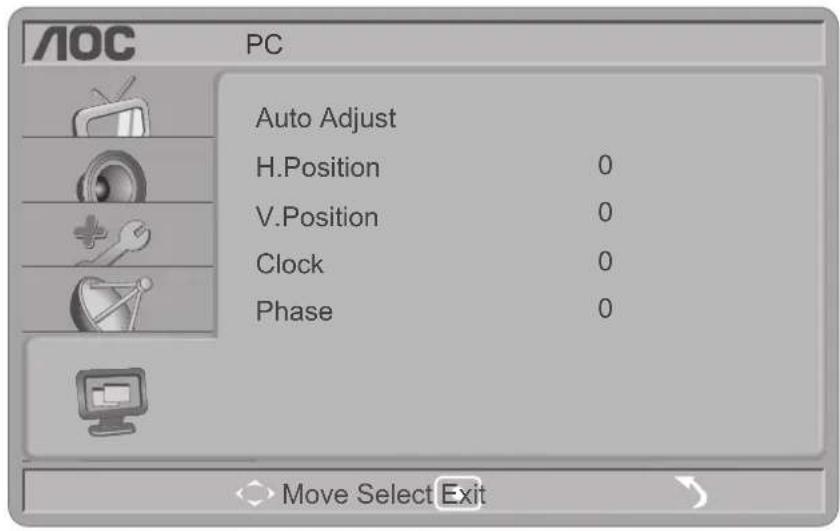
| 1 | Menu | Press Menu key and the Menu screen displays. |
| 2 |  | Press ▲/▼ to select "PC", then press OK. |
| 3 |  | Press ▲/▼ to select PC settings for Auto Adjust,H.Position,V.Position,Clock,Phase,then press OK to enter selected item. |
| 4 |  | Press ◀/► to adjust. |
| 5 |  | Press Menu key to exit. |
| Items Description | |
| Auto Adjust | Synchronize resolutions between your TV set and computer for correct full screen display.Please refer to the "PC Input Signal Reference Chart" for details on supported resolutions. |
| H.Position | Adjust the Horizontal position. |
| V.Position | Adjust the Vertical position. |
| Clock | Adjust clocking speed of your computer signal. |
| Phase | Adjust phase frequency of your computer signal. |
Setting Adjust

| 1 |  | Press Menu key and the Menu screen displays. |
| 2 |  | Press ▲/▼ to select “SETTING” , then press OK. |
| 3 |  | Press ▲/▼ to select item for adjusting including : Menu Language, Menu Timeout, Sleep Timer, DCC, DCR, B/L Control, V-Chip, Closed Caption, Reset All, then press OK to enter selected item. |
| 4 |  | Press ◀/► to adjust. |
| 5 |  | Press Menu key to exit. |
| Items Description | |
| Menu Language Select menu language for your TV set. | |
| Menu Timeout Set up period of time that the menu screen displays. | |
| Sleep Timer | Set up period of idle time before your TV set entering the standby mode automatically (inactive for computer/USB modes). |
| DCC Set up the contrast | of your TV set to its maximum value. |
| DCR Set up the contrast | of your TV set to vary in accordance with the brightness and darkness of your TV set. |
| B/L Control | Adjust brightness of your screen. (You may experience a quick white flash when power on a TV set with very low back light value.This is normal. In case of dynamic contrast this item is hidden.) |
| V-Chip | When the user select the V-Chip item and a rating table will show in the screen and user can setting the rating to be lock or unlock. |
| Closed Caption | There are CC1/CC2/CC3/CC4/TT1/TT2/TT3/TT4 can be choose.Choose “CC On”, “CC With Mute” this function will be enabled.When “CC Off”, this function will be disabled. |
| Reset All Reset all setup | values to the default settings. |
USB music and picture playback
- Picture playback
1) Enter the picture playback menu
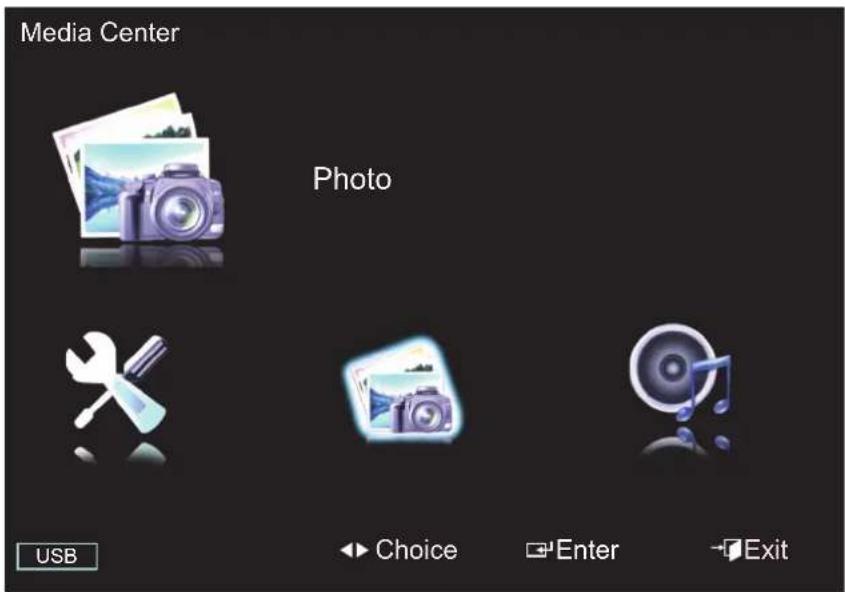
| 1 |  | Press the Source key and the list of signal sources displays. |
| 2 |  | Press ▲/▼ to select USB, then press OK. |
| 3 |  | Press ◀/► to select photo, and press OK. |
| 4 |  | Press the Menu key to exit. |
2) Select photo
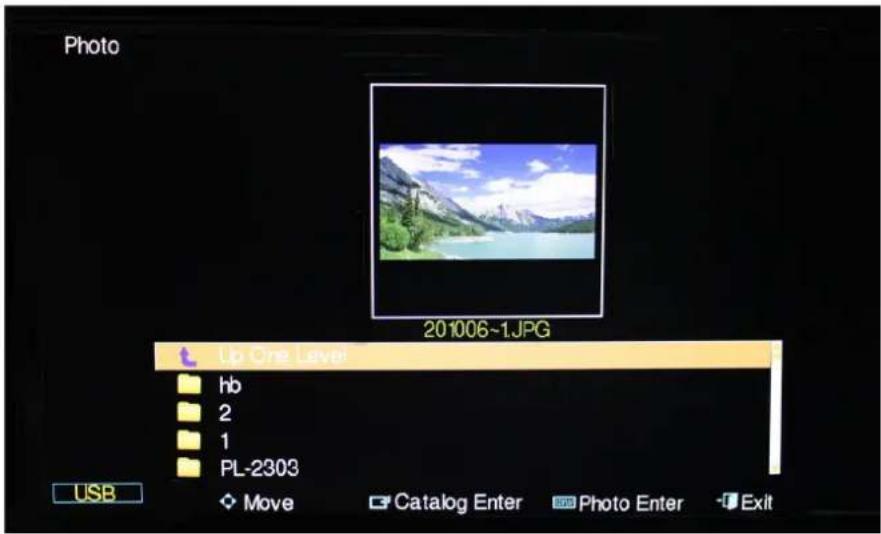
| 1 | [xx6w] | Press ▲/▼ to select picture folder, then press OK to enter that folder. |
| 2 |  | Press ◀/▶ to select picture, then press Display. |
| 3 |  | Press the Menu key to exit. |
3) Picture playback
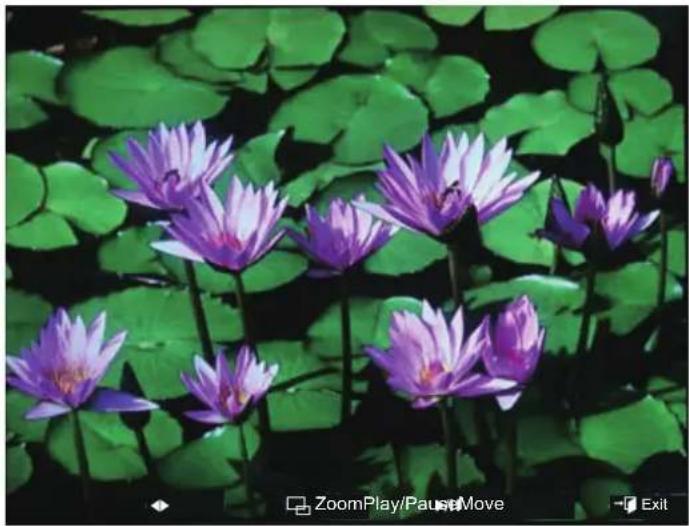
natural_image
Close-up of purple water lilies with green leaves, no text or symbols visible1 Press  | ◀/▶ key to view pictures one by one. |
2   | Press these two keys to play backward and forward. |
3  | Press this key to play/pause the current picture playback. |
4  | Press this key to Zoom in current picture. |
5  | Press the Menu key to exit by steps. |
2. Music playback
1) Enter the music playback menu

| 1 | Press the Source key and the list of signal sources displays. | |
| 2 |  | Press ▲/▼ to select USB, then press OK. |
| 3 |  | Press ◀/► to select music, then press OK. |
| 4 |  | Press the Menu key to exit. |
2) Select music

| 1 |  | Press ▲/▼ to select track, press OK to start playing. |
| 2 |  | Press Back key to switch between list of tracks and folders. Press OK to enter/play. |
| 3 | [66xw] | Press the Menu key to exit. |
3) Music playback

bar
| Metric | Value | | :--- | :--- | | 2/12 | 03:450 | | Volum | 20 || 1 Press the next tracks to select previous/next tracks. | ||
2 Press the  to play/pause current music playing. to play/pause current music playing. | ||
3 Press the  to end music playing. to end music playing. | ||
| 4 |  | Press the Menu key to exit. |
Setup
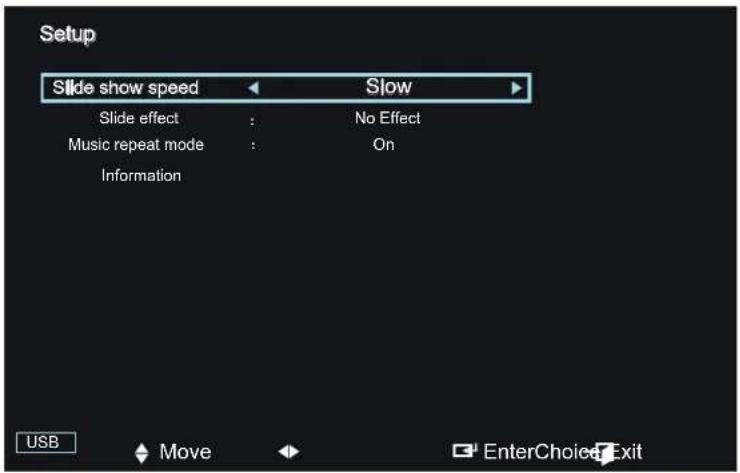
| 1 |  | Press the Source key and the list of signal sources displays. |
| 2 |  | Press ▲/▼ to select USB, then press OK. |
| 3 |  | Press ◀/► to select setup, then press OK. |
| 4 | Press  | ▲/▼ to select items to be adjusted. |
| 5 | Press  | ◄/► to make adjustment. |
| 6 |  | Press the Menu key to exit. |
Use the abnormality reminder
Take example: If you don't have USB device connected a reminder of "There is no USB device" message pops up after you selected a picture and pressed the OK key.

Note : A reminder pops up when you selected photo/music yet there is no USB device available.
Troubleshooting
| Condition Explanation / Solution | |
| No picture | |
| No picture Check the Power Saving settings. | |
| Cannot receive any channels | Make sure the power cord is connected securely. Turn on the power of the TV.Check antenna/cable connections. Make sure the Cable setting is correct for your TV signal source. |
| TV is locked to one channel Perform | Auto Program to add receivable channels that are not present in the TV's memory. |
| Cannot receive or select | Perform Auto Program to add receivable channels that are not present in the channels TV's memory.To receive or select cable channels, make sure that Cable in the Channel settings is set to On. To receive or select UHF channels over an antenna, make sure Cable is set to Off. |
| The TV turns off | Check if Sleep Timer is activated, or confirm the Duration setting of Timer automatically.Check PC Power Management in General Settings. |
| No picture from some video | Check the connection between the optional video equipment and the TV Sources.Press INPUT on the remote control.Select your desired input from the External Inputs list. |
| Poor picture | |
| The quality of the images is not as good as what I saw at the store | Picture quality depends on the signal content. See Quick Start Guide (supplied) to display the best possible picture for that signal. |
| Double images or ghosts | Check antenna/cable connections.Check the antenna location and direction. |
| Only snow and noise appear on the screen | Check if the antenna is broken or bent; Check if the antenna has reached the end of its serviceable life.(3-5 years in normal use, 1-2 years at the seaside.) |
| Dotted lines or stripes | Keep the TV away from noise sources such as cars, motorcycles, or hair-dryers.If using 300 ohm twin lead, move the excess lead away from the TV or try using 75 ohm coaxial cable instead. |
| No color/Dark picture/Color is not correct/The picture is too bright | Press PICTURE to select the desired Picture Mode; Adjust the Picture Mode options in the Picture settings. |
| Noisy picture | Make sure that the antenna is connected using a 75-ohm coaxial cable.Keep the antenna cable away from other connecting cords.To avoid TV interference, make sure to use an undamaged antenna cable. |
| No sound/Noisy sound | |
| Good picture, no sound | Check the volume control. Press MUTE or VOL + so that [64x2] pears from the screen.Disconnect your headphones.For HDMI equipment, confirm that the audio output setting of the connected equipment is set to PCM.This TV's HDMI inputs support PCM 32, 44.1 and 48 kHz. |
| Audio noise | Make sure that the antenna is connected using a 75-ohm coaxial cable.Keep the antenna cable away from other connecting cords.To avoid TV interference, make sure to use an undamaged antenna cable. |
| PC Input | |
| No Picture / No Signal | Confirm the PC is correctly connected to the TV with either the PC IN (with an HD15 cable) or with the HDMI IN.Ensure the output signal from the PC is one of the formats listed on page 15.Turn the PC off. Confirm the PC connection and restart the PC. Plug and play will auto-detect the TV and correctly set up PC timing.Verify PC Power Management is activated. |
| Poor Picture Adjust the resolution. Adjust Pitch and Phase. | |
| Wide Mode changes automatically | The current Wide Mode setting is automatically replaced with the 4:3Default setting when you change the channel or video input, if 4:3 Default in the Screen settings is set to other than Off. If you want to lock in Wide Mode selected with WIDE on the remote control, set 4:3Default to Off in the Screen settings.Check the Auto Wide option in the Screen settings. |
| Suddenly the picture gets smaller | The picture gets smaller during the commercials, this is due to the method the provider broadcasts their contents. When HD content channels switch to SD definition content (commercials), the picture may be small with a black border. |
| "Black box" on screen | You have selected a text option and no text is available. To turn off this feature, set the CC Display option to Off. If you were trying to select closed captioning, select CC1 instead of Text1-4. |
| Black bands appear at the edges of the screen | Some wide screen programs are filmed in aspect ratios that are greater than 16:9 (this is especially common with theatrical releases). Your TV will show these programs with black bands at the top and bottom of the screen. For more details, check the documentation that came with your DVD (or contact your program provider). Programs in 4:3 aspect ratio will have bands on left and right sides of the screen. |
| Condition Explanation / Solution | |
| PC Input | |
| Certain programs on DVD or other digital sources display a loss of detail, especially during fast-motion or dark scenes | This is due to the digital compression of the source content used by certain digital broadcasts and DVDs which may cause your TV's screen to display less detail than usual, or cause artifacts (small blocks or dots, pixilation) to appear on your screen. These signal compressions are more visible and are dependent on the clarity and resolution of the television. |
| Remote control does not operate | Check the polarity of the batteries or replace the batteries.Point the remote control at the remote control sensor located at the front of the TV.Fluorescent lamps can interfere with your remote control operation; try turning off the fluorescent lamps.Keep the remote control sensor area clear from obstacles. |
Dimensions & Specifications
| Model LE19A1321 LE22A1321 | LE24A1321 | |||
| Panel size | 470.1 mm diagonal(18.51" viewable) | 546.86 mm diagonal(21.53" viewable) | 596.9 mm diagonal(23.5" viewable) | |
| Resolution 1366 x 768 1920 x | 1080 1920 x 1080 | |||
| TV System | NTSC MPAL M/N | NTSC MPAL M/N | NTSC MPAL M/N | |
| Speaker 3 W x 2 3 W x 2 3 W x 2 | ||||
| Antenna impedance 75Ω 75Ω | 75Ω | |||
| Input Voltage 100-240V AC, 50/60Hz 100-240V AC, 50/60Hz 100-240V AC, 50/60Hz | ||||
| Power consumption 45W 45W | 45W | |||
| Standby power consumption <1W <1W <1W | ||||
| Video/Audio Terminals | Rear AV in x 1 | Rear AV in x 1 | Rear AV in x 1 | |
| Video/Audio Input | VIDEO: 1 V(p-p), 75 ohm,negative sync.AUDIO: 500mv (rms) | VIDEO: 1 V(p-p), 75 ohm,negative sync.AUDIO: 500mv (rms) | VIDEO: 1 V(p-p), 75 ohm,negative sync.AUDIO: 500mv (rms) | |
| Audio Output | Audio line out (R/L): Max2.0Vrms | Audio line out (R/L): Max2.0Vrms | Audio line out (R/L): Max2.0Vrms | |
| Component Input | Rear Component :Y: 1V(p-p), 75 ohm, includingsync.Pr/Cr: ±0.35V(p-p), 75 ohmPb/Cb: ±0.35V(p-p), 75 ohmAUDIO: 500mv (rms) | Rear Component :Y: 1V(p-p), 75 ohm, includingsync.Pr/Cr: ±0.35V(p-p), 75 ohmPb/Cb: ±0.35V(p-p), 75 ohmAUDIO: 500mv (rms) | Rear Component :Y: 1V(p-p), 75 ohm, includingsync.Pr/Cr: ±0.35V(P-p), 75 ohmPb/Cb: ±0.35V(P-p), 75 ohmAUDIO: 500mv (rms) | |
| HDMI Terminals | HDMI INPUT: Rear HDMI x1HDCP compliantE-EDID compliant | HDMI INPUT: Rear HDMI x1HDCP compliantE-EDID compliant | HDMI INPUT: Rear HDMI x1HDCP compliantE-EDID compliant | |
| VGA Terminals | VGA INPUT:Rear VGA (D-SUB 15 Pin)Input x1E-EDID compliantAudio Input: Mini-jack for stereo (3.5∅ ) | VGA INPUT:Rear VGA (D-SUB 15 Pin)Input x1E-EDID compliantAudio Input: Mini-jack for stereo (3.5∅ ) | VGA INPUT:Rear VGA (D-SUB 15 Pin)Input x1E-EDID compliantAudio Input: Mini-jack for stereo (3.5∅ ) | |
| Size (W x H x D)(with base and stand) (mm) | 453 x 343 x 129 | 520 x 380 x 144 | 567 x 407 x 144 | |
| Size (W x H x D)(without base and stand)(mm) | 453 x 303 x 38 | 520 x 340 x 38 | 567 x 367 x 38 | |
| Weight | 2.85 Kg (with base)2.70 Kg (without base) | 3.35 Kg (with base)3.21 Kg (without base) | 4.1 Kg (with base)3.95 Kg (without base) | |
| Wall mount size | 75 x 75mm (Wall mount kit is not included) | 75 x 75mm (Wall mount kit is not included) | 75 x 75mm (Wall mount kit is not included) | |
| Wall-Mount accessory | Optional accessory and notincluded in standard package | Optional accessory and notincluded in standard package | Optional accessory and notincluded in standard package | |
| Operatingconditions | TemperatureHumidityAltitude | 0°C to +40°C10%~85%To 3,000m | 0°C to +40°C10%~85%To 3,000m | 0°C to +40°C10%~85%To 3,000m |
| Storageconditions | TemperatureHumidityAltitude | -10°C to +50°C5%~85%To 5,000m | -10°C to +50°C5%~85%To 5,000m | -10°C to +50°C5%~85%To 5,000m |
Note:
- Designs and specifications are subject to change without notice.
- This model may not be compatible with features and/or specifications that may be added in the future.
natural_image
Line drawing of a computer monitor with an open rear panel and a small screen (no text or symbols)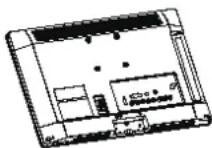
Descarga eléctrica
Cuando no se use
Sobrecarga
Equipo opcional
Accesorios pequeños
natural_image
Cartoon illustration of a baby crawling on the floor next to a computer monitor with a warning triangle (no text or symbols)Antenas
Baterías
Limpieza
Sonido
natural_image
Two silhouettes of people holding a computer monitor (no text or symbols visible)natural_image
Simple line drawing of a person sitting on a chair holding a blank board (no text or symbols)
natural_image
Illustration of a computer monitor with a water feature and warning symbol (no text or labels)Ajuste del Volumen
natural_image
Illustration of a folder with lightning bolts and a warning symbol (no text or labels)Piezas de repuesto


Controls & Connections
Sujeción de la Base
natural_image
Technical line drawing of a device casing with internal components and a separate panel (no text or symbols)
natural_image
Technical line drawing of a computer monitor with an attached cable and indicator lights (no text or symbols)natural_image
Technical line drawing of a device chassis with labeled components (no text or symbols)
natural_image
Line drawing of a device rear panel with buttons and ports (no text or symbols)Cable or VHF/UHF(or VHF only)

flowchart
graph LR
    A["TUNER"] --> B["Output Stage"]
    B --> C["Antenna"]
    C --> D["Antenna Signal"]
natural_image
Close-up of purple water lilies surrounded by green lily pads, with no visible text or symbols.bar
| Metric | Value | | :--- | :--- | | 2/12 | 0 | | 03:450 | 450 | | Volum | 20 | Previous Next Play/Pause ExitBelow information applied in Mexico only.
IMPORTADO POR:
TOP VICTORY ELECTRONICS DE MEXICO, S.A. DE C.V.
AV. RICARDO MARGAIN No. 240 SAN AGUSTIN CAMPESTRE
SAN PEDRO GARZA GARCIA, NL C.P. 66270 TELEFONO: 0052 81 1522-28-88
TELEVISION A COLOR DE PANTALLA DE DIODOS EMISORES DE LUZ (LED)
MARCA: AOC MODELO: LE19A1321, LE22A1321, LE24A1321
ESPECIFICACIONES ELECTRICAS:
100-240V\~50/60Hz 1.5A




- Table of Contents
- IMPORTANT INFORMATION....3
- IMPORTANT SAFETY INFORMATION....3
- USAGE INSTRUCTIONS....4
- CONTENTS IN THE BOX 9
- CONTROLS & CONNECTIONS 10
- SET-UP 12
- CONNECTING TV 13
- PC INPUT SIGNAL REFERENCE CHART 15
- DVI/ PC HDMI INPUT SIGNAL REFERENCE CHART 15
- VIDEO INPUT SIGNAL REFERENCE CHART 15
- VIDEO SYSTEMS SUPPORTED BY THE TV,VIDEO MODES....15
- SWITCHING INPUT SOURCE....16
- TROUBLESHOOTING 30
- DIMENSIONS & SPECIFICATIONS 31
- Important Information
- WARNING
- CAUTION
- NOTIFICATION
- SAFETY: Lamp Disposal
- Important Safety Information
- Usage Instructions
- Installation
- Placement
- Outdoor Use
- Vehicle, Ships and Other Vessels
- Medical institutions
- Attachments
- Wall-Mount
- AC Power Cable
- LCD Screen
- Broken Pieces
- Handling of broken glass and liquid crystal leakage
- Wiring
- Electric Shock
- Lightning Storms
- When Not in Use
- Overloading
- Optional Equipment
- Small Accessories
- Antennas
- Outdoor antenna grounding
- Batteries
- Disposal of used batteries
- Cleaning
- Cleaning the AC power plug
- Cleaning the screen surface/ cabinet of the TV set
- Magnetic Influence
- Sound
- Carrying the TV
- Carry the TV in the specified manner
- Ventilation
- Objects and ventilation holes
- Moisture
- Moisture and flammable objects
- Volume Adjustment
- Servicing
- Replacement Parts
- Safety Check
- Mobile telephone warning
- End of life directive
- Canadian notice
- Contents in the Box
- Controls & Connections
- Set-Up
- Inserting Batteries into the Remote control
- Attaching the Base
- Wall-Mounting
- Connecting TV
- Cable System or VHF/UHF Antenna System
- High Definition Interface
- Composite Signal Connection
- PC Connection
- PC Input Signal Reference Chart
- DVI/ PC HDMI Input Signal Reference Chart
- Video Input Signal Reference Chart
- Video systems supported by the TV, video modes
- Switching Input Source
- Language Setting
- Channel Search
- Changing Channel/Flashback
- Changing Volume/Mute
- Adjust Video Setting
- Adjust Audio Setting
- Adjust Channel Setting
- Adjust PC Setting
- Setting Adjust
- USB music and picture playback
- Music playback
- Use the abnormality reminder
- Descarga eléctrica
- Cuando no se use
- Sobrecarga
- Equipo opcional
- Accesorios pequeños
- Antenas
- Baterías
- Limpieza
- Sonido
- Ajuste del Volumen
- Piezas de repuesto
- Sujeción de la Base
Brand : AOC
Model : LE19A1321
Category : Television