MultiSync LCD19WV - Monitor NEC - Free user manual and instructions
Find the device manual for free MultiSync LCD19WV NEC in PDF.
Download the instructions for your Monitor in PDF format for free! Find your manual MultiSync LCD19WV - NEC and take your electronic device back in hand. On this page are published all the documents necessary for the use of your device. MultiSync LCD19WV by NEC.
USER MANUAL MultiSync LCD19WV NEC
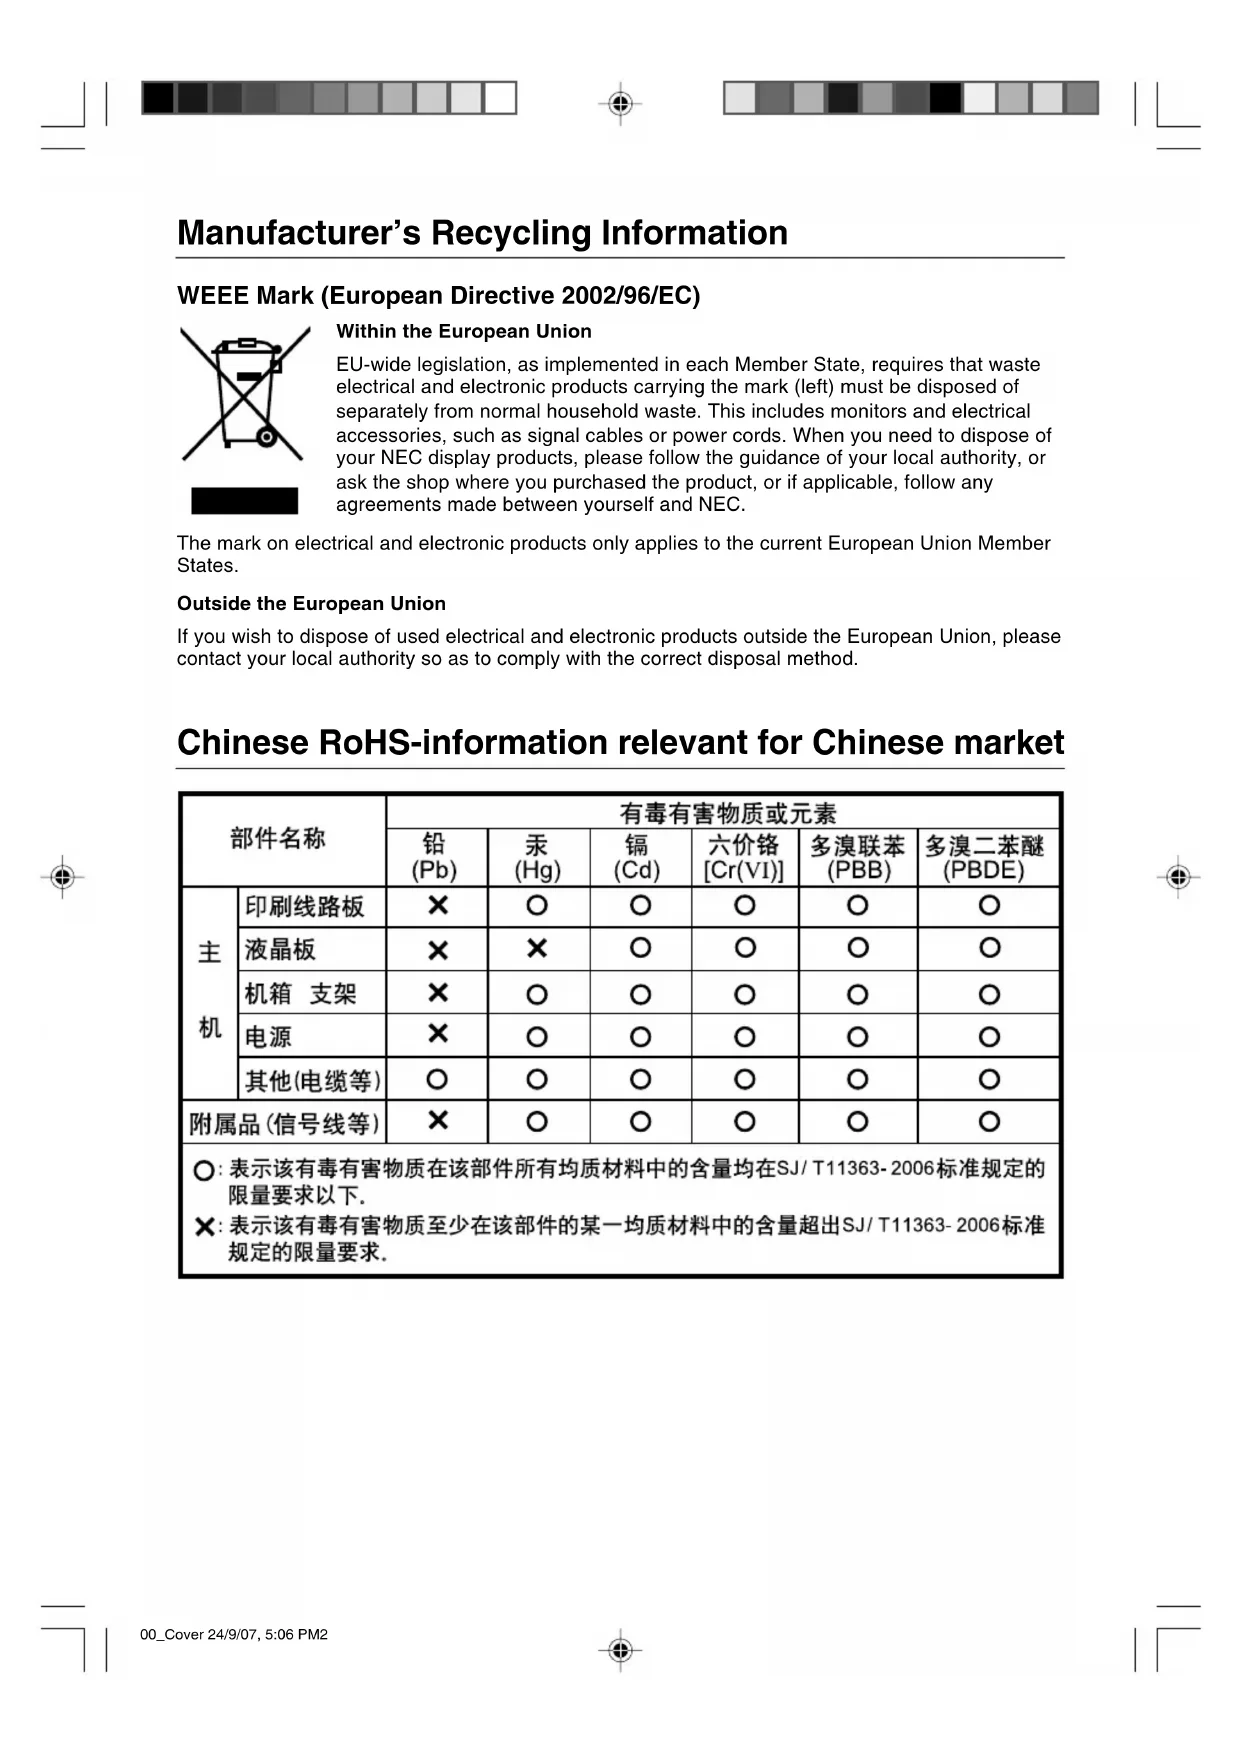
LCD19WV LCD22WV User’s Manual Bedienerhandbuch Manual del usuario Manuel Utilisateur Manuale utente Руководство пользователя Kullan∂c∂ Kılavuzu 00_Cover 24/9/07, 5:06 PM1Chinese RoHS-information relevant for Chinese market WEEE Mark (European Directive 2002/96/EC) Within the European Union EU-wide legislation, as implemented in each Member State, requires that waste electrical and electronic products carrying the mark (left) must be disposed of separately from normal household waste. This includes monitors and electrical accessories, such as signal cables or power cords. When you need to dispose of your NEC display products, please follow the guidance of your local authority, or ask the shop where you purchased the product, or if applicable, follow any agreements made between yourself and NEC. The mark on electrical and electronic products only applies to the current European Union Member States. Outside the European Union If you wish to dispose of used electrical and electronic products outside the European Union, please contact your local authority so as to comply with the correct disposal method. Manufacturer’s Recycling Information 00_Cover 24/9/07, 5:06 PM2English-1 English Declaration of the Manufacturer We hereby certify that the colour monitor LCD19WV (TFT19W80PS)/ LCD22WV (TFT22W90PS) are in compliance with RISK OF ELECTRIC SHOCK • DO NOT OPEN TO PREVENT FIRE OR SHOCK HAZARDS, DO NOT EXPOSE THIS UNIT TO RAIN OR MOISTURE. ALSO, DO NOT USE THIS UNIT’S POLARIZED PLUG WITH AN EXTENSION CORD RECEPTACLE OR OTHER OUTLETS UNLESS THE PRONGS CAN BE FULLY INSERTED. REFRAIN FROM OPENING THE CABINET AS THERE ARE HIGH VOLTAGE COMPONENTS INSIDE. REFER SERVICING TO QUALIFIED SERVICE PERSONNEL. WARNING CAUTION: TO REDUCE THE RISK OF ELECTRIC SHOCK, DO NOT REMOVE COVER (OR BACK). NO USER
SERVICEABLE PARTS INSIDE. REFER SERVICING
TO QUALIFIED SERVICE PERSONNEL. This symbol warns user that uninsulated voltage within the unit may have sufficient magnitude to cause electric shock. Therefore, it is dangerous to make any kind of contact with any part inside this unit. This symbol alerts the user that important literature concerning the operation and maintenance of this unit has been included. Therefore, it should be read carefully in order to avoid any problems. CAUTION and marked with NEC Display Solutions, Ltd. 4-13-23, Shibaura, Minato-Ku Tokyo 108-0023, Japan Contents Your new NEC LCD monitor box* should contain the following:
- LCD monitor with tilt base
Remember to save your original box and packing material to transport or shipthe monitor.User’s ManualPower CordVideo Signal CableCable HolderLCD monitor(Stand not connected)CD-ROM Quick Start To attach the Base to the LCD Stand:
1. Insert the front of the LCD stand into the holes in the front of the
2. Attach the Base to the Stand. The locking tab on the Base should
fit into the hole on the back of the Stand (Figure S.1). To attach the LCD monitor to your system, follow these instructions:
1. Turn off the power to your computer.
2. For the PC with Analog output: Connect the 15-pin mini D-SUB
signal cable connected with the monitor to the connector of the display card in your system (Figure A.1). Tighten all screws. For the Mac: Connect the MultiSync Macintosh cable adapter (not included) to the computer. Attach the 15-pin mini D-SUB signal cable to the MultiSync Macintosh cable adapter (Figure A.2). Tighten all screws. NOTE: Some Macintosh systems do not require a Macintosh cable adapter.
3. Connect one end of the power cord to the monitor and the other
end to the power outlet. Use the Cable holder to keep the Video Signal Cable and power cord together (Figure B.1).
4. To attach the Cable Holder:
Attach the Cable Holder on to the Base. Insert the hooks on the Cable Holder into the holes at the back of the Stand and slide the Cable Holder downward into place (Figure B.1). NOTE: Please confirm that the tabs are completely secure. NOTE: Adjust position of cable that place under the Cable holder to avoid damage for cable or monitor. NOTE: Please refer to Caution section of this manual for proper selection of power cord. Figure S.1 Figure A.1 Figure A.2 Council Directive 73/23/EEC: – EN 60950-1 Council Directive 89/336/EEC: – EN 55022 – EN 61000-3-2 – EN 61000-3-3 – EN 55024 Stand Base Locking TabsMacintosh Cable Adapter(not included) Figure B.1 Cable holderInput (VGA)Power Cable 01_English 24/9/07, 5:06 PM1English-2 English Figure C.1 Power Button Figure TS.1 Figure R.1 Non-abrasive surface Figure R.2 4-SCREWS (M4) (MAX depth: 8.5 mm) Weight of LCD assembly: 4.2 kg (MAX) - (LCD19WV)
5.0 kg (MAX) - (LCD22WV)
5. Turn on the monitor with the front power button and the computer
settings upon initial setup for most timings. For further adjustments, use the following OSD controls:
- Image Position Refer to the Controls section of this User’s Manual for a full description of these OSD controls. NOTE: If you have any problem, please refer to the Troubleshooting section (CD-ROM). Tilt Grasp both sides of the monitor screen with your hands and adjust the tilt as desired (Figure TS.1). Remove Monitor Stand for Mounting To prepare the monitor for alternative mounting purposes:
3. Remove the 3 screws connecting the monitor to the stand and
remove the stand as indicated (Figure R.1). The monitor is now ready for mounting in an alternative manner.
4. Connect the AC cord to the back of the monitor (Figure R.2).
5. Reverse this process to re-attach stand.
NOTE: Use only VESA-compatible alternative mounting method. NOTE: Handle with care when removing monitor stand. Removing the Base NOTE: Always remove the Base when shipping the LCD.
1. Place monitor face down on a non-
bottom tabs upward to unlock.
3. Press the top tabs down to unlock
and pull off the stand. Connecting a Flexible Arm This LCD monitor is designed for use with a flexible arm. Please use the attached screws (4pcs) as shown in the picture when installing. To meet the safety requirements, the monitor must be mounted to an arm which guaranties the necessary stability under consideration of the weight of the monitor. The LCD monitor shall only be used with an approved arm (e.g. GS mark). Tab 4 x 12 mm with lock washer and flat washer Tighten all screws 100 mm 100 mm Thickness of Bracket (Arm) 2.0 ~ 3.2 mm 12 mm
To lock the OSD, press and hold the MENU button while the monitor is off and then press power button to turn the monitor on. To un-lock the OSD press and hold the MENU button while the monitor is off and then press power button to turn the monitor on.
Controls OSD (On-Screen Display) control buttons on the front of the monitor function as follows:
1. Basic Key function
Main Menu(Icon Select, Analog Input)Sub Menu (Icon Select)Press“MENU” key Press“- / <” or “+ / >”Main Menu (Exit)Press “AUTO” keyPress“MENU” keyAdjust by using“- / <” or “+ / >”Press“AUTO” keyPress“AUTO” keyPress “MENU” key Press “AUTO”or “MENU” keySub Menu (Adjust)Press“- / <” or “+ / >” Active Auto Adjustment function (press over 2 seconds). Shortcut to Luminance (Brightness) window. Button OSD Off Shortcut to Luminance (Contrast) window. OSD ON (Icon selection stage) Act Exit-key. Cursor moves left. Cursor moves right. OSD ON (Adjustment stage) Act Exit-key. Adjust value decrease or Cursor for adjust moves left. Adjust value increase or Cursor for adjust moves right. AUTO – / < + / > OSD displayed. Go to Icon selection stage. MENU OSD Lock Active Auto Adjustment function (press over 2 seconds). Shortcut to Luminance (Brightness) window. Shortcut to Luminance (Contrast) window. Message displayed “OSD Loked”. Go to Adjustment stage. Luminance Contrast Contrast from Digital-register. Brightness Backlight Adjustment. Image Setup Focus Adjusts Picture Phase to reduce Horizontal-Line noise. Clock Adjusts picture Clock to reduce Vertical-Line noise. Image Position H. Position Adjusts the horizontal position of the picture.
Adjusts the vertical position of the picture. Color Temp. Warm Recalls Warm Color Temperature from EEPROM. Cool Recalls Cool Color Temperature from EEPROM. sRGB Recalls sRGB Color Temperature from EEPROM. User/Red Red Gain from Digital-register. User/Green Green Gain Digital-register. User/Blue Blue Gain from Digital-register. Auto Config Yes Auto Adjusts the H/V Position, Focus and Clock of picture.
Adjusts the verticalposition of the OSD. OSD Timeout Adjusts the OSD timeout. Language Language Sets OSD language. Information Information Shows the resolution, H/V frequency, serial number and input port of current input timing. Reset Yes Clear each old status of Auto-configuration.