MultiSync XP17 - Monitor NEC - Free user manual and instructions
Find the device manual for free MultiSync XP17 NEC in PDF.
| Technical Specifications | 17-inch screen, CRT technology, resolution 1280 x 1024, refresh rate up to 85 Hz. |
|---|---|
| Usage | Ideal for office applications, Internet browsing, and basic video games. |
| Maintenance and Repair | Clean the screen with a soft cloth, avoid harsh chemicals, regularly check connections. |
| Safety | Use on a stable surface, avoid exposure to moisture, follow electrical safety instructions. |
| General Information | Compatible with Windows and Mac systems, VGA connectivity, approximate weight 15 kg. |
Frequently Asked Questions - MultiSync XP17 NEC
Download the instructions for your Monitor in PDF format for free! Find your manual MultiSync XP17 - NEC and take your electronic device back in hand. On this page are published all the documents necessary for the use of your device. MultiSync XP17 by NEC.
USER MANUAL MultiSync XP17 NEC
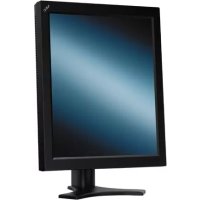
MultiSync XP-Series User’s ManualRöntgenstrahlung Die in diesem Gerät erzeugten Röntgenstrahlen sind in den Modell MultiSync XP17 durch die eigensichere Kathodenstrahlröhre ausreichend abgeschirmt. Für das Modell XP21 ist eine Bescheinigung zur Strahlensicherheit beigefügt. Unsachgemäße Eingriffe, insbesondere Verändern der Hochspannung oder Einbau eines anderen Bildröhrentyps, können dazu führen, daß Röntgenstrahlung in erheblicher Stärke auftritt. So veränderte Geräte entsprechen nicht mehr dieser Zulassung und dürfen nicht betrieben werden. Bescheinigung des Herstellers/Importeurs Hiermit wird bescheinigt, das der MultiSync XP17 Farbmonitor JC-1743UMA/R MultiSync XP21 Farbmonitor JC-2143UMA/R (Gerät Typ, Bezeichnung) in Übereinstimmung mit den Bestimmungen der BMPT-Amtsbl.Vfg 243/1991 funkentstört ist. Dem Bundesamt für Zulassungen in der Telekommunikation wurde das Inverkehrbringen dieses Gerätes angezeigt und die Berechtigung zur Überprüfung der Serie auf Einhaltung der Bestimmungen eingeräumt. NEC Deutschland GmbH (Name des Herstellers/Importeurs)Safety Instruction Caution: When operating the 1743UMB/JC-2143UMB with a 220-240V AC power source in Europe except UK, use the power cord provided with the monitor. In UK, a BS approved power cord with moulded plug has a Black (five Amps) fuse installed for use with this equipment. If a power cord is not supplied with this equipment please contact your supplier. When operating the JC-1743UMR/JC-2143UMR with a 220-240V AC Power source in Australia, use the power cord provided with the monitor. For all other cases, use a power cord that matches the AC voltage of the power outlet and has been approved by and complies with the safety standard of your particular country. IBM PC/XT/AT, PS/2, MCGA, VGA, 8514/A and XGA are registered trademarks of Interna- tional Business Machines Corporation. Apple and Macintosh are registered trademarks of Apple Computer Inc. NEC is a registered trademark of NEC Corporation. ErgoDesign, IPM, ColorControl, Advanced Digital Control System are trademarks of NEC Home Electronics, Ltd. MultiSync is a registered trademark of NEC Technologies, Inc in U.S., and of NEC Home Electronics, Ltd in Canada, U.K., Germany, France, Spain, Italy, Austria, Benelux, Switzer- land, Denmark, Finland, Norway and Saudi Arabia.English Deutsch Français Italiano Español AppendixEnglishIntroduction Congratulations on your purchase of the MultiSync XP17/XP21 colour Monitor! The MultiSync XP17/XP21 monitor includes Microsoft’s Plug and Play, NEC’s ErgoDesign properties, the On Screen Manager (OSM), as well as all the unique features you expect from MultiSync Monitors. The MultiSync technology provides you with automatic compatibility with multiple operating platforms and a vast array of graphics standards allowing resolution upgrades without upgrading the monitor. The MultiSync XP17/XP21 monitor strictly follows ErgoDesign guidelines featuring enhanced human ergonomics (human and earth condition). The goal of ErgoDesign is to maximise the comfort and productivity of the end user. ErgoDesign parallels the strict European standards of power management and reduced emissions. In addition our monitor is designed to be recyclable. Feature Highlights Plug and Play is the new Microsoft solution for Windows 95 to provide instant peripheral connections without confusing and time-consuming setup. NEC co-developed the monitors Plug and Play capability that allows your system to automatically identify and configure the monitor connected to it. The XP-series monitors automatically tell the system its type and capabilities. NECs Partnership with Microsoft provides you with simple installation, setup, and services. ACCESS.bus is fast becoming the new industry standard for device communication. This channel provides a real two-way communication between devices, such as monitors, mice and keyboards, and the system. The system can now learn about the devices connected to it, and the devices, in turn, can receive and follow instructions. These convenient ACCESS.bus devices can be plugged into any ACCESS.bus connector at anytime whether your system is on or not. Introduction E-1ACCESS.bus capability not only includes the convenience and ease of Plug and Play, but also allows your system to automatically set the XP-series monitor to its best case settings. You can be sure that your monitor is set to the highest resolution and refresh rate your system or video card is capable of. The monitor can also be adjusted remotely through system software, applications, or the keyboard for further customization and ease of use. You have now increased functionality and serviceability of your XP-series monitor. The common cable maze behind your monitor and system is reduced thanks to ACCESS.bus. The MultiSync XP-series of monitors include an extra connector for current ACCESS.bus devices like mice or keyboards; just put your system under your desk. You now have an increased flexibility for connection of peripherals to your system because you can plug into any ACCESS.bus connection anytime and anywhere. The XP-series of monitors is further enhanced by Monitor Manager Software - a suite of applications that take advantage of ACCESS.bus. Beyond the power saving gained by Power Manager software, also available for your MultiSync monitor are the following applications that work together to help you customize your display for different applications, different work areas, different times of day or different users. Store and recall each customized setting. On-Screen Manager, OSM, controls are extended by using an Image Manager software. A new, easy to use, application that allows you to customise and store an unlimited number of monitor settings and provides application-based resolution and color switching. You can now tie not only a resolution, but a specific color setting to a multimedia application and another paper-white color setting to a letter or spread sheet. The Color Manager represented by the Colorific Color Enhancement System helps you match what is on your screen to your printer output by incorporating Kodaks Color Management System in Microsoft Windows or Apples ColorSync Utility on the Macintosh to translate your choices to matching printed material. The Resolution Manager is represented by DPI-On-The-Fly for Macintosh Computers enables you to take advantage of switching to different resolutions that are supported by you Apple Macintosh system. Switch to a higher resolution like 1024x768, to see more information on E-2 Introductionyour screen or switch to a lower resolution, such as 640x480, to increase the speed of your system or to increase the number of available colours. Please see the instructions included with the software for installation and function instructions. The Intelligent Power Manager System (IPM) follows the United States government’s EPA and Europe’s Nutek guidelines. The IPM-System increases the monitor’s life and saves energy and costs by powering down when not in use. The Nutek specification 803299 requires automatic power down to less than 30 watts in the suspend and 8 watts in the off mode. When in the maximum power-down mode, the MultiSync XP-series monitors will consume approximately 10% of the total power drawn under normal operation. This innovation adds up to 90% energy savings, longer monitor life, environmental protection, reduced emissions, and reduced heating and air-conditioning costs of the work environment. Note: This utility can only be enabled if your video supports this feature according to DPMS of VESA or using Power Manager software. The OSM (On Screen Manager) makes the MultiSync monitor’s Digital Control System easier to use. A touch of the up front controls turns on OSM. You’ll find it easy to navigate through the menu that appears, and icons show you how the controls works. The enhanced Color Control allows you to adjust the colours on your screen to exactly what you want, thus eliminating misrepresentations and frustration. The Colorific Color Enhancement System helps you match what is on your screen to your printer output by incorporating Kodaks Color Management System in Microsoft Windows or Apple’s ColorSync Utility on the Macintosh to translate your choices to matching printed material. The OptiClear surface of the XP-series CRT dramatically reduces the reflection of ambient illumination and glare without sacrificing the focus level, clarity or brightness. Introduction E-3A 0.28 mm dot pitch in conjuktion to the Invar Shadow Mask and the Dual Dynamic Beam Focus increases the clarity and displays greater detail. Good clarity allows your eyes to flow over the screen image and more easily view the on-screen information. Up-front BNC/D-SUB Selection Button on the monitors allows you to connect two systems to one MultiSync XP-series monitor. This front panel button allows you to select a system. Use the MultiCable with the D-Sub connector to display the video of one system, and use the BNC inputs to display the video of another system. Using the same XP-series monitor, you can easily select either one of the systems by simply pushing the BNC/D-SUB Button. The Global Sync control of the model MultiSync XP21 also minimises any effects of the earths magnetic field on screen performance. Emission Test The ErgoDesign also incorporates reduced electrostatic and electromagnetic emission. NEC monitors follow the strictest magnetic field, alternating electric field, and electro-static recommendations of TCO and SWEDAC (Swedish Board for Technical Accreditation), previously known as MPR (National Board for Measurement and Testing), which specify maximum recommended values of electric and magnetic fields. NEC MultiSync Monitors conform to SWEDAC MPR 1990:8 (MPRII) and TCO 92 (with the use of an optional Lens) Testing Methods for emission. These standards are the most restrictive guidelines in the world. The Multiple Frequency Technology automatically adjusts the monitor to the video card’s scanning frequency thus displaying the resolution you require. The MultiSync XP-series also supports multiple operating platforms including IBM compatible and Macintosh family systems (with optional Macintosh-Kit). Increased Resolution adds to the image clarity, and the MultiSync XP-series provides a wider range of higher resolutions for your needs for now and in the future. E-4 IntroductionA Wide Range of Graphics Standards is displayable by the MultiSync XP17/XP21 monitor including:
VGA at 640x480 at 60, 72 and 75 Hz
SuperVGA at 800x600 at 56, 60, 72 and 75 Hz
MAC II at 640x480 at 67 Hz
Macintosh 832x624 at 75 Hz
XGA and 8514/A at 1024x768 Interlaced
1024x768 Non-Interlaced 60, 70 and 75 Hz
XGA-2 at 1024x768 at 72 and 75 Hz (special cable required)
1152x900 at 66 and 76 Hz (special cable required)
1280x1024 at 60, 70 and 75 Hz
1600x1200 viewable due to the horizontal and vertical scan frequency range. (XP21 only)
1280x1024 is recommended (XP21 only) Introduction E-5Contents of the package The diagram below illustrates all of the items included in your MultiSync XP series monitor package. Please save the original box and packing materials for transportation or shipment of this monitor. ➀ MultiSync XP17/XP21 colour monitor (JC-1743UMB/ JC-2143UMB) with removable tilt/swivel stand. ➁ MultiCable ➂ Power cord ④ Users Manual 2 Diskettes for communication channel Software Colour-Reference card for the Colorific Program. Note: The tilt/swivel stand of the monitor can be removed. There are small plastic monitor feet as an optional stand available, which fit into the bottom of the monitors cabinet. E-6 Contents of the packageRecommended use For optimum performance when setting up and using the MultiSync XP series colour monitor, please note the following: The optimum monitor position is away from direct sunlight. Place the monitor just below eye level for the ideal viewing angle. Allow adequate ventilation around the monitor so that heat can properly dissipate. Do not place any heavy objects on the power cord. Damage of the cable may cause shock or fire. Keep the monitor away from high capacity transformers, electric motors and other devices which may create strong magnetic fields. Use the monitor in a clean, dry area. Handle with care when transporting. We recommend to adjust the brightness in a way that the background raster disappears. For ergonomical reasons we recommend not to use the position of the maximum contrast control. For ergonomical reasons the preset size and position is recommended with the standard signals. For ergonomical reasons preset colour setting and preset distortion setting is recommended. For ergonomical reasons we recommend using non-interlaced signals with a vertical refresh rate between 70 and 160 Hz. For ergonomical reasons we recommend not to use the primary colour blue on dark background ( it is difficult to recognise and produces eye fatigue due to insufficient contrast). To separate the equipment from the power source you have to remove the plug from the inlet socket. Recommended use E-7The power outlet socket should be installed as near to the equipment as possible, and should be easily accessible. We recommend using the power cord supplied with the monitor. However, if another type of power cord is required, power cord H05VV-F should be used except in U.K.
Warning: Do not press the degaussing switch for more than 10 seconds.
To clean the CRT surface use a lint-free, non-abrasive cloth and an neutral cleaner based, non-abrasive cleaning solution or glass cleaner for best results. E-8 Recommended useQuick start The following chart summarises the connection process for the MultiSync XP17/XP21 monitor. For more details please turn to the following pages if you are connecting to an IBM compatible, Macintosh or compatible or other system. Connect the power cord of the moni- tor to the power outlet and to the mo- nitor itself. If necessary, use the OSM controls for personal preference of the image. Turn the monitor and computer on. See the Trouble Shooting section Call your NEC-Dealer Is the image correct?
Yes Problem solved? Yes
Is the BNC Input being used? Yes
Set the BNC/D-SUB switch to the up (raised) position Set the BNC/D-SUB switch to the down (push in) position Attach the Multicable or BNC Cable to the to the video board. first and then to the monitor Enjoy your monitor. Is your computer a Macintosh computer? Yes
Set the Sync. Switch to the ON position. Set the Sync. Switch to the OFF position. Quick start E-9Connection Connection to your PC (NEC, IBM and compatibles) The MultiSync XP-series colour monitor complements NEC or IBM PC/XT, AT, 386, 486, PS/2 computer and compatibles. Your System has one of two configurations:
1. The video controller is built into the computer.
2. The video controller is in the form of a video card (sometimes
referred to as a graphic card, video adapter, or graphics board.) Both configurations have a video connector (or a CRT PORT on NEC laptop computers). If you are not sure as to which connector is the video connector, consult your computer or video card manual. To attach the monitor to your system, follow the instructions below.
1. Turn off the power to the monitor and computer.
2. If necessary, install the video card. For more information,
refer to the manual accompanying the card.
3. Make sure the BNC/D-SUB Switch on the front of the monitor is
set to the D-SUB down (pushed in) position.
4. Connect the 15-pin mini D-SUB (the smaller connector) end
of the MultiCable to the video connector of your system.
5. Connect the 15-pin D-SUB (the larger connector) end of the
MultiCable to the monitor.
6. Connect one end of the power cable to the MultiSync
XP-series monitor and the other end to the power outlet.
7. Turn on the monitor and computer.
8. This completes the installation
If you have any problems, please refer to the section "Trouble Shooting". E-10 ConnectionConnecting to your personal computer (Macintosh) The MultiSync XP-series colour monitor complements the Macintosh family of computers. Your System should have one of two configurations:
1. The video controller is built into the computer.
2. The video controller is in the form of a video card (sometimes
referred to as graphic card, video adapter, or graphics board) installed in a Nu-Bus or PDS slot. Both configurations have a video connector. If you are not sure as to which connector is the video connector, consult your computer or video card manual. To attach the monitor to your system, follow the instructions below.
1. Turn off the power to the monitor and computer.
2. If necessary, install the video card. For more information,
refer to the manual accompanying the card.
3. Make sure the SYNC. switch on the back of the monitor is set to
the OFF position when using one of the Macintosh family or Quadra series computers. All other Mac systems mentioned in the quick start chart required the SYNC. switch to be in the ON position.
4. Make sure the BNC/D-SUB Switch on the front of the
monitor is set to the D-SUB down (pushed in) position
5. Connect the 15-pin D-SUB (the larger connector) end of the
MultiCable to the video card.
6. Connect the 15-pin mini D-SUB (the smaller connector) end
of the MultiCable to the monitor.
7. Connect one end of the power cable to the MultiSync
XP17/XP21 monitor and the other end to a power outlet.
8. Turn on the monitor and computer.
9. This completes the installation
Connection E-11Power Macintosh 6100/60 Users will have to use the Apple HDI-45 cable adapter that comes with the computer in conjunction with the MultiCable when connecting a MultiSync monitor. If you have any problems, please refer to the section "Trouble Shooting" Connection to other Computers or Video cards If your computer or video card is not compatible with the MultiSync XP-series colour monitor’s preset signals (see timing charts Appendix B) or has a different pin assignment (see pin assignment table Appendix A), refer to the steps below to determine if your system is compatible with the MultiSync XP-series colour monitor or consult your NEC Dealer.
1. Turn off the power to the monitor and computer.
2. Determine the video connector’s pin assignment of your
3. Determine the output signal timing and level of your video
4. Check the pin assignment and signal timing charts of the
video card and make sure the monitor accepts these pin assignments and signal timings.
5. Connect the signal cable supplied with your video card to the
6. Connect one end of the power cable to the MultiSync
XP-series monitor and the other end to a power outlet.
7. Turn on the monitor and computer.
8. Adjust size and position of the image to your preference.
9. This completes the installation.
If you have any problems, please refer to the chapter "Trouble Shooting". E-12 ConnectionConnection to computers or Cards Using BNC Cables The MultiSync XP-series colour monitor also complements high resolution graphics cards or systems. To attach the mintor to your system, follows the instruction below.
1. Turn off the power to the monitor and computer.
2. If necessary, install the video card. For more information,
refer to the manual accompanying the card.
3. Make shure the BNC/D-SUB Switch on the front of the
monitor is set to the BNC up (raised) position.
4. Connect the D-SUB ( or the appropriate connector) end of the
video cable supplied with the graphics card to the connector of the video card.
5. Connect the red BNC cable to the BNC connector of the
monitor labelled R. The green BNC cable should be connected to the BNC connector of the monitor labelled G. The blue BNC cable should be connected to the BNC connector of the monitor labelled B. If you have a fourth BNC connector (composite SYNC.) connect it to the BNC connector on the monitor labelled HS/CS. If you have a fifth BNC connector (vertical SYNC.) connect it to the BNC connector on the monitor labelled VS.
6. Connect one end of the power cable to the MultiSync
XP-series monitor and the other end to the power outlet.
7. Turn on the monitor and computer.
8. This completes the installation
If you have any problems, please refer to the section "Trouble Shooting". Connection E-13Connection to Two Systems or Video Cards (ie. an IBM and a Macintosh system) The MultiSync XP-series monitors were designed to support connection to two systems or video cards simultaneously. This feature allows you to use one monitor for two systems and easily select between the two with the front panel BNC/D-SUB switch. This configuration requires one of the systems to be connected using BNC connectors. If your video card did not come with a BNC cable, one must be purchased from a local computer store. To attach the monitor to two systems, follow the instructions below.
1. Follow the installation guidelines for IBM- or Macintosh
computers you find on the pages before, to connect the first system using the supplied MultiCable. This completes the installation of the first system.
2. Follow the installation guidelines on the page before
(Connections to computers or cards using BNC cables), to connect the second system.
3. Turn on the monitor and both systems.
4. This completes the installation.
5. Use the BNC/D-SUB switch on the front panel of the monitor
to switch between the systems. If you have any problems, please refer to the section "Trouble Shooting". E-14 ConnectionOSM Controls NEC’s new OSM, or On Screen Manager, System offers the ultimate form of monitor controls. Buttons on the front of the monitor allow you to navigate through menus and adjust controls. As you choose controls, the moving icon shows you what the chosen control will do. These pictures give you immediate understanding of the controls. OSM controls include the following extended controls: Size, Position, Basic and Advanced Geometry, Enhanced Colour Control and other OSM utilities. Adjustments are saved instantly. The currently addressed control can be reset to factory settings by pressing the Reset button. OSM buttons on the front of the monitor function as follows: exit:
in the main menu: exits the OSM controls
in a submenu: exits to the main menu control up/down:
moves the highlighted area up/down to select one of the controls. control +/-:
in a submenu: moves the bar in the + or - direction to increase or decrease the adjustment. OSM Controls E-15proceed:
in the main menu: proceeds to the selected menu choice (indicated by the highlighted area).
in a submenu: proceeds to the control in that sub-menu. reset: Resets the currently highlighted control to the factory settings;
in a submenu: reset the highlighted control. Note: When pressed, a warning window will appear allowing you to cancel the reset function. Front panel controls outside of OSM controls are: Degauss:
eliminates the build-up of stray magnetic fields which alter the correct scan of the electron beams and affect the purity of the screen colours, focus and convergence.
When pressed, your screen image will jump and waver a bit as the screen is demagnetized. Caution: Please allow a minimum of 20 minutes to elapse between uses of the Degauss button. Do not hold the button down continuously to avoid decreasing the life of the degauss circuitry. E-16 OSM ControlsContrast:
adjusts the image brightness in relation to the background. Brightness:
adjusts the overall image and background screen brightness. Power switch:
turns the monitor power on or off. When the power is on, the LED is lit. LED Power Indicator Light: located left of the power switch is on and indicates the monitor’s power mode. Each mode reduces the amount of power used by the monitor. Mode Light On green Stand by yellow Suspend orange Off orange Switched Off no light OSM Controls E-17OSM elements Typical OSM windows have the following elements: highlight: indicates the selected menu or control moving icon: provides a quick moving illustration of what the con- trol will do (also indicates the direction of control when adjusting). scroll bar: indicates direction of adjustment numeric reading: provides a number to remember, record or compare with a specific setting. Accessing OSM Press any of the control buttons, +,-, arrow up, arrow down, or the proceed button. Turning off OSM When in the main menu: press exit button. When in submenus: press the exit button twice. E-18 OSM ControlsOSM Menus Main Menu On-Screen Manager’s Main Menu of Controls gives you an overview of the selection of controls available.
Position Size Color Control Basic Geometry Advanced Geometry GlobalSync OSM Location The arrows in the bottom or upper right corners indicates further choices are available. Use the Up or Down control buttons to scroll through all of the options. While in the Main Menu, the buttons on the front of the monitor work as follows: exit: exits the OSM controls. control up/down: moves the highlighted area up/down to select one of the choices. control +/-: no function. proceed: proceeds to the selected menu choice. reset: resets all the controls within the highlighted submenu. Note: resetting the Color Control menu resets all of the colour setting. The reset function is not needed in the OSM Turn Off Time and Language Select menus. OSM Menus E-19Position Menu Position
Left Right Down Up/Down: moves the image vertically up or down. Left/Right: moves the image horizontally left or right. Size Menu Size Tall Narrow Wide Short Tall/Short: increases or decreases the vertical size of the image Narrow/Wide: increases or decreases the horizontal size of the image While in the Position/Size Controls Menu, the buttons on the front of the monitor work as follows: exit: exits to the main menu. control up/down: refers to Up/Down and Tall/Short. control +/-: refers to Left/Right and Narrow/Wide. proceed: has no function. reset: resets the current menu control to the factory setting. Note: a warning window will allow you to choose to reset the current control or to cancel reset of the current control. E-20 OSM MenusColor Control Menu Color Control Preset:
Color Gain: Red Green Blue Preset (Setting): Selects the desired colour setting. The bar is replaced by the colour setting choice (from 1 to 5). Each colour setting is adjusted at the factory to the stated degree Kelvin. If a setting is adjusted, the name of the setting will change from degree Kelvin to Custom. Color Gain Red, Green, Blue: Increases or decreases red, green or blue depending upon which is selected. The change in colour will appear on screen and the direction (increase or decrease) will be shown by the colour bars. One colour is always used as the reference colour and therefore will not changed when adjusted. Your adjustments are automatically saved instantly. While in the Color Control Menu, the buttons on the front of the monitor work as follows: exit: exits to the main menu. control up/down: moves the highlighted area up/down to select one of the choices. control +/-: moves the bar in the + or - direction to increase or decrease the adjustment or selects the colour setting (1 through 5). proceed: moves the highlighted area down to select one of the choices. reset: resets the current Color Preset to the factory setting. Note: a warning window will allow you to choose to reset the current control or to cancel reset of the current control. OSM Menus E-21Basic Geometry Controls Menu The Basic Geometry controls allow you to adjust the curvature or angle of the sides of your display. Basic Geometry Sides: In/Out Left/Right Tilt Align Rotate Sides In/Out (pin cushion): increases or decreases the curvature of the sides either inward or outward. Sides Left/Right (pin cushion balance): increases or decreases the curvature of the sides relative to each other. Sides Tilt (parallelogram): increases or decreases the tilt of the sides either to the left or right. Sides Align (trapezoidal): increases or decreases the top of the screen to be the same as the bottom. Rotate (raster rotation): rotates the entire display clockwise or counter clockwise. While in the Basic Geometry Controls Menu, the buttons on the front of the monitor work as follows: exit: exits to the main menu. control up/down: moves the highlighted area up/down to select one of the choices. control +/-: moves the bar in the + or - direction to increase or decrease the adjustment. proceed: moves the highlighted area down to select one of the choices. reset: resets the current highlighted control to the factory setting. Note: a warning window will allow you to choose to reset the current control or to cancel reset of the current control. E-22 OSM MenusAdvanced Geometry Controls Menu The Advanced Geometry controls allow you to adjust the corners of your display. Advanced Geometry Top: In/Out Left/Right Bottom: In/Out Left/Right Top In/Out (upper corner distortion): upper bow. Top Left/Right (upper corner distortion balance): upper bow balance. Bottom In/Out (lower corner distortion): lower bow. Bottom Left/Right (lower corner distortion balance): lower bow balance. While in the Advanced Geometry Controls Menu, the buttons on the front of the monitor work as follows: exit: exits to the main menu. control up/down: moves the highlighted area up/down to select one of the choices. control +/-: moves the bar in the + or - direction to increase or decrease the adjustment. proceed: moves the highlighted area down to select one of the choices. reset: resets the current highlighted control to the factory setting. Note: a warning window will allow you to choose to reset the currentcontrol or cancel to reset the current control. OSM Menus E-23GlobalSync Due to the larger screen size, the MultiSync XP21 features the GlobalSync control. GlobalSync eliminates colour impurities at the edges of the screen that may result from the Earth’s magnetic field in the northern hemisphere. The control is automatically adjusted when PROCEED is pressed. GlobalSync Press: PROCEED - Start EXIT - Cancel OSM Location Menu You can choose where you would like the OSM image to appear on the screen. Selecting OSM Location allows you to manually adjust the OSM Menu left, right, up or down. OSM Location
Left Right Down OSM Turn Off Time Menu The OSM menu will stay on as long as it is in use. In the OSM Turn Off Time Menu, you can select how long the monitor waits after the last touch of a button to shut off the OSM menu. The preset choices are 10, 20, 30, 60 and 120 seconds. OSM Turn Off Time Seconds:
E-24 OSM MenusDisplay Mode Menu Display Mode provides you information about the current resolution display and technical data including the horizontal and vertical frequency. Display Mode Mode: H Freq: V Freq: H Pol: V Pol: Note: If the Mode indicates the symbol "(!)", the reset function for Position and Size are not effective. Language Select Menu OSM Menus are available in six languages. Vertical Linearity Menu The vertical linearity controls allow you to adjust the spacing of the areas on the screen. The object of this control is to ensure that a one-inch circle is a true one-inch circle whereever it is drawn on the screen (same image size throughout the total screen area). Vertical Linearity Center Bottom/Top The best way to determine the vertical linearity is as shown in the Vertical Linearity Menu. Draw equally spaced (as determined by a drawing application that has a ruler) horizontal lines across your screen. OSM Menus E-25Using the Center control allows you to adjust the spacing between the center lines, and using the Bottom/Top control allows you to adjust the spacing between the top and bottom lines. Factory Preset Selecting Factory Preset allows you to reset all OSM settings back to the factory settings. The following warning statement will appear to confirm that you do want to reset ALL settings. Individual settings can be reset by highlighting the control to be reset and pressing the reset button. WARNING
ALL SETTINGS Press: RESET - Reset EXIT - Cancel Self Test To make sure, that your monitor is working well, you can choose the Self Test function in the following way: Power down your monitor and your PC. Power on the monitor. While the Exit button is held down, press the Proceed button. The following picture is shown on the monitor. If you do not press the Exit button to cancel the Self Test function, the monitor will show a dark screen within 20 seconds. Self Test Menu EXIT - Cancel E-26 OSM MenusTrouble Shooting Please check to be certain that the following items are properly connected or set, before calling your NEC dealer. If a non IBM computer or video card, non Apple Macintosh II computer or video card is being used, make sure the signal timing and pin assignments meet the specifications outlined in Appendix A and B and C. Problem, Check these items No picture. Power Switch and computer power switch should be in the ON position. MultiSync signal cable should be completely connected to the video card/computer. The video card must be com- pletely seated in the slot. Check the connector for bent or pushed-in pins. Image is scrolling or unstable. Signal cable may not be completely connected to the computer. Check the pin assignments and signal timings of the monitor and your video card with respect to recommended timings and pin assignments.Check for proper connection or make sure the video card is PC or Mac compatible and that the card is properly seated in the computer. Check SYNC. Switch for its correct position LED on the monitor is not lit or lit with orange or yellow colour. Power switch should be in the ON position and the power cord should be connected. Make certain the computer is not in a power saving mode (touch keyboard or mouse). Picture is fuzzy. Adjust Contrast and Brightness controls. Push the Degauss Button once. Caution: A minimum interval of 20 minutes should exist before the Degauss Button is used a second time when not switching between signal modes. Do not hold down the button down continuously. Trouble Shooting E-27Problem, Check these items Picture bounces or a waving pattern is present in the picture. Move electrical devices that may be causing electrical interference away from the monitor. Edges of the display image are not square. Use the OSM Basic and Advanced Geomatry Controls to straighten the edges. If possible position the monitor east. Display image is not centred, is too small, or too large. Adjust Size and Position Controls to adjust the image in the OSM. Picture has a green tint or the background brightness cannot be turned down. Check the Sync Switch is in the proper position. Disconnect the C/S input of the BNC cable if you are using the BNC inputs. Colour looks blotchy. Press the Degauss Button once. Do not hold down the button down continuously. Colour is incorrect or background brightness is too high and cannot be decreased. The Sync Switch should be in the correct position. OFF position: When using a Macintosh II, Quadra, or compatible (and not a Macintosh LC) with both the Sync on green signal. ON position: When using computers or video cards with separate Sync (VGA, SVGA, 8514/A, XGA) equipped with a 15-pin mini D-sub connector for the monitor input and composite Sync signals, or a Macintosh LC, AV’s, PowerBooks, Power Macs or Quadra 605. No green color (if using BNC connection) Check the BNC cables for propper connection (G and CS connection may be reversed). E-28 Trouble ShootingSpecifications Picture Tube 41/51 cm (17/21 inch) flat square CRT, 41/51 cm usable square 0.28 mm Trio dot pitch Dot type black matrix Medium-short persistence phosphor, dark bulb, glass with multi-layered anti-static coating Input Signal Video Analog 0.7 Vp-p 75
800x600 at 60 Hz 800x600 at 72 Hz VESA 800x600 at 75 Hz VESA 1024x768 at 70 Hz VESA 1024x768 at 75 Hz
VESA 1280x1024 at 75Hz