KDR951BT - Car stereo JVC - Free user manual and instructions
Find the device manual for free KDR951BT JVC in PDF.
| Product type | CD/MP3/WMA Car Stereo with Bluetooth |
| Brand | JVC |
| Model | KDR951BT |
| Dimensions (W × H × D) | 182 mm × 53 mm × 158 mm |
| Weight | 1.26 kg |
| Power supply | 14.4 V DC (10.5 – 16 V allowable) |
| Maximum current consumption | 10 A |
| Maximum output power | 50 W × 4 |
| DIN output power | 30 W × 4 (at 14.4 V) |
| Speaker impedance | 4 Ω – 8 Ω |
| Supported audio formats | MP3, WMA, WAV (CD, USB) |
| Bluetooth connectivity | HFP, A2DP, AVRCP, OPP, PBAP, SPP |
| FM range | 87.5 – 108.0 MHz |
| AM range (MW/LW) | 531 – 1611 kHz / 153 – 279 kHz |
| USB input | USB 1.1/2.0, 5V 1A max, FAT12/16/32 |
| Auxiliary input | 3.5 mm stereo mini jack |
| Display | Customizable backlit digital display |
| Radio functions | RDS, PTY, TA, memory 18 FM + 6 AM |
| Equalizer | Presets (10) + 2 customizable (5 bands) |
| Bluetooth hands-free | Call, phonebook, voice recognition |
| Cleaning | Dry silicone cloth for faceplate; cotton swab for connector |
| Safety | Do not use while driving; moderate volume; avoid metal objects |
| Included accessories | Remote control RM-RK52 (battery included) |
| Environmental information | WEEE and battery recycling; RoHS compliant |
Frequently Asked Questions - KDR951BT JVC
User questions about KDR951BT JVC
0 question about this device. Answer the ones you know or ask your own.
Ask a new question about this device
Download the instructions for your Car stereo in PDF format for free! Find your manual KDR951BT - JVC and take your electronic device back in hand. On this page are published all the documents necessary for the use of your device. KDR951BT by JVC.
USER MANUAL KDR951BT JVC
Information on Disposal of Old Electrical and Electronic Equipment and Batteries (applicable for EU countries that have adopted separate waste collection systems) Products and batteries with the symbol (crossed-out wheeled bin) cannot be disposed as household waste.
Old electrical and electronic equipment and batteries should be recycled at a facility capable of handling these items and their waste byproducts.
Contact your local authority for details in locating a recycle facility nearest to you. Proper recycling and waste disposal will help conserve resources whilst preventing detrimental effects on our health and the environment.
Notice: The sign "Pb" below the symbol for batteries indicates that this battery contains lead.
The marking of products using lasers
The label is attached to the chassis/case and says that the component uses laser beams that have been classified as Class 1. It means that the unit is utilizing laser beams that are of a weaker class. There is no danger of hazardous radiation outside the unit.
- Microsoft and Windows Media are either registered trademarks or trademarks of Microsoft Corporation in the United States and/or other countries.
- "Made for iPod," and "Made for iPhone" mean that an electronic accessory has been designed to connect specifically to iPod, or iPhone, respectively, and has been certified by the developer to meet Apple performance standards. Apple is not responsible for the operation of this device or its compliance with safety and regulatory standards. Please note that the use of this accessory with iPod or iPhone may affect wireless performance.
- iPhone, iPod, iPod classic, iPod nano, and iPod touch are trademarks of Apple Inc., registered in the U.S. and other countries.
Lightning is a trademark of Apple Inc.
Android is trademark of Google Inc. - The Bluetooth® word mark and logos are registered trademarks owned by Bluetooth SIG, Inc. and any use of such marks by JVC KENWOOD Corporation is under license. Other trademarks and trade names are those of their respective owners.

Declaration of Conformity with regard to the R&TTE Directive 1999/5/EC Declaration of Conformity with regard to the EMC Directive 2004/108/EC Declaration of Conformity with regard to the RoHS Directive 2011/65/EU
Manufacturer:
JVC KENWOOD Corporation
3-12, Moriya-cho, Kanagawa-ku, Yokohama-shi, Kanagawa, 221-0022, Japan
EU Representative:
JVC Technical Services Europe GmbH
Konrad-Adenauer-Allee 1-11, D-61118 Bad Vilbel, Germany
Hereby, JVC KENWOOD declares that this unit KD-R951BT/KD-R852BT/KD-R851BT is in compliance with the essential requirements and other relevant provisions of Directive 1999/5/EC.
Français
How to read this manual
- Operations are explained mainly using buttons on the faceplate of KD-R852BT / KD-R851BT.
- English language is used for the display explanation in this manual.
- [XX] indicates the selected items.
- (XX) indicates references are available on the stated page.
Warning
Do not operate any function that takes your attention away from safe driving.
Caution
Volume setting:
- Adjust the volume so that you can hear sounds outside the car to prevent accidents.
- Lower the volume before playing digital sources to avoid damaging the speakers by the sudden increase of the output level.
General:
- Avoid using the USB device or iPod/iPhone if it might hinder safe driving.
- Make sure all important data has been backed up. We shall bear no responsibility for any loss of recorded data.
- Never put or leave any metallic objects (such as coins or metal tools) inside the unit, to prevent a short circuit.
- If a disc error occurs due to condensation on the laser lens, eject the disc and wait for the moisture to evaporate.
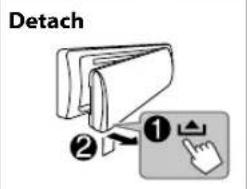
- USB rating is indicated on the main unit. To view, detach the faceplate. (3)
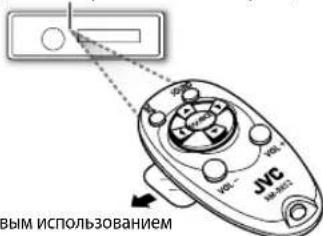
Remote control (RM-RK52):
- Do not leave the remote control in hot places such as on the dashboard.
- The Lithium battery is in danger of explosion if replaced incorrectly. Replace it only with the same or equivalent type.
The battery pack or batteries shall not be exposed to excessive heat such as sunshine, fire or the like. - Keep the battery out of reach of children and in its original packaging when not in used. Dispse of used batteries promptly. If swallowed, contact a physician immediately.
Maintenance
Cleaning the unit: Wipe off dirt on the faceplate with a dry silicone or soft cloth.
Cleaning the connector: Detach the faceplate and clean the connector gently with a cotton swab, being careful not to damage the connector.
Connector (on the reverse side of the faceplate)
Handling discs:
- Do not touch the recording surface of the disc.
- Do not stick tape etc. on the disc, or use a disc with tape stuck on it.
- Do not use any accessories for the disc.
Clean from the center of the disc and move outward. - Clean the disc with a dry silicone or soft cloth. Do not use any solvents.
- When removing discs from this unit, pull them out horizontally.
- Remove burrs from the center hole and disc edge before inserting a disc.
BASICS
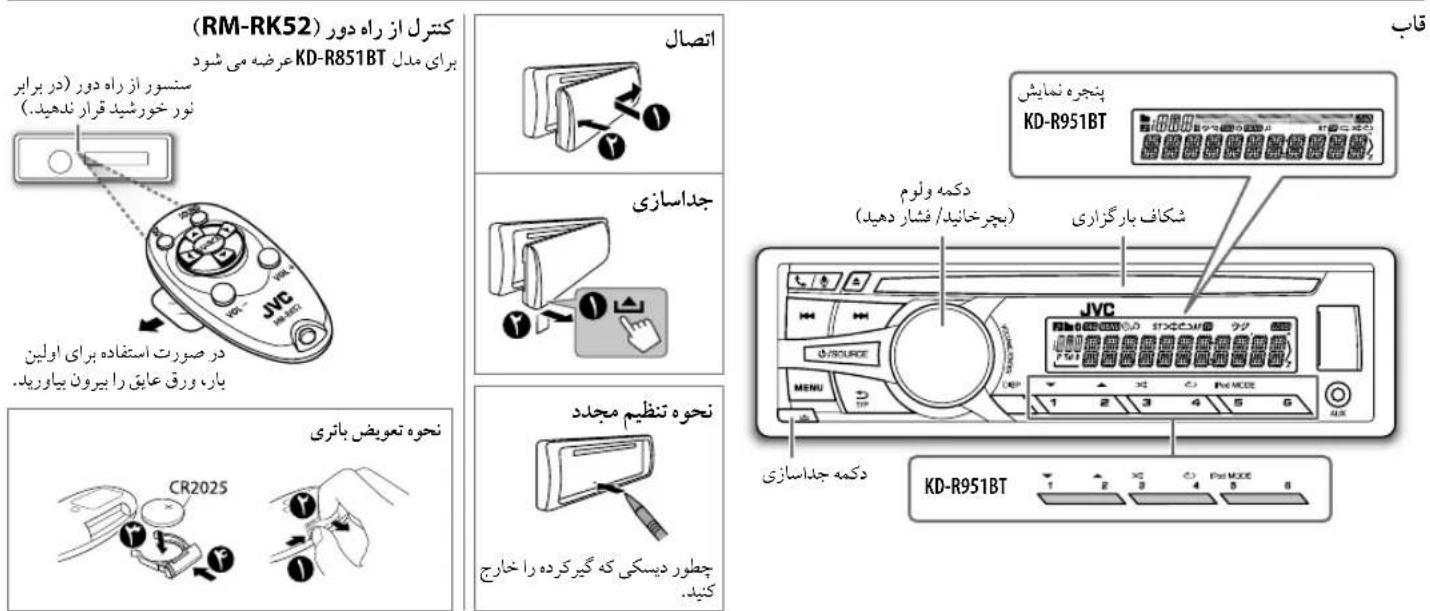
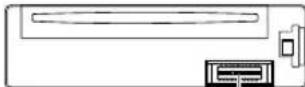
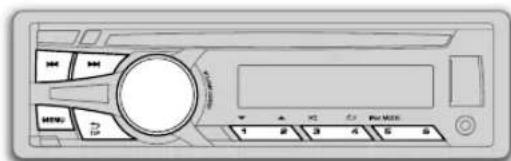
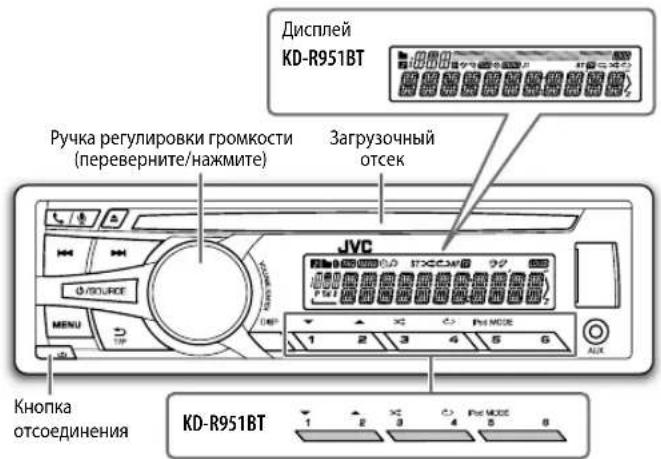
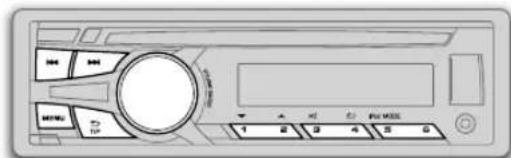
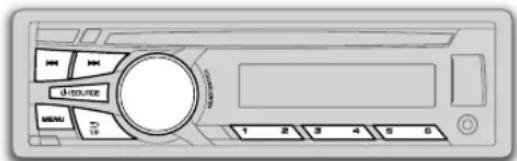
Faceplate
Remote control (RM-RK52) Supplied for KD-R851BT

Remote sensor (Do not expose to bright sunlight.)
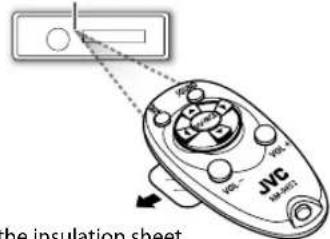
Pull out the insulation sheet when using for the first time.
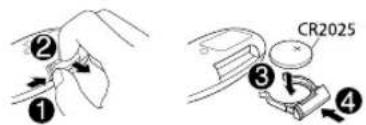
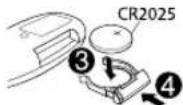
How to replace the battery
To Do this (on the faceplate) Do this (on the remote control)
| Turn on the power | Press ☐ /SOURCE. • Press and hold to turn off the power. | (not available) |
| Adjust the volume | Turn the volume knob. | Press VOL + or VOL -. |
| Press the volume knob to mute the sound or pause playback. • Press again to cancel. | Press to mute the sound or pause playback. • Press again to cancel. | |
| Select a source | • Press ☐/SOURCE repeatedly. • Press ☐/SOURCE, then turn the volume knob within 2 seconds. | Press SOURCE repeatedly. |
| Change the display Information | Press DISP repeatedly. (7) • Press and hold to scroll the current display information. | (not available) |
GETTING STARTED

Cancel the demonstration
1 Press and hold MENU.
2 Turn the volume knob to select [DEM0], then press the knob.
3 Turn the volume knob to select [DEMO OFF], then press the knob.
4 Press MENU to exit.

Set the clock
1 Press and hold MENU.
2 Turn the volume knob to select [CLOCK] then press the knob.
3 Turn the volume knob to select [CLOCK SET], then press the knob.
4 Turn the volume knob to make the settings, then press the knob. Day Hour Minute
5 Turn the volume knob to select [24H/ 12H], then press the knob.
6 Turn the volume knob to select [12 HOUR] or [24 HOUR], then press the knob.
7 Press MENU to exit.

Set the basic settings
1 Press and hold MENU.
2 Turn the volume knob to make a selection (see the following table), then press the knob.
3 Press MENU to exit.
To return to the previous setting item or hierarchy, press T/P.
Default: XX
| CLOCK | |
| CLOCK ADJ | AUTO: The clock time is automatically set using the Clock Time (CT) data in FM Radio Data System signal. ; OFF: Cancels. |
| CLOCK DISP ON | : The clock time is shown on the display even when the unit is turned off. ; QEE: Cancels. |
| SETTINGS | |
| BEEP | ON: Activates the keypress tone. ; OFF: Deactivates. |
| SRC SELECT | |
| AM* | ON: Enables AM in source selection. ; OFF: Disables. |
| AUX* | ON: Enables AUX in source selection. ; OFF: Disables. |
| LANGUAGE | Selects the display language for menu and Tag information (folder name, file name, song title, artist name, album name) if applicable. ENGLISH Display language is English. PUSCHKII: Display language is Russian. |
| F/W UPDATE | |
| SYSTEM / BLUETOOTH | |
| F/W xxxx | YES: Starts upgrading the firmware. ; NO: Cancels (upgrading is not activated). For details on how to update the firmware, see: <http://www.jvc.net/cs/car/>. |
- Not displayed when the corresponding source is selected.
CD/USB/iPod
Start playback
The source changes automatically and playback starts.
CD
USB
iPod/iPhone
Press 5 iPod MODE repeatedly to select the control mode ([HEAD MODE] / [IPHONE MODE]).
HEAD MODE: From the unit.
IPHONE MODE From the iPod/iPhone.*2
To Do this
| Select a track/file | Press ↓/▶ (or press ↓/▶ on RM-RK52). |
| Select a folder *3 | Press 1▼/2▲ (or press ▲/▼ on RM-RK52). |
| Reverse/Fast-forward | Press and hold ↓/▶ (or press and hold ↓/▶ on RM-RK52). |
| Repeat play*4 | Press 4 repeatedly to make a selection. • Audio CD or JVC Playlist Creator (JPC) / JVC Music Control (JMC) file (↓6): TRACK RPT, RPT OFF • MP3/WMA/WAV file: TRACK RPT, FOLDER RPT, RPT OFF • iPod: ONE RPT, ALL RPT, RPT OFF |
| Random play*4 | Press 3 repeatedly to make a selection. • Audio CD: ALL RND, RND OFF • MP3/WMA/WAV file or JPC / JMC file: FOLDER RND, ALL RND, RND OFF • iPod: SONG RND, ALL RND, RND OFF |
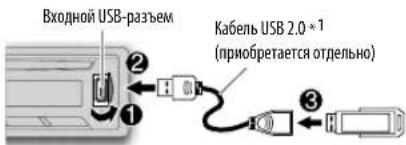
1 Do not leave the cable inside the car when not using.
2 You can still play/pause, file skip, fast forward or reverse files from the unit.
3 Only for MP3/WMA/WAV files. This does not work for iPod.
4 For iPod: Applicable under [HEAD MODE] only.
Select a track/file from a list
For IPod: Applicable only when [HEAD MODE] is selected. ( )
1 Press MENU.
2 Turn the volume knob to make a selection, then press the knob.
-
MP3/WMA/WAV file: Select the desired folder, then a file.
-
iPod or JPC / JMC file: Select the desired file from the list (PLAYLISTS, ARTISTS, ALBUMS, SONGS, PODCASTS, GENRES, COMPOSERS, AUDIOBOOKS*).
-
Only for iPod.
If you have many files....
You can search through them quickly (on step 2 above) by turning the volume knob quickly.
- Not applicable for iPod.
Select a song by name
While listening to the iPod and [HEAD MODE] is selected (5) ....
If you have many folders or tracks/files, you can search through them quickly according to the first character (A to Z, 0 to 9 and OTHERS).
"OTHERS" appear if the first character is other than A to Z, 0 to 9.
1 Press MENU.
2 Turn the volume knob to select the desired list, then press the knob.
3 Press 1 / 2 or turn the volume knob quickly to select the desired character.
4 Turn the volume knob to select the desired folder or track/file, then press the knob.
Change the USB drive
When a smartphone (Mass Storage Class) is connected to the USB input terminal, you can select its internal memory or external memory (such as an SD card) to playback the stored songs.
You can also select the desired drive to playback when a multiple drives device is connected.
Press 5 iPod MODE repeatedly to select the desired drive.
(or)
1 Press and hold MENU.
2 Turn the volume knob to select [USB/IP0D], then press the knob.
3 Turn the volume knob to select [USB], then press the knob.
4 Press the volume knob to select [DRIVECHANGE].
The next drive is selected automatically.
Repeat steps 1 to 4 to select the following drives.
Selectable items: [DRIVE 1] to [DRIVE 5]
Change the playback speed of the Audiobook
While listening to the iPod and [HEAD MODE] is selected (5) ...
1 Press and hold MENU.
2 Turn the volume knob to select [USB/IPOD], then press the knob.
3 Turn the volume knob to select [IPOD], then press the knob.
4 Turn the volume knob to make a selection, then press the knob. BOOK NORMAL / BOOK FASTER / BOOK SLOWER: Select the desired playback speed of the Audiobooks sound file in your iPod/iPhone. (Default: Depends on your iPod/iPhone setting.)
To return to the previous setting item or hierarchy, press T/P.
- To cancel, press MENU.
RADIO

"ST" lights up when receiving an FM stereo broadcast with sufficient signal strength.
Search for a station
1 Press SOURCE to select FM or AM.
2 Press / (or press / on RM-RK52) to search for a station automatically.
(or)
Press and hold or press and hold on RM-RK52) until "M" flashes, then press repeatedly to search for a station manually.
Store a station
You can store up to 18 stations for FM and 6 stations for AM. While listening to a station...
Press and hold one of the number buttons (1 to 6) to store. (or)
1 Press and hold the volume knob until "PRESET MODE" flashes.
2 Turn the volume knob to select a preset number, then press the knob.
The preset number flashes and "MEMORY" appears.
To select a stored station: Press one of the number buttons (1 to 6). (or)
Press MENU, then turn the volume knob to select a preset number and press the knob to confirm.
Search for your favorite program (PTY Search)
Available only for FM source.
1 Press and hold 出 T/P.
2 Turn the volume knob to select a PTY code, then press the knob to start searching.
If there is a station broadcasting a program of the same PTY code as you have selected, that station is tuned in.
PTY code: NEWS, AFFAIRS, INFO, SPORT, EDUCATE, DRAMA, CULTURE, SCIENCE, VARIORED, POP M (music), ROCK M (music), EASY M (music), LIGHT M (music), CLASSICS, OTHER M (music), WEATHER, FINANCE, CHILDREN, SOCIAL, RELIGION PHONE IN, TRAVEL, LEISURE, JAZZ, COUNTRY, NATION M (music), OLDIES, FOLK M (music), DOCUMENT
Activate TA Standby Reception
Available only for FM source.
Press T/P.
The unit will temporarily switch to Traffic Announcement (TA) (if available) from any source other than AM.
To deactivate, press T/P again.
Other settings
1 Press and hold MENU.
2 Turn the volume knob to select [TUNER], then press the knob.
3 Turn the volume knob to make a selection (→), then press the knob.
4 Press MENU to exit.
To return to the previous setting item or hierarchy, press T/P.
RADIO
Default: XX
| RADIO TIMER | Turns on the radio at a specific time regardless of the current source.1 ONCE/ DAILY/ WEEKLY/ OFF: Select how often the timer will be turned on.2 FM/ AM: Select the FM or AM band.3 01 to 18 (for FM)/ 01 to06 (for AM): Select the preset station.4 Set the activation day * 1 and time.· “⊕” lights up when complete.*1 Selectable only when [ONCE] or [WEEKLY] is selected in step 1. Radio Timer will not activate for the following cases.· The unit is turned off.· [OFF] is selected for [AM] in[SRC SELECT] after Radio Timer for AM is selected. (▲) |
| SSM | SSM 01 - 06/ SSM 07 - 12 / SSM 13 - 18: Automatically resets up to 18 stations for FM. "SSM" stops flashing when the first 6 stations are stored. SelectSSM 07 - 12 / SSM 13 - 18 to store the following 12 stations. |
| IF BAND*2 | AUTO: Increases the tuner selectivity to reduce interference noises from adjacent FM stations. (Stereo effect may be lost.) ; WIDE: Subjects to interference noises from adjacent FM stations, but sound quality will not be degraded and the stereo effect will remain. |
| MONO*2 | ON: Improves the FM reception, but the stereo effect will be lost. ; OFF: Cancels. |
| NEWS-STBY*2 | ON: The unit will temporarily switch to News Programme if available. ; OFF: Cancels. |
| REGIONAL*2 | ON: Switches to another station only in the specific region using the "AF" control. ;OFF: Cancels. |
| AF SET*2 | ON: Automatically searches for another station broadcasting the same program in the same Radio Data System network with better reception when the current reception is poor. , OFF: Cancels. |
*2 Only for FM source.
AUX
Use a portable audio player
1 Connect a portable audio player (commercially available).
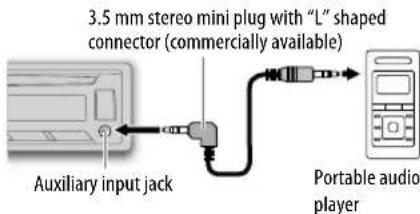
2 Select [ON] for [AUX] in [SRC SELECT].(4)
3 Press SOURCE to select AUX.
4 Turn on the portable audio player and start playback.

Use a 3-core plug head stereo mini plug for optimum audio output.
BLUETOOTH®
You can operate Bluetooth devices using this unit.
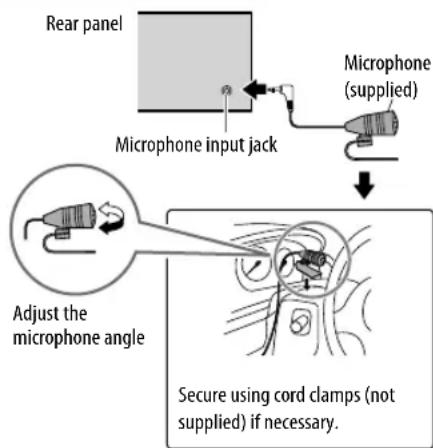
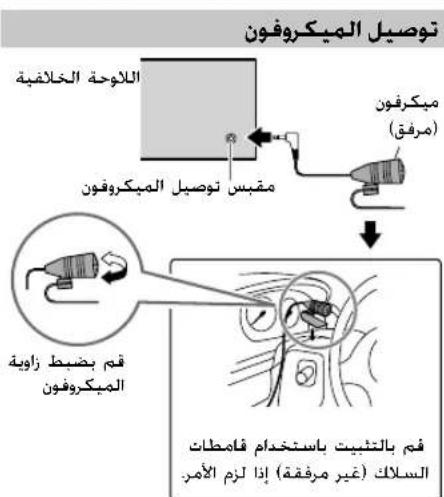
Connect the microphone
If you turn off the unit or detach the control panel during a phone call conversation, the Bluetooth connection is disconnected. Continue the conversation using your mobile phone.
Supported Bluetooth profiles
- Hands-Free Profile (HFP1.5)
- Advanced Audio Distribution Profile (A2DP)
Audio/Video Remote Control Profile (AVRCP1.3) - Object Push Profile (OPP)
-Phonebook Access Profile (PBAP) - Serial Port Profile (SPP)
Pair a Bluetooth device
When connecting a Bluetooth device to the unit for the first time, perform pairing between the unit and the device. Once the pairing is completed, the Bluetooth device will remain registered in the unit even if you reset the unit.
- Up to five devices can be registered (paired) in total.
- A maximum of two Bluetooth phones and one Bluetooth audio device can be connected at any time.
- This unit supports Secure Simple Pairing (SSP).
- Some Bluetooth devices may not automatically connect to the unit after pairing. Connect the device to the unit manually. Refer to the instruction manual of the Bluetooth device for more information.
1 Press /SOURCE to turn on the unit.
2 Search and select "JVC UNIT" on the Bluetooth device. "BT PAIRING" flashes on the display.
- For some Bluetooth devices, you may need to enter the Personal Identification Number (PIN) code immediately after searching.
3 Perform (A) or (B) depending on what scrolls on the display.
- For some Bluetooth devices, pairing sequence may vary from the steps described below.
(A) "[Device Name]" "XXXXXX" "VOL-YES" "BACK-NO"
- "XXXXXX" is a 6-digit passkey randomly generated during each pairing.
Ensure that the passkey which appears on the unit and Bluetooth device is the same.
Pres the volume knob to confirm the passkey.
Operate the Bluetooth device to confirm the passkey.
(B) "Device Name" "VOL-YES" "BACK-NO"
Press the volume knob to start pairing.
-
PAIRING "PIN 0000" scrolls on the display, enter the PIN code "0000" into the Bluetooth device. You can change to a desired PIN code before pairing. (13)
-
If only "PAIRING" appears, operate the Bluetooth device to confirm pairing.
"PAIRING COMPLETED" appears when pairing is completed.
- "or" will light up when a Bluetooth mobile phone is connected.
- "P" will light up when a Bluetooth audio player is connected.
Bluetooth compatibility check mode
You can check the connectivity of the supported profile between the Bluetooth device and the unit.
- Make sure there is no Bluetooth device connected.
1 Press and hold 山 / "BLUETOOTH" "CHECK MODE" appears. "SEARCH NOW USING PHONE" "PIN IS 0000" scrolls on the display.
BLUETOOTH®
2 Search and select "JVC UNIT" on the Bluetooth device within 3 minutes.
3 Perform (A), (B) or (C) depending on what appears on the display.
(A) "PAIRING" "XXXXXX" (6-digit passkey): Ensure that the same passkey appears on the unit and Bluetooth device, then operate the Bluetooth device to confirm the passkey.
(B) "PAIRING" "PIN IS 0000": Enter "0000" on the Bluetooth device.
(C) "PAIRING": Operate the Bluetooth device to confirm pairing.
After pairing is successful, "PAIRING OK" "[Device Name]" appears and Bluetooth compatibility check starts.
If "CONNECT NOW USING PHONE" appears, operate the Bluetooth device to allow phonebook access to continue.
The connectivity result flashes on the display.
"PAIRING OK" and/or "H.FREE OK"1 and/or
"A STREAM OK" and/or "PBAP OK" : Compatible
1 Compatible with Hands-Free Profile (HFP)
2 Compatible with Advanced Audio Distribution Profile (A2DP)
3 Compatible with Phonebook Access profile (PBAP)
After 30 seconds, "PAIRING DELETED" appears to indicate that pairing has been deleted, and the unit exits check mode.
- To cancel, press and hold /SOURCE to turn off the power, then turn on the power again.
Bluetooth mobile phone
| To Do this | |
| Receive a call | Press the volume knob. On RM-RK52: Press ▲/▼/▲/▲. · When[AUTO ANSWER] is set to the selected time, the unit answers incoming call automatically. (■1) |
| Reject an incoming call | Press and hold the volume knob. On RM-RK52: Press and hold ▲/▼/▲/▲. |
| End a call | Press and hold the volume knob. On RM-RK52: Press and hold ▲/▼/▲/▲. |
| Activate or deactivate hands-free mode | Press the volume knob during a call. · Operations may vary according to the connected Bluetooth mobile phone. |
| Adjust the phone volume | Turn the volume knob during a call. Phone volume[00] to [50] (Default: [15]) · This adjustment will not affect the volume of the other sources. |
| Switch between two connected phones | Press repeatedly. · Not applicable during a call. |
Improve the sound quality during a call
While talking on the phone....
1 Press and hold MENU.
2 Turn the volume knob to make a selection (see the following table), then press the knob.
3 Press MENU to exit.
To return to the previous setting item or hierarchy, press T/P.
Default: XX
| MIC LEVEL -20 | - +08 (0): The sensitivity of the microphone increases as the number increased. |
| NOISE RDCT -05 | - -20 (-10): Adjust the noise reduction level until the least noise is being heard during a phone conversation. |
| ECHO CANCEL 1 | - 10 (4): Adjust the echo cancellation delay time until the least echo is being heard during a phone conversation. |
Bluetooth mode operations
1 Press to enter Bluetooth mode.
2 Turn the volume knob to make a selection (see the following table), then press the knob.
3 Press MENU to exit.
To return to the previous setting item or hierarchy, press T/P.
RECENTCALL
1 Press the volume knob to select a name or a phone number.
- " > " indicates call received, " < " indicates call made, "M" indicates call missed.
- "NO HISTORY" appears if there is no recorded call history or call number.
2 Press the volume knob to call.
PHONEBOOK
1 Turn the volume knob to select a name, then press the knob.
2 Turn the volume knob to select a phone number, then press the knob to call.
- If the phone supports PBAP, the phonebook of the connected phone is automatically transferred to the unit when pairing. If the phone does not support PBAP, "SEND P.BOOK MANUALLY" appears. Transfer the phonebook manually. (→ 13, P.BOOK WAIT)
- This unit can display only non-accent letters. (Accent letters such as "U" is shown as "U".)
- If the phonebook contains many contacts, (▶ 12, Select a contact by name).
DIAL NUMBER
1 Turn the volume knob to select a number (0 to 9) or character (#, +).
2 Press to move the entry position. Repeat stepsand 2 until you finish entering the phone number.
3 Press the volume knob to call.
VOICE
Speak the name of the contact you want to call or the voice command to control the phone functions. (Use Voice Recognition)
SETTINGS
Default: XX
| AUTO ANSWER | 01 SEC — 30 SEC: The unit answer incoming call automatically in the selected time (seconds).; OFF: Cancels. |
| RING TONE IN UNIT: The unit rings to notify you when a call/text message comes in. (Default ring tone is different according to the paired device.) • CALL: Selects your preferred ring tone (TONE 1 — 5) for incoming calls. •MESSAGE: Selects your preferred ring tone (TONE 1 — 5) for incoming text messages. IN PHONE: The unit uses the connected phones' ring tone to notify you when a call/text message comes in. (The connected phone will ring if it does not support this feature.) | |
| RING COLOR (for KD-R951BT) | COLOR 01 — COLOR 29 COLOR 06): Display zone will change to the selected color during a call or when a text message comes in. ; OFF : Cancels. |
| MSG NOTICE * | ON: The unit rings and "RCVMESSAGE" appears to notify you of an incoming text message. ; OFF: Cancels. |
- Functionality depends on the type of the phone used.
Text message notification
When the phone receives a text message, the unit rings and "RCVMESSAGE" appears.
- You cannot read, edit, or send a message through the unit.
To clear the message, press any button.
Use Voice Recognition
1 Press and hold /
The connected phone (which has been paired the earliest) is activated. However, if priority device is connected, pressing and holding / 念 activate the priority device. (2, PRIORITY)
2 Speak the name of the contact you want to call or the voice command to control the phone functions.
- Supported Voice Recognition features vary for each phone. Refer to the instruction manual of the connected phone for details.
- This unit also supports the intelligent personal assistant function of iPhone.
BLUETOOTH
Select a contact by name
- You can search through the contacts quickly according to the first letter (A to Z, 0 to 9, and OTHERS).
"OTHERS" appears if the first character is other than A to Z, 0 to 9.
1 Press to enter Bluetooth mode.
2 Turn the volume knob to select [PHONEBOOK], then press the knob.
3 Press 1 / 2 to select the desired letter.
4 Turn the volume knob to select a name, then press the knob.
5 Turn the volume knob to select a phone number, then press the knob to call.
To return to the previous setting item or hierarchy, press T/P.
Store a contact in memory
You can store up to 6 contacts.
1 Press to enter Bluetooth mode.
2 Turn the volume knob to select [RECENT CALL], [PHONEBOOK], or [DIAL NUMBER], then press the knob.
3 Turn the volume knob to select a contact or enter a phone number. If a contact is selected, press the volume knob to show the phone number.
4 Press and hold one of the number buttons (1 to 6). "MEMORY P(select preset number)" appears when the contact is stored.
To erase a contact from the preset memory, select [DIAL NUMBER] in step2 and store a blank number.
Make a call from memory
1 Press to enter Bluetooth mode.
2 Press one of the number buttons (1 to 6).
3 Press the volume knob to call.
"NO PRESET" appears if there is no contacts stored.
Delete a contact
Not applicable for mobile phone that supports PBAP.
1 Press to enter Bluetooth mode.
2 Turn the volume knob to select [RECENT CALL] or [PHONEBOOK], then press the knob.
3 Turn the volume knob to select a contact or a phone number.
4 Press and hold 出 T/P.
5 Turn the volume knob to select [DELETE] or [DELETE ALL], then press the knob.
DELETE: Selected name or phone number in step 3 is deleted.
DELETE ALL: All names or phone numbers from the selected menu in step 2 is deleted.
6 Turn the volume knob to select [YES] or [NO], then press the knob.
Bluetooth mode settings
1 Press and hold MENU.
2 Turn the volume knob to select [BLUETOOTH], then press the knob.
3 Turn the volume knob to make a selection (see the following table), then press the knob.
4 Press MENU to exit.
To return to the previous setting item or hierarchy, press T/P.
Default: XX
| PHONE | Selects the phone or audio device to connect or disconnect. |
| AUDIO | “*” appears in front of the device name. |
| APPLICATION | Shows the connected phone name using the JVC Smart Music Control*1 app. “*” appears in front of the device name. |
| DELETE PAIR | 1 Turn the volume knob to select a device to delete, then press the knob. 2 Turn the volume knob to select [YES] or [NO], then press the knob. |
| PRIORITY | Selects a device to be connected as priority device. “*” appears in front of the device name set as priority. · “NO PAIR” appears if there is no registered device found. |
BLUETOOTH
AUDIO SETTINGS
| P.BOOK WAIT*2 | Copies up to 400 numbers from the phonebook memory of a connected phone. |
| SET PINCODE (0000) | Changes the PIN code (up to 6 digits).1 Turn the volume knob to select a number.2 Press |▶/▶to move the entry position.Repeat stepsand2 until you finish entering the PIN code.3 Press the volume knob to confirm. |
| AUTO CNT ON | _: The unit automatically reconnect when the Bluetooth device is within range. ; OFF: Cancels. |
| INITIALIZE YES | : Initializes all the Bluetooth settings (including stored pairing, phonebook, and etc.).; NO: Cancels. |
| INFORMATION | MY BT NAME: Displays the unit name (JVC UNIT).; MY ADDRESS: Shows address of this unit. |
1 JVC Smart Music Control is designed to view JVC car receiver status and perform simple control operations on Android smart phones. For JVC Smart Music Control operations, visit JVC website: http://www.jvc.net/cs/car/.
2 Selectable only when the connected phone supports OPP.
Bluetooth audio player
Operations and display indications may differ according to their availability on the connected device.
| To Do this | |
| Playback | 1 Press Ⓞ/SOURCE to select BT AUDIO. 2 Operate the Bluetooth audio player to start playback. |
| Pause or resume playback | Press MENU (or press on RM-RK52). |
| Select group or folder | Press 1▼/2▲ (or press ▲/▼ on RM-RK52). |
| Reverse/forward skip | Press ↓/▲▶ (or press ↓/▲ on RM-RK52). |
| Reverse/ fast-forward | Press and hold ↓/▲▶ (or press and hold ↓/▲ on RM-RK52). |
| Repeat play | Press 4 Ⓞ repeatedly to make a selection. TRACK RPT, ALL RPT, RPT OFF |
| Random play | Press 3 Ⓞ repeatedly to make a selection. GROUP RND, ALL RND, RND OFF |
1 Press and hold MENU.
2 Turn the volume knob to make a selection (see the following table), then press the knob. Repeat step 2 until the desired item is selected.
3 Press MENU to exit.
To return to the previous setting item or hierarchy, press T/P.
Default: XX
| EQ SETTING | |
| EQ PRESET | FLAT / HARD ROCK /JAZZ /POP /R&B /TALK /USER1 /USER2 /VOCAL BOOST /BASS BOOST /CLASSICAL /DANCE: Selects a preset equalizer. |
| EASY EQDefault:00 | 1 USER1/USER2: Select a preset name.2 Adjust your own sound settings.(For KD-R852BT /KD-R851BT)SUB.W*: -08 to +08BASS LVL: -06 to +06MID LVL: -06 to +06TRE LVL: -06 to +06(For KD-R951BT)SUB.W*: -08 to +08BASS LVL: -10 to +10MID LVL: -10 to +10TRE LVL: -10 to +10 |
AUDIO SETTINGS
| PRO EQ (for KD-R852BT / KD-R851BT) | 1 USER1/ USER2: Select a preset name. 2 BASS/MIDDLE/TREBLE Select a sound tone. 3 Adjust the sound elements of the selected sound tone. | ||
| BASS Frequency:60/ 80/ 100/ 200 Hz Level: -06 to +06 Q: Q1.0/Q1.25/Q1.5/Q2.0 MIDDLE Frequency:0.5/1.0/1.5/2.5 kHz Level: -06 to +06 Q: Q0.75/Q1.0/Q1.25 TREBLE Frequency:10.0/ 12.5/ 15.0/17.5 kHz Level: -06 to +06 Q: Q FIX | Default: (80 Hz) 00) (Q1.0) Default: 1.0 kHz) (00) (Q1.25) Default: 10.0 kHz) (00) (Q FIX) | ||
| PRO EQ (for KD-R951BT) | 1 USER1/ USER2: Select a preset name. 2 BASS/MID BASS/MID HIGH/HIGH: Select a sound tone. 3 Adjust the sound elements of the selected sound tone. | ||
| BASS Frequency:63/80/100/ 125 Hz Level: -10to +10 Q: Q1.0/Q1.25/Q1.5/Q2.0 MID BASS Frequency:200/250/315/400 Hz Level: -10to +10 Q: Q1.0/Q1.25/Q1.5/Q2.0 MID Frequency:630/800 Hz/1.0/1.25 kHz Level: -10to +10 Q: Q0.75/Q1.0/Q1.25/Q2.0 MID HIGH Frequency:2.0/2.5/ 3.15 4.0 kHz Level: -10to +10 Q: Q0.75/Q1.0/Q1.25/Q2.0 HIGH Frequency:6.3/8.0/ 10.0/ 12.5 kHz Level: -10to +10 Q: Q0.75/Q1.0/Q1.25/Q2.0 | Default: (80 Hz) (00) (Q1.25) Default: 250 Hz) (00) (Q1.25) Default: (800 Hz) (00) (Q1.0) Default: 2.5 kHz) (00) (Q1.0) Default: 8.0 kHz) (00) (Q1.0) | ||
| AUDIO | |||
| BASS BOOST | +01 / +02: Selects your preferred bass boost level.; OFF: Cancels. | ||
| LOUD 01 | _/ 02: Boosts low or high frequencies to produce a well-balanced sound at low volume.; OFF: Cancels. | ||
| SUB.W LEVEL*1 | -08 — +08 (00): Adjusts the subwoofer output level. |
| SUB.W*2 | ON / OFF: Turns on or off the subwoofer output. |
| SUB.W LPF*1 | THROUGH: All signals are sent to the subwoofer. LOW 55Hz/MID 85Hz /HIGH 120Hz Audio signals with frequencies lower than 55 Hz/85 Hz/120 Hz are sent to the subwoofer. |
| HPF*3 | OFF: All signals are sent to the front/rear speakers. LOW 100Hz / MID 120Hz / HIGH 150Hz: Audio signals with frequencies lower than 100 Hz/120 Hz/150 Hz are cut off from the front/rear speakers. |
| FADER*4*5 | R06 — F06 00: Adjusts the front and rear speaker output balance. |
| BALANCE*4 | L06 — R06 00: Adjusts the left and right speaker output balance. |
| VOL ADJUST -05 | — +05 (00): Presets the volume adjustment level of each source (compared to the FM volume level). Before adjustment, select the source you want to adjust. ("VOL ADJ FIX" appears if FM is selected.) |
| AMP GAIN LOW | POWER: Limits the maximum volume level to 30. (Select if the maximum power of each speaker is less than 50 W to prevent damaging the speakers.); HIGH POWER: The maximum volume level is 50. |
| D.T.exp(Digital Track Expander) | ON: Creates realistic sound by compensating the high-frequency components and restoring the rise-time of the waveform that are lost in audio data compression. ;OFF: Cancels. |
| L/O MODE*6 | SUB.W / REAR Selects whether rear speakers or a subwoofer are connected to the REAR/SW line out terminals on the rear panel (through an external amplifier). |
1 ForKD-R852BT / KD-R851BT: Displayed only when [L/O MODE]is set to [SUB.W] and [SUB.W] is set to [ON].
2 ForKD-R852BT / KD-R851BT: Displayed only when [L/O MODE] is set to [SUB.W].
3 ForKD-R951BT.
4 This adjustment will not affect the subwoofer output.
5 If you are using a two-speaker system, set the fader level to [00].
6 ForKD-R852BT / KD-R851BT.
DISPLAY SETTINGS

KD-R852BT/KD-R851BTKD-R951BT
1 Press and hold MENU.
2 Turn the volume knob to make a selection (see the following table), then press the knob. Repeat step2 until the desired item is selected.
3 Press MENU to exit.
To return to the previous setting item or hierarchy, press T/P.
Default: XX
DISPLAY
| DIMMER | Selects the display and button illumination adjusted in the [BRIGHTNESS] setting.AUTO: Changes between the day and night adjustments when you turn off or on the car headlights. *1; ON: Selects the night adjustments. ; OFF: Selects the day adjustments. |
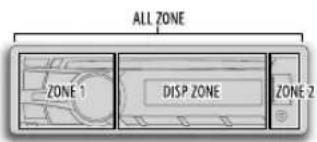
| BRIGHTNESS | Sets the button, display and USB input terminal brightness for day and night separately.1 DAY/NIGHT: Select day or night.2 Select a zone for setting. (Illustration above)3 Set the brightness level (00to 31).(Default: KD-R951BT :DAY: 31 ; NIGHT: 11KD-R852BT / KD-R851BT: BUTTON ZONE: DAY:25 ; NIGHT: 09DISP ZONE: DAY: 31 ; NIGHT: 12) |
| SCROLL*2 | ONCE: Scrolls the display information once.; AUTO: Repeats scrolling at 5-second intervals.; OFF: Cancels. |
*1 The illumination control wire connection is required. (21)
*2 Some characters or symbols will not be shown correctly (or will be blanked).
Default: XX
COLOR (for KD-R951BT)
| PRESET | You can select a color for [ALL ZONE], [ZONE 1], [DISP ZONE], or [ZONE 2] separately. For [ALL ZONE], you can also select a color pattern. Default color: ALL ZONE: [COLOR 06], ZONE 1: [COLOR 06], DISP ZONE [COLOR 01],ZONE 2: [COLOR 27] 1 Select a zone for setting. (Illustration on left column) 2 Select a color for the selected zone. - COLOR 01 to COLOR 29 - USER The color you have created for [DAY COLOR] or [NIGHT COLOR] is shown. - COLOR FLOW 01 to COLOR FLOW 03: Color changes at different speeds. - SPECTRUM/ GROOVE/ TECHNO/ EMOTION/ RELAX/ NIGHT SWEEP: The selected color pattern is shown.* (Selectable only when [ALL ZONE] is selected in step 1.) * If one of these color pattern is selected, the [ZONE 1], [DISP ZONE], [ZONE 2] illumination color will change to the default color. |
| DAY COLOR | Store your own day and night colors for different zone. 1 Select a zone for setting. (Illustration on left column) 2 RED /GREEN / BLUE: Select a primary color. 3 00 to31: Select the level. |
| NIGHT COLOR | Repeat steps 2 and 3 for all the primary colors. - Your setting is stored to [USER]in [PRESENT]. - If [00]is selected for all primary colors for [DISP ZONE], nothing appears on the display. |
| COLOR GUIDE | ON Changes the button, display and USB input terminal illumination when settings are performed on menu and list search. Display zone will automatically change depending on volume level.;OFF: Cancels. |
[NIGHT COLOR] or [DAY COLOR] is changed by turning on or off your car's headlight.
MORE INFORMATION
About discs and audio files
- This unit can only play the following CDs:


- This unit can play back multi-session discs; however, unclosed sessions will be skipped during playback.
- Unplayable discs:
- Discs that are not round.
- Discs with coloring on the recording surface or discs that are dirty.
- Recordable/ReWritable discs that have not been finalized.
- 8 cm CD. Attempting to insert using an adapter may cause malfunction.
- DualDisc playback: The Non-DVD side of a "DualDisc" does not comply with the "Compact Disc Digital Audio" standard. Therefore, the use of Non-DVD side of a DualDisc on this product cannot be recommended.
- Playable files:
- File extensions: MP3 (.mp3), WMA (.wma)
-Bit rate: MP3: 8 kbps — 320 kbps
WMA: 32 kbps — 192 kbps
Sampling frequency: MP3:48 kHz, 44.1 kHz, 32 kHz, 24 kHz, 22.05 kHz, 16 kHz, 12 kHz, 11.025 kHz, 8 kHz WMA:8 kHz —48 kHz
Variable bit rate (VBR) files.
Maximum number of characters for file/folder name:
It depends on the disc format used (includes 4 extension characters—<.mp3> or <.wma>).
- ISO 9660 Level 1 and 2: 32 characters
Romeo: 32 characters
Joliet: 32 characters - Windows long file name: 32 characters
About USB devices
- This unit can play MP3/WMA/WAV files stored on a USB mass storage class device.
- You cannot connect a USB device via a USB hub.
-
Connecting a cable whose total length is longer than 5m may result in abnormal playback.
The maximum number of characters for: -
Folder names: 64 characters
- File names: 64 characters
MP3 Tag: 64 characters
WMA Tag: 64 characters
WAV Tag: 64 characters
This unit can recognize a total of 20 480 files, 999 folders (999 files per folder including folder without unsupported files), and of 8 hierarchies.
This unit cannot recognize a USB device whose rating is other than 5 V and exceeds 1 A.
About iPod/Phone
Made for
- iPod touch (1st, 2nd, 3rd, 4th, and 5th generation)
-
iPod classic
-
iPod nano (3rd, 4th, 5th, 6th and 7th generation)
- iPhone, iPhone 3G, 3GS, 4, 4S, 5
- It is not possible to browse video files on the "Videos" menu in [HEAD MODE].
The song order displayed on the selection menu of this unit may differ from that of the iPod/iPhone. - If some operations are not performed correctly or as intended, visit: http://www.jvc.net/cs/car/.
About Bluetooth
- Depending on the Bluetooth version of the device, some Bluetooth devices may not be able to connect to this unit.
- This unit may not work with some Bluetooth devices. Signal conditions vary, depending on the surroundings.
For more information about Bluetooth, visit the following JVC website: http://www.jvc.net/cs/car/.
About JVC Playlist Creator and JVC Music Control
- This unit supports the PC application JVC Playlist Creator and Android application JVC Music Control.
- When you play audio file with song data added using the JVC Playlist Creator or JVC Music Control, you can search for audio file by Genres, Artists, Albums, Playlists, and Songs.
- JVC Playlist Creator and JVC Music Control are available from the following web site: http://www.jvc.net/cs/car/.
Available Cyrillic letters
Available characters Display indications
MORE INFORMATION
TROUBLESHOOTING
Change the display information
Press DISP repeatedly.
| FM or AM | Station name (PS)*1 frequency Program type (PTY)* 1*2 Title*1*2 Day/Clock (back to the beginning) *1 For FM Radio Data System stations only. *2 If unavailable, "NO PTY" / "NO TEXT" appears. |
| CD or USB | Playing time-Day/Clock Disc name* 3 Album title/Artist*4 Track title*5 Folder/file name*6 (back to the beginning) *3 Only for CD-DA: If not recorded, "NO NAME" appears. *4 Only for MP3/WMA/WAV files: If not recorded, "NO NAME" appears. *5 If not recorded, "NO NAME" appears. *6 Only for MP3/WMA/WAV files. |
| USB-IPOD | Playing time-Day/Clock Album title/Artist* 7 Track title* 7 (back to the beginning) *7 If not recorded, "NO NAME" appears. |
| AUX | AUX-Day/Clock |
| BT AUDIO | Playing time-Day/Clock Album title/Artist* 8 Track title* 8 (back to the beginning) *8 If not recorded, "NO NAME" appears. |
Symptom Remedy
| Sound cannot be heard. • Adjust the volume to the optimum level. • Check the cords and connections. | |
| "MISWIRING CHK WIRING THEN RESET UNIT" / "WARNING CHK WIRING THEN RESET UNIT" appears and no operations can be done. | Check to be sure the terminals of the speaker wires are insulated properly, then reset the unit. If this does not solve the problem, consult your nearest service center. |
| Source cannot be selected. Check the [SRC SELECT] setting. (←4) | |
| Radio reception is poor. / Static noise while listening to the radio. | • Connect the antenna firmly. • Pull the antenna out all the way. |
| Correct characters are not displayed. | This unit can only display uppercase letters, numbers, and a limited number of symbols. The unit can also display uppercase Cyrillic letters. (←6) |
| "PLEASE" and "EJECT" appear alternately. | Press ▲, then insert the disc correctly. |
| "IN DISC" appears. Make sure nothing is blocking the loading slot when you eject the disc. | |
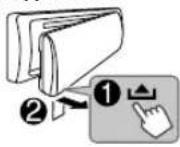
| Disc cannot be ejected. | Press and hold ▲ to forcibly eject the disc. Be careful not to drop the disc when it is ejected. |
| Playback order is not as intended. | The playback order is determined by the file name (USB) or the order in which files were recorded (disc). |
| Elapsed playing time is not correct. | This depends on the recording process earlier. |
| "Not SUPPORT" appears and track skips. | Check whether the track is a playable format. (←6) |
Symptom Remedy
| "CANNOT PLAY" flashes and/or connected device cannot be detected. | ·Check whether the connected device is compatible with this unit and ensure the files are in supported formats. (16)·Reattach the device. | |
| "READING" keeps flashing. · Do not use too many hierarchical levels and folders. ·Reload the disc or reattach the USB device. | ||
| The iPod/iPhone does not turn on or does not work. | ·Check the connection between this unit and iPod/iPhone. · Detach and reset the iPod/iPhone using hard reset. | |
| Bluetooth® | No Bluetooth device is detected. | ·Search from the Bluetooth device again. ·Reset the unit. (2) |
| Pairing cannot be made. | ·Make sure you have entered the same PIN code to both the unit and Bluetooth device. ·Delete pairing information from both the unit and the Bluetooth device, then perform pairing again. (3) | |
| "PAIRING FULL" appears. | The number of registered devices has reached its limit. Retry after deleting an unnecessary device. (4, DELETE PAIR) | |
| "PLEASE WAIT" appears. | The unit is preparing to use the Bluetooth function. If the message does not disappear, turn off and turn on the unit, then connect the device again. | |
| "BT DEVICE NOT FOUND" appears. | The unit failed to search for the registered Bluetooth devices during [AUTO CNT]. Turn on Bluetooth from your device and connect manually. (5) | |
| Echo or noise occurs. · Adjust the microphone unit's position. (6)· Check the[ECHO CANCEL]setting. (7) | ||
| Phone sound quality is poor. | ·Reduce the distance between the unit and the Bluetooth device. ·Move the car to a place where you can get a better signal reception. | |
Symptom Remedy
| Bluetooth® | "NOT SUPPORT" appears. The connected phone does not support Voice Recognition feature. | |
| "ERROR" appears. Try the operation again. If "ERROR" appears again, check if the device supports the function you have tried. | ||
| The unit does not respond when you try to copy the phonebook to the unit. | You may have tried to copy the same entries (as stored) to the unit. Press DISP or T/P to exit. | |
| Sound is being interrupted or skipped during playback of a Bluetooth audio player. | • Reduce the distance between the unit and the Bluetooth audio player. • Turn off, then turn on the unit and try to connect again. • Other Bluetooth devices might be trying to connect to the unit. | |
| The connected Bluetooth audio player cannot be controlled. | • Check whether the connected Bluetooth audio player supports Audio/Video Remote Control Profile (AVRCP). (Refer to the instructions of your audio player.) • Disconnect and connect the Bluetooth player again. | |
| "H/W ERROR" appears. Reset the unit and try the operation again. If "H/W ERROR" appears again, consult your nearest service center. | ||
| "BT ERROR PLS UPDATE" appears. | Update the Bluetooth firmware. (*) | |
If you still have troubles, reset the unit. (8)
SPECIFICATIONS
| TUNER | FM Frequency Range | 87.5 MHz to 108.0 MHz (50 kHz step) |
| Usable Sensitivity (S/N = 26 dB) | 0.71 μV/75 Ω | |
| Quieting Sensitivity(DIN S/N = 46 dB) | 2.0 μV/75 Ω | |
| Frequency Response (±3 dB) 30 Hz to 15 kHz | ||
| Signal-to-Noise Ratio (MONO) 64 dB | ||
| Stereo Separation (1 kHz) | 40 dB | |
| AM | Frequency Range | MW 531 kHz to 1611 kHz (9 kHz step)LW 153 kHz to 279 kHz (9 kHz step) |
| Useable Sensitivity (S/N = 20 dB) | MW 28.2 μVLW 50 μV | |
| CD player | Laser Diode | GaAlAs |
| Digital Filter | 8 times over sampling | |
| Spindle Speed | 500 rpm — 200 rpm (CLV) | |
| Wow & Flutter | Below measurable limit | |
| Frequency Response (±1 dB) | 20 Hz — 20 kHz | |
| Total Harmonic Distortion (1 kHz) | 0.01 % | |
| Signal-to-Noise Ratio (1 kHz) | 105 dB | |
| Dynamic Range | 90 dB | |
| Channel Separation | 85 dB | |
| MP3 Decode | Compliant with MPEG-1/2 Audio Layer-3 | |
| WMA Decode | Compliant with Windows Media Audio | |
| USB | USB Standard | USB 1.1, USB 2.0 (Full speed) |
| Compatible Devices | Mass storage class | |
| File System | FAT12/ 16/ 32 | |
| Maximum Supply Current | DC 5 V=1 A | |
| MP3 Decode | Compliant with MPEG-1/2 Audio Layer-3 | |
| WMA Decode | Compliant with Windows Media Audio | |
| WAV Decode | Linear-PCM | |
| Auxiliary | Frequency Response (±3 dB) 20 Hz — 20 kHz | |
| Input Maximum Voltage | KD-R951BT: 1 000 mV KD-R852BT /KD-R851BT: 1 200 mV | |
| Input Impedance 30 kΩ | ||
| Bluetooth | Version Bluetooth Ver.2.1+EDR | |
| Frequency Range 2.402 GHz — 2.480 GHz | ||
| Output Power +4 dBm (MAX), 0 dBm (AVE) Power Class 2 | ||
| Maximum Communication Range Line of sight approx. 10 m | ||
| Profile HFP1.5 (Hands-Free Profile), A2DP (Advanced Audio Distribution Profile), AVRCP1.3 (Audio/Video Remote Control Profile), OPP (Object Push Profile), PBAP (Phonebook Access Profile), SPP (Serial Port Profile) | ||
| Audio | Maximum Output Power 50 W × 4 | |
| Output Power (DIN 45324, +B = 14.4 V) | 30 W × 4 | |
| Speaker Impedance 4 Ω — 8 Ω | ||
| Preout Level/Load (CD) | KD-R951BT: 4 800 mV/10 kΩ load KD-R852BT /KD-R851BT: 2 500 mV/10 kΩ load | |
| Preout Impedance ≤ 600 Ω | ||
| General | Operating Voltage 14.4 V (10.5 V — 16 V allowable) | |
| Maximum Current Consumption 10 A | ||
| Operating Temperature Range 0°C to +40°C | ||
| Installation Size (W × H × D) 182 mm × 53 mm × 158 mm | ||
| Weight | 1.26 kg | |
Subject to change without notice.
Warning
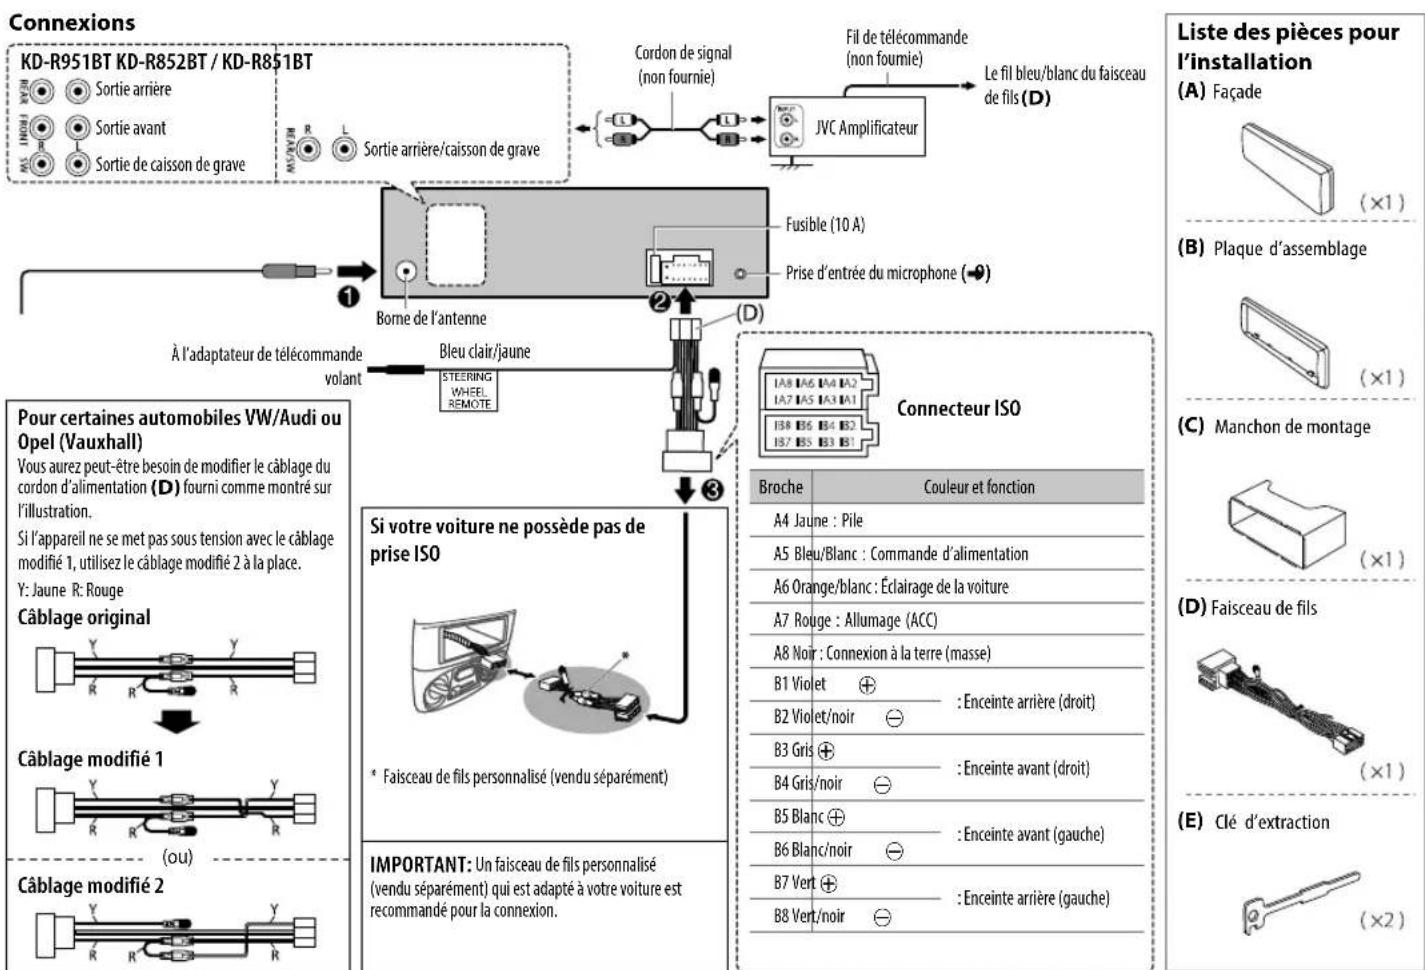
- The unit can only be used with a 12 V DC power supply, negative ground.
- Disconnect the battery's negative terminal before wiring and mounting.
- Do not connect Battery wire (yellow) and Ignition wire (red) to the car chassis or Ground wire (black) to prevent a short circuit.
- Insulate unconnected wires with vinyl tape to prevent a short circuit.
- Be sure to ground this unit to the car's chassis again after installation.
Caution
- For safety's sake, leave wiring and mounting to professionals. Consult the car audio dealer.
- Install this unit in the console of your vehicle. Do not touch the metal parts of this unit during and shortly after use of the unit. Metal parts such as the heat sink and enclosure become hot.
- Do not connect the wires of speakers to the car chassis or Ground wire (black), or connect them in parallel.
- Connect speakers with a maximum power of more than 50 W. If the maximum power of the speakers is lower than 50 W, change the [AMP GAIN] setting to avoid damaging the speakers. (▶ 14)
- Mount the unit at an angle of less than 30^ .
- If your vehicle wiring harness does not have the ignition terminal, connect Ignition wire (red) to the terminal on the vehicle's fuse box which provides 12 V DC power supply and is turned on and off by the ignition key.
- After the unit is installed, check whether the brake lamps, blinkers, wipers, etc. on the car are working properly.
- If the fuse blows, first make sure the wires are not touching car's chassis, then replace the old fuse with one that has the same rating.
Basic procedure
1 Remove the key from the ignition switch, then disconnect the terminal of the car battery.
2 Connect the wires properly.
See Wiring connection 21)
3 Install the unit to your car.
See Installing the unit (in-dash mounting).
4 Connect the terminal of the car battery.
5 Reset the unit. ( 3)
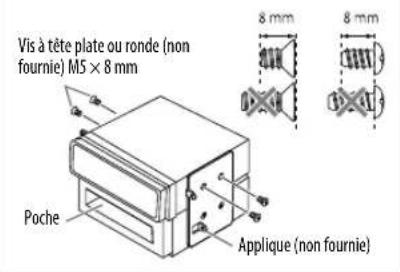
When installing without the mounting sleeve
Use only the specified screws. Using wrong screws might damage the unit.

How to remove the unit
Part list for installation
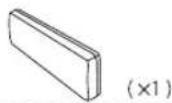
(A) Faceplate
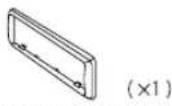
(B) Trim plate
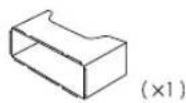
(C) Mounting sleeve
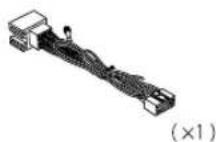
(D) Wiring harness
(E) Extraction key

TABLE DES MATIERES
AVANT L'UTILISATION
Frequence d'échéantillonnage: MP3:48 kHz, 44.1 kHz, 32 kHz, 24 kHz, 22.05 kHz, 16 kHz, 12 kHz, 11.025 kHz, 8 kHz
WMA:8kHz—48kHz
Made for
- iPod touch (1st, 2nd, 3rd, 4th et 5th generation)
- iPod classic
- iPod nano (3rd, 4th, 5th, 6th et 7th generation)
- iPhone, iPhone 3G, 3GS, 4, 4S, 5

Comment retiree I'appareil
ICINDEKILER KULLANIM ONCESI
KULLANIM ONCESI 2
TEMEL BILGILER 3
BASLARKEN 4
CD/USB/iPod5
RADYO 7
AUX 8
BLUETOOTH 9
SESAYARLARI 13
EKRAN AYARLARI 15
DAHA FAZLA BILGI 16
SORUN GIDERME 17
TEKNIK OZELLIKLER 19
KURULUM / BAGLANTI 20
Uyari
- Hands-Free Profile—Eller Serbest Profili (HFP1.5)
- Advanced Audio Distribution Profile—Gelismis Ses Yaylimi Profili (A2DP)
Audio/Video Remote Control Profile—Ses/Video Uzaktan Kumanda Profili (AVRCP1.3) - Object Push Profile—Nesne Itme Profili (OPP)
Phonebook Access Profile—Rehber Erisim Profili (PBAP) - Serial Port Profile—Seri Port Profili (SPP)
Bluetooth aygitinci eslestirme
Uniteye bir Bluetooth aygitini ilk kez baglarken, unite
ile aygitarasinda esylestirmayipin. Esylestirmie isleminin
tamamlanmasinin ardindan Bluetooth aygitui, uniteyi
sifirlasaniz bile unitede kayth kalir.
Ömeklemde frekansı: MP3:48 kHz,44.1 kHz,32 kHz,24 kHz,22.05 kHz,16 kHz,12 kHz, 11.025 kHz,8 kHz
WMA:8kHz—48kHz
He nCnoB3yIte fynKuNN, KOToPbIe OTBnEkaT BnHMaHne N MeuaIOT 6e3oNaChOMy BoXdEHIO.
BHHMaHne
HactpoKa rPOMKocTn:
- OtperynnpyTe rpoMKoCTb TaKIM 6pa3OM 7TO6bl CbIaTb 3ByKN 3a npedeJAM ABTomO6nla Jn PpeDToBpaueHnabapn.
YMeHbIInTe rPOMKocTb nped BOCpOnu3BeDeHnEm, YTO6bl npeoTbPAITb NOBpeXeHne DnHaMnKOB H3-3a BHe3aHOrO NOBbIeHnA yPOBnI rPOMKcToH Na BBIXOE.
06uexapaKTePncTnK:
He nCnOJIb3yIte yCTPOcTBO USB nIN npOnrPbBATEb iPod/iPhone,ecNI 3TO MOKeT OTpuCaTeNbHO NOBnIaTB Ha 6e30NaCHOCTb BOKDEHNA.
- y6eHNTecb B TOM, qTO co3aHbI pe3epBbIe KOINN BCEX BAXHBIX daHHbIX. Mbl He Hecem OTBETCTBEHHOCb 3a NOTEPIO 3aNNcaHHbIX daHHbIX.
HnKorDa He octabIte MetaJIuueckne npedMetbI (Haepmep, MoHetb IIN MetaJIuueckne HNCTpyMeHTb) BHTPN yCTpoiCTBa BO n36eKaHHe KOPOTKnx 3aMbIkaHIn.
- Ecnn OoN6ka YTeHnna DnCKa BO3HKnna N3-3a Obpa3ObaHnKa KOHeHcata Ha Na3epHbIX LnH3ax, INBLeKeNTe DnCK N DoXnITeCb, NOKa Bnara UcnapITcR.
- HanpaxkHeIe USB yka3aHo Ha rnaBHOM ycTpoCTBe. IIN npocMToPa CHIMnTe nepdHIO nHaHeB. (3)
IynbT ductanHnHoro ynpabHeHra (RM-RK52):
He octabnaiTe npbT dntaHOnHO ynpaBHeHn B HarpBaemix MeCTax, TaKx KaN pN6OpHa naHel.
- JIITNtEeBbAkkymyTApTO MPoKET 6bItb B3pblBOONaChbIM PnHnHepaBnJIbHOH 3aMeHe. 3aMeHReTe TOnbKO aKKMyJrTopOM TaKOrO Xe NIN 3KBMBAJIeHTHO TINa.
- 5nOK aKKymyIaTOPOB INN aKKymyIaTOpbl HeJIb3N NOBepraTb N36bItoHOMy HArpeBaHIO B COnHeHbIX Lyuax, ORHe I T.I.
XpaHnTe 6aTapeB MeCTax, HeoocTyHbIX dIeTe, IN B opirHnHaJIbHO ynaKOBKe, cIIN OHn HcNoIb3yOTcR. HEmedneHOr ytnnnuPoBaTB nCOnnb3ObaHHBe 6aTapeN. B cnYae nporNaTbBAHnHr HEmedneHNO 6paTntbCk Bpauy.
06cnyxnbHne
YcTa yCToPcTbA: B cnyae 3aqrA3HeHn npoTpnte nepeDHOIO nAHen cyXO CNIKHOBOHnn MmKoTKaHbIO.
OuCTKa pa3bema:OTcoeHNHTe NmueByIO naHn bAkkypaTHo npotpnte pa3bem BaTHOH nanoukO. Co6JIoAaTe octopoxHOCTb, UTO6bHe NOBpeINb pa3bem.
Pa3bem (Ha 6paTHoN CTOPOHe nIueBOI naHEni)
06paueHHe cDnckamM:
- He kacaTecb 3aHcHHOIOBepxHOCTn DnCKa.
He npKneBaIe Ha nCK KneKkyo IeHTy N. n He nCnOJb3yTe DnCK C npKneeHHo H a Hero neHToI.
He nCnoB3yTe HnKaKe DOnoHnTeBhBte npHaDneXHoCTn DnA DnCKa.
PpOBODInTe uNCTky no HAnpaBHeHIO OT ueHTpa DnCKa Kero Kpaio. - OuNTKn DnCKa HcNtB3yIe cyxyIO CnNkoHOByIO Nm INHyIO MrgKyIO TKAHb. He nCnObl3yIe KaKne-Jn6o paCTBOpTEnn.
PnN3BHeueHnn DnCKOB N3 yCTpoHCTBa Depxnte INx Ropn3OHTaNbHO.
-Пелед установков дида устдане Лобные Неровhoeц lehtpaalbho ro OTBepctma UNI BHeuHero Края дисka.
OCHOBHbIE CBeDEHnA
Ipeedna naheb

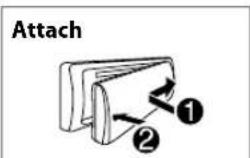
PpKpEnne
OToeMHeHne

PopdoKc6poca
3anporpammmopobAHnbe NahtpoKn 6ydt TaKke yuaheBt.
BxOHT B KOMNNEKT NOCTABKN KD-R851BT TeMeTePmueckn DaTUnK (He noDBepraIte BO3dEiCTBnIO pRMAbIX COJIHeHbIX Lyuei.)
IynbT dNCTaHcnoHHoro ynpabneHnra (RM-RK52)
Ipeep nepBbIM nCNOlb3OBAHnEM CHMNITe 3aunTHyIO NHeKy.
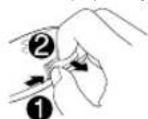
3aMeHa aKKyMnyTopa
3aapa Heo6xOummbie deiCtBnna (ha nepeHne naHn)
Heo6xOaMbIe DeIcTBnHa nIyIbTe ductaHouHOHorO ynpabJeHn
Hauano Bocnpon3BedeHH
PpOxCoDNT ABOTMAUWeCKA CMeHa NCTOuHnKa, HauHHeTc BOCpON3BeDeHne.

CD
USB

iPod/iPhone
HaKMITE5IPODMODEHeckoBko pa3nla Bb6opapeKMa ynpaBneHnna [HEAD MODE] / [IPHONE MODE]HaPpMyIO.
HEAD MODE: C yctpoiCtba. IPHONE MODE C iPod/iPhone.*2
3a4aHa Heo6xOumbIe DeIcTBnA
- HenpimemHmO nIy iPod.
Bb6op nechno mmeHn
Пи npocnyuBaHm iPod, kOrda Bb6paHo HEAD MODE ...
Ecm y Bac Mhoro nanok nnn dopoxek/phiinob, moxho BblonHrB 6bictpbn IX nonck no nepbomy cunboy (A-Z,0-9 n OTHERS).
"OTHERS" oTo6paKaetcra,ecnI npBbI CNMBON OTnuaertcraT A-Z,0-9.
1 Haxmte KhoNky MENU.
2 NIOBEPHNTe pyKy perynnpOBKn rPOMKOCTn Ia Bb6opa Tpe6yemoro cnNcKa, a 3aTeM hXmTne ee.
3 HaxMMTe 1▼/2▲ nnn 6bIcTpo NOBepHnTe pyky perynnpOBKn rpOMKoCTu, YTO6bl Bbl6paTb HyKhbl CmBON.
4 NObepHnTe pyky perynnpOBKn rPOMKoTn Ia Bbl6opa Tpe6yeMbIX nanknn DOpOxxk/phiNa, a 3aTEM Haxmnte ee.
CmeHa USB-ycTpOCTBa
Korda cMaprfoh (3aHOMHaOooee yCtpoCTBO6b0wE mKoctn) noKIOHOeK BxOHOy USB-pa3bemy, MOKHO bIbpaTb BHTpeHHIOUI HBEHIOIO NAMYB (HanpPrme, kapy SD) fBocPONB3DEHnOc coXPAHEHHbcneH
EcnnoKIOUHOyCTPOCTBO CHeCKOJIbKIMM DnCKAMM,MOXHO TAKKe Bbl6paTb Heo6xOuMbI dyck nBocPON3BeDEHn.
Дя Вьбopa Heo6xOIMoro ДИСКа HAXMITE HeCKONbKO pa3 "5 iPod MODE".
(nnn)
1 HaxmTe n yepKnBaTHe haxaToi KhOnky MENU.
2 NObepHnTe pykny perynipOBKn rpoMkoCTn nla Bbl6opa 3neMeHTa [USB/IPOD], a 3aTeMaHxMnTe ee.
3 NobeprHnTe pyuKy peRyIuPOBKn rpOMKoCTn IJIa BbI6Opa 3JIeMeHTa [USB], a 3aTeM HaxMnTe ee.
4 HaxmiTe pyky perynipOBKn rpoMkoCTn, YTO6bl BbIbpaTb 3neMeHT [DRIVECHANGE].
CnedyuomniDmckBbivpaetcABTOMaTHueckn.
IyBb6opa Cnedyuux NcKOB NOBTOPte DeCTBn1-4.
Bb6npaemble 3neMeHtbl:OT[DRIVE1]do[DRIVE5]
I3meHenne cKopocn Bocnpoun3BeHna aydnokn (Audiobook)
Пи npocnyuBaHm iPod, korga Bb6paHo [HEAD MODE] (5) ...
1 HaKmTe n ydePknBaBte HkaToN KhoNky MENU.
2 NIOBepHnTe pyKu peRynOpBKn rPOMKocTn dIa BbI6opa 3IeMeHTa [USB/IPOD], a 3aTEM HAXMnTe ee.
3 NobeprHne pyky peRyIINpOBKn rPOMKocTn dIa BB6Opa 3JIeMeHTa [IPOD], a 3aTeM hAkmTe ee.
4 To6bI cEnaTb Bb16Op, NOBepHnTe pyKy perynipOBKn rPOMKocTn, a 3aTeM HaxMNTE ee.
BOOK NORMAL / BOOK FASTER / BOOK SLOWER: BbIbePnte Jenaemyo ckopocbBocpOu3BeHnna 3yboKorO foaiHa n3 katerOpnn "Audiobooks" ha iPod/iPhone. (IPO ymoJauHIO: 3aBcUInOT hAcTPOKn iPod/iPhone.)
-ДявОЗВРATAКпрдыншемуnapamETpyИИпэрхиueckOMу ypoBHOHAxMnTe KHONKy T/P.
-ДЯгOTMehbHaJKMITEKHONKY MENU.
PAДИОПРЕМнИК
Индikatop "ST" Zaropaetc npn npneMe ctepeocnHana FM-tpaHcnaHIO doctatoHoro ypOBH.
Ponck paadnoctaHcnn
1 Haxmnte /SOURCE nBb6opa FM nn AM.
2 HaxMMTe 一 一 一 一 (HnHa RM-RK52)IaABTomatueckoro noncka paiaoctua.
(nnn) Haxmte uyepeKnBaTe HaxaToi KhoNkY I /▶I (ninn △/Ha RM-RK52), noka cunBON "M" He hauHet MnaTaTb, 3aTe m Haxmte HeckoNkO pao dIy aBOMATneCCKOrO noncKa paAnocCTaHcIM.
CoxpaHenepe padnoctaunn
Mochno coxpaHantb do 18 padioctaHm FM n 6 padiooctaHm AM.
PnpnpocnyuBaHm npaoctaH..
CoxpaHnTb MoXHO Do 6 KOHTaKToB.
1 Haxmte BnBIOueHn peKmua Bluetooth.
2 NobepeHnTe pyuKy peryunipOBKn rpomKoCTn Ira BbI6pa 3JeMeHaT [RECENTCALL] [PHONEBOOK] uIN [DIAL NUMBER], a 3aTeM haxmTepyuKy.
3 NOBEPHnTe pyky perynuPbKN rPOMKoCTn dIa BbIbopa KOHTaTaN BBOda HOMepa TenefoHa.
Ecn KOHTK Bb6paH, HaxMMte pyky perynpoBkn rpoMkoCTn dno OTo6paKeHmHOmepa TeneoHa.
4 HaxmTe u ydepxnBaute HxatbIMn HymepoAHhBle KhoNkn (1-6).
Pocne coxpaHHeNkohtKaTo OTb6paKaeTc Coo6ueHMe "MEMORY P(Bb6paHbN 3a npOrpaMMnpObaHHb Homep)
YTO6bI ydaJIbT bKoHTaKT INaMaTIN, B DeiCTBnN 2 Bbl6epHtE [DIAL NUMBER] COxpaHNTe pcyToHOMeP.
BbINOJIHeHHe BbI3OBA n3 naMTN
1 HaxmTe 4nKIOUeHnpeXnMa Bluetooth.
2 Haxmnte uydepxmbaTe HaxatbIMn HymepoBaHHble KhONK1 (1-6).
3 HaXMte pyky perynnpOBKn rpoMKoCTN, YTO6bl BbINONHtB Bbl3OB.
PnO TcTbM COxpaHeHHbIX B NAMrN KOHTaKToB OTO6pKaTeC4 Coo6uHHe "NO PRESET".
ydaJIeHne KOHTaKTa
He npimehmmoIraMoibbHbIX TeneoHOB, noIepKbauOx PBAP.
1 Haxmte AeyBnioeHMa peKMa Bluetooth.
2 NobeprHne pyky peRynOpBKn rPOMKoCTn Ia Bb6op3eMeHTa [RECENTCALL]nnn [PHONEBOOK], a 3aTeM HaxMMte pyky.
3 NObepHnTe pyuKpy perynpOBNr pOMKOCTn DnBb6opa KOHTaKTa HmOp a TeneoHa.
4 HaxmTe uydepKnBaTe HaxaToN KhoNky T/P.
5 NObepHnTe pyky peRynOpBKn rPOMKoCTn IaIy BbI6opa 3eMeHtA [DELETE] nn [DELETE ALL], a 3aTeM hXKMnTe pyky.
DELETE: BbGpaHHOB B DeIeCTBmN NMM NIM HOMep TeneoHa YdaJIHOTcA.
DELETE ALL: Bce MMeHa NIM HOMepaTeEFOHOB B bIbpaHHOM B DeIeCTBm2 MeHo ydaJIHOTca.
6 NObepHnTe pyky perynnpOBKn rpoMkoCTn DnB Bb6opa [YES] nN [NO], a 3aTEM Haxmnte pyky.
Hactpoynpuexmua Bluetooth
1 HaKMITE n ydepeKnBaIte HaaTOn KhoNky MENU.
2 NObepHnTe pyky perynpOBKn rpoMkOCTn dna Bb6opa 3neMeHTa [BLUETOOTH], a 3aTEM HAXMnTe ee.
3 To6bI cenatb Bb6Op, NOBEPHnTe pyky perynnpOBKn rpoMkoCTn (cM. cnedyiouyo Ta6nny), 3aTeM Haxmnte ee.
4 Haxmte MENU BixOda.
IaBo3BpTa K nppebIyUeMy npaMeTpY IIN nepapXnueckOMy ypoBnHO HaxMnte KhoNky T/P.
NoymonhaHHIO: XX
TEXHUNeCKNE XAPAKTEPNUKNI
A E B F G E E K M N O P
CTYΦXUUYUUBbbl3IORE
C75y#x#y#y#y#3N8E
USBδjJ
WAV/WMA/MP3 Lslo Jooa oio gai
(5th generation , 4th ,3rd ,2nd ,1st) iPod touch -
iPod classic -
(7th generation , 6th ,5th ,4th ,3rd) iPod nano
5.4S.4.3GS iPhone 3G iPhone
"Videos" 2000
[HEAD MODE]
g j 121 10
iPhone/iPod jgj
gullll lalxell jai gai
aagaa 1 Llaog Lg bawj
CD 10


y
a a a a a a a a a a a a a a a a a a a a a a
1 18 aLg cLg
| a.1234567890000000000000000000000000000000000000000000000000000000000000000000000000000000000000000000000000000 | *SUB.W LEVEL |
| b.12345678900000000000000000000000000000000000000000000000000000000000000000000000000000000000000000 | *SUB.W |
| c.12345678900000000000000000000000000000000000000000000000000000000000000000000000000000000000000000 | |
| d.12345678900000000000000000000000000000000000000000000000000000000000000000000000000000000000000000 | |
| e.12345678900000000000000000000000000000000000000000000000000000000000000000000000000000000000000000 | |
| f.12345678900000000000000000000000000000000000000000000000000000000000000000000000000000000000000000 | |
| g.123456789000000000000000000000000000000000000000000000000000000000000000000000000000000000000000001 | |
| h.123456789000000000000000000000000000000000000000000000000000000000000000000000000000000000000000002 | |
| i.123456789000000000000000000000000000000000000000000000000000000000000000000000000000000000000000008 | |
| j.12345678900000000000000000000000000000000000000000000000000000000000000000000000000000000000000008 | |
| k.123456789000000000000000000000000000000000000000000000000000000000000000000000000000000000008 | |
| l.123456789000000000000000000000000000000000000000000000000000000000000008 | |
| m.1234567890000000000000000000000000000000000000000000000000008 | |
| n.123456789000000000000000000000000000000000000000000008 | |
| o.1234567890000000000000000000000000000000008 | |
| p.1234567890000000000000000000000008 | |
| q.12345678900000000000008 | |
| r.123456789000008 | |
| s.12345678908 | |
| t.1234567898 | |
| u.12345678988 | |
| v.123456789888888 | |
| w.123456789888888888 | |
| x.1234567898888888888 | |
| y.12345678988888888888 | |
| z.12345678988888888888 | |
| #.12345678988888888888 | |
| #.12345678988888888888 | |
| #.12345678988888888888 | |
| #.123456789888888888888 | |
| #.12345678988888888888 | |
| #.12345678988888888888 | |
| #.12345678988888888888 | |
| #.1234851BT/KB-R852BT 2* [SUB.W] , [SUB.W] | |
| #.1234851BT/KB-R852BT 2* [SUB.W] | |
| #.1234851BT/KB-R852BT 2* [SUB.W] | |
| #.1234851BT/KB-R852BT 2* [SUB.W] | |
| #.1234851BT/KB-R852BT 2* [SUB.W] | |
| #.12348851BT/KB-R852BT 2* [SUB.W] | |
| #.1234851BT/KB-R852BT 2* [SUB.W] | |
| #.1234851BT/KB-R852BT 2* [SUB.W] | |
| #.1234851BT/KB-R852BT 2* [UB] | |
| #.1234851BT/KB-R852BT 2* [UB] | |
| #.1234851BT/KB-R852BT 2* [UB] | |
| #.1234851BT/KB-R852BT 2* [UB] | |
| #.1234851BT/KB-RB52BT 2* [UB] | |
| #.1234851BT/KB-R852BT 2* [UB] | |
| #.1234851BT/KB-R852BT 2* [UB] | |
| #.1234851BT/KB-R852BT 2* [UB] | |
| #.1235467898888888888888888888888888888888888888888888888888888888888888888888888888888888888888888888888888888 | |
| (80 Hz) | 200 Hz /100 Hz /80 Hz /60 Hz | BASS | / KD-R852BT |
| (00) | +06 ↓ -06 | MIDDLE | |
| (Q1.0) | Q2.0 /Q1.5 /Q1.25 /Q1.0 | Q | |
| (1.0 kHz) | 2.5 kHz /1.5 kHz /1.0 kHz /0.5 kHz | MIDDLE | |
| (00) | +06 ↓ -06 | MIDDLE | |
| (Q1.25) | Q1.25 /Q1.0 /Q0.75 | Q | |
| (10.0 kHz) | 17.5 kHz /15.0 kHz /12.5 kHz /10.0 kHz | TREBLE | |
| (00) | +06 ↓ -06 | MIDDLE | |
| (OFIX) | QFIX Q | ||
| (80 Hz) | 125 Hz /100 Hz /80 Hz /63 Hz | BASS | / KD-R951BT |
| (00) | +10 ↓ -10 | MID BASS | |
| (Q1.25) | Q2.0 /Q1.5 /Q1.25 /Q1.0 | Q | |
| (250 Hz) | 400 Hz /315 Hz /250 Hz /200 Hz | MID BASS | |
| (00) | +10 ↓ -10 | MID | |
| (Q1.25) | Q2.0 /Q1.5 /Q1.25 /Q1.0 | Q | |
| (800 Hz) | 1.25 kHz /1.0 kHz /800 Hz /630 Hz | MID | |
| (00) | +10 ↓ -10 | MID | |
| (Q1.0) | Q2.0 /Q1.25 /Q1.0 /Q0.75 | Q | |
| (2.5 kHz) | 4.0 kHz /3.15 kHz /2.5 kHz /2.0 kHz | MID HIGH | |
| (00) | +10 ↓ -10 | MID | |
| (Q1.0) | Q2.0 /Q1.25 /Q1.0 /Q0.75 | Q | |
| (8.0 kHz) | 12.5 kHz /10.0 kHz /8.0 kHz /6.3 kHz | HIGH | |
| (00) | +10 ↓ -10 | HIGH | |
| (Q1.0) | Q2.0 /Q1.25 /Q1.0 /Q0.75 | Q | |
| AUDIO | |||
| OFF: | BASS BOOST | ||
| LOUD | |||
g
BLUETOOTH
| .MENU le jujunjuni jujunjuni |
| T/P le jujunjuni |
| EQ SETTING | |
| / POP / JAZZ / HARD ROCK / FLAT / USER2 / USER1 / TALK / R&B / BASS BOOST / VOCAL BOOST Jules Lefkien / DANCE / CLASSICAL Lafel / Mousavi / | |
| EASY EQ 00 / 10 / 15 / 20 / 25 / 30 / 35 / 40 / 45 / 50 / 55 / 60 / 65 / 70 / 75 / 80 / 85 / 90 / 95 / 100 / 105 / 110 / 115 / 120 / 125 / 130 / 135 / 140 / 145 / 150 / 155 / 160 / 165 / 170 / 175 / 180 / 185 / 190 / 195 / 200 / 205 / 210 / 215 / 220 / 225 / 230 / 235 / 240 / 245 / 250 / 255 / 260 / 265 / 270 / 275 / 280 / 285 / 290 / 300 / 305 / 310 / 315 / 320 / 325 / 330 / 335 / 340 / 345 / 350 / 355 / 360 / 365 / 370 / 375 / 380 / 385 / 390 / 395 / 400 / 405 / 410 / 415 / 420 / 425 / 430 / 435 / 440 / 445 / 450 / 455 / 460 / 465 / 470 / 475 / 480 / 485 / 490 / 495 / 500 / 505 / 510 / 515 / 520 / 525 / 530 / 535 / 540 / 545 / 550 / 555 / 560 / 565 / 570 / 575 / 580 / 585 / 590 / 595 / 600 / 605 / 610 / 615 / 620 / 625 / 630 / 635 / 640 / 645 / 650 / 655 / 660 / 665 / 670 / 675 / 680 / 685 / 690 / 695 / 700 / 705 / 710 / 715 / 720 / 725 / 730 / 735 / 740 / 745 / 750 / 755 / 760 / 765 / 770 / 775 / 780 / 785 / 790 / 795 / 800 / 805 / 810 / 815 / 820 / 825 / 830 / 835 / 840 / 845 / 850 / 855 / 860 / 865 / 870 / 875 / 880 / 885 / 890 / 895 / 900 / 905 / 910 / 915 / 920 / 925 / 930 / 935 / 940 / 945 / 950 / 955 / 960 / 965 / 970 / 975 / 980 / 985 / 990 / 995 / 999 / 1000 / 1005 / 1010 / 1015 / 1020 / 1025 / 1030 / 1035 / 1040 / 1045 / 1050 / 1055 / 1060 / 1065 / 1070 / 1075 / 1080 / 1085 / 1090 / 1105 / 1110 / 1115 / 1120 / 1125 / 1130 / 1135 / 1140 / 1145 / 1150 / 1155 / 1160 / 1165 / 1170 / 1175 / 1180 / 1185 / 1190 / 1195 / 1200 / 1205 / 1210 / 1215 / 1220 / 1225 / 1230 / 1235 / 1240 / 1245 / 1250 / 1255 / 1260 / 1265 / 1270 / 1275 / 1280 / 1285 / 1290 / 1305 / 1310 / 1315 / 1320 / 1325 / 1330 / 1335 / 1340 / 1345 / 1350 / 1355 / 1360 / 1365 / 1370 / 1375 / 1380 / 1385 / 1390 / 1400 / 1405 / 1410 / 1415 / 1420 / 1425 / 1430 / 1435 / 1440 / 1445 / 1450 / 1455 / 1460 / 1465 / 1470 / 1475 / 1480 / 1485 / 1490 / 1500 / 1505 / 1510 / 1515 / 1520 / 1525 / 1530 / 1535 / 1540 / 1545 / 1550 / 1555 / 1560 / 1565 / 1570 / 1575 / 1580 / 1585 / 1590 / 1600 / 1605 / 1610 / 1615 / 1620 / 1625 / 1630 / 1635 / 1640 / 1645 / 1650 / 1655 / 1660 / 1665 / 1670 / 1675 / 1680 / 1685 / 1690 / 1695 / 1700 / 1705 / 1710 / 1715 / 1720 / 1725 / 1730 / 1735 / 1740 / 1745 / 1750 / 1755 / 1760 / 1765 / 1770 / 1775 / 1780 / 1785 / 1790 / 1795 / 1800 / 1805 / 1810 / 1815 / 1820 / 1825 / 1830 / 1835 / 1840 / 1845 / 1850 / 1855 / 1860 / 1865 / 1870 / 1875 / 1880 / 1885 / 1890 / 1895 / 1900 / 1905 / 1910 / 1915 / 1920 / 1925 / 1930 / 1935 / 1940 / 1945 / 1950 / 1955 / 1960 / 1965 / 1970 / 1975 / 1980 / 1985 / 1990 / 1995 / 1999 / 2000 / 2005 / 2010 / 2015 / 2020 / 2025 / 2030 / 2035 / 2040 / 2045 / 2050 / 2055 / 2060 / 2065 / 2070 / 2075 / 2080 / 2085 / 2090 / 2105 / 2110 / 2115 / 2120 / 2125 / 2130 / 2135 / 2140 / 2145 / 2150 / 2155 / 2160 / 2165 / 2170 / 2175 / 2180 / 2185 / 2190 / 2205 / 2210 / 2220 / 2230 / 2240 / 2245 / 2250 / 2255 / 2260 / 2265 / 2270 / 2275 / 2280 / 2285 / 2290 / 2305 / 2310 / 2315 / 2320 / 2325 / 2330 / 2335 / 2340 / 2345 / 2345 / 2350 / 2355 / 2360 / 2365 / 2370 / 2375 / 2380 / 2385 / 2390 / 2405 / 2410 / 2415 / 2420 / 2425 / 2430 / 2435 / 2440 / 2445 / 2450 / 2455 / 2460 / 2465 / 2470 / 2475 / 2480 / 2485 / 2490 / 2505 / 2510 / 2515 / 2520 / 2525 / 2530 / 2535 / 2540 / 2545 / 2550 / 2555 / 2560 / 2565 / 2570 / 2575 / 2580 / 2585 / 2600 / 2605 / 2610 / 2615 / 2620 / 2625 / 2630 / 2635 / 2640 / 2645 / 2645 / 2650 / 2655 / 2660 / 2665 / 2670 / 2675 / 2680 / 2685 / 2690 / 2705 / 2710 / 2715 / 2720 / 2725 / 2730 / 2735 / 2740 / 2745 / 2745 / 2750 / 2755 / 2760 / 2765 / 2770 / 2775 / 2780 / 2785 / 2790 / 2800 / 2805 / 2810 / 2815 / 2820 / 2825 / 2830 / 2835 / 2840 / 2845 / 2845 / 2850 / 2855 / 2860 / 2865 / 2870 / 2875 / 2880 / 2885 / 2890 / 2905 / 2910 / 2915 / 2920 / 2925 / 2930 / 2935 / 2940 / 2945 / 2945 / 2945 / 2945 / 2945 / 2945 / 2945 / 2945 / 2945 / 2945 / 2945 / 2945 / 2945 / 2945 / 2945 / 2945 / 2945 / 2840 / 2845 / 2845 / 2845 / 2845 / 2845 / 2845 / 2845 / 2845 / 2845 / 2845 / 2845 / 2845 / 2845 / 2845 / 2845 / 2845 / 2845 / 2945 / 2945 / 2945 / 2945 / 2945 / 2945 / 2945 / 2945 / 2945 / 2945 / 2945 / 2945 / 2945 / 2945 / 2945 / 2945 / | |
c [DELETE ALL] [DELETE]
DELETE
DELETE ALL
j(2)[NO]g(aei)[YES]
a
9 0 Z A) Jz11
OTHERS
90gZgA Jg21Jg21 (s) "OTHERS"
Bluetooth 281
[PHNEBOK] 18
2A/1V
y
y821 3b201 pai jia 5g 28 6g21 g
JLWJ1c
T/P 1
Bluetooth
.MENU
1
101 (olj Jg21 jbl) 8g21 g
0
guyx MENU 2
T/P 1
XX
a5121 jJLai a>
Jusai 1
.Bluetooth 1
[PHONEBOOK].[RECENTCALL]
DIAL NUMBER]
aJlsljI Jlaaiagg 8g21 gnnn
JU 1/SOURCE Jc J
Jc "JVC UNIT"
"BT PAIRING" allwlll
Bluetho 10000000000000000000000000000000000000000000000000000000000000000000000000000000000000000000000000000
bltiooth 1
slll lgl glgll glll cag
JLl Bluetooth Jlal jaiy aiaa oiao s!
Jl Jl Jl al all plasily aiaiall
dGcblt Bleettoh E (HFP1.5) psspln (A2DP) paaol 000000000000000000000000000000000000000000000000000000000000000000000000000000000000000
AUX
| XX:الإستعمال | |
| الإستعمال الحرفية الحرفية الحرفية الحرفية الحرفية الحرفية الحرفية الحرفية الحرفية الحرفية الحرفية الحرفية الحرفية الحرفية الحرفية الحرفية الحرفية الحرفية الحرفية الحرفية الحرفية الحرفية الحرفية الحرفية الحرفية الحرفية الحرفية الحرفية الحرفية الحرفية الحرفية الحرفية الحرفية الحرفية EXCELLENTLY [WEEKLY] [ONCE] [INCE] [OFF] [AM] [OFF] [SRS SELECT] [AM] [OFF] [SMM] [SSM] [SSM 13-18 / SSM 07-12 / SSM 01-06 SSM 13-18 / SSM 07-12 ] [Jajl] [Jajl] [Jajl] [Jajl] [Jajl] [Jajl] [Jajl] [Jajl] [Jajl] [Jajl] [Jajl] [Jajl] [Jajl] [Jajl] [Jajl] [Jajl] [Jajl] [Jajl] [Jajl] [Jajl] [Jajl] [OFF] [Jajl] [Jajl] [Jajl] [Jajl] [Jajl] [Jajl] [Jajl] [Jajl] [Jajl] [Jajl] [Jajl] [Jajl] [Jajl] [Jajl] [Jajl] [Jajl] [Jajl] [Jajl] [Jajl] [Jaj] [Jaj] [Jaj] [Jaj] [Jaj] [Jaj] [Jaj] [Jaj] [Jaj] [Jaj] [Jaj] [Jaj] [Jaj] [Jaj] [Jaj] [Jaj] [Jaj] [Jaj] [Jaj] [Jaj] [Jaj] [Jaj] [Jaj] [Jaj] [Jaj] [J aj] [Jaj] [Jaj] [Jaj] [Jaj] [Jaj] [Jaj] [Jaj] [Jaj] [Jaj] [Jaj] [Jaj] [Jaj] [Jaj] [Jaj] [Jaj] [Jaj] [Jaj] [Jaj] [Jaj] [Jaj] [Jaj] [Jaj] [Jaj] [Jaj] [JAJ] [JAJ] [JAJ] [JAJ] [JAJ] [JAJ] [JAJ] [JAJ] [JAJ] [JAJ] [JAJ] [JAJ] [JAJ] [JAJ] [JAJ] [JAJ] [JAJ] [JAJ] [JAJ] [JAJ] [JAJ] [JAJ] [JAJ] [JAJ] [JAJ] [J AJ] [JAJ] [JAJ] [JAJ] [JAJ] [JAJ] [JAJ] [JAJ] [JAJ] [JAJ] [JAJ] [JAJ] [JAJ] [JAJ] [JAJ] [JAJ] [JAJ] [JAJ] [JAJ] [JAJ] [JAJ] [JAJ] [JAJ] [JAJ] [JAJ] [JAZ] [JAZ] [JAZ] [JAZ] [JAZ] [JAZ] [JAZ] [JAZ] [JAZ] [JAZ] [JAZ] [JAZ] [JAZ] [JAZ] [JAZ] [JAZ] [JAZ] [JAZ] [JAZ] [JAZ] [JAZ] [JAZ] [JAZ] [JAZ] [JAZ] [J AZ] [JAZ] [JAZ] [JAZ] [JAZ] [JAZ] [JAZ] [JAZ] [JAZ] [JAZ] [JAZ] [JAZ] [JAZ] [JAZ] [JAZ] [JAZ] [JAZ] [JAZ] [JAZ] [JAZ] [JAZ] [JAZ] [JAZ] [JAZ] [JAZ] [JIZ] [JIZ] [JIZ] [JIZ] [JIZ] [JIZ] [JIZ] [JIZ] [JIZ] [JIZ] [JIZ] [JIZ] [JIZ] [JIZ] [JIZ] [JIZ] [JIZ] [JIZ] [JIZ] [JIZ] [JIZ] [JIZ] [JIZ] [JIZ] [JIZ] [JAZ] [JAZ] [JAZ] [JAZ] [JAZ] [JAZ] [JAZ] [JAZ] [JAZ] [JAZ] [JAZ] [JAZ] [JAZ] [JAZ] [JAZ] [JAZ] [JAZ] [JAZ] [JAZ] [JAZ] [JAZ] [JAZ] [JAZ] [JAZ] [JZ] [JAZ] [JAZ] [JAZ] [JAZ] [JAZ] [JAZ] [JAZ] [JAZ] [JAZ] [JAZ] [JAZ] [JAZ] [JAZ] [JAZ] [JAZ] [JAZ] [JAZ] [JAZ] [JAZ] [JAZ] [JAZ] [JAZ] [JAZ] [JAZ] [JAz] [JAZ] [JAZ] [JAZ] [JAZ] [JAZ] [JAZ] [JAZ] [JAZ] [JAZ] [JAZ] [JAZ] [JAZ] [JAZ] [JAZ] [JAZ] [JAZ] [JAZ] [JAZ] [JAZ] [JAZ] [JAZ] [JAZ] [JAZ] [JAZ] [JAX] [JAZ] [JAZ] [JAZ] [JAZ] [JAZ] [JAZ] [JAZ] [JAZ] [JAZ] [JAZ] [JAZ] [JAZ] [JAZ] [JAZ] [JAZ] [JAZ] [JAZ] [JAZ] [JAZ] [JAZ] [JAZ] [JAZ] [JAZ] [JAZ] [JAJ] [JAZ] [JAZ] [JAZ] [JAZ] [JAZ] [JAZ] [JAZ] [JAZ] [JAZ] [JAZ] [JAZ] [JAZ] [JAZ] [JAZ] [JAZ] [JAZ] [JAZ] [JAZ] [JAZ] [JAZ] [JAZ] [JAZ] [JAZ] [J AZ] [J AZ] [JAZ] [JAZ] [JAZ] [JAZ] [JAZ] [JAZ] [JAZ] [JAZ] [JAZ] [JAZ] [JAZ] [JAZ] [JAZ] [JAZ] [JAZ] [JAZ] [JAZ] [JAZ] [JAZ] [JAZ] [JAZ] [JAZ] [JAZ] [J AZ] [JZ] [JAZ] [JAZ] [JAZ] [JAZ] [JAZ] [JAZ] [JAZ] [JAZ] [JAZ] [JAZ] [JAZ] [JAZ] [JAZ] [JAZ] [JAZ] [JAZ] [JAZ] [JAZ] [JAZ] [JAZ] [JAZ] [JAZ] [JAZ] [J AZ] [JAz] [JAZ] [JAZ] [JAZ] [JAZ] [JAZ] [JAZ] [JAZ] [JAZ] [JAZ] [JAZ] [JAZ] [JAZ] [JAZ] [JAZ] [JAZ] [JAZ] [JAZ] [JAZ] [JAZ] [JAZ] [JAZ] [JAZ] [JAZ] [J AZ] [JIZ] [JAZ] [JAZ] [JAZ] [JAZ] [JAZ] [JAZ] [JAZ] [JAZ] [JAZ] [JAZ] [JAZ] [JAZ] [JAZ] [JAZ] [JAZ] [JAZ] [JAZ] [JAZ] [JAZ] [JAZ] [JAZ] [JAZ] [JAZ] [J AZ] [JZZ] [JZZ] [JZZ] [JZZ] [JZZ] [JZZ] [JZZ] [JZZ] [JZZ] [JZZ] [JZZ] [JZZ] [JZZ] [JZZ] [JZZ] [JZZ] [JZZ] [JZZ] [JZZ] [JZZ] [JZZ] [JZZ] [JZZ] [JZZ] [JZZ] [JZ] [JAZ] [JAZ] [JAZ] [JAZ] [JAZ] [JAZ] [JAZ] [JAZ] [JAZ] [JAZ] [JAZ] [JAZ] [JAZ] [JAZ] [JAZ] [JAZ] [JAZ] [JAZ] [JAZ] [JAZ] [JAZ] [JAZ] [JAZ] [JIZ] [JAZ] [JAZ] [JAZ] [JAZ] [JAZ] [JAZ] [JAZ] [JAZ] [JAZ] [JAZ] [JAZ] [JAZ] [JAZ] [JAZ] [JAZ] [JAZ] [JAZ] [JAZ] [JAZ] [JAZ] [JAZ] [JAZ] [JAZ] [JIZ] [JZ] [JAZ] [JAZ] [JAZ] [JAZ] [JAZ] [JAZ] [JAZ] [JAZ] [JAZ] [JAZ] [JAZ] [JAZ] [JAZ] [JAZ] [JAZ] [JAZ] [JAZ] [JAZ] [JAZ] [JAZ] [JAZ] [JAZ] [JAZ] [JZ] [JZ] [JZ] [JZ] [JZ] [JZ] [JZ] [JZ] [JZ] [JZ] [JZ] [JZ] [JZ] [JZ] [JZ] [JZ] [JZ] [JZ] [JZ] [JZ] [JZ] [JZ] [JZ] [JZ] [JZ] [JZZ] [JZZ] [JZZ] [JZZ] [JZZ] [JZZ] [JZZ] [JZZ] [JZZ] [JZZ] [JZZ] [JZZ] [JZZ] [JZZ] [JZZ] [JZZ] [JZZ] [JZZ] [JZZ] [JZZ] [JZZ] [JZZ] [JZZ] [JZZ] [Jzz] [Jzz] [Jzz] [Jzz] [Jzz] [Jzz] [Jzz] [Jzz] [Jzz] [Jzz] [Jzz] [Jzz] [Jzz] [Jzz] [Jzz] [Jzz] [Jzz] [Jzz] [Jzz] [Jzz] [Jzz] [Jzz] [Jzz] [Jzz] [Jzz] [JZZ] [JZZ] [JZZ] [JZZ] [JZZ] [JZZ] [JZZ] [JZZ] [JZZ] [JZZ] [JZZ] [JZZ] [JZZ] [JZZ] [JZZ] [JZZ] [JZZ] [JZZ] [JZZ] [JZZ] [JZZ] [JZZ] [JZZ] [JZZ] [J ZZ] [JZZ] [JZZ] [JZZ] [JZZ] [JZZ] [JZZ] [JZZ] [JZZ] [JZZ] [JZZ] [JZZ] [JZZ] [JZZ] [JZZ] [JZZ] [JZZ] [JZZ] [JZZ] [JZZ] [JZZ] [JZZ] [JZZ] [JZZ] [JZZ] [JZX] [JZX] [JZX] [JZX] [JZX] [JZX] [JZX] [JZX] [JZX] [JZX] [JZX] [JZX] [JZX] [JZX] [JZX] [JZX] [JZX] [JZX] [JZX] [JZX] [JZX] [JZX] [JZX] [JZX] [JZX] [JZZ] [JZZ] [JZZ] [JZZ] [JZZ] [JZZ] [JZZ] [JZZ] [JZZ] [JZZ] [JZZ] [JZZ] [JZZ] [JZZ] [JZZ] [JZZ] [JZZ] [JZZ] [JZZ] [JZZ] [JZZ] [JZZ] [JZZ] [JZZ] [JIZZ] [JIZZ] [JIZZ] [JIZZ] [JIZZ] [JIZZ] [JIZZ] [JIZZ] [JIZZ] [JIZZ] [JIZZ] [JIZZ] [JIZZ] [JIZZ] [JIZZ] [JIZZ] [JIZZ] [JIZZ] [JIZZ] [JIZZ] [JIZ Z] [JIZZ] [JIZZ] [JIZZ] [JIZZ] [JIZZ] [JIZZ] [JIZZ] [JIZZ] [JIZZ] [JIZZ] [JIZZ] [JIZZ] [JIZZ] [JIZZ] [JIZZ] [JIZZ] [JIZZ] [JIZZ] [JIZZ] [JIZZZ] [JIZZZ] [JIZZZ] [JIZZZ] [JIZZZ] [JIZZZ] [JIZZZ] [JIZZZ] [JIZZZ] [JIZZZ] [JIZZZ] [JIZZZ] [JIZZZ] [JIZZZ] [JIZZZ] [JIZZZ] [JIZZZ] [JIZZZ] [JIZZZ] [JIZZZ] [JIZZ] [JIZZ] [JIZZ] [JIZZ] [JIZZ] [JIZZ] [JIZZ] [JIZZ] [JIZZ] [JIZZ] [JIZZ] [JIZZ] [JIZZ] [JIZZ] [JIZZ] [JIZZ] [JIZZ] [JIZZ] [JIZZ] [JZZ] [JZZ] [JZZ] [JZZ] [JZZ] [JZZ] [JZZ] [JZZ] [JZZ] [JZZ] [JZZ] [JZZ] [JZZ] [JZZ] [JZZ] [JZZ] [JZZ] [JZZ] [JZZ] [JZZ] [JZZ] [JZZ] [JZZ] [JZZ] [JZZ] [JZZ] [JZZ] [JZZ] [JZZ] [JZZ] [JZZ] [JZZ] [JZZ] [JZZ] [JZZ] [JZZ] [JZZ] [JZZ] [JZZ] [JZZ] [JZZ] [JZZ] [JZZ] [JZZ] [KZZ] [KZZ] [KZZ] [KZZ] [KZZ] [KZZ] [KZZ] [KZZ] [KZZ] [KZZ] [KZZ] [KZZ] [KZZ] [KZZ] [KZZ] [KZZ] [KZZ] [KZZ] [KZZ] [KZZ] [KZZ] KZZ KZZ KZZ KZZ KZZ KZZ KZZ KZZ KZZ KZZ KZZ KZZ KZZ KZZ KZZ KZZ KZZ KZZ KZZ KZZ KZZ KZZ KZZ KZZ KZZ KZZ | |
F
(PTY)
JFIMFMjuaoljgso
T/P 100000000000000000000000000000000000000000000000000000000
SCIENCE.CULTURE.DRAMA.EDUCATE.SPORT INFO.AFFAIRS NEWS.PTY 2000)LIGHT M.(2000)EASY M.(2000)ROCK M.(2000)POP M.VARIED RELIGION.SOCIAL.CHILDREN.FINANCE.WEATHER.(2000)OTHERM.CLASSES FOLKM.OLDIES.(2000)NATION M.COUNTRY JAZZ.LEISURE.TRAVEL.PHONE IN DOCUMENT.(2000)
12018 19
JFFM,
T/P
J 1000000000000000000000000000000000000000000000000000
T/P 2
.MENU
TUNER] 10000000000000000000000000000000000000000000000000
T/P 1
aLs aLfo FM aegy sLp aagaae y Jiaaiwie "ST"
aboo jc
AMgFM aagoo 1/SOURCE lc hioi
(RM-RK52lc/laocbiolg) ▪/lclhioi
(9)
(RM-RK52/aj) ▪/laocjwlybdoi
Lgab
.1
[DRIVECHANGE] 4 1 1
[DRIVE5] [DRIVE1]
2015年上海春季班
(△→[HEAD MODE] Loric baa aabbs jy iPod 1
. MENU 1
. . WAV/WMA/MP3 J
. PLAYLISTS) aJMC/JPC JPOD
*COMPOSERS.GENRES.PODCASTS.SONGS.ALBUMS.ARTISTS
*AUDIOBOOKS
iPod
...Lxdo 15
y 0000000000000000000000000000000000000000000000000000000000000000000000000
gai aai 1i
[HEAD MODE] iPod
.MENU 1
JXI [USB/IPOD] 1x1x1x1x1x1x1x1x1x1x1x1x1x1x1x1x1x1x1x1x1x1x1x1x1x1x1x1x1x1x1x1x1x1x1x1x1x1x1x1x1x1x1x1x1x1x1x1x1x1x1 x2
JXI [IPOD] 1xx1xx1xx1xx1xx1xx1xx1xx1xx1xx1xx1xx1xx1xx1xx1xx1xx1xx1xx1xx1xx1xx1xx1xx1xx1xx1xx1xx
T/P 10
.MENU
aaw21 jzjzjc zic 21
[HEAD MODE] iPod e1s 1
LgS L S y, aayy/gya y 0 2 A) J A
(OHTERS90ZA A) J
90ZA A 15 (s) "OTHERS" 2w,
iPod / USB / CD
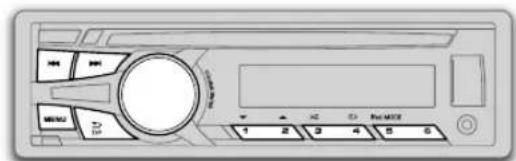
1 1
| (RM-RK52 gi /▲ le lal g) ▶ ▶ /▲ le lal g | #do/#do |
| (RM-RK52 gi /▲ le lal g) 2▲/1▼ le lal g | * |
| (RM-RK52 gi /▲ le lal g) ▶ ▶ /▲ le lal g | #do/#do |
| (JMC) JVC Music Control / (JPC) JVC Playlist Creator gi # # # # # # # # # # # # # # # # # # # # # # # # # # # # # # # # # # # # # # # # # # # # # # # # # # # # # # # # # # # # # # # # # # # # # # # # # # # # # # # # # # # # # # # # # # # # # # # # # # # # RPT OFF .TRACK RPT : (114RPT OFF .FOLDER RPT ,TRACK RPT .WAV/WMA/MP3 .RPT OFF .ALL RPT .ONE RPT .iPod ) | * * |
| RND OFF .ALL RND : wav/MP3 .RND OFF .ALL RND .FOLDER RND .JMC / JPC gi WAV/WMA/MP3 .RND OFF .ALL RND .SONG RND .iPod | #do/#do |
| CLOCK | |
| (CT) Clock Time: 10 MHz, 2.5 GHz, 10 MHz, 2.5 GHz, 10 MHz, 2.5 GHz, 10 MHz, 2.5 GHz, 10 MHz, 2.5 GHz, 10 MHz, 2.5 GHz, 10 MHz, 2.5 GHz, 10 MHz, 2.5 GHz, 10 MHz, 2.5 GHz, 10 MHz, 2.5 GHz, ON | CLOCK ADJ |
| SETTINGS | |
| BEEP | BEEP |
| SRC SELECT | |
| *AM | *AM |
| *AUX | *AUX |
| LANGUAGE | LANGUAGE |
| F/W UPDATE | |
| SYSTEM / BLUETOOTH | |
| (F) | (F) |
jai 2
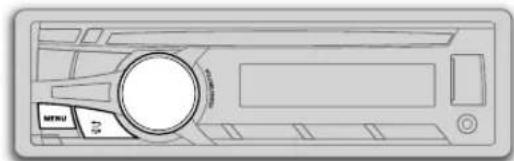
a + b = 3
sgiio h
joo
J
Loglo
p
Lg
a21 0521
:
aaii i 100
:PLc
iPone/iPod USB jgs
1111 1111 1111 1111 1111 1111 1111 1111 1111 1111 1111 1111 1111 1111 11
Lg 1000000000000000000000000000000000000000000000000000000000000000
| r | plaza21 |
| r | cl |
| ε | Jous21 |
| δ | iPod/USB/CD |
| v | rajesh |
| A | AUX |
| 4 | BLUETOOTH° |
| 1r | |
| 10 | Lalal |
| 11 | LogLea21 |
| 1V | JLbca21 |
| 19 | Lalal |
| r. |

aaii jai aai i 10000000000000000000000000000000000000000000000
j0010000000000000000000000000000000000000000000000000000
:LiIgbiWgJooJoLei
aIgawyJolal JwWll jw wai 8 aIgawyJcL aIw Lo gJbW gai 8
aIgssu 100
L 1
1.2.211 = 1 = 1 = 1 = 1 =
JL JIJIJIJIJIJIJIJIJIJIJIJIJIJIJIJIJIJIJIJIJIJIJIJIJIJIJIJIJIJIJIJIJIJIJIJIJIJIJIJIJIJIJIJIJIJIJIJIJIJIJIJIJIJIJIJIJIJIJIJIJIJIJIJIJIJIJIJIJIJIJIJIJIJIJIJIJIJIJIJIJIJIJIJIJIJIJIJIJIJIJIJIJIJIJIJIJIJIJIJIJIJ
Aaagaae aae aee aee
aannnlll [xx] aeggge gaae (xx
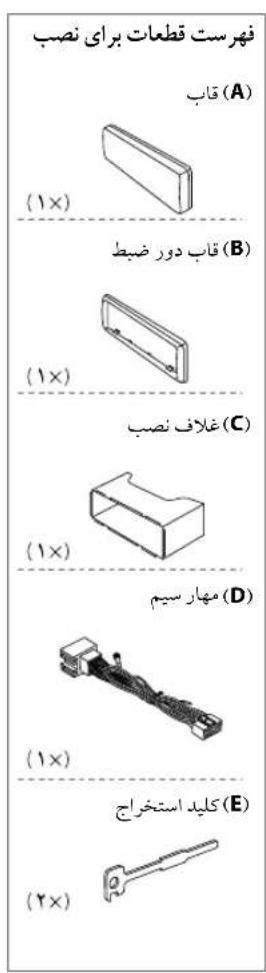
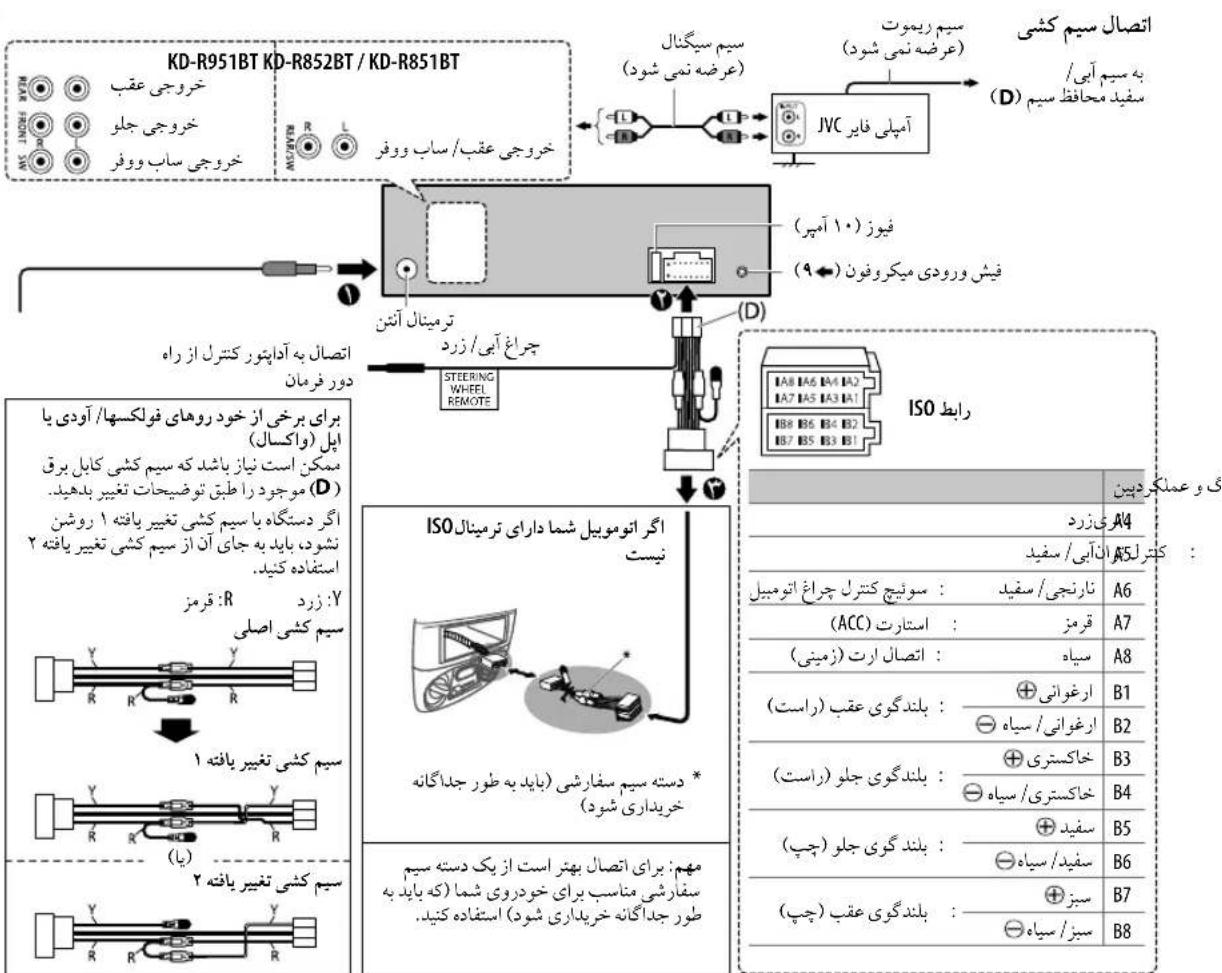
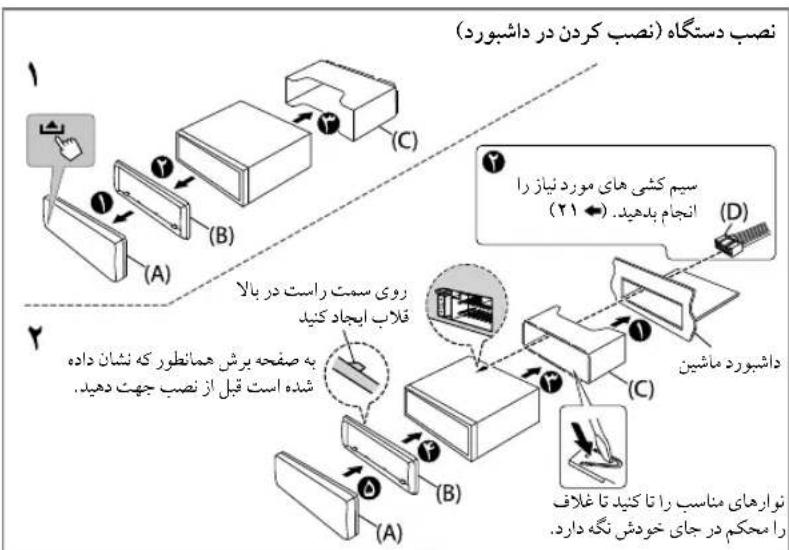
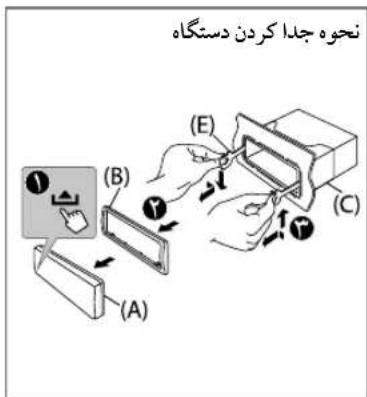
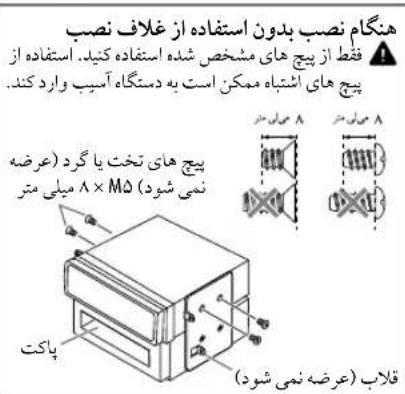


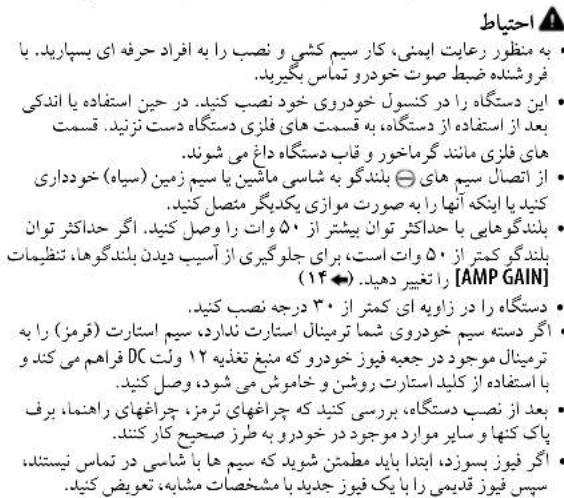
http://www.jvc.net/cs/car/>
JVC Playlist Creator. JVC Music Control
JVC Playlist Creator 50
JVC Jolalu Lull Uol jus Jp Jp Jp Jp Jp Jp Jp Jp Jp Jp Jp Jp Jp Jp Jp Jp Jp Jp Jp Jp Jp Jp Jp Jp Jp Jp Jp Jp Jp Jp Jp Jp Jp Jp Jp Jp Jp Jp Jp Jp Jp Jp Jp Jp Jp Jp Jp Jp Jp Jp J
g 1
jJVC Music Control, JVC Playlist Creator. http://www.jvc.net/cs/car/:
s 50
2020 51,51,51
juiu
ABBΓΕχ3ινΚΜΗΟΝΡ
A6B7B8E 3H H M H O P
CTYΦXU4WUbbb3IORE
C75yXyIyIyIyIy
USB
WAV/WMA/MP3
Lai jy USB 1000000000000000000000000000000000000000000000000000
3.214056 2
i#y#slui jSla
= 99 : 10% < < 99 : 100
3^x = - 2 + 22
MP = 3
9^ : WMA
99:WAV
499 48 4A
()
()
0j 1sU5B s
iPhone/iPod
Made for
(5th generation , 4th , 3rd , 2nd , 1st) iPod touch - iPod classic -
(7th generation , 6th , 5th , 4th , 3rd) iPod nano - 5 , 4S , 4 , 3GS , iPhone 3G , iPhone -
"Videos" 2012 2012 2012 2012 2012 2012 [HEAD MODE]
iPhone /iPod 2345678900000000000000000000
j 1
.1yjLai kaoJy jis cuiu uo s y jie pui jia 1. http://www.jvc.net/cs/car/
Soo la llo la Ssoo
1 1


jdyduy yuys
j 1
L
iJ1jI JIs Sua
…
111111111111111111111111111
1
U)ReWritable/(LsS)U) Recordable S
i 100
C. loii plo 1ol 5, 60
0111 50
1.24 1.25 1.26 1.27 1.28 1.29 1.30
DVD 5, jB"DualDisc"JgS: SjD
CompactDiscDigitalAudio
DVD 5
.
- 1, & 2, 2, & 3 .
Color FLOW 03 COLOR FLOW 01
1.5
/RELAX /EMOTION /TECHNO /GROOVE /SPECTRUM
NIGHT SWEEP
ALLZONE]
(ZONE 1]
ZONE2]DISP ZONE
a 50
()
BLUE/GREEN/RED
3100
15 151,444101p1p1p1p1p1p1p1
[PRESET] [USER] pL L
DISP ZONE] [00]
psilis 1s201 USB sssssssssssssssssssssssssssssssssssssssssssssssssssssssssssssssssssssss
aee
0FF:ss sS 5s
[DAY COLOR] [NIGHT COLOR].
DAY COLOR
NIGHT COLOR
COLOR GUIDE
KD-R852BT/KD-R851BTKD-R951BT

ALL ZONE

MENUM
140s s 200000000000000000000000000000000000000
S OBC = S COD + S_ BOC
T/P.
ab( a^2 + 1) = 0
1 9 1
1
[DIAL NUMBER] [PHONEBOOK].[RECENT CALL]
1234567890
1
1.2020 1.2020 1.2020 1.2020 1.2020 1.2020 1.2020
(6)1)
()()
3y 0s12
DIAL NUMBER] 1
150
abla 1j1b1j(y1j
1
(61)j0jla glaos
a 1
NO PRESET"
BLUETOOTH
| XX:الله <|im_start|>assistant / | 30 SEC-01 SEC OFF . . . . . . . . . . . . . . . . . . . . . . . . . . . . . . . . . . . . . . . . . . . . . . . . . . . . . . . . . . . . . . . . . . . . . . . . . . . . . . . . . . . . . . . . . . . . . . . . . . . . IN UNIT ( . . . . . . . . . . . . . . . . . . . . . . . . . . . . . . . . . . . . . . . . . . . . . . . . . . . . . . . . . . . . . . . . INUNIT ( . . . . . . . . . . . . . . . . . . . . . . . . . . . . . . . . . . . . . . . . . . . . . . . . . INUNIT ( . . . . . . . . . . . . . . . . . . . . . . . . . . . . . . . . . . INUNIT ( . . . . . . . . . . . . . . . . . . . . . . . . . . . INUNIT ( . . . . . . . . . . . . . . . . . . . INUNIT ( . . . . . . . . . . . . . INUNIT ( . . . . . INUNIT ( . INUNIT ( . INUNIT ( . INUNIT ( . INUNIT ( . INUNIT ( . INUNIT ( . INUNIT ( . INUNIT ( . INUNIT ( . INUNIT ( . INUNIT ( . INUNIT ( . INUNIT ( . INUNIT ( . INUNIT ( . INUNIT ( . IN UNIT ( . IN UNIT ( . IN UNIT ( . IN UNIT ( . IN UNIT ( . IN UNIT ( . IN UNIT ( . IN UNIT ( . IN UNIT ( . IN UNIT ( . IN UNIT ( . IN UNIT ( . IN UNIT ( . IN UNIT ( . IN UNIT ( . IN UNIT ( . IN UNIT ( . |
| COLOR 06 COLOR 29 COLOR 01 COLOR 01 COLOR 01 COLOR 01 COLOR 01 COLOR 01 COLOR 01 COLOR 01 COLOR 01 COLOR 01 COLOR 01 COLOR 01 COLOR 01 COLOR 01 COLOR 01 COLOR 01 COLOR 01 COLOR 01 COLOR 01 COLOR 01 COLOR 01 COLOR 01 COLOR 01 COLOR 01 COLOR 01 COLOR 02 COLOR 01 COLOR 02 COLOR 01 COLOR 02 COLOR 01 COLOR 02 COLOR 01 COLOR 02 COLOR 01 COLOR 02 COLOR 01 COLOR 02 COLOR 01 COLOR 02 COLOR 01 COLOR 02 COLOR 01 COLOR 02 COLOR 01 COLOR 02 COLOR 01 COLOR 02 COLOR 01 COLOR 02 COLOR 02 COLOR 01 COLOR 02 COLOR 01 COLOR 02 COLOR 01 COLOR 02 COLOR 01 COLOR 02 COLOR 01 COLOR 02 COLOR 01 COLOR 02 COLOR 01 COLOR 02 COLOR 01 COLOR 02 COLOR 01 COLOR 02 COLOR 01 COLOR 02 COLOR 01 COLOR 02 COLOR 01 COLOR 01 COLOR 02 COLOR 01 COLOR 02 COLOR 01 COLOR 02 COLOR 01 COLOR 02 COLOR 01 COLOR 02 COLOR 01 COLOR 02 COLOR 01 COLOR 02 COLOR 01 COLOR 02 COLOR 01 COLOR 02 COLOR 01 COLOR 02 COLOR 01 COLOR 02 COLOR 01 COLOR 01 COLOR 01 COLOR 02 COLOR 01 COLOR 02 COLOR 01 COLOR 02 COLOR 01 COLOR 01 COLOR 02 COLOR 01 COLOR 02 COLOR 01 COLOR 01 COLOR 02 COLOR 01 COLOR 02 COLOR 01 COLOR 01 COLOR 02 COLOR 01 COLOR 01 COLOR 02 COLOR 01 COLOR 01 COLOR 02 COLOR 01 COLOR 01 COLOR 02 COLOR 01 COLOR 01 COLOR 02 COLOR 01 COLOR 01 COLOR 02 COLOR 01 COLOR 01 COLOR 02 COLOR 01 COLOR 01 COLOR 02 COLOR 01 COLOR 02 COLOR 01 COLOR 01 COLOR 02 COLOR 01 COLOR 01 COLOR 02 COLOR 01 COLOR 01 COLOR 02 COLOR 01 COLOR 01 COLOR 02 COLOR 01 COLOR 01 COLOR 02 COLOR 01 COLOR 01 COLOR 01 COLOR 02 COLOR 01 COLOR 01 COLOR 02 COLOR 01 COLOR 01 COLOR 02 COLOR 01 COLOR 01 COLOR 02 COLOR 01 COLOR 01 COLOR 02 COLOR 01 COLOR 01 COLOR 02 COLOR 01 COLOR 01 COLOR 02 COLOR 01 COLOR 01 COLOR 02 COLOR 02 COLOR 01 COLOR 01 COLOR 02 COLOR 01 COLOR 01 COLOR 02 COLOR 01 COLOR 01 COLOR 02 COLOR 01 COLOR 01 COLOR 02 COLOR 01 COLOR 01 COLOR 02 COLOR 01 COLOR 01 COLOR 02 COLOR 01 COLOR 01 COLOR 02 COLOR 01 COLOR 01 COLOR 01 COLOR 02 COLOR 01 COLOR 01 COLOR 02 COLOR 02 COLOR 01 COLOR 01 COLOR 02 COLOR 01 COLOR 01 COLOR 02 COLOR 01 COLOR 01 COLOR 02 COLOR 01 COLOR 01 COLOR 02 COLOR 01 COLOR 01 COLOR 02 COLOR 01 COLOR 01 COLOR 01 COLOR 02 COLOR 01 COLOR 01 COLOR 02 COLOR 01 COLOR 02 COLOR 01 COLOR 01 COLOR 02 COLOR 01 COLOR 01 COLOR 02 COLOR 01 COLOR 01 COLOR 02 COLOR 01 COLOR 01 COLOR 02 COLOR 01 COLOR 01 COLOR 02 COLOR 01 COLOR 02 COLOR 01 COLOR 01 COLOR 02 COLOR 01 COLOR 01 COLOR 01 COLOR 02 COLOR 01 COLOR 01 COLOR 02 COLOR 01 COLOR 01 COLOR 02 COLOR 01 COLOR 01 COLOR 02 COLOR 01 COLOR 01 COLOR 02 COLOR 01 COLOR 01 COLOR 02 COLOR 02 COLOR 01 COLOR 01 COLOR 02 COLOR 01 COLOR 01 COLOR 01 COLOR 02 COLOR 01 COLOR 01 COLOR 02 COLOR 01 COLOR 01 COLOR 02 COLOR 01 COLOR 01 COLOR 02 COLOR 01 COLOR 01 COLOR 02 COLOR 01 COLOR 01 COLOR 02 COLOR 01 COLOR 02 COLOR 01 COLOR 01 COLOR 02 COLOR 01 COLOR 02 COLOR 01 COLOR 01 COLOR 02 COLOR 01 COLOR 01 COLOR 02 COLOR 01 COLOR 01 COLOR 02 COLOR 01 COLOR 01 COLOR 02 COLOR 02 COLOR 01 COLOR 01 COLOR 02 COLOR 01 COLOR 01 COLOR 02 COLOR 01 COLOR 01 COLOR 02 COLOR 02 COLOR 01 COLOR 01 COLOR 02 COLOR 02 COLOR 01 COLOR 01 COLOR 02 COLOR 02 COLOR 01 COLOR 01 COLOR 02 COLOR 02 COLOR 01 COLOR 01 COLOR 02 COLOR 02 COLOR 01 COLOR 01 COLOR 02 COLOR 02 COLOR 01 COLOR 01 COLOR 02 COLOR 01 COLOR 01 COLOR 02 COLOR 02 COLOR 01 COLOR 01 COLOR 02 COLOR 02 COLOR 01 COLOR 01 COLOR 02 COLOR 02 COLOR 01 COLOR 01 COLOR 02 COLOR 02 COLOR 01 COLOR 01 COLOR 02 COLOR 02 COLOR 02 COLOR 01 COLOR 01 COLOR 02 COLOR 02 COLOR 01 COLOR 01 COLOR 02 COLOR 02 COLOR 01 COLOR 01 COLOR 02 COLOR 02 COLOR 01 COLOR 01 COLOR 02 COLOR 02 COLOR 01 COLOR 01 COLOR 02 COLOR 02 COLOR 01 COLOR 01 COLOR 01 COLOR 02 COLOR 02 COLOR 01 COLOR 01 COLOR 02 COLOR 02 COLOR 01 COLOR 01 COLOR 02 COLOR 02 COLOR 01 COLOR 01 COLOR 02 COLOR 02 COLOR 01 COLOR 01 COLOR 02 COLOR 02 COLOR 01 COLOR 01 COLOR 02 COLOR 02 COLOR 02 COLOR 01 COLOR 01 COLOR 01 COLOR 02 COLOR 02 COLOR 01 COLOR 01 COLOR 02 COLOR 02 COLOR 01 COLOR 01 COLOR 02 COLOR 02 COLOR 01 COLOR 01 COLOR 02 COLOR 02 COLOR 01 COLOR 01 COLOR 02 COLOR 02 COLOR 01 COLOR 02 COLOR 02 COLOR 01 COLOR 01 COLOR 02 COLOR 02 COLOR 01 COLOR 01 COLOR 02 COLOR 02 COLOR 01 COLOR 01 COLOR 02 COLOR 02 COLOR 01 COLOR 01 COLOR 02 COLOR 02 COLOR 01 COLOR 01 COLOR 02 COLOR 02 COLOR 01 COLOR 02 COLOR 02 COLOR 01 COLOR 02 COLOR 02 COLOR 01 COLOR 01 COLOR 02 COLOR 02 COLOR 01 COLOR 01 COLOR 02 COLOR 02 COLOR 01 COLOR 01 COLOR 02 COLOR 02 COLOR 01 COLOR 01 COLOR 02 COLOR 02 COLOR 01 COLOR 01 COLOR 01 COLOR 02 COLOR 02 COLOR 02 COLOR 01 COLOR 01 COLOR 02 COLOR 02 COLOR 01 COLOR 01 COLOR 02 COLOR 02 COLOR 01 COLOR 01 COLOR 02 COLOR 02 COLOR 01 COLOR 01 COLOR 02 COLOR 02 COLOR 01 COLOR 01 COLOR 02 COLOR 01 COLOR 01 COLOR 02 COLOR 01 COLOR 01 COLOR 02 COLOR 02 COLOR 01 COLOR 01 COLOR 02 COLOR 02 COLOR 01 COLOR 01 COLOR 02 COLOR 02 COLOR 01 COLOR 02 COLOR 02 COLOR 01 COLOR 01 COLOR 02 COLOR 02 COLOR 01 COLOR 01 COLOR 02 COLOR 02 COLOR 02 COLOR 01 COLOR 01 COLOR 02 COLOR 02 COLOR 01 COLOR 01 COLOR 02 COLOR 02 COLOR 01 COLOR 01 COLOR 02 COLOR 02 COLOR 02 COLOR 01 COLOR 01 COLOR 02 COLOR 02 COLOR 02 COLOR 01 COLOR 01 COLOR 02 COLOR 02 COLOR 02 COLOR 01 COLOR 01 COLOR 02 COLOR 02 COLOR 02 COLOR 01 COLOR 01 COLOR 02 COLOR 02 COLOR 02 COLOR 01 COLOR 01 COLOR 01 COLOR 02 COLOR 02 COLOR 02 COLOR 01 COLOR 01 COLOR 02 COLOR 02 COLOR 02 COLOR 01 COLOR 01 COLOR 02 COLOR 02 COLOR 02 COLOR 01 COLOR 01 COLOR 02 COLOR 02 COLOR 02 COLOR 01 COLOR 01 COLOR 02 COLOR 02 COLOR 01 COLOR 01 COLOR 02 COLOR 02 COLOR 02 COLOR 01 COLOR 01 COLOR 02 COLOR 02 COLOR 02 COLOR 01 COLOR 01 COLOR 02 COLOR 02 COLOR 02 COLOR 01 COLOR 01 COLOR 02 COLOR 03 COLOR 04 COLOR 05 COLOR 06 COLOR 07 COLOR 08 COLOR 09 COLOR 10 COLOR 11 COLOR 12 COLOR 13 COLOR 14 COLOR 15 COLOR 16 COLOR 17 COLOR 18 COLOR 19 COLOR 20 COLOR 21 COLOR 22 COLOR 23 COLOR 24 COLOR 25 COLOR 26 COLOR 27 COLOR 28 COLOR 29 COLOR 30 COLOR 31 COLOR 32 COLOR 33 COLOR 34 COLOR 35 COLOR 36 COLOR 37 COLOR 38 COLOR 39 COLOR 40 COLOR 41 COLOR 42 COLOR 43 COLOR 44 COLOR 45 COLOR 46 COLOR 47 COLOR 48 COLOR 49 COLOR 50 COLOR 51 COLOR 52 COLOR 53 COLOR 54 COLOR 55 COLOR 56 COLOR 57 COLOR 58 COLOR 59 COLOR 60 COLOR 61 COLOR 62 COLOR 63 COLOR 64 COLOR 65 COLOR 66 COLOR 67 COLOR 68 COLOR 69 COLOR 70 COLOR 71 COLOR 72 COLOR 73 COLOR 74 COLOR 75 COLOR 76 COLOR 77 COLOR 78 COLOR 79 COLOR 80 COLOR 81 COLOR 82 COLOR 83 COLOR 84 COLOR 85 COLOR 86 COLOR 87 COLOR 88 COLOR 89 COLOR 90 COLOR 91 COLOR 92 COLOR 93 COLOR 94 COLOR 95 COLOR 96 COLOR 97 COLOR 98 COLOR 99 |
.2j0 001000 jieji 6
| Sali## |
| PRIORITY. Y |
| IPhone ### |
11
| RECENT CALL | |
| PHONEBOOK | |
| DIAL NUMBER |
BLUE
| ### | ### | ### |
| ### | ### | ### |
| ### | ### | ### |
| ### | ### | ### |
| ### | ### | ### |
| ### | ### | ### |
| ### | ### | ### |
| ### | ### | ### |
| ### | ### | ### |
| ### | ### | ### |
| ### | ### | ### |
| ### | ### | ### |
| ### | ### | ### |
| ### | ### ### | ### |
| ### | ### | ### |
| ### | ### | ### |
| ### | ### | ### |
| ### | ### | ### |
| ### | ### | ### |
| ### | ### | ### |
| ### | ### | ### |
| ### | ### | ### |
| ### | ### | ### |
| ### | ### | ### |
| ### | ### | ### |
| ### | ### | ### 2 |
| ### | ### | ### |
| ### | ### | ### |
| ### | ### | ### |
| ### | ### | ### |
| ### | ### | ### |
| ### | ### | ### |
| ### | ### | ### |
| ### | ### | ### |
| ### | ### | ### |
| ### | ### | ### |
| ### | ### | ### |
| ### | ### | ### |
| XX: ### | ||
1 1
"BACK-NO"←"VOL-YES"←"[0]
1 1
1PIN0000"PAIRING"
1,PIN"0000"
PIN 100s 1,100
(1).
PAIRING"1235
"PAIRING COMPLETED" 150 plu 8s jus 46
1 1
#
g jyjg 1000000000000000000000000000000000000000000000
1
"CHECK MODE" "BLUETOOTH" SEARCH NOW USING PHONE
PINIS0000
#
(pairing)
0y 1
.5()c10s
1 1
SSP) Secure Simple Pairing
25 130 130 130 130 130 130 130 130 130 130 130 130 130 130 130 130 130 130 130 130 130 130 130 130 130 13
JSSS/Source 0500000000
JVCUNIT"
Sue 80 "BT PAIRING" 100
y j 100000000000000000000000000000000000000000000000000000000000
(B) (A).
法一.
"VOL-YES" "XXXXXX" "[Ls] (A) BACK-NO
1 205 C 9 3 7 7 7 7 7 7 7 7 7 7 7 7 7 7 7 7 7 7 7 7
1
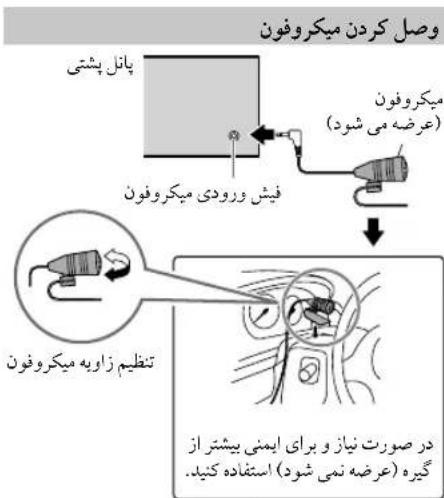
1005 1005 1005 1005 1005 1005 1005 1005 1005 1005 1005 1005 1005 1005 1005 1005 1005 1005 1005 1005 1005
(HFP1.5)
(A2DP)
(AVRCP1.3) (OPP) Object Push
(PBAP) jL 200000000000000000000000000000000000000000000000000000000
AUX
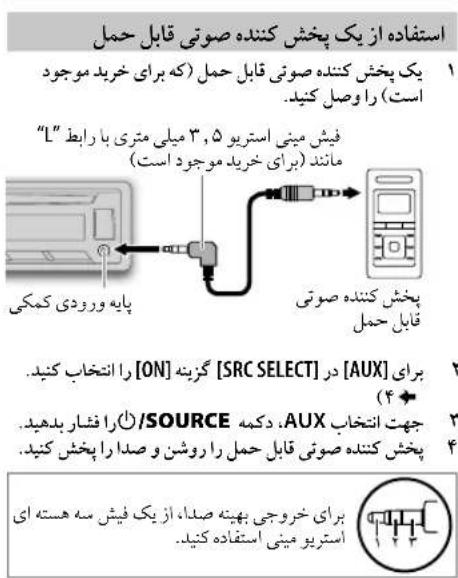
| RADIO TIMER | |
| SMM | |
| *IF BAND | |
| *MONO | |
| *NEWS-STBY | |
| *REGIONAL | |
| *AF SET |
(PTY s)
FMM
100
Pty 1
PTY 55
1
.VARIED.SCIENCE.CULTURE.DRAMA.EDUCATE.SPORT INFO AFFAIRS NEWS:PTY
CLASSICS (山 ;山) LIGHTM (山 ;山) EASY M (山 ;山) ROCK M (山 ;山) POP M
. PHONE IN. RELIGION.SOCIAL . CHILDREN.FINANCE.WEATHER.(山)OTHERM
OLDIES (C)NATION M. COUNTRY JAZZ, LEISURE, TRAVEL
DOCUMENT.()FOLKM
(Stj jxoljy)TA Standby Reception gJw
1
T/P
AM j 1 (2000) (TA)
2.5mol 2
T/P 1
MENUM
TUNER]
1
MENU
T/P. 10
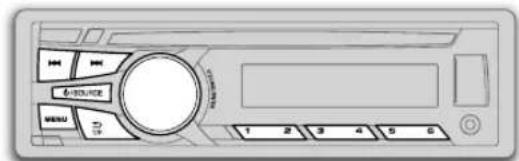
Saa"ST"JgLd jyFM y
S_ OBC = 12 · CO · BC = 12 × CD × 5
SOURCE.AMFM
y 408515RKM-RL2j
153
RM-RK521/4)aJgG
g 1
2
( 0,12,0) ,( 0,12,0)
AMFMFM
....
j(61)j0aJaaSj
()“PRESET MODE"
S
y
a 1
(61)jlaa jlaa 0
()
MENU
USB
10000000000000000000000000000000000000000000
1
a 1
5 iPod MODE
()
,1,1,1,1,1,1,1
[USB/IPOD]
Lss1,ssS,ssu1,p0s[USB]
DRIVECHANGE
.
1515141111111111
[DRIVE5] [DRIVE1]:
Jy jyj 1
[HEAD MODE]ipod 400
MENU
[USB/IPOD]
Aa 1
100000000000000000000000000000
BOOK SLOWER / BOOK FASTER / BOOK NORMAL
iPhone/iPod
(.)iPhone/iPod
T/P 20000000000000000000000000000
MENU
()
().HADMODE]
MENUM
-
-
-
-
-
-
-
-
-
-
-
-
-
-
-
-
-
-
-
-
-
- 1.
-
-
-
-
-
-
-
-
-
-
-
-
-
-
-
-
-
-
-
-
WAV/WMA/MP3
PLAYLISTS) 111, jMJC /JPC, u iPod
*COMPOSERSGENRES*PODCASTSSONGSALBUMSARTISTS
. * AUDIOBOOKS
.iPod s jz
100 100
(1)
iipod
L
[HEAD MODE] 45
Z(A)JISJISJISLILGLIgSLGLaJSLGLaJSL
OTHERS,90
"OTHERS". 90ZgA
MENUM
y
2A/1V
4
iPod / USB / CD
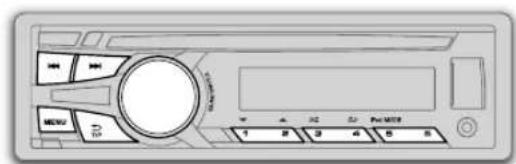
MENUM 1
1,450
1,450
1,450
1,450
1,450
1,450
1,450
1,450
1,450
1,450
1,450