
DVM171THD - Thermometer VELLEMAN - Free user manual and instructions
Find the device manual for free DVM171THD VELLEMAN in PDF.
| Product Type | Temperature and humidity data logger with dew point display |
| Brand | Velleman |
| Model | DVM171THD |
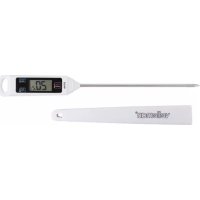
| Dimensions (L x W x H) | 101 x 25 x 23 mm |
| Weight (with battery) | 172 g |
| Power Supply | 3.6 V lithium battery (type 1/2 R6) |
| Temperature measurement range | -40°C ~ +70°C (-40°F ~ +158°F) |
| Temperature accuracy | ±1°C (±1.8°F) from -10 to +40°C; ±2°C elsewhere |
| Relative humidity measurement range | 0 % ~ 100 % RH |
| Relative humidity accuracy | ±3.0 % RH from 40 to 60 %; ±3.5 % from 20 to 40 % and 60 to 80 %; ±5.0 % elsewhere |
| Dew point measurement range | -40°C ~ +70°C (-40°F ~ +158°F) |
| Dew point accuracy | ±2.0°C (±4.0°F) at 25°C, 40-100 % RH |
| Memory | 32,000 measurements (16,000 temperature + 16,000 humidity) |
| Interface | USB |
| Configurable measurement cycle | 2 s, 5 s, 10 s, 30 s, 1 min, 5 min, 10 min, 30 min, 1 h, 2 h, 3 h, 6 h, 12 h, 24 h |
| Configurable alarm | Yes, with high and low thresholds for temperature and humidity |
| LED indication | Green LED (REC) and red/yellow LED (ALM) |
| Software included | Yes, analysis software on CD-ROM |
| Operating temperature | -35°C ~ +80°C |
| Cleaning | With a slightly dampened, lint-free cloth; avoid alcohols and solvents |
| Safety | Protect against rain and moisture; keep out of reach of children; do not modify the device |
| Spare parts and repairability | No user-serviceable parts; order from the dealer |
| Original accessories | Use only original accessories |
Frequently Asked Questions - DVM171THD VELLEMAN
User questions about DVM171THD VELLEMAN
0 question about this device. Answer the ones you know or ask your own.
Ask a new question about this device
Download the instructions for your Thermometer in PDF format for free! Find your manual DVM171THD - VELLEMAN and take your electronic device back in hand. On this page are published all the documents necessary for the use of your device. DVM171THD by VELLEMAN.
USER MANUAL DVM171THD VELLEMAN
To all residents of the European Union Important environmental information about this product
This symbol on the device or the package indicates that disposal of the device after its lifecycle could harm the environment.
Do not dispose of the unit (or batteries) as unsorted municipal waste; it should be taken to a specialized company for recycling.
This device should be returned to your distributor or to a local recycling service. Respect the local environmental rules.
If in doubt, contact your local waste disposal authorities.
Thank you for choosing Velleman! Please read the manual thoroughly before bringing this device into service. If the device was damaged in transit, don't install or use it and contact your dealer.
1.2. Safety Instructions

Keep this device away from rain and moisture .
- Damage caused by disregard of certain guidelines in this manual is not covered by the warranty and the dealer will not accept responsibility for any ensuing defects or problems.
- Keep the device away from splashing and dripping liquids.
Note that damage caused by user modifications to the device is not covered by the warranty. - Keep the device away from children and unauthorised users.
1.3. General Guidelines
- This device is battery-operated, using one 3.6V lithium battery (1/2AA)
- Protect this device from shocks and abuse. Avoid brute force when operating the device.
- Protected the device against extreme heat (see "Technical Specifications"), dust and moisture.
- Familiarise yourself with the functions of the device before actually using it.
- All modifications of the device are forbidden for safety reasons.
- Only use the device for its intended purpose. Using the device in an unauthorised way will void the warranty.
1.4. Features
Memory for 32,000 readings (16,000 temperature and 16,000 humidity readings)
- Dew point indication
- Status Indication
- USB Interface
- User-Selectable Alarm
Analysis software
Multi-mode to start logging
- Long battery life
- Selectable measuring cycle: 2s, 5s, 10s, 30s, 1m, 5m, 10m, 30m, 1hr, 2hr, 3hr, 6hr, 12hr, 24hr
1.5.Use
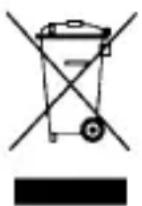
- Protective cover
- USB connector to PC port
3.Start button - RH and Temperature sensors
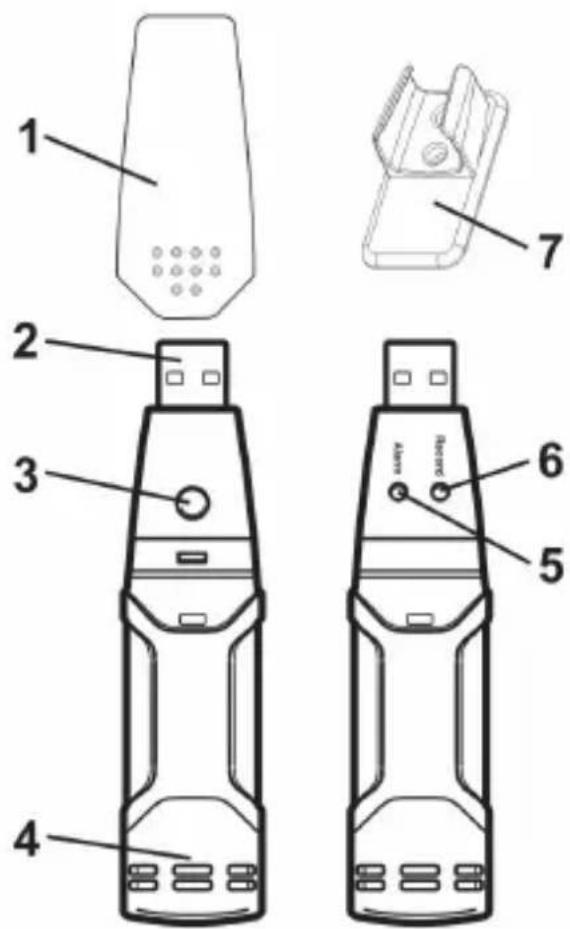
- Alarm LED (red/yellow)
- Record LED (green)
- Mounting bracket
- First install the datalogger software on a personal computer, by inserting the enclosed disc into the CD drive and following the instructions on the screen.
- Remove the protective cover (1) from the datalogger, plug the datalogger into a free USB-slot on the personal computer and start the datalogger software.
- Set up the datalogger software and press the 'Setup' button. Refer to the help-function of the datalogger software ('Help' 'Help topics ...') for more information on the use of the software and setup of the datalogger.
- Remove the datalogger from the USB slot and replace the protective cover (1).
DVM171THD
- Place the device in a location where recording of ambient temperature and/or relative humidity is required. Refer to the technical specifications for allowed operating temperature range.
- When the datalogger is set up to start manually (delayed start), the green LED (6) will flash two times every 10 seconds. Press the Start button (3) until the green (6) and yellow LED (5) flash once (together). The datalogger starts logging and the green LED (6) will flash every 10 seconds (increase this value through the setup procedure to increase battery life).
- To download the data into the personal computer, start the datalogger software, remove the protective cover (1) and plug the datalogger into a free USB-slot.
- Refer to the help-function of the datalogger software ('Help' 'Help topics ...') for more information on downloading and handling the data from the datalogger.
1.6. Troubleshooting

Both LEDs are off
Logging is not active or battery is low. Start logging or replace battery
Green REC LED (6), flashes 1x every 10 seconds
Logging, no alarm condition.
Green REC LED (6), flashes 2x every 10 seconds
Delayed start mode,
Red ALM LED (5), flashes 1x every 10 seconds
Logging, humidity lower limit exceeded.
Red ALM LED (5), flashes 2x every 10 seconds
Logging, humidity upper limit exceeded.
Red ALM LED (5), flashes 1x every 60 seconds
Low battery. Logging will stop, replace battery and download data.
Yellow ALM LED (5), flashes 1x every 10 seconds
Logging, temperature lower limit exceeded.
Yellow ALM LED (5), flashes 2x every 10 seconds
Logging, temperature higher limit exceeded.
Yellow ALM LED (5), flashes 1x every 60 seconds
Logger memory full. Logging will stop, download data.
DVM171THD
Note 1: in case of one alarm, the green REC LED (6) and the red or yellow ALM LED (5) will blink alternately every 10 seconds. When two alarms occur, only the ALM LED (5) will blink, showing alternately the first and second alarm every 10 seconds.
Note 2: when battery is low, all operations will be disabled automatically and memory will be preserved.
1.7. Cleaning and storage
- The humidity and temperature sensors (4) are very sensitive. Avoid dust, smoke and other particles to enter the housing. Refer to paragraph "Sensor reconditioning"
- Wipe the datalogger regularly with a moist, lint-free cloth. Do not use alcohol or solvents. Do not touch the USB connector.
- Do not submerge the datalogger in water or any other liquid.
- There are no user-serviceable parts.
- Contact your dealer for spare parts if necessary.
1.8. Battery
- To replace the battery, disconnect the device from the computer.
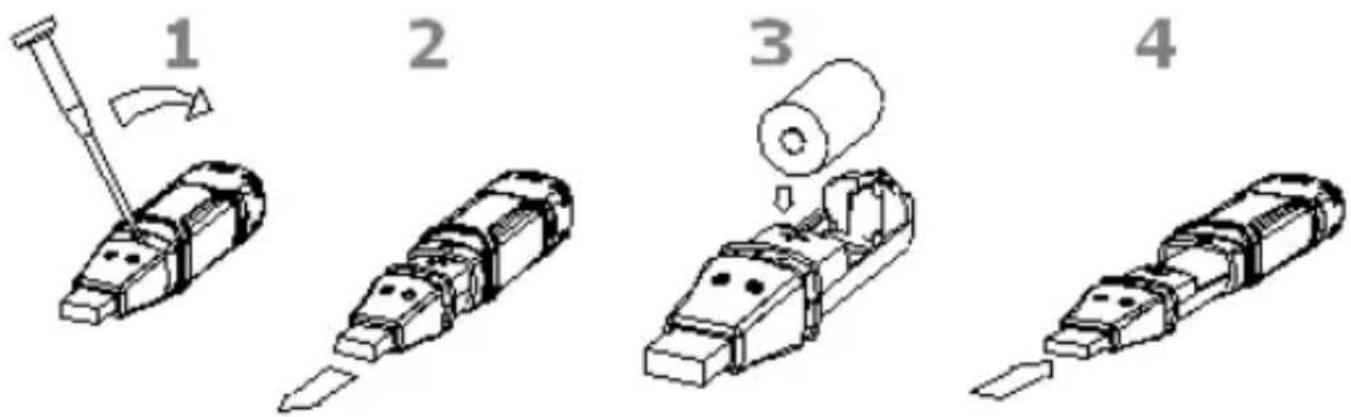
(1) Open the battery compartment by using a pointed object (e.g. small screwdriver). Move the pointed object in the direction of the arrow.
(2) Gently pull the datalogger from the casing.
(3) Remove/insert the battery. Only use 3.6V Lithium batteries. Make sure the polarity is as indicated in the casing. When the battery is inserted, the green and yellow LEDs will flash alternately.
(4) Slide the datalogger back in the housing until it snaps into place. Configure the datalogger using the enclosed software.
Note: leaving the device in the USB port will reduce the battery life.
WARNING: handle Lithium batteries with care, observe warnings on battery casing. Keep the battery away from children.
1.9. Sensor reconditioning
Over time, the internal sensor may become compromised as a result of pollutants, chemical vapours or other environmental conditions. This can lead to inaccurate readings. To recondition the internal sensors, use following procedure:
- Heat the datalogger to +80^ (+176^) , humidity < 5% for 36 hours.
- Keep the datalogger at +20 +30^ C ( +70 +90^ F ), humidity >74 % for 48 hours
1.10. Technical Specification
relative humidity (RH) Overall range 0% 100% relative humidity accuracy 0~20% ±5.0%
20~40% ±3.5%
40~60% ±3.0%
60~80% ±3.5%
80~100% ±5.0%
temperature Overall range -40°C ~ +70°C (-40°F ~ +158°F)
temperature accuracy -40~-10°C (-10~+40°F) ±2°C (±3.6°F)
-10~+40°C (+14~+104°F) ±1°C (±1.8°F)
+40~+70°C (+104~+158°F) ±2°C (±3.6°F)
dew point temperature Overall range -40°C ~ +70°C (-40°F ~ +158°F)
dew point accuracy 25°C, 40~100% RH ±2.0°C (±4.0°F)
logging rate Selectable interval, 2sec ~ 24 hours
operating temperature -35°C ~ +80°C (-31°F ~ +176°F)
battery type 3.6V Lithium (½ AA)
dimensions 101 x 25 x 23 mm
weight 172 gr. (6 oz) (battery)
Use this device with original accessories only. Velleman nv cannot be held responsible in the event of damage or injury resulted from (incorrect) use of this device.
For more info concerning this product, please visit our website www.velleman.eu. The information in this manual is subject to change without prior notice.


- To all residents of the European Union Important environmental information about this product
- Safety Instructions
- General Guidelines
- Features
- 1.5.Use
- DVM171THD
- Troubleshooting
- Both LEDs are off
- Green REC LED (6), flashes 1x every 10 seconds
- Green REC LED (6), flashes 2x every 10 seconds
- Red ALM LED (5), flashes 1x every 10 seconds
- Red ALM LED (5), flashes 2x every 10 seconds
- Red ALM LED (5), flashes 1x every 60 seconds
- Yellow ALM LED (5), flashes 1x every 10 seconds
- Yellow ALM LED (5), flashes 2x every 10 seconds
- Yellow ALM LED (5), flashes 1x every 60 seconds
- Cleaning and storage
- Battery
- Sensor reconditioning
- Technical Specification
Brand : VELLEMAN
Model : DVM171THD
Category : Thermometer