SR5238 - Steam cleaner TRISTAR - Free user manual and instructions
Find the device manual for free SR5238 TRISTAR in PDF.
| Brand | TriStar |
| Model | SR5238 |
| Product Type | Steam Cleaner |
| Tank Capacity | 175 ml |
| Heating Time | About 4 minutes |
| Included Accessories | Short jet nozzle, Long jet nozzle, Extension nozzle, Curved nozzle, Round brush nozzle, Generic nozzle, Door and window nozzle, Terry cloth sleeve, Funnel, Measuring cup |
| Main Functions | Disinfection, Clothing cleaning, Door and window cleaning, Floor cleaning |
| Power Supply | Mains (power cord) |
| Safety | Safety cap, Pressure release before opening |
| Maintenance | Empty the tank after use, Clean the surface with a cloth |
Frequently Asked Questions - SR5238 TRISTAR
User questions about SR5238 TRISTAR
0 question about this device. Answer the ones you know or ask your own.
Ask a new question about this device
Download the instructions for your Steam cleaner in PDF format for free! Find your manual SR5238 - TRISTAR and take your electronic device back in hand. On this page are published all the documents necessary for the use of your device. SR5238 by TRISTAR.
USER MANUAL SR5238 TRISTAR
General safety instructions
Check if the tension of your supply corresponds with the voltage indicated on the rating plate of your appliance1
Before commissioning this device please read the instruction manual carefully and keep this sothat you can check them later 1
- Please keep these instructions, the guarantee certificate, the sales receipt and, if possible, the carton with the inner packaging!
- The device is intended exclusively for private and not for commercial use! Keep it away from direct heat, sun and moist and protect it against sharp impacts1
Always remove the plug from the socket whenever the device is not in use, when attaching accessory parts, cleaning the device or whenever a disturbance occurs1 'witch off the device before1 Pull on the plug, not on the cable1
- This appliance is not intended for use by persons with reduced physical, sensory or mental capacities, or lack of experience and knowledge (including children), unless they have been supervised or instructed concerning use of the appliance by a person responsible for their safety.
- In order to protect children from the dangers of electrical appliances, never leave them unsupervised with the device1 Consequently, when selecting the location for your device, do so in such a way that children do not have access to the device1 Take care to ensure that the cable does not hang down 1
- Test the device, plug and the cable regularly for damage1 If there is damage of any kind, the device should not be used but the appliance must be repaired by a qualified technician in order to avoid a hazard1 Only original spare parts must be used1
- A damaged cord or plug must be replaced by an authorized technician to avoid a hazard1 Do not repair the device yourself,1
- Keep the device and the cable away from heat, direct sunlight, moisture, sharp edges and such like1
- Never use the device unsupervised! 'witch off the device whenever you are not using it, even if this is only for a moment1
- Do not use the device outdoors1
- Under no circumstances must the device be placed in water or other liquid, or come into contact with such1 Do not use the device with wet or moist hands1
- 'should the device become moist or wet, remove the mains plug from the socket immediately! Do not reach into the water!
- Use the device only for the intended purpose1
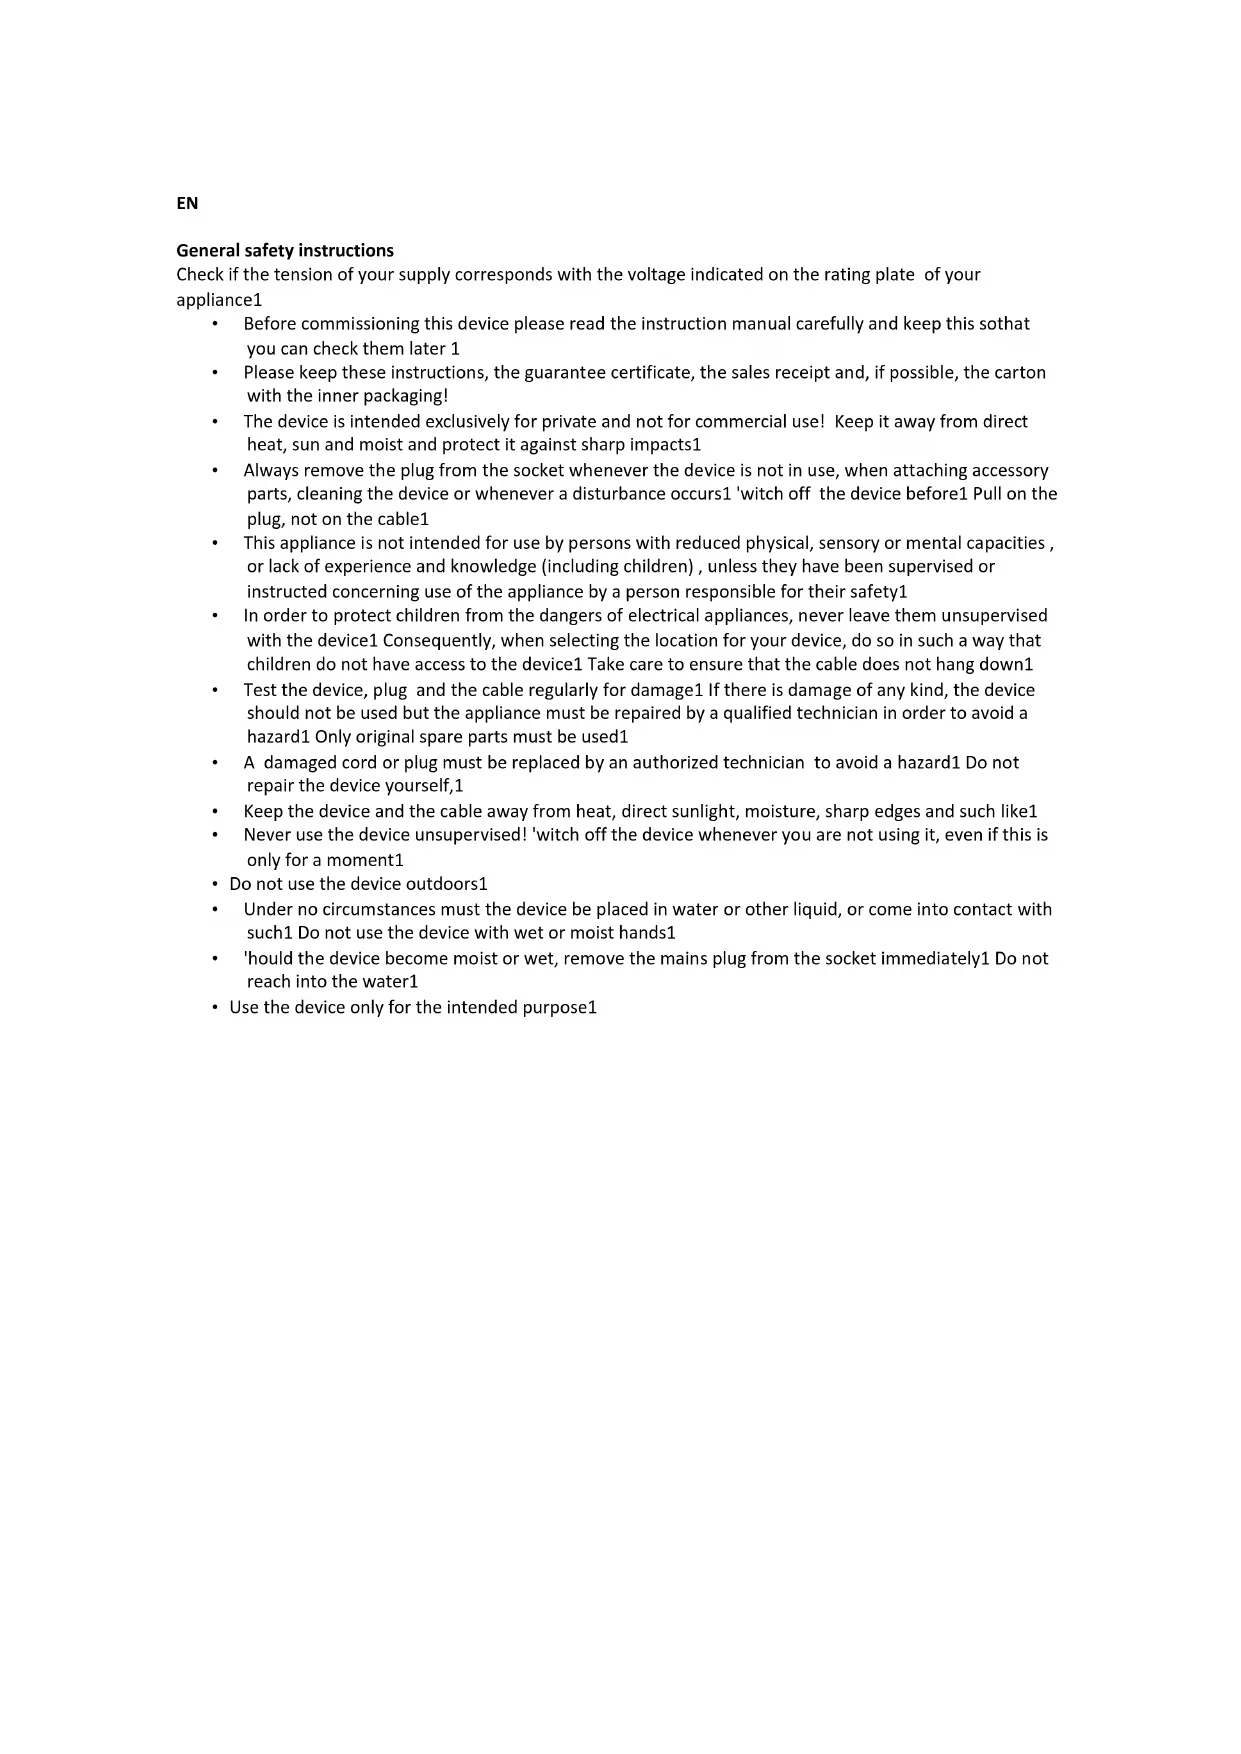
Parts list
1 Body
2 Short spray nozzle
3 Safety cap
4 Steam button
5 Handle
6 Power cord and plug
7 Power indicator
8 Funnel
9 Measuring cup
10 Spray nozzle with round brush
11 Bent spray nozzle
12 Long spray nozzle
13 Extended connecting spray nozzle
14 General spray nozzle
15 Spray nozzle for door/ window
16 Towel sleeve
Operation procedures
- Unpack the product, check the accessories and documents supplied with the product and make sure that the product and accessories are not damaged.
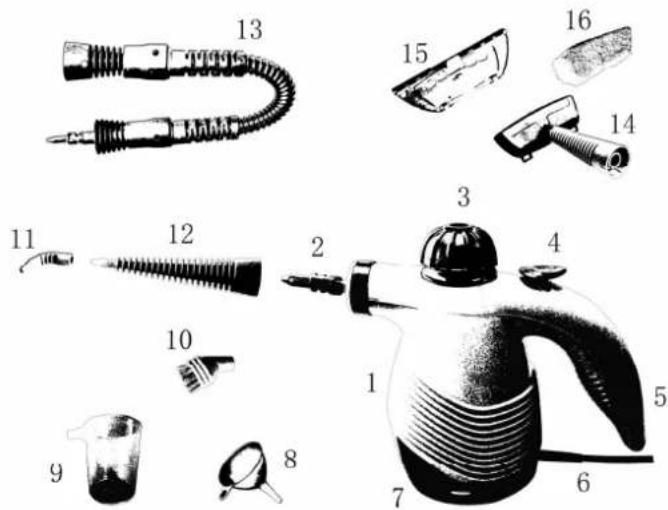
Before use, please read the instruction manual carefully. The steam cleaner is only for use in households. - First, place the steam cleaner on a flat platform, push down the safety cover (I), unscrew the safety cap counter clockwise (II), and then install the funnel.

- Fill the measuring cup with maximum 175 ml. of clean water and add the water into the tank. Do not overfill the tank, some space must be left in the tank. Re-install the safety cap and tighten it in position.
After plug-in it will take around 4 minutes that the steamcleaner is ready for use. At this time lightly press the steam button and check whether steam is sprayed out of the nozzle. Before using please put 175ml of water in the tank and spray this, for example into the sink. (Do not aim the spray nozzle at other persons).
If there is steam sprayed out, please install suitable accessories according to your needs after you release the button.
Press down the steam button again in order to carry out the operations required by you.
Installation of Accessories
Install the long spray nozzle (12) or extended connecting spray nozzle (13)
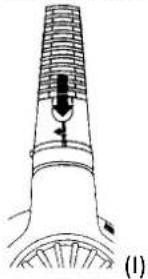
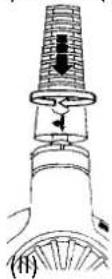
Hold the pipe section of the long spray nozzle in your hand, align the arrow with the single-line mark on short spray nozzle (2) on the machine body, and insert the long spray nozzle in position. Rotate the long spray nozzle in clockwise direction, and align the arrow on the long spray nozzle with the double-line mark on short spray nozzle on the machine body, as shown in figure (I). To remove the long spray nozzle, please rotate the long spray nozzle inversely (counter clockwise) as shown in figure (II), and align the arrow on the spray nozzle with the single-line mark on the machine body. Then the long spray nozzle can be pulled out.
For the extended connecting spray nozzle (13) you have to use the same procedure as shown above.
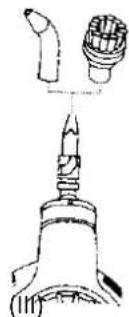
Install spray with round brush (10) or bent spray nozzle(11)
For direct installation on short spray nozzle (2), aim the spray nozzle with round brush or bent spray nozzle at the top of spray nozzle, as shown in figure (III), and push the spray nozzle upwards until it is in position.
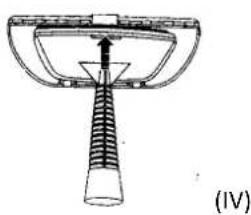
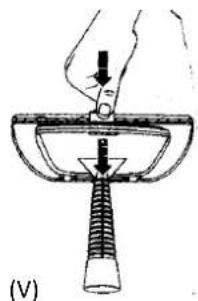
Installation of spray nozzle for door/window (14 & 15)
First install the general spray nozzle (16) on short spray nozzle (2), as shown in figure (IV) Install the two small hooks of the spray nozzle for door/window (17) onto suspension lugs of the general spray nozzle, and then trigger the big hook of the spray nozzle for door/window, and push the spray nozzle for door/window up and clutch (V) it onto the body of the general spray nozzle.
Functions
Disinfection and sterilization:
Install the long spray nozzle (12) on the short spray nozzle (2) and aim the spray nozzle at the position that needs disinfection, then press down the steam button. High-temperature steam can kill bacteria.
- Cleaning the clothes:
Install the general spray nozzle (14) on the short spray nozzle (2), and then mount the towel sleeve (18). Aim it at the hung clothes, and press down the steam button and move the general spray nozzle up and down as well as to the left and to the right at the same time. Then stains can be removed from the clothes.
- Cleaning doors and windows:
Install the general spray nozzle (14) on the short spray nozzle (2), and then install the spray nozzle for door/window (17) on it. Aim this at the door/window, and press down the steam button and move it up and down as well as to the left and to the right at the same time. Then stains can be removed from the door/window.
- Cleaning the floor boards:
Install the bent spray nozzle (11) or round spray nozzle (10) on the long spray nozzle (12). For spots on difficult places you can also use the extended connecting spray nozzle (13). Then aim it at the floor board, and press down the steam button to remove the dirt and stains in wall corners and on the floor.
Refill water during operation
- Unplug the power cord and disconnect the power supply.
- Press down the steam button to release the pressure until no steam is injected out.
- Slowly unscrew the safety cap but do not remove it, and residual steam will be discharged slowly until no steam comes out. Then make sure the machine cools down for about five minutes. Finally, completely remove the safety cap.
Use the funnel and measuring cup to refill a suitable quantity of cold or hot water into the tank. - Re-install the safety cap onto the machine body and tighten it in position.
Cleaning
- When finished cleaning, unplug the power cord and disconnect the power supply.
- Press down the steam button to release the pressure until no steam is injected out.
- Slowly unscrew the safety cap but do not remove it, and residual steam will be discharged slowly until no steam comes out. Then make sure the machine cools down for about five minutes. Finally, completely remove the safety cap.
- Empty the residual water in the tank and clean the external surface with a piece of dry cloth.
- At last, re-install the safety cap onto the machine body and tighten it in position.
Guidelines for protection of the environment
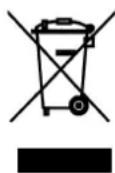
This appliance should not be put into the domestic garbage at the end of its useful life, but must be disposed of at a central point for recycling of electric and electronic domestic appliances. This symbol on appliance, instruction manual and packaging puts your attention to this important issue. The materials used in this appliance can be recycled. By recycling used domestic appliances you contribute an important push to the protection of our environment. Ask your local authorities for information regarding the point of recollection.