
BR1002 - Toaster TRISTAR - Free user manual and instructions
Find the device manual for free BR1002 TRISTAR in PDF.
| Product type | Toaster |
| Brand | TriStar |
| Model | BR1002 |
| Power supply | 220-240 V ~ 50 Hz |
| Power | 800 W max. |
| Dimensions (approx.) | 30 x 20 x 20 cm |
| Weight (approx.) | 1.5 kg |
| Number of slots | 2 |
| Browning adjustment | Rotary temperature control |
| Functions | Toasting, reheating, defrosting, cancel |
| Reheat function | Yes, approximately 30-second cycle |
| Defrost function | Yes, automatic cycle |
| Automatic shut-off | Yes, at end of cycle |
| Bun warmer rack | Yes, removable |
| Crumb tray | Yes, removable |
| Cord length | Approximately 0.8 m |
| Care and cleaning | Clean the exterior with a damp cloth; empty the crumb tray regularly; do not immerse |
| Safety | Automatic shut-off; do not insert metal objects; do not use near water |
| Spare parts and repairability | No spare parts provided; repair by authorized professional |
| General information | Household use only; do not leave unattended |
Frequently Asked Questions - BR1002 TRISTAR
User questions about BR1002 TRISTAR
0 question about this device. Answer the ones you know or ask your own.
Ask a new question about this device
Download the instructions for your Toaster in PDF format for free! Find your manual BR1002 - TRISTAR and take your electronic device back in hand. On this page are published all the documents necessary for the use of your device. BR1002 by TRISTAR.
USER MANUAL BR1002 TRISTAR
MANUEL D'INSTRUCTION
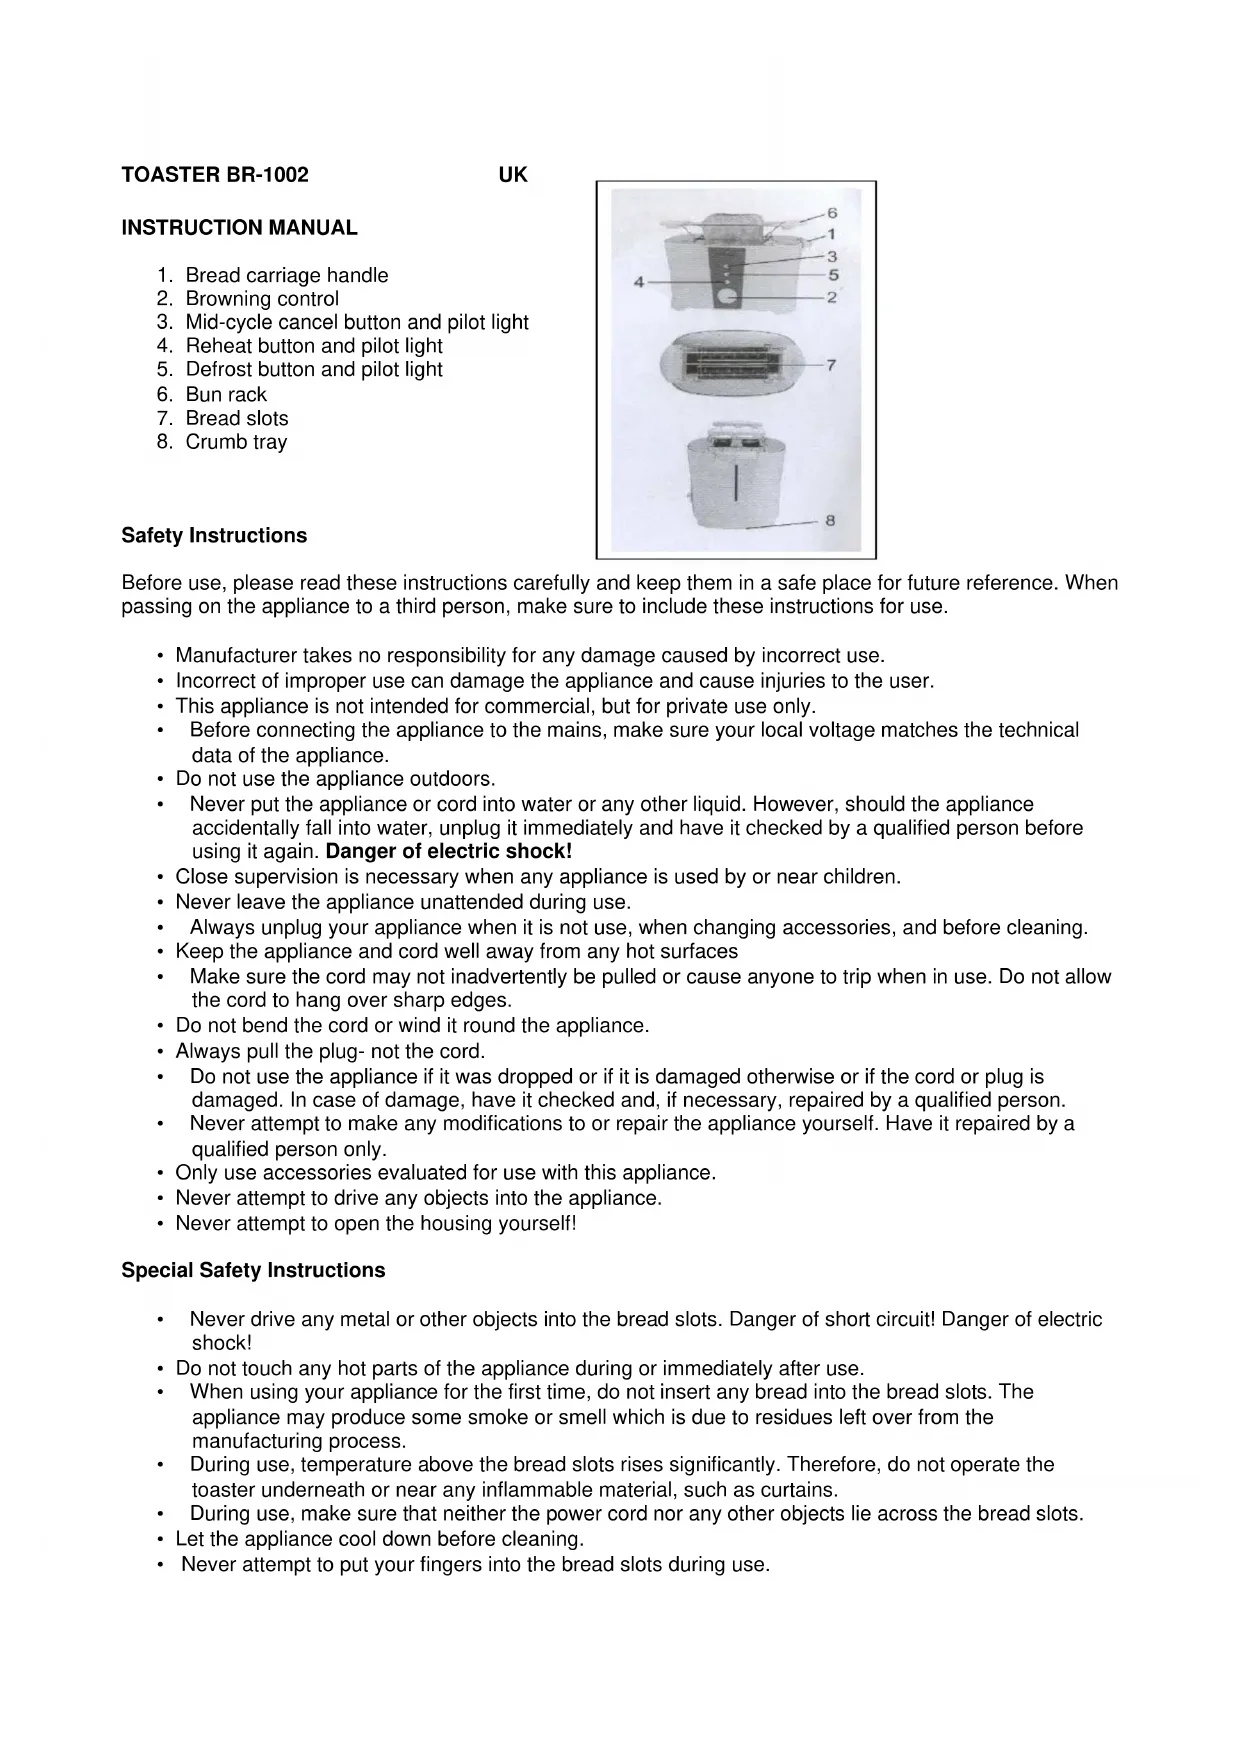
- Bread carriage handle
- Browning control
- Mid-cycle cancel button and pilot light
- Reheat button and pilot light
- Defrost button and pilot light
- Bun rack
- Bread slots
- Crumb tray
Safety Instructions

Before use, please read these instructions carefully and keep them in a safe place for future reference. When passing on the appliance to a third person, make sure to include these instructions for use.
- Manufacturer takes no responsibility for any damage caused by incorrect use.
- Incorrect of improper use can damage the appliance and cause injuries to the user.
- This appliance is not intended for commercial, but for private use only.
Before connecting the appliance to the mains, make sure your local voltage matches the technical data of the appliance. - Do not use the appliance outdoors.
- Never put the appliance or cord into water or any other liquid. However, should the appliance accidentally fall into water, unplug it immediately and have it checked by a qualified person before using it again. Danger of electric shock!
- Close supervision is necessary when any appliance is used by or near children.
- Never leave the appliance unattended during use.
Always unplug your appliance when it is not use, when changing accessories, and before cleaning. - Keep the appliance and cord well away from any hot surfaces
- Make sure the cord may not inadvertently be pulled or cause anyone to trip when in use. Do not allow the cord to hang over sharp edges.
- Do not bend the cord or wind it round the appliance.
Always pull the plug- not the cord. - Do not use the appliance if it was dropped or if it is damaged otherwise or if the cord or plug is damaged. In case of damage, have it checked and, if necessary, repaired by a qualified person.
- Never attempt to make any modifications to or repair the appliance yourself. Have it repaired by a qualified person only.
- Only use accessories evaluated for use with this appliance.
- Never attempt to drive any objects into the appliance.
- Never attempt to open the housing yourself!
Special Safety Instructions
- Never drive any metal or other objects into the bread slots. Danger of short circuit! Danger of electric shock!
- Do not touch any hot parts of the appliance during or immediately after use.
- When using your appliance for the first time, do not insert any bread into the bread slots. The appliance may produce some smoke or smell which is due to residues left over from the manufacturing process.
- During use, temperature above the bread slots rises significantly. Therefore, do not operate the toaster underneath or near any inflammable material, such as curtains.
During use, make sure that neither the power cord nor any other objects lie across the bread slots. - Let the appliance cool down before cleaning.
-
Never attempt to put your fingers into the bread slots during use.
-
Do not operate your toaster near a gas supply or any electric sources of heat.
- Bread may burn. Don't use this toaster near curtains or other combustible materials.
Before First Use
Clean the exterior of the toaster as described in 'Cleaning'.
Connect your toaster to a properly installed wall socket. Set the browning control (2) to the maximum setting and slide down the carriage handle (1) until it clicks into place. Do not insert any slices of bread during this first use and let your toaster heat up for 3-4 minutes.
During this process, the appliance may briefly produce some smoke or smell which is due on residues on the heating elements left over from the manufacturing process.
Ensure proper room ventilation during this first use. As soon as the toaster has cooled down, it is ready for use.
Operation
Connect your toaster to a properly installed wall socket.
Using the browning control (2), now select your preferred browning degree depending on the thickness and freshness of the bread to be toasted.
Insert the bread slots (7), and slide down the carriage handle (1) until it clicks into place. The bread is centred in the slots to ensure even browning. The pilot light (3) of the cancel button lights up. Make sure the bun rack (6) is not attached to the toaster. (cf. "Use Of The Bun Rack")
The appliance switches off automatically as soon as the toast has the preferred browning degree. The carriage handle (1) moves back into its initial position thus lifting the toast slices for easy removal. The pilot light (3) goes out.
Should a slice of bread accidentally be wedged in the toast slot, always unplug the appliance first. As soon as the toaster has cooled down, remove the slice. Never use any metal objects for removal.
To stop the toasting cycle before automatic cut-off, press the mid-cycle cancel button (3). The carriage handle (1) moves back into its initial position lifting the toasted bread. The cancel button pilot light (3) goes out.
After several cycles, slide out the crumb tray (8), if necessary, and wipe off any crumps.
Reheat Function
Your toaster has a reheat function.
Should you wish to reheat bread already toasted earlier, simply insert the bread as described above, slide the carriage handle (1) down and press the reheat button (4). Its pilot light lights up. The toaster automatically stops reheating after approx. 30 seconds.
A pre-set browning degree has no effect on the reheat cycle.
Defrost Function
To activate the defrost function start the toaster as described before and press the defrost button (5). The defrost button pilot light lights up. The toaster automatically stops at the end of defrost cycle.
Use Of The Bun Rack
Your BR-1002 toaster also features a bun rack (6).
If required, put the bun rack (6) onto the bread slots (7). Select a browning degree and start the toasting or warm-up cycle. To set the browning degree, switch on or stop the toaster please refer to "Operation".
Cleaning
Make sure the appliance is unplugged and has cooled down before cleaning.
Regularly pull out the crumb tray (8) and clean.
To avoid scratching surfaces, do not use sharp detergents.
Do not put the toaster into water or any other liquid.
Technical Data
Voltage 220-240V 50 Hz
Output 800 watts max.
Subject to change.
*****
TOSTAPANE BR-1002
IT
Guidelines for protection of the environment

This appliance should not be put into the domestic garbag at the end of its useful life, but must be disposed of at a central point for recycling of electric and electronic domestic appliances. This symbol on appliance, instruction manual and packaging puts your attention to this important issue. The materials used in this appliance can be recycled. By recycling used domestic appliances you contribute an important push to the protection of our environment. Ask your local authorities for information regarding the point of recollection..


Brand : TRISTAR
Model : BR1002
Category : Toaster