BM-4585 - Toaster TRISTAR - Free user manual and instructions
Find the device manual for free BM-4585 TRISTAR in PDF.
| Product type | Programmable bread machine |
| Brand | TRISTAR |
| Model | BM-4585 |
| Number of programs | 12 (Normal, French, Whole Wheat, Rapid, Sweet, Ultra Rapid I, Ultra Rapid II, Dough, Jam, Cake, Sandwich, Bake) |
| Capacity | 0.75 kg or 1.00 kg |
| Crust color | Light, Medium, Dark (except for Cake, Sandwich, Bake, Dough, Jam programs) |
| Delay timer | Up to 13 hours |
| Keep warm | 1 hour automatic |
| Viewing window | Yes |
| Non-stick coating | Baking pan and kneading paddle |
| Power | 650 W (approx.) |
| Power supply | 220-240 V, 50-60 Hz (approx.) |
| Dimensions (approx.) | 30 x 25 x 35 cm |
| Weight (approx.) | 4.5 kg |
| Cleaning | Wipe with a damp cloth; do not immerse; do not use abrasive products |
| Safety | Emergency stop (long press on Start/Stop); hot surfaces; supervision required |
| Spare parts and repairability | Available at service.tristar.eu |
| Warranty | 24 months |
| Usage | Household use only |
Frequently Asked Questions - BM-4585 TRISTAR
User questions about BM-4585 TRISTAR
0 question about this device. Answer the ones you know or ask your own.
Ask a new question about this device
Download the instructions for your Toaster in PDF format for free! Find your manual BM-4585 - TRISTAR and take your electronic device back in hand. On this page are published all the documents necessary for the use of your device. BM-4585 by TRISTAR.
USER MANUAL BM-4585 TRISTAR
natural_image
Exterior view of a white rectangular device with a recessed glass opening and mounting hardware (no text or symbols visible)
natural_image
White Tristar 3D toaster with baked bread slices and digital display, no visible text or symbols on the device itself.EN Instruction manual
NL Gebruiksaanwijzing
FR Mode d'emploi
DE Bedienungsanleitung
ES Manual de usuario
PT Manual de utilizador
PL Instrukcja obsługi
IT Manuale utente
SV Bruksanvisning
cs Návod na použití
SK Návod na použitie


service
.tristar.eu

natural_image
Four black-and-white icon set with gear, folder, question mark, and information symbols (no text or labels)
text_image
service .tristar.euYou can find all information and spare parts at service.tristar.eu
SAFETY INSTRUCTIONS
- By ignoring the safety instructions the manufacturer can not be hold responsible for the damage.
- If the supply cord is damaged, it must be replaced by the manufacturer, its service agent or similarly qualified persons in order to avoid a hazard.
- Never move the appliance by pulling the cord and make sure the cord can not become entangled.
- The appliance must be placed on a stable, level surface.
- The user must not leave the device unattended while it is connected to the supply.
- This appliance is only to be used for household purposes and only for the purpose it is made for.
- The appliance can be used by children aged from 8 years and above and persons with reduced physical, sensory or mental capabilities or lack of experience and knowledge if they have been given supervision or instruction concerning use of the appliance in a safe way and understand the hazards involved. Children shall not play with the appliance. Cleaning and user maintenance shall not be made by children unless they are older than 8 and supervised.
- To protect yourself against an electric shock, do not immerse the cord, plug or appliance in the water or any other liquid.

Surface may get hot during use.
- Keep the appliance and its cord out of reach of children less than 8 years.
- The temperature of accessible surfaces may be high when the appliance is operating.
• Caution! Bread can burn.
- This appliance is not intended to be operated by means of an external timer or separate remote-control system.
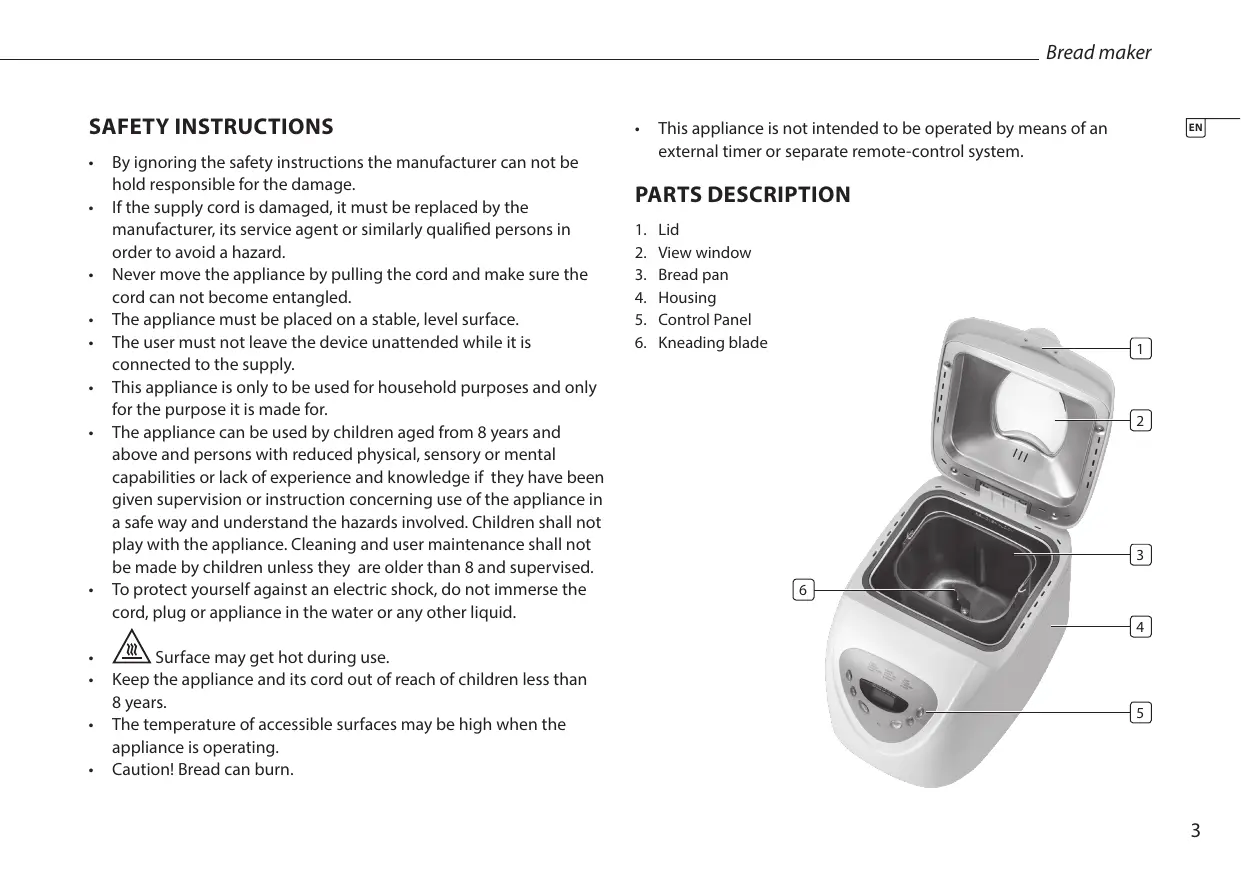
PARTS DESCRIPTION
- Lid
- View window
- Bread pan
- Housing
- Control Panel
- Kneading blade

text_image
Labeled diagram of a rice cooker showing open lid, interior compartments, and control panel with Chinese text annotationsBEFORE THE FIRST USE
- Clean the bread maker, the bread pan and the kneading blade with a damp cloth. For cleaning the bread pan and the kneading blade do not use any sharp or abrasive agents for the consideration of protecting the non-stick coating. Place the unit on a flat stable surface.
- As soon as the bread maker is plugged into power supply, a beep will be heard and "1 3:00" will be displayed. But the colon between the "3" and "00" don't flash constantly. And "1" is the default program. The arrows point to "2.0LB" and "MEDIUM" as they are default settings. Before doing this you have to read the entire manual and safetyinstructions.
- At the first use the device indicates some smoke or odor, this is normal.
THE CONTROL PANEL
Start/stop
The button is used for starting and stopping the selected baking program.
- To start a program, press the START/STOP button once. A short beep will be heard, the indicator will light up, and the two dots in the time display begin to flash and the program starts. Any other button is inactivated except the START/STOP button after a program has begun.
- To stop the program, press the START/STOP button for approx. 3 seconds, then a beep will be heard, it means that the program has been switched off. This feature will help to prevent any unintentional disruption to the operation of program.
Menu
The MENU button is used to set different programs. Each time it is pressed (accompanied by a short beep) the program will vary. Press the button discontinuously, the 12 menus will be cycled to show on the LCD display. Select your desired program. The functions of 12 menus will be explained below.
- Program 1: Basic
For white and mixed breads, it mainly consist of wheat flour or rye flour.
• Program 2: French
For light breads made from fine flour. Normally the bread is fluffy and has a crispy crust. This is not suitable for baking recipes requiring butter, margarine or milk.
• Program 3: Whole Wheat
For breads with heavy varieties of flour that require a longer phase of kneading and rising (for example, whole wheat flour and rye flour). The bread will be more compact and heavy
• Program 4: Quick
Kneading, rise and baking loaf within the time less than basic bread. But the bread baked on this setting is usually smaller with a dense texture.
• Baking program 5: Sweet
For breads with additives such as fruit juices, grated coconut, raisins, dry fruits, chocolate or added sugar. Due to a longer phase of rising the bread will be light and airy.
• Program 6: Ultra fast-I
Kneading, rise and baking 1.5LB loaf in a shortest time. Usually the bread made is smaller and rougher than that made with Quick program.
• Program 7: Ultra fast-II
The same as Program 6, but applicable for 2.0LB loaf. - Program 8: Dough
Kneading and rise, but without baking. Remove the dough and use for making bread rolls, pizza, steamed bread, etc. - Program 9: Jam
Boiling jams and marmalades.
• Program 10: Cake
Kneading, rise and baking, but rise with soda or baking powder.
• Program 11: Sandwich
Kneading, rise and baking sandwich. For baking light texture bread with a thinner crust.
- Program 12: Bake
For additional baking of breads that are too light or not baked through. In this program there is no kneading or raising.
Color
With the button you can select light, medium or dark color for the crust. This button is not applicable for the following program: CAKE, SANDWICH, BAKE, DOUGH and JAM.
Loaf size
- Select the weight (1.5LB, 2.0LB). Press the LOAF SIZE button to choose your desired gross weight, see the mark beneath it for reference.
- This button is only applicable for the following program: BASIC, FRENCH, WHOLE WHEAT, SWEET and SANDWICH.
Delay (▲ or ▼)
- If you want the appliance do not start working immediately you can use this button to set the delay time.
- You must decide how long it will be before your bread is ready by pressing the ▲ or ▼. Please note the delay time should include the baking time of program. That is, at the completion of delay time, there is hot bread can be serviced. At first the program and degree of browning must be selected, then pressing ▲ or ▼ to increase or decrease the delay time at the increment of 10 minutes. The maximum delay is 13 hours.
• Example: Now it is 8:30p.m, if you would like your bread to be ready in
the next morning at 7 o'clock, i.e. in 10 hours and 30 minutes. Select your menu, color, loaf size then press the ▲ or ▼ to add the time until 10:30 appears on the LCD. Then press the START/STOP button to activate this delay program and the indicator will light up. You can see the dot flashed and LCD will count down to show the remaining time. You will get fresh bread at 7:00 in the morning, if you don't want to take out the bread immediately, the keeping warm time of 1 hour starts.
Keep warm
Bread can be automatically kept warm for 1 hour after baking. During keeping warm, if you would like to take the bread out, switch the program off by pressing the START/STOP button.
USE
- Place the bread pan in position, and then turn it clockwise until they click in correct position.
- Fix the kneading blade onto the drive shaft. It is recommended to fill hole with heat-resisting margarine prior to place the kneading blade to avoid the dough sticking the kneading blade, also this would make the kneading blade be removed from bread easily.
- Place ingredients into the bread pan. Please keep to the order mentioned in the recipe. Usually the water or liquid substance should be put firstly, then add sugar, salt and flour, always add yeast or baking powder as the last ingredient.
- Note: the quantities of flour and raising agent that may be used refer to the recipe.
- Make a small indentation on the top of flour with finger, add yeast into the indentation, make sure it does not come into contact with the liquid or salt.
-
Close the lid gently and plug the power cord into a wall outlet. Press the MENU button until your desired program is selected.
-
Press the COLOR button to select the desired crust color.
- Press the LOAF SIZE button to select the desired size.
- Set the delay time by pressing ▲ or ▼ button. This step may be skipped if you want the bread maker to start working immediately.
- For the program of Basic, French, Whole wheat, Sandwich and cake beeps sound will be heard during operation. This is to prompt you to add ingredients. Open the Lid and put in some ingredients. It is possible that steam will escape through the vent in the lid during baking. This is normal.
- Once the process has been completed, ten beeps will be heard. You can press START/STOP button for approx. 3 seconds to stop the process and take out the bread. Open the Lid and while using oven mitts, turn the bread pan in anti-clockwise and take out the bread pan.
- Let the bread pan cool down before removing the bread. Then use non-stick spatula to gently loosen the sides of the bread from the pan.
- Turn bread pan upside down onto a wire cooling rack or clean cooking surface and gently shake until bread falls out.
CLEANING AND MAINTENANCE
- Before cleaning, unplug the appliance and wait for the appliance to cool down.
- Wipe the inside and outside of the bread pan with damp cloths, do not use any sharp or abrasive agents for the consideration of protecting the non-stick coating. The pan must be dried completely before installing.
- Clean the appliance with a damp cloth. Never use harsh and abrasive cleaners, scouring pad or steel wool, which damages the device.
GUARANTEE
- This product is guaranteed for 24 months granted. Your warranty is valid if the product is used in accordance to the instructions and for the purpose for which it was created. In addition, the original purchase (invoice, sales slip or receipt) is to be submitted with the date of purchase, the name of the retailer and the item number of the product.
- For the detailed warranty conditions, please refer to our service website: www.service.tristar.eu
GUIDELINES FOR PROTECTION OF THE ENVIRONMENT
This appliance should not be put into the domestic garbage at the end of its durability, but must be offered at a central point for the recycling of electric and electronic domestic appliances. This symbol on the appliance, instruction manual and packaging puts your attention to this important issue. The materials used in this appliance can be recycled. By recycling of used domestic appliances you contribute an important push to the protection of our environment. Ask your local authorities for information regarding the point of recollection.
SUPPORT
You can find all available information and spare parts at service.tristar.eu!
VEILIGHEIDSVOORSCHRIFTEN
text_image
Labeled diagram of a rice cooker showing open lid, interior compartments, and control panel with Chinese text annotationstext_image
Labeled diagram of a rice cooker showing open lid, interior sink, and control panel with Chinese text annotationstext_image
Labeled diagram of a rice cooker showing open lid, interior compartments, and control panel with digital display.text_image
Labeled diagram of a rice cooker showing open and closed compartments with numbered partstext_image
Labeled diagram of a rice cooker showing interior components and parts in ChineseFÖRE FÖRSTA ANVÄNDNING
text_image
Labeled diagram of a rice cooker showing open lid, interior compartments, and control panel with Chinese text annotationsPŘED PRVNÍM POUŽITÍM
text_image
Labeled diagram of a rice cooker showing open lid, interior compartments, and control panel with Chinese text annotationsPRED PRVÝM POUŽITÍM
Quality shouldn't be a luxury!
natural_image
Two kitchen grates: a black TRiSTAR grill with four panes and a black TRiSTAR grater with three panes, both open with a side panel (no visible text or symbols on the grates themselves)BP-2827

natural_image
A black and silver waffle-shaped grill with round cavities, placed on a white surface with several small round cookies nearby (no text or symbols visible).SA-1123

text_image
QR code image containing encoded data, no visible human-readable textservice.tristar.eu