— Laptop — Mode d'emploi PDF")
Kira Series (Linux) - Laptop AIRIS - Free user manual and instructions
Find the device manual for free Kira Series (Linux) AIRIS in PDF.
User questions about Kira Series (Linux) AIRIS
0 question about this device. Answer the ones you know or ask your own.
Ask a new question about this device
Download the instructions for your Laptop in PDF format for free! Find your manual Kira Series (Linux) - AIRIS and take your electronic device back in hand. On this page are published all the documents necessary for the use of your device. Kira Series (Linux) by AIRIS.
USER MANUAL Kira Series (Linux) AIRIS
NOTEBOOK KIRA Series
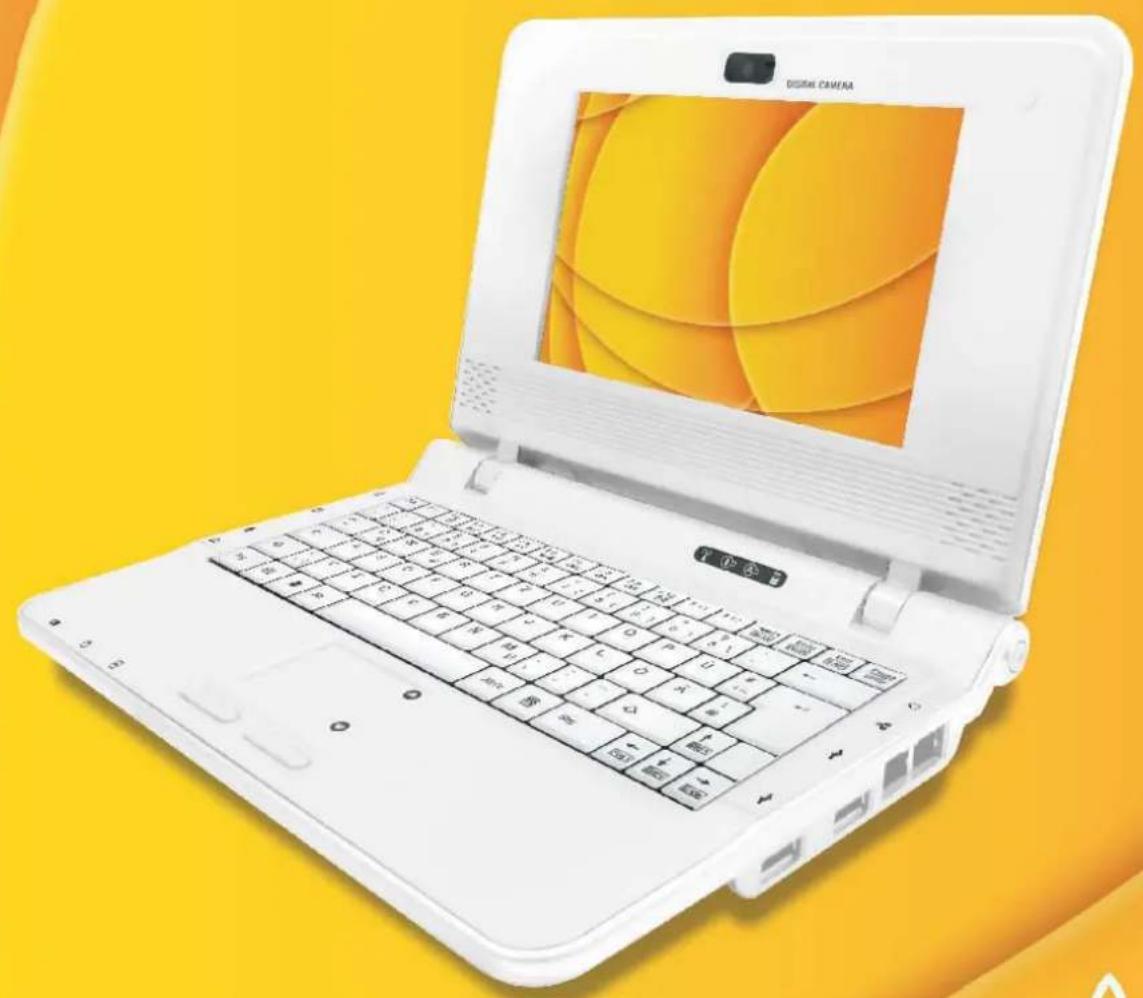
AIRIS
Sistema Operativo
Manual de Nombre
FBReader is an e-book reader for Linux/Windows XP PDA/UMPC/Desktop computer. FBReader supports several e-book formats: fb2, html, chm, rtf, plucker, etc. Direct reading from zip, tar, gzip and bzip2 archives is also supported. FBReader is distributed under the terms of the GNU GPL.
How To Start
FBReader looks for fb2 , oeb and OpenReader books in directories listed in the Book Path option. First of all you need to set this path. Open the options dialog (just click on in the toolbar) and change the value of Book Path option in the General tab. This option contains the list of directories containing fb2, .oebzip, *.orb or archive files. Directories in the list are separated by colons.
Start book selection dialog (click on ), select a book from the list and read it.
All Rights Reserved.
Original Issue: 03/2008
1.1 Allume ton computer
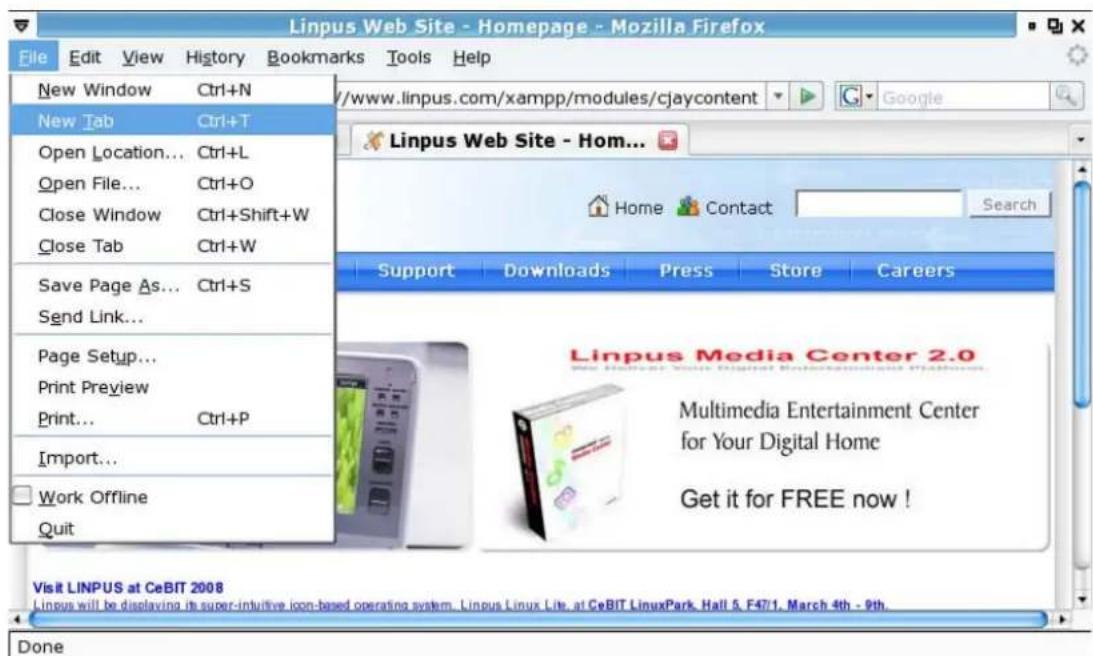
Image 2-5 Tabbed web navigation.
Image: 4-1 Evince PDF reader
Imagee: 4-2 StarDict
FBReader is an e-book reader for Linux/Windows XP PDA/UMPC/Desktop computer. FBReader supports several e-book formats: fb2, html, chm, rtf, plucker, etc. Direct reading from zip, tar, gzip and bzip2 archives is also supported.
FBReader is distributed under the terms of the GNU GPL.
How To Start
FBReader looks for fb2 , oeb and OpenReader books in directories listed in the Book Path option. First of all you need to set this path. Open the options dialog (just click on in the toolbar) and change the value of Book Path option in the General tab. This option contains the list of directories containing .fb2, .oebzip, *.orb or archive files. Directories in the list are separated by colons.
Start book selection dialog (click on ), select a book from the list and read it.
4-4 Calculatrice
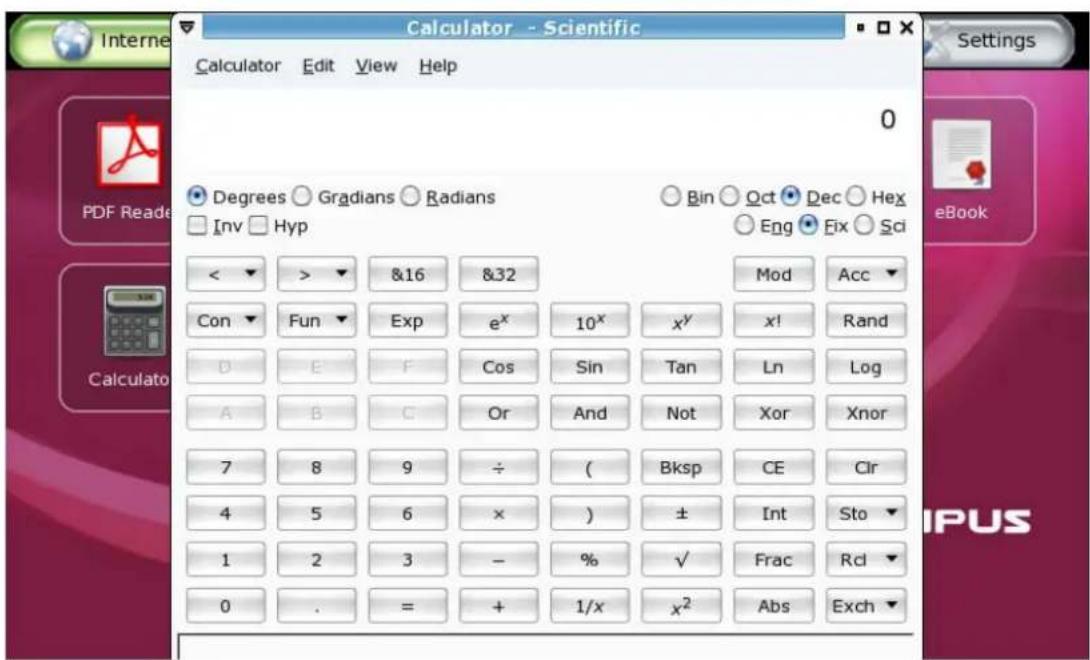
Image: 4-4 Calculatrice
5-1 Application Multimedia
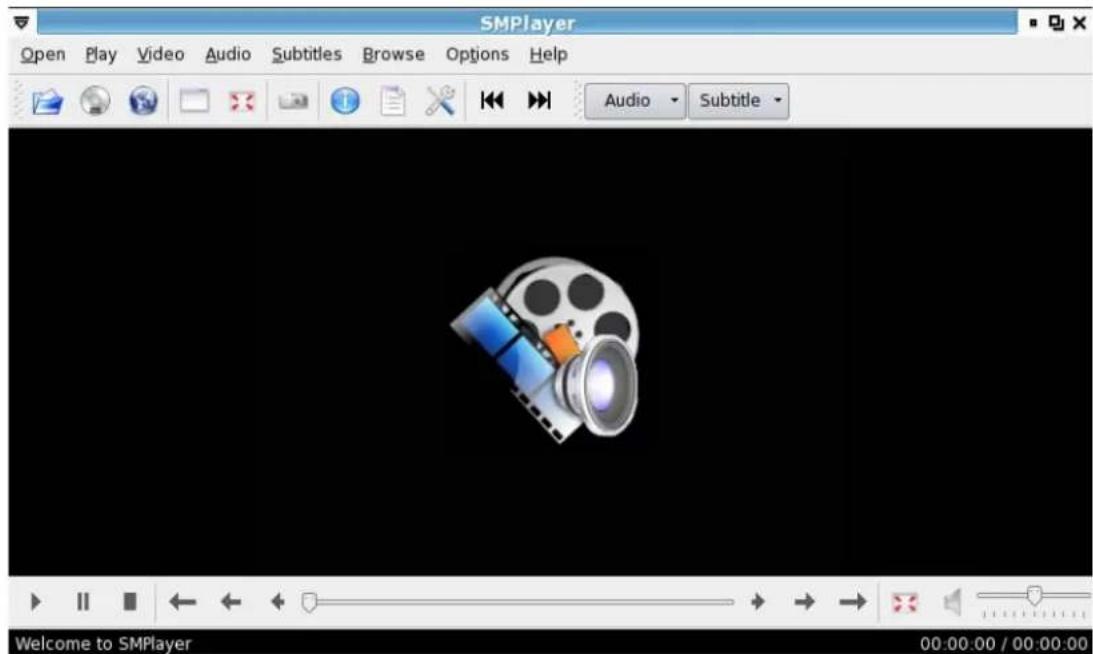
Image 5-1: SMPlayer multimedia player

The "Media Player" supporte les formats video and audio: DVD, VCD, Audio CD, MPEG1, MPEG2, MP3, WMV, WMA, OGG, WAV etc.
Lire un disque
KIRA Series Operating System
User Manual
All Rights Reserved.
KIRA Series Operating System User's Guide
Original Issue: 03/2008
Changes may be made periodically to the information in this publication without obligation to notify any person of such revisions or changes. Such changes will be incorporated in new editions of this manual or supplementary documents and publications. This company makes no representations or warranties, either expressed or implied, with respect to the contents hereof and specifically disclaims the implied warranties of merchantability or fitness for a particular purpose. Record the model number, serial number, purchase date and place of purchase information in the space provided below. The serial number and model number are recorded on the label affixed to your computer. All correspondence concerning your unit should include the serial number, model number and purchase information.
No part of this publication may be reproduced, stored in a retrieval system, or transmitted, in any form or by any means, electronically, mechanically, by photocopy, recording or otherwise, without the prior written permission of Infinity System, Inc.
Other companies' product names or trademarks are used herein for identification purposes only and belong to their respective companies.
C
Index
Chapter One - Getting to Know Your System 5
1.1 Turn on your computer 5
1.2 Turn off your computer 5
1.3 Desktop Modes 6
1.4 Tool Bar. 6
1.5 Windows 7
1.6 File Manager 8
1.7 Using Removable Devices 8
1.8 Using the Keyboard 10
Chapter Two - Using the Internet 11
2-1 Wired Network Setup 11
2-2 Wireless Network Setup 11
2-3 Web Browsing 13
2-4 Emails 15
2-5 Instant Messaging. 18
2-6 Skype Internet Phone 19
Chapter 3 Office Applications 20
3-1 Word Processor (OpenOffice.org Writer) 20
3-2 Spreadsheet (OpenOffice.org Calc) 23
3-3 Slide Presentation (OpenOffice.org Impress) 26
Chapter 4 Useful Tools 29
4-1 PDF Reader. 29
4-2 Dictionary - StarDict. 29
4-3Ebook. 30
4-4 Calculator. 31
Chapter 5 Multimedia, Games 32
5-1 Multimedia Play 32
5-2 Image Viewer. 33
5-3 Games 33
Chapter 6 System Configuration 35
6-1 Date and Time. 35
6-2 System Monitoring 35
6-3 Printer Setup 36
6-4 Power Management Preferences 37
Appendix A Rapid System Recovery 39
A-2 Using the Recovery CD 40
Chapter One - Getting to Know Your System
KIRA Series has brought you a brand new super-intuitive user interface with a simple and easy-to-use system menu and more of your favorite applications.
1.1 Turn on your computer
- Switch on you PC monitor and press the power button to turn on your PC.
- The system will then auto-login to the Simple Mode using the default user account "KIRA".

At default settings, the password for user account "KIRA" is "KIRA".
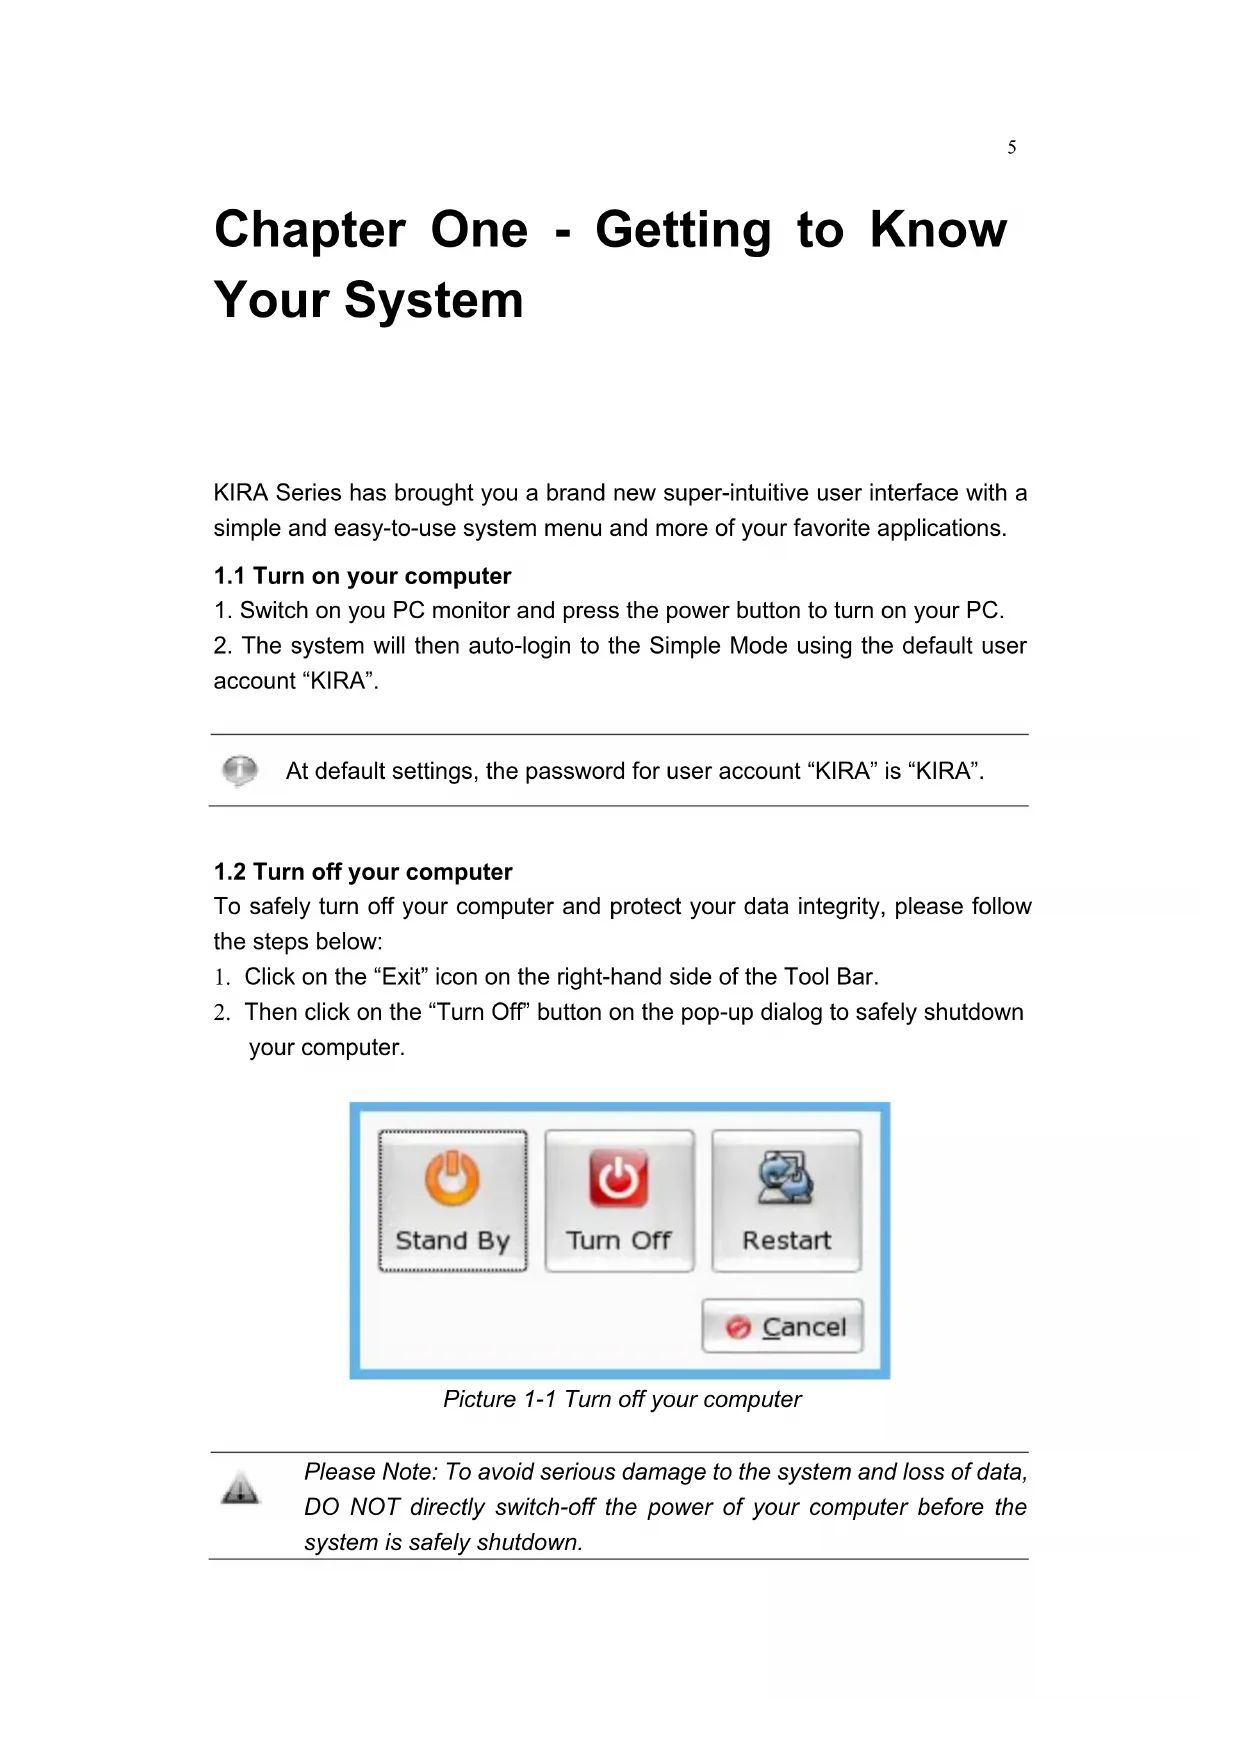
1.2 Turn off your computer
To safely turn off your computer and protect your data integrity, please follow the steps below:
- Click on the "Exit" icon on the right-hand side of the Tool Bar.
- Then click on the "Turn Off" button on the pop-up dialog to safely shutdown your computer.
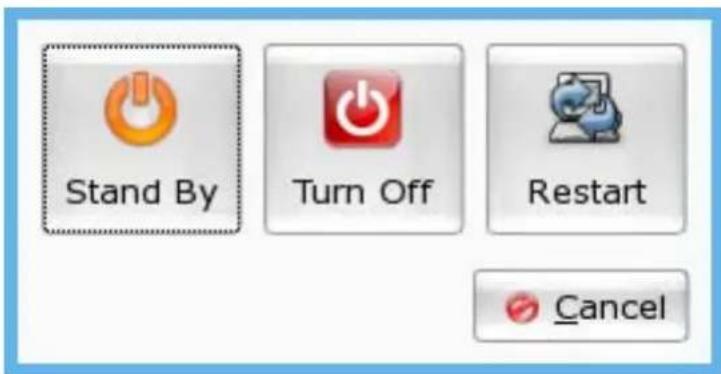
Picture 1-1 Turn off your computer

Please Note: To avoid serious damage to the system and loss of data, DO NOT directly switch-off the power of your computer before the system is safely shutdown.
1.3 Desktop Modes
Your KIRA Series OS offers a super-intuitive icon desktop mode. After the system is started, you will see this Simple Mode user interface as shown in Picture 1-2. All software applications are categorized into 5 tabs - Internet, Work, Learn, Play and Setting.
To open a tab or an application simply click on it.
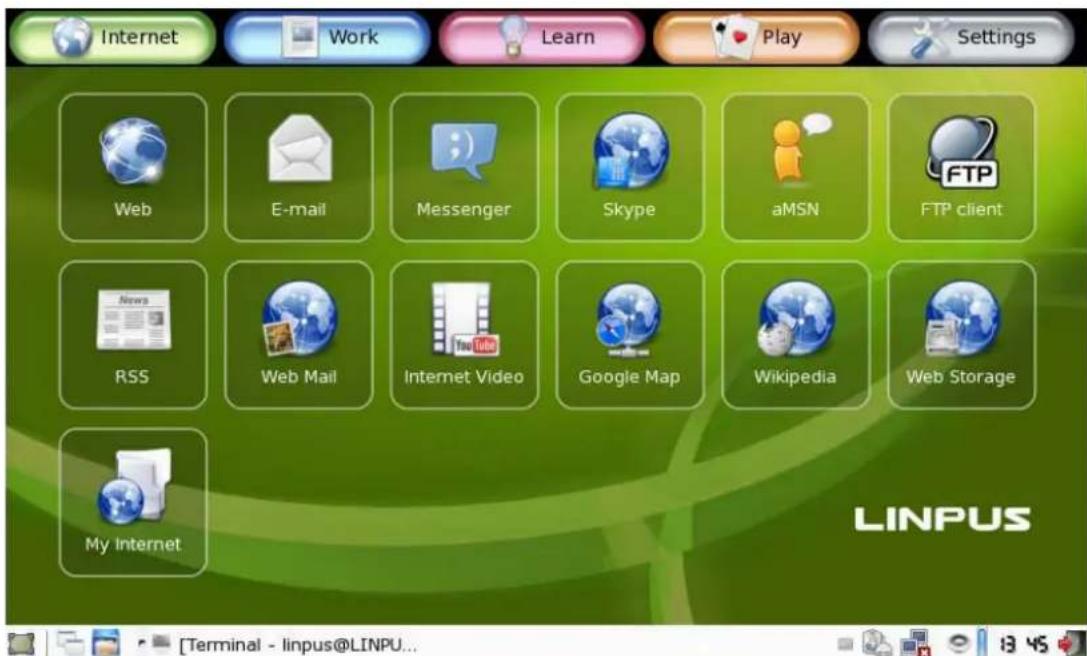
Picture 1-2 The Simple Mode desktop environment
1.4 Tool Bar
The Tool Bar is located at the bottom of the desktop. There are some application shortcuts, system notification, and permanent system utility icons within (see picture below).

Picture 1-3 The Tool Bar
Application Shortcuts
Located on the left-hand side of the Tool Bar, there are 2 application shortcuts. They are shortcuts for "Display Desktop" and "File Manager". You can minimize all running applications at once using the "Display Desktop" - and browse through files using the "File Manager".
System Notification Area
When an application program is started, it will remain running in the system until you close it. At the middle of the Tool Bar is the system notification area. All running applications will reside in this area.

Picture 1-4 System Notification Area
Permanent System Utilities
There are several permanent system utilities located at the right-hand side of the Tool Bar. Details about these utilities will be introduced in later chapters.
| Utility Icon Description | |
| Language input methods | |
| System power supply status | |
| System network connection status | |
| System sound volume | |
| System Date/Time | |
| Exit | |
1.5 Windows
When you open a program, it should fit to your screen. If a running application window does not fit just right to your screen, you can make adjustments using the steps below:
- Hold down the [Alt] button, then move the mouse cursor over the targeting window and hold down the left mouse key at the same time. The mouse cursor will then become a palm like icon as illustrated in Picture 1-5.
- Move the mouse to adjust the windows to an appropriate position.
Picture 1-5 Adjust windows position
1.6 File Manager
Click on the "File Manager" icon located under the "Settings" feature group tab to start the File Manager program. Alternatively, you can click on the File Manager shortcut located at the left-hand side of the Tool Bar.
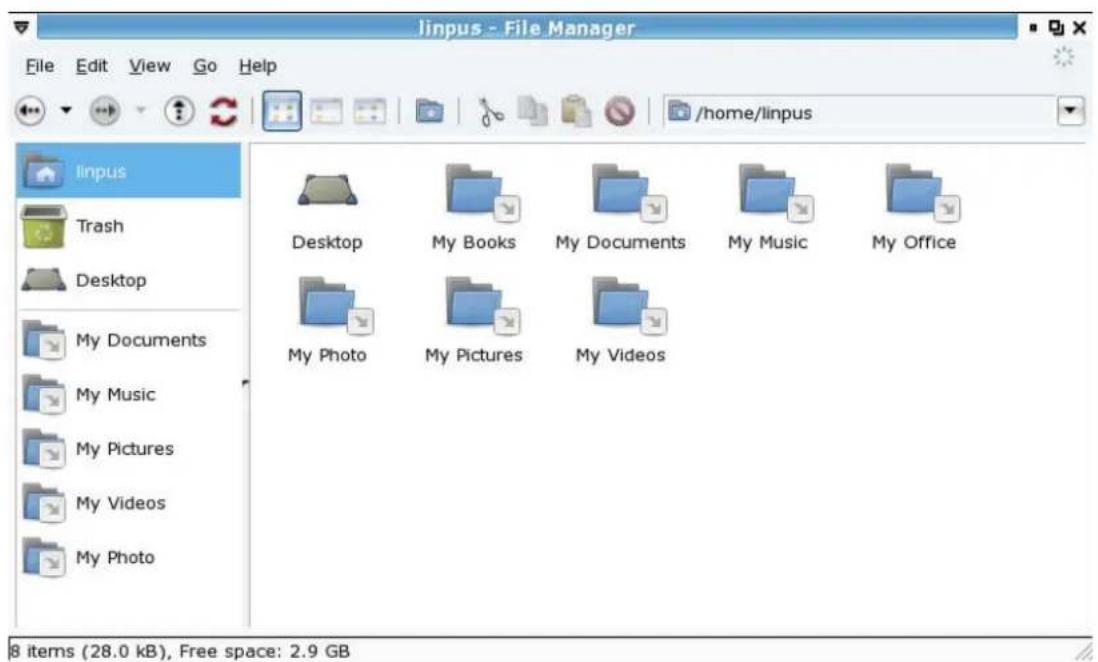
Picture 1-6 File Manager
1.7 Using Removable Devices
When you plug-in removable storage devices such as USB Disks, the system will automatically detect the device and, using the File Manager, display its
contents ( As shown in Picture 1-7). You can use the File Manager to view, copy, modify, move and delete any files and folders stored on that device.
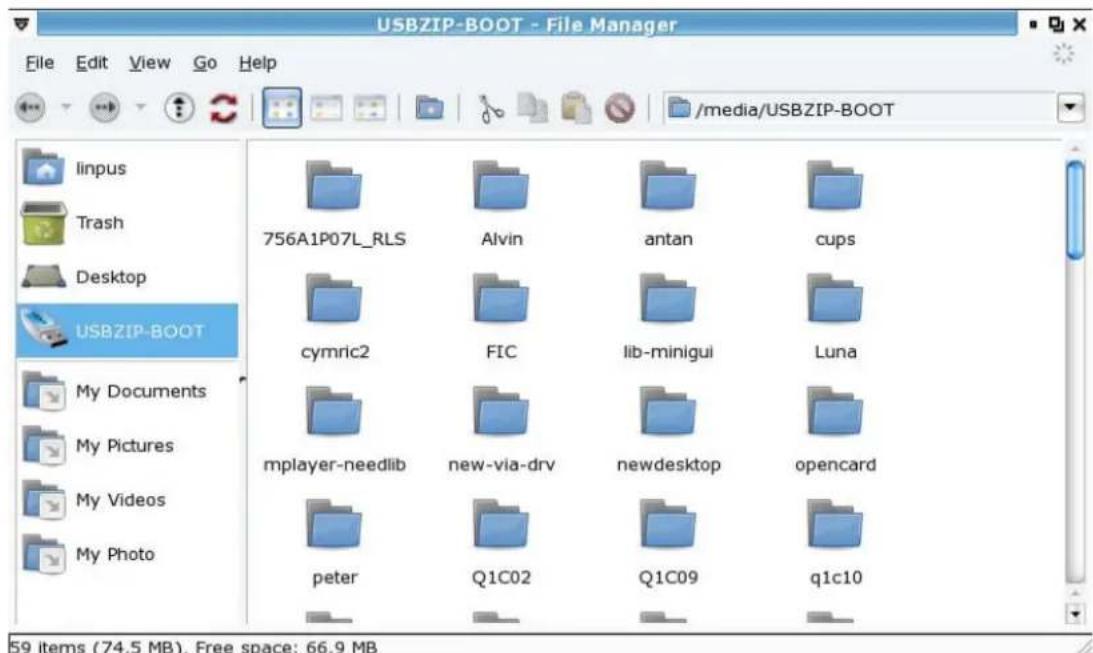
Picture 1-7 Using File Manager to browse data stored in a USB Disk.
After you have finished your tasks, please firstly close all files saved to the USB device. To remove the USB device safely, right click on the USB storage device icon and select the "Unmount" option in the quick menu, finally physically remove the USB storage device.
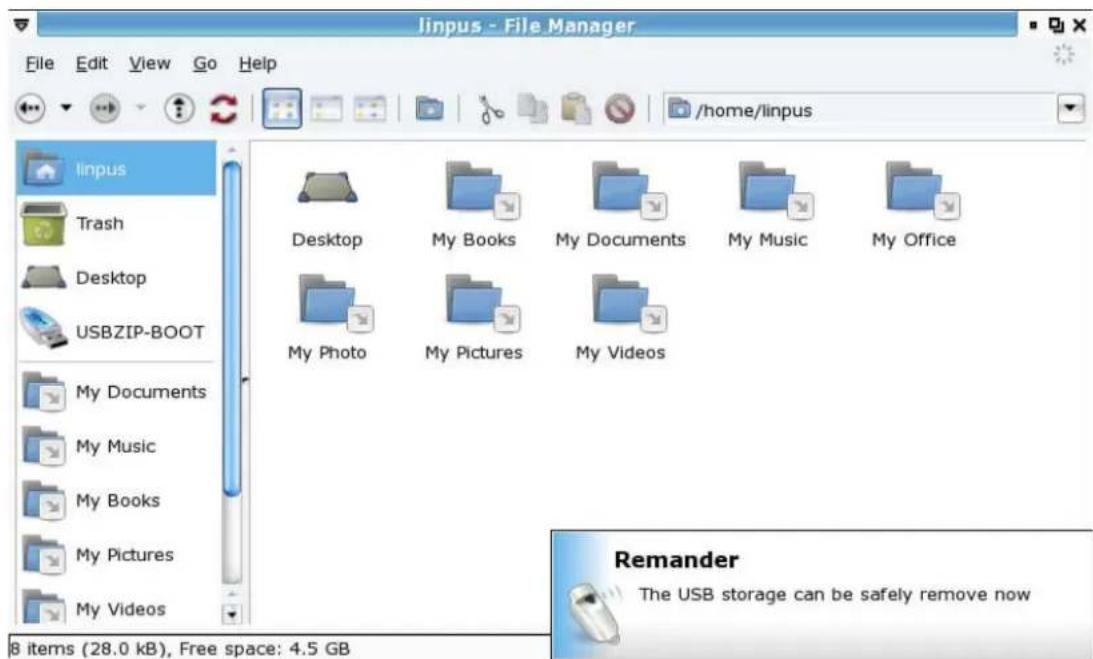
Picture 1-8 Safely unmount and remove a USB Disk.

Please DO NOT physically remove the USB storage device while files saved on it are open as it may corrupt the files and result in loss of data.
1.8 Using the Keyboard
| Function Keys Description |
| [Fn] [F2] Wireless Network On/Off |
| [Fn] [F3] Dual Display Switch |
| [Fn] [F6] Mute On/Off |
| [Fn] [F7] Display On/Off |
| [Fn] [F8] Brightness Down |
| [Fn] [F9] Brightness Up |
| [Fn] [F10] Volume Down |
| [Fn] [F11] Volume Up |
| [Fn] [PrtScr] Start Screen Capture Software and Capture Screenshot |
| [Fn] [Num Lk] Built-in Number Keypad On/Off |
| [Ctrl] [Alt] [P] Simple Mode and Normal Mode Desktop Switch |
| To use the Function Keys, you need to hold down the [Fn] key at the bottom-left of the keyboard then press the Function Key. |
Chapter Two - Using the Internet
Your KIRA Series OS supports both wired and wireless network. Before you start surfing on the Internet, please follow the steps below to setup your Internet connection.
2-1 Wired Network Setup
Before proceeding with the setup, please make sure the following:
- One end of the network cable is properly plugged into your computer's network adapter port;
- Plug the other end of the cable into a Switch or Hub which is already part of a LAN connected to the Internet.
LAN Network with Dynamic IP Allocation (DHCP)
KIRA Series' wired network is automatically set to on. If you are connected to a LAN configured with dynamic IP allocation (DHCP), the Internet will connect as soon as you have plugged in the cable.

If you are connected to a wireless network and wish to switch to a wired network, firstly plug the network cable into the computer. Right click on the network adapter icon as shown in Picture 2-1 then uncheck the "Wireless Network" option.

Picture 2-1: Switching from wireless network connection to wired one.
2-2 Wireless Network Setup
The wireless network adapter is turned on by default at startup. If no wireless network is detected, please firstly check if your wireless network access point is turned on. To get a list of all the wireless networks your device has detected left click on the wireless icon in the Tool Bar (see picture 2-2). Simply then click on the network you wish to connect to.
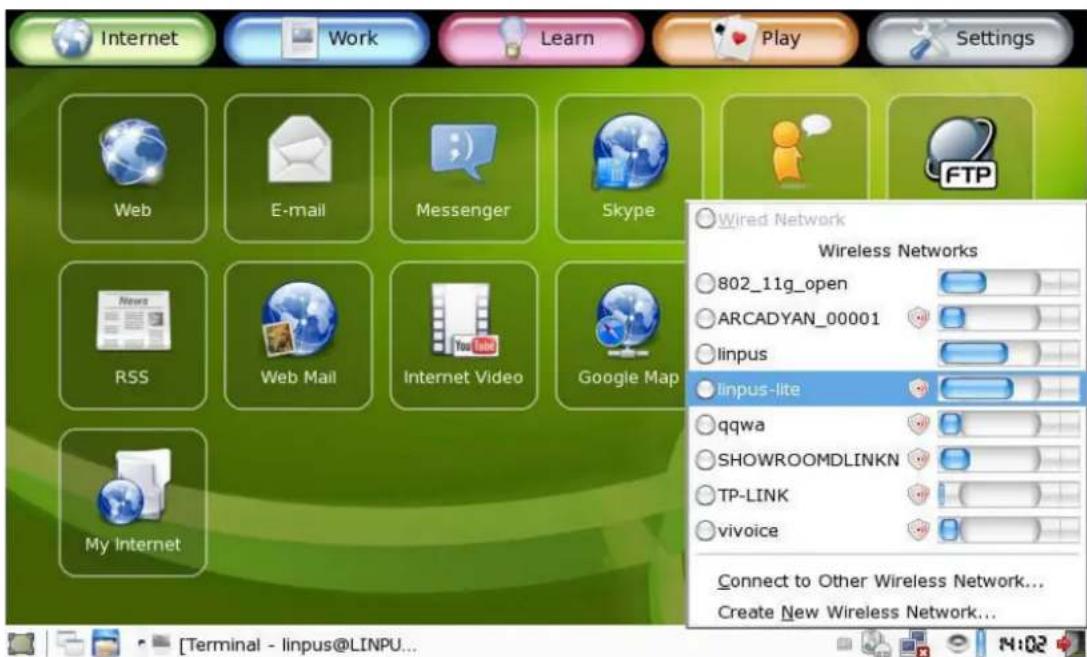
Picture 2-2: Selecting a wireless access point (AP)
When a wireless access point is selected, the system might prompt you for the password of the access point. Enter the correct password to the dialogue box then click the "Login to Network" button as illustrated in Picture 2-3.
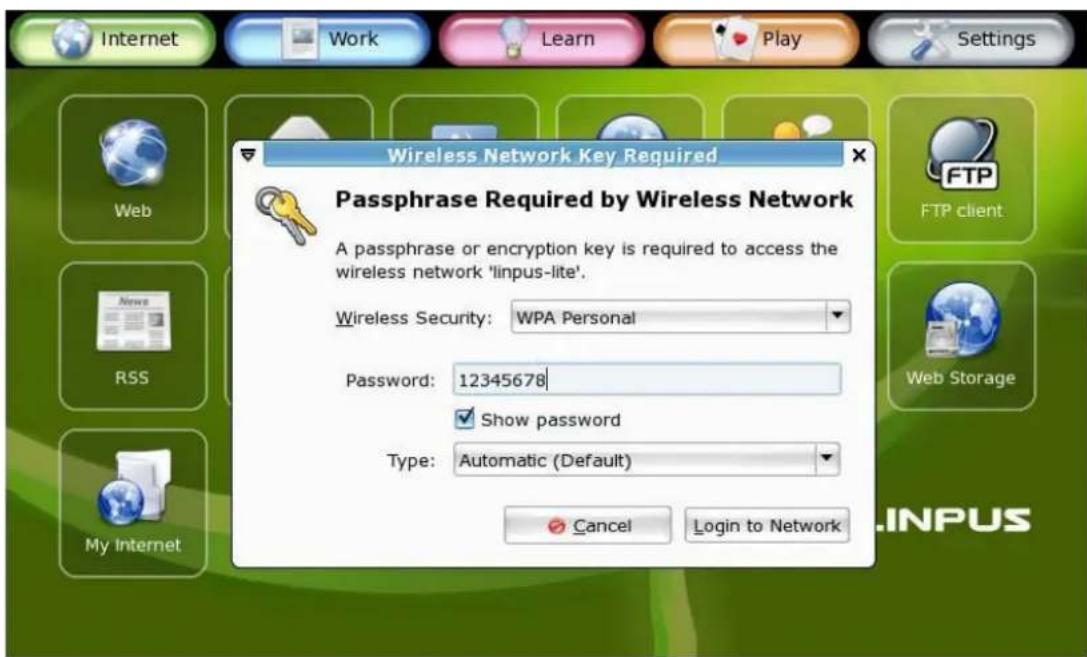
Picture 2-3 Input password of a wireless access point.
When you are successfully connected, you can see an icon indicating the connection signal strength at the Tool Bar.

Picture 2-4 Signal strength of the wireless network currently connected
2-3 Web Browsing
When you have finished setting up your network network you can start browsing the Internet. Your KIRA Series is equipped with the popular Firefox Internet browser to bring you the best Internet surfing experience. In the following sections, you can learn the basics of the Firefox user interface.
Tabbed Browsing
Tabbed Browsing is a page management feature for enhancing your browsing experience. When you are browsing several web pages at the same time, you can load these pages into "tabs" under the same browser; by doing so you can open many web pages in one browser and quickly switch between them. You may go to "File -> New Tab" to add an extra tab or alternatively use the shortcut key [Ctrl] + [t].
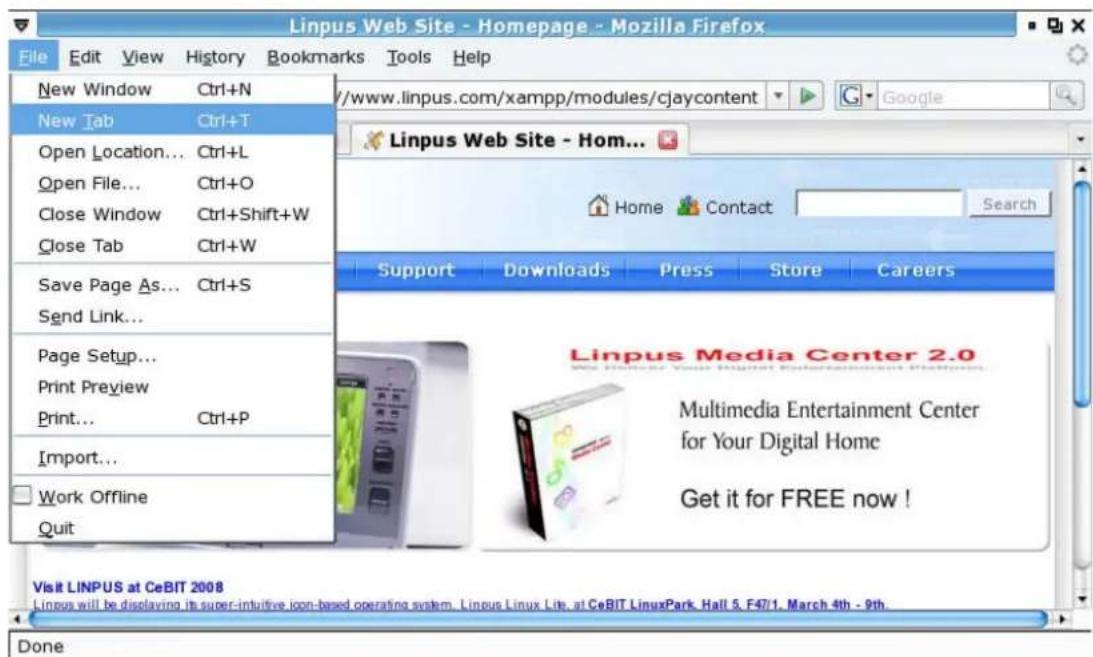
Picture 2-5 Tabbed web browsing
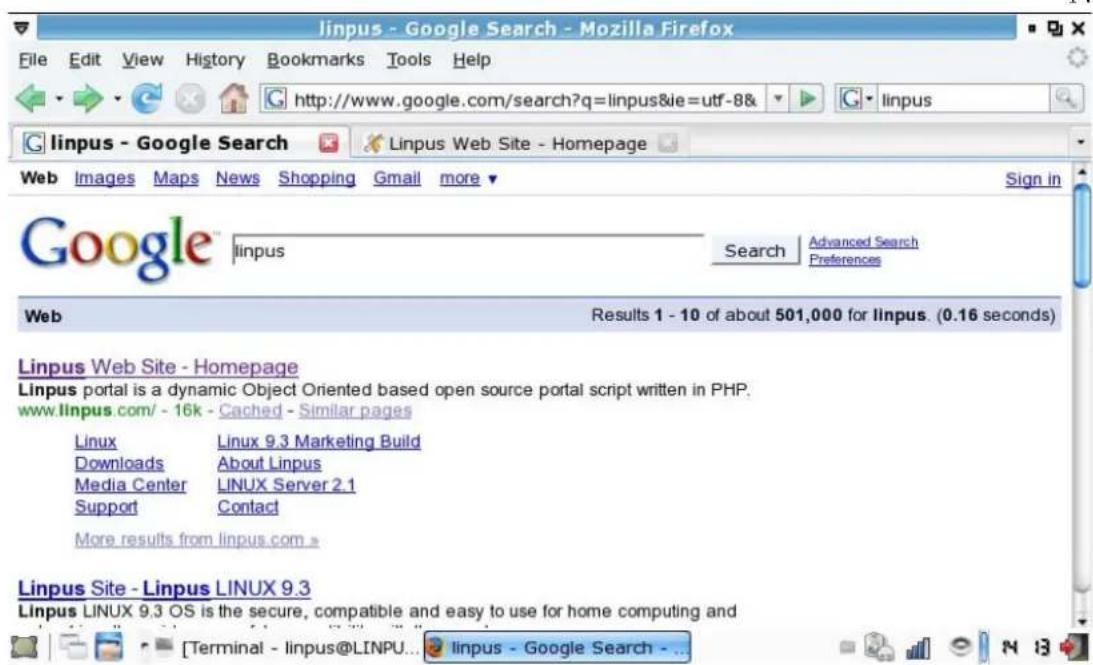
Using an Internet Search Engine
The Firefox Internet browser includes Google as shown in Picture 2-6. To use this feature, simply input the search keyword into box and press the Return/Enter key to start searching.
Picture 2-6: Keyword search using Google.
Other than Google, Firefox also has many other popular search engine interfaces built-in like Yahoo, Amazon, eBay, Dictionary.com etc. You can select your favourite search engine from the textbox located at the top right-hand corner of Firefox browser. Input your search keyword then hit Return/Enter to start searching.
Font Size Adjustment
You may adjust the web page font size by using the "Increase" and "Decrease" options under the "View -> Text Size" setting in Firefox.
Bookmark Management
Click on "Bookmarks -> Book This Page" to bookmark the page you are browsing. You may also edit and modify the bookmark label when you add the bookmark.
Popular Internet Website Services
Your KIRA Series desktop is preloaded with several popular website shortcuts for your convenience. You may access these shortcuts in the Internet group tab.
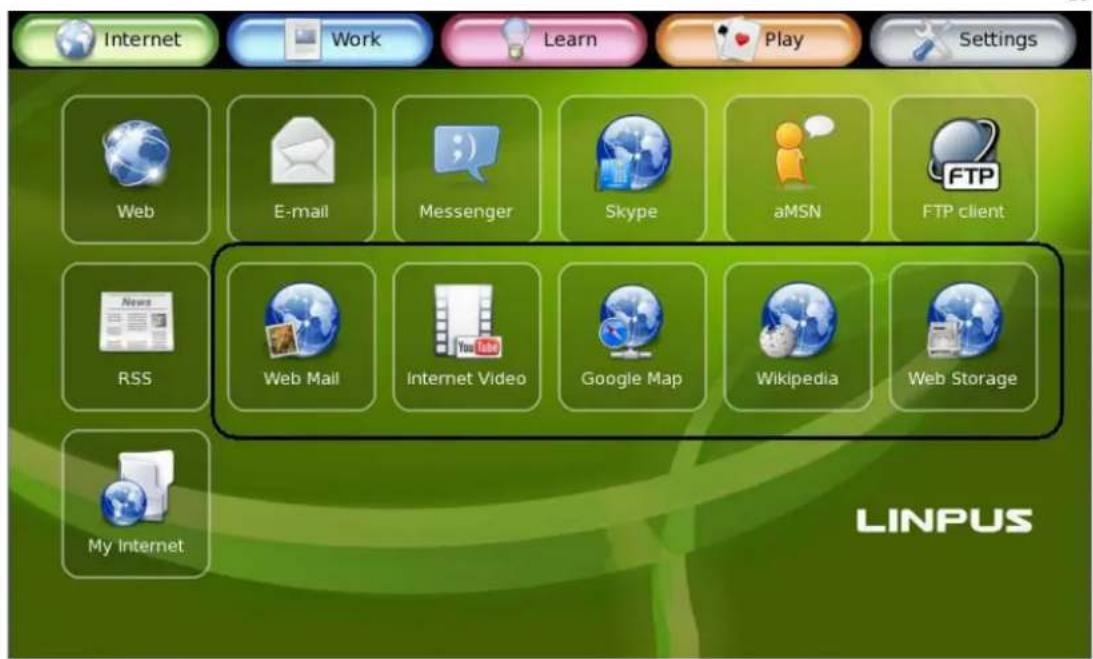
Picture 2-7 Shortcuts to popular Internet website services
2-4 Emails
Email is another common Internet tool. The KIRA Series uses Thunderbird as the main email client software. You may start Thunderbird by clicking the Email icon in the Internet group tab. When Thunderbird is started for the first time, you will see an Account Wizard guiding you to setup your e-mail account configurations as illustrated below.
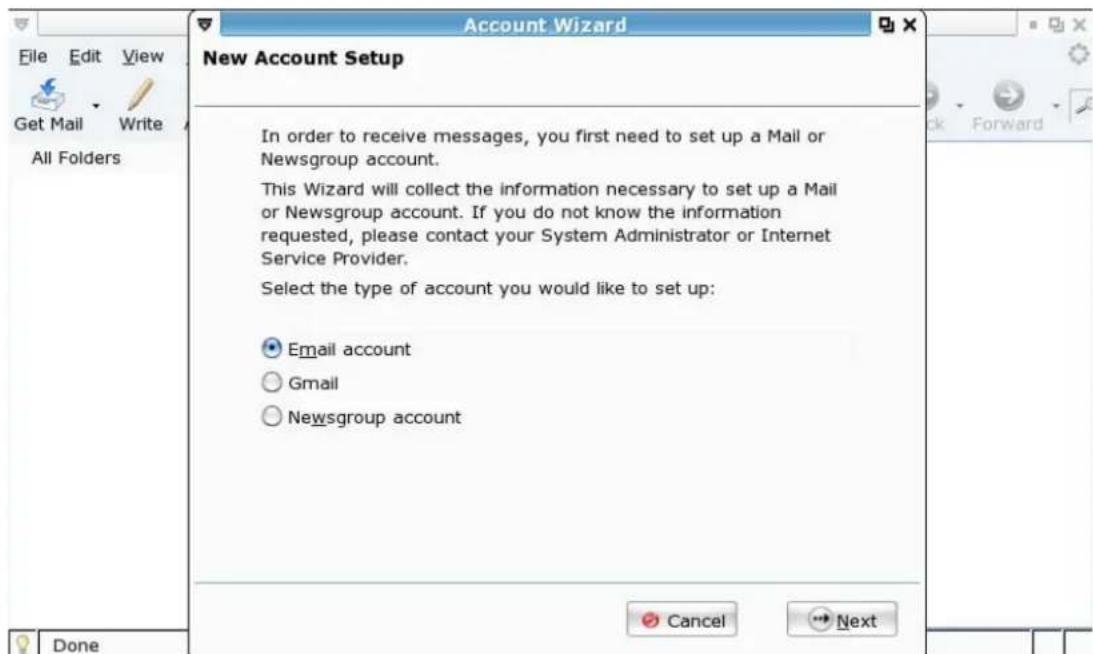
Picture 2-8: Thunderbird -- Email account management wizard

If you do not wish to setup your e-mail account at this time, you may choose to setup your accounts later by selecting the "Add" option under the "Edit -> Account Setup" in Thunderbird.
Setup Email Accounts
If you would like to add an email account into Thunderbird, the targeting email server should support SMTP and POP3 protocols for sending and receiving emails respectively. After you start Thunderbird, please following the steps below to complete your email account setup.
- As illustrated in Picture 2-8, select "Email account" then click "Next";
- Following by inserting "Your Name" and "Email Address";
- Choose POP as the server type for retrieving your e-mails then input your email server address. Input your email SMTP server address as you email sending agent as illustrated in Picture 2-9.;
- Follow the Account Wizard to input the receiving user name and the account name in the next two pages;
- At last, check all the account details are correct and click on the "Finish" button.

Picture 2-9: Confirm e-mail account configuration details.
Composing Emails
After you have properly configured your email account with Thunderbird, you can then start sending and receiving emails. All emails can be accessed from the email folders in the left panel. You can use the [< ] and [>] controls to
switch between email folders. If you would like to write an email, simply click on the "Compose" button and you will see a mail composer as illustrated below. To send your email, just click on the "Send" button.
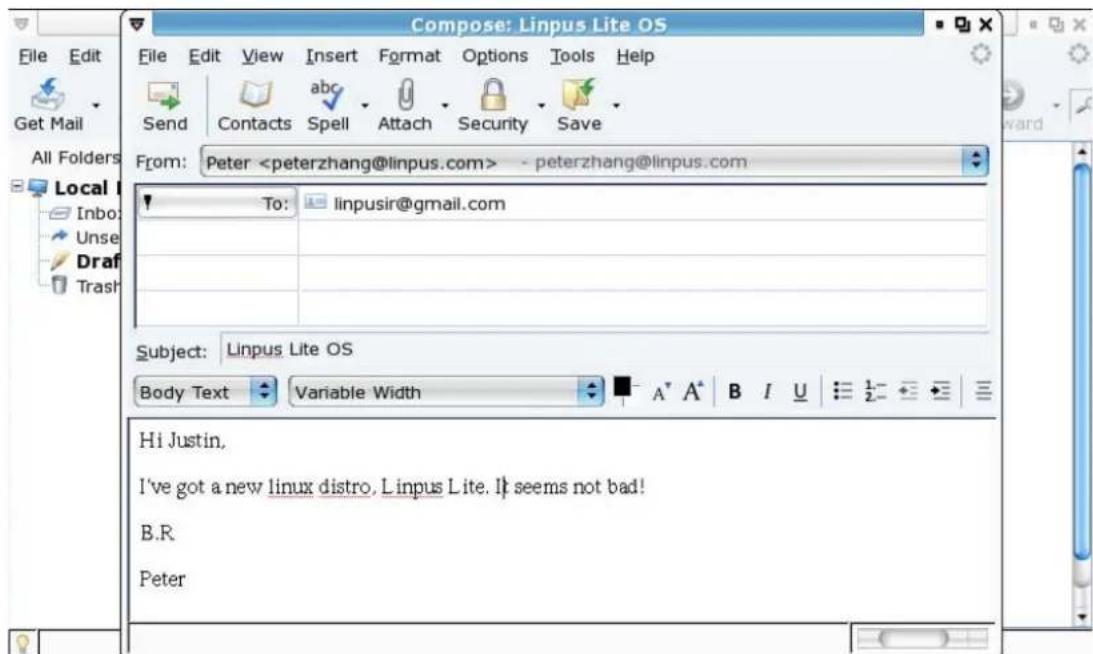
Picture 2-10: Composing an email

While composing your email you can use the "Attach" button to attach files to the email and use the "Contacts" button to add your friend's email address in the existing contact list.
Receiving Emails
At the main control page in Thunderbird, click on the "Get Mail" button to download your emails to Inbox.

Picture 2-11 Receiving emails
2-5 Instant Messaging
Under the Internet tab, there is an instant messaging software that allows you use popular instant messaging services like MSN, ICQ, Yahoo, AIM etc. You can click on the "Messenger" icon to start the "Pidgin" instant messaging application. Click the "Add" icon to add accounts from various instant messaging services as illustrated in Picture 2-12.
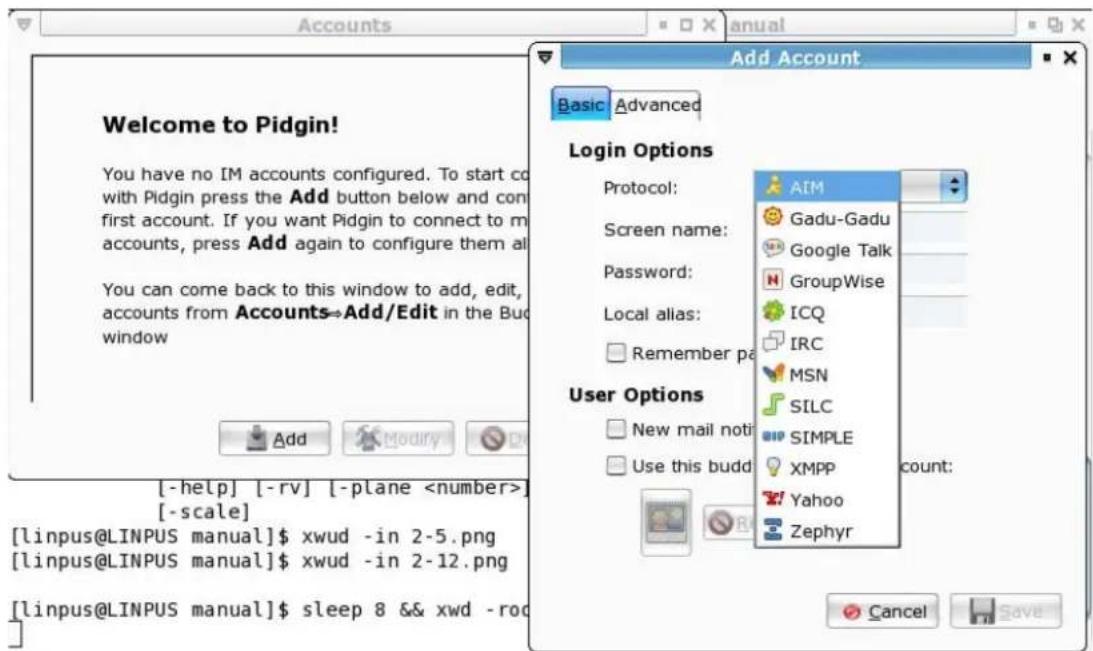
Picture 2-12: Choose the instant messaging service you want.
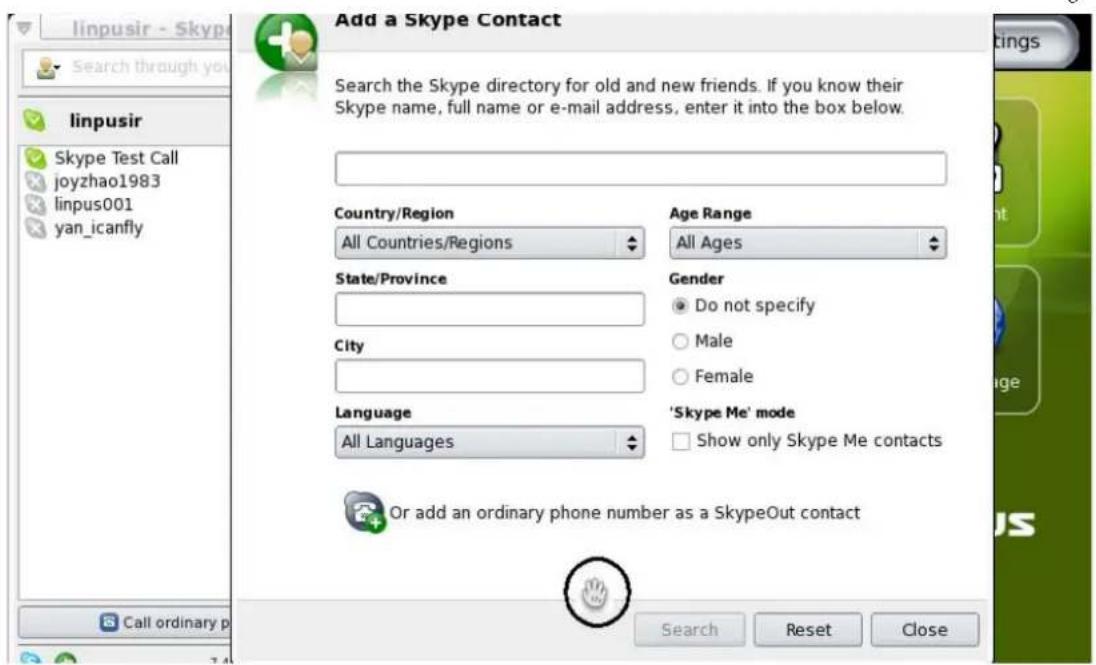
2-6 Skype Internet Phone
KIRA Series OS offers the popular Skype Internet phone application. You can access the Skype phone on the Internet tab. When you start Skype for the first time, you will be prompted to accept the Skype End User License Agreement. Skype will start up immediately after you click on the "Accept" button as shown in Picture 2-13.
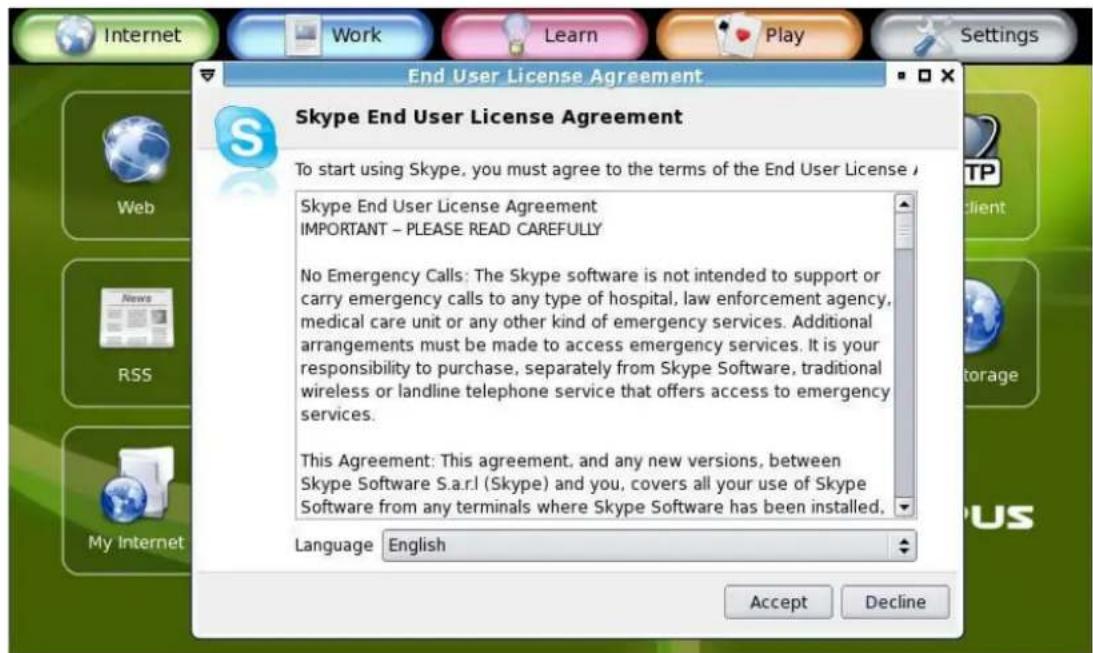
Picture 2-13 Skype End User License Agreement

Skype user interface window is oversized for KIRA Series' desktop. You can follow the steps below to adjust it window position as needed.
- Hold down the [Alt] button, then move the mouse cursor over the targeting window and hold down the left mouse key at the same time. The mouse cursor will then become a palm like icon as illustrated in Picture 1-5.
- Move the mouse to adjust the windows to an appropriate position.
Chapter 3 Office Applications
The "Office" tab provides some common office applications, you can double click the "Office Software" icon to open any one of OpenOffice.org product family, for example, word processor, spreadsheet, presentation and others tools.
Diagram 3-1 OpenOffice.org product family

OpenOffice.org and MS Office has a good format compatibility
3-1 Word Processor (OpenOffice.org Writer)
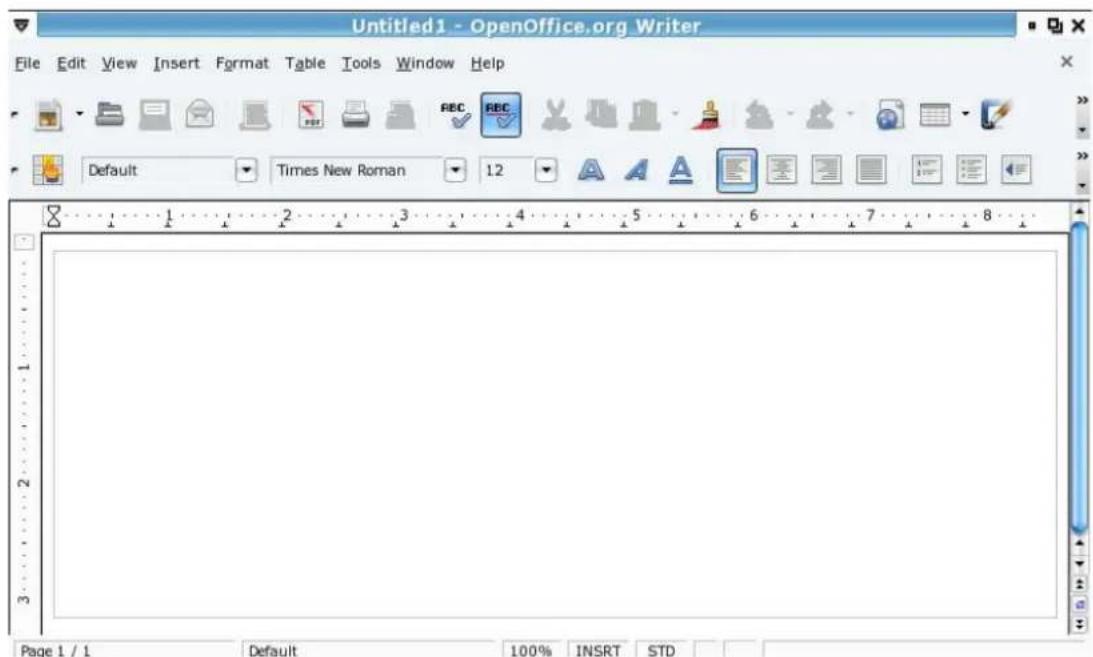
Diagram 3-1: Writer Introduction
Create a New File
Select "File" and then "New" from the top "Tool bar" to create a new Writer Text document, like Diagram 3-2
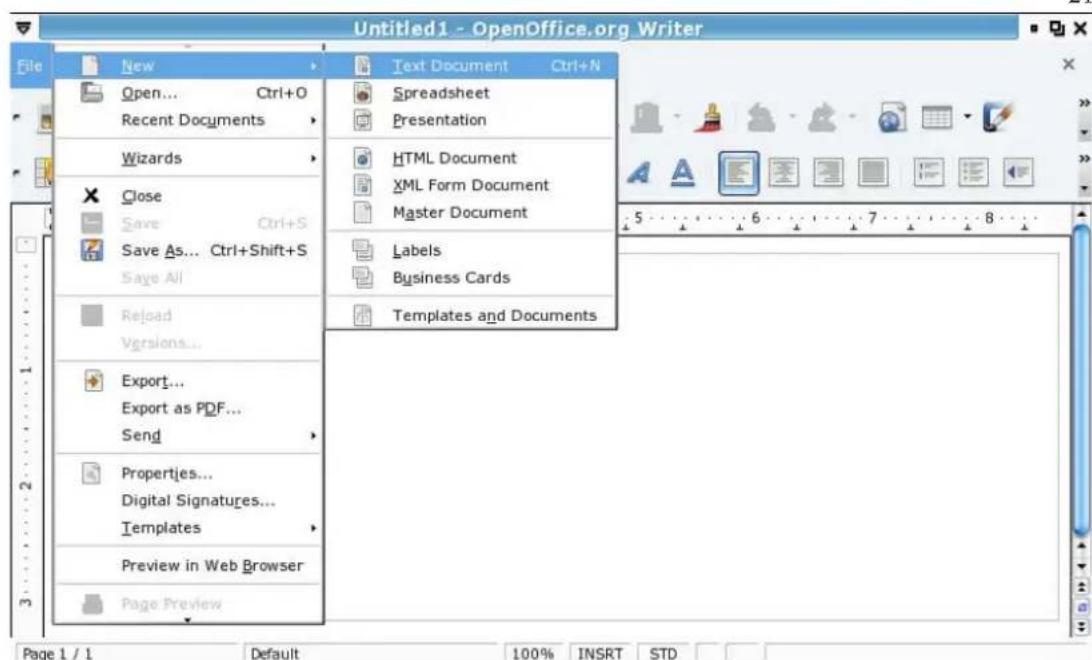
Diagram 3-2: Open a new Write text document
Open an Old File
Select "File" and then "Open". Use the "File System" to find the file you want to open.
Save File
Select "File" and then "Save", enter the "Filename" and "File type" when the "Save As" dialog window appears. This is the same for the "Save As" option.
Change Font Type
In Writer, you can use a lot of different ways to define the character appearance, such as font type, size, color and so on. The simple way is to highlight and select the words that you want to change, select "Format" and then "Character".

Diagram 3-3: (Object Tool Bar)
To edit a character, you can also use the right-click button of the mouse, and then select "Font", "Size", "Style" from the pop-up menu.
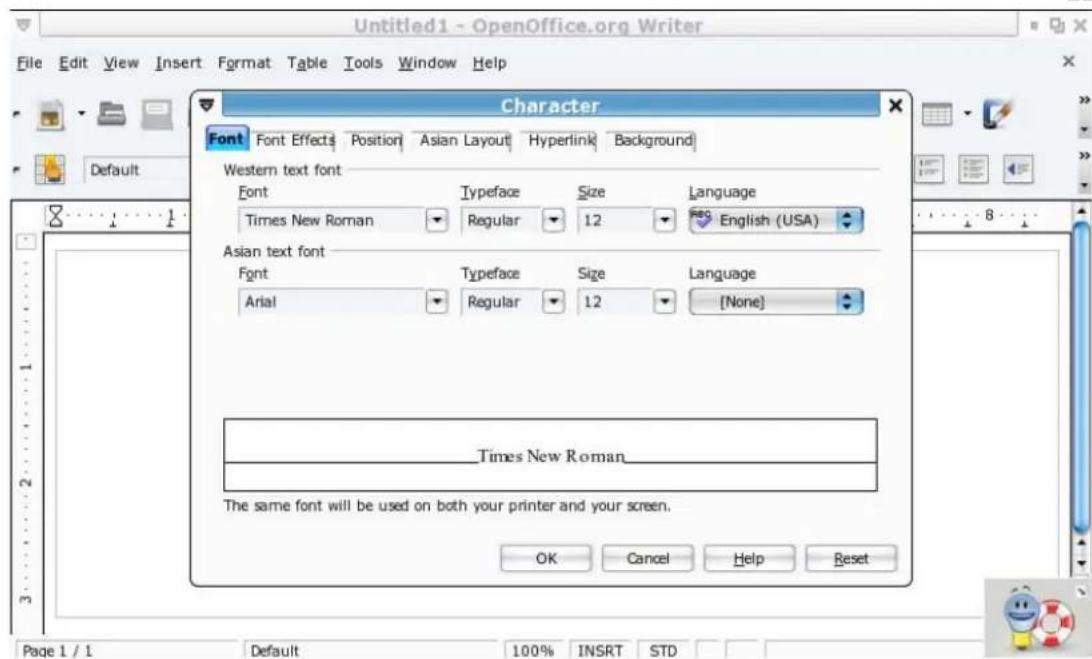
Diagram 3-4: "Character" setting dialog box
Insert Table
To insert a table into the document, select a location with your cursor, then click on "Insert" and then "Table" on the top "Tool bar"; finally input the table name, and number of columns and rows etc.

Point to the top frame boundary of the table and press the left button of the mouse, move left/right and up/down to set the height and width of the table
Insert a Picture
On the top toolbar click on "Insert", "Picture" and then "From File"; at the "Insert Picture" dialog window, input the "File Name" to open.

You can also set the picture size; first select and click on the picture, then use the mouse to hold the tiny "Green" box on the picture boundary and move to resize. While resizing, press the "Shift" key to keep the picture size aligned in an even ratio.
If you want to print - assuming that your printer is already setup - click on "File" and then "Print" on the top "Tool bar"; choose a printer, and number of copies.
Export to PDF format
If you want to export your document as a PDF format, please directly click on "File" and then "Export as PDF" on the top "Tool bar".
3-2 Spreadsheet (OpenOffice.org Calc)
Calc Introduction
Diagram 3-5: Calc Introduction
Cell
Many cells form a sheet; each cell is able to hold data. If you want to select a whole row or column, just click the column name (e.g. C) or row name (e.g. 10). If you want to select non-sequential columns or rows, you can hold down "Ctrl" and then click a row or column.
Edit the sheet
Use the left button of the mouse to click on the Cell. For example, if you want to create a sheet for a top 10 ranking, you can create columns named "Rank", "Candidate", "Score A" and "Score B". At the Candidate column, input "1" and "2" for the first 2 Cells. Select these 2 Cells and using the left button of the mouse move in a downwards direction the "Black" spot at the bottom right corner.
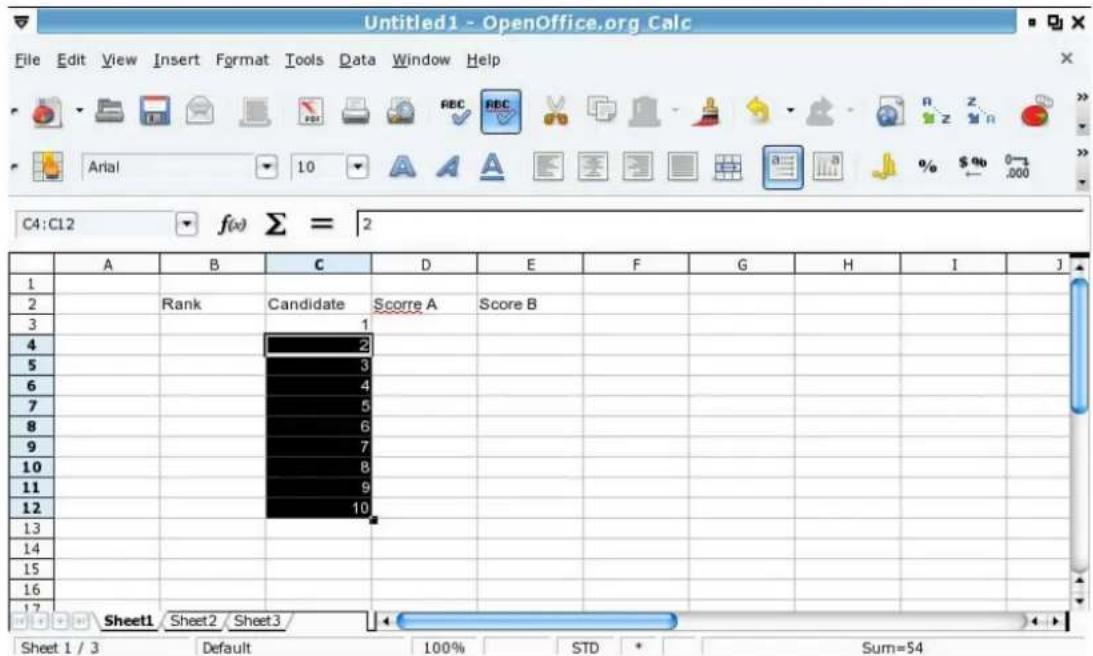
Diagram 3-6: The selected Cells are numbered "1,2,3,..."
If you want to change the background color, just select the Cells you want to color and then right-click button on the mouse and select "Format Cells". In the "Background" tab, select the color and press "OK".
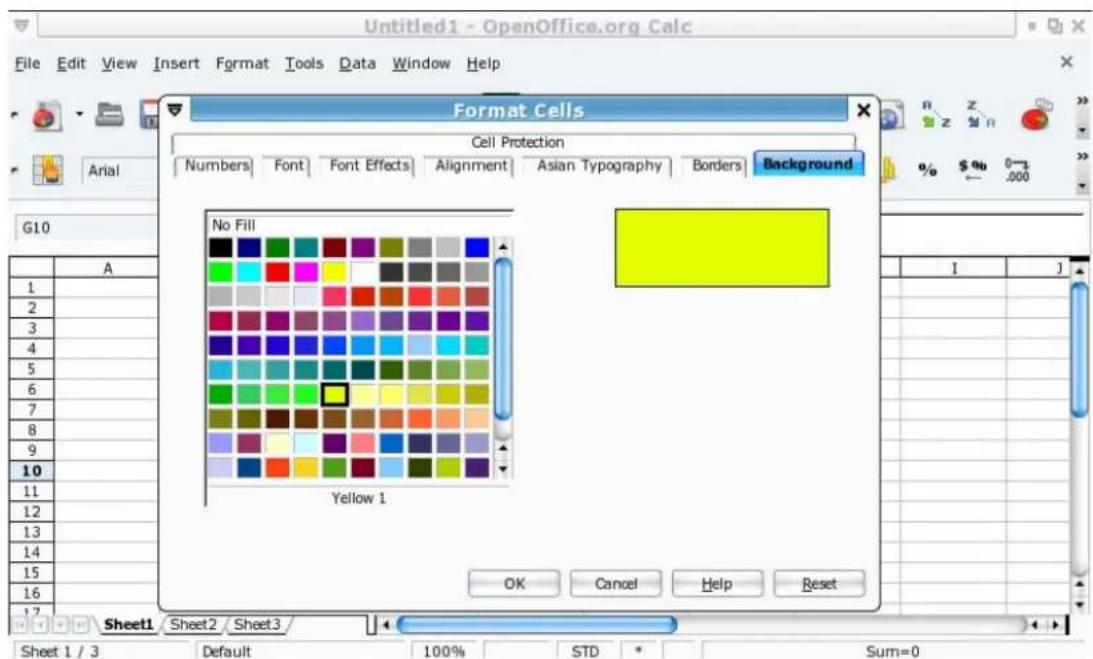
Diagram 3-7: Select the background color for the text within the Cell
Insert a Column/Row
If you want to add a column or a row move the cursor to the last column or row; right-click on the mouse and select "insert". At the "Insert Cells" window dialog, you then select "Entire Row" or "Entire Column".
Automatically Summation
If you want to calculate the total scores of Ellen, you can use "Summation" sign ( ) to do so. For example, first click on the "F3" Cell and then press the "Σ" sign, a frame with blue color is shown to surround "D3" and "E3" Cells. Press "Enter" and the result will be put in the "F3" Cell.
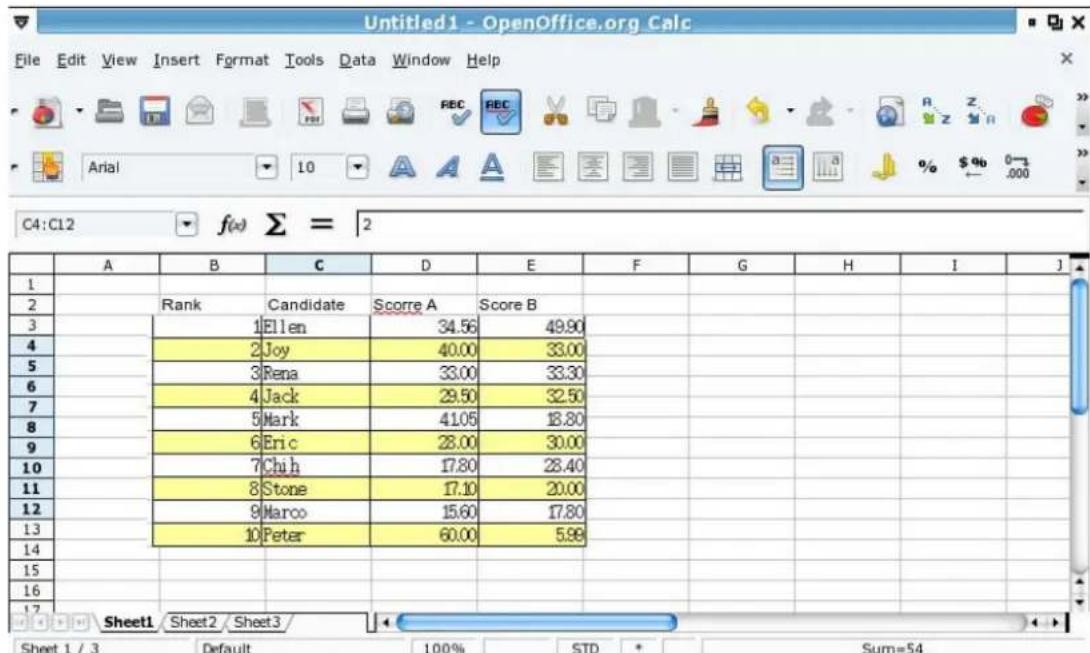
Diagram 3-8: Formula of Summing up
You can use "Sum(C1:C3)" in the formula, or use "Computation symbol" and "number" to do the calculation. First, at the input line, type an "=" sign and then type the equation (e.g. C1+C2+C3 or Sum(C1:C3)). The result is given after pressing the "Enter" key
Create a Chart
First Highlight and select the Cells, then select "Insert" and "Chart" on the top "Tool bar". A "Chart Wizard" will be shown and you can select and input the "Chart Type", "Data Range", "Data Series" and "Chart Element". However, the most important information needed is the "Title", "X-axis" and "Y-axis" under "Chart Element". Press "Finish" when you are done and the chart will be inserted.
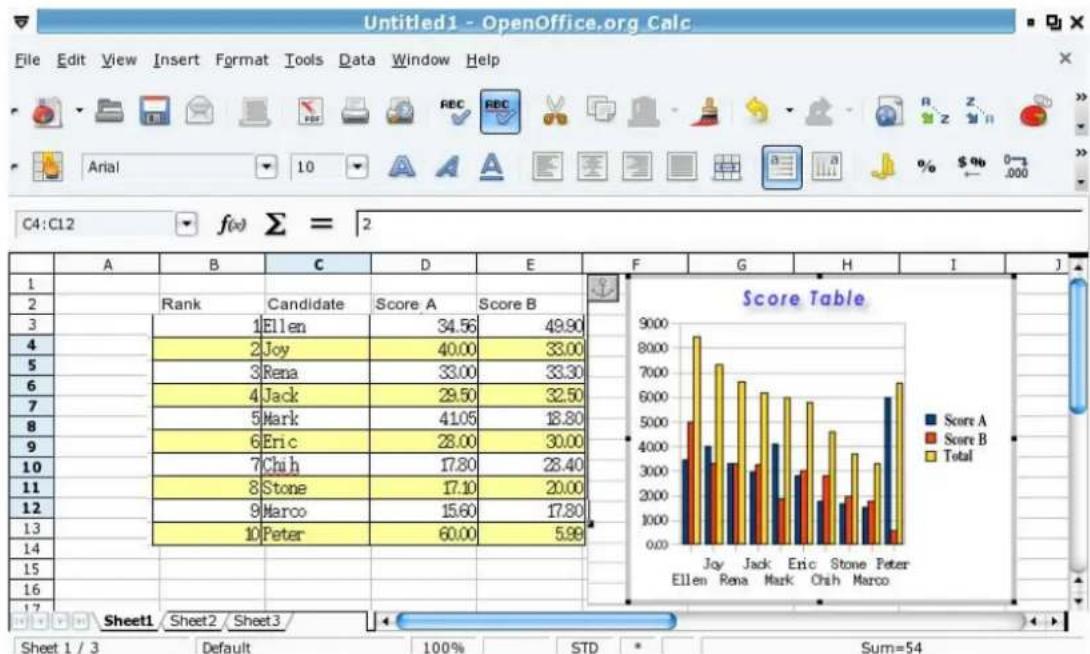
Diagram 3-9: Result of inserting Chart
3-3 Slide Presentation (OpenOffice.org Impress)
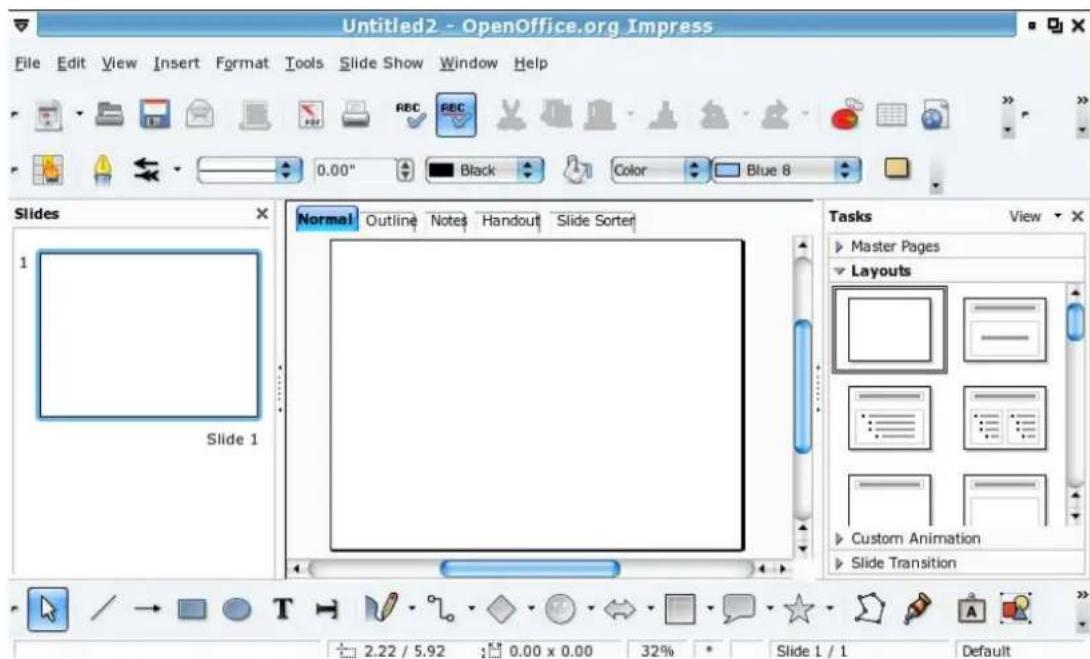
Diagram 3-10: Impress Introduction
Insert a New page
Select "Insert" and then "Slide" from the top "Tool bar"; in the right window, you can select a slide layout.
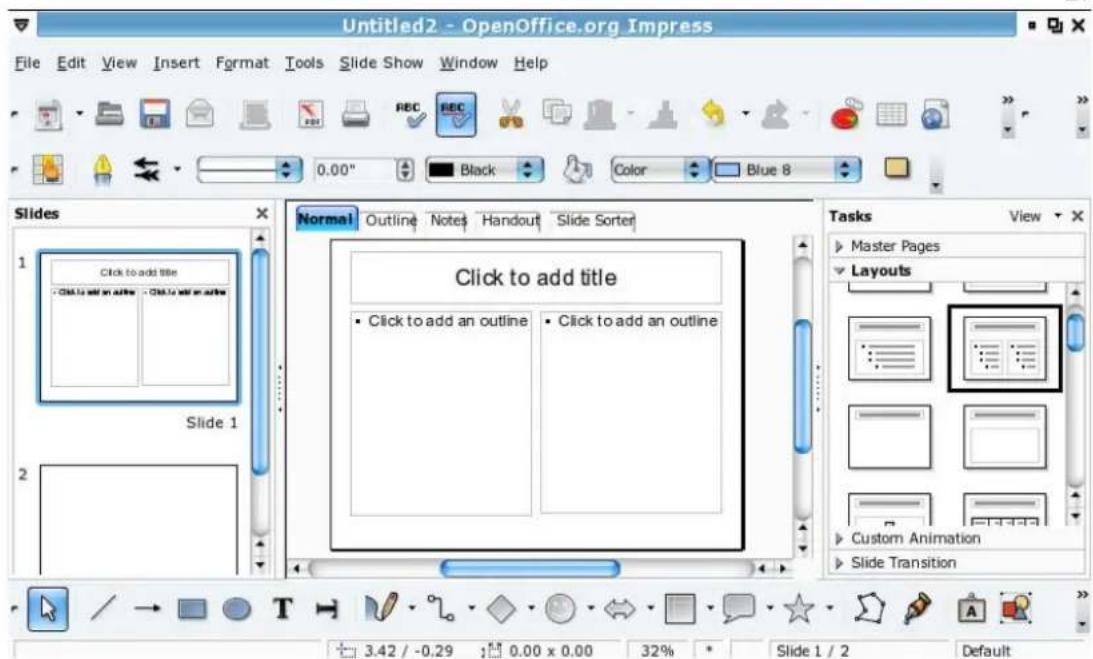
Diagram 3-11: Using Layouts windows to select the slide layout
View Slide
Impress provides 5 different types of viewing modes. Use the right-hand side windows to switch viewing modes.
Insert Text Editor Frame
Directly press the "T" icon on the bottom "Tool bar", and use the left button to insert a text editor frame.
Insert Picture
Select "Insert" and then "Picture" from the top "Tool bar", in "From File" dialog windows, select and open the needed picture.
Change Background Color
Select "Format" and then "Page" from the top "Tool bar", then the "Background" tab. You can select and apply "Color", "Bitmap", "Gradient" and "Hatching" as background for the slide.

After setting the background color, the system will prompt you with a dialog window, you can press "yes" to apply background settings for all pages or "No" to apply the setting to the present page
Insert a chart
Select "Insert" and then "Chart" to insert a chart. Use "Chart information" to define the columns and data, or to add/remove columns/rows. You can also
select the "Chart" icon on the top "Tool bar" to define different types of chart.
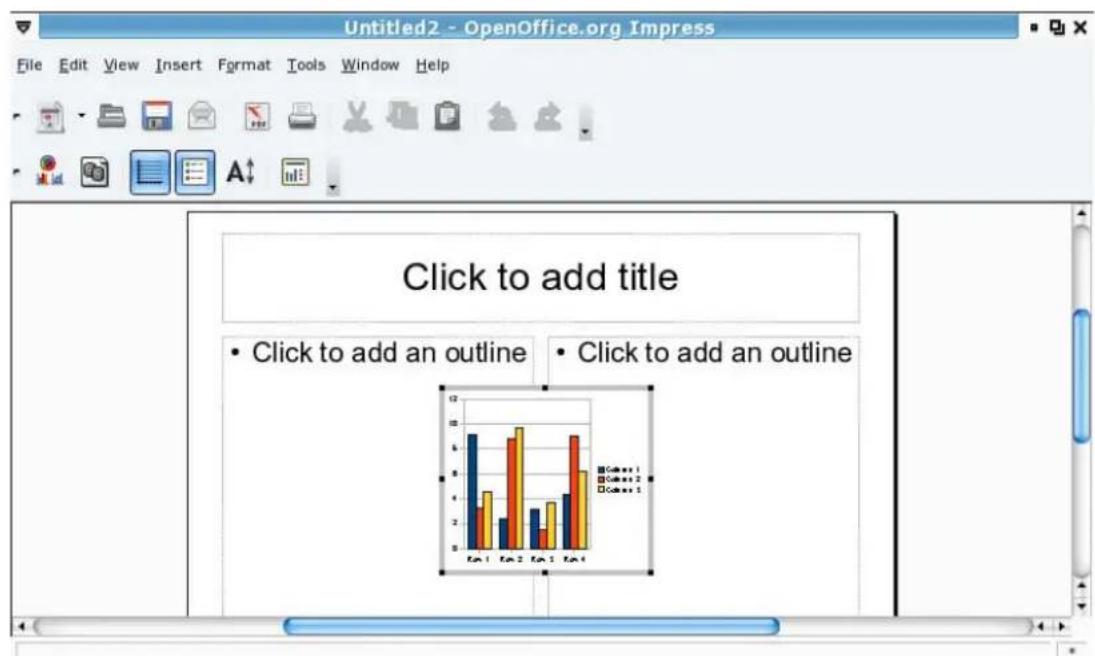
Diagram 3-12: Insert a chart template
Chapter 4 Useful Tools
Your KIRA Series OS provides many useful tools, for example: PDF reader, dictionary, ebook, calculator etc. In this chapter, we will introduce them.
4-1 PDF Reader
Click on the "Learn" tab, then click "PDF Reader". You can open PDF and PostScript format files.
Picture: 4-1 Evince PDF reader
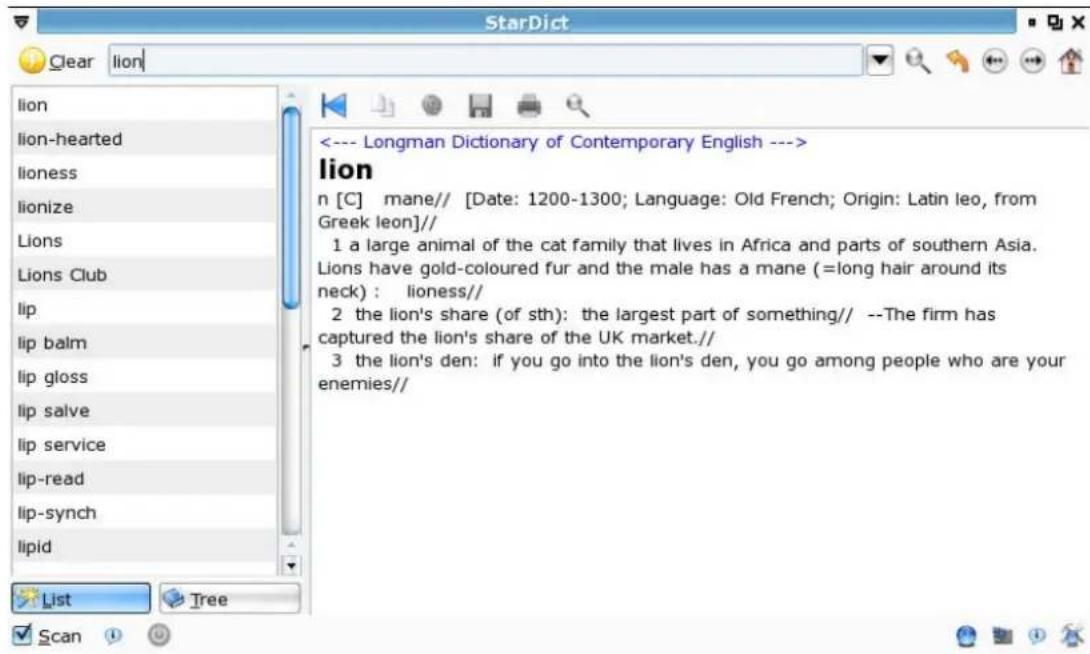
4-2 Dictionary - StarDict
On the "Learn" tab, click "Dictionary" to open StarDict. StarDict by default is a pure English dictionary. You can update or download other translation dictionaries through KIRA Series OS on-line update.

Picture: 4-2 StarDict
4-3 Ebook
On the "Learn" tab, click "eBook" to open the FBReader ebook software. Through it you can open fb2, HTML, CHM and RTF etc format files. FBReader can also open document files in the zip - tar etc. formats.

Picture 4-3 FBReader ebook
About FBReader
FBReader is an e-book reader for Linux/Windows XP PDA/UMPC/Desktop computer. FBReader supports several e-book formats: fb2, html, chm, rtf, plucker, etc. Direct reading from zip, tar, gzip and bzip2 archives is also supported.
FBReader is distributed under the terms of the GNU GPL.
How To Start
FBReader looks for fb2 , oeb and OpenReader books in directories listed in the Book Path option. First of all you need to set this path. Open the options dialog (just click on in the toolbar) and change the value of Book Path option in the General tab. This option contains the list of directories containing .fb2, .oebzip, *.orb or archive files. Directories in the list are separated by colons.
Start book selection dialog (click on), select a book from the list and read it.
1/1 15:10
4-4 Calculator
On the "Learn" tab, click "Calculator" to open Gcalctool. By default, Gcalctool starts in "Basic" mode. To change the mode, click "View/Advanced, Financial or Scientific".
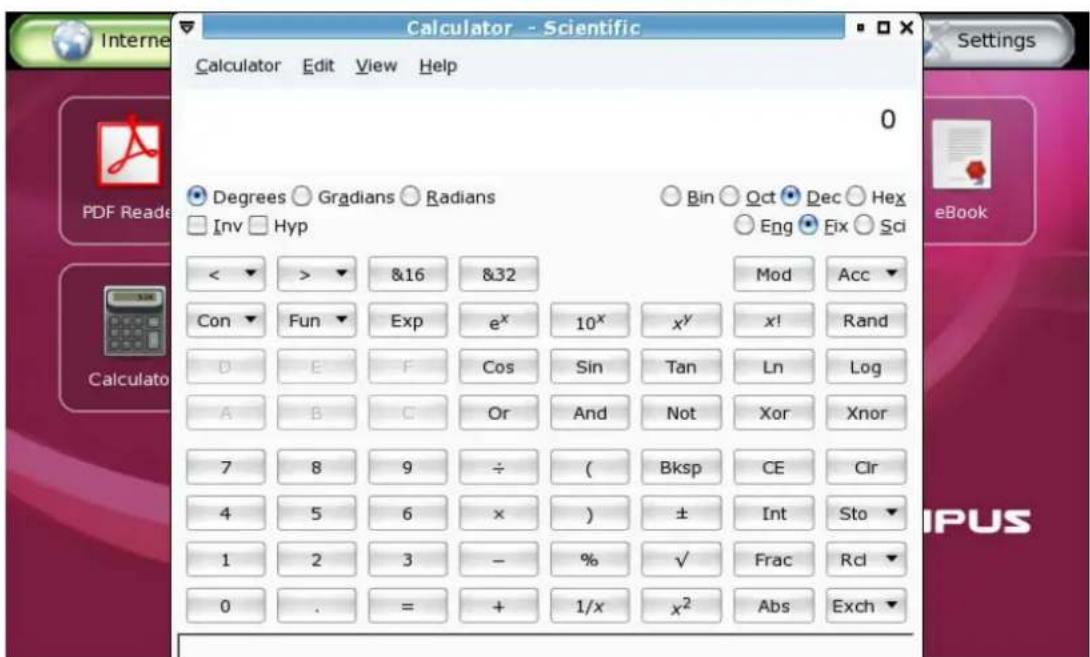
Picture: 4-4 Calculator
Chapter 5 Multimedia, Games
Your KIRA Series has a number of multimedia players and games, for example: SMPlayer, gThumb, LTris, Lpairs etc. In this chapter, we have some brief introductions.
5-1 Multimedia Play
On the "Play" tab, click "Media Player" to open the SMPlayer (shown below in Picture 5-1).

Picture 5-1: SMPlayer multimedia player

The "Media Player" can support the video and audio formats: DVD, VCD, Audio CD, MPEG1, MPEG2, MP3, WMV, WMA, OGG, WAV etc.
Playing Disks
Please use the following steps to play a disk:
- Connect the USB DVD or CD-ROM player to your device;
- Insert a disk into the player - After the system detects the disk, the File Manager will display the CD icon at the left side.
- Click on the disk icon to play it.
- On the "Play" tab, click "Media Player" to run the SMPlayer. Then click "Open/Disk" to play it.
While playing, you can find setting functions on the menu bar or the screen right-click shortcut menu. Click "Video/Fullscreen" or directly press the [F] key to switch to Fullscreen mode.

Codec for playing certain formats are not included with your KIRA Series.
5-2 Image Viewer
On the "Play" tab, click "Picture" to open gThumb, the included picture software. You can open BMP, JPEG, GIF, PNG etc. You can view images in Folders, Catalogs, Image, Fullscreen and Slide Show modes. You could configure the selected image. Use the following steps to configure:
- After choosing an image.
- Select the function that you want in the "gThumb" menu bar.
- After configure, click "File", "Save" or "File" or "Save As".
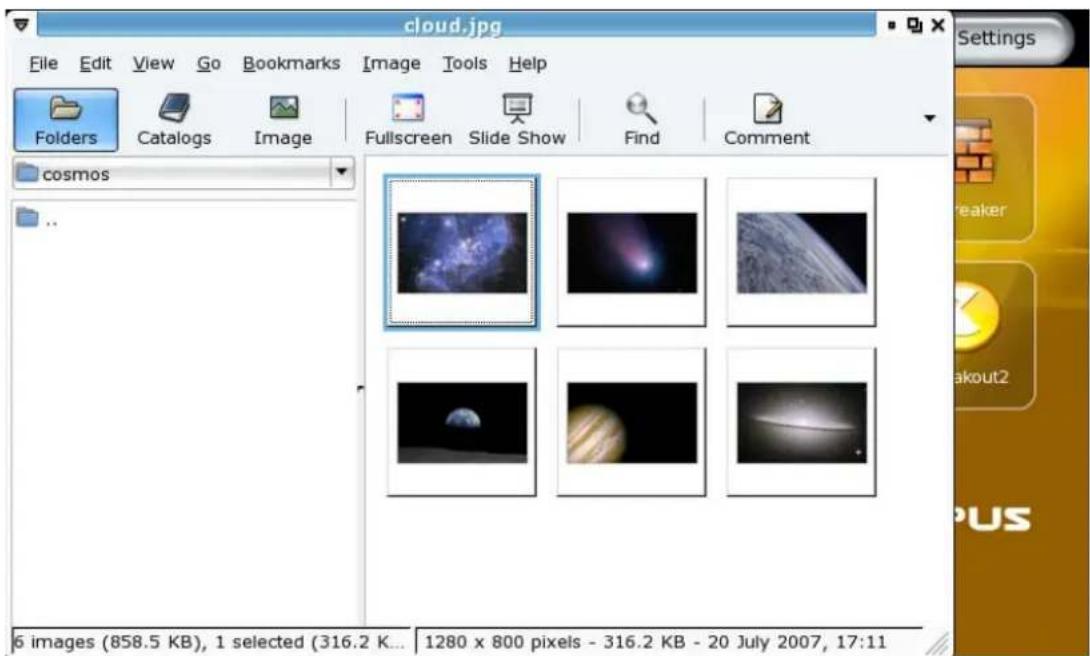
Picture 5-2 Image Viewer
5-3 Games
On the "Play" tab, the KIRA Series OS provides some fun games as shown in Picture 5-3.
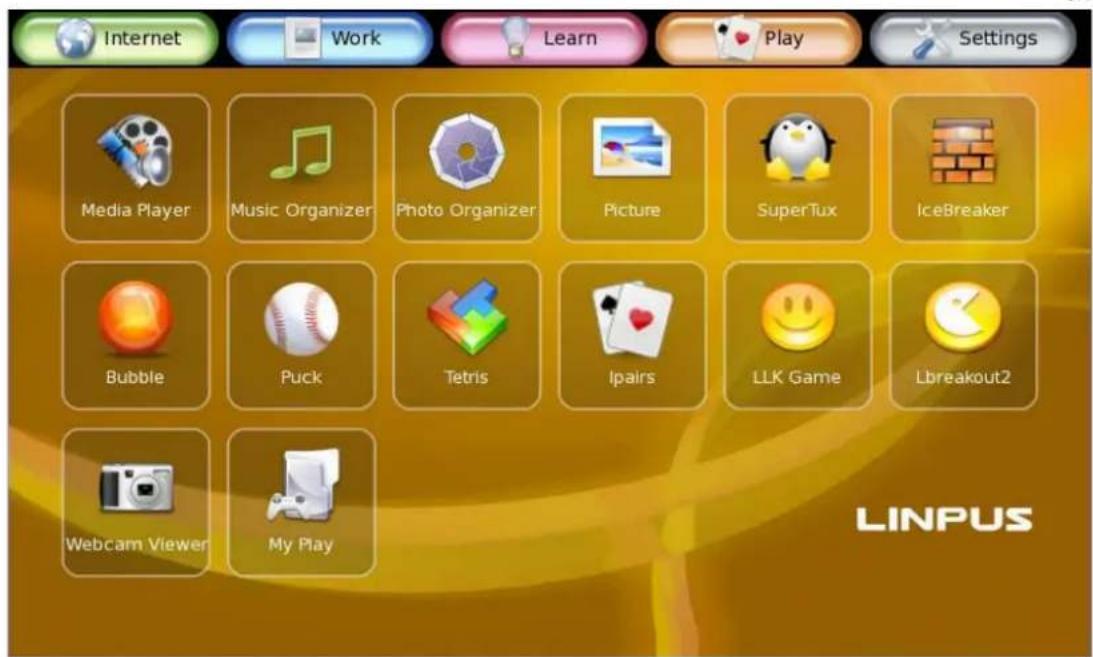
Picture: 5-3 some fun games
Chapter 6 System Configuration
6-1 Date and Time
Click on the icon named "Date and Time" located in the "Settings" page to launch the "Date and Time" application. Once there you can adjust system time and date. Additionally, you can view and change the time zone info by clicking into the "Time Zone" sub-tag.
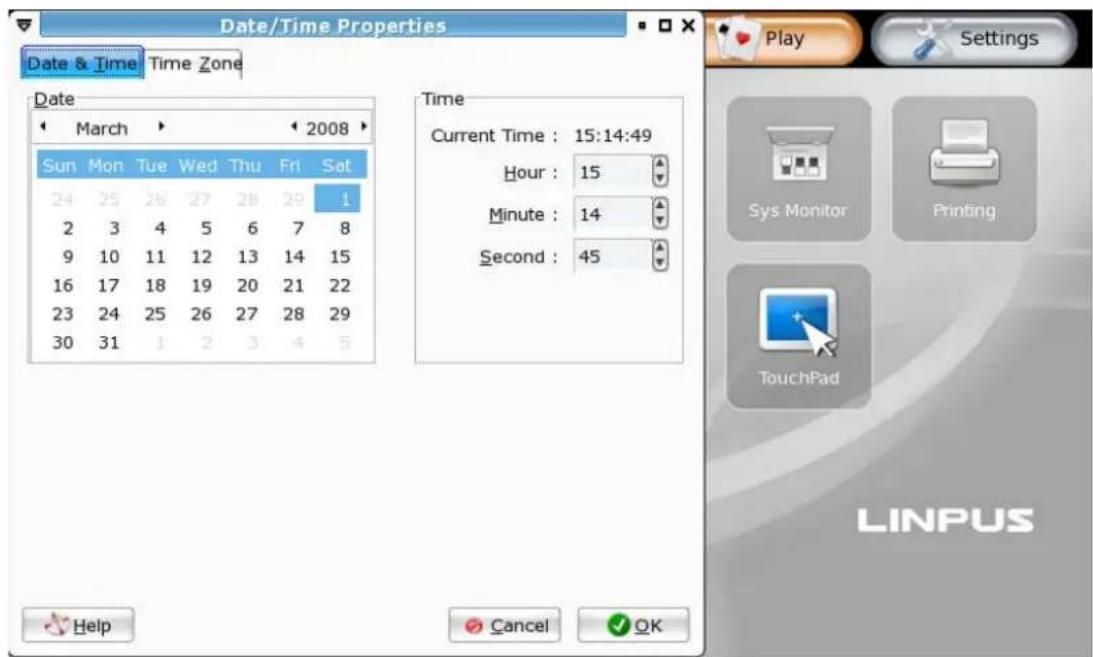
Figure 6-1: Adjust System Date and Time
6-2 System Monitoring
Click on the "System Monitor" icon to view the status of all running programs (processes). If a process is found to be behaving abnormally, you may opt to terminate it by clicking the "Processes" sub-tag, selecting the process and then clicking on the "End Process" button. In addition, you can get an overview of the system load - CPU, memory and network usage, by clicking into the "Resources" sub-tag.
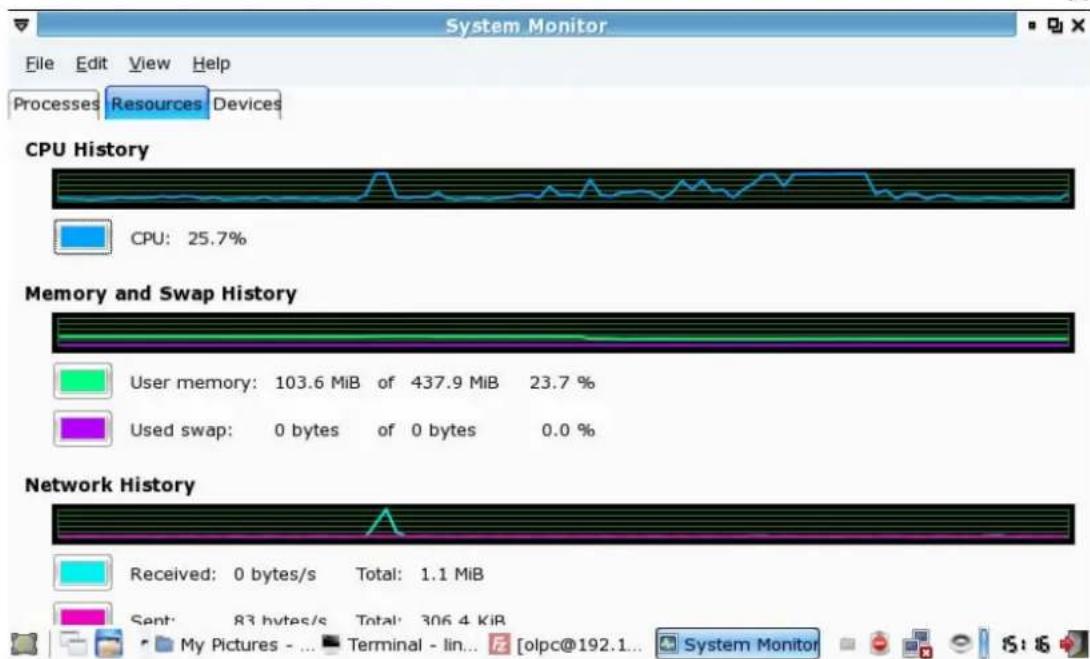
Figure 6-2: Monitor System Running Status
6-3 Printer Setup
If you are setting up your printer for the first time, please click on the "New" icon, a printer setup wizard will walk you through the steps of setting up a printer.
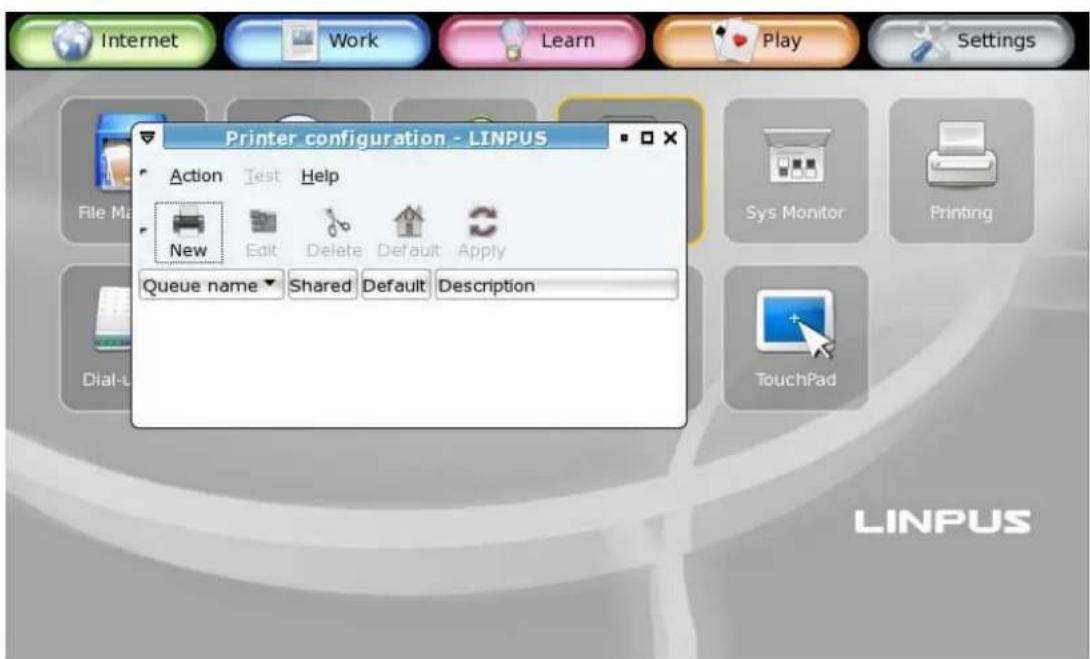
Figure 6-3: Printer Setup
Add a local printer
As you follow the instructions in the printer setup wizard, you will be prompted to enter a printer name and an optional description. Clicking on the "Forward"
button, a screen like Fig. 6-4 will show up. Here you can select "Locally-connected" on the pull-down list and then select "/dev/usb/lp0". Click on "Forward" button to continue.
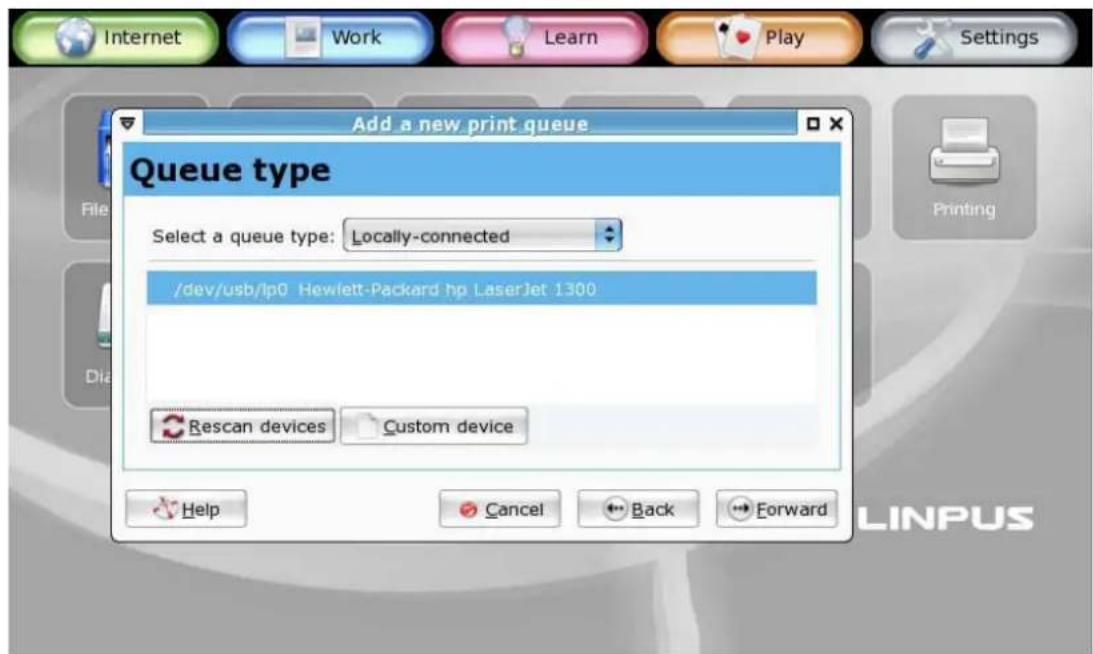
Fig 6-4: Setup Local Printers
Next, you will be asked to select the make and model of the printer you wish to set up. Press the "Forward" button to continue and you will see the summary of the printer configuration. Please review it and press "Complete" if the information looks correct to you. A dialogue box will then pop up asking if you want to print a test page. Select "Yes" to print a test page and review the printed page to see if the printer works properly as configured.
6-4 Power Management Preferences
Click on the "Power Management" icon in the Settings sub-page to launch the power management application. In this application, you can configure how your system behaves both on AC power and battery power.
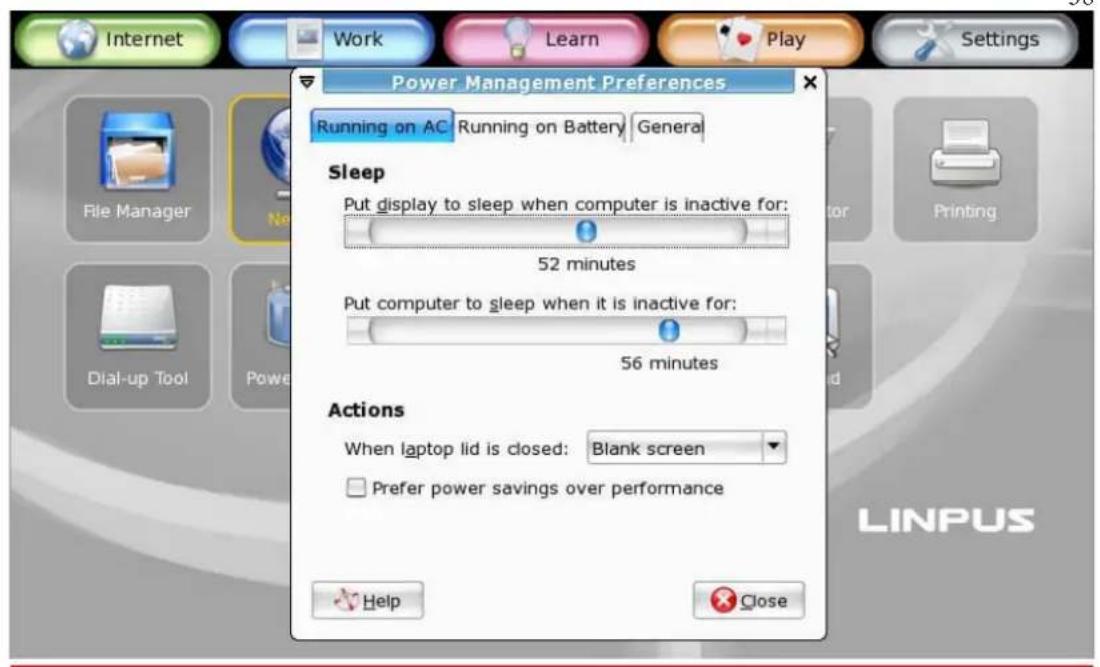
Fig. 6-5: Power Management Preferences

You can also access Power Management Preferences by right clicking the power icon located on the tool panel on the bottom of the screen and select "Preferences".
Appendix A Rapid System Recovery
The KIRA Series offers two ways of recovering your system. First, you may make use of the built-in "Single Key Recovery" to return your system to its factory mode. Alternatively, you can recover your system by using the included Recovery CD in a few easy to follow steps.

Attention: To ensure successful operation, please read closely the following instructions before attempting system recovery.
A-1 Recover Your System Using the built-in "Single Key Recovery" Function
This process will return your device to its original factory settings. Please make sure you have made backups of files and data you wish to keep beforehand as recovery process will erase all your personal data.

Before starting system recovery, you may opt to back up personal files using USB Flash Disk or network drives. Please refer to "1-7 Using Removable Devices" for more details.
Please follow the steps below to execute the "Single Key Recovery" function: 1. Upon system boot up, you should see a display as shown in Fig. A-1

Fig. A-1: System Boot-up Screen
- Press F1 key at this moment to enter the system recovery mode. As in Fig. A-2, the system will first ask you if you want to proceed with the system recovery process. Please type "Yes" to continue, "No" to cancel it.

Fig. A-2: Confirmation of Continuing With System Recovery
- Please do not shutdown or power off your system during system recovery. After a few seconds, the system will be recovered and rebooted.
A-2 Using the Recovery CD
You can also use the included recovery CD to quickly recover your system to its factory state. Please follow the steps below to carry out the system recovery:
- Please connect an external optical drive through the USB port on your system.
- Insert the Recovery CD into the drive and make sure your system is configured to boot up from your optical drive.
- As shown in Fig. A-3, upon being greeted with the main screen of the recovery program, you may press F2 to switch the language. You may also press F1 to find out other options. Press Enter to continue and follow the instructions shown on the screen.
Fig. A-3: The greeting screen of system recovery program
Fig. A-4: Optionally select the disk partition to restore the system into