
42C3035DG - Television TOSHIBA - Free user manual and instructions
Find the device manual for free 42C3035DG TOSHIBA in PDF.
| Product Type | LCD Television |
| Brand | Toshiba |
| Model | 42C3035DG |
| Screen Size | 42 inches (106 cm) |
| Aspect Ratio | 16:9 |
| Dimensions (approx.) | 73 cm (H) x 103 cm (W) x 34 cm (D) with stand |
| Weight (approx.) | 27.5 kg |
| Power Supply | 220-240 V AC, 50/60 Hz |
| Power Consumption (max.) | 241 W |
| Standby Power Consumption | Less than 1 W |
| Reception System | DVB-T (UHF 21-68), analog PAL/SECAM/NTSC |
| Connectivity | 2 x HDMI (1080p), 2 x Scart (EXT1/EXT2), 1 x PC (D-sub 15), EXT3 (component + audio), optical digital audio output, subwoofer output, 3.5 mm headphone jack |
| Audio Power | 2 x 10 W (stereo) |
| Audio Features | SRS WOW (3D, FOCUS, TruBass), super bass, sound equalization, bilingual |
| Video Features | Dynamic backlight, cinema mode, 3D color management, MPEG/DNR noise reduction, multiple screen formats |
| Digital Functions | Program guide, parental control, timer, automatic software update, digital teletext |
| Safety | Ventilation 10 cm around, do not expose to humidity or excessive heat, automatic shutdown in case of overheating |
| Maintenance | Clean with a soft dry cloth, after unplugging. Do not use chemical products. |
| Included Accessories | Remote control, 2 AAA batteries (IEC R03 1.5 V), user manual |
Frequently Asked Questions - 42C3035DG TOSHIBA
User questions about 42C3035DG TOSHIBA
0 question about this device. Answer the ones you know or ask your own.
Ask a new question about this device
Download the instructions for your Television in PDF format for free! Find your manual 42C3035DG - TOSHIBA and take your electronic device back in hand. On this page are published all the documents necessary for the use of your device. 42C3035DG by TOSHIBA.
USER MANUAL 42C3035DG TOSHIBA
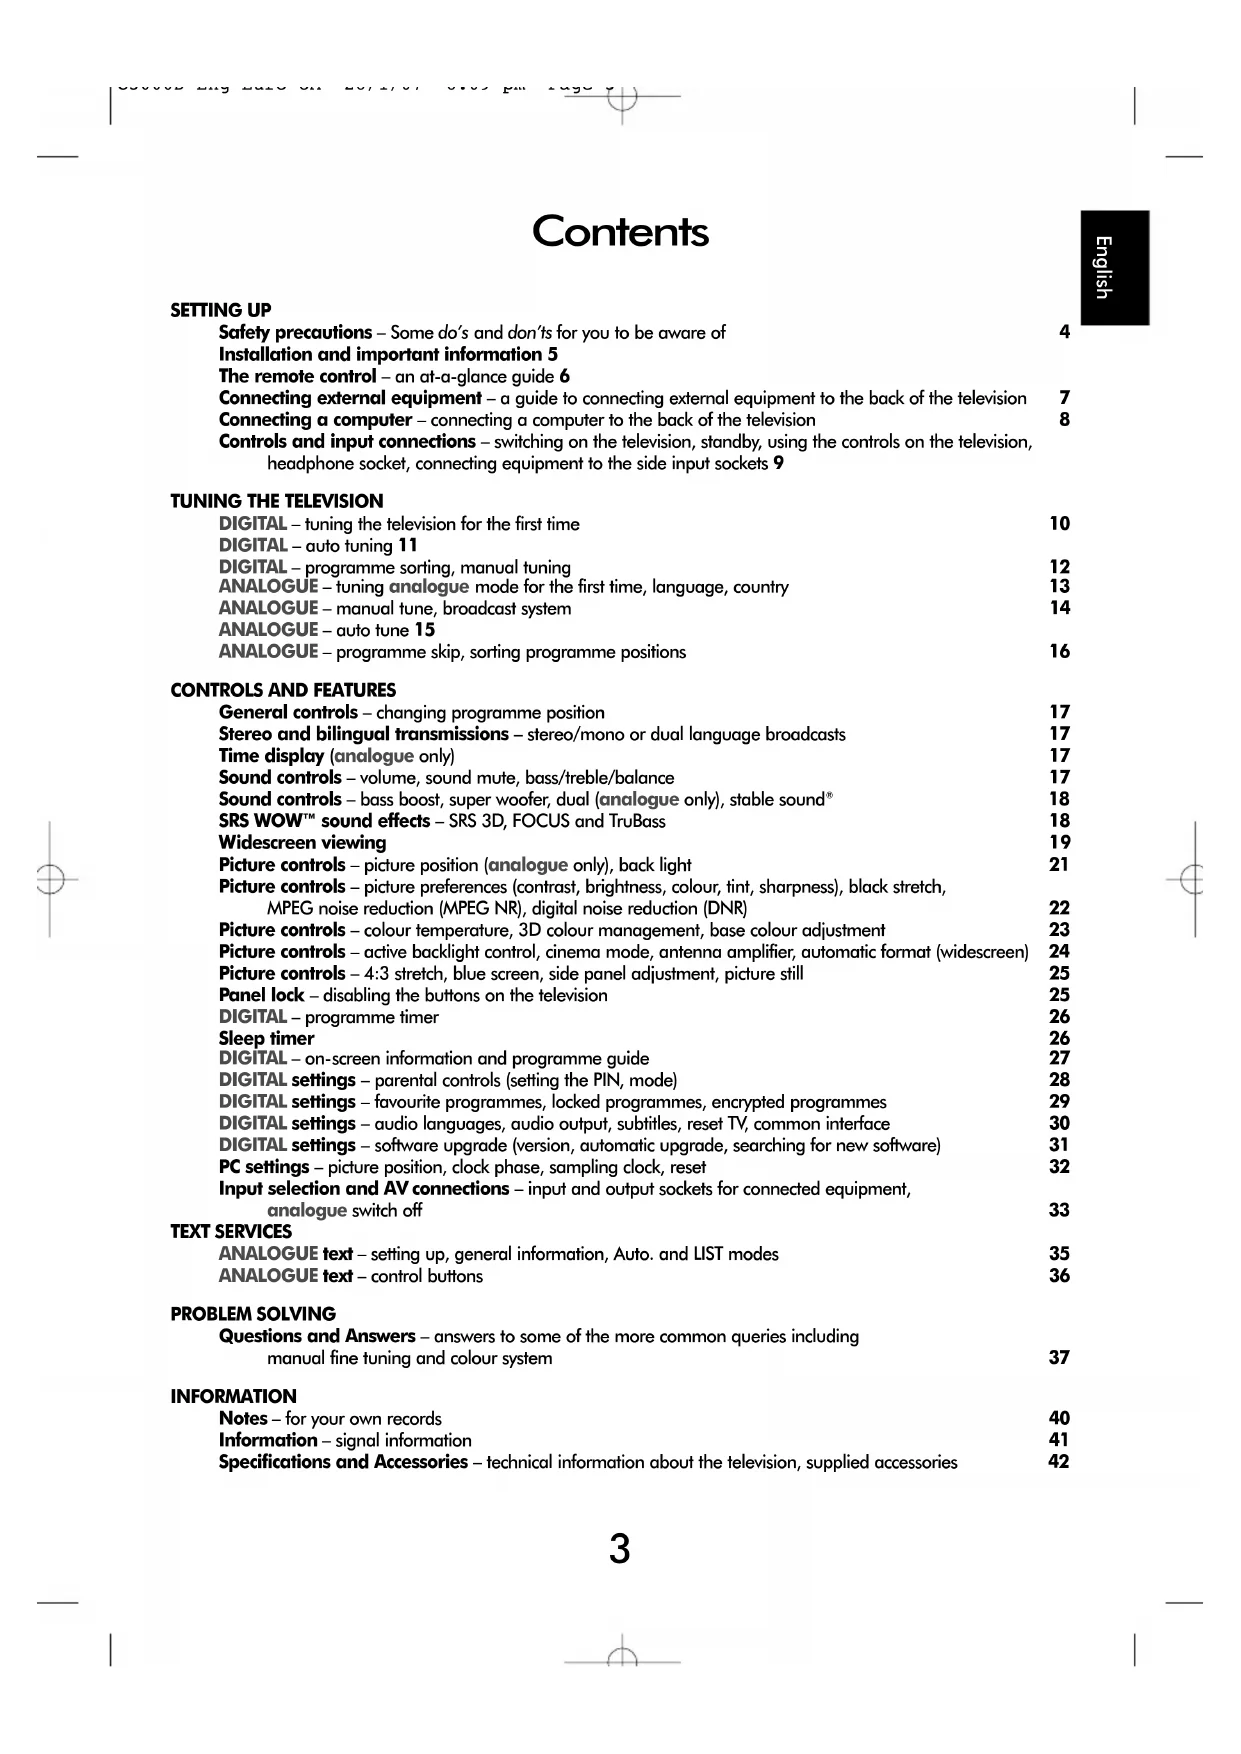
Safety precautions - Some do's and don'ts for you to be aware of 4
Installation and important information 5
The remote control - an at-a-glance guide 6
Connecting external equipment - a guide to connecting external equipment to the back of the television 7
Connecting a computer - connecting a computer to the back of the television 8
Controls and input connections - switching on the television, standby, using the controls on the television, headache socket, connecting equipment to the side input sockets 9
TUNING THE TELEVISION
DIGITAL - tuning the television for the first time 10
DIGITAL - auto tuning 11
DIGITAL - programme sorting, manual tuning 12
ANALOGUE - tuning analogue mode for the first time, language, country 13
ANALOGUE - manual tune, broadcast system 14
ANALOGUE - auto tune 15
ANALOGUE -programme skip, sorting programme positions 16
CONTROLS AND FEATURES
General controls - changing programme position 17
Stereo and bilingual transmissions - stereo/mono or dual language broadcasts 17
Time display (analogue only) 17
Sound controls - volume, sound mute, bass/treble/balance 17
Sound controls - bass boost, super woofer, dual (analogue only), stable sound* 18
SRS WOW™ sound effects - SRS 3D, FOCUS and TruBass 18
Widescreen viewing 19
Picture controls - picture position (analogue only), back light 21
Picture controls - picture preferences (contrast, brightness, colour, tint, sharpness), black stretch, MPEG noise reduction (MPEG NR), digital noise reduction (DNR) 22
Picture controls - colour temperature, 3D colour management, base colour adjustment 23
Picture controls - active backlight control, cinema mode, antenna amplifier, automatic format (widescreen) 24
Picture controls - 4:3 stretch, blue screen, side panel adjustment, picture still 25
Panel lock - disabling the buttons on the television 25
DIGITAL - programme timer 26
Sleep timer 26
DIGITAL - on-screen information and programme guide 27
DIGITAL settings - parental controls (setting the PIN, mode) 28
DIGITAL settings - favourite programmes, locked programmes, encrypted programmes 29
DIGITAL settings - audio languages, audio output, subtitles, reset TV, common interface 30
DIGITAL settings - software upgrade (version, automatic upgrade, searching for new software) 31
PC settings - picture position, clock phase, sampling clock, reset 32
Input selection and AV connections - input and output sockets for connected equipment, analogue switch off 33
TEXT SERVICES
ANALOGUE text - setting up, general information, Auto. and LIST modes 35
ANALOGUE text - control buttons 36
PROBLEM SOLVING
Questions and Answers - answers to some of the more common queries including manual fine tuning and colour system 37
INFORMATION
Notes - for your own records 40
Information - signal information 41
Specifications and Accessories - technical information about the television, supplied accessories 42
Safety Precautions
This equipment has been designed and manufactured to meet international safety standards but, like any electrical equipment, care must be taken to obtain the best results and for safety to be assured. Please read the points below for your own safety. They are of a general nature, intended to help with all electronic consumer products and some points may not apply to the goods you have just purchased.
Air Circulation
Leave more than 10cm clearance around the television to allow adequate ventilation. This will prevent overheating and possible damage to the television. Dusty places should also be avoided.
Heat Damage
Damage may occur if the television is left in direct sunlight or near a heater. Avoid places subject to extremely high temperatures or humidity. Place in a location where the temperature remains between 5^ (41^) min. and 35^ (94^) max.
Mains Supply
The mains supply required for this equipment is 220-240v AC 50/60Hz. Never connect to a DC supply or any other power source. DO ensure that the television is not standing on the mains lead. DO NOT cut off the mains plug from this equipment, this incorporates a special Radio Interference Filter, the removal of which will impair its performance.
IF IN DOUBT PLEASE CONSULT A COMPETENT ELECTRICIAN.
Do
DO read the operating instructions before you attempt to use the equipment.
DO ensure that all electrical connections (including the mains plug, extension leads and inter-connections between pieces of equipment) are properly made and in accordance with the manufacturers' instructions. Switch off and withdraw the mains plug before making or changing connections.
DO consult your dealer if you are ever in doubt about the installation, operation or safety of your equipment.
DO be careful with glass panels or doors on equipment.
DO NOT REMOVE ANY FIXED COVERS AS THIS WILL EXPOSE DANGEROUS AND LIVE PARTS.
THE MAINS PLUG IS USED AS A DISCONNECTING DEVICE AND THEREFORE SHOULD BE READILY OPERABLE.
Do not
DO NOT obstruct the ventilation openings of the equipment with items such as newspapers, tablecloths, curtains, etc. Overheating will cause damage and shorten the life of the equipment.
DO NOT allow electrical equipment to be exposed to dripping or splashing or objects filled with liquids, such as vases, to be placed on the equipment.
DO NOT place hot objects or naked flame sources, such as lighted candles or nightlights on, or close to equipment. High temperatures can melt plastic and lead to fires.
DO NOT use makeshift stands and NEVER fix legs with wood screws. To ensure complete safety, always fit the manufacturers' approved stand, bracket or legs with the fixings provided according to the instructions.
DO NOT leave equipment switched on when it is unattended, unless it is specifically stated that it is designed for unattended operation or has a standby mode. Switch off by withdrawing the plug, make sure your family know how to do this. Special arrangements may need to be made for people with disabilities.
DO NOT continue to operate the equipment if you are in any doubt about it working normally, or it is damaged in any way - switch off, withdraw the mains plug and consult your dealer.
WARNING - excessive sound pressure from earphones or headphones can cause hearing loss.
ABOVE ALL - NEVER let anyone, especially children, push or hit the screen, push anything into holes, slots or any other openings in the case.
NEVER guess or take chances with electrical equipment of any kind - it is better to be safe than sorry.
Installation and important information
Where to install
Locate the television away from direct sunlight and strong lights, soft, indirect lighting is recommended for comfortable viewing. Use curtains or blinds to prevent direct sunlight falling on the screen.
Place on a sturdy platform, the mounting surface should be flat and steady. It should then be secured to the wall with a sturdy tie using the clip on the back of the stand, or secured to the platform using the fixing strap located underneath the table top stand, this will prevent it from falling over.
The LCD display panels are manufactured using an extremely high level of precision technology, however sometimes some parts of the screen may be missing picture elements or have luminous spots. This is not a sign of a malfunction.

Make sure the television is located in a position where it cannot be pushed or hit by objects, as pressure will break or damage the screen, and that small items cannot be inserted into slots or openings in the case.
Please take note
EXCLUSION CLAUSE
Toshiba shall under no circumstances be liable for loss and/or damage to the product caused by:
i) fire;
ii) earthquake;
iii) accidental damage;
iv) intentional misuse of the product;
v) use of the product in improper conditions;
vi) loss and/or damage caused to the product whilst in the possession of a third party;
vii) any damage or loss caused as a result of the owner's failure and/or neglect to follow the instructions set out in the owner's manual;
viii) any loss or damage caused directly as a result of misuse or malfunction of the product when used simultaneously with associated equipment;
Furthermore, under no circumstances shall Toshiba be liable for any consequential loss and/or damage including but not limited to the following, loss of profit, interruption of business, the loss of recorded data whether caused during normal operation or misuse of the product.
NOTE: A Toshiba wall bracket or stand, where available, must be used. If a non Toshiba wall bracket or stand is used the product's BEAB approval will become void and the equipment is then used at the consumers own risk.
If stationary images generated by text services, channel identification logos, computer displays, video games, on screen menus, etc. are left on the television screen for any length of time they could become conspicuous, it is always advisable to reduce both the brightness and contrast settings.
English
The remote control
Simple at-a-glance reference of your remote control.

Inserting batteries and effective range of the remote

Remove the back cover to reveal the battery compartment and make sure the batteries are inserted the right way round. Suitable battery types for this remote are AAA, IEC R03 1.5V.
Do not combine a used, old battery with a new one or mix battery types. Remove dead batteries immediately to prevent acid from leaking into the battery compartment. Dispose of them in a designated disposal area. Warning: batteries must not be exposed to excessive heat such as sunshine, fire or the like.
The performance of the remote control will deteriorate beyond a distance of five metres or outside an angle of 30 degrees from the centre of the television. If the operating range becomes reduced the batteries may need replacing.
Connecting external equipment
Before connecting any external equipment, turn off all main power switches. If there is no switch remove the mains plug from the wall socket.

Aerial cables:

Connect the aerial to the socket on the rear of the television. If you use a decoder* and/or a media recorder it is essential that the aerial cable is connected through the decoder and/or through the media recorder to the television.
SCART leads:

Connect the video recorder IN/OUT socket to the television. Connect the decoder TV socket to the television. Connect the media recorder SAT socket to the decoder MEDIA REC. socket.
Before running Auto tuning put your decoder and media recorder to Standby.
The phono sockets alongside the COMPONENTVIDEO INPUT sockets will accept L and R audio signals.
The Digital Audio Output socket enables the connection of a suitable surround sound system. NOTE: this output is always active.
In addition there is a fixed external audio output which enables the connection of a suitable Hi-Fi unit. Make sure the Speaker option in the Sound menu is set to Off.
HDMI (High-Definition Multimedia Interface) is for use with a DVD, decoder or electrical equipment with digital audio and video output.
It is designed for best performance with 1080i and 1080p high-definition video signals but will also accept and display 480i, 480p, 576i, 576p and 720p signals. NOTE: For 1080p it is recommended that approved HDMI cable up to 5m long is used. If the unit has DVI output a special conversion cable from DVI to HDMI will be required.
PLEASE NOTE: Although this television is able to connect to HDMI equipment it is possible that some equipment may not operate correctly.
A wide variety of external equipment can be connected to the back of the television, therefore the relevant owners manuals for all additional equipment must be referred to.
We recommend SCART 1 for a decoder and SCART 2 for a media recorder. If connecting S-VIDEO equipment, set the INPUT for EXT2. See page 33.
If the television automatically switches over to monitor external equipment, return to normal television by pressing the desired programme position button. To recall external equipment, press to select between DTV, EXT1, EXT2, EXT3C, HDMI1, HDMI2, PC or ATV.
HDMI, the HDMI logo, and High-Definition Multimedia Interface are trademarks or registered trademarks of HDMI Licensing, LLC.
Connecting a computer
Before connecting any external equipment, turn off all main power switches. If there is no switch remove the mains plug from the wall socket.

Connect the PC cable from the computer to the PC terminal on the back of the television.
Connect the audio cable to the PC/HDMI1 Audio socket on the back of the television. Select PC from the PC/HDMI1 audio options in the AV connection menu located in the SET UP menu.
Press the to select PC mode.
PLEASE NOTE:
Some PC models cannot be connected to this television.
An adaptor is not needed for computers with a DOS/V compatible mini D-sub 15 pin terminal.
A band may appear at the edges of the screen or parts of the picture may be obscured. This is due to scaling of the picture by the set, it is not a malfunction.
When PC input mode is selected some of the television's features will be unavailable e.g. Manual setting in the SET UP menu, Colour, Tint, DNR and Black Stretch in the Picture settings menu.
The following signals can be displayed:
VGA: 640 × 480 / 60Hz (VESA)
VGA: 640 × 480 / 75Hz (VESA)
SVGA: 800 × 600 / 60Hz (VESA)
SVGA: 800 × 600 / 75Hz (VESA)
XGA: 1024 x 768/60 Hz (VESA)
XGA: 1024 x 768/70 Hz (VESA)
XGA: 1024 × 768 / 75Hz (VESA)
WXGA: 1280 × 768 / 60Hz (VESA)
WXGA: 1280 × 768 / 60Hz (VESA) - Reduced Blanking
WXGA: 1280 × 768 / 75Hz (VESA)
WXGA: 1360 × 768 / 60Hz (VESA)
SXGA:1280x1024/60Hz
SXGA: 1280 × 1024 / 75Hz
IMPORTANT NOTE: SXGA will display but it will not be to VESA standards.
When connecting a PC using HDMI the following signals can be accepted:
1080i 50/60Hz
1080p 50/60Hz
720p 50/60Hz
Controls and input connections
A wide variety of external equipment can be connected to the input sockets on the side of the television. Whilst all the necessary adjustments and controls for the television are made using the remote control, the buttons on the television may be used for some functions.

Switching on
If the RED LED is unlit check that the mains plug is connected to the power supply. If the picture does not appear press on the remote control, it may take a few moments.
To put the television into Standby press on the remote control, the GREEN active standby LED will appear (see 'Software Upgrade' section) next to the RED for a few moments then disappear. To view the television press again. The picture may take a few seconds to appear.
Using the remote control
Press the MENU button on the remote control to see the menus.
In digital mode the menu bar at the top of the screens will show three different topics shown in symbols. As each symbol is selected by pressing the or button on the remote control, its respective options will appear below.
In analogue mode the menu appears as a list of five topics. As each symbol is selected by pressing the or button on the remote control, its respective options will appear below.
To use the options press the and button on the remote control to move up and down through them and OK, or to select the required choice. Follow the on screen instructions. The functions of each menu are described in detail throughout the manual.
Using the controls and connections
To alter the volume press-
To alter the programme position press P
Press MENU and , , or to control the sound and picture options.
Press MENU twice to finish.
When connecting sound equipment to EXT3, connect the audio output of the equipment to the phono sockets on the television.
To select the Input, press until the display shows EXT3 as described on page 33. The television will automatically sense the type of signal.
Please always refer to the owner's manual of the equipment to be connected for full details.
Please note: Inserting the headphone plug will mute the sound from all speakers.
Tuning Digital television for the first time
Before switching on the television put your decoder and media recorder to Standby if they are connected and ensure the aerial is connected. To set up the television use the buttons on the remote control as detailed on page 6.
Press the button, the LOCAL OPTIONS screen will appear. This screen will appear the first time that the television is switched on and each time the television is reset.

Press to highlight Country and or to select. The television will now tune the stations for your country.
Using highlight Language, then or to select.
4 Press OK to start tuning.
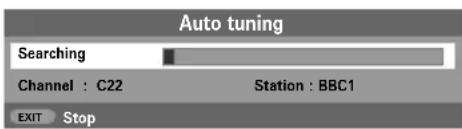
The AUTO TUNING screen will appear and the television will start to search for available stations. The progress bar will move along the line.
You must allow the television to complete the search.
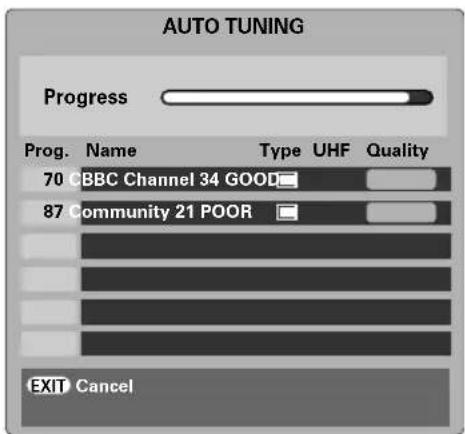
When the search is complete the television will automatically select programme one.
The AUTO TUNING screen will display the total number of services found.
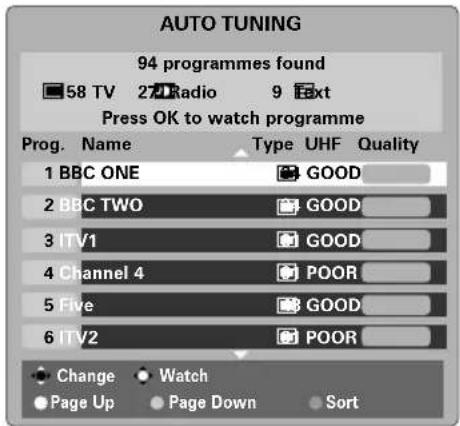
Use or to move through the list to select a programme then press OK to view.
NOTE: The time will be set automatically by transmission but can be advanced or decreased by up to 2 hours using Local Time Settings.
Digital auto tuning
NOTE: As new services are broadcast it will be necessary to re-tune the television in order to view them.
Auto tuning
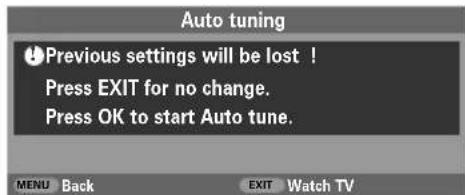
Auto tuning will completely re-tune the television and can be used to up date the channel list. It is recommended that Auto tuning is run periodically to ensure that all new services are added. All current programmes and settings, i.e. favourites and locked programmes, will be lost.
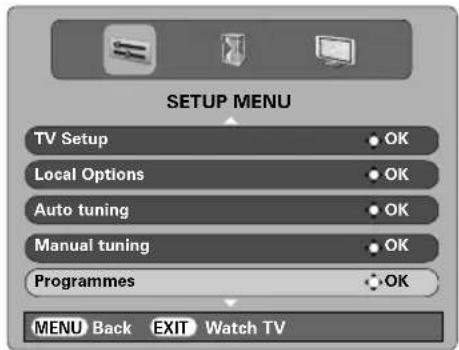
Press MENU, the SETUP MENU will appear. Use to highlight Auto tuning. Press OK.
A screen will appear warning that previous digital programmes and settings will be deleted. Press OK to continue with the Auto tuning.

The television will start to search for all available stations.

You must allow the television to complete the search.
When the search is complete the Auto tuning screen will display the total number of services found.

Use or to move through the list to select a programme then press OK to view.
Digital programme sorting, manual tuning
NOTE: When the television is switched off the mode being viewed at the time will automatically be selected when the television is switched back on.
Programme sorting
The station order may be changed to suit personal preference. Press MENU, the SETUP MENU will appear on screen.
Use to move down through the list and highlight Programmes. Press OK.
3 With the list of stations now showing use or to highlight the station you want to move and press
The selected station will be moved to the right of the screen.

Use or to move through the list to your preferred position. As you do so the other stations will move to make room.
Press to store your move. Repeat as necessary, then press EXIT.
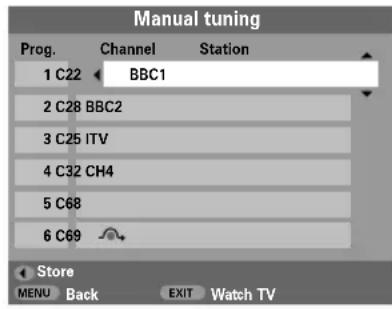
Manual tuning
This feature is available for service engineers or can be used for direct channel entry if the multiplex channel is known.
1 Select Manual tuning from the SETUP MENU and press OK.
2 Enter the multiplex number using the number buttons and then press OK. The television will automatically search for that multiplex.
When the multiplex is found any channels not currently on the programme list will be added and the programme information at the top of the screen will be updated.
Repeat as necessary. Press EXIT to finish.
Tuning Analogue mode for the first time
The Quick Setup feature will tune all analogue channels currently available in the area. To put the television into ATV mode press the A/D button.

1 Select ATV mode. The Quick Setup screen will appear.
Using or select your language, then press OK.
3 Then press or to select your country.
4 To start Auto tuning press OK.
The search will begin for all available stations. The slide bar will move along the line as the search progresses.
You must allow the television to complete the search.
When the search is complete the television will automatically select programme position 1 and the Manual tuning screen will appear.

Use or to move through the list to select a programme then press EXIT to view.
The station order may be changed using the Manual tuning screen (see the analogue 'Sorting programme positions' section).
Analogue manual tune
The television can be tuned-in manually using Manual tuning. For example: if the television cannot be connected to a media recorder/decoder with a SCART lead or to tune-in a station on another System.
Use and to move across the screen and select any of these Manual Tune options.

Programme: The number to be pressed on the remote control.
System: Specific to certain areas.
Colour system: Factory set to Auto, should only be changed if problems are experienced, i.e. NTSC input from external source.
Programme skip: means nothing has been stored or the facility to skip the channel is ON. See page 16.
Channel: The channel number on which a station is being broadcast.
Search: Search up and down for a signal.
Manual fine tuning: Only used if interference/weak signal is experienced. See page 37.
Station: Station identification. Use the or and or buttons to enter up to seven characters.
To allocate a programme position on the television for a decoder and media recorder: turn the decoder on, insert a pre-recorded film in the media recorder and press PLAY, then manually tune.
Press MENU and using or select the SET UP menu, with highlight Manual tuning, press OK to select.

Use or to highlight the programme position required e.g. we suggest Prog. 0 for a media recorder.

Press OK to select. If the programme is skipped, Programme skip must be removed before storing.
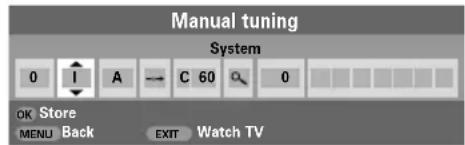
Press to select System and use or to change if required.
Then press to select Search.
Press or to begin the search. The search symbol will flash.

Each signal will show on the television, if it is not your media recorder, press or again to restart the search.
Analogue manual tune continued, Auto tune
When your media recorder signal is found, press to move along to Station. With , , and put in the required characters, e.g. VCR.

9 Press OK to store.
Repeat for each programme position you want to tune or, press MENU to return to the list of channels and select the next number to tune.
11 Press EXIT when you have finished.
12 To name external equipment, e.g. DVD on EXT2, press to select 2, then select Manual setting from the SET UP menu.
13 Press to select Label then using , , and put in the required characters. Press OK.

PLEASE NOTE
This television has direct channel entry if the channel numbers are known.
Select the Manual tuning screen in Step 3. Enter the Programme number, the System, then C for standard (terrestrial) channels or S for cable channels and the Channel number. Press OK to store.
Using Auto tuning
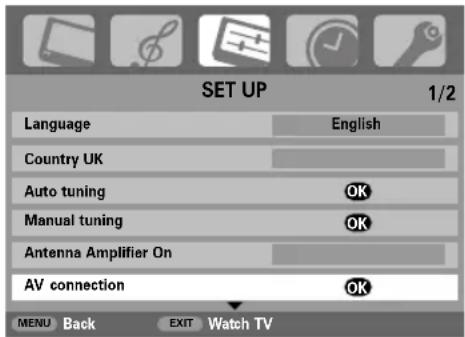
To set up the television using Auto tuning, press MENU and use or to select the SET UP menu.

Press to highlight Language and or to select.
Using highlight Country, then or to select. The television will now tune the stations for your country.
4 Press to highlight Auto tuning, then press OK.
5 To start Auto tuning press OK.
You must allow the television to complete the search.
When the search is complete the television will automatically select programme position 1. This may not be a clear picture, so the station order can be changed (see 'Sorting programme positions' section).
Analogue programme skip, sorting programme positions
Programme skip
To prevent certain programmes from being viewed, the programme position can be skipped. The remote control must be removed as the channels will still be available using the number buttons. Programmes can then be watched as normal using the controls on the television, but the television will not show the skipped programme position.
1 Select Manual tuning from the SET UP menu.

Use or to highlight the programme position to be skipped and press OK to select.
Press to select Programme skip.
Use ▲ or ▼ to turn Programme skip on. Press OK.
on the screen indicates a skipped programme position.
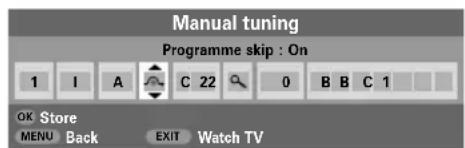
Press MENU and repeat from Step 2 or press EXIT.
Each programme position has to be individually selected. To turn Programme skip off, repeat the procedure for each position.
Skipped programme positions cannot be selected by P and P or by the controls on the television, but can still be accessed by the number buttons on the remote control.
Sorting programme positions
Channels may be moved and stored on the programme position of your choice.
1 Select Manual tuning from the SET UP menu.
2 With the list of stations now showing use or to highlight the station you want to move and press
The selected station will be moved to the right of the screen.
Use or to move through the list to your preferred position. As you do so the other stations will move to make room.
Press to store your move.
Repeat as necessary, then press EXIT.
General controls, stereo/bilingual transmissions, time display, sound controls
Selecting programme positions
To select a programme position use the numbered buttons on the remote control.
Programme positions can also be selected using P and P .
To revert to the previous programme position press
To display on-screen information i.e. programme position, channels or stereo/mono signal, press IPless again to cancel.
Stereo and Bilingual transmissions
If stereo or dual language broadcasts are transmitted the word Stereo or Dual will appear on the screen each time programme positions are changed, disappearing after a few seconds. If the broadcast is not in stereo the word Mono will appear.
Stereo... Press CD I/II to select Stereo or Mono.
Bilingual... Bilingual transmissions are rare. If they are transmitted the word Dual will display. Choose the required programme number and if the word Dual appears press CO I/II to select Dual 1, Dual 2 or Mono.
The Time Display - analogue only
The time display facility allows the current (text service) time to be seen on the television screen.
Press 0 whilst watching a normal television broadcast to see a time display from the broadcaster. It will remain on screen for about 5 seconds.
Sound controls
Volume
Press or + to adjust the volume.
Sound Mute
Press once to turn the sound off and again to cancel.
Bass, Treble and Balance
The sound controls are accessible in digital and analogue modes, as are most of the televisions features.
In digital mode, press MENU and using highlight TV setup then press OK.
Use or to select SOUND.
In analogue mode, press MENU and or to select SOUND.

Press to highlight Bass, Treble or Balance and or to change the setting.
When connecting to a Hi-fi unit, set the Speaker option to Off. Press to highlight Speaker and or to select Off.

Sound controls continued, SRS WOW™ sound effects, dual, stable sound®
Bass boost
Bass boost enhances the depth of the sound on the TV speakers. The difference will only be noticeable on sound with a strong bass.
In the SOUND menu press to highlight Bass boost. Use or to select On.
Then press to highlight Bass boost level and using or adjust to suit your preference.

When an active Superwoofer is connected to the Woofer Out connection on the back of the television, select AV connection in the SET UP menu, press to highlight Woofer and using or select External. (See 'Input Selection and AV Connections' section).
SRS WOW sound effects
SRS WOW™ is a suite of audio effects which use the stereo signals being broadcast to produce enhanced sound from the television's speakers. If mono sound is broadcast only TruBass will be available.
SRS 3D gives a rich sound experience, FOCUS concentrates the sound and gives the effect of it coming from the centre of the television, TruBass enhances the lower bass frequencies.
Press MENU and select the SOUND menu.
Use or to highlight WOW then press OK.
SRS (O) WOW, SRS and () symbol are trademarks of SRS Labs, Inc. WOW technology is incorporated under license from SRS Labs, Inc.
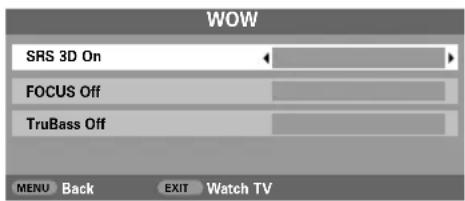
Press to highlight SRS 3D and using or select between On or Off.
4 Then press to highlight FOCUS and press or to select between On or Off.
5 Highlight TruBass and use or to select Off, Low or High to suit your preference.
NOTE: This feature is not available through headphones.
Dual-analogue only
If a programme or film is being broadcast with a soundtrack in more than one language, the DUAL feature allows selection between them.
1 Select the SOUND menu.
Use to highlight Dual then press or to choose between Dual 1 or Dual 2.
Stable sound®
The Stable Sound feature limits high volume levels on the TV speakers, preventing the extreme changes in volume that can occur when channels are changed or a programme switches to a commercial.
Select the SOUND menu.
Use to highlight Stable sound then press or to select On or Off.
Widescreen viewing
Depending on the type of broadcast being transmitted, programmes can be viewed in a number of formats. Press the button repeatedly to select between PC, Exact scan, Wide, Super Live 2, Cinema 2, 4:3, Super Live 1, Cinema 1, Subtitle and 14:9.
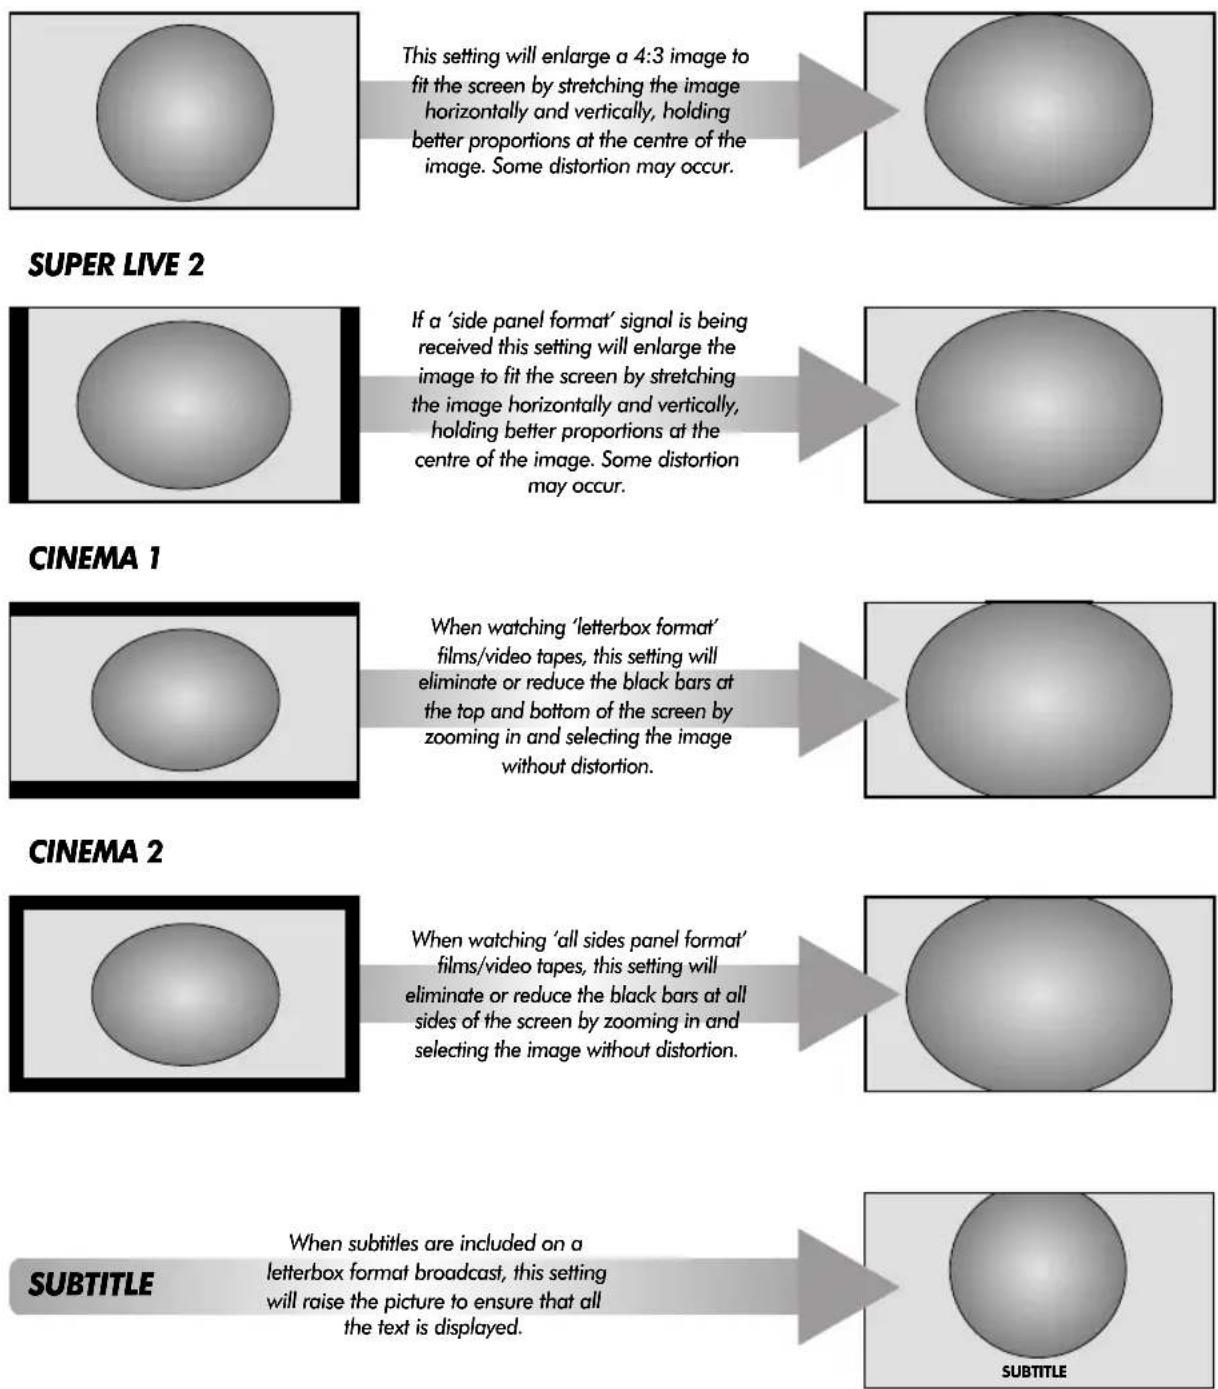
SUPER LIVE 1
Widescreen viewing continued

Press the button and a list of all the widescreen formats will appear on screen. Use and to highlight the required format and OK to select.
When a PC is connected via HDMI it will be selectable in the widescreen format list.
Using the special functions to change the size of the displayed image (i.e. changing the height/width ratio) for the purposes of public display or commercial gain may infringe on copyright laws.
| PC |
| Exact Scan |
| Wide |
| Super Live 2 |
| Cinema 2 |
| 4:3 |
| Super Live 1 |
| Cinema 1 |
| Subtitle |
| 14:9 |
Picture controls
Most of the picture controls and functions are available in both digital and analogue modes. To access the required menus when in digital mode: press MENU and using select TV setup, press OK then or to select the desired menu. PLEASE NOTE: features not available in digital mode will be greyed out. To access the required menus when in analogue mode: press MENU and use or to select the desired menu.
Picture position - analogue only
The picture position may be adjusted to suit personal preference and can be particularly useful for external inputs.
In the SET UP menu press until Picture position is highlighted.

Press OK to view the options available for the picture format that has been selected.
Press and to select an option, then or to adjust the settings.
The options alter depending on the widenscreen format chosen and when viewing connected equipment.
In Cinema 2:

To return to the original factory settings select Reset in the Picture position menu and press OK.
Backlight
Adjusting the Backlight can improve the clarity of the screen when viewing.
In the PICTURE menu press to select Picture settings, then press OK.

In the Picture settings menu press to select Backlight.
Press or to adjust.

Picture controls continued
Picture preferences
This television offers the choice of personalising the picture style. Press to view the different styles available:
Picture mode-1 to 3 are preset options and effect many features/ settings within the television, Picture mode-M stores your own settings as detailed below:
1 Select Picture settings from the PICTURE menu.

Use or to adjust the Contrast, Brightness, Colour, Tint and Sharpness.
Black stretch
Black Stretch increases the strength of dark areas of the picture which improves the definition.
In the Picture settings menu press until Black Stretch is highlighted.

Press or to select between On and Off. The effect depends on the broadcast and is most noticeable on dark colours.
MPEG NR - Noise Reduction
When watching a DVD the compression may cause some words or picture elements to become distorted or pixelated. Using the MPEG NR feature reduces this effect by smoothing out the edges.
1 Select MPEG NR from the Picture settings menu.
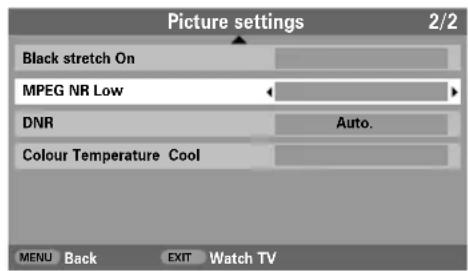
Use or to select a setting to suit your preference.
DNR - Digital Noise Reduction
DNR enables you to 'soften' the screen representation of a weak signal to reduce the noise effect.
1 Select DNR from the Picture settings menu.

Use or to adjust. The differences may not always be noticeable (for the best result use lower settings as picture quality can be lost if the setting is too high).
Picture controls
continued
Colour temperature
Colour Temperature increases the 'warmth' or 'coolness' of a picture by increasing the red or blue tint.
In the Picture settings menu press until Colour Temperature is highlighted.
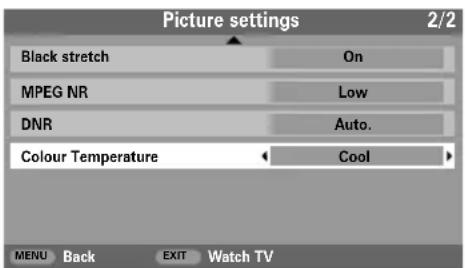
Press or to select between Normal, Warm and Cool to suit your preference.
3D Colour management
When 3D Colour management is selected it allows the 'Base colour adjustment' feature to become available.
In the PICTURE menu press to select 3D Colour management.

Press or to select On or Off.
Base colour adjustment
The Base colour adjustment feature allows the adjustment of individual colours to suit personal preference. This can be useful when using an external source.
In the PICTURE menu press to select Base colour adjustment, then press OK.
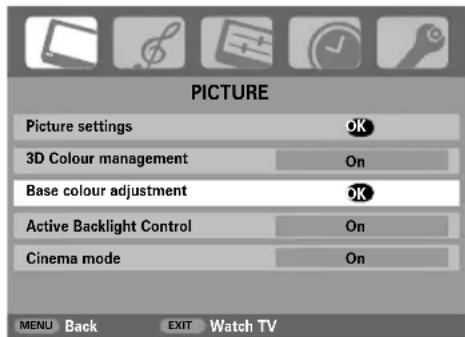
Press and to select an option, then to adjust the settings.

To return to the original factory settings select Reset and press OK.
Picture controls continued
Active Backlight Control
When Active Backlight Control is activated it will automatically optimise the backlighting levels for dark scenes.
In the PICTURE menu press to select Active Backlight Control.

Press or to select On or Off.
Cinema mode
If there are lines or jagged edges in the film or programme being viewed, selecting Cinema mode can help correct this by smoothing out the picture.
In the PICTURE menu press to select Cinema mode.

Press or to select On or Off.
NOTE: When a DVD with subtitles is being played this mode may not work correctly.
Antenna amplifier
If the signal being received by the television is too strong, this may result in picture interference and/or a buzzing sound. Setting Antenna Amplifier to Off reduces the signal strength, and can help to remove the interference.
In the SET UP menu press until Antenna Amplifier is highlighted.
With or select either On or Off.

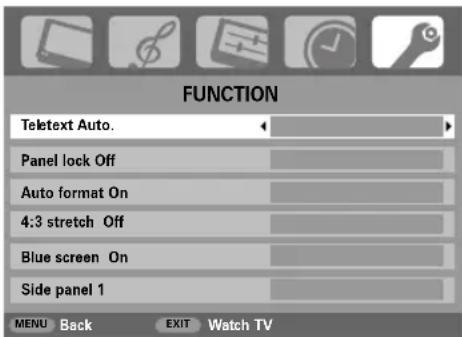
Automatic format (Widescreen)
When this television receives a true Widescreen picture and Auto format is On, it will automatically be displayed in Widescreen format, irrespective of the television's previous setting.
Press MENU and or to select the FUNCTION menu.
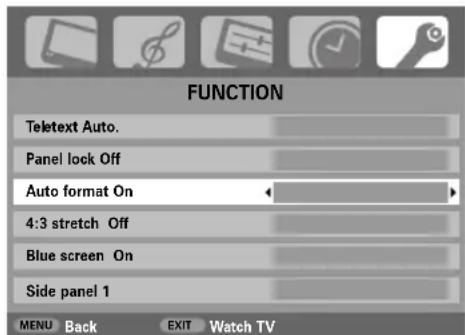
Press to highlight Auto format, then or to select On or Off.
Picture controls continued, panel lock
4:3 stretch
When 4:3 stretch is activated the size switching system changes 4:3 programs into a full screen picture.
In the FUNCTION menu press to highlight 4:3 stretch.
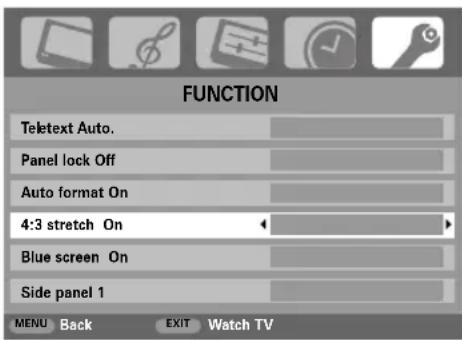
Press or to select On or Off.
Blue screen
When Blue screen is selected the screen will turn blue and the sound will be muted when no signal is received.
In the FUNCTION menu press to highlight Blue screen.

Press or to select On or Off.
Side panel adjustment
The Side panel feature lightens or darkens the band each side of the screen when in 4:3 or 14:9 format. This helps prevent image retention of the band and can also make viewing in bright or dark conditions more comfortable.
In the FUNCTION menu press until Side panel is highlighted.
Press or to adjust.
Picture still
This feature is used to hold a still image on the screen.
Press to hold an image on the screen, press again to cancel.
Panel lock
Panel lock disables the buttons on the television. All buttons on the remote control can still be used.
From the FUNCTION menu select Panel lock and choose On or Off using or

When Panel lock is On, a reminder will appear when the buttons on the television are pressed. If the standby button is pressed the television will switch off and can only be brought out of standby by using the remote control.
The timers
Programme timer - digital only
This feature will set the television to go to a specific channel at a certain time. It can be used to view a particular programme, or by setting the mode to daily or weekly, can be used to view a series of programmes.
Press MENU and or to select the TIMER MENU.

Press to select Programme Timers, then press OK to select.
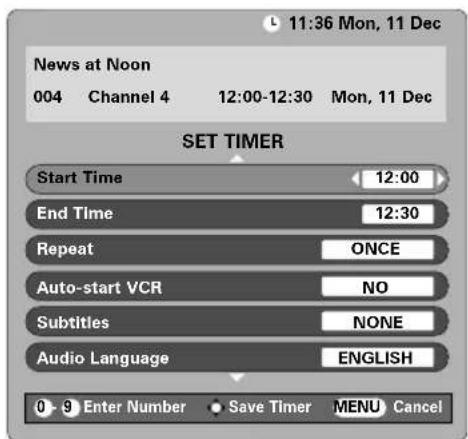
Press to select the first programme to be timed, then press OK. The SET TIMER menu will now appear on screen.
Press and to go through the list adding the details of the programme to be timed by using the number buttons and and to make selections.

When all the details have been entered press OK to save the timer.
Auto-start VCR: If your Toshiba media recorder is AV link compatible setting this feature to YES will auto start/stop a recording.
PLEASE NOTE: When a timed programme is about to start, an information screen will appear offering the option of watching or cancelling the programme. The menus and other channels will not be available during the timed programme unless the programme timer is cancelled.
Sleep timer
The television can be set to turn itself off after a certain time.
Press MENU and or to select the TIMER menu.
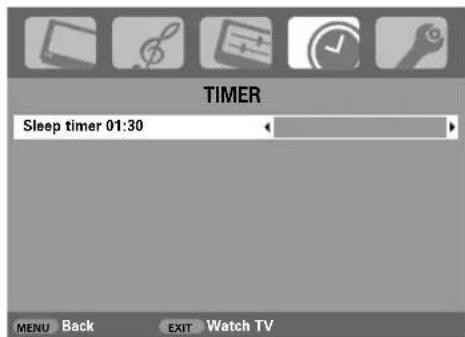
Press to select the Sleep timer. Use the number buttons to set the required time. For example, to switch the television off in one and a half hours enter 01:30, or press or to increase/decrease in steps of 10 minutes.
3 Press EXIT to finish.
Digital on-screen information and Programme Guide
When viewing in digital mode, the on-screen information and programme guide give access to programme details for all available channels.
Information
1 Select information by pressing 1 + ,the information screen will appear giving details of the channel and programme currently being viewed.
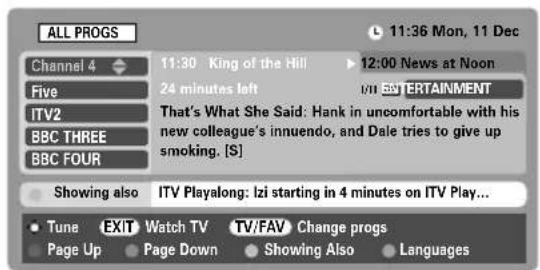
To see details of any of the other channels currently available, press and to scroll up and down the channel list. As the channel is selected details of the programme currently being broadcast will appear.
3 Pressing the YELLOW button will activate Showing also, giving details of programmes which have started on other channels.
To record the following programme, with the information guide showing, press The Tune option in the bottom section of the screen will change to Record, press OK. The SET TIMER screen will appear.
The details of the programme will have been added to the screen. Press OK to save.
Guide
1 Select the on-screen guide by pressing GUIDE, the guide screen will appear highlighting details of the channel and programme currently being viewed. This may take a few moments to appear.
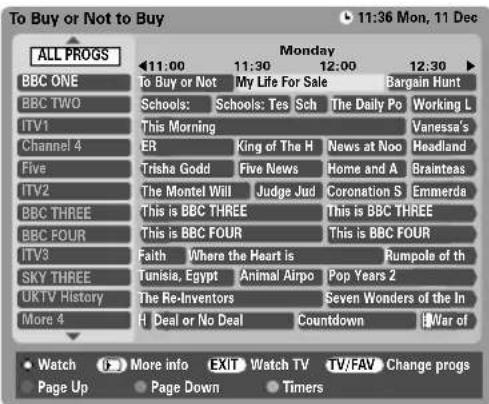
Press or for information of other programmes scheduled for the channel selected.
For details of other channels currently available, press and to scroll up and down the channel list. As the channel is selected details of the programme currently being broadcast will appear, then press or .
For information on a highlighted programme press i+ To set the timer for that programme press the BLUE button to bring up the Programme timers menu.
NOTE: Recording can be set from both the information screen and guide. In order for the recording operation to work the media recorder must be AV link compatible.
Press to move the Guide forward by 24 hours, press to go back. Pressing or will move the Guide forwards or backwards a page at a time.
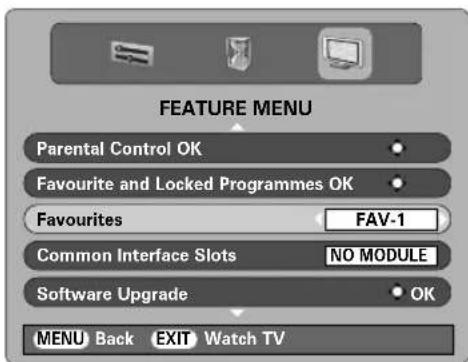
Digital settings – parental control
In order to prevent viewing of unsuitable films and programmes, channels and menus can be locked. These can then only be accessed with a security code PIN when in digital mode.
Setting the PIN
Press MENU and to select the FEATURE MENU.

Use to select Parental Control then press OK.
3 Press to highlight Change Pin then press OK.

Using the number buttons enter a four digit number, when these have been entered the screen will ask you to confirm them by entering them again.

The PIN number is now set. To activate put the television into standby.
Mode
This feature locks various menus to prevent the television being refuned or the settings being overridden.
In the PARENTAL CONTROL menu press to select Mode.

Use or to choose between ON, LOCK MENU, LOCK INSTALL and OFF.
When menus that have been locked are now selected they will only become available when the PIN is entered.
Digital settings - favourite programmes, locked programmes, encrypted programmes
Selecting favourite programmes
Favourite Programmes creates a list of the digital channels that are watched most. Four lists can be created, these can be a mixture of television, text and radio channels.
From the FEATURE MENU press to select Favourite and Locked Programmes.
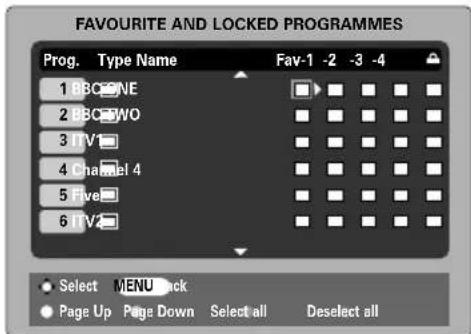
Use and to go through the list of channels pressing OK to select the ones required, a tick will appear in the box.
Press to select List 2. Follow the same procedure to make the selection. When all favours have been selected press MENU to return to the FEATURE menu.
Use to highlight Favourites and or to select between ALL, TV, RADIO, FAV-1 and FAV-2. The number of favourites available depends on how many lists have been created.
Press EXIT.
Using the P buttons will now only access those channels in Favourite List 1 when FAV-1 is selected.
Locking programmes
Locked Programmes stops the viewing of digital channels, they can only be accessed by entering the PIN.
From the FEATURE MENU press to select Favourite and Locked Programmes.
Press repeatedly to select the Locked Programme list.
Use ▲ and ▼ to go through the list of channels pressing OK to select the ones required, a padlock will appear in the box.

Press EXIT and put the television into standby.
When the television is switched back on and any of the channels in the Locked Programme list are selected the PIN must be entered before they can be accessed.
Encrypted programmes
Selecting Encrypted Programmes allows all encrypted programmes to be shown in the programme list even if they are not available to select.
In the FEATURE MENU press or to select Encrypted Programmes.
Use or to select ON or OFF.
NOTE: CAMs (Conditional Access Modules) are available from service providers (see 'Common Interface' section)
Digital settings continued - audio languages, audio output, subtitles, reset tv, common interface
Audio languages
This feature allows a programme or film to be viewed with a choice of soundtrack language, provided they are currently being broadcast.
In the SETUP MENU press to select Local Options.
Press OK, then press or to highlight Audio Language.
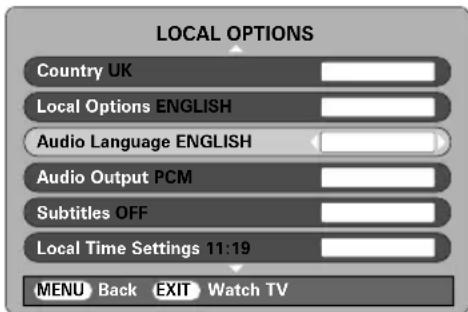
Use or to select an option.
NOTE: If more than one soundtrack is available, use CDI/II to select between them.
Audio output
When connecting a surround sound amplifier to the digital audio output (Sony/Philips Digital Interface Format [S/PDIF]), the following options can be selected.
PCM: this mode outputs PCM format to the digital audio output socket.
BITSTREAM: this mode outputs audio format (eg. Dolby Digital) to the digital audio output socket providing it is being broadcast. It will automatically mute the speakers.
In the LOCAL OPTIONS menu press to select Audio output.
Use or to select PCM or Bitstream.
Subtitles
This feature will show subtitles on the bottom of the screen in the selected language provided they are being broadcast.
In the LOCAL OPTIONS menu press to select Subtitles.
Use or to select an option.
Reset TV
Selecting Reset TV will delete all stored digital channels and settings. The television will return to factory settings and then auto tune.
In the SETUP MENU press until Reset TV is highlighted.
Press OK to select. A screen will appear warning that all digital settings will be lost, press OK to continue.
The Welcome screen will appear, press OK to continue, the television will then auto tune.
Common interface
The Common Interface Slot, situated on the back of the television, enables the insertion of a CAM (Conditional Access Module) and card. These are purchased from a service provider and allow additional subscription broadcasts to be viewed. For information see a service provider.
Insert the CAM and card into the Common Interface Slot, following the instructions provided with the CAM. A box will appear on screen to confirm that the CAM is loaded.
In the FEATURE MENU press or to select Common Interface Slots.
Details of the CAM should now be available. Use OK to select it. If two CAMs are inserted use or to select between the two.
Digital settings continued - software upgrade
Version
This feature can be used to check the version of software currently installed.
From the FEATURE MENU press or to select Software upgrade. Press OK.

Press or to select Version. Use or to select. When the software has been updated there will be a choice of two versions available.

Auto Upgrade
If Auto upgrade is selected the software will automatically update as each version becomes available, provided the television is on or in standby. If the television is on, a screen prompt will appear showing the software download taking place.
In the SOFTWARE UPGRADE menu press or to select Auto upgrade.
Use or to select ON or OFF.
Searching for new software
If preferred, software upgrades can be searched for manually using Search for New Software.
In the SOFTWARE UPGRADE menu press or to select Search for New Software.

Press OK. The television will automatically start searching for a software upgrade, the progress bar will move along the line.

If an upgrade is found the television will automatically start downloading, if not a screen will appear stating that an upgrade is unavailable.

PC settings - picture position, clock phase, sampling clock, reset
Connect the PC (as shown in the 'Connecting a PC' section) and ensure that a picture is showing on the television screen. The picture position may now be adjusted to suit personal preference.
Press to select PC, then select PC Setting from the SET UP menu.
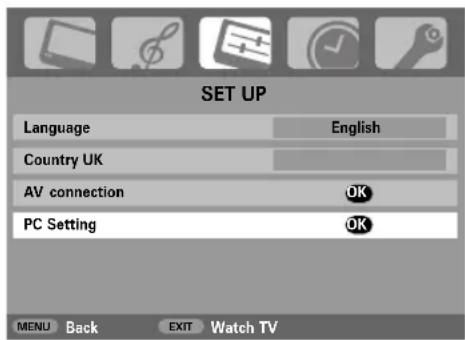
Press OK. Press and to select an option, then or to adjust the settings.

Clock phase
The Clock phase matches the PC signal with the LCD display. Adjusting this can clear horizontal stripes and picture blur.
In the SET UP menu press until PC Setting is highlighted.
Press OK to select, then to highlight Clock phase.
Use or to adjust until the picture clears.
Sampling clockPicture position
Adjusting the Sampling clock alters the number of pulses per scan, this will clear vertical lines on the screen.
In the SET UP menu press until PC Setting is highlighted.
Press OK to select, then to highlight Sampling clock.

Use or to adjust until the picture clears.
Reset
To return to the original factory settings.
In the SET UP menu press until PC Setting is highlighted.
Press OK to select, then to highlight Reset.
3 Press OK.
NOTE: When a PC is connected using HDMI none of these functions will be available.
Input selection and
AV connections
Defining the INPUT and OUTPUT sockets so that the television recognises connected equipment. See page 7 for a clear view of the back connection recommendations.
Most media recorders and decoders send a signal through the SCART lead to switch the television to the correct Input socket.
Alternatively press the external source selection button until the picture from connected equipment is shown.
This button must be used to view equipment connected using the COMPONENTVIDEO INPUT (EXT3C).
An S in the display e.g. 2S (EXT 2S), indicates the input is set for an S-Video signal.
Input selection
At any time by pressing a list will appear on screen showing modes and all stored external equipment. Use and to highlight and OK to select.


NOTE: When in digital mode ATV cannot be selected, in analogue mode DTV cannot be selected. To switch between DTV and ATV press the A/D button.
HDMI™ displays equipment connected to Input HDMI on the back of the television. It is designed for best performance with 1080i high definition signals.
PC displays a computer connected to Input RGB/PC on the back of the television.
INPUT signal selection
This specifies the type of signal going into SCART 2 (EXT2) on the back of the television. Please refer to the manufacturers instructions for the connected equipment.
In the SET UP menu press until AV connection is highlighted, then press OK.

2 With or select either AV or S-VIDEO as the required input for EXT2.

If the colour is missing try the alternative setting.
Input selection and AV connections continued
PC audio
In order to receive sound from a connected PC, plug the audio cable into the back of the television (as shown in 'Connecting a computer' section), then use the PC/HDMI1 audio settings.
In the SET UP menu press until AV connection is highlighted, then press OK.
2 Highlight PC/HDMI1 audio then use to select the PC option.
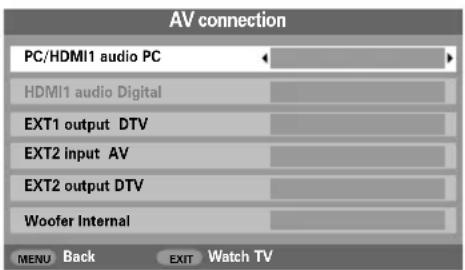
NOTE: Selecting the PC option will force HDMI into digital audio.
HDMI, the HDMI logo, and High-Definition Multimedia Interface are trademarks or registered trademarks of HDMI Licensing, LLC.
HDMI1 audio
If the connected HDMI source does not support digital audio, plug the audio cable into PC/HDMI1 audio on the back of the television (as shown in the 'Connecting a computer' section), then use the HDMI1 audio settings.
In the AV connection menu press to highlight PC/HDMI1 audio and using select HDMI1.
2 Then highlight HDMI1 audio and using or select Auto, Digital or Analogue.

If the sound is missing select an alternative setting.
NOTE: HDMI1 supports digital and analogue sound, HDMI2 is digital sound only.
Certain formats of DVD disk may not output from this TV (32/44.1/48kHz and 16/20/24 bits are acceptable).
Analogue switch-off
This is a digital television which is integrated to allow the use of both digital and analogue services. However, during the lifetime of this set it is very likely that analogue services will be switched off to allow for more new digital services.
This 'switch-off' will happen in a number of phases, which will be advertised in your area well in advance. It is recommended that at each phase the television is re-tuned to ensure that existing and new digital services can be viewed without disruption (see the 'Auto tuning' section).
Analogue text services - setting up, general information, Auto and LIST modes
This television has a multi-page text memory, which takes a few moments to load. It offers two Modes of viewing text - Auto will display Fastext, if available. LIST will store your four favourite pages.
Selecting modes
The text character set will be automatically chosen by the language setting in the SET UP menu.
1 Select Teletext from the FUNCTION menu.
2 With or choose Auto. or LIST then press EXIT.
Text information
The / / button:
To view text services press 3 / 2 / 0 . Press again to superimpose the text over a normal broadcast picture and again to return to normal viewing. Programmes cannot be changed until text is cancelled.
The first text page shown will be the initial page.
Any text page can be accessed by entering the 3 digit page number using the numbered buttons, pressing the coloured buttons or pressing P to advance to the next page and P to go back to the previous page.
Sub-pages
If there are sub-pages they will automatically load into memory without changing the page on screen.
To access the sub-pages press l then use P and P to view them. A bar with numbers will appear on the side of the screen.
The sub-page you are viewing will be highlighted and, as the television loads any additional sub-pages the colour of the numbers will change, indicating that these pages have been loaded.
These sub-pages will remain available to view until another page is chosen or, in normal TV mode, the channel is changed.
Navigating pages using Auto.
If Fastext is available four coloured titles will appear at the base of the screen.
To access one of the four given subjects, press the relevant coloured button on the remote control.
For further information on your particular text system(s), see the broadcast text index page or, consult your local Toshiba dealer.
Navigating pages using LIST
The four coloured choices at the bottom of the screen are numbers - 100, 200, 300 and 400, which have been programmed into the television's memory. To view these pages press the relevant coloured buttons.
To change these stored pages press the relevant coloured button and enter the 3 digit number. This number will change in the top left of the screen and in the coloured highlight.
Press OK to store. The bars at the bottom of the screen will flash white. Whenever OK is pressed all four page numbers showing at the bottom will be stored and the previous ones will be lost.
If OK is not pressed the selection will be forgotten when text is cancelled.
Other pages may be viewed by entering the 3 digit page number - but DO NOT press OK or these pages will be stored.
Analogue text services - control buttons, Digital interactive services
Below is a guide to the functions of the remote control text buttons.

To display the index/initial page:
Press to access the index/initial page. The one displayed is dependant on the broadcaster.


To display a page of text:
Press to display text. Press again to superimpose text over a normal normal broadcast picture. Press again to return to normal television viewing. Programmes cannot be changed until this has been done.

To access sub-pages:
For use with P and P to view sub-pages when available.

To reveal concealed text:
To discover the solutions on quiz and joke pages press the button.

To hold a wanted page:
At times it is convenient to hold a page of text. Press 三 and 四 will appear in the top left of the screen. The page will be held on screen until the button is pressed again.

To enlarge the text display size:
Press once to enlarge the top half of the page, press again to enlarge the bottom half of the page. Press again to revert to normal size.

To select a page whilst viewing a normal picture:
Enter the page number then press 0 / × , a normal picture will be displayed. The television will indicate when the page is present by displaying the page number at the top of the screen. Press 三 to view the page.
To display news flashes: Select the news flash page for the chosen text service (see the index page of text service). Press 0 / . The news flashes will be displayed as and when they are broadcast. Press 0 / again to cancel the display.
The news flash page must be cancelled before changing programmes.

Remember to cancel text before changing channels - press the
按钮 twice.
Questions and Answers
Below are the answers to some of the most common queries. For more information go to www.toshiba.co.uk

Why is there no sound or picture?

Check the television is not in standby mode. Check the mains plug and all mains connections.

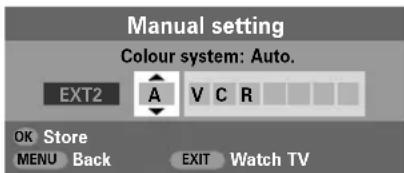
There is a picture, but why is there little or no colour?

When using an external source, for instance, a poor quality video tape, if there is little or no
colour, improvements may sometimes be achieved. The colour is factory set to Auto, to automatically display the best colour system.
To check that you have the best colour:

With the external source playing, select Manual setting from the SET UP menu.
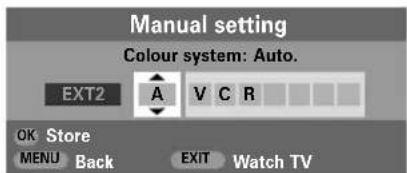

With or choose between Auto., PAL, SECAM, NTSC 4.43 or 3.58.

Why doesn't the video/DVD being played show on screen?

Make sure the VCR or DVD player is connected to the television as shown on page 7, then select the input by pressing

Why is there a good video picture but no sound?

Check all lead connections.

Why is there a picture but no sound?

Check the volume has not been turned down or that sound mute has not been selected.

Why is the VCR/DVD picture in black and white?

Check the correct input has been chosen, S-VIDEO or AV. See AV connections page 33.

Why is there picture and sound interference on all digital and analogue channels?

The signal strength may be too strong. Set the Antenna Amplifier option in the SET UP menu

What else can cause a poor analogue picture?

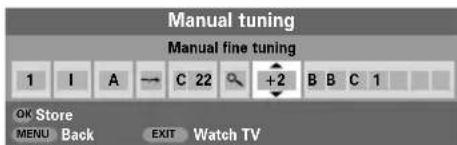
Interference or a weak signal. Try a different television station. Manual fine tuning may help.

Select the Manual tuning menu. Highlight the station and press OK, then press to select Manual fine tuning.

Using or adjust to get the best picture and sound. Press OK and then EXIT.

Why don't the controls on the front of the television work?

Check that Panel lock is not ON.

Why doesn't the remote control work?

Check the side switch on the remote control is in TV mode.
Ched
the batteries aren't dead or inserted incorrectly.

Why is there a message permanently on the screen?

Remove it by pressing i+
Questions and Answers continued
Q Why is the DTV main menu unavailable?
Another mode is selected. Press A/D to select DTV.
Why are some of the menus locked?
A Lock Menu has been enabled (see 'Parental Controls' page).
Why is the digital channel locked?
The channel has been selected in Locked Programmes (see 'Digital Settings' section).
Q Why can only certain digital channels be viewed?
A Favourite list has been selected (see 'Favourite Programmes' section), set the feature to ALL PROGS or change channels by using the number buttons.
Q Why are some of the digital subscription channels unavailable?
A Your subscription needs upgrading. Contact your service provider.
Why is the soundtrack in English when a different audio language has been selected?
The programme is currently being broadcast with an English soundtrack only.
Q Why is there incorrect or no sound when in DTV mode?
A Press COI/II to check if the hard of hearing option has been selected.
Q Why is there no sound from my connected sound equipment?
A Check the Speaker option in the Sound menu is set to Off.
What can be done if the PIN number has been forgotten?
Use the Master PIN code of 1276, then change to a number of your choice. Ensure that no-one else can use the Master PIN by removing the Owner's Manual.
Q Why are there vertical stripes on the screen when in PC mode?
The Sampling clock may need adjustment. Select PC Setting from the SET UP menu, highlight Sampling clock and adjust until the lines clear.
Why are there horizontal stripes and/or blurred images on the screen when in PC mode?
The Clock phase may need adjustment. Select PC Setting from the SET UP menu, highlight Clock phase and adjust until the picture clears.
Why when digital subtitles have been selected are they not showing on screen?
A Subtitles are not currently being transmitted by the broadcaster.
Q Why is there no digital text service?
The digital programme being viewed is not broadcasting digital text. Try another digital programme.
Q Why are there problems with analogue text?
Good performance of text depends on a good strong broadcast signal. This normally requires a roof or loft aerial. If the text is unreadable or garbled, check the aerial. Go to the main index page of the text service and look for the User Guide. This will explain the basic operation of text in some detail. If further information is needed on how to use text see the text section.
Questions and Answers continued
Q Why are there no analogue text sub-pages?
There are none broadcast or they have not yet loaded. Press the button to access. (See text section).
Why are the four coloured text numbers visible but no text?
A Text has been selected whilst viewing an external source i.e. DVD or VCR. No text will appear on screen or a box may appear stating no information is available. Select a broadcasting channel and press to access.
Why does the GREEN Active Standby LED sometimes take longer to go out?
When put into standby the television's active standby will automatically search all available channels for downloads, provided Auto upgrade is On. The time it takes to do this may vary.
Q Why are the colours wrong when an NTSC source is played?
A Connect the source via a SCART lead and play. Select Manual setting from the SET UP menu.
1 Set the Colour to Auto, and exit.
2 Go to the Picture settings menu and adjust the tint.
Q Why is there no sound from a PC connected via HDMI?

Press and hold the OK button for 5 seconds - the Lip Sync Latency menu will appear. Select between On and Off.
Lip Sync Latency On

Cleaning the screen and cabinet...
Turn off the power, clean the screen and cabinet with a soft, dry cloth. We recommend that you do not use any proprietary polishes or solvents on the screen or cabinet as this may cause damage.
Disposal...
The following information is only for EU-member states:
The use of the symbol indicates that this product may not be treated as household waste. By ensuring this product is disposed of correctly, you will help prevent potential negative consequences for the environment and human health, which could otherwise be caused by inappropriate waste handling of this product. For more detailed information about recycling of this product, please contact your local city office, your household waste disposal service or the shop where you purchased the product.

English
Notes
For your own records
Information
Before connecting any external equipment, turn off all main power switches. If there is no switch remove the mains plug from the wall socket.
Connecting a computer
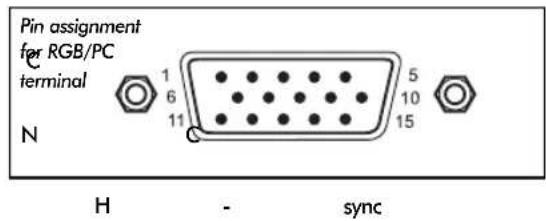
Signal information for Mini D-sub 15 pin connector
| Pin No. | Signal name Pin No. | Signal name | |
| 1 | R | 9 | N |
| 2 | G | 10 Ground | |
| 3 | B | 1 | 1 |
| 4 NC (not connected) | 12 NC | ||
| 5 | N | C | 1 |
| 6 Ground | 14 V-sync | ||
| 7 Ground | 15 NC | ||
| 8 Ground |
Connecting a DVD/STB via HDMI
Acceptable video signals through HDMI terminals
| H. Active | V. Active | I/P | H. Frequency (kHz) | V. Frequency (Hz) | Pixel Frequency (MHz) |
| 720 | 576 | Prog | 31.250 | 50.000 | 27.000 |
| 1280 | 720 | Prog | 37.500 | 50.000 | 74.250 |
| 1920 | 1080 | Int | 28.125 | 50.000 | 74.250 |
| 640 | 480 | Prog | 31.469 | 59.940 | 25.175 |
| 720 | 480 | Prog | 31.469 | 59.940 | 27.000 |
| 1280 | 720 | Prog | 44.955 | 59.940 | 74.176 |
| 1920 | 1080 | Int | 33.716 | 59.940 | 74.176 |
| 640 | 480 | Prog | 31.500 | 60.000 | 25.200 |
| 720 | 480 | Prog | 31.500 | 60.000 | 27.027 |
| 1280 | 720 | Prog | 45.000 | 60.000 | 74.250 |
| 1920 | 1080 | Int | 33.750 | 60.000 | 74.250 |
| 1920 | 1080 | Prog | 56.250 | 50.000 | 148.500 |
| 1920 | 1080 | Prog | 67.433 | 59.940 | 148.352 |
| 1920 | 1080 | Prog | 67.500 | 60.000 | 148.500 |
Int = Interlace; Prog = Progressive
Specifications and accessories
DVB-T Broadcast systems/channels
UK UHF 21-68
Broadcast systems/channels
PAL-I UHF UK21-UK69
France VHF 05-10 (VHF 01-05)
UHF 21-69
PAL-B/G UHF E21-E69
VHF E2-E12, S1-S41
Germany VHF 05-12
UHF 21-69
SECAM-L UHF F21-F69
VHF F1-F10, B-Q
Switzerland VHF 05-12
UHF 21-69
SECAM-D/KUHF R21-R69
VHF R1-R12
Italy VHF 05-12 (D,E,F,G,H,H1,H2)
UHF 21-69
Spain UHF 21-69
Video Input PAL,SECAM,NTSC 3.58/4.43
External connections
EXT1 Input/Output 21-pin SCART RGB, A/V
Selectable output
EXT2 Input/Output 21-pin SCART A/V, S-video
Selectable output
EXT3 Input
Phono jacks
Phono jacks
Y, P
B CB P R/CR
A/V
EXT3 Input (Side)
Phono jack
Phono jacks
Video
Audio L + R
HDMI 1/2 Input
HDMI™ (1080p, LIP SYNC)
PC
Mini D-sub 15-pin
Analog RGB signal
PC/HDMI Audio
Phono jacks
Audio L + R
Digital Audio Output (S/PDIF)
Optical
Output to Active Super Woofer
Phono jack
Fixed Audio Output
Phono jacks
Audio L + R
Stereo
Nicam
2 carrier system
Visible Screen Size
Model 32 80cm
(approx.)
37 94cm
42 107cm
Display
16:9
Sound output (at 10% distortion) Main 10W + 10W
Power consumption
Model 32
154W
as specified in
37 190W
EN60107-1:1997
42 241W
Standby (approx.)
Model 32
<1W
37<1W
42<1W
Dimensions
Model 32
60cm (H) 80cm (W) 29cm (D)
(approx.)
67cm (H) 92cm (W) 29cm (D)
42 73cm (H) 103cm (W) 34cm (D)
(Height dimension includes foot stand)
Weight (approx.)
Model 32
18kg
37 22kg
42 27.5kg
Headphone socket
3.5mm stereo
Accessories
Remote control
2 batteries
AAA,IEC R03 1.5V
DVB is a registered trademark of the DVB Project

Printed on recycled paper. 100% Chlorine free.
© Toshiba Information Systems (U.K.) Limited
All rights reserved.
Reproduction in whole or part without written permission is strictly prohibited.
Toshiba Information Systems (U.K.) Limited
Consumer Products Division,
European Service Centre.
Admiralty Way, Camberley.
Specification is subject to change without notice.
Originated by Zushi Illustration & Visualisation, Bristol, UK.


Sommaire
MISE EN ROUTE
SRS(●) WOW, SRS and (●) symbol are trademarks of SRS Labs, Inc.
WOW technology is incorporated under license from SRS Labs, Inc.
AUCUNE MISE A JOUR DISPONIBLE
HDMI, the HDMI logo, and High-Definition Multimedia Interface are trademarks or registered trademarks of HDMI Licensing, LLC.
Audio HDMI1
Int = Entrelace; Prog = Progressif
France VHF 05-10 (VHF 01-05) UHF 21-69
Allemagne VHF 05-12
UHF21-69
Suisse VHF 05-12
UHF 21-69
Italie VHF 05-12 (D,E,F,G,H1,H2) UHF 21-69
Espagne UHF 21-69
Entree video
PAL, SECAM, NTSC 3.58/4.43
Connexions externes
EXT1 Entree/Sortie Peritel 21 broches RGB, A/V
© Toshiba Information Systems (U.K.) Limited
Toshiba Information Systems (U.K.) Limited
Consumer Products Division,
European Service Centre,
Admiralty Way, Camberley,
3D Colour Management
Active Backlight Control

m = 311
Informationen
Int = Interlace; Prog = Progressive
Italian VHF 05-12 (D,E,F,G,H,H1,H2) UHF 21-69
Spanien UHF 21-69
© Toshiba Information Systems (U.K.) Limited
Toshiba Information Systems (U.K.) Limited
Consumer Products Division,
European Service Centre,
Admiralty Way, Camberley,
DVB is a registered trademark of the DVB Project

© Toshiba Information Systems (U.K.) Limited
Consumer Products Division,
European Service Centre,
Admiralty Way, Camberley,
Connecting a computer
Ingresso video PAL, SECAM, NTSC 3.58/4.43
Connessioni esterne
EXT1 Ingresso/uscita SCART a 21 piedini RGB, A/V
Consumer Products Division,
European Service Centre,
Admiralty Way, Camberley, Surrey GU15 3DT.
DVB is a registered trademark of the DVB Project

© Toshiba Information Systems (U.K.) Limited
License Information used with
Toshiba Televisions
Information
The software pre-installed in TOSHIBA Digital Televisions consists of multiple, independent software components. Each software component is copyrighted by TOSHIBA or a third party.
The TOSHIBA Digital Television uses software components that are distributed as freeware under a third-party end-user license agreement or copyright notice (hereinafter referred to as a "EULA"). Some EULAs require that the source code of the applicable component be disclosed as the condition for distributing the software component in executable format.
You can check the software components subject to such EULA requirements on the following Home Page:
URL: http://tesc.toshiba.co.uk/Web/Website.nsf/ContentFrameSet?OpenFrameset
In addition, some of the software components which are used in TOSHIBA Digital Televisions include the software that are made or developed originally by Toshiba. These software and accompanied documents are copyrighted by TOSHIBA, and protected by Copyright Act, an international treaty's articles and other governing laws.
The software components which are made or developed originally by TOSHIBA and not subject to EULAs are not a target of source code offering.
TOSHIBA provides a warranty for the TOSHIBA Digital Television you have purchased under conditions set forth by TOSHIBA. However, some of the software components distributed under an EULA are made available for use by the user on the assumption that they are not copyrighted or warranted by TOSHIBA or any third party. These software components are licensed to the user free of charge and therefore are not covered by a warranty within the scope of the applicable laws. These software components are not subject to any copyrights or other third-party rights and are provided in "as is" condition without any warranty, whether express or implied. "Warranty" here includes, but not limited to, an implied warranty for marketability or fitness for specific uses. All risks associated with the quality or performance of these software components are assumed by the user. TOSHIBA shall not be liable whatsoever for any cost of repair or correction or other incidental expense incurred in connection with a defect found in any of these software components. Unless specified under the applicable laws or in a written agreement, a party who changes or redistributes the software with consent from the copyright holders or based on the aforementioned licenses shall not be held liable whatsoever for any loss arising from the use of or inability to use such software. The same applies even when the copyright holders or relevant third parties have been informed of the possibility of such loss. "Loss" here includes normal, special, incidental and indirect loss (including, but not limited to, the loss of data or its accuracy; loss incurred by the user or any third party; and interface incompatibility with other software). Please read each EULA for details on the use conditions and items that must be observed regarding these software components.
The table below lists the software components pre-installed in TOSHIBA Digital Televisions, which are subject to EULAs. The user should read the applicable EULAs carefully before using these software components. The EULAs are exhibited in their original text (English) as exactly written by the respective parties other than TOSHIBA.
| Pre-Installed Software EULA | |
| Linux Kernel Busybox | Exhibit A |
| uClibc Exhibit B | |
| ZBOOT Exhibit C |
Exhibit A
GNU GENERAL PUBLIC LICENSE Version 2, June 1991
Copyright © 1989, 1991 Free Software Foundation, Inc.
59 Temple Place, Suite 330, Boston, MA 02111-1307 USA
Everyone is permitted to copy and distribute verbatim copies of this license document, but changing it is not allowed.
Preamble
The licenses for most software are designed to take away your freedom to share and change it. By contrast, the GNU General Public License is intended to guarantee your freedom to share and change free software – to make sure the software is free for all its users. This General Public License applies to most of the Free Software Foundation's software and to any other program whose authors commit to using it. (Some other Free Software Foundation software is covered by the GNU Library General Public License instead.) You can apply it your programs, too.
When we speak of free software, we are referring to freedom, not price. Our General Public Licenses are designed to make sure that you have the freedom to distribute copies of the free software (and charge for this service if you wish), that you receive source code or can get it if you want it, that you can change the software or use pieces of it in new free programs; and that you know you can do these things.
To protect your rights, we need to make restrictions that forbid anyone to deny you these rights or to ask you to surrender the rights. These restrictions translate to certain responsibilities for you if you distribute copies of the software, or if you modify it.
For example, if you distribute copies of such a program, whether gratis or for a fee, you must give the recipients all the rights you have. You must make sure that they too, receive or can get the source code. Also you must show them these terms so they know their rights.
We protect your right with two steps: (1) copyright the software, and (2) offer you this license which gives you legal permission to copy, distribute and/or modify the software.
Also, for each author's protection and ours, we want to make certain that everyone understands that there is no warranty for this free software. If the software is modified by someone else and passed on, we want its recipients to know that what they have is not the original, so that any problems introduced by others will not reflect on the original authors' reputations.
Finally, any free program is threatened constantly by software patents. We wish to avoid the danger that redistributors of a free program will individually obtain patent license, in effect making the program proprietary. To prevent this, we have made it clear that any patent must be licensed for everyone's free use or not licensed at all.
The precise terms and conditions for copying, distribution and modification follow.
GNU GENERAL PUBLIC LICENSE TERMS AND CONDITIONS FOR COOPYING, DISTRIBUTION AND MODIFICATION
- This license applies to any program or other work which contains a notice placed by the copyright holder saying it may be distributed under the terms of this General Public License. The "Program", below, refers to any such program or work, and a "work based on the Program" means either the program or any derivative work under copyright law: that is to say, a work containing the Program or a portion of it, either verbatim or with modifications and/or translated into another language. (Hereinafter, translation is included without limitation in the terms "modification".) Each licensee is addressed as "you".
Activities other than copying, distribution and modification are not covered by this License; they are outside its scope. The act of running the program is not restricted, and the output from the Program is covered only if its contents constitute a work based on the Program (independent of having been made by running the program). Whether that is true depends on what the Program does.
- You may copy and distribute verbatim copies of the Program's source code as you receive it, in any medium, provided that you conspicuously and appropriately publish on each copy an appropriate copyright notice and disclaimer of warranty; keep intact all notices that refer to this License and to the absence of any warranty; and give any other recipients of the Program a copy of this License along with the Program.
You may charge a fee for the physical act of transferring a copy, and you may at your option offer warranty protection in exchange for a fee.
- You may modify your copy or copies of the program or any portion of it, thus forming a work based on the program, and copy and distribute such modifications or work under the terms of Section 1 above, provided that you also meet all of these conditions:
a) You must cause the modified files to carry prominent notices stating that you changed the files and the date of any change.
b) You must cause any work that you distribute or publish, that in whole or in part contains or is derived from the Program, or any part there of, to be licensed as a whole at no charge to all third parties under the terms of the this License.
c) If the modified Program normally reads commands interactively when run, you must cause it, when started running for such interactive use in the most ordinary way, to print or display an announcement including an appropriate copyright notice and a notice that there is no warranty (or else, saying that you provide a warranty) and that users may redistribute the program under these conditions, and telling the user how to view a copy of this License. (Exception: if the program itself is interactive but does not normally print such an announcement, your work based on the program is not required to print such an announcement.)
These requirements apply to the modified work as a whole. If identifiable sections of that work are not derived from the program, and can be reasonably considered independent and separate works in themselves, then this License, and its terms, do not apply to those sections when you distribute them as separate works. But when you distribute the same sections as part of a whole which is a work based on the Program, the distribution of the whole must be on terms of this License, whose permissions for other licensees extend to the entire whole, and thus to each and every part regardless of who wrote it.
Thus, it is not the intent of this section to claim rights or contest your rights to work written entirely by you; rather, the intent is to exercise the right to control the distribution of derivative and collective works based on the Program.
In addition, mere aggregation of another work not based on the Program with the Program (or with a work based on the Program) on a volume of a storage or distribution medium does not bring the other work under the scope of this License.
- You may copy and distribute the program (or a work based on it, under Section 2) in object code or executable form under the terms of Sections 1 and 2 above provided that you also do one of the following:
a) Accompany it with the complete corresponding machine-readable source code, which must be distributed under the terms of Sections 1 and 2 above on a medium customarily used for software interchange; or,
b) Accompany it with a written offer, valid for at least three years, to give any third party, for a
charge no more than your cost of physically performing source distribution, a complete
machine-readable copy of the corresponding source code, to be distributed under the terms of Sections 1 and 2 above on a medium customarily used for software interchange; or,
c) Accompany it with the information you received as to the offer to distribute corresponding source code. (This alternative is allowed only for noncommercial distribution and only if you received the program in object code or executable form with such an offer, in accord with subsection b above.)
The source code for a work means the preferred form of the work for making modifications to it. For an executable work, complete source code means all the source code for all modules it contains, plus any associated interface definition files, plus the scripts used to control compilation and installation of the executable. However, as a special exception, the source code distributes need not include anything that is normally distributed (in either source or binary form) with the major components (compiler, kernel, and so on) of the operating system on which the executable runs, unless that component itself accompanies the executable.
If distribution of executable or object code is made by offering access to copy from a designated place, then offering equivalent access to copy the source code from the same place counts as distribution of the source code, even though third parties are not compelled to copy the source along with the object code.
- You many not copy, modify, sublicense, or distribute the program except as expressly provided under this License. Any attempt otherwise to copy, modify, sublicense or distribute the Program is void, and will automatically terminate your rights under this License. However, parties who have received copies, or rights, from you under this License will not have their licenses terminated so long as such parties remain in full compliance.
- You are not required to accept this License, since you have not signed it. However, nothing else grants you permission to modify or distribute the Program or its derivative works. These actions are prohibited by law if you do not accept this License. Therefore, by modifying and distributing the Program (or any works based on the Program), you indicate your acceptance of this License to do so, and all its terms and conditions for copying, distributing or modifying the Program or works based on it.
- Each time you redistribute the Program (or any works based on the Program), the recipient automatically receives a License from the original licensor to copy, distribute or modify the Program subject to these terms and conditions. You may not impose any further restrictions on the recipient's exercise of the rights granted herein. You are not responsible for enforcing compliance by third parties to this License.
- If as a consequence of a court judgement or allegation of patent infringement or for any other reason (not limited to patent issues), conditions are imposed on you (whether by court order, agreement or otherwise) that contradicts the conditions of the License, they do not excuse you from the conditions of this License. If you cannot distribute so as to satisfy simultaneously your obligations under this License and any other pertinent obligations, then as a consequence you may not distribute the Program at all.
For example, if a patent license would not permit royalty-free redistribution of the Program by all those who receive copies directly or indirectly through you, then the only way you could satisfy both it and this License would be to refrain entirely from distribution of the Program. If any portion of this section is held invalid or unenforcable under any particular circumstances, the balance of the section is intended to apply and the section as a whole is intended to apply in other circumstances. It is not the purpose of this section to induce you to infringe any patent to other property right
claims or to contest validity of any such claims; this section has the sole purpose of protecting the integrity of the free software distribution system, which is implemented by public license practices. Many people have made generous contributions to the wide range of software distributed through that system in reliance upon consistent application of that system; it is up to the author/donor to decide if he or she is willing to distribute software through any other system and a licensee cannot impose that choice.
This section is intended to make thoroughly clear what is believed to be a consequence of the rest of this License.
- If the distribution and/or use of the program is restricted in certain countries either by patents or by copyrighted interfaces, the original copyright holder who places the Program under this License may add an explicit geographical distribution limitation excluding those countries, so that distribution is permitted only in or among countries not thus excluded. In such case, this License incorporates the limitation as if written in the body of this License.
- The Free Software Foundation may publish revised and/or new versions of the general Public License from time to time. Such new versions will be similar in spirit to the present version, but may differ in detail to address new problems or concerns. Each version is given a distinguishing version number. If the Program specifies a version number of this License which applies to it and "any later version", you have the option of following the terms and conditions either of that version or of any later version published by the Free Software Foundation. If the Program does not specify a version number of this License, you may choose any version ever published by the Free Software Foundation.
- If you wish to incorporate parts of the Program into other free programs whose distribution conditions are different, write to the author to ask for permission. For software which is copyrighted by the Free Software Foundation, write to the Free Software Foundation; we sometimes make exceptions for this. Our decision will be guided by the two goals of preserving the free status of all derivatives of our free software and of promoting the sharing and use of software generally.
NO WARRANTY
- BECAUSE THE PROGRAM IS LICENSED FREE OF CHARGE, THERE IS NO WARRANTY FOR THE PROGRAM, TO THE EXTENT PERMITTED BY APPLICABLE LAW. EXCEPT WHEN OTHERWISE STATED IN WRITING THE COPYRIGHT HOLDERS AND/OR OTHER PARTIES PROVIDE THE PROGRAM "AS IS" WITHOUT WARRANTY OF ANY KIND, EITHER EXPRESSED OR IMPLIED, INCLUDING, BUT NOT LIMITED TO, THE IMPLIED WARRANTYES OF MERCHANTABILITY AND FITNESS FOR A PARTICULAR PURPOSE. THE ENTIRE RISK AS TO THE QUALITY AND PERFORMANCE OF THE PROGRAM IS WITH YOU, SHOULD THE PROGRAM PROVE DEFECTIVE, YOU ASSUME THE COST OF ALL NECESSARY SERVICING, REPAIR OR CORRECTION.
- IN NO EVENT UNLESS REQUIRED BY APPLICABLE LAW OR AGREED TO IN WRITING WILL ANY COPYRIGHT HOLDER, OR ANY OTHER PARTY WHO MAY MODIFY AND/OR REDISTRIBUTE THE PROGRAM AS PERMITTED ABOVE, BE LIABLE TO YOU FOR DAMAGES, INCLUDING ANY GENERAL, SPECIAL, INCIDENTAL OR CONSEQUENTIAL DAMAGES ARISING OUT OF THE USE OR INABILITY TO USE THE PROGRAM (INCLUDING BUT NOT LIMITED TO LOSS OF DATA OR DATA BEING RENDERED INACCURATE OR LOSSES SUSTAINED BY YOU OR THIRD PARTIES OR A FAILURE OF THE PROGRAM TO OPERATE WITH ANY OTHER PROGRAMS), EVEN IF SUCH HOLDER OR OTHER PARTY HAS BEEN ADVISED OF THE POSSIBILITY OF SUCH DAMAGES.
END OF TERMS AND CONDITIONS
How to Apply These Terms to Your New Programs
If you develop a new program, and you want it be of the greatest possible use to the public, the best way to achieve this is to make it free software which everyone can redistribute and change under these terms.
To do so, attach the following notices to the program. It is safest to attach them to the start of each source file to most effectively convey the exclusion of warranty; and each file should have at least the "copyright" line and a pointer to where the full notice is found.
Copyright © 19yy
This program is free software; you can redistribute it and/or modify it under the terms of the GNU General Public License as published by the Free Software Foundation; either version 2 of the License, or (at your option) any later version.
This program is distributed in the hope that it will be useful, but WITHOUT ANY WARRANTY; without even the implied warranty of MERCHANTABILITY or FITNESS FOR A PARTICULAR PURPOSE. See the GNU General Public License for more details.
You should have received a copy of the GNU General Public License along with this program; if not, write to the Free Software Foundation, Inc., 59 Temple Place, Suite 330, Boston, MA 02111-1307 USA.
Also add information on how to contact you by electronic and paper mail.
If the program is interactive, make it output a short notice like this when it starts in an interactive mode.
Gnomovision version 69, Copyright © 19yy name of author Gnomovision comes with ABSOLUTELY NO WARRANTY; for details type "show w". This is free software, and you are welcome to redistribute it under certain conditions; type "show c" for details.
The hypothetical commands "show w" and "show c" should show the appropriate parts of the General Public License. Of course, the commands you use may be called something other than "show w" and "show c"; they could even be mouse-clicks or menu items - whatever suits your program.
You should also get your employer (if you works as a programmer) or your school, if any, to sign a "copyright disclaimer" for the program; if necessary. Here is a sample; alter the names:
Yoyodyne, Inc., hereby disclaims all copyright interest in the 'Gnomovision' (which makes passes at compilers) written by James Hacker.
Ty Coon, President of Vice
This General Public License does not permit incorporating your program into proprietary programs. If your program is a subroutine library, you may consider it more useful to permit linking proprietary applications with the library. If this is what you want to do, use the GNU Library General Public License instead of this License.
Exhibit B
GNU LESSER GENERAL PUBLIC LICENSE Version 2.1, February 1999
Copyright © 1991, 1999 Free Software Foundation, Inc.
59 Temple Place, Suite 330, Boston, MA 02111-1307 USA
Everyone is permitted to copy and distribute verbatim copies of this license document, but changing it is not allowed.
[This is the first released version of the Lesser GPL. It also counts as the successor of the GNU Library Public License, version 2, hence the version number 2.1.]
Preamble
The licenses for most software are designed to take away your freedom to share and change it. By contrast, the GNU General Public Licenses are intended to guarantee your freedom to share and change free software – to make sure the software is free for all its users.
This License, the Lesser General Public License, applies to some specially designated software packages – typically libraries – of the Free Software Foundation and other authors who decide to use it. You can use it too, but we suggest you first think carefully about whether this license or the ordinary General Public License is the better strategy to use in any particular case, based on the explanations below.
When we speak of free software, we are referring to freedom of use, not price. Our General Public Licenses are designed to make sure that you have the freedom to distribute copies of free software (and charge for this service if you wish); that you receive source code or can get it if you want it; that you can change the software or use pieces of it in new free programs; and that you are informed that you can do these things.
To protect your rights, we need to make restrictions that forbid distributors to deny you these rights or to ask you to surrender these rights. These restrictions translate to certain responsibilities for you if you distribute copies of the library or if you modify it.
For example, if you distribute copies of the library, whether gratis or for a fee, you must give the recipients all the rights that we gave you. You must make sure that they, too, receive or can get the source code. If you link other code with the library, you must provide complete object files to the recipients, so that they can link them with the library after making changes to the library and recompiling it. Also you must show them these terms so they know their rights.
We protect your rights with a two step method: (1) we copyright the library, and (2) we offer you this license which gives you legal permission to copy, distribute and/or modify the library.
To protect each distributor, we want to make it very clear that there is no warranty for the free library. Also, if the library is modified by someone else and passed on, the recipients should know that what they have is not the original version, so that original authors' reputation will not be affected by problems that might be introduced by others.
Finally, software patents pose a constant threat to the existence of any free program. We wish to make sure that a company cannot effectively restrict the users of a free program by obtaining a restrictive license from a patent holder. Therefore, we insist that any patent license obtained for a version of the library must be consistent with the full freedom of use specified in this license.
Most GNU software, including some libraries, is covered by the ordinary GNU General Public License. This license, the GNU Lesser General Public License, applies to certain designated libraries, and is quite different from the ordinary General Public License. We use this license for certain libraries in order to permit linking those libraries into non-free programs.
When a program is linked with a library, whether statically or using a shared library, the combination of the two is legally speaking a combined work, a derivative of the original library. The ordinary General Public License therefore permits such linking only if the entire combination fits its criteria of freedom. The Lesser General Public License permits more lax criteria for linking other code with the library.
We call this license the "Lesser" General Public License because it does Less to protect the user's freedom than the ordinary General Public License. It also provides other free software developers Less of an advantage over competing non-free programs. These disadvantages are the reason we use the ordinary General Public License for many libraries. However, the Lesser license provides advantages in certain special circumstances.
For example, on rare occasions, there may be a special need to encourage the widest possible use of a certain library, so that it becomes a de-facto standard. To achieve this, non-free programs must be allowed to use the library. A more frequent case is that a free library does the same job as widely used non-free libraries. In this case, there is little to gain by limiting the free library to free software only, so we use the Lesser General Public License.
In other cases, permission to use a particular library in non-free programs enables a greater number of people to use a large body of free software. For example, permission to use the GNU C Library in non-free programs enables many more people to use the whole GNU operating system, as well as its variant, the GNU/Linux operating system.
Although the Lesser General Public License is Less protective of the users' freedom, it does ensure that the user of a program that is linked with the Library has the freedom and the wherewithal to run that program using a modified version of the Library.
The precise terms and conditions for copying, distribution and modification follow. Pay close attention to the difference between a "work based on the library" and a "work that uses the library". The former contains code derived from the library, whereas the latter must be combined with the library in order to run.
GNU LESSER GENERAL PUBLIC LICENSE TERMS AND CONDITIONS FOR COOPYING, DISTRIBUTION AND MODIFICATION
- This License Agreement applies to any software library or other program which contains a notice placed by the copyright holder or other authorised party saying it may be distributed under the terms of this Lesser General Public License (also called "this License"). Each licensee is addressed as "you".
A "library" means a collection of software functions and/or data prepared so as to be conveniently linked with application programs (which use some of those functions and data) to form executables.
The "Library", below, refers to any such software library or work which has been distributed under these terms. A "work based on the library" means either the Library or any derivative work under copyright law: that is to say, a work containing the Library or a portion of it, either verbatim or with modifications and/or translated straightforwardly into another language. (Hereinafter, translation is included without limitation in the terms "modification".)
Each licensee is addressed as "you".
"Source code" for a work means the preferred form of the work for making modifications to it. For a library, complete source code means all source code for all modules it contains, plus any associated interface definition files, plus the scripts used to control compilation and installation of the library.
Activities other than copying, distribution and modification are not covered by this License; they are outside its scope. The act of running a program using a library is not restricted, and output from such a program is covered only if its contents constitute a work based on the Library
(independent of the use of the Library in a tool for writing it). Whether that is true depends on what the Library does and what the program that uses the Library does.
- You may copy and distribute verbatim copies of the Library's complete source code as you receive it, in any medium, provided that you conspicuously and appropriately publish on each copy an appropriate copyright notice and disclaimer of warranty; keep intact all notices that refer to this License and to the absence of any warranty; and distribute a copy of this License along with the Library.
You may charge a fee for the physical act of transferring a copy, and you may at your option offer warranty protection in exchange for a fee.
- You may modify your copy or copies of the program or any portion of it, thus forming a work based on the Library, and copy and distribute such modifications or work under the terms of Section 1 above, provided that you also meet all of these conditions:
a) The modified work must itself be a software library.
b) You must cause the files modified to carry prominent notices stating that you changed the files and the date of any change.
c) You must cause the whole of the work to be licensed at no charge to all third parties under the terms of this License.
c) If a facility in the modified Library refers to a function or a table of data to be supplied by an application program that uses the facility, other than as an argument passed when the facility is invoked, then you must make a good faith effort to ensure that, in the event an application does not supply such function or table, the facility still operates, and performs whatever part of its purpose remains meaningful.
(For example, a function in a library to compute square roots has a purpose that is entirely well-defined independent of the application. Therefore, Subsection 2d requires that any application-supplied function or table used by this function must be optional: if the application does not supply it, the square root function must still compute square roots.)
These requirements apply to the modified work as a whole. If identifiable sections of that work are not derived from the Library, and can be reasonably considered independent and separate works in themselves, then this License, and its terms, do not apply to those sections when you distribute them as separate works. But when you distribute the same sections as part of a whole which is a work based on the Library, the distribution of the whole must be on terms of this License, whose permissions for other licensees extend to the entire whole, and thus to each and every part regardless of who wrote it.
Thus, it is not the intent of this section to claim rights or contest your rights to work written entirely by you; rather, the intent is to exercise the right to control the distribution of derivative and collective works based on the Library.
In addition, mere aggregation of another work not based on the Library with the Library (or with a work based on the Library) on a volume of a storage or distribution medium does not bring the other work under the scope of this License.
- You may opt to apply the terms of the ordinary GNU General Public License instead of this License to a given copy of the Library. To do this, you must alter all the notices that refer to this License, so that they refer to the ordinary GNU General Public License, version 2, instead of to this License. (If a newer version than version 2 of the ordinary GNU General Public License has appeared, then you can specify that version instead if you wish.) Do not make any other change in these notices.
Once this change is made in a given copy, it is irreversible for that copy, so the ordinary GNU General Public License applies to all subsequent copies and derivative works made from that copy.
This option is useful when you wish to copy part of the code of the Library into a program that is not a Library.
- You may copy and distribute the Library (or a portion or derivative of it, under Section 2) in object code or executable form under the Sections 1 and 2 above provided that you accompany it with the complete corresponding machine readable source code, which must be distributed under the terms of sections 1 and 2 above on a medium customarily used for software interchange. If distribution of object code is made by offering access to copy from a designated place, then offering equivalent access to copy the source code from the same place satisfies the requirement to distribute the source code, even though third parties are not compelled to copy the source along with the object code.
- A program that contains no derivative of any portion of the Library, but is designed to work with the library by being compiled or linked with it, is called a "work that uses the Library". Such a work, in isolation, is not a derivative work of the Library, and therefore falls outside the scope of this License.
However, linking "work that uses the Library" with the Library creates an executable that is a derivative of the Library (because it contains portions of the Library), rather than a "work that uses the Library". The executable is therefore covered by this License. Section 6 states terms for distribution of such executables.
When a "work that uses the Library" uses material from a header file that is part of the Library, the object code for the work may be a derivative work of the Library even though the source code is not. Whether this is true is especially significant if the work can be linked without the Library, or if the work is itself a library. The threshold for this to be true is not precisely defined by law.
If such an object file uses only numerical parameters, data structure layouts and accessors, and small macros and small inline functions (ten lines or less in length), then the use of the object file is unrestricted, regardless of whether it is legally a derivative work. (Executables containing this object code plus portions of the Library will still fall under Section 6.)
Otherwise, if the work is a derivative of the Library, you may distribute the object code for the work under the terms of Section 6. Any executables containing that work also fall under Section 6, whether or not they are linked directly with the Library itself.
- As an exception to the Sections above, you may also combine or link a "work that uses the Library" with the Library to produce a work containing portions of the Library, and distribute that work under terms of your choice, provided that the terms permit modification of the work for the customer's own use and reverse engineering for debugging such modifications.
You must give prominent notice with each copy of the work that the Library is used in it and that the Library and its use are covered by the License. You must supply a copy of this License. If the work during execution displays copyright notices, you must include the copyright notice for the Library among them, as well as a reference directing the user to the copy of this License. Also, you must do one of these things:
a) Accompany the work with the complete corresponding machine-readable source code for the Library including whatever changes were used in the work (which must be distributed under Sections 1 and 2 above); and, if the work is an executable linked with the Library, with the complete machine-readable "work that uses the Library", as object code and/or source code, so that the user can modify the Library and then relink to produce a modified executable containing the modified Library. (It is understood that the user who changes the contents of definitions files in the Library will not necessarily be able to recompile the application to use the modified definitions.)
b) Use a suitable shared library mechanism for linking the Library. A suitable mechanism is
one that (1) uses at run time a copy of the library already present on the user's computer system, rather than copying library functions into the executable, and (2) will operate properly with a modified version of the library, if the user installs one, as long as the modified version is interface-compatible with the version that the work was made with.
c) Accompany the work with a written offer, valid for at least three years, to give the same user the materials specified in Subsection 6a, above, for a charge no more than the cost of performing this distribution.
d) If distribution of the work is made by offering access to copy from a designated place, offer equivalent access to copy the above specified materials from the same place.
e) Verify that the user has already received a copy of these materials or that you have already sent this user a copy.
For an executable, the required form of the "work that uses the Library" must include any data and utility programs needed for reproducing the executable from it. However, as a special exception, the materials to be distributed need not include anything that is normally distributed (in either source or binary form) with the major components (compiler, kernel, and so on) of the operating system on which the executable runs, unless that component itself accompanies the executable.
It may happen that this requirement contradicts the license restrictions of other proprietary libraries that do not normally accompany the operating system. Such a contradiction means that you cannot use both them and the Library together in an executable that you distribute.
- You may place library facilities that are a work based on the Library side-by-side in a single library together with other library facilities not covered by this License, and distribute such a combined library, provided that the separate distribution of the work based on the Library and of the other library facilities is otherwise permitted, and provided that you do these two things:
a) Accompany the combined library with a copy of the same work based on the Library, uncombined with any other library facilities. This must be distributed under the terms of the Sections above.
b) Give prominent notice with the combined library of the fact that part of it is a work based on the Library, and explaining where to find the accompanying uncombined form of the same work.
- You may not copy, modify, sublicense, link with or distribute the Library except as expressly provided under this License. Any attempt otherwise to copy, modify, sublicense, link with, or distribute the Library is void, and will automatically terminate your rights under this License. However, parties who have received copies, or rights, from you under this License will not have their licenses terminated so long as such parties remain in full compliance.
- You are not required to accept this License, since you have not signed it. However, nothing else grants you permission to modify or distribute the Library or its derivative works. These actions are prohibited by law if you do not accept this License. Therefore, by modifying and distributing the Library (or any works based on the Library), you indicate your acceptance of the License to do so, and all its terms and conditions for copying, distributing or modifying the Library or works based on it.
-
Each time you redistribute the Library (or any works based on the Library), the recipient automatically receives a License from the original licensor to copy, distribute, link with or modify the Library subject to these terms and conditions. You may not impose any further restrictions on the recipient's exercise of the rights granted herein. You are not responsible for enforcing compliance by third parties with this License.
-
If, as a consequence of a court judgement or allegation of patent infringement or for any other reason (not limited to patent issues), conditions are imposed on you (whether by court order, agreement or otherwise) that contradicts the conditions of this License, they do not excuse you from the conditions of this License. If you cannot distribute so as to satisfy simultaneously your obligations under this License and any other pertinent obligations, then as a consequence you may not distribute the Library at all. For example, if a patent license would not permit royalty-free redistribution of the Library by all those who receive copies directly or indirectly through you, then the only way you could satisfy both it and this License would be to refrain entirely from distribution of the Library.
If any portion of this section is held invalid or unenforcable under any particular circumstances, the balance of the section is intended to apply and the section as a whole is intended to apply in other circumstances.
It is not the purpose of this section to induce you to infringe any patents to other property rights claims or to contest validity of any such claims; this section has the sole purpose of protecting the integrity of the free software distribution system which is implemented by public license practices.
Many people have made generous contributions to the wide range of software distributed through that system in reliance upon consistent application of that system; it is up to the author/donor to decide if he or she is willing to distribute software through any other system and a licensee cannot impose that choice.
This section is intended to make thoroughly clear what is believed to be a consequence of the rest of this License.
- If the distribution and/or use of the program is restricted in certain countries either by patents or by copyrighted interfaces, the original copyright holder who places the Library under this License may add an explicit geographical distribution limitation excluding those countries, so that distribution is permitted only in or among countries not thus excluded. In such case, this License incorporates the limitation as if written in the body of this License.
- The Free Software Foundation may publish revised and/or new versions of the Lesser General Public License from time to time. Such new versions will be similar in spirit to the present version, but may differ in detail to address new problems or concerns. Each version is given a distinguishing version number. If the Library specifies a version number of this License which applies to it and "any later version", you have the option of following the terms and conditions either of that version or of any later version published by the Free Software Foundation. If the Library does not specify a license version number, you may choose any version ever published by the Free Software Foundation.
- If you wish to incorporate parts of the Library into other free programs whose distribution conditions are incompatible with these, write to the author to ask for permission. For software which is copyrighted by the Free Software Foundation, write to the Free Software Foundation; we sometimes make exceptions for this. Our decision will be guided by the two goals of preserving the free status of all derivatives of our free software and of promoting the sharing and reuse of software generally.
NO WARRANTY
- BECAUSE THE LIBRARY IS LICENSED FREE OF CHARGE, THERE IS NO WARRANTY FOR THE LIBRARY, TO THE EXTENT PERMITTED BY APPLICABLE LAW. EXCEPT WHEN OTHERWISE STATED IN WRITING THE COPYRIGHT HOLDERS AND/OR OTHER PARTIES PROVIDE THE LIBRARY "AS IS" WITHOUT WARRANTY OF ANY KIND, Either EXPRESSED OR IMPLIED, INCLUDING, BUT NOT
LIMITED TO, THE IMPLIED WARRANTYES OF MERCHANTABILITY AND FITNESS FOR A PARTICULAR PURPOSE. THE ENTIRE RISK AS TO THE QUALITY AND PERFORMANCE OF THE LIBRARY IS WITH YOU. SHOULD THE LIBRARY PROVE DEFECTIVE, YOU ASSUME THE COST OF ALL NECESSARY SERVICING, REPAIR OR CORRECTION.
- IN NO EVENT UNLESS REQUIRED BY APPLICABLE LAW OR AGREED TO IN WRITING WILL ANY COPYRIGHT HOLDER, OR ANY OTHER PARTY WHO MAY MODIFY AND/OR REDISTRIBUTE THE LIBRARY AS PERMITTED ABOVE, BE LIABLE TO YOU FOR DAMAGES, INCLUDING ANY GENERAL, SPECIAL, INCIDENTIAL OR CONSEQUENTIAL DAMAGES ARISING OUT OF THE USE OR INABILITY TO USE THE LIBRARY (INCLUDING BUT NOT LIMITED TO LOSS OF DATA OR DATA BEING RENDERED INACCURATE OR LOSSES SUSTAINED BY YOU OR THIRD PARTIES OR A FAILURE OF THE LIBRARY TO OPERATE WITH ANY OTHER SOFTWARE), EVEN IF SUCH HOLDER OR OTHER PARTY HAS BEEN ADVISED OF THE POSSIBILITY OF SUCH DAMAGES.
END OF TERMS AND CONDITIONS
How to Apply These Terms to Your New Libraries
If you develop a new library, and you want it be of the greatest possible use to the public, we recommend making it free software that everyone can redistribute and change. You can do so by permitting redistribution under these terms (or, alternatively, under the terms of the ordinary General Public License).
To apply these terms, attach the following notices to the library. It is safest to attach them to the start of each source file to most effectively convey the exclusion of warranty; and each file should have at least the "copyright" line and a pointer to where the full notice is found.
Copyright © 19yy
This library is free software; you can redistribute it and/or modify it under the terms of the GNU Lesser General Public License as published by the Free Software Foundation; either version 2 of the License, or (at your option) any later version.
This library is distributed in the hope that it will be useful, but WITHOUT ANY WARRANTY; without even the implied warranty of MERCHANTABILITY or FITNESS FOR A PARTICULAR PURPOSE. See the GNU Lesser General Public License for more details.
You should have received a copy of the GNU Lesser General Public License along with this library; if not, write to the Free Software Foundation, Inc., 59 Temple Place, Suite 330, Boston, MA 02111-1307 USA.
Also add any information on how to contact you by electronic and paper mail.
You should also get your employer (if you works as a programmer) or your school, if any, to sign a "copyright disclaimer" for the library, if necessary. Here is a sample; alter the names:
Yoyodyne, Inc., hereby disclaims all copyright interest in the library 'Frob' (a library for tweaking knobs) written by James Random Hacker.
TyCoon, President of Vice
That's all there is to it!
Exhibit C
/\* zlib.h--interface of the ' zlib' general purpose compression library version 1.2.3, July 18th, 2005
Copyright © 1995-2005 Jean-loup Gailly and Mark Adler
This software is provided 'as-is', without any express or implied warranty. In no event will the authors be held liable for any damages arising from the use of this software.
Permission is granted to anyone to use this software for any purpose, including commercial applications, and to alter it and redistribute it freely, subject to the following restrictions:
- The origin of this software must not be misrepresented; you must not claim that you wrote the original software. If you use this software in a product, an acknowledgement in the product documentation would be appreciated but is not required.
- Altered source versions must be plainly marked as such, and must not be misrepresented as being the original software.
- This notice may not be removed or altered from any source distribution.
Jean-Ioup Gailly jIoup@gzip.org
Mark Adler madler@alumni.caltech.edu
*/
Notes


Printed on recycled paper. 100% Chlorine free.