
SE846 - Earphones SHURE - Free user manual and instructions
Find the device manual for free SE846 SHURE in PDF.
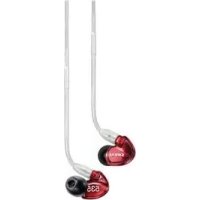
| Product type | Sound Isolating™ In-Ear Headphones |
| Brand | Shure |
| Model | SE846 |
| Technology | Balanced armature speakers |
| Noise isolation | Up to 37 dB |
| Frequency response | 15 Hz - 20 kHz |
| Sensitivity | 114 dB SPL/mW |
| Eartips provided | Flexible soft (small, medium, large), foam, triple flange |
| Detachable cables | 1.50 m and 1.10 m |
| Included adapters | Airplane, 6.3 mm (1/4"), inline attenuator (EA650) |
| Carrying case | Water and crush resistant |
| Interchangeable acoustic conduit inserts | Blue (neutral), white (bright +2.5 dB 1-8 kHz), black (warm -2.5 dB 1-8 kHz) |
| Eartip cleaning | Rinse with warm water, air dry; do not use alcohol-based disinfectants |
| Maintenance | Replace eartips if they do not stay; clean conduit if obstructed |
| Spare parts available | Eartips, cables, acoustic conduit inserts |
| Safety | Do not insert eartip beyond ear canal; do not modify product |
| Warranty | Any modification voids the warranty |
| Certifications | CE (declaration of conformity at www.shure.com/europe/compliance) |
Frequently Asked Questions - SE846 SHURE
User questions about SE846 SHURE
0 question about this device. Answer the ones you know or ask your own.
Ask a new question about this device
Download the instructions for your Earphones in PDF format for free! Find your manual SE846 - SHURE and take your electronic device back in hand. On this page are published all the documents necessary for the use of your device. SE846 by SHURE.
USER MANUAL SE846 SHURE
Shura Sound Isolating™ Earphones, built with balanced armature speakers, deliver a detailed soundstage free from outside noise. The powerful and stylish Shura SE earphones come with a detachable cable, adapters, a durable carrying case, and interchangeable Sound Isolating sleeves for a comfortable and personalized fit.
Choosing a Sleeve
Select an earphone sleeve that provides the best fit and sound isolation. It should be easy to insert, fit comfortably, and easy to remove.
| Soft Flex Sleeves: In small, medium, and large sizes. Made from pliable rubber. | |
| Soft Foam Sleeves: Compress the foam sleeve between your fingers and insert into the ear canal. Hold in place for about ten seconds while the foam expands. | |
| Triple-Flange Sleeves: If desired, use scissors to trim the stem on the sleeve. |
©2015 Shure Incorporated 27EU23776 (Rev. 3) Printed in China
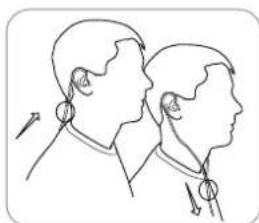
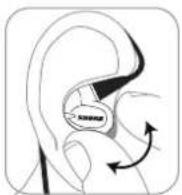
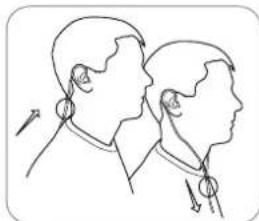
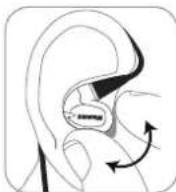
Wearing the Earphones
Wear them like earplugs. A good acoustic seal provides maximum bass.
- Select a sleeve.
- Twist and pull to remove. Push new sleeve on fully. Compress foam sleeve slightly.
- Insert firmly into ear. Wear cable over and behind ear. Tighten the cable and take up slack by raising the cable cinch.
Important: If there seems to be a lack of low frequency response (bass), this means that the earphone sleeve is not forming a tight seal. Gently push the earphone deeper into the ear canal or try a different sleeve.
Warning: Do not push the earphone sleeve beyond the ear canal opening Wearing the cable over the ear and securing it behind the head can help keep the earphones in place during physical activity.
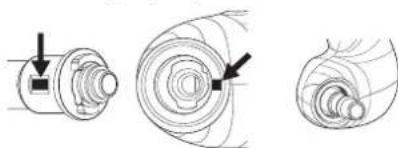
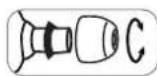
Changing Sleeves
Twist and pull to remove the sleeve from the nozzle.
- Slide on a new sleeve so that it completely covers the barb and the nozzle.
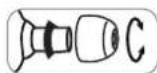
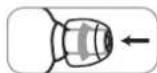
Caution: If the bar or any of the nozzle is exposed, the sleeve is not properly installed. Replace sleeves if they do not tightly grip the nozzle. To ensure proper fit and performance, use only sleeves supplied by Shure (unless using custom molded sleeves).
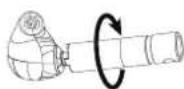
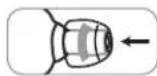
Removing the Earphones
Grasp the body of earphone and gently twist to remove.
Note: Do not pull on cable to remove earphone.
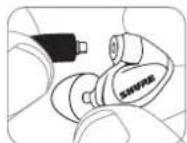
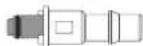
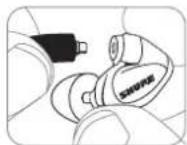
Detachable Cable
You may need to detach the cable from the earphones to attach optional components or to replace the cable if it becomes damaged. To prevent accidental separation, the connector has a snug fit. Take special care to prevent damage to the earphone and connector.
- Do not use pliers or other tools.
- Grasp the connector and the earphone as close as possible to where they join.
Pull straight apart—do not twist. Cable is a snap fit, not threaded.
Note: If you pull at an angle, the connector will not detach.
- Do not pull on the cable or put any pressure on the telephone nozzle.
- Listen for a click when connecting.
- When reattaching the cable, match the "L" and "R" markings. For clear cables and earphones, match the color dots (Red=Right, Blue=Left).
Maintenance and Cleaning
Careful maintenance ensures a tight seal between the sleeve and nozzle, improving sound quality and product safety.
- Keep the earphones and sleeves as clean and dry as possible.
To clean sleeves, remove them from earphones, gently rinse in warm water and air dry. Foam sleeves require a longer drying time. Inspect for damage and replace if necessary. Ear sleeves must be completely dry before reusing.
Wipe the earphones and sleeves with mild antiseptic to avoid infections. Do not use alcohol-based disinfectants.
- Do not expose earphones to extreme temperatures.
- Replace sleeves if they do not fit properly.
- Do not attempt to modify this product. Doing so will void the warranty and could result in personal injury and/or product failure.
Cleaning the Nozzle
If you notice a change in sound quality, remove the sleeve and check the nozzle of your earphone. If nozzle is blocked, clear obstructions. If no obstruction is found or if sound quality does not improve, replace the sleeve with a new sleeve or disassemble the nozzle to clean inside.
Caution: When cleaning, do not force any object through the earphone nozzle! This will damage the earphone sound filter.
Interchangeable Nozzle Insert
Three varieties of nozzle insert provide customizable frequency responses for a personalized listening experience. Use these instructions to replace or clean the nozzle insert.
Nozzle Inserts
| Color Sound | Signature | Response |
| Blue Balanced Neutral (as shipped) | ||
| White Bright | +2.5 dB, 1 kHz to 8 kHz | |
| Black Warm | -2.5 dB, 1 kHz to 8 kHz | |
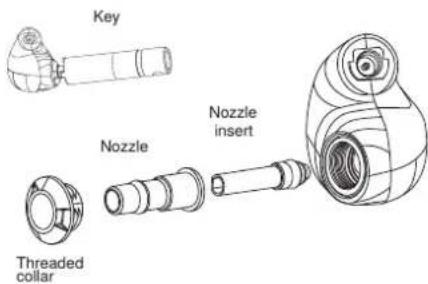
Removing the Nozzle
Note: The nozzle contains small parts. Choose a proper work surface before disassembly.
- Place the nozzle key (included with earphones) over the nozzle.
- Turn the key counter-clockwise to loosen and remove the threaded collar.
- Pull gently on the nozzle with your fingers to remove.
- Using your fingers only, grasp the end of the nozzle insert and gently slide it out.
Caution: Do not use any tools or your teeth as this could cause damage to the nozzle insert.
Reassembling the Nozzle
- Gently slide the insert into the nozzle.
Important: The insert needs to be fully seated. Reposition until it slides in easily. Do not force.
Correct
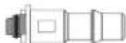
Incorrect
- Insert the nozzle into the earphone, aligning the dots so it matches the keyed opening.
- Place the threaded collar over the nozzle. After ensuring the threads are properly engaged, use the nozzle key to gently turn clockwise.
Caution: There should be no resistance to turning the collar until fully threaded into the housing. Check the following:
The insert is fully seated in the nozzle.
- The nozzle is properly seated in the housing (dots aligned).
- Once you are certain that the nozzle is properly seated and the collar threaded all the way into the microphone housing, use the key to tighten the collar just enough to ensure it will not loosen during normal earphone usage.
Airline Adapter
The airline adapter accessory is a dual-mono adapter plug for compatibility with the in-seal entertainment systems on certain international airlines.
Inline Attenuator
The high sensitivity of Shure earphones means you get louder sound at a typical listening level, and you might need to reduce the volume of your audio source on your media player or computer. For some devices, especially those with a high fixed noise floor, you will hear more noise when reducing the volume below the nominal level. Use the EA650 attenuator to reduce the signal level at the earphone, so you can keep the source volume at a higher level to maintain a good signal-to-noise ratio.
Road Case
Use the included water resistant, crush resistant road case to store and transport your earphones.
Precaution During Air Travel:
- Pressure changes during air travel can create a vacuum seal of the case which may make it difficult to open. If this occurs, gently pry the case open using a coin or other flat surface.
- To prevent this from occurring, place the attached carrying cord inside the case before closing and leave the left clasp open.
Specifications
Frequency Range 15 Hz-20 kHz
Sensitivity at 1 Hz 114 dB SPL/mW
Impedance at 1 kHz 9.0
Noise Attenuation up to 37 dB
Included Accessories
- Crush and water resistant road case
- Fit Kit with assorted sleeves
Zippered carrying case - 64-inch and 46-inch detachable cables
Airline adapter - 1/4-inch (6.3 mm) adapter
- Inline attenuator
- Cable clip
- Nozzle removal key
- Nozzle inserts for custom frequency response For optional accessories, visit www.shure.com.
Certifications
This product meets the Essential Requirements of all relevant European directives and is eligible for CE marking.
The CE Declaration of Conformity can be obtained from: www. shure.com/europe/compliance
Authorized European representative: Shure Europe GmbH
Headquarters Europe, Middle East & Africa
Department: EMEA Approval
Jakob-Dieffenbacher-Str. 12
75031 Eppingen, Germany
Phone:49-7262-92490
Fax:49-7262-9249114
Email: info@shure.de


SHURE
©2015 Shure Incorporated 27EU23776 (Rev.3) Printed in China
Port des écouteurs
©2015 Shure Incorporated 27EU23776 (Rev. 3) Printed in China
Tragen der Ohrhören
©2015 Shure Incorporated
27EU23776 (Rev. 3)
Printed in China
©2015 Shure Incorporated
27F1123776 (Rev. 3)
Printed in China
©2015 Shure Incorporated
27EU23776 (Rev. 3)
Printed in China
Uso dos Fones Auriculares
©2015 Shure Incorporated
27EU23776 (Rev. 3)
Printed in China
Kak Hocntb HayuHnki
BCTaBnneHxKAKyHbBeTAMNOHaXoPooeeAkyCTNcEeOyTNOTHeHNEo6CbeNaBaETMaKcMnHbBeBaCbS.
- BbIepeTBeBtynk
2.CHMMTE BTYNY, NOKPYUMBA B 6e CTOpHO. HaeHBe DO npOpa HOBy BTVNY. CnerKa COKMMTE neHonnactoBry BTVNY.
3.ПлOTHOBCTABBByxO.OTBeNTe KAbEbI NOBEPXyHAHasAD. HATINHTeKAbEbNbIbEgPte cna6nHy,NOHBnBbTynKyKaBEna
BHHMHaH! Ecm OuyuAetcnaOEOCTAOH NIKHKY qACT0 (aocOB)370 03HAaHT, VTO BTVNk HAYUHnH HENIOHO pnpIeAer K yxy. AKKypatHO BCTabte HAYUNH Rny6ke B yUHoi KAHA, HIN NoPpOByTe HCNb3oBaT bApYrO HAcAky.
BHHMaHHe:He 8ctabnIte Btynky HauNHaKa DaJIbe OTeBepCTNa cnXyBOrO KAnHAna.
YTo6bHayUHHNHeBbIaJAHnKoTaBbIbHbIaRaeTeCb,KAbEbnMOHHO 3aBeCTn3aYxoN3akPENHbEroC3aHn TOrBOB.
CmeHa HacaKn
Pobhehne n NotHane HacadHy, OTObCy CHBtE e c HAKOHeVHHika.
HaDeHbTe HOBy HAcAky,HTo6bI OHaONHOCTb23aKpbBa7aHIN HAKOHEYNIK.
PnpynpeHnne. Ecnnnnnnnn
Yc7b HAKOHeHnKBAuHbI,3HaHT,
HacaJa HAdeta HnepaBnBHo.
3AmEHnTe HAcADKn, cenOn OH
HEnNOTHO OXBaTbAoiT HAKOHHeHnK.
4To6bI ObecNeHTb HaNekKaaee
npnerahme N KauCteBO paobtbo,
NCNoBbSy TOnBo HACaHd,
NoCTABnREMBe KOMNaHmEh Shure (3a
NIOIOHnHm HAcADok, CbeMaHbHO
NtOTOBnHEhNb No Fopme yxa).
Kak n3Bneueh HayuHnki
BosbMMTEc 3a kopnyc HAYUHNA, cnerKa nOBepHTe N BbHbTe n3 yHa.
PnmeuHne. EcHn HynHo CHrTb HayuHnK, He TReHtte 3a npOboD.
CbeHbI KaebIb
Bo3MOKHO, BAM NOHaOboHCTCA
OTcOeHNHT KabeB OT
HAYUHINHO,OTb6yCTAHOBHT
DIOHNTABT HNHO KOMIOHHTbl
HIN 3aMeHHTb NOBpKeHHB
KabeB,BOIb6eKaHHe
CnyaHoro OTcoeDNHnH
NPDOyCMTOPOHa NIOTHA
NoCaja Ka pBaEMe
DieCTByte octoPOnHO,
OTb6y HO NOBpOeHb TBAHUYHK
NpaBEM.
He cnnon3yTe nnockorybHnDpyMe HNCTpyMeHT.
BoaBMNTcB 3a paBem Ka6BnN 3a HAYUHMK KAK MOKHO 6IINHE K MCTY 8 CoDINEHINH
TAHHTeKa6BnHanyuHnK pNMO,HeNOKPYuHBaIe. Ka6Bn HnTOHO nOcAKeH 603pe3b6b. PnHMeUHHe.EcIN TnHYtNoD yrnn,Ka6Bn He OTCoEOHHHTC.
He TAHITE 3a Ka6ebn H He CdaBnBaTe HakoHeuHk HAYUHnKa.
PmH CoaIDHHENHOI DnHJHK 6bbl CbHue HJNQK.
Pn npncoeDHHHn KaBena coDnOaIte MapKnpoBky L (NeBb) n R (npab). Ha npaoapHbX KaBena h NauyHnKx CneJyHe MapKnpoBke UBTbHm TOUkAMn (KpChaHa - npab, CNHn (neBb).
TexobcnykBaHne n uCTka
TuaTeJIbHOeOcIyKINBaHHe OecneYHbAe
NoTHoTHPe PnPIEraHHe HAcADIK K HAcHOHEYNKY,
TO NOBbIaET KaCCTBO 3ByKa N630NaCHOCtB
MSEJIN
CodepHKTHAYHUNIKHNACADKHNCHTBMHNYCYMHN,HACKOLKBNO30BO3MOKHO。
YQoBbOuOHNTBuHACKn,CHMIMTeHX C HAYuHNKB,AKKypaTHo BbMOte TepNoI BOaON H BuCyUHTe HBaOdyXue.HacADKn HnEOHPONACTA HkyHO CYUHTbDobLIOOCMOTPHTE,NEH NPOBPEKDeHEN;cEIN HynKHO,3aMeHNHe. PpeN NOBTOpHBm HnCNOBbAMoHmUHbHbHACKn Heo6xOdmoNIOHOCbTbHbCuCYuHTb
BoH36KanHe HnFekuHn npToHpaTne HauyHKn Hn HacAdk nCnAbm AHNTcNtHOM. He Kcnonb3yTe DeHHnMpyUe CpeCTBa Hn CnptroBOn OCHOB.
- O6epaTHe HAYUHmKn OT OCHb BbICOKMx HIN OCHb HN3KNX Tmnpepatyp.
3aMeHNHTHbAaHHcCNHnHOPO pnpneraHTO.
He bHtAeBbOCHb N3MeEHHH B 3TO nDJIeM.3To AHUYHpyET rapaHTHO H MOKET npHECTN K TpaBME N (NIN) BBXOy H3DeJnH N3 CTPOR.
OuNTka HakoHeuHnKa HayuHnKa
ECnBb3aMeTnnH, Yo KaeeCTBO 3ByKa
mmeHnOcB, CHHMITE BTyNKy I npOBepBe T
HAKoEHNHYauHnKa. ECn HAKoEHNk
3acOpEh, OocHeIe erO.
Ecnn 3acopehn HET nncn KaueCTBO 3bYka HE yUHINOCb, yCTAHOBITE HOBY BtynKy nnn Paa6epne HAKOHEHHNK, YTO6bI NnHnCTNb HHTPN.
PpeynpeHnHe.1n HcHn HAcOHeHHKa HnpotaKBAIe Ype3 Hero HNakoi npmeiT 3To nobpeDt 3ykoBoi Hnltbtp HayuHa.
B3aHMO3aMeHReMbIe BCTaBKn HakoHeuHnKa
IINPNCNOC6NEHNIYCACTOHNOXAPAKTEPHNTNNK INHINBDyAubHMI INPDEIOHTHEIMNION30BATEINPEDYMOTpeHBI TPN BAPNHATA BCTABOK DIAHAKOENHHNK.PIRI 3aMEHE H NCTKIE BCTABIK HAKOENHHKApyKOBOCDCTBYIEC 3TNMM IINTCPYKUHM
BCTaBn HAKOHeYHnKa
United States, Canada
Latin America, Caribbean:
Shure Incorporated
5800 West Touhy Avenue
Niles, IL 60714-4608 USA
Phone: 847-600-2000
Fax:847-600-1212 (USA)
Fax:847-600-6446
Email: info@shure.com
Europe, Middle East, Africa:
Shure Europe GmbH
Jakob-Dieffenbacher-Str. 12,
75031 Eppingen, Germany
Phone:49-7262-92490
Fax:49-7262-9249114
22/F, 625 King's Road
North Point, Island East
Hong Kong
Phone:852-2893-4290
Fax:852-2893-405

- Choosing a Sleeve
- Wearing the Earphones
- Changing Sleeves
- Removing the Earphones
- Detachable Cable
- Maintenance and Cleaning
- Cleaning the Nozzle
- Interchangeable Nozzle Insert
- Removing the Nozzle
- Reassembling the Nozzle
- Airline Adapter
- Inline Attenuator
- Road Case
- Precaution During Air Travel:
- Specifications
- Included Accessories
- Certifications
- SHURE
- Port des écouteurs
- Tragen der Ohrhören
- Uso dos Fones Auriculares
- Kak Hocntb HayuHnki
- CmeHa HacaKn
- Kak n3Bneueh HayuHnki
- CbeHbI KaebIb
- TexobcnykBaHne n uCTka
- OuNTka HakoHeuHnKa HayuHnKa
- B3aHMO3aMeHReMbIe BCTaBKn HakoHeuHnKa
Brand : SHURE
Model : SE846
Category : Earphones