BSD9001 - Radio BLAUPUNKT - Free user manual and instructions
Find the device manual for free BSD9001 BLAUPUNKT in PDF.
User questions about BSD9001 BLAUPUNKT
0 question about this device. Answer the ones you know or ask your own.
Ask a new question about this device
Download the instructions for your Radio in PDF format for free! Find your manual BSD9001 - BLAUPUNKT and take your electronic device back in hand. On this page are published all the documents necessary for the use of your device. BSD9001 by BLAUPUNKT.
USER MANUAL BSD9001 BLAUPUNKT
USER MANUALS
Models: BSD-9000 / BSD-9001
| Page 2 | German |
| Page 7 | English |
| Page 11 | French |
| Page 16 | Italian |
| Page 20 | Spanish |
| Page 25 | Portuguese |
| Page 29 | Dutch |
| Page 34 | Swedish |
| Page 38 | Danish |
| Page 42 | Finnish |
| Page 46 | Norwegian |
| Page 50 | Russian |
| Page 55 | Greek |
| Page 59 | Turkish |
| Page 63 | Polish |
| Page 68 | Bulgarian |
| Page 73 | Romanian |
| Page 77 | Czech |
| Page 81 | Hungarian |
| Page 86 | Japanese |
| Page 90 | Chinese |
| Page 94 | Arabic |
text_image
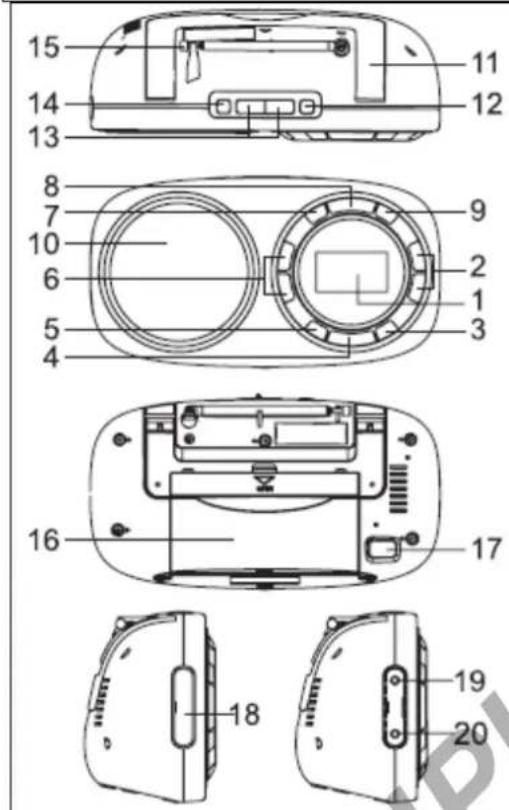
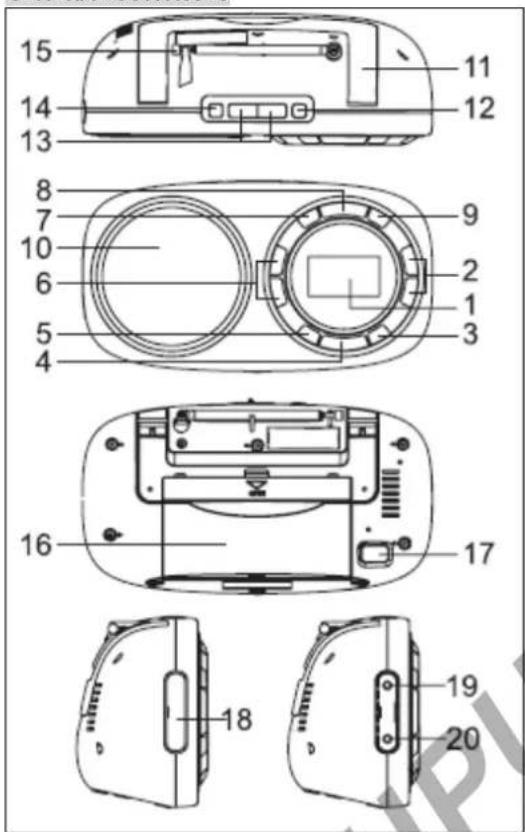
Technical diagram of a device with numbered parts, likely an electronic device or enclosure with labeled parts 1 through 20.Please read the instrucon carefully before operang the unit.
GENERAL CONTROLS
text_image
15 14 13 8 7 10 6 5 4 11 12 9 2 1 3 16 17 18 19 20- LCD display
- Preset buon
- ALARM buon
- SNOOZE buon
- SLEEP buon
- TUNING
- MEMO buon
- BAND buon
- RDS buon
- Speaker
- Carrying handle
- ON/OFF buon
- VOLUME+/- buons
- AUDIO buon
- FM telescopic antenna
- Baery compartment
- AC socket (\~ AC IN)
- Rubber cover
- LINE IN jack
- Earphone jack
POWER SUPPLY
This set operates on AC 230\~50Hz or 4 x 1.5 V R20/UM1/"D" size baeries (not provided).
AC operaon
Connect the detachable AC cord (included) to the AC socket on the rear of the unit. Insert the AC power cord into a convenient standard AC wall outlet.
Cauon!
- The set must be disconnected from the mains to operate on baeries.
- When the set is connected to the mains, the power source automacally switches to AC.
Baery operaon
- Remove the lid of the baery compartment by sliding it outward in the direcon of the arrow.
- Insert 4 R20/UM1/"D"size baeries into the compartment. Make sure to match their polaries (+/-) to the markings inside the compartment.
- Put the lid back in place.
Note:
-The AC cord must be unplugged from both the socket on the unit and the power outlet for the unit to run on the baeries.
- When the set is connected to the mains, the power source automacally switches to AC.
- The appearance of baery icon “ 📄 on display indicates that the baeries are low. Replace them with new baeries.
Notes on baeries (not supplied)
- Do not mix dierent types of baeries or old baeries with new ones.
·Never recharge the baeries, apply heat to them or take them apart. - Baeries should not be exposed to excessive heat such as sunshine, re or the like.
- Do not throw the baeries in re!
·Aenon should be drawn to the environmental aspects of baery disposal.
The baeries need to be replaced when: The volume decreases, or sound is distorted during operaon.
·In order to avoid leakage, remove the baeries when unit will not be used for a long period of me. - Please respect the environment. Before throwing any baeries away, consult your distributor who may be able to take them back for specific recycling.
Cauon!
Danger of explosion if baeries are incorrectly replaced. Replace only with the same or equivalent type.
SETTING TIME
Aer the baeries are installed, the display will show "0:00".
- Press MEMO once to enter me seng mode. The display will show ashing "24 HOUR". Then press TUNING to select 24H or 12H me format.
- Press MEMO again to conrm and the hour digits ash.
- Press TUNING ◀◀▶ to set the hour value. Press MEMO to conrm and minute digits ash.
- Press TUNING ◀◀▶ to set the minute value and press MEMO again to conrm.
SETTING THE ALARM
Set alarm me
In Standby mode, long press ALARM buon unl "ALARM" indicator displays and hour digits ash on display.
- Press TUNING ◀◀▶ to adjust hour value. Then press ALARM to conrm and minute digits ash.
- Press TUNING ◀◀▶ to adjust minute value and press ALARM to conrm.
Set wake up source
Press ALARM repeatedly to select the wake up source among “ ” and “ ”.
- Wake to the buzzer sound

displays and buzzer sound will come out when the alarm me is reached.
- Wake to the radio
- Follow procedures in "Listen to the radio" to select your desired radio staon and adjust the alarm sound level.
- displays and radio sound will come out when the alarm me is reached.
Checking Wake Time
Long press ALARM unl you see a ashing wake me.
Silence the alarm momentarily
Press SNOOZE to turn the alarm o temporarily. The alarm will sound again when the snooze period is over.
Note: snooze me is 9 minutes.
Stop the alarm
Press ON/OFF: The alarm will stop, and will sound again 24 hours later.
Cancel Wake Seng
Press ALARM repeatedly unl all alarm indicators disappear from the display.
SLEEP TO THE RADIO
In sleep mode, the radio will turn o automacally aer a specied me.
In radio ON mode, press SLEEP to select the desired me before turn o among 120-90-60-45-30-15-00.
* Select "00" then the sleep funcon is OFF, SLEEP indicator disappear from display.
When in SLEEP mode, press SLEEP buon to read the remaining sleep me.
SOUND PRESETS
When listening to the radio, press AUDIO buon repeatedly to select desired sound preset: VOICE, MUSIC or NORMAL.
USING THE RADIO
Listen to the radio
- Press ON/OFF.
- Select the frequency band FM/MW/SW/LW by pressing BAND.
- Select the required radio staon with the buons and
- Adjust the volume with the buons VOLUME +/-
- To switch the radio o, press ON/OFF.
To enhance radio recepon ability:
FM/ SW: Extend the telescopic antenna.
MW/LW: Rotate the unit horizontally for opmum recepon.
Saving Preset Staons
- Tune to a staon to be saved as a preset staon (see "Listen to the radio").
- Press MEMO once and you will see "M" and ashing "01" on the display.
- Press Preset / to select a preset number.
- Press MEMO to save staon as selected preset number.
- Repeat above steps to preset a maximum of 10 staons for each band respectively.
Selecng Preset Staons
Press Preset / to select a preset number.
RDS FUNCTION
When FM staon with RDS is received, the staon name (PS) is displayed. Press RDS buon repeatedly to display the program type (PTY), the radio text (RT), the frequency and the staon name (PS).
AUXILIARY FUNCTION
- Connect an audio device to the LINE IN jack, using an audio cable (not supplied).
- Switch the appliance on.
- Use the device's controls directly.
PRODUCT INFORMATION
Power consumpon: 5W
Frequency Range:
FM 87.5-108.0 MHz
MW 530-1600 KHz
LW 150-280 kHz
SW 5.80-10.0 MHz
LISTENING WITH EARPHONES
Connect earphones (not included) to the earphone jack on unit.

Connuous use of earphones at high volume can damage the user's hearing.
SAFETY INSTRUCTION

CAUTION: To reduce the risk of electric shock, do not remove the cover (or back). There are no
user serviceable parts inside the unit. Refer all servicing to qualify personnel.

The lightening ash with arrowhead symbol within the triangle is a warning sign alerng the user of “dangerous age” inside the unit.

The exclamaon point within the triangle is a warning sign alerng the user of important instrucons accompanying product.
IMPORTANT!
- The venlaon should not be impeded by covering the venlaon openings with items such as newspapers, tablecloths, curtains, etc.
- No naked ame sources, such as lighted candles, should be placed on the apparatus.
- The use of apparatus in moderate climates.
- The apparatus should not be exposed to dripping or splashing.
- Ensure a minimum distance of 5cm around the apparatus for sucient venlaon.
- Do not place objects lled with liquids, such as vases, on the apparatus.
- The rang plate is located at back of unit.
-Excessive sound pressure from earphones and headphones can cause hearing loss. - Mains plug is used as the disconnect device and it shall remain readily operable. To be completely disconnected the power input, the mains plug of the apparatus shall be disconnected from the mains completely. The mains plug should not be obstructed or should be easily accessed during intended use.
- Under the inuence of electrical fast transient or/and electrostac phenomenon, the product may malfuncon and require user to power reset.

If at any me in the future you should need to dispose of this product please note that Waste electrical products should not be disposed of with household waste. Please recycle where facilities exist. Check with your Local Authority or retailer for recycling advice. (Waste Electrical and Electronic Equipment Directive)
Note: Design and specicaon are subject to change without noce.
© 2011 All rights reserved by Blaupunkt. This material may be reproduced, copied or distributed for personal use only.
CE
INFORMATIONS PRODUIT
Consommaon : 5W
PLL/RDS Desktop World receiver
Manuale utente
text_image
Technical diagram of a device with numbered parts, likely an electronic device or enclosure with labeled parts 1 through 20.text_image
Technical diagram of a device with numbered parts, likely an electronic device or terminal block layout.LCD display
PRESET knappen
ALARM knap
SNOOZE (slumre) knap
SLEEP (sove) knap
TUNING knapper
MEMO knap (hukommelse)
BAND knap
RDS knap
Højtaler
Håndtag
ON/OFF (TÆND/SLUK) knap
VOLUME+/- knapper
AUDIO knap
FM Teleskopantennen
Baerirum
AC indgang (\~ AC IN)
Gummi dække
LINE IN sk
text_image
Technical diagram of a device with numbered parts, likely an electronic device or scanner component.LCD näyö
Preset <napit
ALARM nappi
SNOOZE nappi
SLEEP nappi
TUNING napit
MEMO nappi
BAND nappi
RDS nappi
Kaiun
Kantokahva
ON/OFF nappi
VOLUME+/- napit
AUDIO nappi
FM teleskooppi antenni
Paristokotelo
Notes on baeries (not supplied)
text_image
Technical diagram of a device with numbered parts, likely an electronic device or terminal block layout.LCD-skjerm
Preset knapper
ALARM knapp
SNOOZE knapp
SLEEP knapp
TUNING knapper
MEMO knapp
BAND knapp
RDS knapp
Høyaler
Bærehåndtak
ON/OFF bryter
VOLUME +/- knapper
AUDIO knapp
FM utrekkbar antenne
Baerirom
Strømkontakt (\~ AC IN)
Gummideksel
LINE IN kontakt

∅retelefonkontakt
STR∅MFORSYNING
Dee apparatet drives på AC 230 \~ 50Hz eller 4 x 1,5 V R20/UM1 / "D" størrelse baerier (medfølger ikke).
Strømdri
text_image
Technical diagram of a device with numbered parts, likely an electronic device or scanner assembly.INFORMACJA O PRODUKCIE
Pobór mocy: 5W
text_image
Technical diagram of a device rear panel with numbered parts for identification and assembly reference.text_image
Technical diagram of a device with numbered parts, likely an electronic device or scanner assembly.Aşaj LCD
Buton Preset (Presetare)
Buton ALARM (ALARMĂ)
Buton SNOOZE (AMÂNARE)
Buton SLEEP (OPRIRE TEMPORIZATĂ)
Butoane TUNING (ACORD)
Buton MEMO (MEMORIE)
Buton BAND (BANDĂ)
Buton RDS (Sistem de date radio)
Difuzor
Mâner de transport
Buton ON / OFF (PORNIT / OPRIT)
Butoane VOLUME+/- (VOLUM +/-)
Butonul AUDIO
Antenă telescopică FM
Comparment pentru baterii
Priză CA ( \~ AC IN)
Capac din cauciuc
Mufă LINE IN (INTRARE LINIE)
Mufă căș
ALIMENTARE
INFORMATII DESPRE PRODUS
INFORMACE O PRODUKTU
Přikon: 5W
Rozsah frekvenční:
FM 87.5-108.0 MHz
MW 530-1600 KHz
LW 150-280 kHz
SW 5.80-10.0 MHz
POSLECH SE SLUCHÁTKY
text_image
Technical diagram of a device with numbered parts, likely an electronic device or terminal block layout.LCDディスプレイ
Preset ボタン
ALARMボタン
SNOOZEボタン
SLEEPボタン
TUNING ボタン
MEMOボタン
BANDボタン
RDSボタン
スピーカー
キャリングハンドル
ON/OFFボタン
VOLUME+/-ボタン
AUDIOボタン
FM伸縮アンテナ
電池コンパートメント
ACソケット(\~ACIN)
ゴムふた
ライン入力端子
イヤホン端子
電源
text_image
Technical diagram of a device with numbered parts, likely an electronic device or scanner assembly.LCD显示屏
Preset 改进
ALARM按钮
SNOOZE按钮
SLEEP按钮
TUNING ◀◀▶ (调台) 按钮
MEMO按钮
BAND按钮
RDS按钮
喇叭
提把
ON/OFF按钮
VOLUME+/-(音量)按钮
AUDIO(音频)按钮
FM收缩天线
电池仓
交流插座(\~ACIN)
塑料盖
User manual
BSD-9000 / BSD-9001
LINE IN(线路输入)插孔
耳机插孔
电源
text_image
Technical diagram of a device with numbered parts, likely an electronic device or terminal block layout.