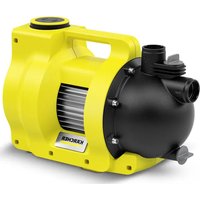
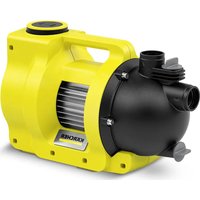
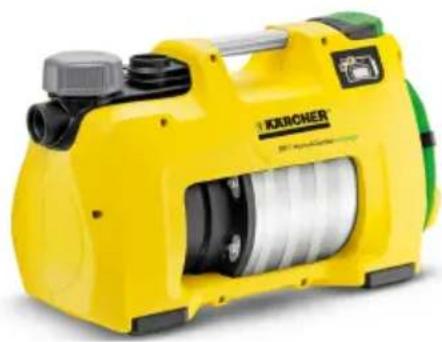
BP 4 - Water pump Kärcher - Free user manual and instructions
Find the device manual for free BP 4 Kärcher in PDF.
| Product type | Water pump |
| Brand | Kärcher |
| Model | BP 4 Home & Garden ecologic |
| Voltage | 230-240 V / 50 Hz |
| Power | 950 W |
| Max flow rate | 3800 l/h |
| Max pressure | 4.5 bar (0.45 MPa) |
| Max suction height | 8 m |
| Max delivery head | 45 m |
| Weight | 10.6 kg |
| Sound power level | 78 dB(A) |
| Pump type | Jet pump |
| Usage | Domestic: garden and house |
| Functions | Automatic operation, dry run protection, integrated check valve |
| Maintenance | Regular cleaning of the pre-filter |
| Power supply | Mains with cable and plug |
| Max fluid temperature | 35 °C |
| Max particle size | 1 mm |
| Recommended electrical protection | Residual current circuit breaker max 30 mA |
| Optional accessories | Pre-filter, suction hose, pressure compensation hose |
Frequently Asked Questions - BP 4 Kärcher
User questions about BP 4 Kärcher
0 question about this device. Answer the ones you know or ask your own.
Ask a new question about this device
Download the instructions for your Water pump in PDF format for free! Find your manual BP 4 - Kärcher and take your electronic device back in hand. On this page are published all the documents necessary for the use of your device. BP 4 by Kärcher.
USER MANUAL BP 4 Kärcher
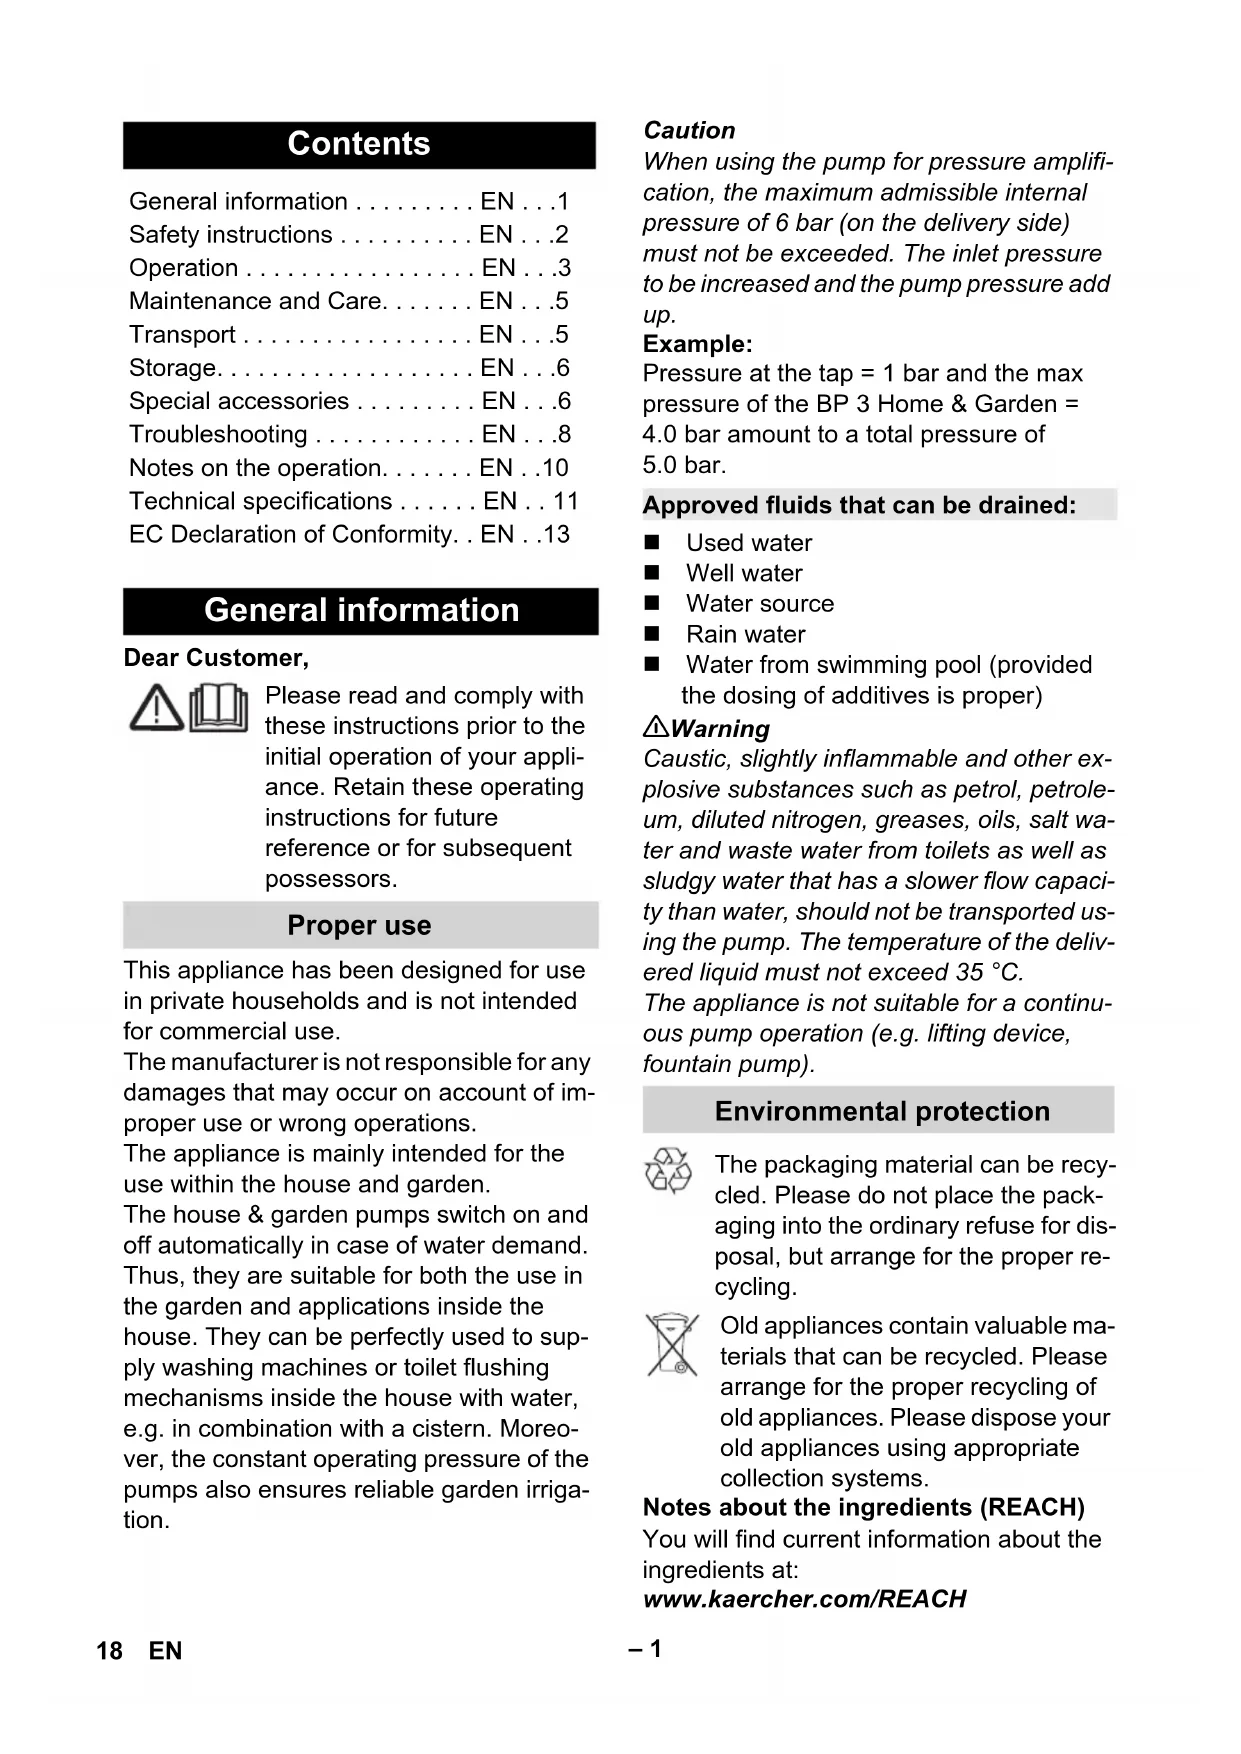
BP 4 Home & Garden ecologic
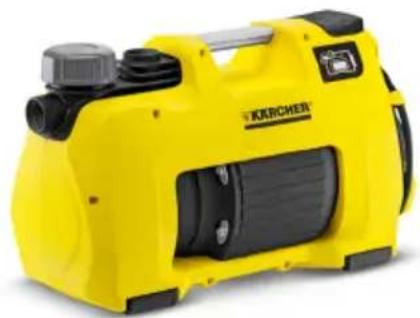
BP 5 Home & Garden
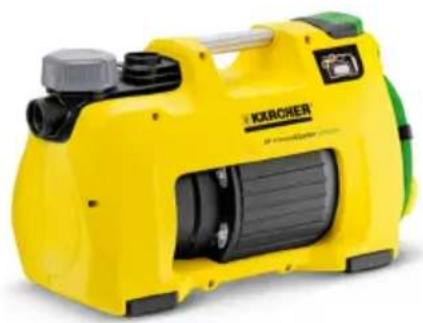
BP 7 Home & Garden eco!ogic
Deutsch 5
English 18
Francais 31
Italiano 44
Nederlands 57
Espanol 70
Portugues 83
EaVnviKa 97
Türkce 112
Reglster and win.
Inhaltsverzeichnis

S. Reiser
Head of Approbation
71364 Winnenden (Germany)
Tel.: +49 7195 14-0
Fax: +49 7195 14-2212
Contents
General information EN .1
Safety instructions EN.2
Operation EN.3
Maintenance and Care. . . . EN . . .5
Transport EN.5
Storage. EN .6
Special accessories EN .6
Troubleshooting EN .8
Notes on the operation. . EN . .10
Technical specifications . . . . EN . . 11
EC Declaration of Conformity.. EN ..13
General information
Dear Customer,

Please read and comply with these instructions prior to the initial operation of your appliance. Retain these operating instructions for future reference or for subsequent possessors.
Proper use
This appliance has been designed for use in private households and is not intended for commercial use.
The manufacturer is not responsible for any damages that may occur on account of improper use or wrong operations.
The appliance is mainly intended for the use within the house and garden.
The house & garden pumps switch on and off automatically in case of water demand. Thus, they are suitable for both the use in the garden and applications inside the house. They can be perfectly used to supply washing machines or toilet flushing mechanisms inside the house with water, e.g. in combination with a cistern. Moreover, the constant operating pressure of the pumps also ensures reliable garden irrigation.
Caution
When using the pump for pressure amplification, the maximum admissible internal pressure of 6 bar (on the delivery side) must not be exceeded. The inlet pressure to be increased and the pump pressure add up.
Example:
Pressure at the tap = 1 bar and the max pressure of the BP 3 Home & Garden = 4.0 bar amount to a total pressure of 5.0 bar.
Approved fluids that can be drained:
Used water
Well water
Water source
Rain water
Water from swimming pool (provided the dosing of additives is proper)
Warning
Caustic, slightly inflammable and other explosive substances such as petrol, petroleum, diluted nitrogen, greases, oils, salt water and waste water from toilets as well as sludgy water that has a slower flow capacity than water, should not be transported using the pump. The temperature of the delivered liquid must not exceed 35^ .
The appliance is not suitable for a continuous pump operation (e.g. lifting device, fountain pump).
Environmental protection

The packaging material can be recycled. Please do not place the packaging into the ordinary refuse for disposal, but arrange for the proper recycling.

Old appliances contain valuable materials that can be recycled. Please arrange for the proper recycling of old appliances. Please dispose your old appliances using appropriate collection systems.
Notes about the ingredients (REACH)
You will find current information about the ingredients at:
www.kaercher.com/REACH
Warranty
The warranty terms published by the relevant sales company are applicable in each country. We will repair potential failures of your appliance within the warranty period free of charge, provided that such failure is caused by faulty material or defects in manufacturing. In the event of a warranty claim please contact your dealer or the nearest authorized Customer Service centre. Please submit the proof of purchase.
Symbols in the operating instructions
Danger
For an immediate danger which can lead to severe injuries or death.
Warning
For a possibly dangerous situation which could lead to severe injuries or death.
Caution
For a possibly dangerous situation which can lead to minor injuries or property damage.
Safety instructions
Danger of death
Violating these safety instructions may result in death through electrocution.
Check the power cord with mains plug for damage before every use. If the power cord is damaged, please arrange immediately for the exchange by an authorized customer service or a skilled electrician.
All electrical sockets should be fixed in an area that is protected against floods.
Unsuitable electrical extension cables can be hazardous. Only use electrical extension cables outdoors which have been approved and labelled for this purpose and have an adequate cable cross-section.
The mains plug and the coupling of an extension cable must be watertight and must never lie in water. Moreover, the coupling may never lie on the ground. The use of cable reels that ensure that the sockets are at least 60~mm above the ground is recommended.
- Do not use the power cord to carry/ transport the machine.
To separate the machine from the mains, pull the plug and not the power cord.
Do not scrape the power cord across sharp edges and ensure that it does not get pressed.
Install the appliance in a safe position at a place protected against flooding.
Do not operate the appliance continuously in rain or during humid weather.
The voltage indicated on the type plate must correspond to the voltage of the electrical source.
To avoid risks, all repairs and replacement of spare parts may only be carried out by the authorised customer service personnel.
The water in the pump heats up if there is no water supply or the pressure side is closed and can cause injury if it flows out!
The pump may be operated for maximum 3 minutes in this operating status.
- Do not use this pump as an immersion pump.
When using the pump near to pools, garden ponds or fountains, observe a minimum distance of 2m and safeguard the device against slipping into the water.
Follow the rules for electrical safety of equipment:
Only operate pumps near to pools, garden ponds or fountains, if they are equipped with an earth leakage circuit breaker with a nominal error current of max. 30mA . It is not permitted to activate the pump, if persons are in the pool or garden pond.
For safety reasons, we recommend that you operate the appliance only via a earth-leakage circuit breaker (max. 30 mA).
The electrical connection of the system may only be performed by a qualified electrician. Please follow the respective national regulations!
In Austria pumps to be used in swimming pools and garden ponds should be equipped with a fixed connection line according to OVE B/EN 60555 Part 1 to 3; power supply should be via a OVE-tested isolating transformer whereby the secondary nominal voltage should not exceed 230V .
This appliance is not intended for use by persons with limited physical, sensory or mental capacities or lacking experience and/or skills, unless such persons are accompanied and supervised by a person in charge of their safety or they have received precise instructions on the use of this appliance and have understood the resulting risks.
Children may only use this appliance if they are over the age of 8 and supervised by a person in charge of their safety, or if they have received instructions on the use of this appliance and have understood the resulting risks.
Children must not play with this appliance.
Supervise children to prevent them from playing with the appliance.
- Cleaning and user maintenance must not be performed by children without supervision.
Caution
Water that has been delivered with this appliance is no drinking water!
Prerequisites for the appliance's stability
Caution
Create stability for the appliance prior to any work on or with the appliance to prevent accidents or damage.
The stability of the appliance is warranted when it is placed onto an even surface.
Operation
Settings
With the ON/OFF switch the following three operating conditions can be switched:
| ON | Switch position I/On Continuous operation |
| OFF | Switch position 0/Off Off |
| AUTO | Switch position Auto Automatic mode |
System operation
In the automatic mode the house & garden pumps automatically maintain the pressure in the system. If the pressure falls below approx. 0.13 MPa (1.3 bar), the pump is started. The pump is running as long as the flow rate
is approx. 60l / h . If the withdrawal of water is completed, the pump goes into the stand-by mode after a short stopping time. The system is now under pressure. In case of water withdrawal and the resulting loss of pressure the pump starts again.

The ec!logic models do not consume energy in the stand-by mode (input power = 0W
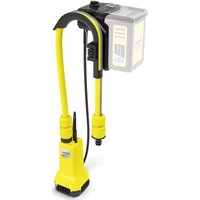
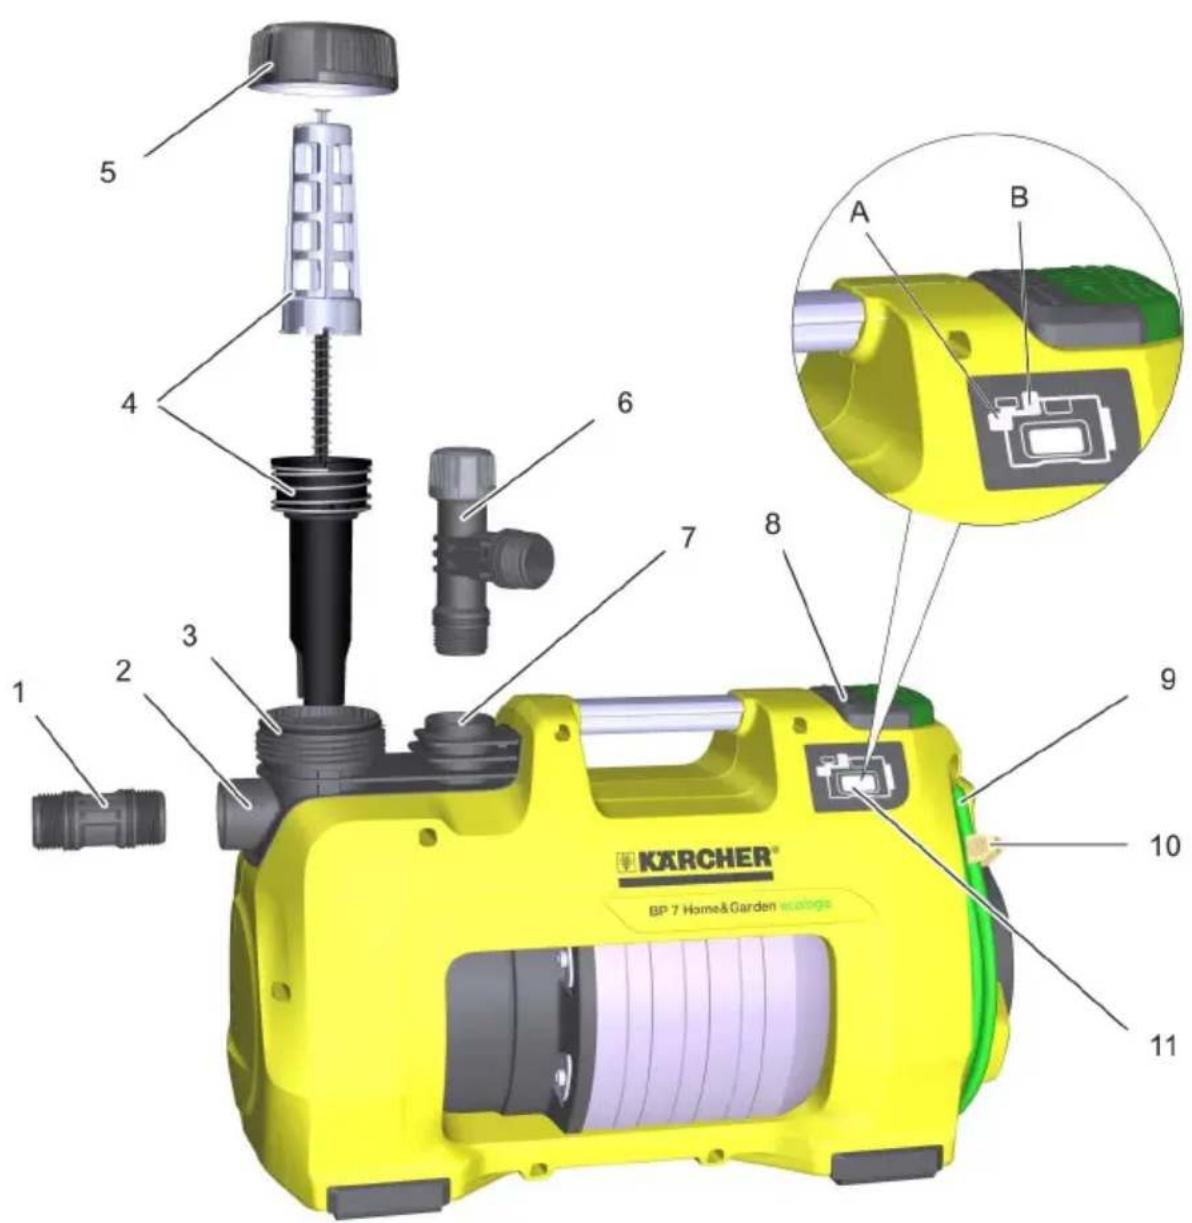
Description of the Appliance
1 Connection adapter for pumps G1
2 Connection G1 (33.3 mm) suction pipe (inlet)
3 Filling nozzle
4 Pre-filter and integrated check valve
5 Cover
6 2-way connection adapter for pumps G1
7 Connection G1 (33.3 mm) delivery line (output)
8 ON/OFF switch
9 Cable storage and mains cable with plug
10 Cable clip
11 Error display
A Error on suction side
B Error on delivery side
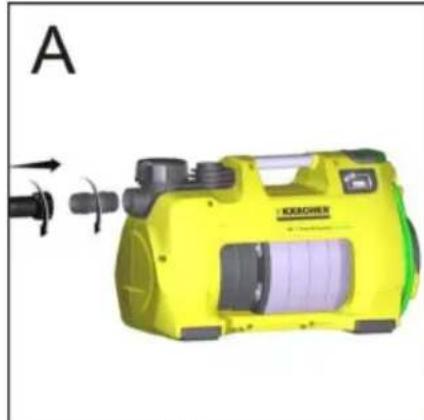
Preparing the Appliance
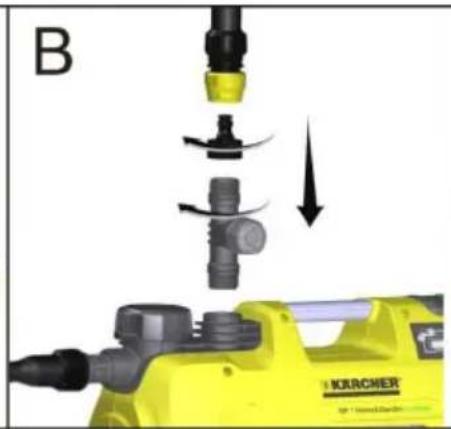
Illustration A
Screw the connection adapter in the suction connection of the pump (inlet). Tighten manually.
Connect the vacuum-proof suction hose.
Note
In order to reduce the time required for suction to start again, use a suction hose that is equipped with a backflow stop. This prevents the emptying of the suction hose after use (see accessories).
If sandy water is to be delivered, we strongly recommend the use of an additional prefilter (see optional accessories). Please install this filter on the suction side of the pump, between the suction hose and the pump.
Please use original Karcher suction pipes, filter components and hose connections. When using components of other manufacturers, malfunctions during drawing in the delivery fluid may arise, especially when using bayonet connection systems. Illustration
Screw the connection adapter in the delivery connection of the pump (outlet). Tighten manually.
Connect delivery line.
A garden hose with a minimum length of 5m at a diameter of 3 / 4'' or 15m at a diameter of 1 / 2'' is recommended.
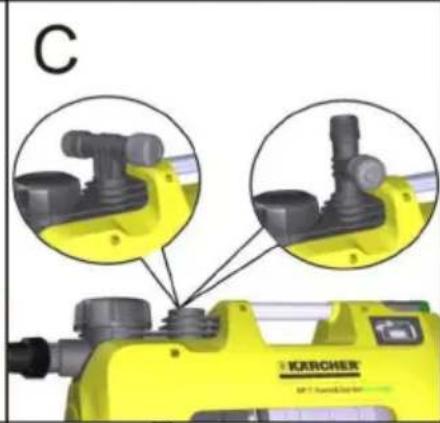
Illustration C
The 2-way adapter allows the simultaneous operation of two appliances (e.g. washing machine or sprinkler). It can be mounted in a way that either both outlets are used at the side or one outlet at the side and one outlet at the top. If only one outlet is used, the outlet that is not required can be closed by means of the accompanying closing cap.
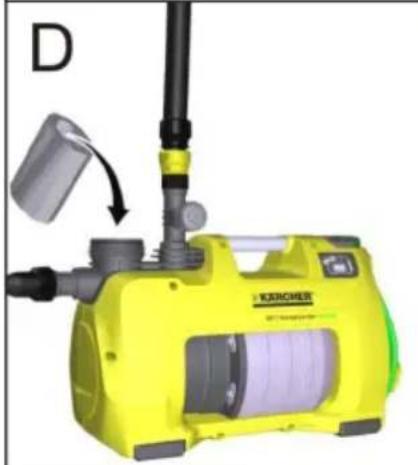
Illustration D
Unscrew the lid of the filler neck and fill in water up to the brim.
→ Manually screw the lid all the way to the stop on the filler neck.
Open existing shutoff valves in the pressure pipe.
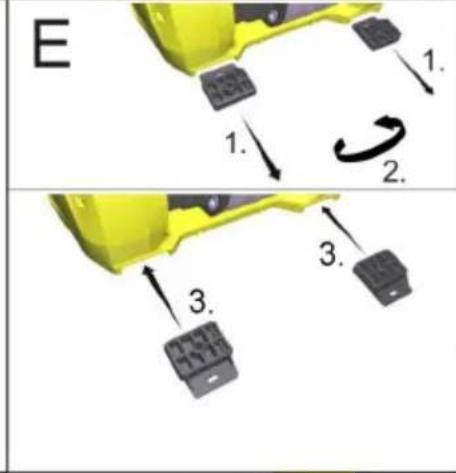
Permanent installation
With a permanent installation the pump can be screwed onto a suitable surface.
Illustration E
Pull out and turn the rubber feet on both sides of the casing.
Reinsert the rubber feed into the casing.
Use suitable screws to screw it onto a level surface.
In case of a permanent installation the installation of a flexible component such as a flexible pressure compensating hose (see optional accessories) on the pressure side is recommended. This has the following benefits:
More flexibility during set-up and installation.
- Noise reduction, since no vibrations are transferred to pipes.
In case of small leaks, the pump does not switch as often.
Note
To facilitate subsequent emptying and pressure release of the system, we recommend the installation of a stop-cock between pump and pressure line.
(not included in delivery)
By closing the shut-off valve when emptying the pump you can prevent water from escaping from the pressure line.
Operation
Insert the mains plug into the socket.
Switch on the appliance using the ON/OFF switch.
Optimum convenience with operation in the automatic mode.
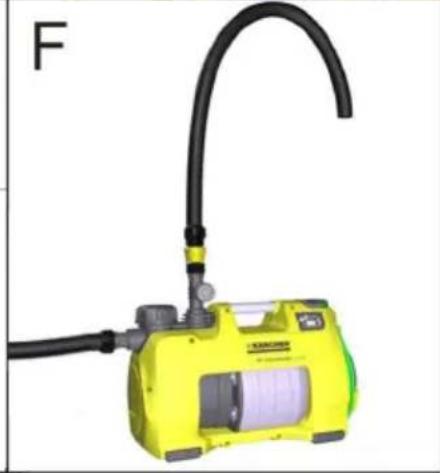
Illustration F
In order to reduce the suction time, lift the delivery hose approx. 1m.
Wait till the pump sucks in and transports water uniformly
Note
The ON/OFF switch can also be conveniently operated with your foot.
Caution
Dry running damages the pump.
Do not leave the pump unattended during operation.
Note
In the automatic mode the pump switches off at a flow rate of < 60~l/h .
Caution
Lacking water supply is recognised by the appliance. If no water is drawn and delivered within 4 minutes during start-up in the manual mode or within 1 minute in the automatic mode, the pump shuts off. The LED "Error on the suction side" is illuminated on the display.
Finish operation
Switch off the appliance using the On/Off switch.
Disconnect the main plug from the socket.
Maintenance and Care
Danger
Turn off the appliance and remove the mains plug prior to any care and maintenance works.
Care
Open the connected shutoff valves to relief pressure and reclose them. The system is free of pressure.
Rinse the pump after every use if you use to transport water with additives.
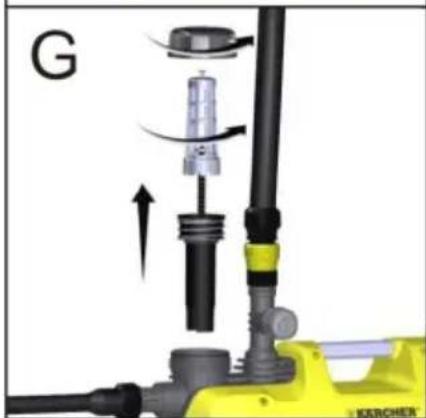
Check pre-filter regularly for dirt. If it is visibly dirty, proceed as follows:
Illustration 6
Unscrew the lid of the filling nozzle.
Remove the pre-filter and the built in backflow valve and clean them under flowing water.
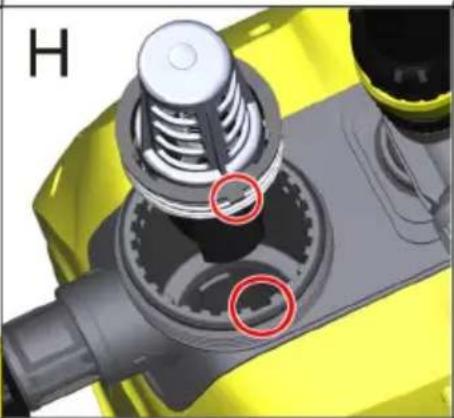
Illustration H
When inserting the pre-filter (with check valve) in the filler neck, mind the correct installation position (notch).
Maintenance
The appliance is maintenance free.
Transport
Caution
In order to prevent accidents or injuries, mind the weight of the appliance during transport (see technical data).
When transporting by hand
Lift appliance by the carrying handle and carry it.
Caution
Tripping hazard due to loose cables!
Coil cable onto the cable holder and secure it by means of a cable clip.
When transporting in vehicles
Secure the appliance against shifting and tipping over.
Storage
Caution
In order to prevent accidents or injuries, mind the weight of the appliance when choosing the storage location (see technical data).
Storing the Appliance
Depressurise the appliance by opening the water outlet connected on the delivery side (e.g. opening the tap).
Drain hoses.
Remove suction pipe and delivery line. Illustration
Unscrew the lid of the filling nozzle.
Remove the pre-filter and the built in backflow valve and clean them under flowing water.
Empty the pump over the filler neck by turning it around.
Store the appliance in a frost free area.
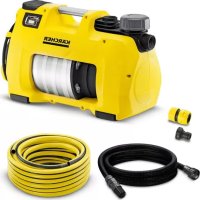
Special accessories
The figures of the following special accessories can be found on page 4 of these instructions.
| 6.997-344.0 | Pump pre-filter, large (flow rate up to 6,000 l/h) | Pump pre-filter for all common pumps without integrated filters. To protect the pump against coarse dirt particles or sand. The fine filter can be washed. For pumps with G1 (33.3 mm) connection thread. |
| 6.997-350.0 | Suction assembly 3.5 m, 3/4" | Completely ready for connection, vacuum-proof spiral hose with suction filter and backflow stop. Can also be used as an extension for the suction hose. For pumps with G1 (33.3 mm) connection thread. |
| 6.997-349.0 | Suction assembly 7.0 m, 3/4" | |
| 6.997-348.0 | Suction hose 3.5 m, 3/4" | Completely ready for connection, vacuum-proof spiral hose for direct connection to the pump. To extend the suction assembly or for use with suction filters. For pumps with G1 (33.3 mm) connection thread. |
| 6.997-359.0 | Pump connection G1 (33.3 mm) incl. Check valve | Vacuum-resistant connection of the hoses to the pump. For pumps with G1 (33.3 mm) connection thread and 3/4" as well as 1" hoses, including union nut, hose clamp, flat packing and check valve. |
| 6.997-347.0 | Vacuum-proof spiral hose, yard goods, 25 m, 3/4" | Vacuum-proof spiral hose. Yard goods for cutting hoses to individual lengths. When combined with the Kärcher connection pieces and the Kärcher suction filters, it can be used as an individual suction assembly. |
| 6.997-346.0 | Vacuum-proof spiral hose, yard goods, 25 m, 1" | |
| 6.997-345.0 | Suction filter Basic 3/4"(19 mm) | To be connected to the suction hose yard goods. The backflow stop prevents the return flow of the delivered water and thus reduces the time required for suction to start again. Including hose clamp. |
| 6.997-342.0 | Suction filter with backflow stop, basic, 1" | |
| 6.997-341.0 | Suction filter with backflow stop, pre-mium | To be connected to the suction hose meter length. The backflow stop prevents the return flow of the transported water and thus shortens the re-suction time. Durable metal/plastic construction. Suitable for 3/4" (19 mm) and 1" (25.4 mm) hoses. Including hose clamp. |
| 6.997-360.0 | Suction hose for pipes 0.5 m, 3/4" | Vacuum-tight hose to reduce noise with fixed installations. 1"(25.4 mm) hose with threaded connection G1(33.3 mm) on both ends. Caution: The suction hose may not be used as a pressure hose. |
| 2.645-007.0/2.645-066.0 | G1 tap connection with G3/4 reducer | Particularly sturdy tap connection. Reducer allows the connection to 2 thread sizes. |
| 6.997-340.0 | Connection kit Pre-mium | For the connection of 3/4" (19 mm) water hoses to pumps with G1 (33.3 mm) connection threads. For increased water flow. |
| 2.645-193.0/2.645-203.0 | Universal hose coupling Plus, for 1/2", 5/8" and 3/4" hoses | Recessed grips made of soft plastic ensure easy handling. Universally useable for all common garden hoses. |
| 2.645-148.0 | Hose PrimoFlex plus, 25 m, 3/4" | Phthalate-free 3/4" garden hose for connecting the pump with the application equipment. |
| 6.997-417.0 | Pressure compensating hose 3/4" (19mm), 1m | Connecting hose for the pressure compensation in the domestic water supply system. To connect the pump to rigid pipe line systems. Furthermore, the internal storage volume in the hose prevents frequent switching on and off of the pump. G1 (33.3 mm) connection thread. |
Troubleshooting
Caution
To avoid risks, all repairs and replacement of spare parts may only be carried out by the authorised customer service personnel.
Prior to all work on the appliance, switch off the appliance and pull the power plug.
| Fault Cause Remedy | ||
| Pump runs but does not transport | Air in the pump see Chapter | pter "Preparation" Fig. A to D and Chapter "Operation" |
| Suction pipe blocked switch | itch off the pump, pull the mains plug and clean the intake area. | |
| Pre-filter is dirty Switch | ff the pump, pull the mains plug, allow the pump to cool down, clean intake area, prevent dry running. Remove the pre-filter and the check valve and clean it under running water, flush dirt residues from the bottom of the filler neck through the filler hole if necessary. Restart by switching the pump back on. | |
| Suction hose or connection adapter not screwed in correctly or completely. | Check whether all seals have been installed and are seated correctly prior to assembly. Manually tighten the suction hose and the connection adapter. | |
| Pump does not run or suddenly comes to a standstill during operations | Power supply interrupted | Check fuses and electrical connections |
| Pre-filter is dirty Remove | the pre-filter and the check valve and clean it under running water, flush dirt residues from the bottom of the filler neck through the filler hole if necessary. | |
| The appliance is in the automatic mode. Pressure in the system > 1.3 bar. | The pump automatically switches back on as soon as the pressure in the system falls below 1.3 bar. Even after switching it off an back on the appliance does not start in the automatic mode if there is an internal pressure of more than 1.3 bar. | |
| Fault Cause Remedy Pump stops, LED "Er- ror on suction side" is illuminated. | Failure on the suction side, pressure cannot build up | Switch off the pump and pull the power plug. Remove the pre-filter and the check valve and clean it under running water, flush dirt residues from the bottom of the filler neck through the filler hole if necessary. Restart by switching the pump back on. |
| Check connections on the suction side for leakage. Restart by switching the pump back on. | ||
| Check if there is sufficient water in the suction container (e.g. cistern). | ||
| Flow rate very low -> the dry run protection has switched off the pump. | Check if there is sufficient water in the suction container (e.g. cistern). | |
| Automatic mode: Pump stops, LED "Er- ror on delivery side" is illuminated. | Failure in the pressure line, the pump frequently switches on and off as a result of leakage. | Check and correct the pressure line for leakages (dripping water tap). Restart by switching the pump back on. |
| Error on delivery side. The pressure is too low after shutdown of the pump, the appliance starts again immediately and thus switches on and off frequently. | There is no sufficient elastic volume avail- able on the delivery side. Use a garden hose with a minimum length of 5 m at a diameter of 3/4" or 15 m at a di- ameter of 1/2" for garden applications. Install a pressure compensating hose on the delivery side between the pump and the piping with permanent installation. Restart by switching the pump back on. | |
| Continuous oper- tion: Pump stops, LED "Er- ror on delivery side" is illuminated. | The appliance works for at least four minutes, al- though the outlet on the delivery side (e.g. tap) is closed. Overheating protection switches off the appli- ance. | Pull out the mains plug. Depressurise the appliance by opening the water outlet connected on the delivery side. Restart by switching the pump back on. |
| Fault Cause Remedy | ||
| Pump transports is reducing or transported quantity is too low | Suction pipe blocked Switch | itch off the pump, pull the mains plug and clean the intake area. |
| Pre-filter is dirty Remove | the pre-filter and the check valve and clean it under running water, flush dirt residues from the bottom of the filler neck through the filler hole if necessary. | |
| Suction side is leaky Check | heck the entire suction side for leaks | |
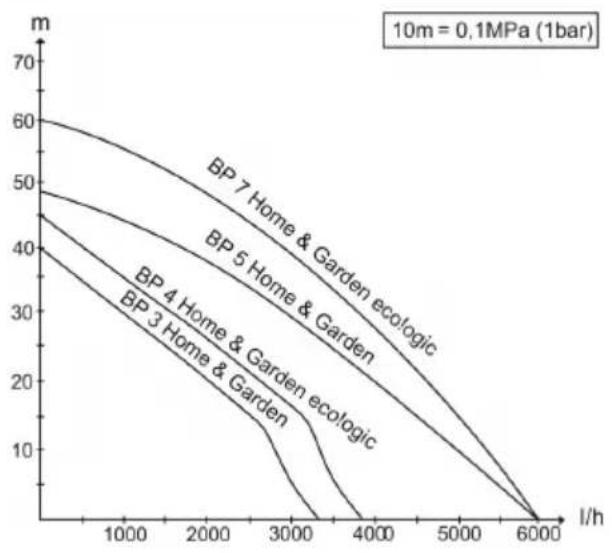
| The quantity transported by the pump depends on the transport height and the connected periphery | Keep max. flow height, see technical data. If necessary, select a different hose diameter or hose length. | |
| Cross section on the delivery side constricted, e.g. due to valve/ball valve that is not completely opened. | Completely open the valve/ball valve. | |
| Hose on the delivery side is kinked. | Remove kinks from the hose. |
Our Kärcher branch will be pleased to help you further in the case of questions or faults. See address on the reverse.
Notes on the operation
| Irrigation House | hold water supply | Irrigation & house- hold water supply | ||
| BP 3 Home & Garden 500 | m | 2 max. 8 per | persons max. 300 m | 2 + 4 persons max. |
| BP 4 Home & Garden ecologic | 800 m2max. 10 | persons max. 600 m | 2 + 4 persons max. | |
| BP 5 Home & Garden 10 | 00 m | 2 max. 12 | persons max. 800 m | 2 + 4 persons max. |
| BP 7 Home & Garden ecologic | 1200 m2max. 12 | persons max. 900 m | 2 + 4 persons max. | |
Technical specifications
| Voltage V 230 - 240 230 | 0 - 240 | BP 3 Home & Garden 230 - 240 230 | BP 4 Home & Garden eco!logic - 240 | BP 5 Home & Garden | BP 7 Home & Garden eco!logic |
| Frequency Hz 50 50 50 | 50 | ||||
| Output Pnom | W 800 | 950 1000 1200 | |||
| Max. flow rate* l/h 3300 | 3800 | 6000 6000 | |||
| Max. Suction height m | 8 8 | 8 | 8 | ||
| Max. pressure | MPa(bar) | 0,40(4,0) | 0,45(4,5) | 0,48(4,8) | 0,60(6,0) |
| Max. flow height | m | 40 45 48 | 60 | ||
| Max. grain size of the dirt particles that can be transported | mm | 1 | 1 | 1 | 1 |
| Pump type | Jet | Jet 4 levels | 5 levels | ||
| Values determined as per EN ISO 20361 | |||||
| Sound pressure level LpA | dB(A) | 61 63 61 | 61 | ||
| Sound power level LWA, guaranteed | dB(A) | 76 78 77 | 76 | ||
| Weight (without accessories) | kg 10,3 | 10,6 | 12,5 13,0 | ||
| LED class 1 as per EN 60825-1 | |||||
Subject to technical modifications!
*The max. flow rate is derived from the
measurement without the backflow valve
installed.
BP HOME & GARDEN
The possible delivery rate is even larger:
- the smaller the suction and delivery heights are.
- the larger the diameter of the hoses used are.
- the shorter the hoses used are.
- the less loss of pressure is caused by the connected accessories.
EC Declaration of Conformity
We hereby declare that the machine described below complies with the relevant basic safety and health requirements of the EU Directives, both in its basic design and construction as well as in the version put into circulation by us. This declaration shall cease to be valid if the machine is modified without our prior approval.
Product: Pump
Type: 1.645-xxx
Relevant EU Directives
2006/95/EEC
2004/108/EC
2000/14/EC
2011/65/EU
Applied harmonized standards
EN 55014-1: 2006+A1: 2009+A2: 2011
EN 55014-2: 1997+A1: 2001+A2: 2008
EN 60335-1
EN 60335-2-41
EN 61000-3-2: 2006+A1: 2009+A2: 2009
EN 61000-3-3:2008
EN 62233: 2008
EN 50581
Applied conformity evaluation method
2000/14/EC: Appendix V
BP3 G, BP3 G Set +,BP3 H&G
Measured: 73
Guaranteed: 76
BP4 H&G eco
Measured: 75
Guaranteed: 78
BP5 H&G
Measured: 74
Guaranteed: 77
BP7 H&G eco
Measured: 73
Guaranteed: 76
The undersigned act on behalf and under the power of attorney of the company management.

CEO
Head of Appropriation
Authorised Documentation Representative S. Reiser
71364 Winnenden (Germany)
Phone: +49 7195 14-0
Fax: +49 7195 14-2212
Table des matieres
Consignes generales . FR .1
www.kaercher.com/REACH
Garantie

CEO
Head of Approbation
Responsible de la documentation:
S. Reiser
71364 Winnenden (Germany)
Telephone: +49 7195 14-0
www.kaercher.com/REACH
Garanzia
71364 Winnenden (Germany)
Tel.: +49 7195 14-0
Fax: +49 7195 14-2212
Inhoud
www.kaercher.com/REACH
Garantie
Head of Appropriation
71364 Winnenden (Germany)
Tel.: +49 7195 14-0
Fax: +49 7195 14-2212
Índice de contentsos
www.kaercher.com/REACH
Garantia
71364 Winnenden (Germany)
Tele.: +49 7195 14-0
Fax: +49 7195 14-2212
Indices
www.kaercher.com/REACH
Garantia
71364 Winnenden (Germany)
Tel.: +49 7195 14-0
Fax: +49 7195 14-2212
www.kaercher.com/REACH
Eyyúnón
71364 Winnenden (Germany)
Tnλ.: +49 7195 14-0
: +49719514-2212
Içindekiler
Genel bilgiler TR.1
www.kaercher.com/REACH
Garanti
71364 Winnenden (Germany)
Tel.: +49 7195 14-0
http://www.kaercher.com/dealersearch

71364 Winnenden (Germany)
Tel.: +49 7195 14-0
Fax: +49 7195 14-2212