
VIX 633 C E - Cooker INDESIT - Free user manual and instructions
Find the device manual for free VIX 633 C E INDESIT in PDF.
User questions about VIX 633 C E INDESIT
0 question about this device. Answer the ones you know or ask your own.
Ask a new question about this device
Download the instructions for your Cooker in PDF format for free! Find your manual VIX 633 C E - INDESIT and take your electronic device back in hand. On this page are published all the documents necessary for the use of your device. VIX 633 C E by INDESIT.
USER MANUAL VIX 633 C E INDESIT
Operating Instructions
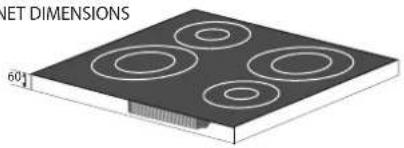
HOB
Contents
Operating Instructions,1
WARNING,2
Description of the appliance-Control Panel,3
Installation,3
Start-up and use,5
Precautions and tips, 10
Care and maintenance, 11
Technical description of the models,11
Français
- WARNING: The appliance and its accessible parts become hot during use.
- Care should be taken to avoid touching heating elements.
Children less than 8 years of age shall be kept away unless continuously supervised. - This appliance can be used by children aged from 8 years and above and persons with reduced physical, sensory or mental capabilities or lack of experience and knowledge if they have been given supervision or instruction concerning use of the appliance in a safe way and understand the hazards involved. Children shall not play with the appliance. Cleaning and user maintenance shall not be made by children without supervision.
WARNING: Unattended cooking on a hob with fat or oil can be dangerous and may result in fire. - NEVER try to extinguish a fire with water, but switch off the appliance and then cover flame e.g. with a lid or a fire blanket.
- WARNING: Danger of fire: do not store items on the cooking surfaces.
- WARNING: If the surface in glass-ceramic is cracked, switch off the appliance to avoid the possibility of electric shock.
- Never use steam cleaners or pressure cleaners on the appliance.
- The appliance is not intended to be operated by means of an external timer or separate remote control system.
- Do not place metal objects (knives, spoons, pan lids, etc.) on the hob as they may become hot.
After use, switch off the hob element by its control and do not rely on the pan detector.
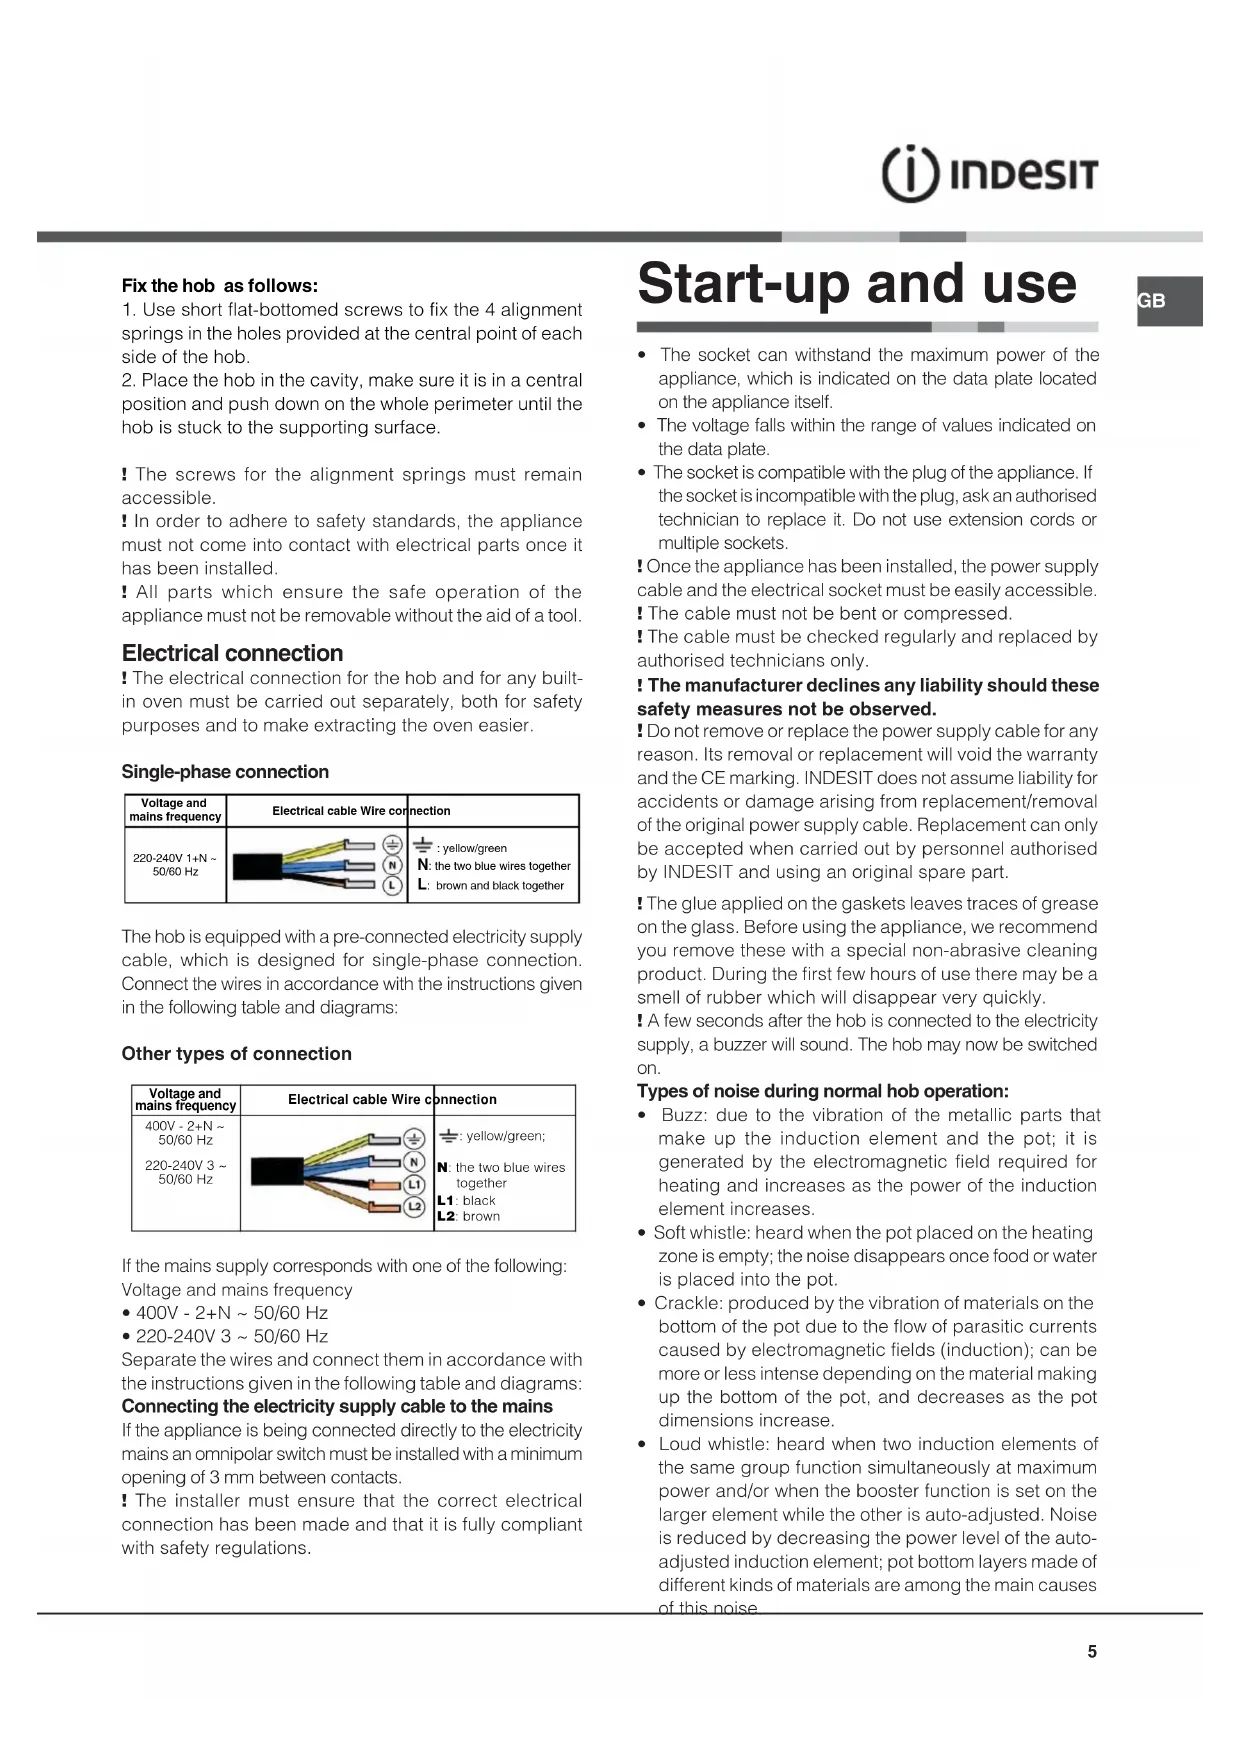
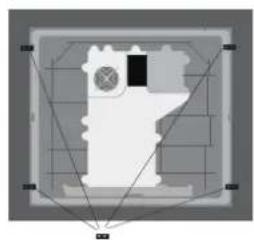
Description of the appliance Control panel
The control panel described in this manual is only a representative example: it may not exactly match the panelon your appliance.
When using the touch control pannel panel:
- Do not use gloves
- Use a clean finger
- Touch the glass smoothly
1 INCREASE (+) REDUCE(-) POWER button - controls the power level on every individual cooking zone
2 INCREASE (+) REDUCE(-) TIME button -controls the time of cooking on the cooking zones.
3 COOKING ZONE POWER displays -show the power level selected for every individual cooking zone
4 ON/OFF button switches the appliance on and off.
5 CONTROL PANEL LOCK button prevents accidental changes to the hob settings and shows the control panel has been locked
6. TIMER display-shows the cookig time selected.
! For detailed information on the control panel functions refer to "Start-up and use" section.
! This product complies with the requirements of the latest European Directive on the limitation of power consumption of the standby mode. If no operations are carried out for a period of 2 minutes, after the residual heat indicator lights turn off and the fan stops (if present), the appliance automatically switches to the .off mode.. The appliance resumes the operating mode once the ON/OFF button is pressed.
! Depending on the number of heaters/cooking zones on the hob the COOKING ZONE SELECTED INDICATORS may vary between 3 and 4
Installation
! Before operating your new appliance please read this instruction booklet carefully. It contains important information concerning the safe operation, installation and maintenance of the appliance.
Please keep these operating instructions for future reference. Pass them on to any new owners of the appliance.
Positioning
! Keep all packaging material out of the reach of children. It may present a choking or suffocation hazard (see Precautions and tips).
! The appliance must be installed by a qualified professional in accordance with the instructions provided. Incorrect installation may cause harm to people and animals or may damage property.
Built-in appliance
Use a suitable cabinet to ensure that the appliance functions properly.
- The supporting surface must be heat-resistant up to a temperature of approximately 100^ .
- If the appliance is to be installed above an oven, the oven must be equipped with a forced ventilation cooling system.
- Avoid installing the hob above a dishwasher: if this cannot be avoided, place a waterproof separation device between the two appliances.
Ventilation
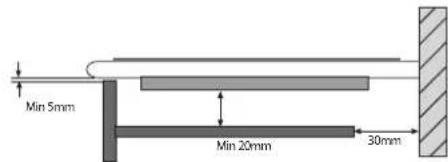
To allow adequate ventilation and to avoid overheating of the surrounding surfaces the hob should be positioned as follows:
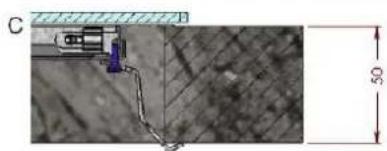
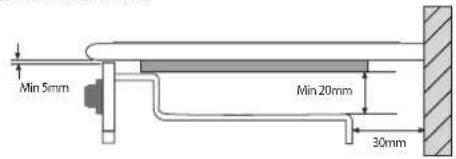
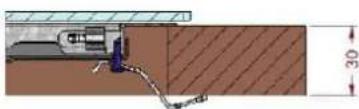
- At a minimum distance of 40mm from the back panel or any other vertical surfaces.
- So that a minimum distance of 20mm is maintained between the installation cavity and the cabinet underneath.
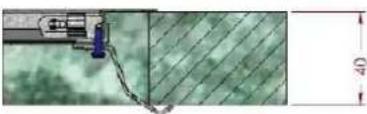
- Kitchen cabinets adjacent to the appliance and taller than the top of the hob must be at least 450mm from the edge of the hob.
Fixing
The appliance must be installed on a perfectly level supporting surface. Any deformities caused by improper fixing could affect the features and operation of the hob. The thickness of the supporting surface should be taken into account when choosing the length of the screws for the fixing hooks:
- 3,5 mm thick: 9,5 mm screws
GB
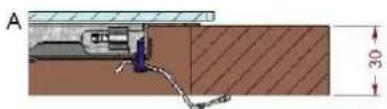
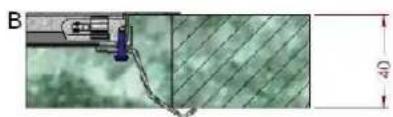
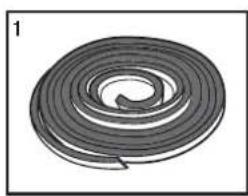
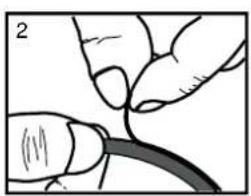
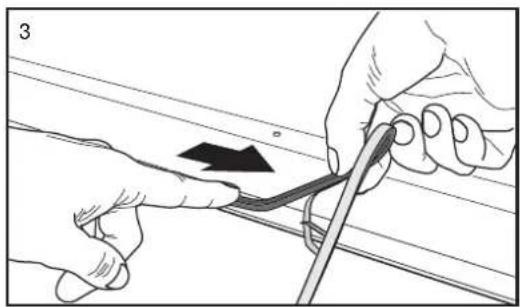
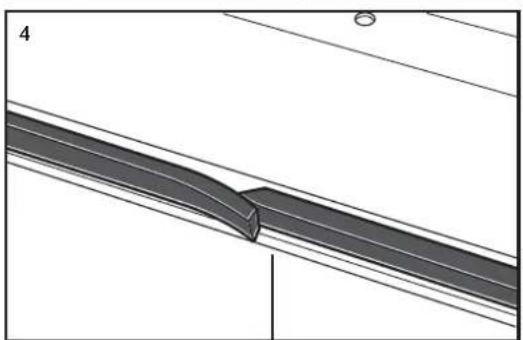
Installation of the safety washer

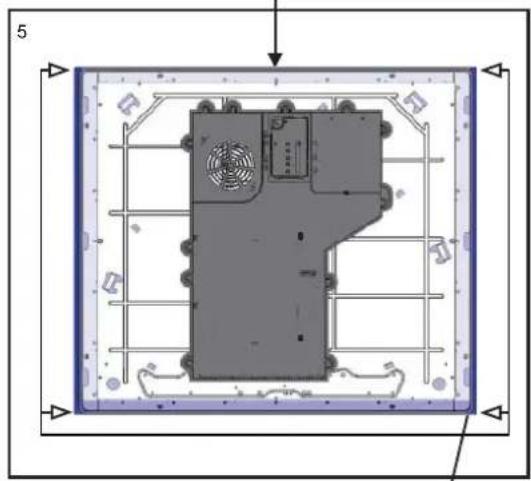

SAFETY DISTANCES WITH FURNITURE

Fix the hob as follows:
- Use short flat-bottomed screws to fix the 4 alignment springs in the holes provided at the central point of each side of the hob.
- Place the hob in the cavity, make sure it is in a central position and push down on the whole perimeter until the hob is stuck to the supporting surface.
! The screws for the alignment springs must remain accessible.
! In order to adhere to safety standards, the appliance must not come into contact with electrical parts once it has been installed.
! All parts which ensure the safe operation of the appliance must not be removable without the aid of a tool.
Electrical connection
! The electrical connection for the hob and for any built-in oven must be carried out separately, both for safety purposes and to make extracting the oven easier.
Single-phase connection
| Voltage and mains frequency | Electrical cable Wire connection | |
| 220-240V 1+N ~ 50/60 Hz | N L | yellow/green N: the two blue wires together L: brown and black together |
The hob is equipped with a pre-connected electricity supply cable, which is designed for single-phase connection. Connect the wires in accordance with the instructions given in the following table and diagrams:
Other types of connection
| Voltage and mains frequency | Electrical cable Wire c | connction |
| 400V - 2+N ~ 50/60 Hz 220-240V 3 ~ 50/60 Hz | yellow/green; N: the two blue wires together L1: black L2: brown |
If the mains supply corresponds with one of the following: Voltage and mains frequency
- 400V - 2+N ~ 50/60 Hz
- 220-240V 3 ~ 50/60 Hz
Separate the wires and connect them in accordance with the instructions given in the following table and diagrams:
Connecting the electricity supply cable to the mains
If the appliance is being connected directly to the electricity mains an omnipolar switch must be installed with a minimum opening of 3mm between contacts.
! The installer must ensure that the correct electrical connection has been made and that it is fully compliant with safety regulations.
Start-up and use
- The socket can withstand the maximum power of the appliance, which is indicated on the data plate located on the appliance itself.
- The voltage falls within the range of values indicated on the data plate.
- The socket is compatible with the plug of the appliance. If the socket is incompatible with the plug, ask an authorised technician to replace it. Do not use extension cords or multiple sockets.
!Once the appliance has been installed, the power supply cable and the electrical socket must be easily accessible.
! The cable must not be bent or compressed.
! The cable must be checked regularly and replaced by authorised technicians only.
! The manufacturer declines any liability should these safety measures not be observed.
Do not remove or replace the power supply cable for any reason. Its removal or replacement will void the warranty and the CE marking. INDESIT does not assume liability for accidents or damage arising from replacement/removal of the original power supply cable. Replacement can only be accepted when carried out by personnel authorised by INDESIT and using an original spare part.
! The glue applied on the gaskets leaves traces of grease on the glass. Before using the appliance, we recommend you remove these with a special non-abrasive cleaning product. During the first few hours of use there may be a smell of rubber which will disappear very quickly.
! A few seconds after the hob is connected to the electricity supply, a buzzer will sound. The hob may now be switched on.
Types of noise during normal hob operation:
- Buzz: due to the vibration of the metallic parts that make up the induction element and the pot; it is generated by the electromagnetic field required for heating and increases as the power of the induction element increases.
- Soft whistle: heard when the pot placed on the heating zone is empty; the noise disappears once food or water is placed into the pot.
- Crackle: produced by the vibration of materials on the bottom of the pot due to the flow of parasitic currents caused by electromagnetic fields (induction); can be more or less intense depending on the material making up the bottom of the pot, and decreases as the pot dimensions increase.
-
Loud whistle: heard when two induction elements of the same group function simultaneously at maximum power and/or when the booster function is set on the larger element while the other is auto-adjusted. Noise is reduced by decreasing the power level of the auto-adjusted induction element; pot bottom layers made of different kinds of materials are among the main causes of this noise.
-
Fan noise: a fan is necessary to ensure the hob functions correctly and to safeguard the electronic unit from possible overheating. The fan functions at maximum power when the large induction element is at maximum power or when the booster function is on; in all other cases, it works at average power depending on the temperature detected. Furthermore, the fan may continue to work even after switching the hob off, if the temperature detected is high. The types of noise listed above are due to induction technology and are not necessarily operational faults.
! If the (-) or (+) button is pressed for an extended period of time, the display scrolls quickly though the power levels and timer minutes.
Initial Light Conditions
When power is initially applied to the Cooktop, the touch control conducts a calibration process for the touch keys, which requires a low level of ambient light in the area of the touch keys.
If during this calibration process excessive ambient lighting is detected the User Interface displays "FL" (Infrared Ambient Light Error) and the control calibration process is suspended. In order to rectify the process any lighting that could effect the calibration process should be switched off (e.g. halogen cooker hood lighting). The error will disappear when satisfactory ambient lighting is detected and the touch control calibration procedure will now complete satisfactorily.
- The "FL" error can only be generated within approx 3s of initial power being applied to the cooktop.
-We recommend that the user switches off all cooker hood lighting and lighting directed towards the cooktop when power is initially applied to the cooktop.
-After the touch control has conducted its initial calibration process, (approx 3s) any cooker hood or other lighting can be switched on as normal and will not affect the operation of the touch control.
Switching on the hob
When power is initially applied to the Cooktop, the touch control conducts a calibration process for the touch keys, which requires a low level of ambient light in the area of the touch keys. If excessive ambient lighting is detected, the User Interface displays "FL" error and the calibration is suspended. The error will disappear when satisfactory ambient lighting is detected and the touch control calibration procedure will now complete satisfactorily
After connecting the hob to the electrical grid, the touch pannel might be automatically locked. To unlock the pannel press and hold the Control Panel

To switch the hob on, press and hold the button for approximately one second.
The cooktop is switched On when a beep sound is emitted and the cooking zones display shows the "0"
When the cooktop is off, after 5 sec. without any error/ alarm or residual heat to display, the control switches
off the (KEYLOCK LED) in order to reduce power consumption. As soon as we touch a key, the (KEYLOCK
LED) goes on and we can continue to operate as usual.
Switching off the cooktop is signalled by 3 beep sound.
Setting the Power Management
The Cooktop maximum power limit (7200W) can be reduced by the user to 2800W, 3500W or 6000W (ECO Power Limits).
The sequence to set a new Cooktop Power Limit is:
- During the first 30 seconds after plugging the appliance
The Touch has to be unlocked and all Heaters Off
- Press at the same time the left and right end heaters [+] and [-] keys.
Once this is done, a beep sounds and "Po" characters will be in the timer displays and the "actual Cooktop Power Limit" will be in the left and right end heater displays.
For selecting a new Power Limit:
With the (+) and (-) keys, the Power Limit is increased. The selectable powers are: 2800W, 3500W, 6000W or 7200W. When the power is 7200W, if the [+] or [-] key is touched the power changes to 2800W.
The sequence to finish recording the new Cooktop Power Limit is:
- Press at the same time the left and right end heaters [+] and [-] keys.
Once this is done, new Cooktop Power Limit is recorded and there is a system reset.
To finish without recording changes:
If during 60 seconds there is no action, changes are not recorded and there is a system reset.
Switching on the cooking zones
Each cooking zone is switched on and controlled using the (-) and (+) POWER buttons, which at the same time are used for power adjustment.
- To begin operating a cooking zone, set the desired power level (between 0 and 9) using the (-) and (+) POWER buttons
Press and hold the (-) POWER button to set the power level immediately at "9"
Press and hold (+) and (-) POWER buttons simultaneously to return to power level "0"
If the power level is "0" press and hold the (+) button to increase the power level quickly.
* Only available in certain models.
Fast Boil- "Booster" function
The booster function for some of the cooking zones may be used to shorten heating-up times.
It may be activated by pressing the (+) POWER button over level 9. This function boosts the power to 1600 W or 2000 W, depending on the size of the relevant cooking zone. The activation of of the booster is signalled by a beep sound, and the letter 'P' appearing on the display corresponding to the selected cooking zone
The booster works for max 10 minutes. After these 10 minutes a beep sounds and the cooking zone will return to level "9"
With the heater at Booster level, if the [+] key is Touched an error beep sounds and the cookset doesn't change. With the heater at Booster level, if the [-] key is Touched a beep sounds and the cookset is reduced to 9.
Switching off the cooking zones
To switch off a cooking zone touch(-)and (+) POWER selection buttons simultaneously.
A beep sounds and the corresponding display shows "0".
Using the Timer
!All the cooking zones can be programmed for a cooking time duration between 1 and 99 min.
1 Activate the timer by pressing the INCREASE/REDUCE TIME buttons. A beep sounds, the timer display shows a "00" and the cooking zone displays show a "t" blinking indicating that a cooking zone has to be selected.
2 Select the desired cooking zone by pressing any of the cooking zones (+) or (-) keys. A beep sounds, the LED next to the cooking zone display starts blinking if no power is selected, or is on if any power is selected. The timer display starts blinking indicating that the time has to be selected
3. Set the desired cooking time by pressing again the INCREASE / REDUCE TIME buttons.
! The user can select only one heater at a time. !Pressing and holding the (+) and (-) keys increase the speed of time selection.
! If the time is not selected before 10 seconds, the timer is switched off.
! If the selected time is "00" after 10 seconds the timer is switched off.
Starting Timer countdown.
The countdown starts 10 seconds after the last operation over the INCREASE (+)/REDUCE(-) TIME buttons. If any power is selected, a beep sounds and the timer display stops blinking. The same happens to the led heater.
The last minute will be displayed in seconds.
! When the timer is in countdown the user can change the time at any time by touching the INCREASE / REDUCE TIME buttons. Then the countdown stops and the timer changes to time selection status waiting a time selection.
End of Timer countdown.
When the time set on the timer has elapsed the timed heater is switched off, the timer display and the timed heater led starts blinking and a timer alarm beep sounds for one minute. The timer alarm can be cancelled by the user at any time, even during the first minute of the alarm. When the timer is in alarm status, by pressing any key of the touch control the timer is switched off.
! To cancel the operation of the timer, select the time value of "00"pressing the (+) and(-) TIME buttons at the same time.
! When all the cooking zones are not powered, and one of them is temporized at zero power level, the key-lock function is activated after 1 minute.
Control panel lock
When the hob is switched on, it is possible to lock the oven controls in order to avoid accidental changes being made to the settings (by children, during cleaning, etc.).
Press the button to lock the control panel: -the icon will illuminate and an audible beep sound will be emitted. To use any of the controls (e.g. to stop cooking), you
must switch off this function. Press the button for a few moments, the icon will stop illuminating and the lock function will be removed.
All the keys on the cooking zone selection will be locked if :the cooktop is off, if the Control Panel Lock is activated or if an error on a cooktop occurs..
Switching off the hob
Press the button switch off the appliance - do not rely solely on the pan sensor.
If the control panel lock has been activated, the controls will continue to be locked even after the hob is switched on again. In order to switch the hob on again, you must first remove the lock function.
Practical advice on using the appliance
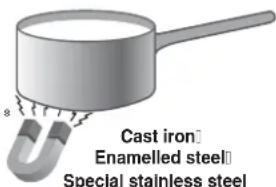
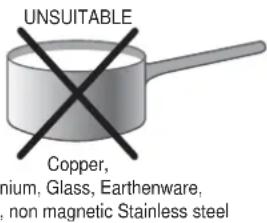
! Use cookware made from materials which are compatible with the induction principle (ferromagnetic material). We especially recommend pans made from: cast iron, coated steel or special stainless steel adapted for induction. Use a magnet to test the compatibility of the cookware.
SUITABLE
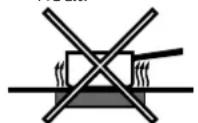
! Do not use adapters, diffusers, or metal plates on the cooking zones .They may have a detrimental effect upon the hob's performance, and might damage the hob's aesthetics.
In addition, to obtain the best results from your hob:
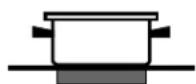
- Use pans with a thick, flat base in order to fully utilise the cooking zone.
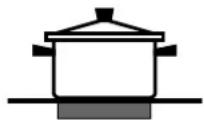
- Always use pans with a diameter which is large enough to cover the hotplate fully, in order to use all the available heat.
- Make sure that the base of the cookware is always clean and dry, in order to fully utilise and extend the life of both the cooking zones and the cookware.
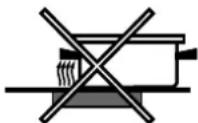
- Avoid using the same cookware which has been used on gas burners: the heat concentration on gas burners may distort the base of the pan, causing it not to adhere correctly.
Safety devices
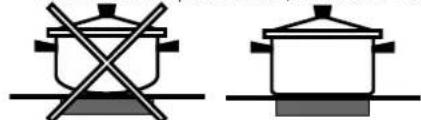
Pan sensor
Each cooking zone is equipped with a pan sensor device. The hotplate only emits heat when a pan with suitable measurements for the cooking zone is placed on it.
The "u" sign on the display appears if after selecting the cooking zone the pan is not placed on a heater, or in case of:
An incompatible pan
- A pan whose diameter is too small
The pan has been removed from the hotplate.
After 10 sec. with no pan on the heating zone, a warning beep signal is emitted.
After 60 sec. with no pan on the heating zone, the heater switches off.
Overheating protection
If the electronic elements overheat, the number signalizing the power level starts flashing, and the letter "c" appears on the display. When the temperature has reached a suitable level, this message disappears and the hob may be used again.
Safety switch
The appliance has a safety switch which automatically switches the cooking zones off after they have been in operation for a certain amount of time at a particular power level. When the safety switch has been triggered, the display shows "0".
For example: the right rear hotplate is set to 5 and will switch off after 5 hours of continuous operation, while the front left hotplate is set to 2 and will switch off after 8 hours. When one or more keys are activated for more than 10 sec, the touch control switches off
A warning beep sounds is emitted every 10 sec., while the key/s is/are activated.
With all heaters at zero power during 10 sec. the Cooktop is switched off.
If the switching off is due to an accidental activation of keys, the touch control actuates as above.
Buzzer
This can also indicate several irregularities:
- An object (a pan, cutlery, etc.) has been placed on the control panel for more than 10 seconds.
- Something has been spilt on the control panel.
- A button has been pressed for too long. All of the above situations may cause the buzzer to sound. Remove the cause of the malfunction to stop the buzzer. If the cause of the problem is not removed, the buzzer will keep sounding and the hob will switch off.
Errors and Alarms
When an error is detected, the whole appliance or the heater/s are switched off, a beep sounds (only if one or more heaters are active) and all displays show a 'F' letter and the error code (an index number or a letter) alternately.
If the problem does not disappear by itself, please contact the Technical Service.
| Power level | Maximum operating time in hours |
| 1 | 9 |
| 2 | 8 |
| 3 | 7 |
| 4 | 6 |
| 5 | 5 |
| 6 | 4 |
| 7 | 3 |
| 8 | 2 |
| 9 | 1 |
GB
Practical cooking advice
| Very high-flame cooking | 80 | Pressure cooking Pressure cooker Grilling Boiling | Frying |
| High-flame cooking | 80 | Crèpes Cooking on a high flame and browning (roasts, steaks, escalopes, fish fillets, fried eggs) | |
| Medium-flame cooking-Low-flame | 67 | Fast thickening (liquid juices) Boiling water (pasta, rice, vegetables) Milk | |
| 66 | Slow thickening (dense juices) | ||
| 59 | Bain-marie cooking Pressure cooking after whistle | ||
| cooking | 49 | Low-flame cooking (stews) | Rehealing dishes |
| very low-flame cooking | 29 | Chocolate sauce Keeping food hot | |
Precautions and tips
GB
! This appliance has been designed and manufactured in compliance with international safety standards. The following warnings are provided for safety reasons and must be read carefully.

This appliance conforms to the following European Economic Community directives:
- 2006/95/EEC dated 12/12/06 (Low Voltage) and subsequent amendments;
- 2004/108/EEC dated 15/12/04 (Electromagnetic Compatibility) and subsequent amendments;
- 93/68/EEC dated 22/07/93 and subsequent amendments.
- 1275/2008 stand-by/off mode.
General safety
!Make sure that the air inlet behind the fan grille is never obstructed. The built-in hob should, in fact, be provided with suitable ventilation for the cooling of the electronic components used in the appliance.
!We advise against the installation of an induction hob above an under-the-counter refrigerator (heat) or above a washing machine (vibrations). In fact, there would be insufficient space for the ventilation of electronic components.
- The appliance was designed for domestic use inside the home and is not intended for commercial or industrial use.
- The appliance must not be installed outdoors, even in covered areas. It is extremely dangerous to leave the appliance exposed to rain and storms.
- Do not touch the appliance when barefoot or with wet or damp hands and feet.
- The appliance must be used by adults only for the preparation of food, in accordance with the instructions provided in this booklet. Do not use the hob as a worktop or chopping board.
- The glass ceramic hob is resistant to mechanical shocks, but it may crack (or even break) if hit with a sharp object such as a tool. If this happens, disconnect the appliance from the electricity mains immediately and contact a Service Centre.
- Ensure that power supply cables of other electrical appliances do not come into contact with the hot parts of the hob.
- Remember that the cooking zones remain relatively hot for at least thirty minutes after they have been switched off. An indicator light provides a warning when residual heat is present (see Start-up and use).
- Keep any object which could melt away from the hob, for example plastic and aluminium objects, or products with a high sugar content. Be especially careful when using plastic film and aluminium foil or packaging: if placed on surfaces which are still hot, they may cause serious damage to the hob.
Always make sure that pan handles are turned towards the centre of the hob in order to avoid accidental burns.
- When unplugging the appliance, always pull the plug from the mains socket; do not pull on the cable.
- Never perform any cleaning or maintenance work without having disconnected the appliance from the electricity mains.
- The appliance should not be operated by people (including children) with reduced physical, sensory or mental capacities, by inexperienced individuals or by anyone who is not familiar with the product. These individuals should, at the very least, be supervised by someone who assumes responsibility for their safety or receive preliminary instructions relating to the operation of the appliance.
- For the attention of wearers of pacemakers or other active implants:
The hob complies with all current standards on electromagnetic interference.
Your induction hob is therefore perfectly in keeping with legal requirements (89/336/CEE directives). It is designed not to create interference on any other electrical apparatus being used on condition that the apparatus in question also complies with this legislation.
Your induction hob generates short-range magnetic fields.
To avoid any interference between your induction hob and a pacemaker, the latter must be designed to comply with relevant regulations.
In this respect, we can only guarantee our own product conformity. Please consult the pacemaker manufacturer or your doctor concerning its conformity or any possible incompatibility.
- Do not let children play with the appliance.
- Do not place metal objects (knives, spoons, pan lids, etc.) on the hob as they may become hot.
- The appliance is not intended to be operated by means of an external timer or separate remote-control system.

Disposal
m = 311
- When disposing of packaging material: observe local legislation so that the packaging may be reused.
- The European Directive 2002/96/EC relating to Waste Electrical and Electronic Equipment (WEEE) states that household appliances should not be disposed of using the normal solid urban waste cycle. Exhausted appliances should be collected separately in order to optimise the cost of re-using and recycling the materials inside the machine, while preventing potential damage to the atmosphere and to public health. The crossed-out dustbin is marked on all products to remind the owner of their obligations regarding separated waste collection.
For further information relating to the correct disposal of exhausted household appliances, owners may contact the public service provided or their local dealer.
Switching the appliance off
Disconnect your appliance from the electricity supply before carrying out any work on it.
Cleaning the appliance
! Do not use abrasive or corrosive detergents (for example, products in spray cans for cleaning barbecues and ovens), stain removers, anti-rust products, powder detergents or sponges with abrasive surfaces: these may scratch the surface beyond repair.
! Never use steam cleaners or pressure cleaners on the appliance.
- It is usually sufficient simply to wash the hob using a damp sponge and dry it with absorbent kitchen towel.
- If the hob is particularly dirty, rub it with a special glass ceramic cleaning product, then rinse well and dry thoroughly
- To remove more stubborn dirt, use a suitable scraper. Remove spills as soon as possible, without waiting for the appliance to cool, to avoid residues forming crusty deposits. You can achieve excellent results by using a rust-proof steel wire sponge - specifically designed for glass ceramic surfaces - soaked in soapy water.
-
If any plastic or sugary substances are accidentally melted on the hob, remove them immediately with the scraper, while the surface is still hot.
-
Once it is clean, the hob may be treated with a special protective maintenance product: the invisible film left by this product protects the surface from drips during cooking. This maintenance task should be carried out while the appliance is warm (not hot) or cold.
- Always remember to rinse the appliance well with clean water and dry it thoroughly: residues can become encrusted during subsequent cooking processes.
Stainless steel frame (only in models with outer frame) Stainless steel can be marked by hard water which has been left on the surface for a long time, or by cleaning products containing phosphorus.
After cleaning, it is advisable to rinse the surface well and dry it thoroughly. If water is spilt on the surface, dry it quickly and thoroughly.
Some hobs have an aluminium frame which is similar to stainless steel. Do not use any cleaning or degreasing products which are not suitable for use with aluminium.
Disassembling the hob
If it is necessary to disassemble the hob:
- Loosen the screws fixing the alignment springs on each side.
- Loosen the screws holding the fixing hooks in each corner.
- Take the hob out of its installation cavity.
!Do not attempt to repair the appliance yourself. If the appliance breaks down, contact a Service Centre.
Technical description of the models
| Hobs | VIX 644 C E | VIX 633 C E |
| Cooking zone | Power (W) | Power (W) |
| Back Left | 1 1200 - B1600 | - |
| Back Right | 1 1500 - B 2000 | 1 1500 - B 2300 |
| Front Left | 1 1500 - B 2000 | 1 1500 - B 2300 |
| Front Right | 1 1200 - B1600 | 1 1200 - B1600 |
| Total power | 7200 | 6200 |
The induction system is the quickest existing way of cooking. Unlike traditional hotplates where the cooking zone heats up, with the induction system heat is generated directly inside pans which have ferromagnetic bases.
Key:
I = single induction cooking zone
B = booster: the power level of the cooking zone may be boosted
VIX 644 C E
VIX 633 C E
ATTENTION!
Activar as zonas de cozedura
Desactivar as zonas de cozedura
PnncnoB3OBaHnCeHCOPHO nHeJN:
He nCnoB3yIe nepuATKn
Cneintb, yTo6bl nIaIbUbl, KOtOpblIM OcyuieCTBnreTcR
Haxatne KHOJOK,6bINNCHTBIMN
- Haximatb Ha CTEKNO PJIABHO
1 KhoNka INCREASE (+) REDUCE(-) POWER (YBEJIINUHNE (+) YMEHBUHNE (-)MOUHOCTN)
-ИСПОЛБ3уETСДЯУнРаВпЕнЯурВЕМ MOUHOCHTI NaКжdoN OТДeЛьНоВ ВарчHо 3OHe
2 Khonka INCREASE (+) REDUCE(-) TIME (YBEJINUEHNE (+) YMEHbUHEHNE (-) BPEMEHN)
- nCNoB3yETcAДЯУnpaBNeHn BpeMeHem npiroTOBHeHnHa KaKDoN OTdEnbHOB BapOHyOH 3OHe
3 KhoNka COOKING ZONE POWER (MOUHOCTb BAPOUHOH 3OHbI)-NCIOB3yETcIg OTO6paKeHH yPOBHa MOUHOCTn Ha KaXDoI OTDeJIbHO BAPOUHO 3OHe
4 Khonka ON/OFF (BKN./BbIKN.) INCNOJIb3yETcR dINB KJIIOUeHnI IN N BbIKIOUeHnYCTPOINCTBa.
5 Khonka CONTROL PANEL LOCK (БLOKIPOBKA
ПАHEЛ NYPABLEHЯ) ИСПОЛБ3YEТСД
праздOTВрашЕня ИЗМЕЧЕНЯ HabTpoE BAPOчHО
пАHEЛ NOKA3bIBaET, YTO NaHEЛ b YnpabLEHЯ
ЗблOKИРОВаHa.
6.Диспнг TANMEPA-OTobpaKaeT BbIbpaHHe BpeM npriTOBNeHn.
!IJI noJyueHnnoJDPo6Ho nHΦopMaunn no fynKUaM naHeu ynpabHnma. pa3dEe "Start-up and use"BKnUoyHne n 3Kcnnyataua".
!DaHHe N3dEJIne COOTBcTCTByeT Tpe6oBaHNmNocJeHEn EBPOENckOJnpeKTHBbI NO ORpaHnueHHoNtpe6nEMo.3NEKTpoAHEprn B pexkme OxndaHn.ECN B TeueHne 2 MHyT He 6yDy TBInONHrTaCkKaHne-JNo60onepaun, BKIOHTcN HINikatop OCTaTOHOro Tenna,IN BeHTnIATop npeKpatnt paBOTy (ecnn OH bIn BKIOUeH, yCTpOHTBO ABTomAtuYeCKn nepeNdEB B BkiKLOUeHHe COCTOHNHe. YCTpOCTBOBepHeTcB pexkm EKnpyatau nn npn HaxKaTNKNhONk ON/OFF (Bkn./BkiN.).
!B3aaBnCmOCTNOTKOnuYeCTBaHarpeBaTeNbHbIX 3JemeHTOB/3OH BapKnHaBapOHyI NaHeIN, BblPAHHbIE INHIIKATOPbI 3OHbIBAPKNMOrT BapbipoBaMbexy 3n4
yctahobka
1 Pepe3Kcnnyataune Baawero HOBORO yCTPOcTBA BHNMaTeJbHO npOHTNE daHHyIO 6pOUIpy-HHCTpyKcuIO. B He coepkntc BaxnHa INHΦopMaunno 6e3oNaChOn 3Kcnnyataun, yCTaHOBeN O6CNYKBAHIO yCTPOcTBA.
XpaHNTe daHHyIO nHCTpyKcIIO NO 3KnNpyaTauIN dIaIbHeIwero nCnOJb3OBAHn. IpeJaBaTe ee HObbIM BnaJeBcAm yCTpoIcTBa.
YCTAHOBKa Ha MecTO
XpaHNTBeBcByyNAKOBOHyMaTePnAaBHeNoCTynHom dIeTeMeTc. OH MoKet npedctabnTb onaCHOCTb ydyweHn nn acfukcn (cm. pa3deJ "Mepbl npedocmopokhocmu u coemb).
YcTaHOBka yCtpoNCTBa DOJXHa npOn3BONDtbcK KBaINΦuNPoBaHbIMn CneuaJINCtAMN B COOTBeTCTBmC npNJarAeMbIMn HcTpkyCuJMaH. HenpaBnIbHaYcTaHOBka MoKeT npNBecTN K npUeHeHIO BpeJa IIOJMy IN KJBOTHbIM Nl60 NOBpeKDeHIO IMyEcTBA.
BcTpaNbaEmoe yctpoIcTBo
NcnoB3yIte NOxOJaUuI uKaΦ, YTO6bI oBeCneuTb HADnHexaUee cyHKUOnHPOBaHne yCTpOCTBa.
- OnopHЯ NOBepxHocTb DoJXHa 6bITb yCTOuHBoK TEmnepaType np6JIu3nteIbHO 100^
- Ecnn yctpoinCTBO 6ydet yctaHaBnBaTbc8 HaD LyXOBbIM uKaΦOM, TO nOcneHn DoJnxEe 6bItb OCHaUeH CnCTeMOI OxJaXDeHnC NCKycCTBeHHoB BEHTnJIrauie..
- N36eraTb yctaHOBKn BapOCHn NaHeJn HaNDocydomoeyHO MaunHO: ecJN 3TO Heo6xOIMOn, NOMeCTnte Mekdy daHHbIMN dByM yCTpoiCTBaMNBODOHepoHnuaemoe pa3deJInteIbHoe yCTpoiCTBO.Behtnla
YTo6bI ObecneuHb HndnEkaUee BeHTnIInpObaHne n36EkaTb NepERpeBa OKpyKaUxN NOBepXHOCTe, BAPoHra naHeJb DoJIkHa paCNoIarTaBc CNeDyUIM O6pa3OM:
Ha paccToHn He MeHee 40 MM OT 3aHne nAHeNn Hn IIO6bIX dpynx BepTnKaIbHbIX NOBepxHOcTei..
- Mexny npoemom noD BapouHy o naHebn paCNOIOXeHHbIM CHN3y KXYOHHBIM 3JemeHTOM DOJXHO 6bITb paCCTOraHHe He MeHee 20 MM.
Kyxohhhe 3nemHbI, pacnoJoxKeHHbI pAOM c KxOHHO nnIOToB, BICOTA KOtOpbIX npeBbIwaET ypoBeHb BapOHO nnHeN, dONXHbI HaxOaNTbcra Ha pacCToHne He Mehee 450 MM OT kpar BapOHO nnHeN.
Kpenenne
N3dJIe DoJXHO 6bIb yCTaHO He Ha IDeaJIbHO POBHO NOBepxHocTN. Bo3MOXHbIE DeOpMaun, Bbl3BaHHbe HnnpaBnIbHbIM KpenJIeHNm, MoryT npNBecTu K n3MeHeHnM XapakTePncTnK n EKcNJyatauOHbIX KaueCTB BapOCHo NaHeJIN.
Дина PerулcaNoHOrO BuHTa KpeNexKbIX KpIOKOB Perylnpyetc nepeH NaJOM MoTaxa No TOniNe KyxOHOro Tona:
TOJIUHa 3,5 MM:ДЛИнвиHTa 9,5 MM
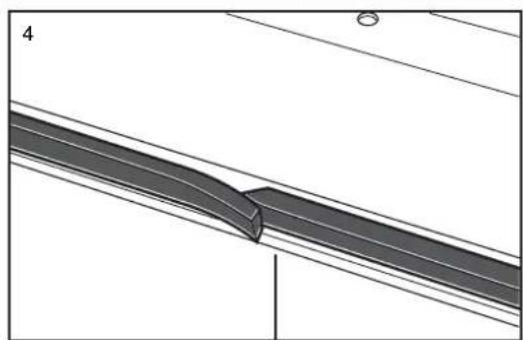
YcTaHOBkA npedeOxApaHntbHOn Waa6bI
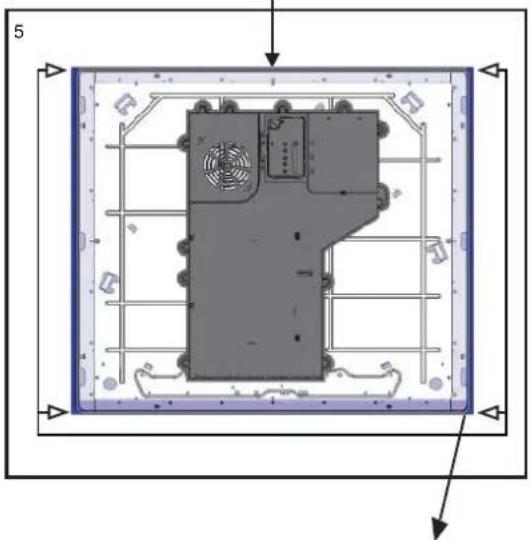

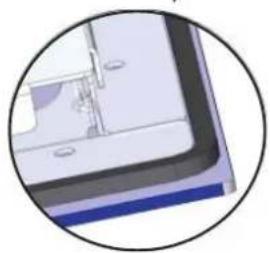
CABINET DIMENSIONS
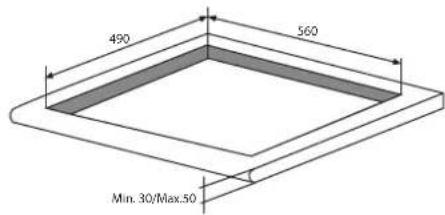
SAFETY DISTANCES WITH FURNITURE


A
B

C
Iopraok KpeHHeHn BapouHoi nHaHei:
1.ПиnomошиКОРOTKIX TynbIX WypynOB npBnHTnte 4 ueHTPOBOHhIe npyXINHb B OTBepCTnIX, paCNoONKeHHbIX no6okam BapOCHOn nAheN;
2.BCTaBbTe BapOHyIO NaHEnb B npoem B KkyxOHHom MoDyIe, BbIpOBHnTe N CnerKa HaxMnTe B cHTp BnIOTb Do IealbHorO pnpierahna BapOHyoi NaHEni K OnOpHOI NOBepXHOCTN.
!BaXHO,YTObI WpyNbI CEHTPOBOHbIX npyXnH OCTaBAJIINcB DOCTYNHbIMN..
!BCOOTBETCTBNCINPABUNAM6e30nacHOCTN NOcNe YCTAHOBKN N3dENN B KXYOHHbIMMOyNb DOJXHa 6bITb NCKIIOUyeHa BO3MOXHOCTb KACAHNK 3JEKTPnueckmN MaCTMNI.
Bce 3aunthbte 3nementbdoJXh6b1b3aKpeJIeHbTaKIM o6pa3OM, yTO6bIXMOxHO6blIO CHrTB TOnbKO pN NOMOu CneuaIbHoro INHCTpyMeHa.
3JIeKTpueeckoe noDknIoueHne
1 ΜηEktpuueckoe NOkJIoueHne BapOchon nAhenn BO3MOxHOro BCTpanBaemoro DyXOBOro 6kaΦa DOJXHO BbIOnHrTbcra pa3JeBHo NO npuHnAm 6eOanchoctn, a TAKxe DnI JERKOrO cEema DyXOBOro 6kaΦa.
MOHofa3Hoe coeHHHeHne
Bapouhna naneb ochaueha ceteBbIM ka6eem, paccuHaHHbIM Ha MOHOa3Hoe 3NeKTPoNTaHne.
BknoueHne o6paTHoro OTCyeta TaMepa
O6paTbI OTCuET HaunHaTcYepe3 10 cekyHc MOMeHTa NocJeDHeRo IcNoJIb3OBaHnRA KHOJOK INCREASE (+) REDUCE(-) TIME (YBEJIuEHEN (+)/ UMEHbUeHNE (-) BPEMeHEN). EcnI bUdET BbIbpaHa MOUHOCTb, 6UdET BKNIOUeH 3ByKOBoI
CnHAn, n DnCnIe TaaMepa npKePaTt MuraTb. To Xe npOn3oNdet CO CBETOIOHbIM INHdNKATOpOM HarpeBaTeNbHorO 3JeMeHTa.
IocneHnMy MNHyTa 6yJeT OTo6paKaTbcR BceKynax.
!KordaHa TaImepe BKNIOHTcO6paTHbO TcHET, NOIb3OBaTeNb MoXeT N3MeHHTb BpEmrB JIO6oB MOMeHT C NOMOuHO KHONoK INCREASE (+) REDUCE(-)TIME(YBEJIuHEHNE (+) /YMEHbUHeHNE (-)BPEMEHN).O6paTHbO TcHET 6yDet octaHOBJeH, n TaImepepeJET BpeKIM OxNJaHn Bbl6opa BpemeHN.
BbIKIOueHne o6paTHOrO oTcyeTa TaMepa
Korda 3aadaHnoe Ha TaImepe Bpem nCTeueT, 3anporpaMMNPOBAHHb NO BpemeHN HArpeBaTeBHBn 3neMeHT 6ydt BbIKIOUeyH, DnCnne TaIMepa N CBETODo 3anporpaMMNPOBAHHORO NO BpemeHN HArpeBaTeBHO 3neMeHTa HauHyT MIRatb, npu 3Tom 3ByKOBOI ONOBeAUteJIb TaIMepa BKIOUHTcra Ha ODHy MNHyTu. 3ByKOBOI ONOBeAUteJIb TaIMepa MoXet 6blb BBkIOUeH NoJb3OBaTeEN M BIOBoE Bpem, DaKe B IepByo MNHyTu 3ByUaHna CnHana. Korda TaIMep 6ydet HaxoDITbcR B COCToAHIN CnHaIINaUN, OH MOxET 6blb BBKIOUeH NyTeM HaxaTna IIObo KNOpKn Ha ceHCOPHO NaHEN ynpabNeHn.
!ДЯ OTMeHbI paBoTb TaMepa BbI6epNTe 3HaueHne BpeMeHn "00" nyTe OJHOBpeMeHHoro HaxaTna KhoNkn (+) n(-).
!KorHa Ha Bcex BapOCHbIX 30Hax He 6yDet yCTaHOBnEHa MOIOCTb, HA OJHOI N3 HNX BpeMeHHO 6yDet yCTaHOBnEHa HynBaM OIOCTb, Ha OJHy
MnHyTu 6ydt BkIIOueHa fynKcIa 6JIoKIpOBKn KJIaBnI.
Блорва на:
B npoucece cyHKUHOHPOBaHn BapOuHo nAHeH NMOKHO 3a6NOKpOBAtbe ynpaBHeHBO n36ExKaHne CnyaHOro 13MeHeHn HAcTpoE (TeN, B npoucece y6OpKn T.D.).
HaXMMTe KHOJky ,YTO6bl 3a6nOKIpOBaTb naHEnb ynpabNeHnra: -HnDKaTOp 3arOpNTc, n 6yDet cblIeH 3ByKOBoi CnHaI.
Дян спосьзовая Кади-лбобулем entobуypаьеня (hanpimep, "stop cooking" (npekaшениприготовеня") Heo6xodmo OTKIOHTb daHHyOФункцю. Haxmntu u yedkmbaite Heckonbko cekyHd
KHOJky COOTBETCTBYUHIM INHINKATOP NORaCHET, H6JIOKINPOBka 6ydt CHrTa.
Bce KhoNn Ha BapOuHoi 3oHe 6dyT 3a6IokpObaHbI, ecNI: BapOuHa nAHeJI b6yTeB bIKIOyeHa, ecNI 6yTeB KInOueHa 6bOKpOBA nAHeI ynpabneHna, IIN60
ecnB03HKnHET OuN6Ka B pa6Ote BapouHoi naHei.
BbIKIOueHHe BapOCHo NaHeJI
I
I
- He
paCCHTbBaTe ToIbKO Ha ceHCOP HAnuHna Nocdybl.
EcIn naHeJIy ynpaBHeHn BapOHyo nAHeJIy 6bIna
3a6NoKpObaHa, OHa oCTaHcTc 3a6NoKpObaHHo TaKKe
nocJe NOBtOPO BRIOUeHn BapOHyo naHeJIy. I
NOBtOPO BRIOUeHn BapOHyo naHeJIy Heo6XoDnMo
Chayana ChrTB 6NoKpOBky.
PpaTnueckne COBeTbI NO 3KcnnyaTaunn n3dennr
!NcnoB3OBaTb Nocydy,n3rOToBnEHHyUo n3 MaTePnaIa, COBMeCTHMOrO C npHnIOM HnyKuNN (peppomarHHTbI MaTePnaI).Mbl Oco6eHNO peKoMeHdyem KAcTpIOJI, n3rOToBnEHHbIe I3: UryHa,ctaJI N cNokpbltnEm IJIcneuaIbHOH HeXkabeHoue CTaJI,npncnoc6NeHHOI dJI INHyDkyUN.ДЯ pNoBepKn COBMeCTHMocTn Nocydu IcNoB3yIteMaHHT.

!He nCnoB3yIte Ha BapOuHbIX 30Hax nepExoDnHKn, DnΦΦy3Opbl IIN MeTaNIIueCKne PnactNHbl. OHN MOrYt OKa3aTb OTPncaTeJIbHOE BO3deIcTBnE Ha npOn3BOIDNTeJIbHOCTb BapOuHoi NaHEI N MCnOpTHTbe e3CTeTIueCKn BvId.
Kpome toro, nanyuyeHn lyuNX pe3yntaTOB OT BapouHno naHn:
IcnoJb3OBAbT NOcyDy C NIOCKM TOCTbIM DHom, NOHOCbTO npnneraoUIM K 30He HArpeBa;
- IVCNIOB3OBAbT Nocdy C DNOM TAKORO DnAmetpa, YTO6bl NOJIHOCTbIg 3aKpbITb BApOHyIO 3OHy IINr ONTMaJIbHOrO INCNOB3OBAHnB BCERO BbIDJeJREMOrTO TENla.

- PpOBepntb, YTo6bl DHO NcNoIb3yEmoN nocSybl 6bln Bcerda COBepueHNO cyxIM M uNCTbIM dNn IeaeIbHoro npNJerAHnK BapOuHOn 30He N dJa DoJrTO Cpoka cJyKbIKAK BapOuHOn naHeN, TAK n CAMOn nocSybl.
He cneyuET nCnONb3OBA Tb Ha daHHoB BapOuHoi naHEni nocydy, nCNOJb3OBAHHyo Ha ra3OBbIX KOHΦopkax: KOHcHTpaunr TaIIHa Ra3OBbIX KOHΦopkax MOKeT deΦopMnPoBa Tb DHO nOCydbI HApUWITb npINerAHe K BapOuHoi 30He.
RU
3aunTHbIe ycTpoINCTBa
CehcopHaJIuHnIPOcUdbI
KakdaBapouhna30ha yKomnneKToBaHa ceHCopom HaNnHnNo cydbi. KoHcpopka BbIeJIaTeT TEnIO ToNbKO npn HAnuHnHa Hei Nocydbi C pa3Mepamn, COOTBETCTByUcIMM DaHHoN KOHcpopke.
Ha dncnnee noaBtca cmboJ "u", ecnn nocne Bbibopa Bapouho 30hbl nocya He bila nomeueHa HaHarpeBaTeNbHbI 3nEmeHT, NIOB BCnyae:
- IcnoIb3OBAHnI HEnoIxDxoJaIe Nocdybl
IcnoIb3OBAHnI NOcyDbI CNIuKOM MaIOro DnaMeTpa - ChTIN Nocyblc BapOHyo 30HbI.
Yepe3 10 c npn OTCyTCTBn NocdyHa BapOCHo 3OHe 6ydeT CbIWeH npeDynpexKaIOuN 3ByKOBo CnHAn.
Yepe3 60 c npn OTCyTCTBn NocyDbHa BapOuHoi 3OHe HerpeBaTeNbHbI 3JeMeHT 6ydt BblKIOueH.
3aunTa oT neperpeBa
B cnyuae neperpeba 3neKToHHbIX KOMnKeKTyUOxH NaHET MInraTb CnFpa, CNrHaJIIN3NpyUOaA yPoBeH MoUHocTu, H Na DnscPiee NpOBuTcN BkBa "C". 3TO COo6ueHne npopadaet, H BapOHTaNaHeIb Bo3BpaAaTcB PabOCH n pexHM, KOJa TemnepaTypa OnyckaTeCJdo DOOnyCTmOro ypoBH.
PpeOxpaHnteIbHbI BbIKNoaTeIb
N3dJIne OCHaUeHO npedeOxApaHHTeJIbHbIM BbIKIOuateJIem, ABTOMaTHUeCKn OTKIIIOUaHOUsm BapOuHbIe 3OHbI NO IcTeueHm BpemeHn FyHKUHOHPoBaHn DaHHO rOpOBHr MOUHOCTn. B pOucece abapHHOrO OTKIOUeHn Ha IucnIee NORBnRETCa "0".
Haepnmep:3aHnra npabar Bapouhna 30ha HactpoeHa Ha5,pepeHna JbeBaBapouhna 30ha HactpoeHa Ha2.
3aHnra npabar Bapounha 30Ha OTKIouaetcyepe35 yacob pa6oTb, nepeHna neBa -yepe3 8 yacob.
Korda Onda KhoNka NnHeckOJbKO KHOJOK HaxKaTbI NcNoJIb3yOTcB TeueHne 60Je 10 CekyH, NaHEnb ynpabJIeHnO TKNIOuHaeTCR
IpeynpexkaUoui 3BykoBoi CnHan 6yET 3ByuTaB KaKdbie 10cekyH, noka
dAnHna KhoNka/-n He 6yDyT BbIKNoueHbI.
Ecn npoBeHb MOUHOCTn BCex HArpeBaTeJIbHbIX 3OH 6yET COCTaBnTb 0 B TeueHne 10 c,TO BapOuHa naHeIb 6yET OTKJIIOUeHa.
Ecnn OTKJIIOUeHHe 6yIeT oBcNIOBJeHO cIyuaHbIM HauKaTNm KHOJOK, TO ceHCOPHa nAHeJI yIpaBnHn8 6yIeT BKNIOUeHa, KaONuCAHO Bblie.
3BykoBaCnHaJINaZaIa
CnTeJIbCTByeT O HeKOTopbIX HEnCnpaBHOCTX:
Kakoi-Jinbo npedmet (nocya, cToNoBbI npnbop nT.D.) HaxoDntcHa naHenn ynpabNeHn60nee 10 cekyHd.
- Yteka KnuKoCTHa n aHaHeIb ynpaBneHna.
CnIshKOM dIInTeJIbHoe HaxKaTne Ha KhoNky. Bce Bblweyka3aHHbIe CNTyaUIM MOrYT YBnTbcr npuHHOB BKIOUeHn 3ByKOBOc CnIHana. UcTpahnte npuHy HeNCnpabHOCHT nIg OTKIIOHeHn 3ByKOBO CnIHn3aUIN. Ecnn npuHa HeNCnpabHOCHT He 6yDet yCTpaHena, 3ByKOBo CnIHan He 6yDet OTKIOUeH, IN BapOuHra NaHEnb BblIKHOHTcR.
Oun6kn n cnHaJIbI TpeBOrn
Korda 6ydet BbIaBHeHa Own6Ka, BCE yctpoiCTBO nHnHarpeBaTeIbHbI 3JemeHT/-bl 6ydyT OKNIOUeHbI, N6ydet CbIuHc H3ByKOBo CNHJI (TOIbKO B cIyae, eCNI BKJIOUeH OIN IJN
60one HapeBatehBbIX 3nemeHToB), nHa Bcex DncnpeX
noohepeNo 6ydet OTo6paKaTbc86yKba "F" N KOD OUn6Kn
(nopraKobbl Homep nn 6yKba).
Ecn npo6nemy 6ydt HeBO3MOxHO yCTpaHntb camocToTebHo, o6paTneTecb TExNueeckyO cnjx6y.
Bo n36exhaHne nomex mExy BapOchno nAhenbIO n 3NeKtpokApDnOCTmUyIaTOpOM NocJeHN dONKeH COOTBcTcBOBaT DeNCTByoUM HOPMaTINBaM.
TOMyMbMOXem rapaHTnpoBaTb COOTBeCTBNE HOpMaTHBAM TOnbKO HaWero IN3dEINr.3a INHfOpMaueNe O COOTBeCTBnN O BO3MOXhIX npO6IeMaX IN3-3a HecOBMeCTMIOcTN ObpaAaNTecb K BaUeMy IeuaSeMy BpaUy INK pON3BOODTeHIO 3NeKtpOKapDIOCTMUYIaTOpa.
He pa3pewaTe DetTm nrgatb c 6bITOBbIM 3JekTpnpu6Opom.
He KnaIte MeTaanHueckne npEmdetb (HOxK, IoxKn, KpbIuKn n T.D.) Ha BapOchHyIO NaHeNb, TaK KaK OH MOryT cnJIbHO HarpeTbcra.
H3eJIHe paccuHTaHO Ha BInOHe HnCpeDCTBOM BHeUHrero CnHXPOHN3aTopa NIN OTDeJIbHOI CNCTEmbl DnCTaHUNOHOrO ynpabJeHn.

YTNIN3aIIN
- YHNUTOXKEHNE yNAKOBOUYbIX MaTePnAIOB: Co6HNOJaNTe MeCTHbIe HOpMaTINbIc CJIeJIbIO NOBTOpHO IcNOJIb3OBAHINr yNAKOBOUYbIX MaTePnAIOB.
Corglacho Ebponeckon DnpeKtBbe 2002/96/CE kacaTeNbHO ytni3aunn3neKtpoHHbIX n3neKtpnuecknx 3neKtpnpnboob 3neKtpnpnbobpI He DoJXHb BblpacBaTbc BMeCTe C o6blHbIM ropDcKIM MycopoM. BblBeHeHbIE n3 CTpor np6bOpblOnJHbOcbupatbcr OTeJIbHO dNn ONTIIMn3aunn IX ytni3aunn IN peKynepaunn COCTaBnIOUxix Nx MaTePnaIOB, a TaKke IJnBe63oNaChOCTN OKpykaOuien Cpebl N3doPOBBy. CmBoN 3auepkHytaMycopHna KOp3nHa, IMeOUnncsHa BCex np6bopax, cnjXHT HaONMHAHmE 06 NX OTdJIbHO ytni3aunn.
3a 6oIee noDpo5HOn HnΦopMaunen O npabNbHOn yTnIIN3aUIN 6bTOBbIX 3JIeKTPonpnpOB NOIb3ObaTeIN MOrTy 6bpaNTbcR B CneuaNBHyIO rOcyapCTBeHHyO oprAH3aUIN UIN B Maar3NH.
OTKlnoueHne 3JeKtpoNTaHn
IpeaHauanomKaKoN-1n60onepaunno 06cnykBaHnIOINuCTKeOTcoeHNHTeN3dJIneOT cTeN3NEKtpOnNTAHn.
UncTkauNdeenn
He cJeDyeT noIb3OBAtbcra abpa3HbIMn IIN Koppo3NBbIMn YNCTaUIMn CpeDCTBaMn TaKIMN KAc Cnpan DnIy NcCTKn DuxOBOK MaHraIOB, PANTHOBBIONTeIN INN CpeDCTBa DnIy UdaJIeHnR pKaBcHbI, NOPouKOBbIMN YNCTaUIMn CpeDCTBaMn INN a6pa3NBbIMn r6KaMn: OHN MOrTy Heo6paTMo POcaPAnaTb NOBepxHOCTb N3DeIIY.
!He nCnoB3ynte napOBbIe YnCTraIue arperaTbI mnn arperaTbI NOB BvICOKIM DaBJIeHNEM DnA YnCTKN I3JeINJ.
B KaueCTBe perIpyHoro yXoJa DoCTaTOHOb BbIMbITb BapOHyIO nAneIb BnaxKHO r6KOn I3aTeM IpOTepeTb Hacyxo KxOHbIM bMyaxKbIM NONOTeHcEM.
- Ecni BapouhnaHb cnIbHo 3arpa3HeHa, nCnoIb3yIte CneuaJIbHoe YnCTaIe e CpeIcTBo InA cTeKnloKepaMuecknx NOBepxHOCTe, ONOLOCHTE BOOn I npOTpIte HacXo.
-Дя удалия особocиьх зарязеньи nCNoIb3yUte cneцalnbHbN cKpe6ok.УдянTe 3arp3henЯ He3aMeIITeIbHO,He DoxuaJaCb oxIaxdHENia N3deJIIN,BO I36eXaHne 3aTBepDeBaHnO octaTkoN.Очьуdo6HaJYnCtKN BapOchON naHEn MoaJIKA n3 npoBOLOKn n3 HepXaBeIOSeI CTaII, CneuAlbHo dJIЯ CTekloKepaMuecknx NOBepxHOCTe,CMOueHHaB MblbHom pactBope.
- Ecnn Ha Bapouhon naneHn cnyaHNO paCnIaBnHc b kakne-lnbo npedmetb nnPiactNKOBbIe MaTePnaJIbI nn caxap, He3aMeDnTebHO ydaNITe INx Ckpe6KOM c eune ropayen nobepxHOCTn.
- По 3аьершеничскв вароча нанел можетбытб obразота на сециальним 3ашитнимсрдсвом ду ухда засткокерампеским NOBERPXHOCTМ: STO cpeдъ ообраует на NOBERXHOCTN BAPOHON NaHEN NEBUДИМУTO 3aшиТую пленьу,прedoхаяншую NOBERXHOCTB CNYuae yteuek ИSUDE B npocece nprirotoblenя. Реком endуетс рponьдьчску, korда вароча нанел edBa TeTTЯн xJOODHA.
CneNyET Bcerda onoJaacknBaTb BapOHyIO naHeIb HCTOn BOOn Hacyxo BbITnpaTb:BO3MOxHbIe OCTaTKN UcTReuX CpeDCTB MOrY 3aTBepDeTb PnI NOcJIeDuOSeI rOtOBKe.
CtpyKtpya n3 HepKaBeHoue en cTaJI (ToIbKO B MoDEnJX CpaMKo)
Ha nobepxhoctn n3 hepXaBeoIe nCTaJI MoryT o6pa3OBaTbCra IyTHa OT BODbIC 60JIbIIM COpeJXaHHeM n3BecTn, eCNI OHa 6yTeB03DeNCTBOBaTb Ha NOBepxHOCTb B TeueHne dIITeJIbHOro BpEmEH, INI pR NcIOJIb3OBAHm YIcTaeux cpeDCTB, coDEPkaUx φocΦop.
PekomeHnyetraatatebHO onoNocHyb N BbITEpbBapouhyu naHenb noce nCTKn. B clyyae cnyauHoro npOINBaHn BOdb He3aMeDNTeBHO ydaIne ee.
!HeKOTopbIe BapOuHbIe NaHeJIIN OChaUeHbI aHOMMHNHeBOI pAMKOn, noXoKeN Ha HepKaBaHoUyIO CTaJIb.ДЯчICTKN pAMKn He nCNoJIb3yUTe CpeDCTBa, HENpNiROdHbIe DnJr aJIOMMHNII.
Iopraok demoHTaKa BapouHoi naHeJI
PnHHeo6xOaIMOCtN DEmOHHTPOBaTb BapOHyI NaHeJIb:
- CHIMITE Wypynbl, Kpenraune c6OKOB CEHTPOBOHbI npyKnHbl;
- ocla6bTe Upynb KpeenexKhbIX KpOKOB no yrJiMa;
3.BbHbTe BapOHyIO NaHeIb I3 HNI.
He pekomehdyetc oTKpbibatb BHytpenhne komnektyoune dny nonbltkn camoctoernbHO bInonHHTpeMOHT.Bcnyae HncnpabHOCTu obpaanTecbB LcHTpTexHueckoro 06cnykBaHna.
YcnoBhbie 06o3HaeyHn:
I = Bapouhna 30Ha c npocToHnDyKuNei
B = BOJbToOo6aBOOHoe yCTpoNCTBO: INDyKUHOHHa BapOCHAR 30Ha MOKeT NMeTb DOnONHHTeJIbHoe 3JIeKTpONITahHe
CnCTema HNDyKUHOHORO HarpeBaHnRABnAeTcmao 6bIcTPOH3 cyuEcTByUOxN TxHoIOnn HarpeBa. B OTnue O TpaDnUHOHaNbHbIX KOHΦopOK HarpeB npOn3BOIDTCa He BapOCHo 30HO: HarpeBaETc HENOCpeDCTBeHHo COedePKMoe KAcTpON, DHO KOTopo 6b3aTeNbHO DoJXHO 6bITb N3 ΦeppOMarHHTHO MaTePnAna.
