Ambient 5.1 A - Speaker HECO - Free user manual and instructions
Find the device manual for free Ambient 5.1 A HECO in PDF.

User questions about Ambient 5.1 A HECO
0 question about this device. Answer the ones you know or ask your own.
Ask a new question about this device
Download the instructions for your Speaker in PDF format for free! Find your manual Ambient 5.1 A - HECO and take your electronic device back in hand. On this page are published all the documents necessary for the use of your device. Ambient 5.1 A by HECO.
USER MANUAL Ambient 5.1 A HECO
natural_image
Symbol of a trash bin with crossed lines indicating no waste or restriction, accompanied by a solid black rectangle below (no text or labels)At the end of the product's useful life, please dispose of it at appropriate collection points provided in your country.
Congratulations on your fine new loudspeakers and thank you very much for choosing HECO!
For best results and to avoid damage please study the instructions and information below carefully before using your new loudspeakers.
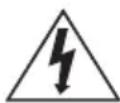
The triangle with a lightning symbol warns the user that high voltage is used within the device which can result in electric shock.

The triangle with an exclamation mark informs the user that important operating and maintenance instructions (repair) are contained in the accompanying instruction manual, which must be observed.
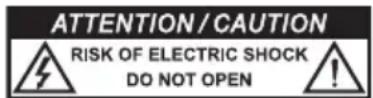
DO NOT OPEN! RISK OF ELECTRIC SHOCK!
CAUTION: In order to avoid electric shock do not open the speaker housing/mains adapters or remove the covers. The user is not to conduct any repairs him/herself. Repairs should only be conducted by qualified technicians! Do not use any sockets or extension cables that do not fully accommodate the plug of the device.
IMPORTANT SAFETY NOTICE
Please read through the instruction manual carefully before starting to use the device. This manual contains important information concerning operation and safety aspects. It is imperative you observe all of the information. Keep the manual in a safe location.
- Never subject the subwoofer to dripping or splashing water. Do not place any flower vases or other filled recipients on top of the subwoofer.
- The distance between the active subwoofer enclosure and the walls of the room or other objects (e.g. furniture, shelf units) may not be less than 5 cm on any side.
The aluminium plate and cooling fins of the amplifier at the rear of the active subwoofer serve to cool the built-in amplifier; for this reason, they must also be at least 5 cm away from all objects and must not be covered (e.g. by a curtain).
The bass reflex opening(s) on the active subwoofer must not be covered (e.g. by curtains, etc.) in order to guarantee adequate ventilation of the amplifier.
- The subwoofer should not be positioned near heat sources (heaters, ovens, radiant heaters, naked flames, etc.).
- Only operate the subwoofer at an ambient/room temperature from 10°C to 40°C. The active subwoofer may not be used in very humid rooms.
- Please do not place any items with naked flames (e.g. candles) on the active subwoofer.
- Please do not touch or connect the mains cable when your hands are damp.
- Keep the mains cable away from heaters.
- The device should not continue to be operated if there is visible damage to the mains cable. A damaged cable should not be repaired, but must be replaced.
• Never place heavy items on the mains cable.
• The mains cable should always be freely accessible. -
If the device is not going to be used for a prolonged period (e.g. when on holiday), it should be disconnected from the mains by removing the plug. The device should also be disconnected from the mains in the event of a thunderstorm. Doing this will prevent damage caused by lightning and overvoltage.
-
Do not use any cleaning agents or chemical solvents when cleaning, as these could damage the surface of the device.
- Repairs must always be conducted by qualified specialists, as you might otherwise be exposed to dangerous high voltage levels or other hazards.
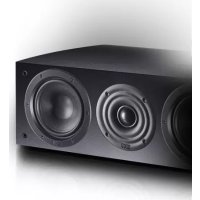
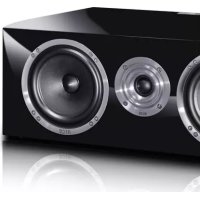
GENERAL NOTES ON CONNECTING YOUR HECO SATELLITE SPEAKERS
The connectors are located at the rear of the satellite speakers. They are equipped with a clamping mechanism for cables cross-sections of up to 1 mm^2 . To connect the satellites, please use normally available 2 × 0.75 mm^2 - 2 × 1 mm^2 loudspeaker cables. The cables are to be cut to the required length, the ends stripped and the end of the wires twisted to make it easier to connect them to the terminals.
Always turn off the amplifier or receiver before connecting or disconnecting loudspeaker cables. For good sound the cables must be connected so that the speakers are “in phase”. This means that the black negative terminals on the speakers (-) must be connected to the negative (-) terminals on the amplifier, the positive (+) speaker terminals to the positive (+) amplifier terminals.
Before switching on the system double-check all your connections and make sure that the terminal screws are tight and that there are no short circuits caused by stray wire filaments – this could cause serious damage to your amplifier!
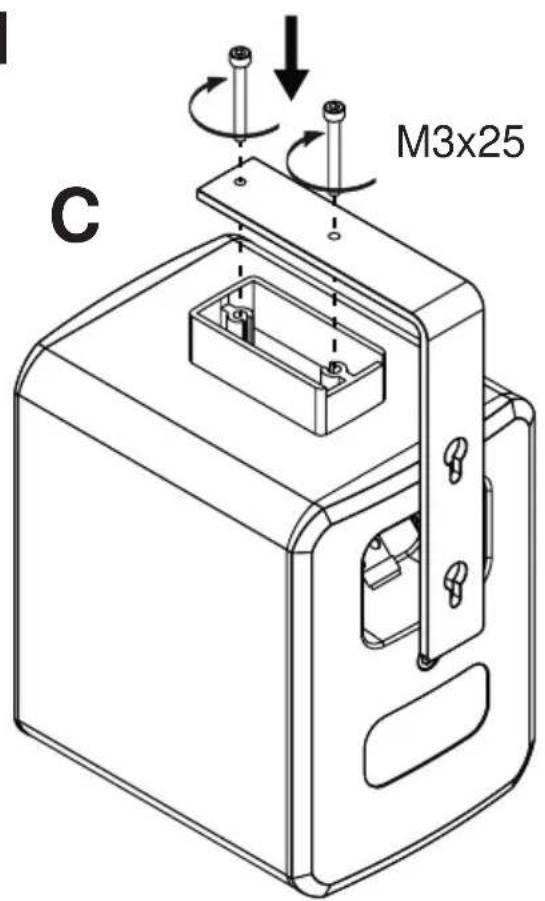
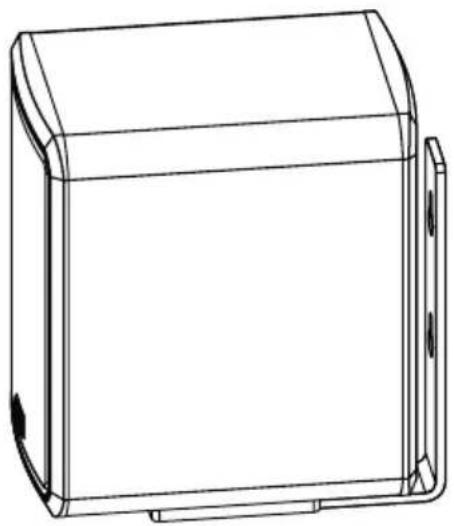
Fig. 1 shows the use of the supplied wall mounts for the satellites.
Important information/safety instructions: The customer is solely responsible for the use of wall brackets / speakers attachments. The customer is also solely responsible for the secure attachment of the speaker bracket to the wall and the selection of suitable mounting material (e.g. screws, wall plugs, etc.), while taking account of the weight and construction of the speaker and the condition of the wall.
POSITIONING
The centre, front and rear loudspeakers are marked on the back. The satellite connected to the centre output should be positioned on top of or beneath your TV set. The front satellites are placed to the left and the right of the TV set, preferably at equal distance and at ear-height. The satellites connected to the rear/surround outputs should be located to the left and right behind the listening position and slightly above ear-height.
Placement of the subwoofer is generally not critical. It should, if possible, be located near the front satellites.
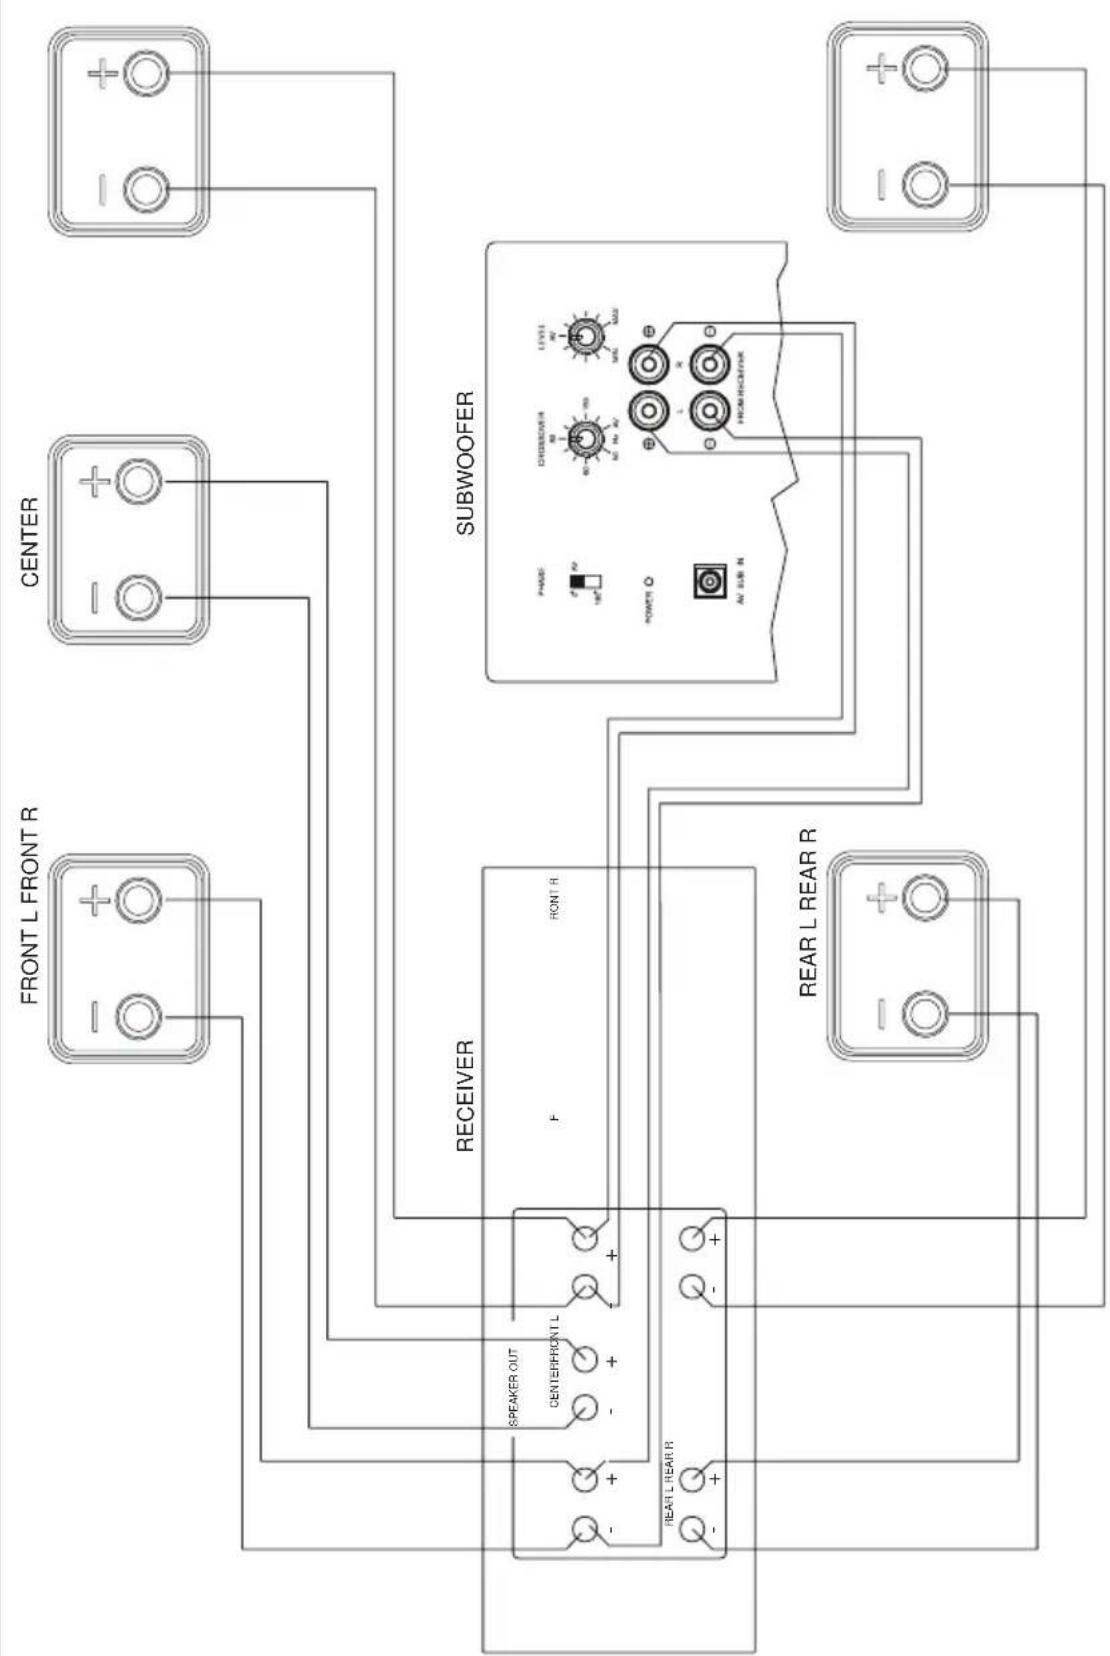
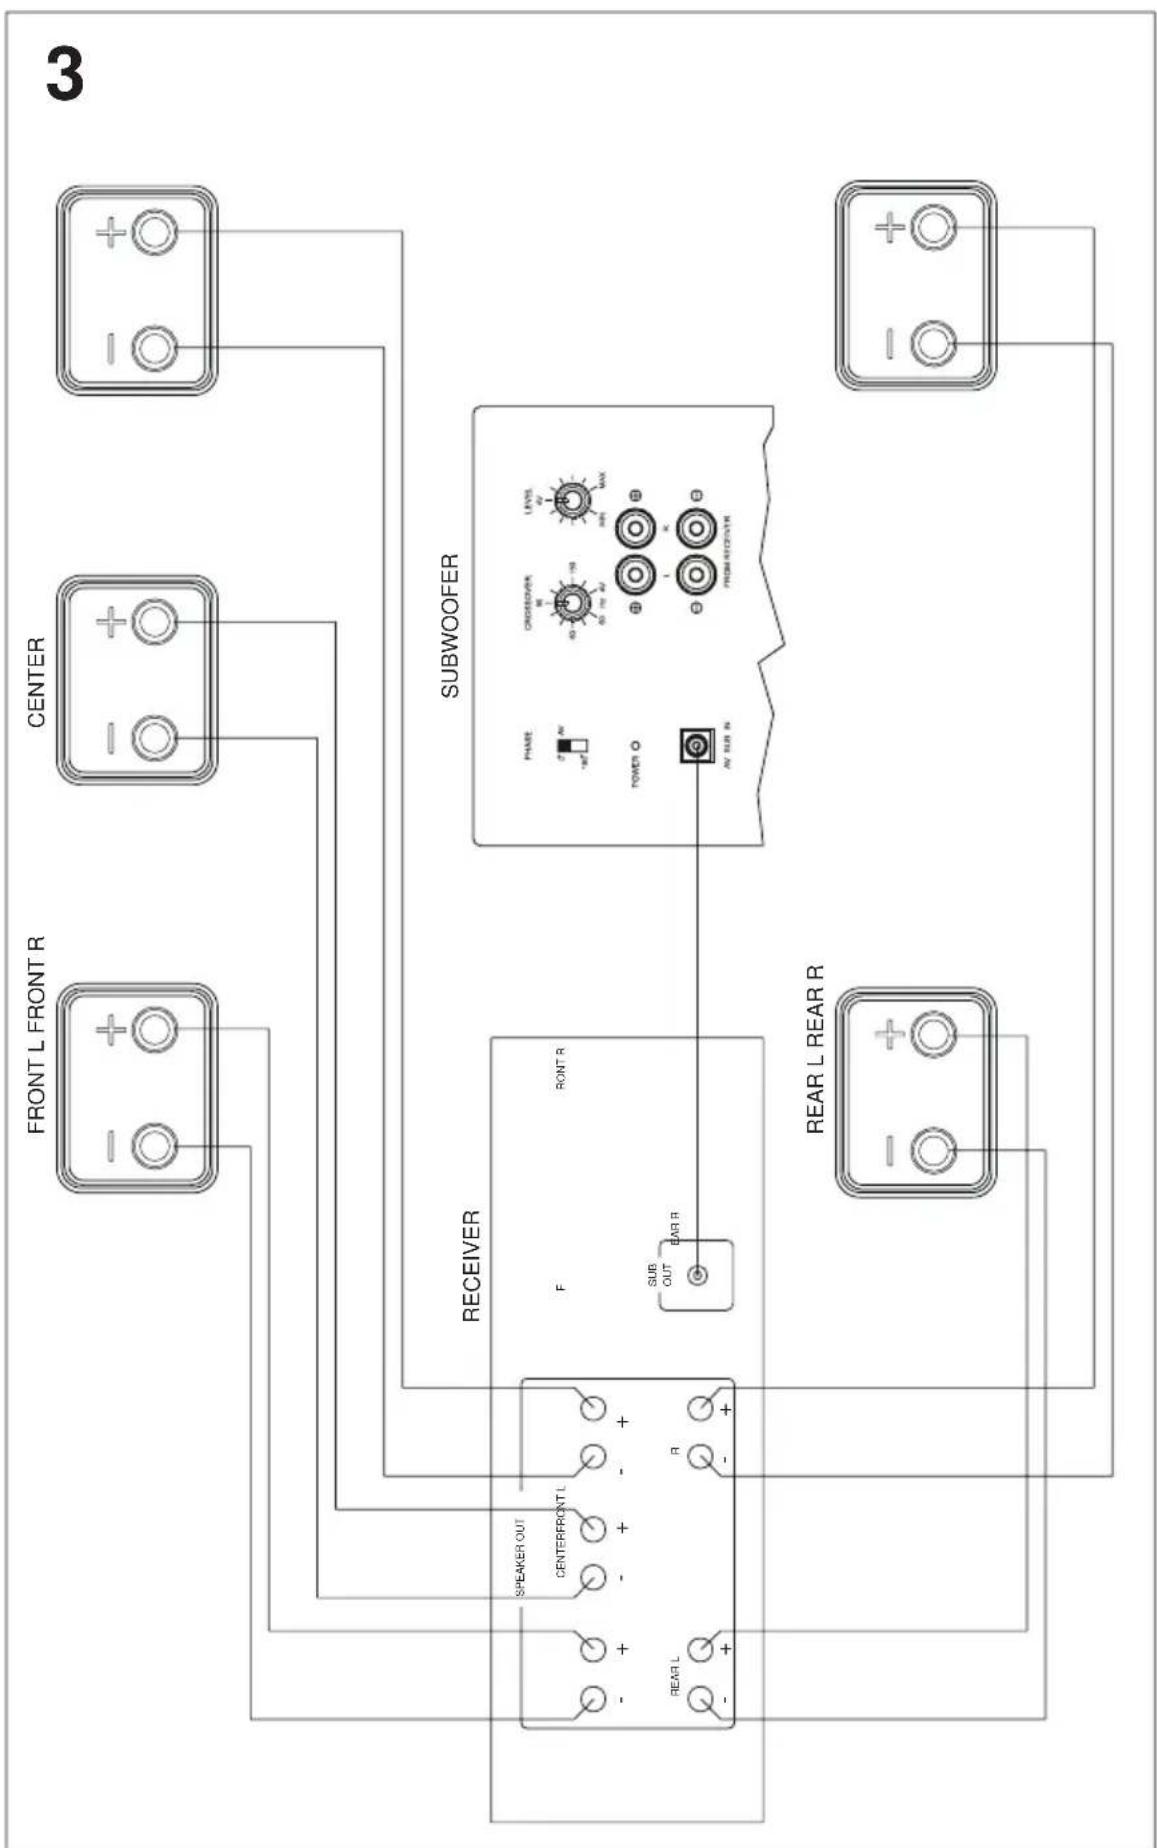
CONNECTION TO AN AV RECEIVER
Connection of the system to an AV receiver is shown in figure 2 (receiver without a subwoofer output), figure 3 (receiver with low-level subwoofer output).
Note: In the receiver set-up, the front, centre, and rear loudspeaker channels should be set to 'small'. Some receivers also provide the option of setting the cross-over frequency between the subwoofer and satellites. If this is the case, please set this frequency to 150 Hz or the frequency that comes closest to 150 Hz. Please consult the user manual supplied with your receiver.
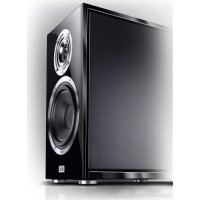
THE ACTIVE SUBWOOFER
Figure 4 shows the subwoofer's controls:
Mains connection (1), mains-voltage switch (2)
The subwoofer is equipped with an integrated amplifier and needs to be connected to a mains outlet by means of the supplied mains cable. The voltage selector has been set at the factory to 230 V for operation in Europe.
Warning: Connecting the subwoofer to a 230 V mains outlet while the voltage selector is set to 115 V will lead to immediate destruction of the amplifier!
Power switch (3), operating state LED (4)
| Power switch ON Power switch OFF | |
| The automatic switching on/off is activated.The subwoofer switches on automatically when it receives a signal from the receiver, the LED turns green.It automatically switches to standby after receiving no signals for some minutes, the LED turns red.In standby mode the power consumption is 0.5 watt. | The subwoofer is switched off, LED is off.This is the setting for when subwoofer isn't used over long periods. |
AV input (5)
Connect your receiver's low-level subwoofer output (sub-pre-out) to the subwoofer's AV input (see Fig. 3). You will require a mono-cinch cable for this (not supplied).
High-level inputs (6)
For connection to the high-level (speaker) outputs of the receiver/amplifier, refer to Fig. 2.
Level control (7)
This control is used to set the bass volume according to your preferences. Proceed as follows::
- Set the bass control of your amplifier into its centre (linear) position.
- Important: Set the level control to its left stop (lowest volume).
- Now, play back some music and set the volume control of the amplifier to the desired level.
- Set the subwoofer level control to the desired bass level.
Cross-over frequency control (8)
Used to set the upper limit of the subwoofer operating range. In combination with your HECO AMBIENT satellites, this control should be set to 120 - 150 Hz.
The cross-over frequency control should be set to the maximum value (200 Hz) when AV receivers/amplifiers are used. The cross-over frequency between the subwoofer and loudspeaker is then set in the receiver's/amplifier's set-up. Please refer to your receiver's/amplifier's operating instructions here.
Phase switch (9)
In normal use the phase switch should be set to 0^ . However, in rare cases it may be advantageous to set the phase to 180^ (e.g. if the subwoofer is far away from the front loudspeakers or in the event of unfavourable acoustics in the room). Generally speaking: the setting where the lower base tone area has a fuller sound is the correct one.
Fuse (10)
Only use a fuse with the parameters indicated next to the fuse holder, on the rear of the amplifier.
HOW TO AVOID DAMAGE TO YOUR VALUABLE SPEAKERS
All HECO loudspeakers are designed and built for optimum sound reproduction with the tone controls in the central position – i.e. with unaltered or “linear” amplifier output. Higher settings of the tone controls increase the amount of energy supplied to the loudspeakers. This may lead to speaker damage, at high volumes.
USE THE VOLUME CONTROL WITH CARE!
If the output of your amplifier is significantly higher than the rated power handling capacity of your speakers extremely high volumes can physically destroy your speakers. This doesn't actually happen often but you should be aware that it is possible.
Weak amplifiers with low output ratings can actually be more dangerous for your speakers at medium volumes. This sounds strange but the reason is quite simple: Weak amplifiers get overloaded much faster than powerful ones and this causes measurable and audible distortion, which is more dangerous for loudspeakers than anything else.
Always turn the volume down immediately as soon as you hear distortion! If you like listening to loud music make sure that your amplifier can deliver at least as much power as the speakers' power-handling rating.
SPECIFICATIONS
Front / Rear Centre
| Configuration: | Two-way | Two-way |
| Power handling capacity RMS / Max.: 50/100 watts 60/120 watts | ||
| Impedance: 4 – 8 ohm 4 – 8 ohm | ||
| Frequency range: 80 – 34 000 Hz 80 – 34 000 Hz | ||
| Cross-over frequency: 3600 Hz 3600 Hz | ||
| Recommended amplifier power: >15 watts >15 watts | ||
| Efficiency (2.8 V/1 m): 88 dB 88 dB | ||
| Dimensions (WxHxD): 90 x 155 x 117 mm 222 x 92 x 117 mm | ||
| Weight: | 1.3 kg | 1.9 kg |
| Accessories: | Wall mount | |
Subwoofer
| Configuration: | bass reflex, downfire |
| Output power RMS/Max.: | 60/120 watts |
| Frequency range: 28 – 200 Hz | |
| Cross-over frequency: 50 – 200 Hz, adjustable | |
| Dimensions (WxHxD): 236 x 410 x 390 mm | |
| Accessories: | mains cable |
SUBJECT TO TECHNICAL CHANGE
Très cher client,
Accessoires: support mural
Subwoofer
Configuration: Bass reflex, Downfire
Demount the glass foot.
text_image
Technical diagram showing a mechanical assembly with labeled components and a 180° angle indicator.1
text_image
C M3x25D
natural_image
Technical line drawing of a rectangular electronic component with mounting flanges (no text or symbols)
text_image
40 mm2
flowchart
graph TD
    A["FRONT L FRONT R"] --> B["RECEIVER"]
    C["CENTER"] --> B
    D["REAR L REAR R"] --> B
    E["SPEAKER OUT"] --> B
    F["CENTERFRONT L"] --> B
    G["F"] --> B
    H["REAR L REAR R"] --> B
    I["SUBWOOFER"] --> J["POWER"]
    J --> K["AV SUB R"]
    K --> L["DRUMOBER"]
    L --> M["LEVEL AV"]
    M --> N["HEMRECKR"]
    N --> O["AV SUB R"]
    O --> P["DISCUER"]
    P --> Q["AV SUB R"]
    Q --> R["DISCUER"]
    R --> S["AV SUB R"]
    S --> T["DISCUER"]
    T --> U["AV SUB R"]
flowchart
graph TD
    A["Subwoofer"] --> B["Receiver"]
    B --> C["Front Front R"]
    B --> D["Center"]
    B --> E["Back Front R"]
    F["Rear L Rear R"] --> B
    G["Rear L Rear R"] --> B
    H["Rear L Rear R"] --> B
    I["Rear L Rear R"] --> B
    J["Rear L Rear R"] --> B
    K["Rear L Rear R"] --> B
    L["Rear L Rear R"] --> B
    M["Rear L Rear R"] --> B
    N["Rear L Rear R"] --> B
    O["Rear L Rear R"] --> B
    P["Rear L Rear R"] --> B
    Q["Rear L Rear R"] --> B
    R["Rear L Rear R"] --> B
    S["Rear L Rear R"] --> B
    T["Rear L Rear R"] --> B
    U["Rear L Rear R"] --> B
    V["Rear L Rear R"] --> B
    W["Rear L Rear R"] --> B
    X["Rear L Rear R"] --> B
    Y["Rear L Rear R"] --> B
    Z["Rear L Rear R"] --> B
    AA["Rear L Rear R"] --> B
    AB["Rear L Rear R"] --> B
    AC["Rear L Rear R"] --> B
    AD["Rear L Rear R"] --> B
    AE["Rear L Rear R"] --> B
    AF["Rear L Rear R"] --> B
    AG["Rear L Rear R"] --> B
    AH["Rear L Rear R"] --> B
    AI["Rear L Rear R"] --> B
    AJ["Rear L Rear R"] --> B
    AK["Rear L Rear R"] --> B
    AL["Rear L Rear R"] --> B
    AM["Rear L Rear R"] --> B
    AN["Rear L Rear R"] --> B
    AO["Rear L Rear R"] --> B
    AP["Rear L Rear R"] --> B
    AQ["Rear L Rear R"] --> B
    AR["Rear L Rear R"] --> B
    AS["Rear L Rear R"] --> B
    AT["Rear L Rear R"] --> B
    AU["Rear L Rear R"] --> B
    AV["Rear L Rear R"] --> B
    AW["Rear L Rear R"] --> B
    AX["Rear L Rear R"] --> B
    AY["Subwoofer"]
    AZ["Receiver"]
    BA["Front Front R"]
    BB["Center"]
    BC["Back Front R"]
    BD["Back Front R"]
    BE["Back Front R"]
    BF["Back Front R"]
4

text_image
9 PHASE 0° AV 180° 4 POWER ○ 5 AV SUB IN 3 OFF ON 2 115V 230V 10 1 8 CROSSOVER 60 150 50 Hz AV LEVEL AV MIN MAX + L R - FROM RECEIVER HECO® AMBIENT 5.1 A POWERED SUBWOOFER 6 7 6D
Congratulations! You have made a wise selection in becoming the owner of a HECO HiFi equipment. Due to high quality HECO HiFi products have earned an excellent reputation through the western world. And this high quality standard enables us to grant a 5-years warranty for HECO HiFi speakers and a 2-years warranty for HECO HiFi-electronic components.
The equipments are checked and tested continuously during the entire production process. In case you have problems with your HECO HiFi equipment, kindly observe the following:
- The guarantee period commences with the purchase of the component and is applicable only to the original owner.
- During the guarantee period we will rectify any defects due to faulty material or workmanship by replacing or repairing the defective part at our discretion. Further claims, and in particular those for price reduction, cancellation of sale, compensation for damages or subsequential damages, are excluded. The guarantee period is not altered by the fact that we have carried out guarantee work.
- Unauthorized tampering with the equipment will invalidate this guarantee.
- Consult your authorized dealer first, if guarantee service is needed. Should it prove necessary to return the component to the factory, please insure that • the component is packed in original factory packing in good condition • the quality control card has been filled out and enclosed with the component • your enclose your receipt as proof of purchase.
- Excluded from the guarantee are: • Illuminates • Wear parts • Shipping damages, either readily apparent or concealed (claims for such damages must be lodged immediately with forwarding agent, the railway express office or post office). • Scratches in cases, metal components, front panels, etc. (You must notify your dealer directly of such defects within three days of purchase.) • Defects caused by incorrect installation or connection, by operation errors (see operating instructions), by overloading or by external force. • Equipments which have been repaired incorrectly or modified or where the case has been opened by persons other than us. • Consequential damages to other equipments. • Reimbursement of cools, without our prior consent, when repairing damages by third parties.
F
Toutes nos félicitations!
Name and address of the dealer/stamp
Käufer/Customer
Name/Name ____
Straße/Street ____
PLZ, Ort/City ____
Land/Country ____
Kaufdatum/buying date
No warranty without receipt!

natural_image
Blank white image with no visible content, text, or symbols
natural_image
Completely blank white image with no visible content, text, or symbols.
natural_image
Blank white image with no visible content, text, or symbols
natural_image
Blank white image with no visible content, text, or symbols.
natural_image
Blank white image with no visible content, text, or symbols.
natural_image
Blank white image with no visible content, text, or symbols.
natural_image
Blank white image with no visible content, text, or symbols.
natural_image
Blank white image with no visible content, text, or symbols.
natural_image
Blank white image with no visible content, text, or symbols.
natural_image
Blank white image with no visible content, text, or symbols.
natural_image
Blank white image with no visible content, text, or symbols.
natural_image
Blank white image with no visible content, text, or symbols.
natural_image
Blank white image with no visible content, text, or symbols.
natural_image
Blank white image with no visible content, text, or symbols.
natural_image
Blank white image with no visible content, text, or symbols.
natural_image
Blank white image with no visible content, text, or symbols.
natural_image
Blank white image with no visible content, text, or symbols.
natural_image
Blank white image with no visible content, text, or symbols.
natural_image
Blank white image with no visible content, text, or symbols.
natural_image
Blank white image with no visible content, text, or symbols.
natural_image
Blank white image with no visible content, text, or symbols.
natural_image
Blank white image with no visible content, text, or symbols.
natural_image
Blank white image with no visible content, text, or symbols.
natural_image
Blank white image with no visible content, text, or symbols.
natural_image
Blank white image with no visible content, text, or symbols.
natural_image
Blank white image with no visible content, text, or symbols.
natural_image
Blank white image with no visible content, text, or symbols.
natural_image
Blank white image with no visible content, text, or symbols.
natural_image
Blank white image with no visible content, text, or symbols.
natural_image
Blank white image with no visible content, text, or symbols
natural_image
Blank white image with no visible content, text, or symbols.
natural_image
Blank white image with no visible content, text, or symbols
natural_image
Blank white image with no visible content, text, or symbols.
natural_image
Blank white image with no visible content, text, or symbols
natural_image
Blank white image with no visible content, text, or symbols
natural_image
Blank white image with no visible content, text, or symbols
natural_image
Blank white image with no visible content, text, or symbols.
natural_image
Blank white image with no visible content, text, or symbols.
natural_image
Blank white image with no visible content, text, or symbols.
natural_image
Blank white image with no visible content, text, or symbols
natural_image
Blank white image with no visible content, text, or symbols.
natural_image
Blank white image with no visible content, text, or symbols.
natural_image
Blank white image with no visible content, text, or symbols.
natural_image
Blank white image with no visible content, text, or symbols.
natural_image
Blank white image with no visible content, text, or symbols.
natural_image
Blank white image with no visible content, text, or symbols.
natural_image
Blank white image with no visible content, text, or symbols.
natural_image
Blank white image with no visible content, text, or symbols.
natural_image
Blank white image with no visible content, text, or symbols.
natural_image
Blank white image with no visible content, text, or symbols
natural_image
A single horizontal black line on a white background (no text or symbols)
natural_image
Blank white image with no visible content, text, or symbols.
natural_image
Blank white image with no visible content, text, or symbols.
natural_image
Blank white image with no visible content, text, or symbols.
natural_image
Blank white image with no visible content, text, or symbols.HECO®
Lise-Meitner-Str. 9 • D-50259 Pulheim • Germany Tel. +49 (0) 2234 / 807 - 0 • Fax +49 (0) 2234 / 807 - 399 Internet: http://www.heco-audio.de