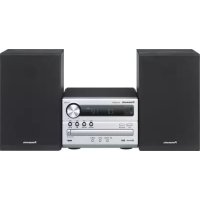
SHFX82EK - Pregnant PANASONIC - Free user manual and instructions
Find the device manual for free SHFX82EK PANASONIC in PDF.
User questions about SHFX82EK PANASONIC
0 question about this device. Answer the ones you know or ask your own.
Ask a new question about this device
Download the instructions for your Pregnant in PDF format for free! Find your manual SHFX82EK - PANASONIC and take your electronic device back in hand. On this page are published all the documents necessary for the use of your device. SHFX82EK by PANASONIC.
USER MANUAL SHFX82EK PANASONIC
Thank you for purchasing this product.
Please read these instructions carefully before using this product, and save this manual for future use.
Precautions
WARNING
Unit
To reduce the risk of fire, electric shock or product damage,
- Do not expose this unit to rain, moisture, dripping or splashing.
- Do not place objects filled with liquids, such as vases, on this unit.
- Use only the recommended accessories.
- Do not remove covers.
- Do not repair this unit by yourself. Refer servicing to qualified service personnel.
- Do not let metal objects fall inside this unit.
- Do not place heavy items on this unit.
AC mains lead
To reduce the risk of fire, electric shock or product damage,
- Ensure that the power supply voltage corresponds to the voltage printed on this unit.
- Insert the mains plug fully into the socket outlet.
- Do not pull, bend, or place heavy items on the lead.
- Do not handle the plug with wet hands.
- Hold onto the mains plug body when disconnecting the plug.
- Do not use a damaged mains plug or socket outlet.
The mains plug is the disconnecting device.
Install this unit so that the mains plug can be unplugged from the socket outlet immediately.
CAUTION
Unit
- Do not place sources of naked flames, such as lighted candles, on this unit.
- This unit may receive radio interference caused by mobile telephones during use. If such interference occurs, please increase separation between this unit and the mobile telephone.
Except South East Asia
This unit is intended for use in moderate climates.
For South East Asia
This unit is intended for use in tropical climates.
Placement
Place this unit on an even surface.
To reduce the risk of fire, electric shock or product damage,
- Do not install or place this unit in a bookcase, built-in cabinet or in another confined space. Ensure this unit is well ventilated.
- Do not obstruct this unit's ventilation openings with newspapers, tablecloths, curtains, and similar items
- Do not expose this unit to direct sunlight, high temperatures, high humidity, and excessive vibration.
Unit care
Clean this unit with a soft, dry cloth.
- Never use alcohol, paint thinner or benzine to clean this unit.
- Before using chemically treated cloth, carefully read the instructions that came with the cloth.
Caution for AC Mains Lead
(For the AC mains plug of three pins)
For your safety, please read the following text carefully.
This appliance is supplied with a moulded three pin mains plug for your safety and convenience.
A 5-ampere fuse is fitted in this plug.
Should the fuse need to be replaced please ensure that the replacement fuse has a rating of 5-ampere and that it is approved by ASTA or BSI to BS1362.
Check for the ASTA mark or the BSI mark on the body of the fuse.
If the plug contains a removable fuse cover you must ensure that it is refitted when the fuse is replaced.
If you lose the fuse cover the plug must not be used until a replacement cover is obtained.
A replacement fuse cover can be purchased from your local dealer.
Before use
Remove the connector cover.
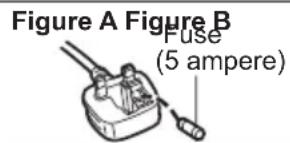
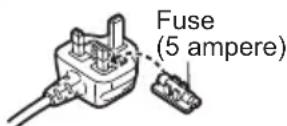
How to replace the fuse
The location of the fuse differ according to the type of AC mains plug (figures A and B). Confirm the AC mains plug fitted and follow the instructions below.
Illustrations may differ from actual AC mains plug.
1 Open the fuse cover with a screwdriver.

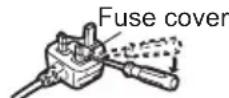
2 Replace the fuse and close or attach the fuse cover.
Accessories
Check the supplied accessories before using this unit.
2 AC mains leads
Except South East Asia
(K2CT2YY00106) (K2CQ2YY00130)
For South East Asia
(K2CP2YY00073) (K2CQ2YY00130)
- Use the AC mains lead that matches the socket for the area you live in.
#
- Product numbers provided in these operating instructions are correct as of February 2014. These may be subject to change.
- Do not use AC mains lead with other equipment.
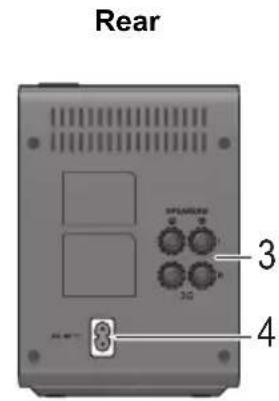
Control reference guide
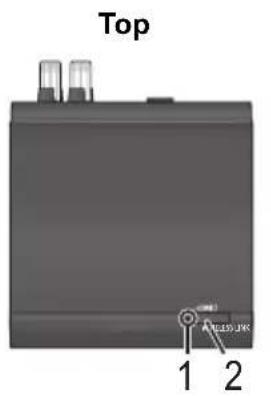
1 Wireless link indicator Green lights: Wireless link is activated. blinks (slow): Searching mode blinks (fast): Pairing mode Red lights: Sleeping mode
2 Enable pairing
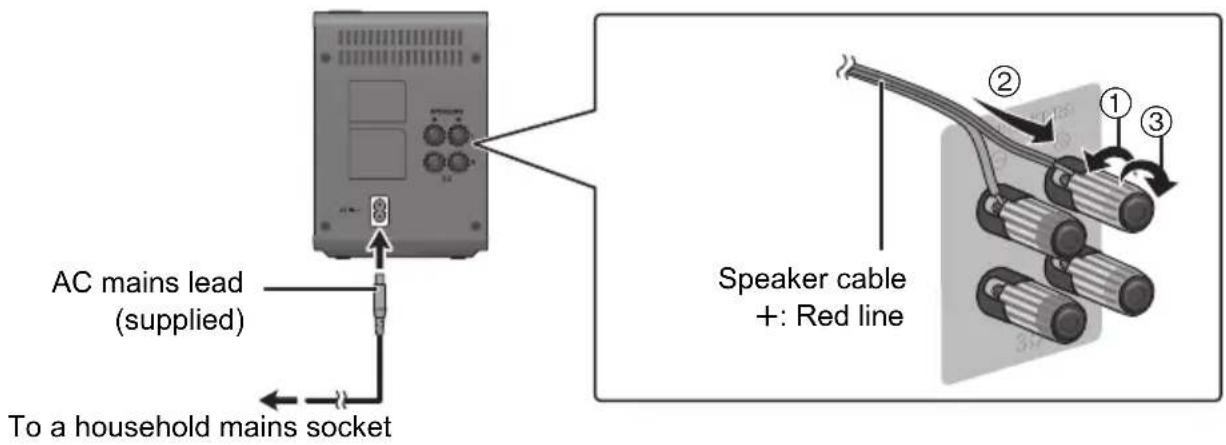
3 Speaker terminals
4 AC IN terminal
Wireless setup diagram
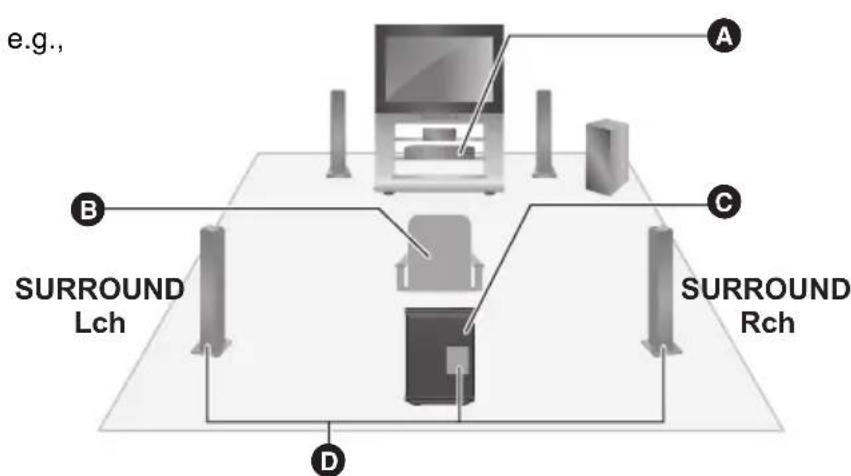
A Home theatre unit
Seating position
Wireless system
Surround speaker cables (not supplied)
- To avoid interference, separate the wireless system from the other electronic devices that use the same radio frequency (2.4 GHz band).
- Place the wireless system within approximately 10m from the home theatre unit.
- To allow for proper ventilation and to maintain good airflow around the wireless system, position it with at least 5 cm of space on all sides.
- Do not use the wireless system in a metal cabinet or bookshelf.
- Do not attempt to connect any extra surround speakers to the home theatre unit.
Connections
Turn off all equipment before connection.
Do not connect the AC mains lead until all other connections are complete.
Pairing with the home theatre unit
Refer also to the operating instructions for your home theatre unit.
Using the remote control of the home theatre unit, perform the following steps:
1 Turn on your home theatre unit.
- If the HOME menu is not displayed, press [HOME].
2 Press [OK] to select "Setup".
3 Select "Settings" to show the Setup menu.
4 Select "Sound" and press [OK].
5 Select "Speaker" and press [OK].
6 Select "Wireless System Pairing" and press [OK].
Follow the on-screen instructions to pair the wireless system and the home theatre unit.
- The wireless link indicator lights green when the wireless system and the home theatre unit are connected wirelessly.

- You can also perform this setup by selecting "Easy Settings" in the Setup menu.
Troubleshooting guide
Before requesting service, please perform the following checks.
If the problem remains unresolved, consult your dealer for instructions.
The wireless link indicator does not light.
Ensure the AC mains lead is connected properly.
Pairing cannot be done.
Disconnect and reconnect the AC mains lead of the wireless system and the home theatre unit, and do pairing again.
No sound from the surround speaker.
Verify the surround sound setting on the home theatre unit.
Specifications
| <AMPLIFIER SECTION> | |
| RMS TTL POWER OUTPUT | 400 W |
| 1 kHz, 10 % total harmonic distortion | |
| SURROUND: 200 W per ch (3 Ω) | |
| <RF SECTION> | |
| Wireless module Frequency range: 2.4 GHz Band | |
| <GENERAL> | |
| Power supply Except | South East AsiaAC 220 V to 240 V, 50 HzFor South East AsiaAC 220 V to 240 V, 50 Hz/60 Hz |
| Power consumption | 36 W |
| Power consumption in off mode | 0.5 W |
| Dimensions (W×H×D) | 123 mm×176 mm×146 mm |
| Mass | Approx. 0.83 kg |
| Operating temperature range | 0 °C to 40 °C |
| Operating humidity range | 35 % to 80 % RH(no condensation) |
Specifications are subject to change without notice.
Except South East Asia

Declaration of Conformity (DoC)
Hereby, "Panasonic Corporation" declares that this product is in compliance with the essential requirements and other relevant provisions of Directive 1999/5/EC.
Customers can download a copy of the original DoC to our R&TTE products from our DoC server:
http://www.doc.panasonic.de
Contact to Authorized Representative:
Panasonic Marketing Europe GmbH, Panasonic Testing
Centre,Winsbergring 15,22525 Hamburg,Germany
This product is intended for general consumer. (Category 3)
Disposal of Old Equipment
Only for European Union and countries with recycling systems

This symbol on the products, packaging, and/or accompanying documents means that used electrical and electronic products must not be mixed with general household waste.
For proper treatment, recovery and recycling of old products, please take them to applicable collection points in accordance with your national legislation. By disposing of them correctly, you will help to save valuable resources and prevent any potential negative effects on human health and the environment.
For more information about collection and recycling, please contact your local municipality.
Penalties may be applicable for incorrect disposal of this waste, in accordance with national legislation.
Centre, Winsberging 15, 22525 Hamburg, Germany
Centre, Winsbergring 15, 22525 Hamburg, Germany
Centre, Winsberging 15, 22525 Hamburg, Germany
Panasonic Marketing Europe GmbH, Panasonic Testing Centre, Winsberging 15, 22525 Hamburg, Germany
Hrvatski
C€ 0560
Panasonic Marketing Europe GmbH, Panasonic Testing Centre, Winsberging 15, 22525 Hamburg, Germany
Norsk
C€0560
Samsvarserklaering (DoC)
For the United Kingdom and Ireland customers
Sales and Support Information
Customer Communications Centre
For customers within the UK: 0844 844 3899
For customers within Ireland: 01 289 8333
Monday-Friday 9:00 am - 5:00 pm (Excluding public holidays).
For further support on your product, please visit our website: www.panasonic.co.uk
Direct Sales at Panasonic UK
- Order accessory and consumable items for your product with ease and confidence by phoning our Customer Communications Centre Monday-Friday 9:00 am - 5:00 pm (Excluding public holidays).
- Or go on line through our Internet Accessory ordering application at www.pas-europe.com.
- Most major credit and debit cards accepted.
- All enquiries transactions and distribution facilities are provided directly by Panasonic UK.
It couldn't be simpler! - Also available through our Internet is direct shopping for a wide range of finished products. Take a browse on our website for further details.
Manufactured by:
Panasonic Corporation
Kadoma, Osaka, Japan
Importer for Europe:
Panasonic Marketing Europe GmbH
Panasonic Testing Centre
Winsbergring 15, 22525 Hamburg, Germany
Panasonic Corporation
Web Site: http://panasonic.net