
ProScan 10T - Scanner Reflecta - Free user manual and instructions
Find the device manual for free ProScan 10T Reflecta in PDF.

| Product Type | Slide Scanner |
| Brand | Reflecta |
| Model | ProScan 10T |
| Power Supply | Included AC adapter |
| Maximum Optical Resolution | 10,000 dpi (402 MB for a 24-bit image) |
| Color Depth | 48 bits (16 bits per RGB channel) |
| Supported Film Formats | Mounted slides (positive), negative strips, black and white |
| Connectivity | USB 2.0 |
| Included Software | CyberView X5 |
| Main Features | One-button scan, Magic Touch (dust/scratch removal), multi-exposure, advanced adjustments (curves, levels, color balance), sharing to Facebook and Dropbox |
| Compatible Operating Systems | Windows and Mac |
| Box Contents | Scanner, AC adapter, USB 2.0 cable, CD with drivers and software, user manual |
| Maintenance and Cleaning | Clean with a soft, dry cloth; do not use solvents |
Frequently Asked Questions - ProScan 10T Reflecta
User questions about ProScan 10T Reflecta
0 question about this device. Answer the ones you know or ask your own.
Ask a new question about this device
Download the instructions for your Scanner in PDF format for free! Find your manual ProScan 10T - Reflecta and take your electronic device back in hand. On this page are published all the documents necessary for the use of your device. ProScan 10T by Reflecta.
USER MANUAL ProScan 10T Reflecta
Facebook for Devices
Connect your Device with facebook
Tnue aonrnnnne rnrnnnre ynrnnn nrrnne nrnne nee
Quick In stallation Guide(QIG) 6
Installing Software and Driver 6
Installing Hardware 8
Additional Features 8
One Button Scan 11
How to Scan Slides 12
STEP 1 - Acquire Driver 12
STEP2-Select Film Type 12
STEP 3 - Optional Prescan 12
STEP4-SetScanSettings13
STEP5-Set Scan Preferences 14
STEP6-Scan 17
STEP7-Exit 17
How to Use Sharing Function 18
- Scanning into Facebook 19
To scan to Dropbox 20
UserInterface 22
I Main Window Area 23
II Preview Window Area 27
III Active Frame Setting Area 29
Technical Support 30
GETTING STARTED
Check the package content before getting started.
For Quick Installation please refer to Quick Installation Guide. (Ref. Pg. 11)

Important! Save the original box, receipt and packing material for future shipping needs.
Package Contents

Warning! Using any other power adapter may severely damage the scanner and will void the product warranty.
NOTE:
Elements", this is subject to change without notice.
GENERAL GUIDANCE:
scanner directly using the USB 2.0 cable.
desktop computers.
cam) connected to the computer through USB disconnect them.
| Operating Ambient Temperature Range 50° to 104°F (10° to 40°C) |
| Note: Do not turn on the scanner unless it is within this range. If the scanner has been stored or transported outside of this range, allow it to return to within this range before turning it on. |
| Operating Ambient Humidity Range 15% to 76% relative humidity (non-condensing) |
| Note: If the scanner is stored or to be transported in cold temperature and then brought into a warm / humid environment condensation may occur. |
QUICK INSTALLATION GUIDE (QIG)
WINDOWS SYSTEMS INSTALLATION DURING DRIVER INSTALLATION A WARNING DIALOGUE BOX MAY APPEAR, IF THIS IS THE CASE PLEASE SELECT "INSTALL THIS DRIVER ANYWAYS".

Be sure to install the Application Software BEFORE installing the scanner driver CyberView
You may install the scanner driver directly if you have already installed TWAIN compliant application software in your computer. Mac users can use iPhoto for editing.
Notice:
- In "Found New Hardware Wizard" window, select "Search automatically or Browse computer for driver software."
- In "Completing the Found New Hardware Wizard" window, click "Finish".
NOTE: Not all PC's will display the found new hardware window, some will install in the background
INSTALLING SOFT WARE AND DRIVER
Before Installing the Scanner Driver...
If you choose to use the provided application for image editing, install the application software (ex: Presto Image Folio) by inserting the application CD into the computer's CD/DVD drive. Follow the instructions that will be displayed in a window that opens automatically.
Installing Scanner Driver
a. Insert driver CD into the computer CD/DVD drive and explore the contents.
b. Double click the "CyberView" icon to begin the installation process. Follow the onscreen prompts to complete the installation process.
NOTE: Make sure the scanner is NOT connected to the computer during the CyberView X 5.0 driver installation.
c. Restart computer once the installation process is complete.
Please Note: When installing your new scanner onto a Windows system that already has another USB Flatbed scanner or All-in-one Scan/Copier/Printer device installed, it may be necessary for you to power off or disconnect the other scanner from the USB port for the Film scanner to work properly.
TWAIN scanner plug-in Installation Guide for Adobe Photoshop Elements 12
You can install the TWAIN component that was installed with versions of Photoshop Elements earlier than verion 9 for use with Elements 11 or 12.
Important: Do not move plug-ins from previous versions of Photoshop Elements into the Photoshop Elements 11 or later > Plug-Ins folder. Also, don't set the Photoshop Elements 8 (or earlier) > Plug-Ins folder as the Additional Plug-Ins Folder in Preferences.
Find complete information at official Adobe website: http://helpx.adobe.com/photoshop-elements/kb/twain-installed-photoshopelements-11.html
Macintosh
If you would like to have TWAIN support on Mac OS, then Adobe strongly recommends that you access your device through Rosetta (PPC) OS. Otherwise, you scan your image, and then open it in Photoshop Elements.
To install the legacy TWAIN plug-in for Mac OS, copy the ImportModules folder from:
//Applications/Adobe Photoshop Elements
Files/Optional Plug-Ins into
//Applications/Adobe Photoshop Elements
*The version Number is 11 or 12 depending on the Photoshop version you have installed.
Windows
Adobe strongly suggests that you use WIA support for your device, if available. If your device does not support WIA drivers, then try updating your TWAIN driver. Contact the manufacturer of your device for further TWAIN support.
To install the legacy TWAIN plug-in, do the following:
For Windows (32 bit), copy the Import-Export folder from:
C:\Program Files\AdobePhotoshop Elements <version number\Optional Plug-Ins\
into
C:\Program Files\AdobePhotoshop Elements
For Windows (64 bit), copy the Import-Export folder from:
C:\Program Files (x86)\AdobePhotoshop Elements
C:\Program Files (x86)\Adobe\Photoshop Elements
*The version number is 11 or 12, depending on the Photoshop version you have installed.
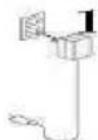
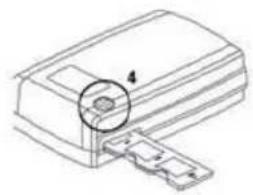
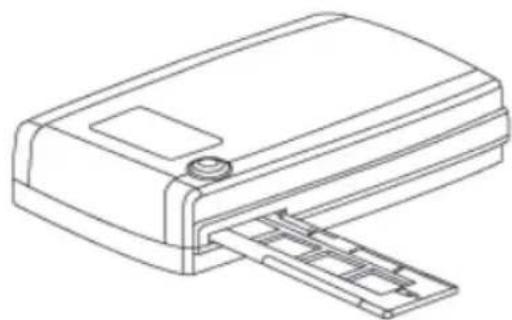
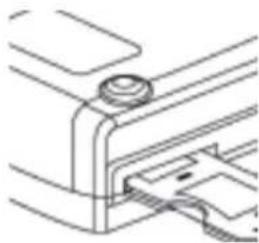
Installing Hardware
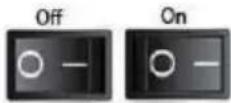
a. Connect the slide scanner to a power source.
- Locate the power switch on the lower left side of the scanner. Make sure the scanner is TURNED OFF.
-
Plug the AC adapter into an AC power source FIRST before plugging it into the scanner.
-
Attach the USB cable to the computer using the standard USB adapter end. Attach the USB adapter end of the cable to back panel of the scanner.
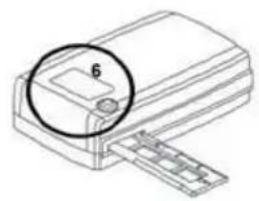
Additional features
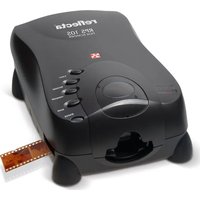
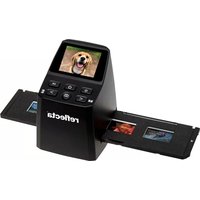
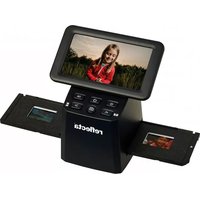
ProScan10T
- Scanner
- Slide holder
- Film Holder
- One Button Scan
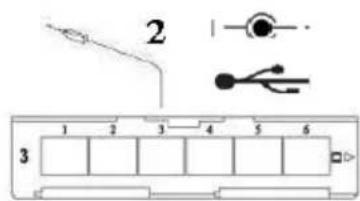
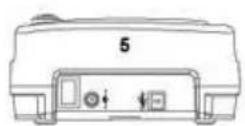
- Back of the unit
- Viewing Window
1.DCIn
2. USB Port
3. Power Switch
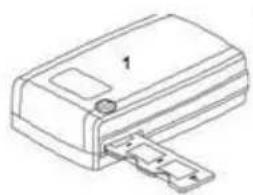

ProScan10T
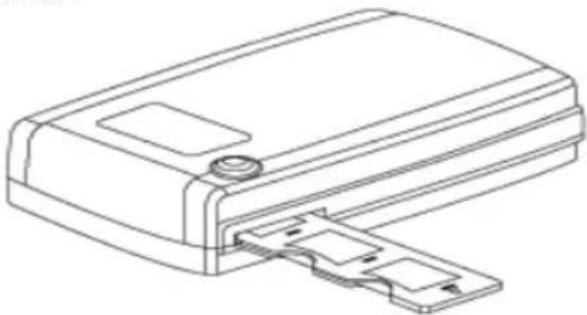
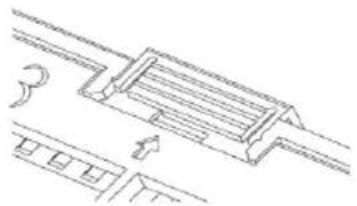
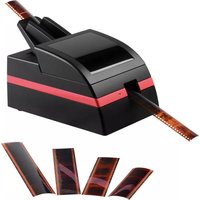
To Scan Mounted Slides
- Mounted Slides
1-1. Load the mounted slides into the slide holder
1-2. Insert the slide holder into the scanner with the arrow facing upwards
1-3. Insert to holder into the scanner from the left or the right side
HSI7DN3
ProScan10T - Scanning Slides (Continued...)
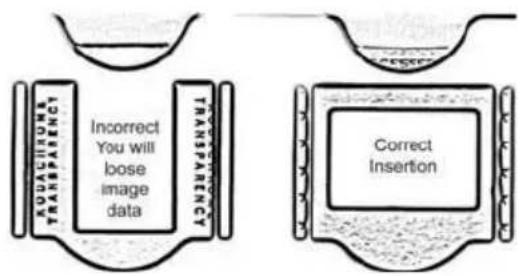
Please Note: improper insertion will cut off the top of the image.

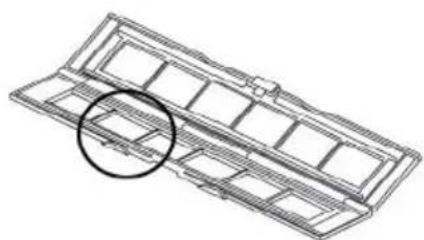
To Scan Negative Film Strips
2-1. Load the negative into the holder making sure to align the film frames with the frames on the holder
2-2 Close the film holder
2-3. Insert the film holder into the scanner from the left or right side, with the arrow facing upwards
One Button Scan
- Open the CvberView
- Configure Scan Settings
- Select the Scan to directory, file format (TIF or JPG, once configured, Press the scanner button to begin scanning.
ProScan10T
One Touch Button
CyberView X5
Scanning to C:\Users\gif\Documents\image001.tif

Film Type: Positive 135
Resolution: 1000 dpi
MagicTouch: Off
Cancel
NOTE: If you do not open CyberView FIRST, the scan button will not function.
HOW TO SCAN SLIDES
STEP 1 - Acquire Driver
(For PC User)
Open CyberView from Start - All Programs -CyberView
(For MAC User)
Open Macintosh Hard drive - Applications -CyberView
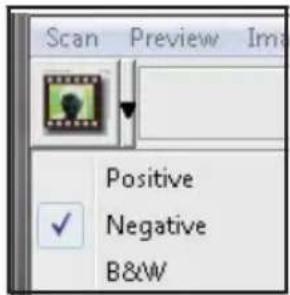
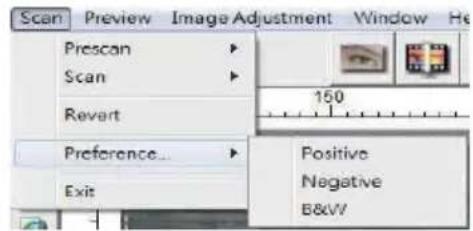
STEP 2 - Select Film Type
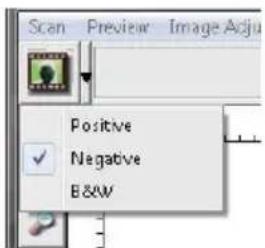
Select the film type to be scanned - Positive, Negative or B&W (Black and White).
STEP 3 - Optional Prescan
Select the "Prescan Current Frame" to prescan the slide currently loaded into the scanner or "Prescan..." to prescan slide or slides at specific positions in the magazine.
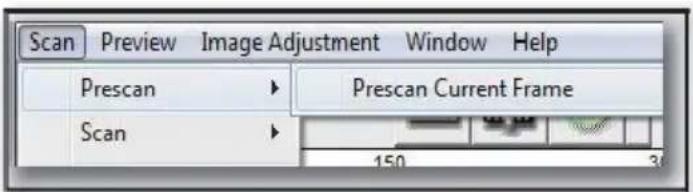
Pre-Scanning should be used to manually adjust color/edit settings for each slide before doing the final scan. It's possible to set different settings for each slide to be scanned.
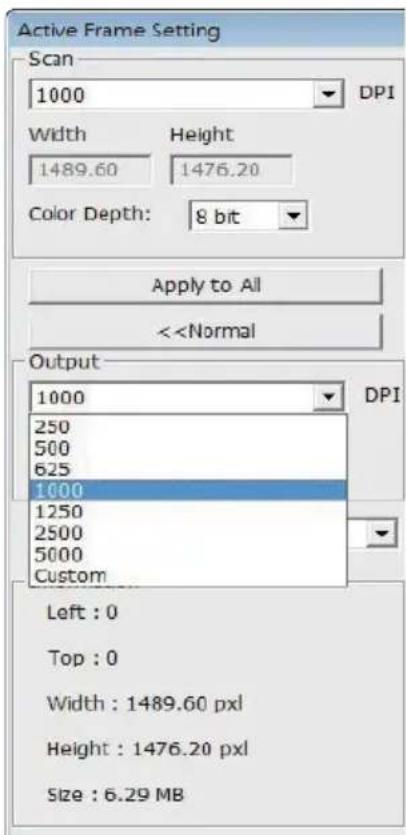
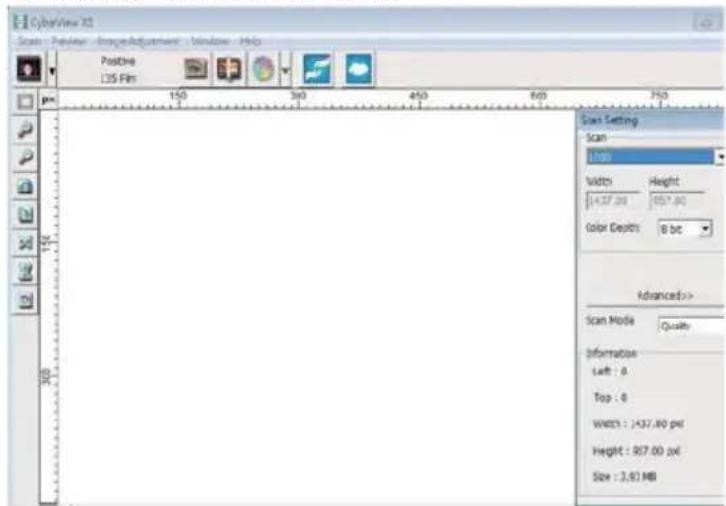
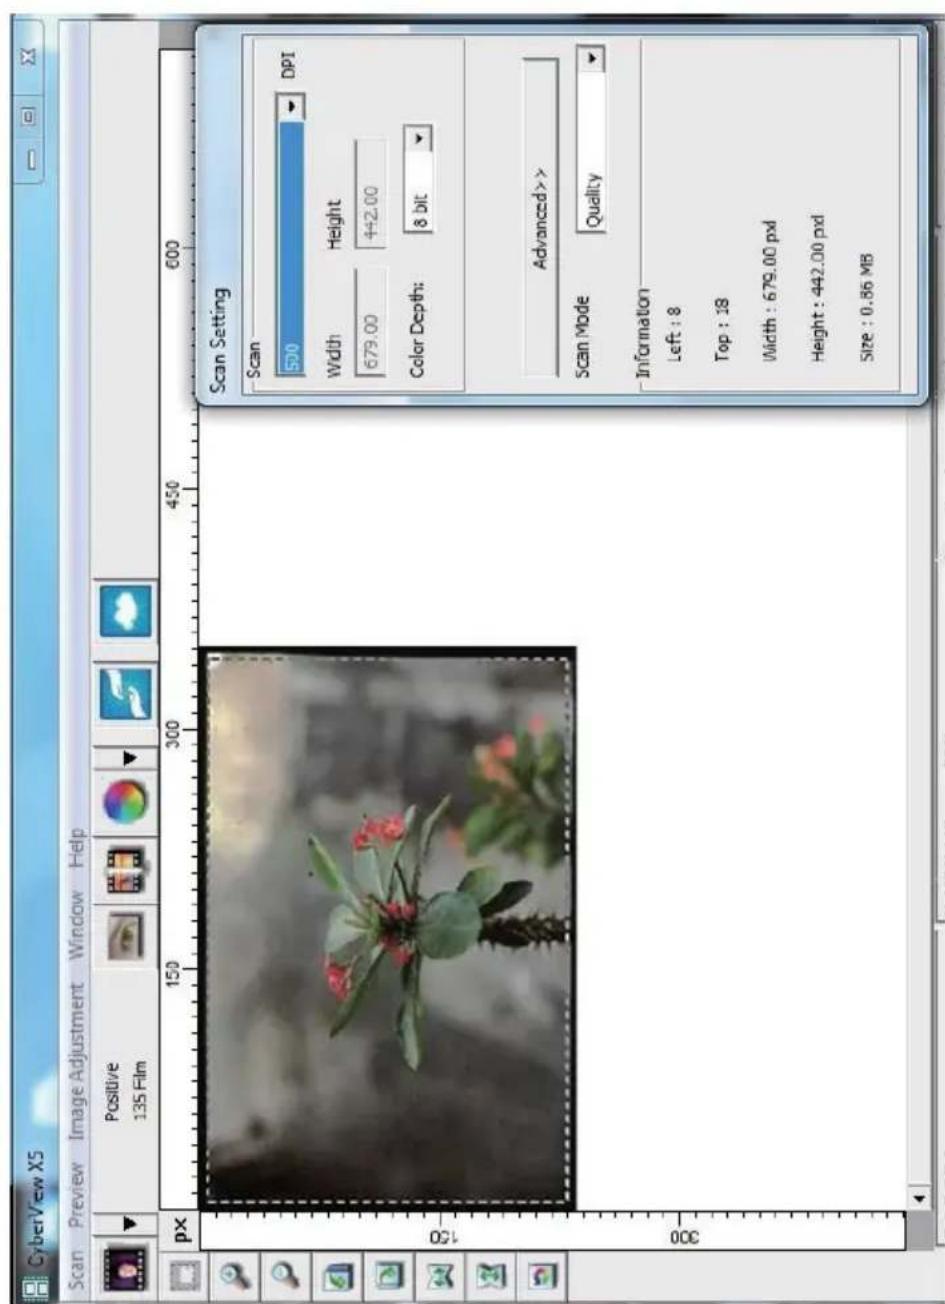
STEP4-SetScan Settings
a. Resolution
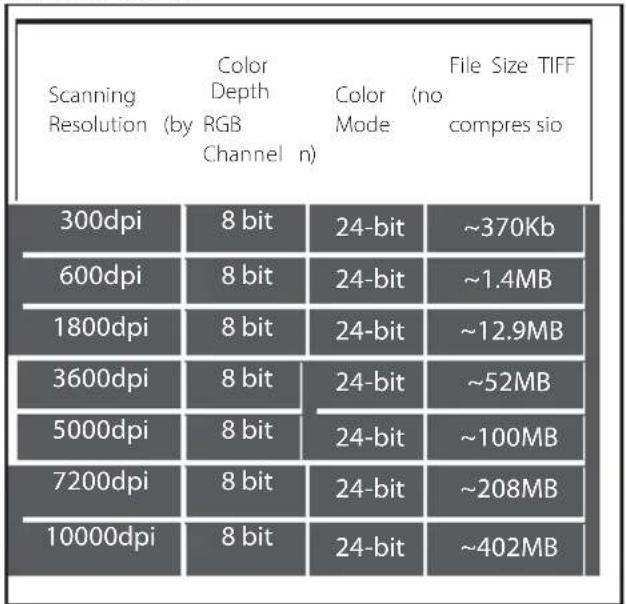
The default scanning resolution is 1000dpi, additional resolution options are listed below.
Notice: Higher scanning resolutions result in greater scanning time and hard disk space requirements.
b. Color Depth
Choose between 8 and 16bit. A higher color depth setting will result in a larger range of colors in the final scanned image.
The Film Scanner color depth is 48 bit true color. The scanning software has the capability of selecting 8 bit color mode or 16 bit color mode when scanning, This will produce 24 or 48 bit color images, 8 bits or 16 bits per Red, Green and Blue color channels.
Example:
8 bit mode = 8 Red, 8 Green, and 8 Blue for a total of 24 bit color
16 bit mode = 16 Red, 16 Green, and 16 Blue for a total of 48 bit color
NOTE: Make sure there is enough space available on the computer when changing the Scanning Resolution. A high scanning resolution results in large files that may prove difficult to save.
Color image file size of different resolutions and color depths:
Scans include Auto Balance and Digital Noise
Reduction on:
Processor: AMD 9650 Quad-Core 2.3GHz
Memory: 2GB
System type: Vista 64 bit
Scan Mode - Normal mode produces a scan in JPEG format while Quality produces a non-compressed, "loss-less"TIFF image.
STEP 5 - Set Scan Preferences
Select Scan - Preference - Film Type - Scan Setting
"Prescan Resolution" - Default pre-scan resolution.
"Color Depth" - Default color depth while scanning.
"Scan Mode" - Default scan mode while scanning.
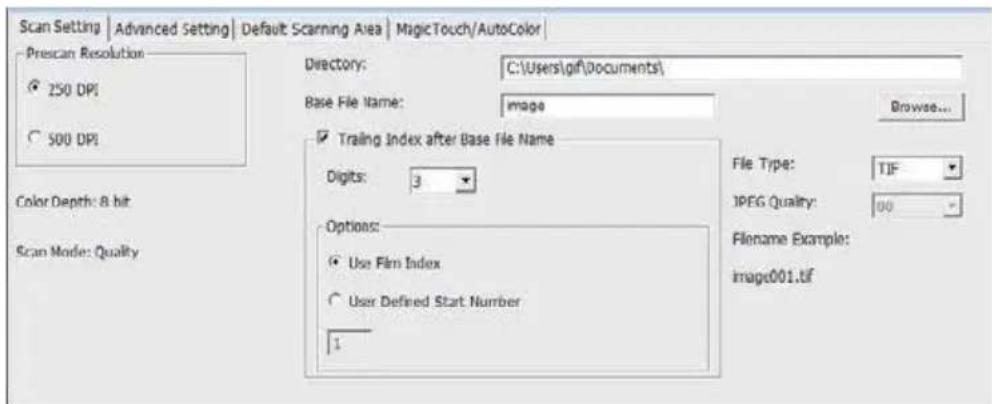
Configuring Scan Preferences
- Select Browse and choose the designated folder to save the scanned image to
- Enter the file name.
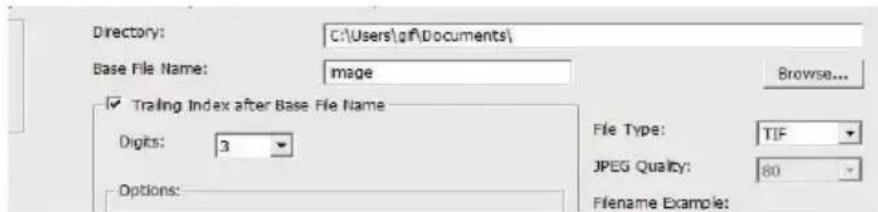
Set Scan Preferences (Continued...)
- Trailing Index after Base File Name Digits: Defines the length of the file name and numbering sequence up to 6 digits Example image1 or image000001.

- Options - Use Film Index: Use the number assigned to the slide based on its position in the car fridge.
User Defined Start Number: Enter a specific start number
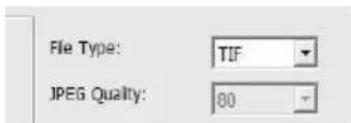
- Choose the file type, "TIF" or "JPG". (TIF uncompressed or JPG Compressed-Choose image quality for JPEG. (20-100) 100 offers the least amount of compression
Advanced Setting
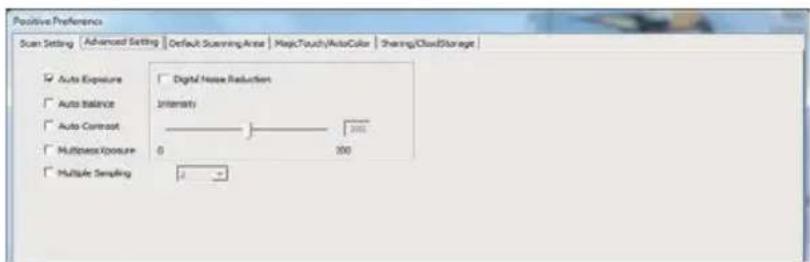
"Auto Exposure" - Attempts to find the correct exposure to get the widest range of whites and blacks while putting the middle grays at around the middle of the data range.
"Auto Balance" - Using the image histogram to balance RGB channels. It estimates images' color cast and adjust the images accordingly
"Auto Contrast"-The scanner software analyzes the data and automatically adjusts the Setting for the White and Black Points.
"Digital Noise Reduction"-Applies a filter, Reducing the film grain.
"Multipass Xposure"- When enabled Multi-Exposure performs a triple scanto obtain the best possible image, This process captures the three individual scans,first a normal passthen two more scans to highlight the shadow details to expose the darker areas more fully, The software then intuitively calculates the final scan, which now contains the data from all three scans.
"Multiple Sampling"- Configure the settings to scan a single image (multiple times)2x, 4x, 8x or 16x for the highest quality output. Please note this greatly increases scan time. With Multi-Sampling image noise is a thing of the past.
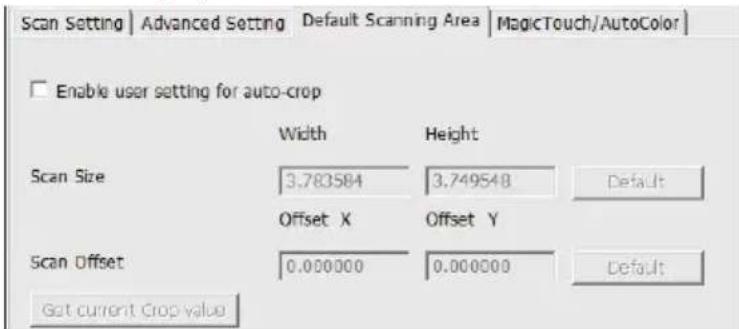
Default Scanning Area
Adjust the scanning size as well as adjust the "Scan Offset" setting to move the image position of slide.
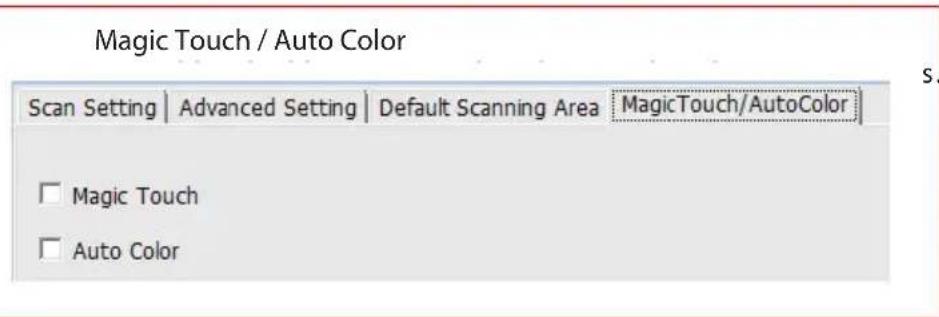
Magic Touch is a powerful dust and scratch removal technology that does away with the hassle of learning complex and tedious software techniques. Being hardware-based, it works seamlessly with the scanning process to ensure the best possible results when bringing images into the computer. Dust, scratches and other flaws are intelligently detected and eliminated, restoring the image to its original beauty. Magic Touch doesn't work with Kodachrome Film and B&W Film, you have to deactivate it.
Scanning with Magic Touch requires longer scanning times, the feature is turned off by default.
Auto Color takes the guesswork out of the scanning process to streamline the workflow and achieve the best results. Proprietary color enhancement technology is applied to scanned images to provide the most accurate color adjustment, resulting in vibrant images with optimal brightness, contrast and saturation.
STEP 6 - Scan
Scan - Scan Current Frame
This begins the scan to file process
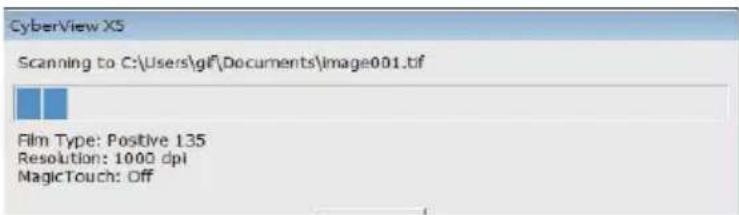
All scanned images will be saved to the directory location set previously, the factory default locations are:
Windows: C:\Users\YOUR NAME\Documents;
MAC: Mac HD\Users\YOUR NAME\Pictures\Cyberview Images),
STEP7-Exit
Select "Scan > Exit" to close the driver. Scanned image files can be open/edited with any image editing software.
NOTE: If using the supplied image editor, for help with this application see the users Help from within the application.
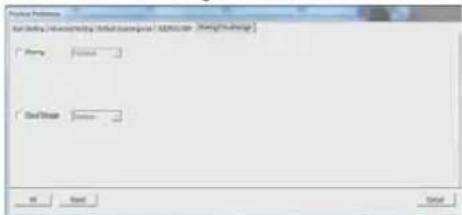
HOW TO USE SHARING FUNCTION
Sharing/CloudStorage:


Dropbox
Simple design and easy to use
Open the CyberviewX5 software, you will need to select positive for slides or negative for film strips.
Configure the Scan setting - Scan - Preference - Film Type - Sharing/Cloud Storage Note: the tool bar options are disabled until activating in the Settings window
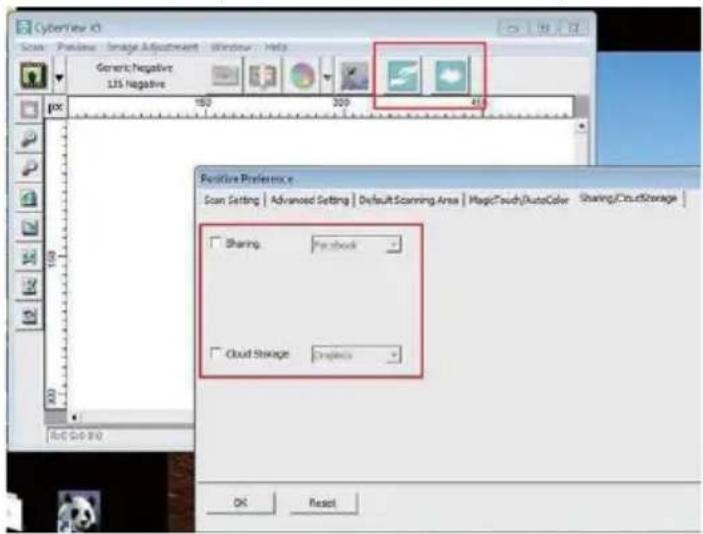
Select your method either Sharing or Cloud


Then Click "OK"
The toolbar icons are now active
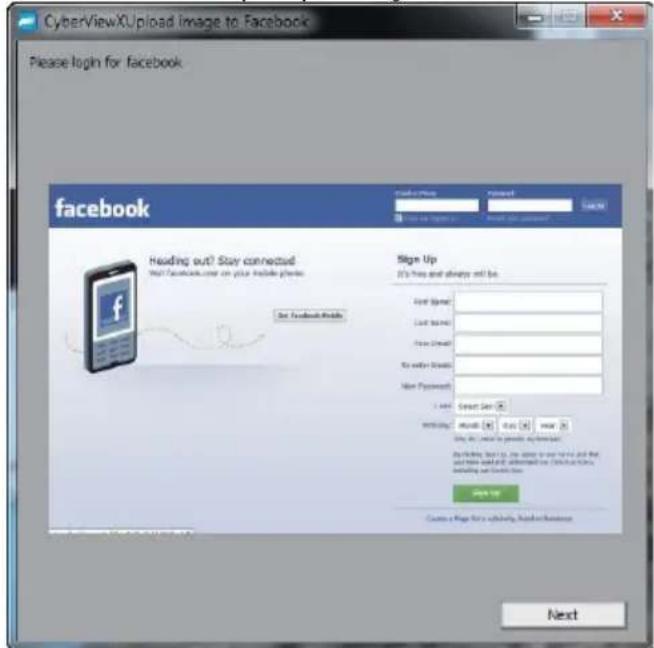
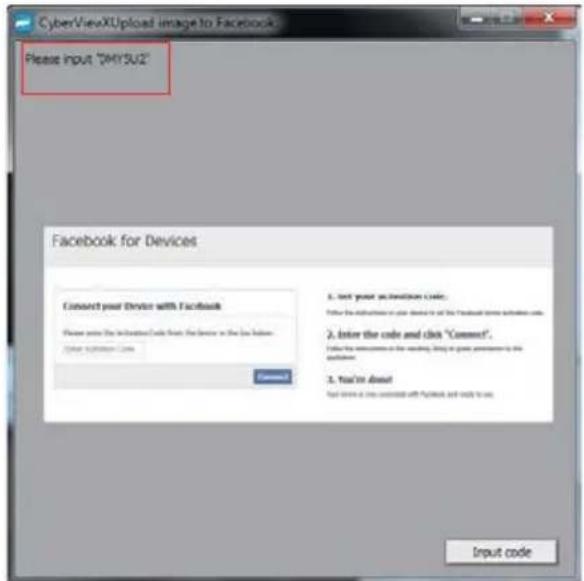
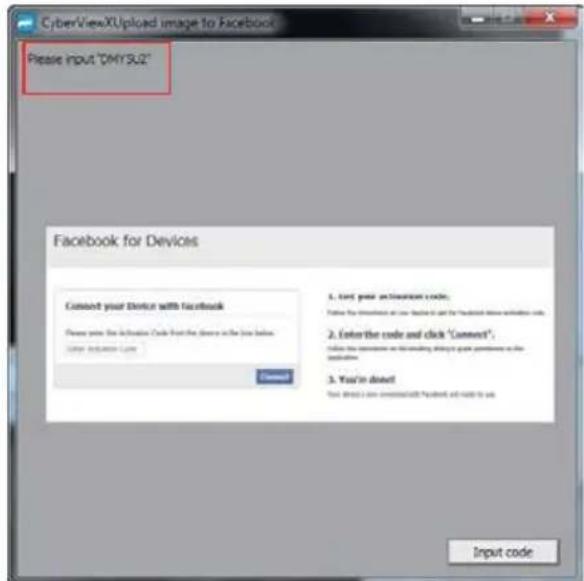
Scanning into facebook, you must first log out of your account, the scanning function will require authentication/login on each use
- Log off of your Facebook account
- In the Cyberview interface activate Sharing feature as described above
- Follow the onscreen prompts to log in and authenticate the device
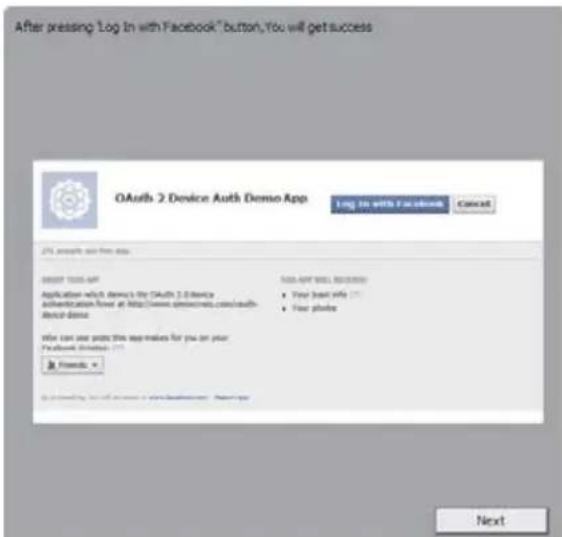

Success
Minimize this browser window
- Minimize the browser window and on the next CyberView screen, note the Code number you have been given (this will be a different code every time, copy it down, you will need to enter it on the Facebook website
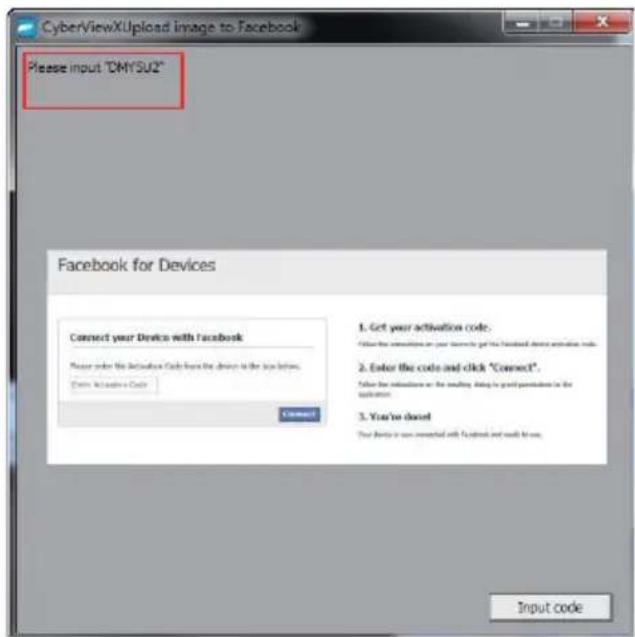
- Enter the code you made a note of earlier, then click Connect
Facebook for Devices

- Your scanner is now connected to Facebook
Facebook for Devices
Connect your Device with Facebook
You have successfully connected your device with Facebook. You may now return to your device.
To scan to Dropbox, you must first go here: https://www.dropbox.com/ and sign up for an account and download and install their software, if you are not currently a Dropbox member and would like to use this service.
Once you have created and installed Dropbox application you will now have a new folder on your computer that you may select to scan into fo automatic sync uploads with your Dropbox account.

To scan into theDropbox folder
- OpenCyberview X5
- Next select Scan -Preference - the film type you wish to scan (Positive or Negative)
- In this scan settings window select the Sharing and CloudStoragetab
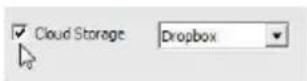
- Check the box beside CloudStorage to activate it
NOTE: When selecting the CloudStorage - Dropbox feature the software will automatically scan to the CyberviewX folder it creates in your Dropbox folder on your computer, ready for synchronization with your Dropbox account.
- Click OK to savesettings, Once configured you are ready to scan.
- All the filescanned will be saved into theDropbox folder
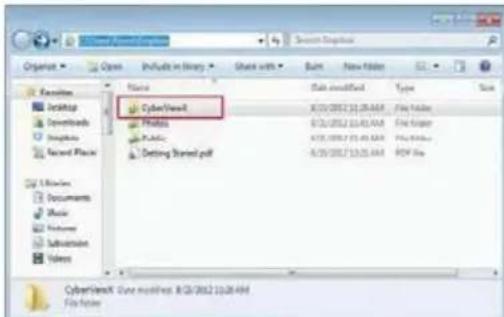
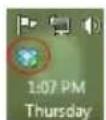
Synchronizationwill automatically occur with your online account when active. (Active=Dropboxis running in the system tray)
USER INTERFACE
HS17DN3
There are four major parts of the CyberView X 5 user interface:
I. Main Window Area [Fixed Windows]
II. Preview Window Area [Fixed Window]
III. Active Frame Setting Area [FloatingWindow]
I. Main Window Area [Fixed Windows]
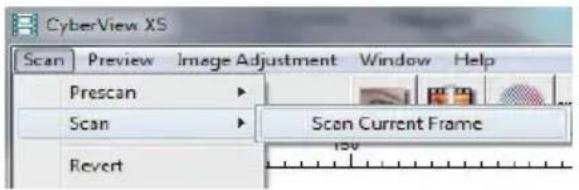
Menu Commands - Scan
Prescan - Prescan Current Frame: Pre-scan the existing slide.
Scan - Scan Current Frame > Scan the current slide.

Zoom, Rotate & Flip features.
Revert
Discards all modifications and restores the image back to the original state.
Preference - See Scan Setting (See Page 13)
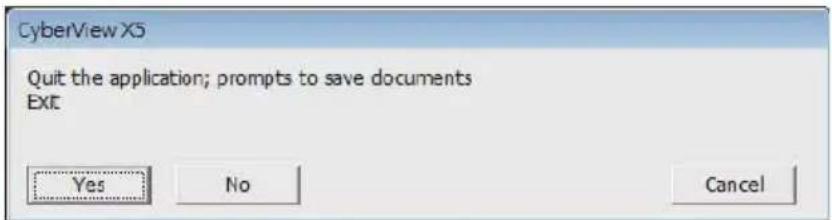
Exit
Closes the CyberView X5 user interface.
There is a message pop-up"Quit the application prompts to save documents?" click"Yes" to save, "No" to discard the current settings or "Cancel" to return to Cyber View X.

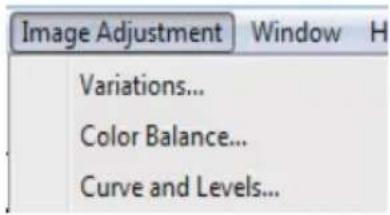
Menu Commands - Image Adjustment
a. Image Adjustment
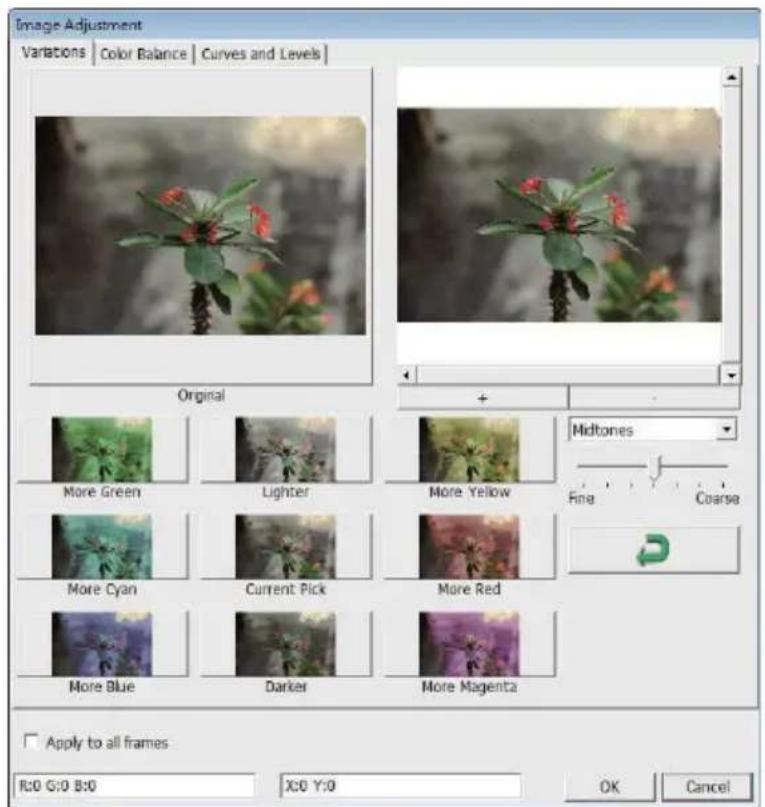
- Variations: Generates different views of image with options to make changes to highlights, mid-tones, etc.
2. Color Balance
To adjust the brightness, contrast, saturation, and color (CMY or RGB) of the image. Comparisons between before and after adjusted images are shown for reference.
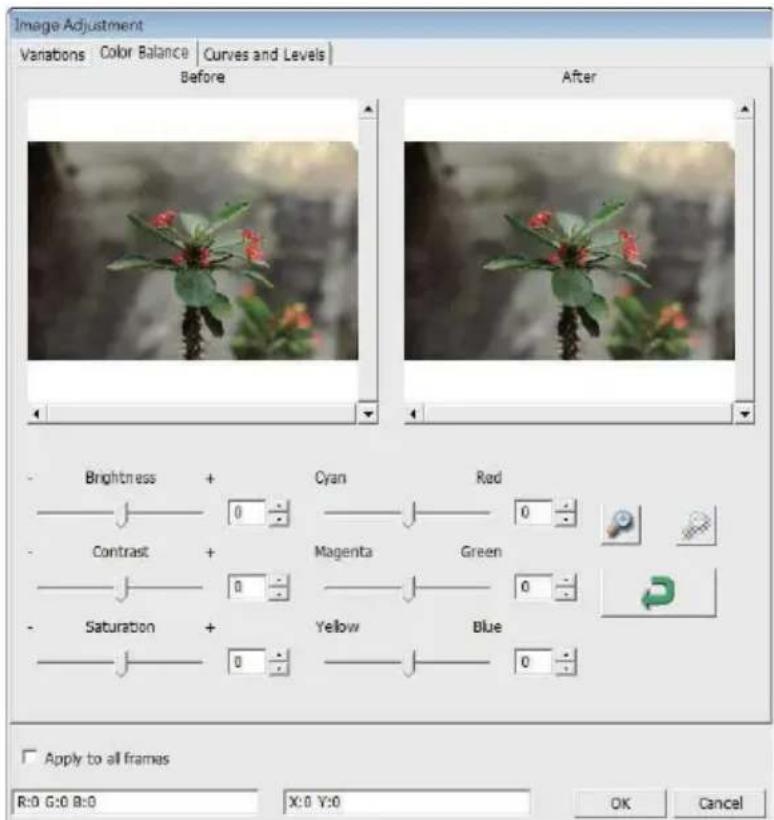
Example: If a previewed image appears too dark, use the "Brightness" slider in the "Color Balance" window to adjust the image by selecting the slider in the center and moving it to the right. The image's "After" view becomes lighter. Select "OK" to accept the changes which will be sent to the scanning hardware. This can also be used to adjust each of the functions in "Color Balance" by contrast, saturation and specific color ranges of cyan, magenta and yellow.
3. Curves and Levels
Adjust image settings by moving Curve and Levels settings. Comparison between before and after adjustment is displayed for reference.
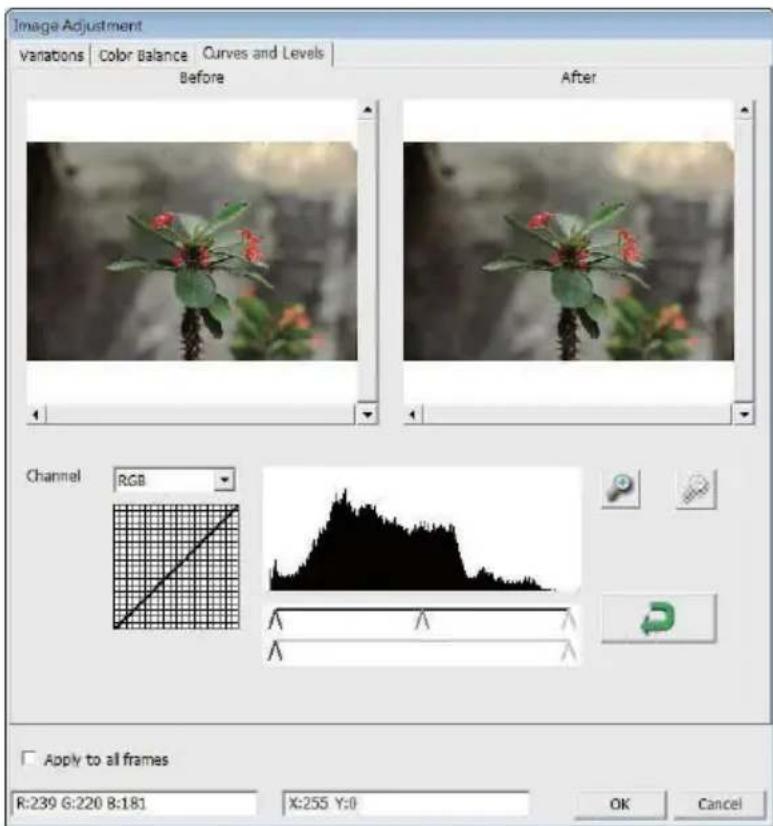
Example: When the previewed image appears to be too dark, adjustments with the Input slider in the Curves and Levels window can be made to correct the image. Selecting the Gray slider in the center and moving it to the left will result in changes in the "After" view resulting in a lighter image. Once the adjusted image is acceptable select "OK" to send changes to the scanning hardware. The same method can also be used to adjust each color channel independently using the channel drop down menu "RGB = All colors" R = Red, G = Green, and B = Blue.
Menu Commands - Windows
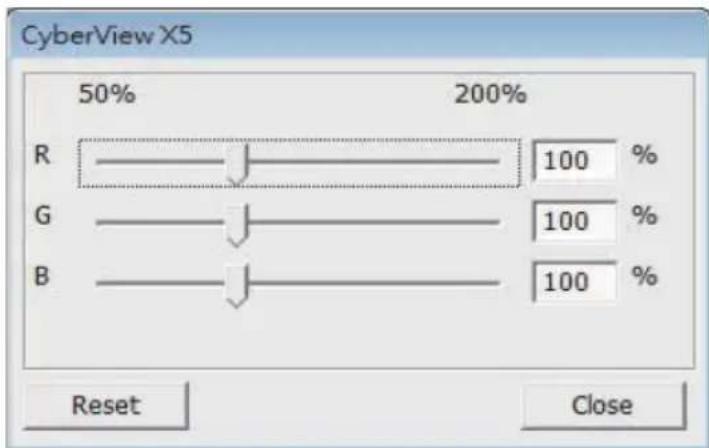
- Exposure Setting: To adjust the exposure time (R, G, B) press "Reset" to restore to the default setting.
Menu Commands - Help
firmware has been saved. (These files may be downloaded from ourwebsite)
information (including product name, model name, hardware version, firmware version, software version, device information including interface and optical resolution).
Function Bar Diagram
Please select your film type and brand from the toolbar:
Negative Positive (also known as Slide) Black and White
II. Preview Window Area [Fixed Windows]
![Reflecta ProScan 10T - Preview Window Area [Fixed Windows] - 1](/content/2026/02/363908/images/66813b539ce48db8f23842ec68f8f26137409c83e1cb7bad04fb199f7e9dfa09.jpg)
Prescan: Pre-scan the current film, press drop down for more options.
![Reflecta ProScan 10T - Preview Window Area [Fixed Windows] - 2](/content/2026/02/363908/images/2cebc790623142d68fe580457e4f0a3564e713bec14803d5c19f36f7378628d2.jpg)
Scan: Scan film, press drop down button for more options.
Image Adjustment: Press drop down button for more options.
![Reflecta ProScan 10T - Preview Window Area [Fixed Windows] - 3](/content/2026/02/363908/images/a3bb198d3a84739c7cc1623e13d61c5f2016007da67425001dd1e99c45a5d9d4.jpg)
Preview the image you pre-scan, you can select the measurement unit "in"-“cm"-“px" by clicking the upper-left corner.
Toolbar Diagram

Select scan area: more than one selection can be made at a time.

Zoom In: To magnify the image where the cursor is currently located. The image will be magnified with every click until the maximum multiple (1000%) is reached.

ZoomOut: To reduce the size of the viewed image click the Zoom Out cursor to the desired area, the image will reduce by half with every click until the lowest multiple (25%) is reached.

Rotate 90 Left:To rotate the image counter clockwise 90 degrees.

Rotate 90 Right: To rotate the image clockwise 90 degrees.

Flip Horizontal: To Flip the image 180 degrees horizontally.

Flip Vertical: To Flip the image 180 degrees vertically.

Revert:Discard all modifications and restores the image back to the original state in preview windows.
Status Line
In the lower left hand corner, the color level (RGB: red, green, blue) and coordinates of the location [ex: I] are displayed. The zoom scale, the current slide magazine location and how many areas selected to scan (2 or or higher indicates: Multiple scan areas on one slide [ex: II].
1.

II.

III. Scan Setting Area [Floating Windows]
Normal mode [ex: I] to input the basic parameter to scan (including scan resolution, film size, color depth).
Advanced mode [ex: II] to input the parameter of scan output, scan resolution, and color depth
1.
![Reflecta ProScan 10T - Scan Setting Area [Floating Windows] - 1](/content/2026/02/363908/images/03294ad4c399d3058ad3c6e3f394fd5a700bc43cc1c69af11090b419d3c1f6fa.jpg)
![Reflecta ProScan 10T - Scan Setting Area [Floating Windows] - 2](/content/2026/02/363908/images/98dfe9790e80da58c9718a3a5c61a1505ad0736730c9fa1c9882942caeb8b488.jpg)
TECHNICAL SUPPORT
Dear customers,
our reflecta products undergo a strict end quality control. If the equipment does not function properly, or to your expectations please first make sure that you have installed the latest software and firmware. These can be found on our website: www.reflecta.de If an error persists, then please contact our customer service, see below.
The warranty period is 24 months and begins on the date of purchase. Please keep your receipt as proof of purchase.
reflecta GmbH
Junghansring 60
72108 Rottenburg
Germany
Phone: +49 (0) 7457-946560
3. Curves and Levels (Curve e livelli)
Log in to use your Facebook account with Gauth 2Device Auth Demo App.
mat
Password

Kasa ma logged in
Forgot your password?

Ridurre a icona estafinestra del browser
Facebook for Devices
Connect your Device with Facebook
Please enter the Activation Code from the device in the box below.
Entire AuthNoBote.Codoe

Facebook for Devices
Connect your Device with Facebook
You have successfully connected your device with Facebook! You may now return to your device.

Dropbox
http://helpx.adobe.com/photoshop-elements/kb/twain-installed-photoshop-elements11.html
Macintosh
//Applications/Adobe Photoshop Elements
haar
//Applications/Adobe Photoshop Elements/
III. Scan Setting Area (Instelgebied scan) [zwevende vensters]
"Scan Mode" (Scanmodus) - standard scanmod us.
Scanvoorkeuren instellen
Selecteer de methode: Delen of Cloud.


Facebook for Devices
Connect your Device with Facebook
Please enter the Activation Code from the device in the box below.
Later estimation Code
Comment
Facebook for Devices
Connect your Device with Facebook
You have successfully connected your device with Facebook! You may now return to your device.

Dropbox
http://helpx.adobe.com/photoshop-elements/kb/twain-installed-photoshop-elements-11.html
Macintosh
| 300dpi | 8 bit | 24-bit | ~370Kb |
| 600dpi | 8 bit | 24-bit | ~1.4MB |
| 1800dpi | 8 bit | 24-bit | ~12.9Mi |
| 3600dpi | 8 bit | 24-bit | ~52MB |
| 5000dpi | 8 bit | 24-bit | ~100MB |
| 7200dpi | 8 bit | 24-bit | ~208ME |
| 10000dpi | 8 bit | 24-bit | ~402MB |
- Minimize the browser window and on the next CyberView screen, note the Code number you have been given (this will be a different code every time, copy it down, you will need to enter it on the Facebook website
Facebook for Devices
Connect your Device with Facebook
Please enter the autovisors code from the space in the box below.

Facebook for Devices
Connect your Device with Facebook
You have successfully connected your device with Facebook You may now return to your device.
http://helpx.adobe.com/photoshop-elements/kb/twain-installed-photoshop-elements-11.html
Macintosh
//Applications/Adobe Photoshop Elements
//Applications/Adobe Photoshop Elements
COMO DIGITALIZAR DIAPOSTIVAS
- Minimize the browser window and on the next CyberView screen, note the Code number you have been given (this will be a different code every time, copy it down, you will need to enter it on the Facebook website

Facebook for Devices

Facebook for Devices
Connect your Device with Facebook
You have successfully connected your device with Facebook. You may
http://helpx.adobe.com/photoshop-elements/kb/twain-installed-photoshop-elements-11.html
Macintosh
MAC:Mac HD\Users\YOUR NAME\Pictures\Cyberview Images),
ETAPE 7 - Quitter
- Minimize the browser window and on the next Cyber View screen, note the Code number you have been given (this will be a different code every time, copy it down, you will need to enter it on the Facebook website
Facebook for Devices
Connect your Device with Facebook
Heapee the Asscssor Code From the devicrs the ict below
中

Facebook for Devices
Connect your Device with Facebook
You have successfully connected your device with Facebook. You may now return to your device.

Dropbox
Pour scanner dans

- GETTING STARTED
- NOTE:
- GENERAL GUIDANCE:
- QUICK INSTALLATION GUIDE (QIG)
- Notice:
- INSTALLING SOFT WARE AND DRIVER
- Installing Scanner Driver
- Macintosh
- Windows
- Installing Hardware
- Additional features
- ProScan10T
- To Scan Mounted Slides
- HSI7DN3
- One Button Scan
- HOW TO SCAN SLIDES
- STEP 1 - Acquire Driver
- STEP 2 - Select Film Type
- STEP 3 - Optional Prescan
- STEP4-SetScan Settings
- STEP 5 - Set Scan Preferences
- Configuring Scan Preferences
- Set Scan Preferences (Continued...)
- STEP 6 - Scan
- STEP7-Exit
- HOW TO USE SHARING FUNCTION
- Simple design and easy to use
- Success
- Connect your Device with Facebook
- USER INTERFACE
- Main Window Area [Fixed Windows]
- Menu Commands - Scan
- Preference - See Scan Setting (See Page 13)
- Menu Commands - Image Adjustment
- a. Image Adjustment
- Color Balance
- Curves and Levels
- Menu Commands - Windows
- Menu Commands - Help
- Function Bar Diagram
- Preview Window Area [Fixed Windows]
- Toolbar Diagram
- Status Line
- Scan Setting Area [Floating Windows]
- TECHNICAL SUPPORT
- Curves and Levels (Curve e livelli)
- Dropbox
- Scan Setting Area (Instelgebied scan) [zwevende vensters]
- Scanvoorkeuren instellen
- COMO DIGITALIZAR DIAPOSTIVAS
- ETAPE 7 - Quitter
Brand : Reflecta
Model : ProScan 10T
Category : Scanner