
KD1250K - Drill BLACK & DECKER - Free user manual and instructions
Find the device manual for free KD1250K BLACK & DECKER in PDF.
User questions about KD1250K BLACK & DECKER
0 question about this device. Answer the ones you know or ask your own.
Ask a new question about this device
Download the instructions for your Drill in PDF format for free! Find your manual KD1250K - BLACK & DECKER and take your electronic device back in hand. On this page are published all the documents necessary for the use of your device. KD1250K by BLACK & DECKER.
USER MANUAL KD1250K BLACK & DECKER
Your BLACK+DECKER rotary hammer drill has been designed for drilling in wood, metal, plastics, and masonry as well as for screwdriving and light chiselling applications. This tool is intended for consumer use only.
Safety instructions
General power tool safety warnings

Warning! Read all safety warnings and all instructions. Failure to follow the warnings and instruction
listed below may result in electric shock, fire and/or serious injury.
Save all warnings and instructions for future reference. The term "power tool" in the warnings refers to your mains operated (corded) power tool or battery operated (cordless) power tool.
1. Work area safety
2. Electrical safety
a. Keep work area clean and well lit. Cluttered and dark areas invite accidents.
b. Do not operate power tools in explosive atmospheres, such as in the presence of flammable liquids, gases or dust. Power tools create sparks which may ignite the dust or fumes.
c. Keep children and bystanders away while operating a power tool. Distractions can cause you to lose control.
a. Power tool plugs must match the outlet. Never modify the plug in any way. Do not use any adapter plugs with earthed (grounded) power tools. Unmodified plugs and matching outlets will reduce risk of electric shock.
b. Avoid body contact with earthed or grounded surfaces such as pipes, radiators, ranges and refrigerators. There is an increased risk of electric shock if your body is earthed or grounded.
c. Do not expose power tools to rain or wet conditions. Water entering a power
tool will increase the risk of electric shock.
3. Personal safety
d. Do not abuse the cord. Never use the cord for carrying, pulling or unplugging the power tool. Keep cord away from heat, oil, sharp edges or moving parts. Damaged or entangled cords increase the risk of electric shock.
e. When operating a power tool outdoors, use an extension cord suitable for outdoor use. Use of a cord suitable for outdoor use reduces the risk of electric shock.
f. If operating a power tool in a damp location is unavoidable, use a Residual Current Device (RCD) protected supply. Use of an RCD reduces the risk of electric shock.
a. Stay alert, watch what you are doing and use common sense when operating a power tool. Do not use a power tool while you are tired or under the influence of drugs, alcohol or medication. A moment of inattention while operating power tools may result in serious personal injury.
b. Use personal protective equipment. Always wear eye protection. Protective equipment such as dust mask, non-skid safety shoes, hard hat, or hearing protection used for appropriate conditions will reduce personal injuries.
c. Prevent unintentional starting. Ensure the switch is in the off-position before connecting to power source and/or battery pack, picking up or carrying the tool. Carrying power tools with your finger on the switch or energising power tools that have the switch on invites accidents.
d. Remove any adjusting key or wrench before turning the power tool on. A wrench or a key left attached to a rotating part of the power tool may result in personal injury.
e. Do not overreach. Keep proper footing and balance at all times. This enables better control of the power tool in unexpected situations.
f. Dress properly. Do not wear loose clothing or jewellery. Keep your hair, clothing and gloves away from moving parts. Loose clothes, jewellery or long hair can be caught in moving parts.
g. If devices are provided for the connection of dust extraction and collection facilities, ensure these are connected and properly used. Use of these devices can reduce dust related hazards
4. Power tool use and care
a. Do not force the power tool. Use the correct power tool for your application. The correct power tool will do the job better and safer at the rate for which it was designed.
b. Do not use the power tool if the switch does not turn it on and off. Any power tool that cannot be controlled with the switch is dangerous and must be repaired.
c. Disconnect the plug from the power source and/or the battery pack from the power tool before making any adjustments, changing accessories, or storing power tools. Such preventive safety measures reduce the risk of starting the power tool accidentally.
d. Store idle power tools out of the reach of children and do not allow persons unfamiliar with the power tool or these instructions to operate the power tool. Power tools are dangerous in the hands of untrained users.
e. Maintain power tools. Check for misalignment or binding of moving parts, breakage of parts and any other condition that may affect the power tools operation. If damaged, have the power tool repaired before use. Many accidents are caused by poorly maintained power tools.
f. Keep cutting tools sharp and clean. Properly maintained cutting tools with sharp cutting edges are less likely to bi and are easier to control.
g. Use the power tool, accessories and tool bits etc. in accordance with these instructions, taking into account the working conditions and the work to be performed. Use of the power tool for operations different from those intended could result in a hazardous situation.
5. Service
a. Have your power tool serviced by a qualified repair person using only identical replacement parts. This will make sure that the safety of the power tool is maintained.
Additional power tool safety warnings

Warning! Additional safety warnings for rotary and chiselling hammers
- Wear ear protectors. Exposure to noise can cause hearing loss.
- Use auxiliary handles supplied with the tool. Loss of control can cause personal injury.
- Hold power tool by insulated gripping surfaces when performing an operation where the cutting accessory may contact hidden wiring or its own cord. Cutting accessory contacting a "live" wire may make exposed metal parts of the power tool "live" and shock the operator.
- Never use a chisel accessory in rotary mode. The accessory will bind in the material and rotate the drill.
- Use clamps or another practical way to secure and support the workpiece to a stable platform. Holding the work by hand or against your body leaves it unstable and may lead to loss of control.
- Before drilling into walls, floors or ceilings, check for the location of wiring and pipes.
-
Avoid touching the tip of a drill bit just after drilling, as it may be hot.
-
This tool is not intended for use by persons (including children) with reduced physical, sensory or mental capabilities, or lack of experience and knowledge, unless they have been given supervision or instruction concerning use of the appliance by a person responsible for their safety. Children should be supervised to ensure that they do not play with the appliance.
- The intended use is described in this instruction manual. The use of any accessory or attachment or performance of any operation with this tool other than those recommended in this instruction manual may present a risk of personal injury and/or damage to property.
- Use a face or dust mask whenever the operations may produce dust or flying particles.
Safety of others
- This appliance is not intended for use by persons (including children) with reduced physical, sensory or mental capabilities, or lack of experience and knowledge, unless they have been given supervision or instruction concerning use of the appliance by a person responsible for their safety.
Children should be supervised to ensure that they do not play with the appliance.
Residual risks
Additional residual risks may arise when using the tool which may not be included in the enclosed safety warnings. These risks can arise from misuse, prolonged use etc.
Even with the application of the relevant safety regulations and the implementation of safety devices, certain residual risks can not be avoided. These include:
- Injuries caused by touching any rotating/moving parts.
- Injuries caused when changing any parts, blades or accessories.
- Injuries caused by prolonged use of a tool. When using any tool for prolonged periods ensure you take regular breaks.
Impairment of hearing.
- Health hazards caused by breathing dust developed when using your tool (example: - working with wood, especially oak, beech and MDF.)
Vibration
The declared vibration emission values stated in the technical data and the declaration of conformity have been measured in accordance with a standard test method provided by EN 60745 and may be used for comparing one tool with another. The declared vibration emission value may also be used in a preliminary assessment of exposure.
Warning! The vibration emission value during actual use of the power tool can differ from the declared value depending on the ways in which the tool is used. The vibration level may increase above the level stated.
When assessing vibration exposure to determine safety measures required by 2002/44/EC to protect persons regularly using power tools in employment, an estimation of vibration exposure should consider, the actual conditions of use and the way the tool is used, including taking account of all parts of the operating cycle such as the times when the tool is switched off and when it is running idle in addition to the trigger time.
Labels on tool

The following pictograms are shown on the tool:
Warning! To reduce the risk of injury, the user must read the instruction manual.
Electrical safety

This tool is double insulated; therefore no earth wire is required. Always check that the power supply corresponds to the voltage on the rating plate.
- If the supply cord is damaged, it must be replaced by the manufacturer or an authorised BLACK+DECKER Service Centre in order to avoid a hazard.
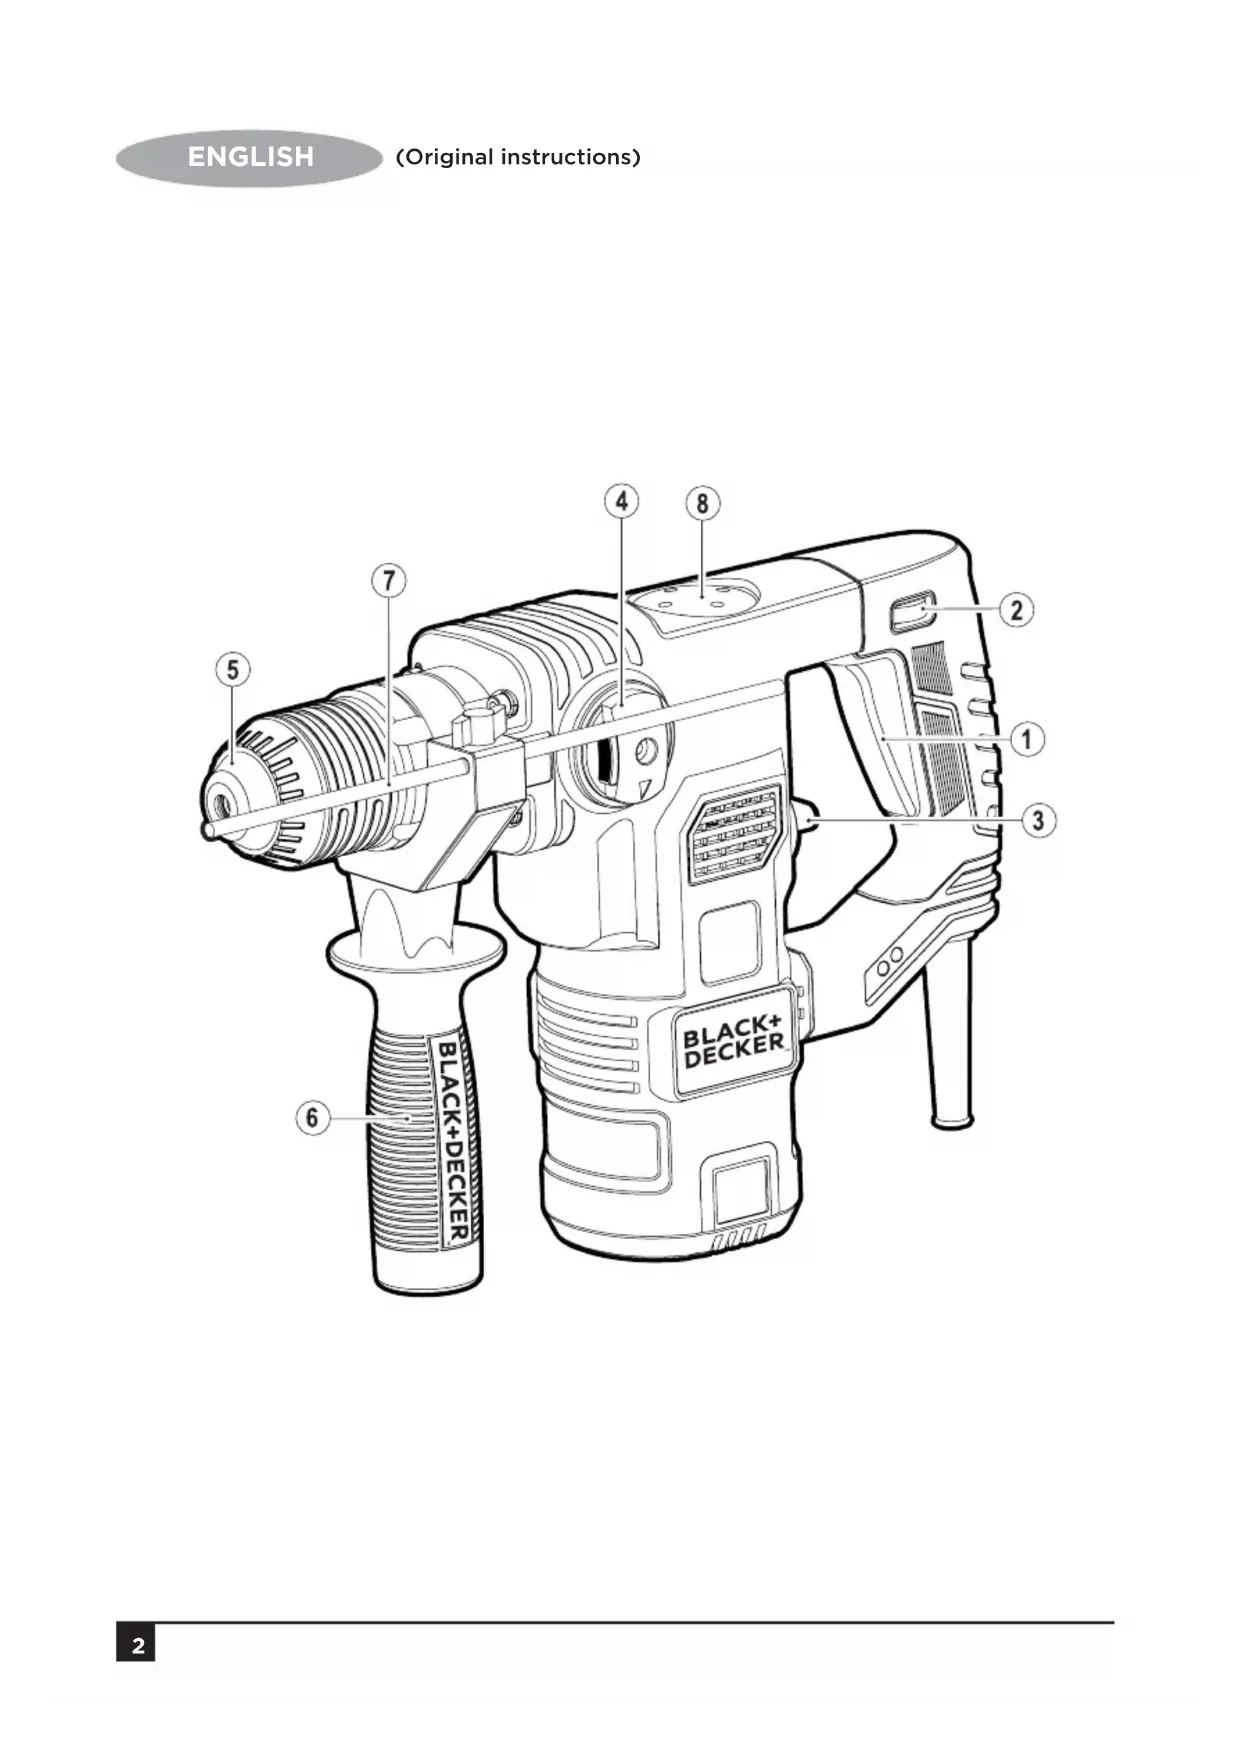
Features
This tool includes some or all of the following features.
- On/Off switch
- Speed selector dial
- Drilling mode selector
- Operating mode selector
- Tool holder
- Side handle
- Depth stop
- Grease cap
Assembly
Warning! Before assembly, make sure that the tool is switched off and unplugged.
Fitting the side handle (fig. A)
- Turn the grip counterclockwise until you can slide the side handle (6) onto the front of the tool as shown.
- Rotate the side handle into the desired position.
- Tighten the side handle by turning the grip clockwise.
Fitting and setting the depth stop (fig. A)
- Slacken the knob (9).
- Insert the depth stop (7) into the mounting hole as shown.
- Set the depth stop (7) to the desired position. The maximum drilling depth is equal to the distance between the tip of the drill bit and the front end of the depth stop.
- Tighten the knob (9).
Fitting an accessory (fig. B - D)
- Clean and grease the shank (10) of the accessory.
-
Pull back the sleeve (11) and insert the shank into the tool holder (5).
-
Push the accessory down and turn it slightly until it fits into the slots.
- Pull on the accessory to check if it is properly locked. The hammering function requires the accessory to be able to move axially several centimetres when locked in the tool holder.
- To remove the accessory, pull back the sleeve (11) and pull out the accessory.
Keyed chuck (fig. D)
- Open the chuck by turning the sleeve (12) anti-clockwise.
- Insert the bit shaft (13) into the chuck.
- Insert the chuck key (14) into each hole (15) in the side of the chuck and turn clockwise until tight.
Use
Warning! Let the tool work at its own pace. Do not overload.
Warning! Before drilling into walls, floors or ceilings, check for the location of wiring and pipes.
Warning! Do not apply chisels when the tool is in the drilling mode.
Selecting the operating mode (fig. F)
The tool can be used in three operating modes.
To operate the drilling mode selector (3), rotate it towards the required position, as indicated by the symbols.
- To operate the operating mode selector (4), push the unlock button (16) and rotate the selector towards the required position, as indicated by the symbols.
Drilling
- For drilling in steel, wood and plastics, and for screwdriving set the operating mode selector (4) to the position and the drilling mode selector (3) to the position.
Hammer drilling
- For hammer drilling in masonry and concrete, set the operating mode selector (4) to the position and the drilling mode selector (3) to the position. When hammering, the tool should not bounce and run smoothly. If necessary, increase the speed.
Hammering
- For hammering with spindle lock, and for light chiselling and chipping, set the operating mode selector (4) to the position and the drilling mode selector (3) to the position.
- When changing from hammer drilling to chiselling, turn the chisel to the desired position. If resistance is felt during mode change, slightly turn the chisel to engage the spindle lock.
Switching on and off
- Select the required speed by turning the speed selector dial (2).
- To switch the tool on, press the on/off switch (1).
- To switch the tool off, release the on/off switch.
Brush monitor (fig. E)
Your tool has a built in system that monitors the health of the brushes.
- Green brush monitor indicator (17). The brushes are in good condition.
- Red brush monitor indicator (18). The brushes are warn and need replacing, return your tool to an authorised BLACK+DECKER Service Centre in order to have the brushes replaced.
Accessories
The performance of your tool depends on the accessory used. BLACK+DECKER and Piranha accessories are engineered to high quality standards and designed to enhance the performance of your tool. By using these accessories you will get the very best from your tool.
Maintenance
Your BLACK+DECKER corded/cordless appliance/tool has been designed to operate over a long period of time with a minimum of maintenance. Continuous satisfactory operation depends upon proper tool care and regular cleaning.
Warning! Before performing any maintenance on corded/cordless power tools:
- Switch off and unplug the appliance/tool.
- Regularly clean the ventilation slots in your appliance/tool/charger using a soft brush or dry cloth.
- Regularly clean the motor housing using a damp cloth. Do not use any abrasive or solvent-based cleaner.
- Regularly open the chuck and tap it to remove any dust from the interior (when fitted).
Technical data
| KD1250 (Type 1) | ||
| Input voltage V | AC | 230 |
| Power input W 1250 | ||
| No-load speed min | -1 | 0-850 |
| Impact rate min | -1 | 0-4100 |
| Impact energy per stroke according to EPTA-j 3.2 Procedure 05/2009 | ||
| Weight kg 5.4 | ||
| Max. drilling capacity | ||
| Concrete mm 32 | ||
| Steel | mm | 13 |
| Wood | mm | 40 |
| Level of sound pressure according to EN 60745: |
| Sound pressure (LpA) 93 dB(A), uncertainty (K) 3 dB(A) |
| Sound power (LWA) 104 dB(A), uncertainty (K) 3 dB(A) |
| Vibration total values (triax vector sum) according to EN 60745: |
| Hammer drilling into concrete (ah, HD) 14.2 m/s2, uncertainty (K) 1.5 m/s2 |
| Chiselling (ah, Cheq) 13.6 m/s2, uncertainty (K) 1.5 m/s2 |
EC declaration of conformity
MACHINERY DIRECTIVE

KD1250
BLACK+DECKER declares that these products described under "technical data" are in compliance with: 2006/42/EC, EN 60745-1, EN 60745-2-6 These products also comply with Directive 2004/108/EC and 2011/65/EU.
For more information, please contact BLACK+DECKER at the following address or refer to the back of the manual.
The undersigned is responsible for compilation of the technical file and makes this declaration on behalf of BLACK+DECKER.

Kevin Hewitt
Vice-President Global Engineering BLACK+DECKER Europe, 210 Bath Road, Slough, Berkshire, SL1 3YD United Kingdom 11.2015
Protecting the environment

Separate collection. This product must not be disposed of with normal household waste.
Should you find one day that your BLACK+DECKER product needs replacement, or if it is of no further use to you, do not dispose of it with household waste. Make this product available for separate collection.

Separate collection of used products and packaging allows materials to be recycled and used again. Reuse of used materials helps prevent environmental pollution and reduces the demand for materials.
Local regulations may provide for separate collection of electrical products from the household, at municipal waste sites or by the retailer when you purchase a new product.
BLACK+DECKER provides a facility for the collection and recycling of BLACK+DECKER products once they have reached the end of their working life. To take advantage of this service please return your product to any authorised repair agent who will collect them on our behalf.
You can check the location of your nearest authorised repair agent by contacting your local BLACK+DECKER office at the address indicated in this manual. Alternatively, a list of authorised BLACK+DECKER repair agents and full details of our after-sales service and contacts are available on the Internet at: www.2helpU.com.
Guarantee
Black + Decker is confident of the quality of its products and offers an outstanding guarantee. This guarantee statement is in addition to and in no way prejudices your statutory rights.
If a Black + Decker product becomes defective due to faulty materials, workmanship or lack of conformity, within 24 months from the date of purchase, BLACK+DECKER guarantees to replace defective parts, repair products subjected to fair wear and tear or replace such products to make sure of the minimum inconvenience to the customer unless:
- The product has been used for trade, professional or hire purposes.
- The product has been subjected to misuse or neglect.
- The product has sustained damage through foreign objects, substances or accidents.
- Repairs have been attempted by persons other than authorised repair agents or Black + Decker service staff.
To claim on the guarantee, you will need to submit proof of purchase to the seller or an authorised repair agent. You can check the location of your nearest authorised repair agent by contacting your local BLACK+DECKER office at the address indicated in this manual. Alternatively, a list of authorised BLACK+DECKER repair agents and full details of our aftersales service and contacts are available on the Internet at: www.2helpU.com
Utilisation
HakneiHa Hnctpymente
Ha nobepxHocTn IHCTpymeHTa pacnoJoxKeHbI cneDyUoJIne rpaqNueckne n3O6paKeHHa:

BHMaHHe!Ig CHNKeHn pUCKa TpaBMIpOBaHn OepaTOp DOnJKeH nPoUHTaTb 3Tu INHCTpyKuIO NO 3KcNpyatau.
3neKtpnuecka 6e3onacHocTb

3TOT INHCTpyMeHT NMEET DBOIHyIO N3OJIaIHO, INo3TOMy npOBOD 3a3emJeHnE My He HyKeH. Bcerda npOBepaTe, YTO6bI ceTeBoe HaprrKeHne COOTBeTCTBOBaNO 3HaueHnIO, Yka3aHHOMY B TabNIuKc c nacnpTHbIMn daHHbIMN.
BcIyae noBpeKeHnHa Hhpy nITaHnA, YTO6bl 36eKaTb BO3HKnHOBeHnO npChbIX CNTyaCm, ero 3aMeHy DOnJKeH BblONHnTB PpON3BODntJIb 06OpUdoBaHnI nn yNoJHMOeHHbI CepBnCHbI ueHTp BLACK+DECKER.
Функлм
3TOT INHCTpyMeHT MOKeT 06JaTaB BCeMn HIN HEKOTOpbIMN 13 IpeuNCJIeHHbIX HIXe FyHKU.
YcTaHOBKa HnacTpOyKa orpaHnHTenrIy6nHbI (Pnc.A)
- Ocna6bTe pykoTky (9).
BCTaBBte OrpaHnHTeJIy6uHbI (7) B MOHTaXHoe OTBepCTne, KaK NOKa3aHO Ha pncyHke. - YctahOBHTe Heo6xOIMoe 3HaueHne OrapanuHTeJI rIy6nHbI (7).MakcunmaJIbHajrIy6nHa CBepeHnna paBHa pacCToHHIO MExdy HakoHeuHOM CBePNa DpeNn I nepeHNm KOHcOM OrapanuHTeJI rIy6nHbI.
- 3aTHeHrTe pyKoRrKy (9).
YcTaHOBka npncnoco6neHna (pnc.B-D)
OuNCTnTe n CmKbTe XBOCTOBNK (10) npncnoc6neHna.
- IOTaHInTe Ha3aI MyΦTy (11) IN BCTaBbTe XBOcTOBnK B depKaTeNb INCTpyMeHTa (5).
- IpoToIKNHnTe npncnOco6JIeHHe BHN3 nCJIerKa npOBepHnTe eo erO yCTaHOBKn B na3bl.
IOTAHHTe npncnocobJeHne IJn npOBepKn HaedXHocTNe erO pKcaun. IJydpHoN cyHKun Tpe6yeTc, YTObI npncnocobJeHne 6blIO cNoCObHO nepMeuaTbcB B IpOIOJBHom HApBaJIeHN Ha HeCKoJIbKO caHTmETPOB npn pKcaun B DEpKaTeJIe IHCTpyMeHa.
-Дя удалениnpсncnocoblenи,OTTHHTe Ha3aMyΦTy(11)иВыталпгпсncnocoblene.
3axmHoi natpoH noKJIou (Pnc. D)
- UTo6bI packpblb 3axmHNO nATPOH, NOBOPaUNBaNTe BTyIKy (12) npOTNB yacOBON CTpeJIKN.
BCTaBtTe XBOCTOBuK CBepna (13) B 3aJxMHOI NaTPOH.
BCTabJIaIte KIOU (14) B KaJIOe N3 60KOBbIX OTBepCTNI (15) 3axmHoro NaTPOHa N NOBOPaYBaIte No YacOBoI Do TEX NOP, IOKa NaTPOH He DoNdTe Do yNopa.
Pa6ota nHcTpymeHTa
BHHMaHHe! DaIte BO3MOXHOCTb INCHTpMyeHTy pa6oTaTb cecTeCTBeHHoCkOPOCTbIO. He nepeRpyKaIte erO.
BhmaHne! PpeB BbINOJIHeHnEM CBePJIeHnA CTeH, IIOOB I NOTOKOB npOBepaTe paCNOJoxKeHne 3JIeKTPoNpOBoDKn IN Tpy6.
BhimaHne! He npimeHnTe doJIoTa, ecn nHCTpyMeHT haxoNTcB pexnme CbeJIeHn.
Bb6op pexkma pa6oTbI (pnc.F)
HCTpymENT MOKET NcNoIb3OBAtbcB Tpex peKIMax pa60Tbl.
- Ⅲo6 dITn He rpaJINc3 IHCTpyMeHToM, BOH NOBHHI 3HAOXOHTNCrPiD HArJrDM.
3aIIuKOBn pN3NK
IodatKOBn 3aJINuKOBn pN3NK MOKe BHNKHyTn y BNnAdKaX BnKOpNCtAHnIHCTpyMeHTy, kI MoKyTB 6ytN He BpaxObaHi B nepepaxOBAHnx Bka3iBkax 7oDo 6e3neHoi po60tn. JKn Pn3NK MOKe BHNKATn npn HnPaBnBHomy BnKOpNCtAHHi, TpNBaJIOMy BnKOpNCtAHHi Ta iH.
Habitb npDotpmaHHI Bcix BiINOBiHNx npaBnI TexhIKN 6e3neK Ta BnKOpNCtAHHi 3axncHx npncTroIB DeAkn 3aIIuKOBn p3NK BCE J 3aIIuaetbca.Bin BkIouae:
- TpaBmN, OTPMaHI npu TOPkaHHi o6epTOBnx i pyxomnx DetajeN.
- TpaBMn, OTPMaHl npu 3aMiHi DeTaJIeN, HoxiB Ta npuJaA.
- TpaBMn,OTpMaHbHacNIOK TpNBaIOno BnKOpNCtAHnHa IhCTpyMeHTy.ПрТрNBaIOMy BnKOpNCtAHnI hCTpyMeHTy HeobxIDHOpoBHTnpereyIapHIpeepBnBpo6Oti.
- NoripseHnNcIyX;
- ⅢKoJaДЯЗIDOPOB'я,ВИКЛиKaHaВДИХаHЯМ NИу,Як 3'ЯВЯЯETbCЯпд.YacpoБOTиIHCTpymeHTy(HaPnKJaI, prnpo60ti3depeBOM,Oco6JIuBO3dY6OM,6yKOMa6O ДВП).
Bi6paia
PIBHi BIBpaqii, 3a3haueHb TexhiuHnx DaHnx Ta deKnapaqii BiNIOBIDHOCTi, BynBnMIPRHi y BiNIOBIDHOCTi 3i CTAHdAPTHIM MeTODOM BInpOboYBaHb, BnKNaJeHM B EN 60745, i MoKyTB BnKOpNCOTByBaTnCra DnI nopBnHHI HCTpyMeHTiB. 3aBJIeHNI pBeHb BIBpaqii Moke TaKoK BnKOpNCOTByBaTnCra DnI NonepEnHbOI OciHNIX BnNINy.
Ybara! PibeNb Bi6pauii niD yac po6Otn eNEKtpuHoro iHCTpymeHTy MoKe BiDiPI3HrTnCra BiD 3aABHeHO rPiBn HBi6paui, OckJIbKn BIn 3aIexNtB BiD KOHKpeTHo BnKOHyBaHOi iHCTpymeHTom po6Otn. PibeNb Bi6paui MoKe 6yTu HxKYe BCTaHOBNeHO rPiBn.
Pn ouiHui BnIbBy Bi6paui DnBn3HaueHHaXoIDIB 6e3neKn, Heo6xihnx 2002/44 / EC dnn 3axncTy oci6, kniocTInHO npauOToB 3 eNeKtpuHmIM iHCTpyMeHTAmN, Heo6xidno BpaxOByBatn peaJIbHi yMOBN BnKOpNCtAHN Ta cnoci6 BnKOpNCtAHN iHCTpyMeHTy, BMnKaOnu BCI deTani po6oOro uKNny, Taki JK cac ABTomTuHOrO BmMKHeHHaTa xOIOCTORO XOdy DoaTKOBO DO aCy 3anyCky.
HakneiHa iHctpymenti
До поьерхи iHCTpymEnTy npikpinJIeHi nactyni rpaqiUHi 306paXeHHa:

Ybara!IJI3HKeHHpN3Ku TpaBMyBaHHonepatop NOHNHe IpoHTaTnIO IHCTpyKciO 3eknnyataui.
EneKtpnHa 6e3neKa

IeHCTpymEtMaIIOBHyI3OJauIIO,ITOMy dpit 3a3emHeHMy He Notpi6eH.3aBXnI nepeBipIte,io6 MepeKeBa HAnpyra BiNObiJaNA 3HaueHHIO,3a3HaueHomy B TabniCi 3 nacnpTHMM daHMM.
- Y pa3i noWkoJxHHeHH Ka6eIIO XINBHeHH, 0O6 yHnKHyTN BnHKHeHH He6e3neuHX CITyaCiN, Ioro 3amHy NOBHeH BnKOHaTN BnPo6HnK OblaHaHH a6o yNoBHOaKeHH cepBicHn ceHtp BLACK+DECKER.
Функцii
IeHCTpyMeHT MOKe BOnOJITN BCIma a6o DeaKmN 3 nepepaxOBaHnX HnXue cyHKui.
YcTaHOBbKa 6iHooI pyKoTkn (Pnc. A)
- Поветайтасторно ГоиннкoboCTpikndoTnx nip,поки Ви He 3moхete nepemiiatni 6iHy pykoRTky (6)Ha nepedhiЧаftiniH iHCTpymehTy,ЯК poka3aHo Ha pncyHKy.
-Повернitsьбokobу рукуВ he6xIDne nIOXKeHHa.
3aTnHt b6Hy pyKoTky, noBepTaHOn 3aTnck 3a roHHNKOBOO CTpiIKOIO.
YcTahOBKa Ta HalaWtUBaHHa 6mExyBaHa rHn6HH (Pnc.A)
- Pocna6Te pyko8Tky (9).
BCTABTe 06mexkyBaayIIN6HHN(7)BMoHTaKHNOTBip,RAK NOKa3aHOHaPNCyHky.
BctaHObitb Heo6xIDHe np3HaueHn8 o6MexyBaayrnnn (7).MaKcImaJIbHa rnn6nHa CBePdInHHApOiBHe BjIcTahi MIX HAKOHeuHkOM CBePdAn dpnii ipeepHim KInCEm 6MexyBaayrnnn.
3aTnHITb pyKoRTky (9).
YcTaHOBKa npncTocyBaHHa (pnc. B-D)
OuNCTiB i 3MaCTiTb XBOCTOBNK (10) npnCTOCyBaHHa.
- Notaryt ha3aMyfTy (11) i BCTaBte XBOCTOBNK ByTPMMyBaHInCTpyMeHTy (5).
- PpOHTOBXHITb npuaanBHN3 i 3nerka npoBepHiTb Do NOrO yCTaHOBKN B na3n.
IotarHtB npnnaDnAnepeBipKn HadiHocti noro 6yno 3daTHe nepemuiyBaTncB No3doBXhOmy HanpMky Ha KjIbKa caHTmEtpiB npn pfikcaui B TpImaHiHCTpyMeHTy.
-ДяВидалелпрпалдя,BIDТЯгнIHbHA3aMyФу(11)I BNTYHbпрпалдя.
3aTnckHn npToH nI KIOU (Pnc. D)
- P03KpNlTe 3aTnCKHn NaTPOH, NOBepTaOH NByIky (12) npOTn rOuHHNKoBOi CtpiJKN.
BCTaTBxBOCTOBNK CBepnla (13) B nataPOH.
BCTaBnIe KIOU (14) B KOKeH 3 6iHnx OTbOpIB (15) 3aTnCKHO nATPOHa i NOBepTaIe 3a RoINHHNKOBIO CTPIKIO DOITN, NOK nATPOH He DInDe Do ynpOy.
Po6ota iHctpymeHTa
Ybara! DaIte MoKJIuBicThb iHCTpyMeHTy npauObaTn 3 npnpoJHOIO WbUdKicTIO. He nepeBaHTaKyIte NOrO.
YBara! Npeed BnKoHaHHm CBeepiHnCtIn, nIeNOr i cTeIb nepeBipraIte po3TaUyBaHH eEeKTPonpOBoKn i Tpy6.
Ybara! He 3actocobyTe IOnTo, kUo IHcTpymeHT 3haxOdbcBpeKmI CBepnIHn.
Bn6ip pexmmy po60tn (pnc.F)
IhctpymEnT MoKe BnKOpNCToBvBaTnC8 B TpbOx peKImax po60Tu.
-Дя уравлиня nepemkaчem pexmy CBepnIHn3), NOBepHITb Ioro B Hanpamky Heo6xIDHO nIOJoxEHn, RA N03NayeO CmMBOJAMN.
Дя уравлиня поемкиам реку po6otn (4), haTnchitb De6JokyUcy KhoNky (16) i nobephiTB nepeMkau y HaprMky Heo6xHOrO noLoKeHHra NO3NayeHO CmBoJAm.
CBeprnHH
-ДясевпиньдервиMiMeTani iПл actkyiДЯ 3aRbHcYBaHHBCTaHOBIbпepeMnKaч pexmmy po6OTn (4)В NOLOKeHHa nepemnkaч pexmmy CBepdniHHa (3)В NOLOKeHH
CbeplinH3yapom
Дясвердлинь 3уаромВцгл iбetoи BCTaHObitb nepeмнкay pexmmy po60n (4)Вплохен a nepeмнкay pexmmy CBepdlnHHa (3)Вплохен Y yapHOMy pexmimi HcTpymeHT He NOBHeH BiDcKaKyBaTN, a NOBHeH npauKOBaTN pIBHomipHo. 3a Heo6xidHocTi 36iNbIbTe WbNdkictb.
YdapHn peKmM
Дя ударно ржиму 3афikcoBaHIM 3aTnCKHM natoHOM,ДЯ DoB6aHHa 3 HeBeJIHKM HabaHTaxKeHHaM i BiDkoJIHOBaHHa, BCTaHOBiTb nepeMkaq pexkmy po60t (4)В noLoXeHHa a nepeMkaq pexkmy cBepdniHHa (3)В noLoXeHHa
- Pn3miHi pexmmy CbepnnHHa yapom Ha yapnHn pekm, npoBepHtB doJTo B 6aKahe noJoxKeHHa. Kaio nIac 3miHn pexmmy poobtn BiuYBaetcbr onip, KInbka pa3ib npoBepHtB doJTO dJa BnNBy Ha φikcatop 3atnckHoro naTpoHy.
BMKAHH Ta BMKAHH
- O6epTaHHm nepemnkaa WbUdkocTi Bn6epiTb Heo6xidHy WbUdkicTb (2).
- Ⅲo6 BBIMKHyTN iHCTpymeHT, HATNCHiTB BmNKaU (1).
- 506 BUMKHyTN IHCTpymeHT, BiDnyCTiTB BUMNKaY.
KoHTpOnepeiok(pnc.E)
Baw iHCTpymeHT MICTNtB B6yIDoBaHy CnCTeMy, kKa KOHTPOJIIOE CTAH UITOK.
- 3eHn iHnKaTOp KOHTpOepa Iitok (17).Iitkn B XopoWomy CTaHi.
- YerboHn iHnKaTOp KOHTpONa epa 1tOK (18). 3HOWeHi I nTope6yHb 3amHn, BiDaIe BaH IHCTpyMeHT B aBTOpN3OBaHm CepBicHm CEHTP
BLACK+DECKERДЯЗаминцITOK.
Ppnaand
EpeKTHBnHicbpo60BaWOroInCTpyMeHTy3aJExNtBViD BnKOpNCToBvBaHOro npJaA. PpJaAaBBACK+DECKER ta Piranha po3pOBeHi y BiNoBIDHoCTi 3 BVCOKMn CTaHdaptAmr kocTi, iix KOHCTpyKzIpaQyepo6ohi XapakTePncTka BaWOro InCTpyMeHTy.Ppn BnKOpNCtAnHi CboRo ppiJaAaBn OTrpMyeTe BiD BaWOro INCTpyMeHTy MaKcImaJIbHy KOpNCTb.
Texhivhe o6cnyroByBaHHa
KoHCTpykui BaWoRo IHCTpyMeHa BLACK+DECKER
po3paxOBaHa Ha po6Oy npOTyrom TpBaNOrO nepioy yacy
Pn MiHimaIbHOMy TexHiCyHOMy 06cnyroByBaHHi. TpBaNla
3aOBIbHa po6Ota IHCTpyMeHTy 3a6e3neUcTbcra HaleXHM
DOrrAOM Ta peRyprHm OOnuEHHM.
YBara! PpeiBnKoHaHHm 6yIb-RAknx po6it 3
06CnyrOByBaHHI INCTpyMeHTy 3 dpoTOBIM/6e3dpoTOBIM
XNBJIeHHM:
BumkhItb IBTuHrHiB npunaIa /iNCTpyMeHT.
- Perynapno ouuptye BeHTnuaihi npop3n B iHCTpyMeHTi 3apdHOMy npicTpoi 3a donomoroIO M'kooi zuToKn a6o cyxoI TkaHHN.
- PeryraHNo OunuYte Kopnyc DnBryHa 3a DonomoroBoIoroTkAHHH. He BnKOpNCToByTe dJa OUnuEHHa6pa3NBHi MaTepiAn Ta YnCTa3acObHa OCHOBiHeBOdHnx po3UHHNKiB.
- Perjnapno po3kpmbaiTe i Bn6mbaiTe 3aTnckHn natpoH dna BndaeneHH npny 3 Noro BHyTpiiHbOi YaCTnHn.
TexhiHdiHi
8.「apaHTiHi yMOBn He nouHIOHObca:
8.1. Ha iHCTpyMeHTn, 0o NiIaIbAJIncb po3KpIITIO, peMOHTy a6o MoNΦiKaUII NO3a yNOBHOBaXeHIM cepBicHIM ueHTpOM.
8.2. Ha detani, By3n Ta MaTepiann, 10 Mo MToBc nI npipOnHoro 3Hocy, Taki JK: npINBOHni peMeHi i Koneca, ByirInbHI uITKn, MaCTnIO, NiDUnnHKN, 3y6hacti 3HeJIeHHpeDyKTopiB, rMyoBI yUilbHeHHa, CaJIbHNKi, HAnpaBnAoi pONIkN, MyΦTn, BmNkaHi, BoIKN, ITOBxayi, CTBOJN ToIO.
8.3.Ha 3mHHi qactHn: natpoHn, zanHn, 3atncKi raiKn i naHci, pInbTpN, akymyIaTOpHi 6atapei, Hoxi, uipyBaJIbHi niOuBn, naHcUor, ipoQKn, nJNbHi uHN, 3axNCHI KOKxyn, nnKn, abpa3NBn, nJNbHi i abpa3NBHdiNCK, ppe3n, cBepda, bypu Toio
8.4.Ha HecnpabHocti,io BnHKnB pe3yIbTati nepeBaHTaxKeHHI hCTpyMeHTy (Km MEXAHiHoro,Tak i eNeKTpnuHoro),IO CnpuHNII BNxID 3 NaHy oNHOACHO DBOX i 6iNbIe Detanei I By3nIB,TaKx J potopa i cTaTopo,06O obMOTOK cTaTopa,BedeHOi I BeDyOoi WeCTepEnb peDyKTopa a60 IHnx By3nIB i DeTaNen. Do 6e3ymOBHX O3hAK nepeBaHTaxKeHH BInpo6y BiHocTbcra,KpIM IHNX: NOBA KONbOpIB MiHnBocTi,deOpMaJia 60 onNaBHeHHa Detanei I By3nIB BInpo6y,NOTEMHIHHA 606ByrIOBAnHH 3OJIauPi npOBID EB eNEKtpoDBurHyHa Ni D BnNtBOM BnCOKOI TEMnepatypn.

iill g jia jia jia jia jia jia jia jia jia jia jia jia jia jia jia jia jia jia jia jia jia jia jia jia jia jia jia jia jia
a 1
1 1 1 1 1 1 1 1 1 1 1 1 1 1 1 1 1 1 1 1 1 1 1 1 1 1 1 1
JLsKgOgJ LlIe JIyB jyB JyB JyB JyB JyB JyB JyB JyB JyB JyB JyB JyB JyB JyB JyB JyB JyB JyB JyB JyB JyB JyB JyB JyB JyB JyB JyB JyB JyB JyB JyB JyB JyB JyB JYJ LsK.1111 1111 .www.2helpU.com:
aaii
eaioll lall pae Jiaoi eaii .aijiall
J 1 1 1 1 1 1 1 1 1 1 1 1 1 1 1 1 1 1 1 1 1 1 1 1 1 1 1 1 1 1 1 1
alallgaiill Jiaaiil gaoiill jSag
yolalwglalllgalejnoaiaiell
eiclaalglallgallpuiwlslc!lcjLs
plalglalllllll
i j 1000000000000000000000000000000000000000000000000000000000
Lg 10000000000000000000000000000000000000000000000000000000000000000
iL 100000000000000000000000000000000000000000000000000000000000
. www.2helpU.com
aaggagaaagaaagaaagaaagaaagaaagaaagaaagaaagaaagaaagaaagaaagaaagaaagaaagaaagaaagaaagaaagaaagaaagaaagaaagaaagaaagaaagaaagaaagaaagaaagaaagaaagaaagaaagaaagaaagaaagaaagaaagaa
C E
KD1250
BLACK+DECKER
olalgall 20 aolil "aill lll" jai
sio-7-7.voEN,1-7.voEN,EC/2r/7
EC/1A/2 4gill Ljil
.EU/0/7
SLJALIJIIGI GLOGLALNOJIOJL JLLALL BLACK+DECKER
jai jia jia jia jia jia jia jia jia jia jia jia jia jia jia jia jia jia jia jia jia jia jia jia jia jia jia jia jia jia jia jia jia jia jia jia jia jia jia jia jia jia jia jia jia jia jia jia jia jia jia j
BLACK+DECKER

Global Engineering
BLACK+DECKER Europe. 210 Bath Road
.Slough
Berkshire. SL1 3YD
= 10^4 cm if ≤ 1 do
11.2015
()
a 1
y1y≤11j11j 11/1j
i 1
jll jll jll jll jll jll
(J)
aLlalaljI jiau Jaiyai yai lll i
Jaiyai IJI EC/2/1 4.4 aagall Lg and yaiyai
i
Jaiyai Jaiyai Jaiyai Jaiyai Jaiyai Jaiyai Jaiyai Jaiyai Jaiyai Jaiyai Jaiyai Jaiyai Jaiyai Jaiyai Jaiyai Jaiyai Jaiyai Jaiyai Jaiyai Jaiyai Jaiyai Jaiyai Jaiyai Jaiyai Jaiyai Jaiyai
jLJI 1e LdaJI
jglalglzlllglgssgss
e 111111111111111111111

y jj jj j j j j j j j j j j j j j j j j j j j j j j j j j j j j j j j j j j j j j j j j j j j j j j j j j j j
Jl jll Jaaill lss aal gge hagabwglg jlaal dwa 1
aIg aai all yg aball qao aaiia g o
iill"dyu u bail qao axo no jplcgl aai i
aegkall aai nall gjll jy jll k y s
aill Lswll ayol ybldo ll jwll s
1 1 1 1 1 1 1 1 1 1 1 1 1 1 1 1 1 1 1 1 1 1 1 1
Jaaal aabg jiaa Jaae aagjiaa Jaaa Jaaa Jaaa Jaaa Jaaa Jaaa Jaaa Jaaa Jaaa Jaaa Jaaa Jaaa Jaaa Jaaa Jaaa Jaaa Jaaa Jaaa Jaaa Jaaa Jaaa Jaaa Jaaa Jaaa Jaaa Jaaa Jaaa Jaaa Jaaa Jaaa Jaaa Jaaa Jaaa Jaa a
g 1
iLw jSsJ 8.8JyRjIy Jy
()
1 1111111111111111111111111111111
yIbio cIiJgJrE Iaia aaiie 10
aljlll jolil 1gossi jao 210
aall aall g bll 1s yall 1yall
p!le! p!le l j! (j!b)
jeogall jololjaiL zalaill Llaill
jllppe jlaJlib 1c jy
a 1111111111
jlll laii jlll jlll jlll jlll jlll jlll jlll jlll jlll jlll jlll jlll jlll jlll jlll jlll jlll jlll jlll jlll jlll jlll jlll jlll jlll jlll jlll jlll jlll jlll jlll jlll jlll jlll
1111111 1111111 1111111 1111111
jglalbgsaaylglg/gssaaallnagllg 2
cioiog.aaiaayylaaglynnnnaaagai g aalll jilaiin g
aaylaaylaaylaaylaayn no sgrsiallaaylaaylaaylaay
Jgliae Jgaiyao jiaiunll g aie yjyL bai 1
Jnngnnn nn nnnnnaaee 1 1 1 1 1 1 1 1 1 1 1 1 1 1 1 1 1 1 1 1 1 1 1 1 1 1 1 1 1 1 1 1 1 1 1
J 1 J 1111111111111111111111111111111111111111111111
a 1 a 1 1 1 1 1 1 1 1 1 1 1 1 1 1 1 1 1 1 1 1 1 1 1 1 1 1 1 1 1
1111111111111111 1 1 1 1 1 1 1 1 1 1 1 1 1 1 1 1 1 1 1 1 1 1 1 1 1 1 1 1 1 1 1 1 1 1 1 1 1 1 1 1 1 1 1 1
( x,y) = ( ab,52aright)
Jgall 111 1
y j 1
aJglll lal bla aL

1
1
