
7101 642 - Oven Foster - Free user manual and instructions
Find the device manual for free 7101 642 Foster in PDF.
| Product Type | Built-in oven |
| Brand | Foster |
| Model | 7101 642 |
| Dimensions (H x W x D) | Standard 60 cm (approx. 59.5 x 59.5 x 55 cm) |
| Interior volume | Approximately 70 liters |
| Capacity | Up to 5 cooking levels |
| Power supply type | Electric (230 V / 400 V depending on installation) |
| Cooking functions | Conventional cooking, fan-forced cooking, grill, defrosting, rotisserie (depending on model) |
| Thermostat | Adjustable from 50°C to MAX (approx. 250°C) |
| Timer | Electronic with start/end cooking programming and timer |
| Display | Digital with clock and indicators |
| Self-cleaning panels | Yes, microporous catalytic coating on side walls |
| Interior lighting | 25 W bulb, type E14, resistant to 300°C |
| Door | Removable for cleaning |
| Safety | Cooling ventilation, automatic shut-off via timer |
| Maintenance | Clean with soapy water, avoid abrasives and steam |
| Spare parts | Available on request with the model number |
| Repairability | Replacement of the bulb and door removal possible |
| Installation | Built into a heat-resistant cabinet, fixed with provided screws and sockets |
Frequently Asked Questions - 7101 642 Foster
User questions about 7101 642 Foster
0 question about this device. Answer the ones you know or ask your own.
Ask a new question about this device
Download the instructions for your Oven in PDF format for free! Find your manual 7101 642 - Foster and take your electronic device back in hand. On this page are published all the documents necessary for the use of your device. 7101 642 by Foster.
USER MANUAL 7101 642 Foster
CnPOCKTHPOBAHHOC H3ROTOBJCHHOC H3
MaTepeHaJIOB BbICIIeFo
KaueCTBa,yCIIeHIO IIPOIIIO BCC 3aBOJCKHC HcIIbITAHIN,
TO6BI COOTBCTCTBOBaT BCCM Tpe6oBaHHM IIHHTOBJEHINIIHIN.
IIOToMy MBI IPOCHM Bac O3HaKOMHTbcra C
HHCTpyKHHH H cJIeIOBaTb IIPOCTbIM IIPHBcEChHbIM B Hx yKa3aHHM, KOTOpBle
H03BOJIT BAM IOCTHTHyTB HauJIyUHHx pe3yJBtaTOB, HaHHa c caMOrO IcpBOHO HCIOJB3OBAHN
H3TOTOBHTIb
IT
CARO CLIENTE,
We thank you and congratulate you on your choice. This new carefully designed product, manufactured with the highest quality materials, has been carefully tested to satisfy all your cooking demands. We would therefore request you to read and follow these easy instructions which will allow you to obtain excellent results right from the start.
THE MANUFACTURER
FR
CHER CLIENT,
The oven's data plate is accessible even with the oven fully installed. The plate is visible simply by opening the door. Always quote the details from it to identify the appliance when ordering spare parts.
IMPORTANT!
Self-cleaning panel 8
Respect for the environment10
Control panel 12-14
Instructions for use:
- conventional cooking 14
-fan cooking 16
- grill cooking 18
Thermostat 20
Cooking timer 20
Electronic timer 24
Light replacement 28
Removing the oven door 30
INDEX
HX B3OJIACHOCTb. AETM
JANHAI HAYAO JIHTCSI IIO
IIPCMOTPOM,HEA3IIO3BOAHTbHM IHPATCIPBOPOM.
AFTH HE OJXHBI BIOJIABHTB OYCHKTY HN PABOHTI IO YXOy3A 3
AUXOBOKOH BE3
HPACMOPTA B3POCBAX 3AHPEIEAETCRAKACTHB A
HO DYXOBKN FOIOIY KACTPOH
H H N IOOObHE IPEAMETB
HAPEB NXKHEOI HAPPBETAIBHO
3AEMEHTA IIPOBOIHUPVET INEPERPB
HNKHE YACTH AXYOBKN ITO
IPBHOAT K NOBPLK DIIHHIO HA
DAKE K OYIEB CEPBE3IIM
IOCAJACTBHM (OIACHOTB
BO3HNIKHOEBHNAIOKA) 418
ONOPHOFMEEBHO3AEMEHTA.

QUESTO PRODOTTO ESTATO
CONCEPITOPERUNIMPIEGO
DI TIPO DOMESTICO.IL COSTRUTFORD
DECLINAOGNIRESPONSABILITA NEL
CASO DIEVENTUALI
DANNACOSEPERSONEDERIVANTIDA
UNANONCORRETTAINSTALLAZIONEODA
USOIMPROPRI,ERRONEOODASSURDO.
L'APPARECHCO NONDEVE ESSERE
USATO DAPERSONE
(COMPRESIBAMBINI)CON
RIDOTTECAPACITA FISICHE,SENSORIALI
O MENTALI, O DAPERSONE
CHEMANCANODELL ESPERIANZAEDILLE
CONOSCENZENCESSARIESENONSOTTO
LASUPERVISIONE O DIETRO ISTRUZIONI
SUL'uso DEL'APPARECHCHO
DAPARTEDI UNA PERSONA
RESPONSABILE PERLA LORO SICUREZZA.
1 BAMBINIDEVONO ESSERE
CONTROLLIATI PERASSICURARI
CHENONGIOCHINOCONL'APPARECHCO.
LAPULIZIAE LAMANUTEN ZIONENON

EFFECTUATE DAI BAMBINI
SENZA SUPERVISIONE
VIETATO AP-PORRE CARTA
STAGNOLAPENTOLEOASIWALGONTATTOCONLAPASE

INTERNADEL FORNOPER
CUCINARE, L'AZIONE DEL RISCALDAMENTO DEL LA RESISTENZANTEIEROREPR
OVOCA IL SURRISCALDAMENTODELLAPARTE BASSA DEL FORNOPROVOCANDONE ILDANNEGGIAMENTO I ADDIRITURA GRAVICONSEGUENZE (RISCHIO DI INCENDIOJANCHESULMOBILEDISUP PORTO DEL FORNO
INSTALLATION
INSTRUCTIONS
Flush fitting 32
Electrical connections 34

THIS APPLIANCE IS
CONCEIVED FOR DOMESTIC
USE ONLY. THE
MANUFACTURER SHALL NOT IN ANY WAY BE HELD RESPONSIBLE FOR WHATEVER INJURIES OR DAMAGES ARE CAUSED BY INCORRECT INSTALLATION OR BY
UNsuitABLE, WORNG OR
ABSURD USE
THIS APPLIANCE IS NOT INTENDED FOR USE BY PERSONS (INCLUDING CHILDREN) WITH REDUCED PHYSICAL, SENSORY OR MENTAL CAPABILITIES, OR LACK OF EXPERIENCE AND KNOWLEDGE, UNLESS THEY HAVE BEEN GIVEN SUPERVISION OR INSTRUCTION CONCERNING USE OF THE APPLIANCE BY A PERSON RESPONSIBLE FOR THEIR SAFETY. CHILDREN SHOULD BE SUPERVISED TO ENSURE THAT THEY

DO NOT PLAY WITH THE APPLIANCE.
CHILDREN SHOULD NOT
CLEAN OR PERFORM MAINTENANCE WITHOUT SUPERVISION. DO NOT PLACE TIN FOIL, PANS OR SIMILAR IN CONTACT WITH THE INNER BASE OF THE OVEN TO
COOK. THE HEATING ACTION OF THE LOWER RESISTANCE CAUSES THE LOWER PART OF THE OVEN TO OVERHEAT, LEADING TO DAMAGE AND EVEN SERIOUS CONSEQUENCES (FIRE RISK) ALSO TO THE UNIT IN WHICH THE OVEN IS INSTALLED.
POUR L'INSTALLATEUR
DIESES PRODUKT IST ALS HAUSHALTSGERAT
VOORXHEMEUBELXWAAROPXDEX
OVENGEPLAATSTISOX

ESTEXPRODUTOX
FOICONCEBIDOXX
ARAUMAUTILIZACOXDEXTIPOX
DOMESTICA.X OX FABRICANTEX
DECLINATODASX
ASRESPONSABILIDADESNOCASODEEVENT
Uaisx DANOSX ACOISASX OUX PESSOASX
DERIVADOSDEX
UMAINSTALACAOINCORRECTAOUDEUSOX
IMPROPRIORRONEOQUABSURDO.
OAPARELHONAODEVESERUSADOX
PORX PESSOASX (INCLUSIVEX
AX LIMPEZX EX AMANUTENCAOX
NAOX DEVEMSERREALIZADASX
PORCRIANCASXSEM
SUPERVISAOX EPROBIDOX COLOCARX
PAPELALUMINIO,X TACHOSX OUX
SIMILARESEMCONTACTOCOMABASEX
INTERNA X DOFORNOPARACOZINHAR.X
AACCAODOAQUECIMENTOX DAX
RESISTENCIAX INTERIORX PROVOCAX OX
SUPERAQUECIMENTODAPARTBAIXAXPOFENONCAHANGYI-DAQINEX
DOFRNOCAUASANDLHEX DANOSEX ATTEGRAVE5X CONSEQUENCTASY (BISCOY
ATEGRAVEXCONSEQUENCEXA(KISCO) PEX INCENTIONINGINVESTNOX,MOVELX
DEX-INDENDIONCEDESCUSSEDESPUIORTEDOTORNO
Py
IIEPBOE IIPIMEHEHNE
IyXOBKY CJEiyET IOCKOHJIbIO BBMBITb MBLIBHIM pACTBOPM H TIIaTcJIbHO OIOJOCHyTB.
YTO6bI CHITb 60KOBbc paMBI B IyXOBkx C ITaIKHM CTCHKMH, DeICTBOABrB, KAK NOKa3HO Ha PnCyHKe. Harpetb IyXOBky B TcCHNc 30 MNHT HA MaKCHMaJIbHOI TCMIIpcaType; TaKHM O6pa3OM 6yUT ydaTCHbI BCE OCTaIKN IIPOH3BOJCTBEHHOH CMA3KH, KOIOpBiE MOYr CTAIB INPHINHO HIEPIHTHO rAnaxa INP INPOTOBICHIN INHIHN. DxyOBKY CICET TIIATCJIbHO BBIMtB MblJBbIM PaCTBOpOM H ONIOLOHytB. YTO6bI C1RtB 60KOBbc paMBI B IyXOBkxC TIAJKHM CTCHKAMH, DEICTBOBaIb, KaK IOKa3aHO Ha PHCYHKc.
Haipetb dyxOBky B teueHne 30
MnHyr Ha MaKCHMaJIbHOI
TcMIePaTypc; TaKIM O6pa3OM
6yDyt yJaICHBi BCC OCTaTKN
PiOnBBOJCTBeHHO H CMa3KN,
KOtOpBle MOYr CTaTB IpiuHNOH
HeipnTHOrO 3aIIaxa IIpH
IIpHiOTOBJIeHHN INIIH. JIN
OHCTKN IyXOBKn Hc
HCIOJB3OBaTb a6pa3HNBHe
MaTepeNaIbI HIN OCTpBle
MeTaJIInHecKe Nc
OHTCKN CTEKJIINHbIX IBepeU
dyXOBKn, IIOCKOJIbKy OIIH MOryT
IOIapAnIbI IOBepXHOCTb H
CIPoBOIHpOBA Tb packaJIbIBaHne
CTeKJIa.
Baxho:
He HcnoIb3ObaT bnapOBbc OOHCTHTCIN DIA OYNCTKN np6opa. B KaueCTBe Mepb IpeIOCTOPOKHOCTN IpexKeJe HeM pHcyIaB K JIO6bIM pa6OTam IO OHNCTK dyXOBKn, BccTaI AOCTaB BNJky H3 PO3cTK NIN OTKIOHOTb 3JIeKTPONTTAHne np6opa.
Kpome toro, He HcIOJIb3OBaTb KHCIOITbIe HJH IIcIOUHbIe cpcIcTBa (JIMMOHHbI coK, yKcyc, COJB, IOMHIOpbln T.I.). He HcIOJIb3OBAITb CpeIXTBa Ha OCHOBe XIOpa, KHCIOr HJH abpa3HHbIX BeIIccETB, 0oc6EHIO JIOYHCTKN OKpaIHChHHbIX IOBCpxHOCTcN.
IT
PRIMO UTILIZZO
Clean the oven thoroughly with soapy water and rinse well. To remove the lateral frames from smooth-walled ovens, proceed as shown in the figure.
Operate the oven for about 30 minutes at maximum temperature to burn off all traces of grease which might otherwise create unpleasant smells when cooking.
Do not use rough abrasives or sharp metal scrapers to clean the glass door of the oven because they could scratch the surface and cause the glass to shatter.
FR
Do not use steam cleaners to clean the appliance.
As a safety precaution, before cleaning the oven, always disconnect the plug from the power socket or the power cable from the oven. Do not use acid or alkaline substances to clean the oven (lemon juice, vinegar, salt, tomatoes etc.).
Do not use chlorine based products, acids or abrasive products to clean the painted surfaces of the oven.
Important
Our smooth walled ovens can be fitted with self cleaning panels to cover the inside walls.
These special panels are simply hooked on to the walls before the side frames are fitted. They are coated in a special, micro-porous catalytic enamel which oxidises and gradually vaporises splashes of grease and oil at cooking temperatures above 200^ . If the oven is not clean after cooking fatty foods, operate the empty oven for 60 minutes (max.) at maximum temperature.
Never wash or clean self cleaning panels with abrasive, acid, or alkaline products.
FR
PANNEAUX AUTONETTOYANTS CATALYTIQUES
The documentation provided I with this oven has been printed on chlorine free bleached paper or recycled paper to show respect for the environment.
The packaging has also been designed to avoid environmental impact. Packaging material is ecological and can be reused or recycled.
By recycling the packaging, you will hel save raw materials as well as reducing the bulk of domestic and industrial waste.
RESPECT DE L'ENVIRONNEMENT
Bottom heating element + Circular heating element with fan. Thermostat setting from 50^ to MAX. ATTENTION: Accessible parts may become very hot during use. Children should be kept at a distance.
INDICATIVE Table for positioning foods based on functions, temperatures and cooking times
FR
Conventional cooking uses top and bottom heat to cook a single dish.
Place the food in the oven only once cooking temperature has been reached, i.e. when the heating indicator goes out. If you want to increase top or bottom temperature towards the end of the cooking cycle, set the temperature control to the right position. It is advisable to open the oven door as little as possible during cooking.
INSTRUCTIONS POUR LE
FONCTIONNEMENT CUISSON
CONVENTIONNELLE
For this type of cooking a fan positioned at the back allows the circulation of hot air inside the oven, creating uniform heat. In this way cooking is more rapid than conventional cooking. It is a suitable method for cooking dishes on more than one shelf, especially when the food is of different types (fish, meat etc.)
FR
CUISSON VENTILEE

By selecting one of the fan cooking functions and setting the thermostat to zero, the fan allows cold air to circulate inside the oven. In this way frozen food can be rapidly defrosted.
DECONGELATION

It is not essential to preheat the oven, but you are advised to do so when cooking pastries.
Cnocob npnrtoBJeHn HnHn Ha rpnIe HJIN D
O6pa3OBaHHpyMaHOn KOpouKN.
HekotopbIe IyXOBKn
IOCTABJHOTcB KOMITcC c IBHrATcIcM H BcpTcIOM IINI INHnHa BepTeIe.
PcTka c
IpiHrOtaBJIbAcMbIM 6JIOOM
CTaBHTcHa 1°-HO 2°
CBepxyno3nHo.
IpeBapHTeJbHO pa3oRpeTb B TeChHc 5 MHHyT. IIOBcpHyTb pyky TepMoCTata H yctaHOHTb TEMHePaTy pO 50^ 1o 200^
IT
COTTURA AL GRILL


Use the grill to grill or brown 1 foods.
Some ovens may be equipped with an electric motor, spit and skewers for turning on the spit.
Place the shelf with the food to be cooked in the 1^st or 2nd position from the top.
Pre-heat the oven for 5 minutes.
Turn the thermostat to a temperature between 50^ and 200^ .
FR
CUISSON AU GRIL


COOLING FAN (if supplied)
The fan is positioned on the upper part of the oven and I create a circle of cooling air on the inside of the furniture and I through the door of the oven.
It is turned on when the temperature of the outer shell of the oven reaches 60^ .
By switching on the oven with the thermostat at 200^ the fan starts working after approx.10 min.
It is turned off when the temperature of the outer shell of the oven descends under 60^
By switching off the oven with the thermostat at 200^ the fan stops working after approx. 30 min.
VENTILATEUR DE REFROIDISSEMENT
Push the knob out and turn it anticlockwise to set the clock.. First, turn the cooking selector to the required cooking function, and the thermostat to the desired cooking temperature. Then, to set end of cooking TME, turn the cooking timer to the left and to the desired time. A buzzer sounds at the end of the timed cooking period, and the oven switches itself off. Push the timer knob in to silence the buzzer.
To set only the start of cooking, leave the knob in the:
manual position.
FR
FIN DE CUISSON ANALOGIQUE
Press the duration key and the end of coking key simultaneously, then press the +/- keys to set the time.
MANUAL OPERATION
To start cooking without setting end of cooking time, press the manual key
SETTING ONLY THE DURATION OF COOKING IN SEMI-AUTOMATIC MODE
To set the duration of cooking, press the duration key and press the +/- keys to set the duration of cooking. A buzzer sounds when the cooking period finishes, and the oven switches itself off. Turn the thermostat and selector knobs back to 0 position and press the manual key.
SETTING ONLY THE END OF COOKING TIME IN SEMI-AUTOMATIC MODE
To set the end of coking time, press the end of cooking key and press the +/- keys to set the time at which you want the oven to switch off. A A buzzer sounds when the clockk reaches the set time, and the oven switches itself off. Turn the thermostat and selector knobs back to 0 position and press the manual key.
FR
TEMPORISATEUR ELECTRONIQUE A 6 TOUCHES
FONCTIONNEMENT MANUEL
To set the end of coking time, press the duration key and press the +/- keys to set the duration of cooking. Press the end of cooking key and press the +/- keys to set the time at which you want the oven to switch off.
When you finish setting these times, the AUTO symbol flashes and the buzzer sounds.. Press any key to silence it.
ALARM TIMER
Press the alarm timer key and press the + / - keys to set the required duration of cooking. The buzzer sounds when the cooking time ends. Press any key to silence it.
PROGRAMMING ERRORS
You cannot program in a cooking period which starts earlier than the time displayed on the clock. If you try to do so, the buzzer sounds and the AUTO symbol flasher. Simply change the duration or cooking time to correct the error.
CANCELLING A COOKING PROGRAMME
To cancel a coking programme, simply press the manual key.
FR
FONCTIONNEMENT AUTOMATIQUE
ANNULATION DU PROGRAMME
REEMPLACEMENT DE LA LAMPE DU FOUR
JIAMIOOYKA IYXOBKN IOJIKHA HEMTB OIIPEJEJEHHBIE XAPAKTEPHCTHKN:
a) KOHCTpyKIIH, IIHPOIHaI IIB BbICOKHX TEMHEpatyp (IO 300 rpaIycob)
b) HHTaHHe: cm. 3naueHHe B/Tu, npHBeJeHHoe Ha Ta6JIHcKe TexHHueckHX daHHbIX
c) MoiHIOCTb 25 Br.
d) KpennieHnE Tnna E 14
IpeKne Yem Ipnctynatb K KaKHM-TH6o DeiCTBnM,
OTcoeHNHTb Pn6op OT cTn
HHaHH, YTO6b HCKJHOHTb
BO3MOKHOCTb yJa pAtoKOM.
-BOH36eKaHHeIOBpeKJEnHH, 3aCTeJIHTbBdyXOBKe KxOHHOIIOJOTehie
-OTBHHTHBCTCKJIaHHyIO 3aIHTHYIO KpbIIKy JAMIOQKN
-OTBHNHTbCTapyIOJAMIOOky H3aMeHHTbe ee Ha HOByO
yctahOBHT 3aHTHyIO CTekJIHHYIO KpbIHKU y6paTb KxyOHHO NOJOTeHIE
- IIOKJIIOHTB 3JIeKTPoIHHTaHHe K IIpHbOpy
IMPORTANT:
The oven light must have these precise features:
a) it must be able to resist high temperatures (up to 300^ )
b) power supply: see V/Hz indicated on data plate.
c) power 25W.
d) E 14 connection.
Before proceeding, disconnect the appliance from the power line to avoid the possibility of electric shock.
- to prevent damage, place a tea cloth in the oven
- unscrew the glass cover of the light
- unscrew the old light bulb and replace it with the new one
- put back the glass cover and remove the tea cloth
- connect the appliance to the main electricity supply
IMPORTANT:
The oven door can be removed quickly and easily.
To do so, proceed as follows:
- Open the door fully.
- Lift the two levers shown in fig.
-
Close the door as far as the first stop (caused by the raised levers).
-
Lift the door upwards and outwards to remove it from its mountings.
To replace fit the door, fit the hinges in their mountings and lower the two levers.
FR
DEMONTAGE DE LA PORTE DU FOUR
The oven can be installed under work top or in cooking column. Figure shows the installation dimensions.
Make sure that surrounding materials are heat resistant.
Align the oven centrally with respect to the side walls of the units surrounding it and fix it in place with the screws and Allen screws provided
Insert the bushings provided in the holes in the face
Use the four screws provided to fasten the bushings to the cabin, taking care not to over tighten and break the bushing.
See the accompanying in -structions for combiningthe oven with multifunctional gas or gas-electric cookers.
Before connecting the oven to the mains power supply, make sure that:
The supply voltage corresponds to the specifications on the data plate: on the front of the oven.
- The mains supply has an efficient earth (ground) connection complying with all applicable laws and regulations.
Correct earthing (grounding) is a legal requirement.
The power cable should never reach a temperature 50^ above ambient temperature at any point along its length.
If a fixed appliance is not provided with a power cable and plug, or some other device permitting it to be disconnected from the mains electricity supply, with a gap between the contacts big enough to
FR
BRANCHEMENT ELECTRIQUE
guarantee class III overvoltage protection, then such a device must be fitted to the power supply in compliance with the regulations governing electrical installations. The omnipolar plug or switch must be easy to reach when the appliance is installed.
The unit becomes very hot during use. Be careful not to touch the heating elements inside the oven.
If the oven came with a meat probe, use only the probe recommended for this oven.
The different cooking levels where grids and drip pans can be placed are shown in the table on page 14.
FR
N.B. The manufacturer declines all responsibility for damage or injury if the above instructions and normal safety precautions are not respected.
The contents of this manual are generic and not all the functions described may be available on your product.
The manufacturer declines all responsibility for possible inaccuracies contained in this pamphlet, due to printing or copying errors. We reserve the right to make on our own products those changes to be considered necessary or useful, without jeopardizing the essential characteristics.
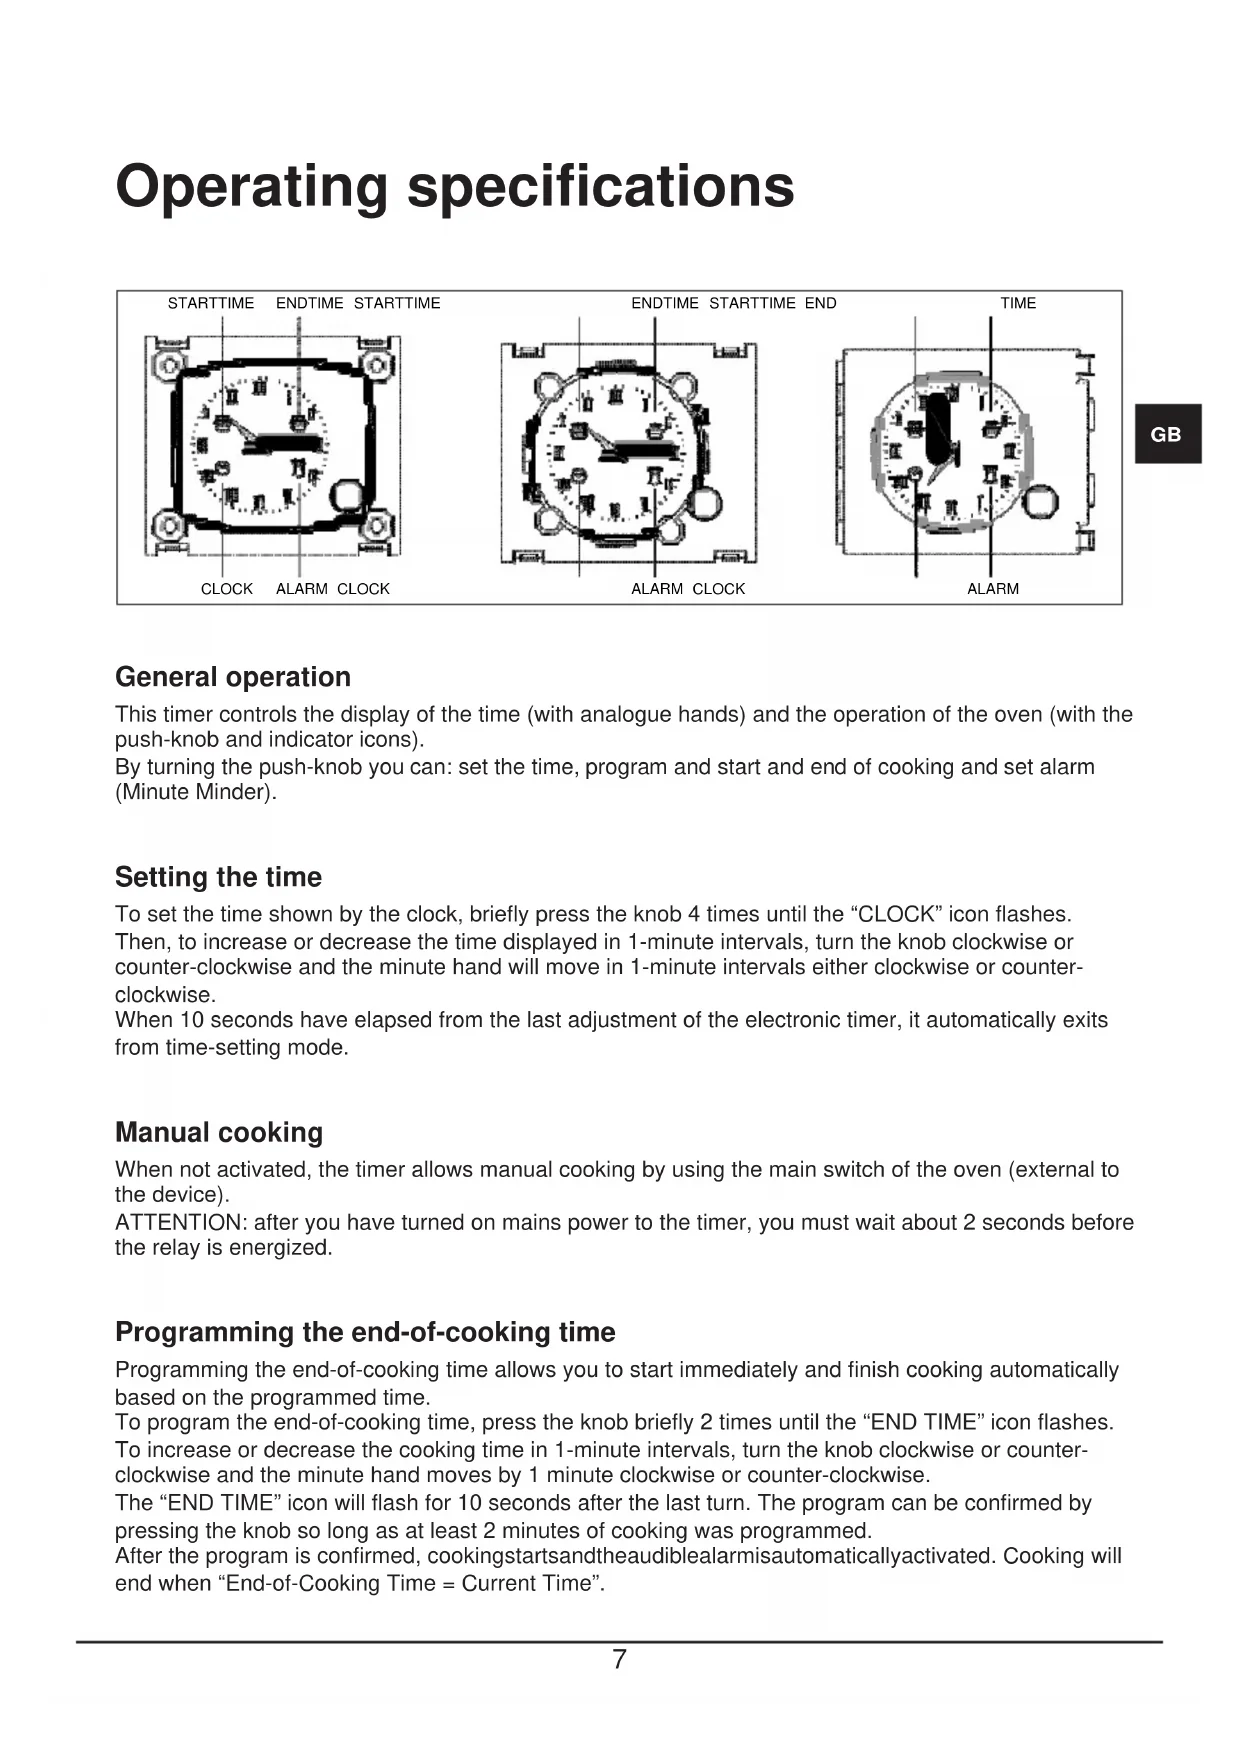
Operating specifications
STARTTIME ENDTIME STARTTIME
CLOCK ALARM CLOCK
ENDTIME STARTTIME END
ALARM CLOCK

ALARM
GB
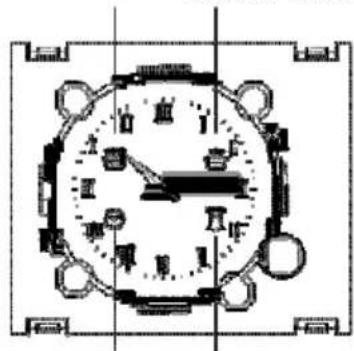
General operation
This timer controls the display of the time (with analogue hands) and the operation of the oven (with the push-knob and indicator icons).
By turning the push-knob you can: set the time, program and start and end of cooking and set alarm (Minute Minder).
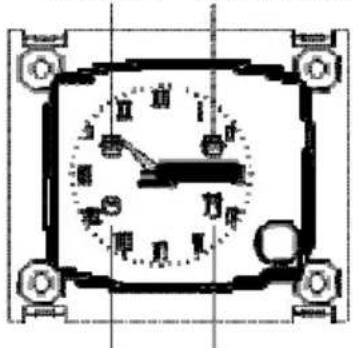
Setting the time
To set the time shown by the clock, briefly press the knob 4 times until the "CLOCK" icon flashes. Then, to increase or decrease the time displayed in 1-minute intervals, turn the knob clockwise or counterclockwise and the minute hand will move in 1-minute intervals either clockwise or counterclockwise.
When 10 seconds have elapsed from the last adjustment of the electronic timer, it automatically exits from time-setting mode.
Manual cooking
When not activated, the timer allows manual cooking by using the main switch of the oven (external to the device).
ATTENTION: after you have turned on mains power to the timer, you must wait about 2 seconds before the relay is energized.
Programming the end-of-cooking time
Programming the end-of-cooking time allows you to start immediately and finish cooking automatically based on the programmed time.
To program the end-of-cooking time, press the knob briefly 2 times until the "END TIME" icon flashes. To increase or decrease the cooking time in 1-minute intervals, turn the knob clockwise or counterclockwise and the minute hand moves by 1 minute clockwise or counter-clockwise.
The "END TIME" icon will flash for 10 seconds after the last turn. The program can be confirmed by pressing the knob so long as at least 2 minutes of cooking was programmed.
After the program is confirmed, cookingstarts and the audible alarm misautomatically activated. Cooking will end when "End-of-Cooking Time = Current Time".

To display the program set, briefly press and release the knob and the hands and icons will show the program set.
At the end of cooking, the "END TIME" icon flashes and the alarm beeps. After 1 minute, the alarm is disabled and the "END TIME" icon continues flashing until you press the knob.
To cancel the program before the end, press the button for 3 seconds: the program will be cancelled and the timer returns to manual cooking mode.
Programming the start-of-cooking and end-of-cooking times
Program the start-of-cooking time allows you to start and end cooking automatically based on the times programmed.
To program the start-of-cooking time, briefly press the knob 1 time until the "START TIME" icon starts flashing.
To increase or decrease the start-of-cooking time in 1-minute intervals, turn the knob clockwise or counter-clockwise and the minute hand moves 1 minute clockwise or counter-clockwise.
The "START TIME" icon will continue to flash for 10 seconds after the last turn. If, within this time, you do not turn or press the knob, the hands automatically return to displaying the time and the program is cancelled. If you press the knob, the start-of-cooking time is stored (the "START TIME" icon turns steady on), so long as you have programmed at least 1 minute of delay, and goes to setting the end-of-cooking time (the "END TIME" icon goes from off to flashing).
To program the end-of-cooking time, follow the procedure in the related paragraph.
Cooking will start when "Start Time = Current Time".
Programming the minute minder
Programming the Minute Minder gives you a simple alarm at the end of the programmed time without activating cooking (Minute Minder mode).
To schedule an "alarm" without cooking (Minute Minder mode), briefly press the knob 3 times until the "ALARM" icon flashes. Then, turn the knob, and the setting of the Minute Minder is the same as the end-of-cooking time (see corresponding paragraph).
The Minute Minder can only be used when there is no program running.
Displaying the program set
The programmer allows the display of the program set.
To view the program set, briefly press and release the knob and the controller displays the program set, moving the hands to the time set and highlighting the steps with the flashing of the related icons.
The controller will automatically return to displaying the current time and continues running the program set.
Deleting the program set
The controller allows cancelling the program.
To cancel the program set, press the knob for a few seconds until the related icons turn off and there is a beep.
The controller automatically returns to manual cooking mode.
Power failure signal
The timer does not cancel the program in the case of a power failure.
The timer signals each power failure of the mains by making the "CLOCK" icon flash, so the user can check that the time is correct.
In this case, briefly press the knob to disable the signal.
GB


- H3TOTOBHTIb
- IT
- CARO CLIENTE,
- THE MANUFACTURER
- FR
- CHER CLIENT,
- IMPORTANT!
- INDEX
- INSTALLATION
- INSTRUCTIONS
- POUR L'INSTALLATEUR
- Py
- IIEPBOE IIPIMEHEHNE
- Baxho:
- PRIMO UTILIZZO
- Important
- PANNEAUX AUTONETTOYANTS CATALYTIQUES
- RESPECT DE L'ENVIRONNEMENT
- INSTRUCTIONS POUR LE
- FONCTIONNEMENT CUISSON
- CONVENTIONNELLE
- CUISSON VENTILEE
- DECONGELATION
- COTTURA AL GRILL
- CUISSON AU GRIL
- COOLING FAN (if supplied)
- VENTILATEUR DE REFROIDISSEMENT
- FIN DE CUISSON ANALOGIQUE
- SETTING ONLY THE DURATION OF COOKING IN SEMI-AUTOMATIC MODE
- SETTING ONLY THE END OF COOKING TIME IN SEMI-AUTOMATIC MODE
- TEMPORISATEUR ELECTRONIQUE A 6 TOUCHES
- FONCTIONNEMENT MANUEL
- ALARM TIMER
- PROGRAMMING ERRORS
- CANCELLING A COOKING PROGRAMME
- FONCTIONNEMENT AUTOMATIQUE
- ANNULATION DU PROGRAMME
- REEMPLACEMENT DE LA LAMPE DU FOUR
- JIAMIOOYKA IYXOBKN IOJIKHA HEMTB OIIPEJEJEHHBIE XAPAKTEPHCTHKN:
- IMPORTANT:
- DEMONTAGE DE LA PORTE DU FOUR
- BRANCHEMENT ELECTRIQUE
- Operating specifications
- General operation
- Setting the time
- Manual cooking
- Programming the end-of-cooking time
- Programming the start-of-cooking and end-of-cooking times
- Programming the minute minder
- Displaying the program set
- Deleting the program set
- Power failure signal
Brand : Foster
Model : 7101 642
Category : Oven