
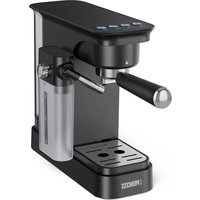
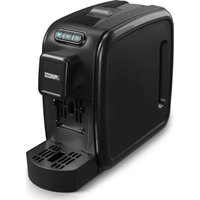
Toscana 240301 - Coffee machine PRINCESS - Free user manual and instructions
Find the device manual for free Toscana 240301 PRINCESS in PDF.

| Product type | Drip coffee maker |
| Brand | Princess |
| Model | Toscana 240301 |
| Capacity | 4 to 14 cups (approx. 0.6 to 1.8 L) |
| Carafe type | Insulated thermal carafe |
| Pause & serve function | Yes, allows serving before the cycle ends |
| Automatic shut-off | Yes, after the brewing cycle |
| Water level indicator | Yes, on the water tank |
| Coffee filter | Paper filter size 1x4 (standard) |
| Power supply | 220-240 V ~ 50/60 Hz |
| Power | Approximately 1000 W |
| Dimensions (W x D x H) | Approximately 25 x 20 x 30 cm |
| Weight | Approximately 2 kg |
| Housing material | Plastic |
| Maintenance | Regular cleaning, periodic descaling |
| Safety | Automatic shut-off, overheat protection |
| Use | Household use only |
| Warranty | Standard, excludes damage due to limescale |
Frequently Asked Questions - Toscana 240301 PRINCESS
User questions about Toscana 240301 PRINCESS
0 question about this device. Answer the ones you know or ask your own.
Ask a new question about this device
Download the instructions for your Coffee machine in PDF format for free! Find your manual Toscana 240301 - PRINCESS and take your electronic device back in hand. On this page are published all the documents necessary for the use of your device. Toscana 240301 by PRINCESS.
USER MANUAL Toscana 240301 PRINCESS
This stylish Princess Coffeemaker is suitable for making 4 to 14 cups of coffee. The appliance has a water level indicator and a thermal jar. The thermal jar assures that the coffee stays hot and fresh for several hours.

Operation and controls
See figure 1.
The appliance includes the following:
1 Cover for the filter holder
2 Filter holder
3 Water reservoir with level indication
4 Measuring spoon
5 Power cord and plug
6 On/Off switch with indicator light
7 Thermal jar with lid
8 Housing
Before using for the first time
- Read and follow these instructions carefully and keep them for future reference.
- Before use, verify that the mains voltage is the same as that indicated on the appliance's type plate.
1 Take the appliance out of the box and remove all of the packaging materials.
2 Place the appliance on a flat, sturdy surface.
3 Insert the plug into the plug socket.
4 To clean the inside of the appliance, only use water for the first few times. Follow the instructions given in 'Making coffee', except do not use a paper filter or any ground coffee. When finished, throw the water away and clean the
appliance (see 'Maintenance and cleaning').
Making coffee
- Before use, verify that the On/Off switch is in OFF position.
1 Open the cover of the filter holder.
2 Fill the water reservoir with the desired volume of water (a minimum of 4-6 cups and a maximum of 12-14 cups as indicated).
See figure 2.
3 Place the filter holder and lock it properly in the appliance, before placing the thermal jar.
See figure 3.
4 Make sure that the lid of the thermal jar is closed and turned in the locked position.
5 Place the thermal jar in the appliance.
6 Place a paper coffee filter (size 1x4) in the filter holder and fill it with the required quantity of ground coffee (as a standard, 1 level measuring spoon per cup).
7 Close the lid of the filter holder.
8 Switch the appliance ON with the On/ Off switch. The indicator light will switch on.
9 Take the thermal jar out of the appliance to pour a cup of coffee. It is not necessary to remove the lid from the jar. The appliance has a pause-and-serve function, so that you can remove the thermal jar whilst the coffee is still being made. Replace the thermal jar in time to prevent the filter from overflowing.
10 The appliance will switch off automatically after use. Although the indicator light will go out, the On/Off switch will stay in ON position. Switch the On/Off switch manually to the OFF position. Before making coffee the next time, be sure that the On/Off switch is in OFF position.
Tips for delicious coffee:
- Keep the appliance clean (see 'Maintenance and cleaning').
- Use fresh, clean water.
- Keep the coffee in a cold, dry location in a sealed container.
Maintenance and cleaning
- Clean the appliance on a regular basis.
- Remove the plug from the plug socket when cleaning the appliance.
- Never clean the appliance when it is switched on.
- Make sure no moisture gets into the electrical parts of the appliance.
- Never immerse the appliance, the power cord or the plug in water or any other liquid.
- Never use aggressive or abrasive cleaning products or sharp objects (like knives or hard brushes) during cleaning.
1 Make sure the appliance has been switched off.
2 Remove the plug from the plug socket.
3 Remove the filter holder from the appliance.
4 Remove the paper filter and dispose of it together with the used coffee grounds.
5 Clean the filter holder in warm water with washing-up liquid or place it in a dishwasher.
6 Turn the lid on the thermal jar to the unlocked position and remove it from the jar (see figure 4).
7 Dispose of any coffee that may still be in the thermal jar. Clean the inside of the thermal jar with warm water and washing-up liquid or place it in a dishwasher.
8 Place the lid on the jar with the indicator directed to the unlocked position and turn it in the locked position (see figure 3).
9 Clean the exterior of the appliance with a soft, damp cloth.
Dscaling
- Scale may have a negative effect on the appliance's performance. Scale often occurs in areas with hard water. We advise you to use a suitable descaling agent when scale appears. Always follow the instructions for the descaling agent. Less scale will form if you use a water purification appliance.
- Make sure there's no scaling agent in the appliance when you start using it again after descending.
- Complaints or problems as a result of furring or scale are not covered by the warranty.

Safety
General information
- Read and follow these instructions carefully and keep them for future reference.
- Only use this appliance as described in these instructions.
- Only use this appliance for domestic purposes.
- The use of this appliance by children or persons with a physical, sensory, mental or motor disability or persons who lack the necessary knowledge and experience may result in a dangerous situation. Persons responsible for their safety must give
explicit instructions or supervise the use of the appliance.
- Keep the appliance out of the reach of small children.
- Repairs may only be carried out by a qualified service technician. Never try to repair the appliance yourself.
- Only use accessories recommended by the supplier. The use of other accessories may result in damage to the appliance, thereby creating hazards for the user.
- The appliance is not intended to be operated by means of an external timer or seperate remote control system.
Heat and electricity
- Before use, verify that the mains voltage is the same as that indicated on the appliance's type plate.
- Plug the appliance into an earthed plug socket.
Always remove the plug from the plug socket when the appliance is not going to be used a long period of time. - Always remove the plug from the plug socket by pulling the plug, not the power cord.
- Never pull the power cable to move the appliance.
- Do not move the appliance while in use.
- Do not use the appliance if the power cord or the appliance has been damaged. To avoid risks, send the appliance to our service department.
- Make sure the appliance and the power cord do not come into contact with heat sources, such as a hot hob or a naked flame.
-
Make sure the power cord and the plug do not come into contact with water.
-
Do not touch the appliance if it has fallen into water. Remove the plug from the plug socket immediately. Do not use the appliance again.
- To avoid the risk of fire, the appliance must be able to release the heat that it produces. Make sure the appliance has sufficient space around it and does not come into contact with inflammable materials. The appliance may not be covered.
During use
- Never use the appliance outdoors.
- Never use the appliance in a humid room.
- Place the appliance on a stable, flat surface where it cannot fall over.
- Do not allow the power cord to hang over the edge of a kitchen surface, a work surface or a table.
- Make sure your hands are dry before you touch the appliance, the power cord or the plug.
- Switch off the appliance and remove the plug from the plug socket in the event of a malfunction during use and before cleaning the appliance, fitting or removing an accessory or storing the appliance after use.
- Do not use the appliance near another heat source. Make sure the hot parts of the appliance do not come into contact with inflammable fabrics, such as tea towels.
- Do not switch on the appliance until you have filled the water reservoir. Only fill the water reservoir with cold water.
- Never fill the water reservoir above the maximum mark.
- Do not use the thermal jar if it is cracked.
U.K. WIRING INSTRUCTIONS
The wires in the mains lead are coloured in accordance with the following code:
As the colours of the wire in the mains lead of this appliance may not correspond with the colour markings identifying the terminals on your plug, proceed as follows:
- The wire which is coloured BLUE must be connected to the terminal which is marked with the letter N or coloured black.
- The wire which is coloured BROWN must be connected to the terminal which is marked with the letter L or coloured red.
- The wire which is coloured GREEN/YELLOW must be connected to the terminal which is marked with the letter E or (earth symbol) and is coloured GREEN or GREEN/YELLOW
WARNING: THIS APPLIANCE MUST BE EARTHED
With this appliance, if a 13A plug is used a 13A fuse should be fitted. If any other type of plug is used, a 15A fuse must be fitted either in the plug or at the distribution board.

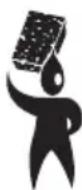
The environment
Dispose of packaging material, such as plastic and boxes, in the appropriate waste containers.
If you wish to dispose of the appliance whilst it still works properly or can be easily
repaired, ensure that the appliance is recycled.
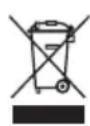
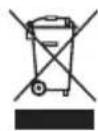
When the appliance reaches the end of its useful life, it should be disposed of in a responsible manner, thereby ensuring the reuse of the appliance or its parts. Do not dispose of the appliance with normal household waste, but hand it over to a recycling collection point. Contact your local authority for information about available disposal and collection systems in your area.
Applicable European guidelines:
2002/95/EC
2002/96/EC

Généralités
LgDjJ 1 J. 1 J 1 J 1 J 1 J 1 J 1 J 1 J 1 J 1 J 1 J 1 J 1 J 1 J 1 J 1 J 1 J 1 J 1 J 1 J 1 J 1 J 1 J 1 J 1 J 1 J 1 J 1 J 1 J 1 J 1 J 1 J 1 J 1 J 1 J
aill" jll Ljhi jlg1 hao y 1"(a.hii)
. iic slo plsiwU
g Jy jLs o agall hao y
pgs sIc
a
aaiia aayjgl 1 aii i
aaii iie yaiaii nn no ayaiaiy jy
jlg
oLioic l! jg 1 aii i
J
s21 slo jai ai no sli
jlg 1 g ayy
LLI glll gljgljg 8
J Lw g
abL aiaa algo puiu wq
aalglg JSL (L) ola cglg
aaiil glil (A)
aLj 1
Jg j
Jg j
Og g aio Jg C Jg J
.
JiLw g JI J
JLWc J
JGJ
JLJ L
JLJ L
JLJ
pLw81cL
jSlo81 jLg1pLusu
..≤ 11
a 1
gimog ciL chw lc jgjg
hawy j 8
a
algbgjcbblcwnl
gjLdJwJdcJyBb
LJI gJ LJI LLW
JgJg
cLjIbcgdsJLgssal 0
5ji jlgj 1 1
jIgJgJgLo
p12
J 10
aLwJsljzJ1sLj
Jio.JieiW21 a,ww 1g1 wouLi 8
L
sU1 j+J sJo JgJgJgJgJgJgJg
LcLcUjLjLj
aLc no 1sUJzJUe
A
G
JgLiio jLgLbLa
JLai JIa8i
JgLx Jgfo aod s 1bWg
an + 1 = an + a_n
LgogjIbAslalssipsi
Lao LpuiwJc 10g1
jIJIg jlgU
alao jbloo 5y prnuiu
ab = ( 1 2·s l)
Jaaia aee
SLgJg0
413 90 90-8≤1 8≤1
Jg jge 1gc gglg
p1
sJ 1
pucuuaa1 no uLai Lai
algboljglplasw1
Jluol y aal jolg 1y L o
Lw w g 4w
L
a ≥ 1
psswsljLg 1
ooj joei 1jgl 1puiuL qai
pssui 2 jglgjll
jllw no g jzj 1j zjg
.
JLwOgJg
gj jLw ggo j0. 0j1
@
JLwOx 8 JwLaJg JLW
山
aolit jhawljlqLcLw
pssu 8.1gaaa aagaaa
j^2x^2 - 2y^2 = ( x + y) ( x - y)
s o
gii yj 0j
jgJg> aLs Lwogg 5
Jleai 8jw sglk Jlpcg
jG

L 100
aaiil lalalalalgL
Jx Jg
aIgG a>Lo! JSc gJ S
aai j 1e o j4
j 1000
JJg.ajgmo aoyb:do jolsi
- ( 2) ^2 ≥ 1 gjLg-1pIauiwI aolcI j0 Sll
JjAolJI Jjll aoLa 20 jLj 10 yalssii
Jai. quai jolc ayol abai aalw
Jg>LogLeo Jc Jg>anL a1s1 abnll
g e a jIg aolae jno yalai aiakii
alhio
:a11a1g9gX1U2Lw,x1
2002/95/EC
2002/96/EC


Brand : PRINCESS
Model : Toscana 240301
Category : Coffee machine