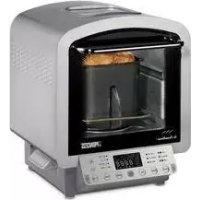
152002 - Bread maker PRINCESS - Free user manual and instructions
Find the device manual for free 152002 PRINCESS in PDF.


| Product type | Bread maker and multifunction oven |
| Brand | Princess |
| Model | 152002 |
| Power supply | 220-240 V ~ 50/60 Hz |
| Power | 600 W (estimated) |
| Bread pan capacity | Up to 1 kg of bread (estimated) |
| Main functions | Bread baking (normal, French, sweet, whole wheat), kneading, rising, steam cooking, grill, convection, defrosting, soup, jam/compote |
| Material | Stainless steel and plastic (estimated) |
| Safety | Automatic shut-off, overheat protection, door-open stop |
| Cleaning and maintenance | Clean with a damp cloth, do not immerse, do not use abrasive cleaners |
| Included accessories | Bread pan, kneading paddle, measuring cup, measuring spoons, baking sheet, grill rack, pizza and baguette pans, drip tray, water tank |
| Repairability | Contact an approved repairer - do not disassemble yourself |
Frequently Asked Questions - 152002 PRINCESS
User questions about 152002 PRINCESS
0 question about this device. Answer the ones you know or ask your own.
Ask a new question about this device
Download the instructions for your Bread maker in PDF format for free! Find your manual 152002 - PRINCESS and take your electronic device back in hand. On this page are published all the documents necessary for the use of your device. 152002 by PRINCESS.
USER MANUAL 152002 PRINCESS
natural_image
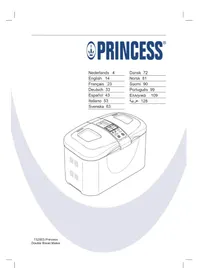
Line drawing of a modern kitchen oven with digital display and control panel (no text or symbols)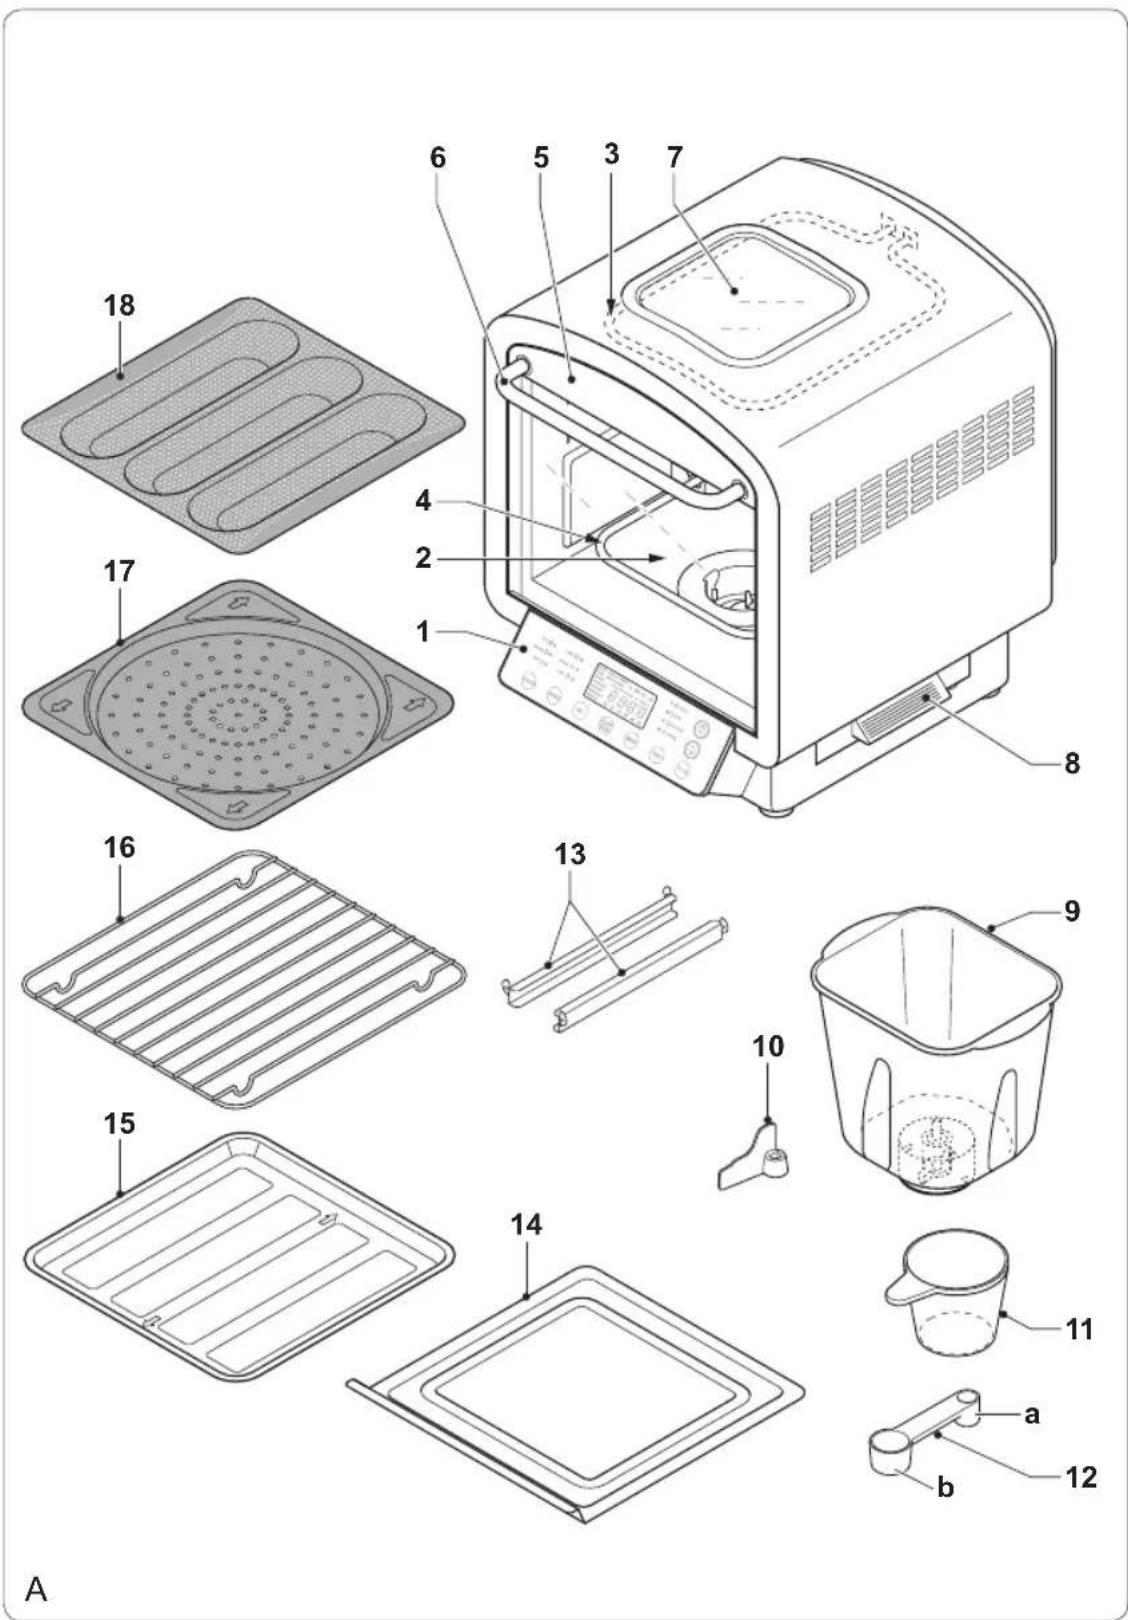
Gefeliciteerd!
kookcompartment (2).
You have purchased a Princess appliance. Our aim is to provide quality products with a tasteful design and at an affordable price. We hope that you will enjoy this appliance for many years.
Instructions for use
The instructions for use have been collected in the corresponding section. Be familiar with the safety instructions when you consult the instructions for use.
Safety instructions
Warning!
- When using mains-powered appliances, basic safety instructions must always be followed to reduce the risk of fire, electric shock and personal injury.
- Do not use the appliance near bathtubs, showers, basins or other vessels containing water.
Read the entire manual carefully before use. The intended use is described in this manual. The use of any accessory or the performance of any operation with this appliance other than recommended can cause a risk of personal injury.
Keep this manual for future reference.
• Children should be supervised to ensure that they do not play with the appliance.
- The use of this appliance by children or persons with a physical, sensory, mental or motorial disability, or lack of experience and knowledge can give cause to hazards. Persons responsible for their safety should give explicit instructions or supervise the use of the appliance.
Use
Always be careful when using the appliance.
- Beware of hot parts. The surface can become hot when the appliance is operating.
• Always protect the appliance from water or excessive humidity.
Do not operate the appliance if your hands • are wet. Do not operate the appliance if you are barefoot.
Carefully guide the mains cable to make • sure that it does not hang over the edge of a worktop and cannot be caught accidentally or tripped over.
Never pull the mains cable to disconnect • the mains plug from the mains. Keep the mains cable away from heat, oil and sharp edges.
Do not remove any part or accessory when the mains plug is connected to the mains. Always first disconnect the mains plug from the mains.
If the mains cable becomes damaged • during use, immediately disconnect the mains plug from the mains. Do not touch the mains cable before disconnecting the mains plug from the mains.
Disconnect the mains plug from the mains • when the appliance is not in use, before assembly or disassembly and before cleaning and maintenance.
Safety of others
Do not allow children or any person • unfamiliar with these instructions to use the appliance.
Do not allow children or animals to come • near the work area. Do not allow children or animals to touch the appliance or mains cable. Close supervision is necessary when the appliance is used near children.
After use
Disconnect the mains plug from the mains • and let the appliance cool down before leaving it unattended and before replacing, cleaning or inspecting any parts of the appliance.
Store the appliance in a dry place when not in use. Make sure that children do not have access to stored appliances.
Inspection and repairs
Before use, check the appliance for • damaged or defective parts. Inspect the appliance for breakage of parts, damage to switches and other conditions that can affect the operation.
Do not use the appliance if any part is • damaged or defective.
Have any damaged or defective part • repaired or replaced by an authorised repair agent. Never attempt to remove or replace any part yourself.
Before use, check the mains cable for wear • or damage.
Do not use the appliance if the mains cable • or mains plug is damaged or defective. If the mains cable or mains plug is damaged or defective, it must be replaced by the manufacturer or an authorised repair agent.
Safety instructions for breadmakers and ovens
Before use, always check that the mains • voltage is the same as the voltage on the rating plate of the appliance.
Connect the appliance to an earthed wall • socket. If necessary, use an earthed extension cable of a suitable diameter (at least 3 × 1 mm^2 ).
For additional protection, install a residual current device (RCD) with a rated residual operating current that does not exceed 30 mA.
- The appliance is not intended to be operated by means of an external timer or separate remote-control system.
- Make sure that water cannot enter the contact plugs of the mains cable and the extension cable.
Always fully unwind the mains cable and the extension cable.
- Do not use the appliance outdoors.
- Place the appliance on a stable and flat surface.
- Place the appliance on a heat-resistant and splash-proof surface.
- Do not place the appliance on a hob.
- Make sure that there is sufficient space around the appliance to allow heat to escape and provide sufficient ventilation.
• Make sure that the appliance does not come into contact with flammable material. - Keep the appliance away from heat sources.
- Do not cover the appliance.
Always be careful when touching the • appliance. Use oven gloves if you need to touch the appliance during or shortly after use.
The heating elements and the racks • become very hot during use. Do not touch the hot heating elements and the hot racks.
Do not move the appliance while it is • switched on or is still hot. Remove the mains plug from the wall socket and wait until the appliance has cooled down.
Do not leave the appliance unattended during use.
U.K. Wiring instructions Class 1
The wires in the mains lead are coloured in accordance with the following code:
BLUE NEUTRAL
BROWN LIVE
GREEN/YELLOW EARTH
As the colours of the wire in the mains lead of this appliance may not correspond with the colour markings identifying the terminals on your plug, proceed as follows:
The wire which is coloured BLUE must be connected to the terminal which is marked with the letter N or coloured black.
The wire which is coloured BROWN must be connected to the terminal which is marked with the letter L or coloured red.
The wire which is coloured GREEN/YELLOW must be connected to the terminal which is marked with the letter E or ( ) and is coloured GREEN or GREEN/YELLOW.
If a 13Amp (BS1363) plug is used, a 13Amp (BS1362) fuse must be fitted, or if any other type of plug is used, a 13Amp fuse must be fitted, either in the plug or adaptor, or on the distribution board.
Warning! This appliance must be earthed.
Description (fig. A)
Your 152002 Princess breadmaker and oven has been designed for baking food and a large number of oven applications. The appliance is suitable for domestic use only.
- Operation panel
- Cooking compartment
- Upper heating element
- Lower heating element
- Door
- Door grip
- Viewing window
- Water reservoir
- Bread pan
- Kneading paddle
- Measuring cup
12a. Measuring spoon (1 teaspoon)
12b. Measuring spoon (1 tablespoon) - Support rail
- Drip tray
- Baking plate
- Grill rack
- Baking plate (pizza)
- Baking plate (baguette)
Initial use
Preparation
- Clean the appliance.
Refer to "Cleaning and maintenance". - Clean the accessories.
Refer to "Cleaning and maintenance".
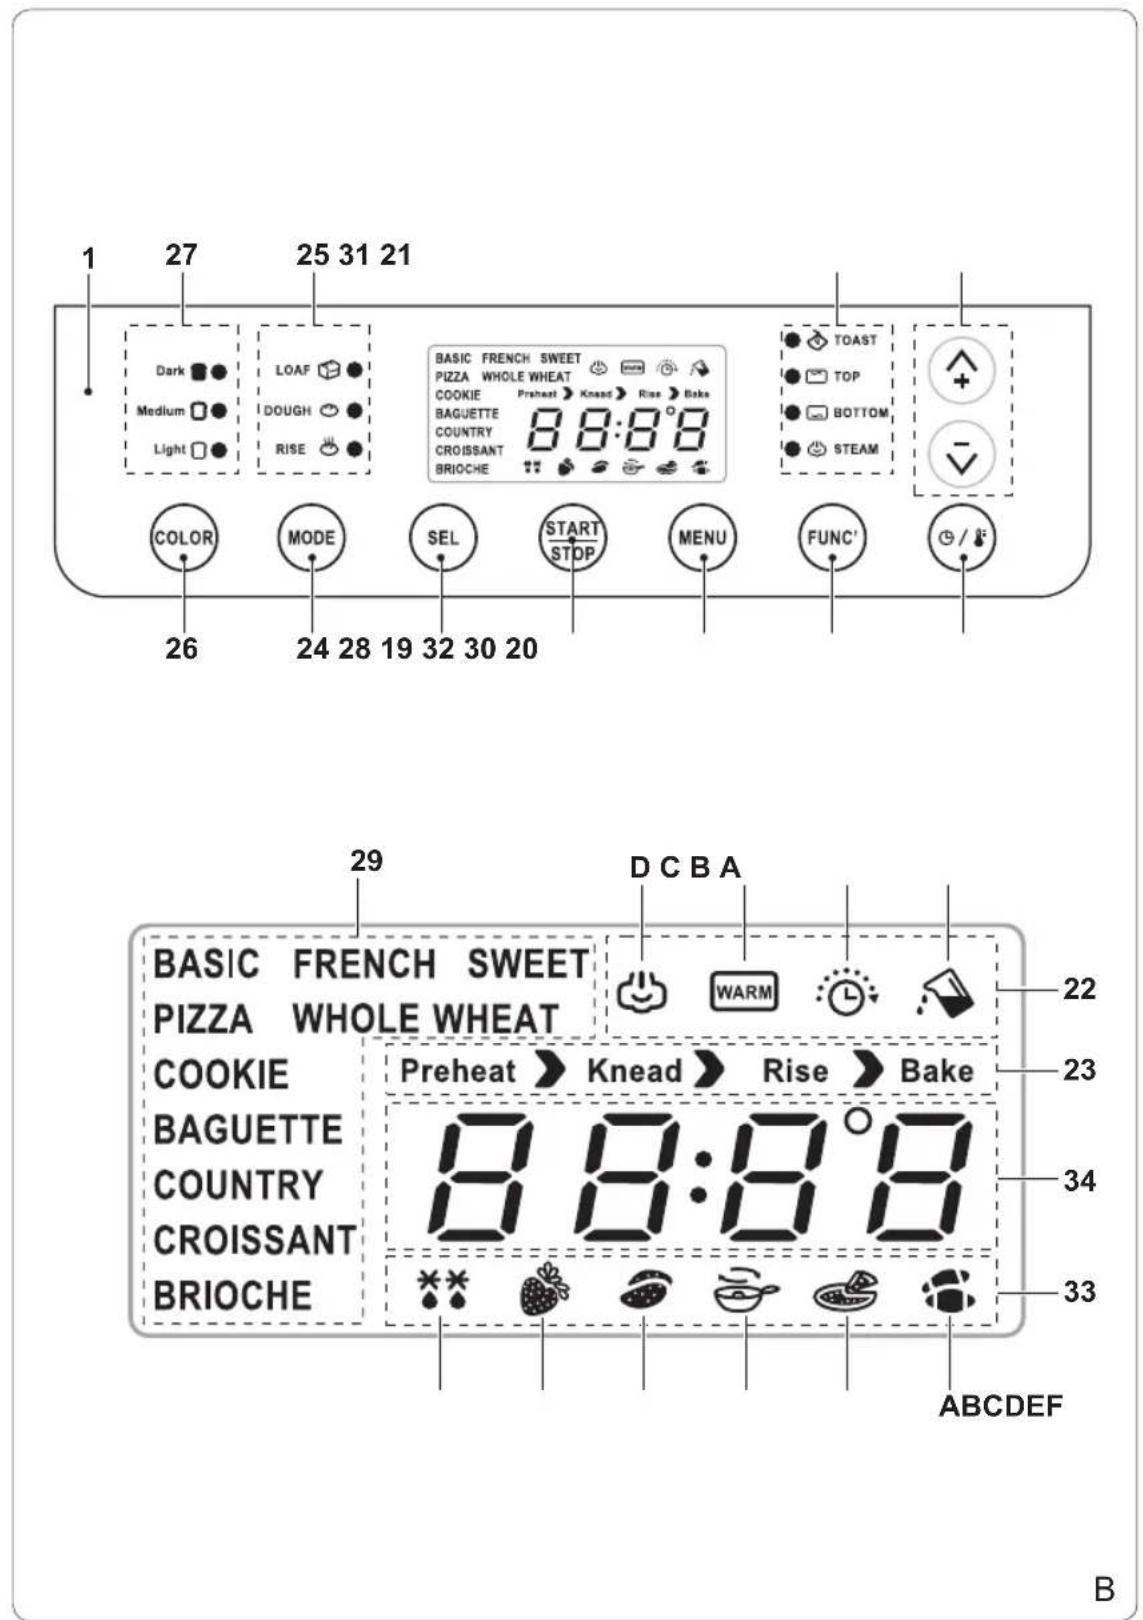
Operation panel (fig. A & B)
The appliance can be operated with the operation panel (1).
Starting and stopping the cooking process (fig. B)
The "START/STOP" button (19) must be used to start and stop a specific cooking process.
- If the cooking process is set, press "START/STOP" to start the process.
- If the cooking process is running, press "START/STOP" for a few seconds to stop the process.
Adjusting the time and the temperature (fig. B)
In a large number of oven settings, the time/temperature button (20) and the "+" and "-" buttons (21) can be used to adjust the time and/or the temperature to meet specific cooking requirements.
If only the time can be set, proceed as follows:
- Press the time/temperature button (20).
- Press the "+" and "-" buttons (21) to set the time.
If only the temperature can be set, proceed • as follows:
- Press the time/temperature button (20).
- Press the "+" and "-" buttons (21) to set the temperature.
If both the time and the temperature can be set, proceed as follows:
- Press the time/temperature button (20).
- Press the "+" and "-" buttons (21) to set the temperature.
- Press the time/temperature button (20) again.
- Press the "+" and "-" buttons (21) to set the time.
Cooking function indicators (fig. B)
The cooking function indicators (22) indicate the cooking function.
Setting Indication
A The steam function is active.
B The heat preservation function is active.
C The delayed finish time function is active.
D The water reservoir must be filled with water.
Cooking process indicators (fig. B)
The cooking process indicators (23) indicate the cooking process.
Setting Indication
PREHEAT The appliance is preheating.
KNEAD The appliance is kneading the dough.
RISE The appliance is rising the dough.
BAKE The appliance is baking the bread.
Setting the baking mode (fig. B)
The baking mode can be set using the "MODE" button (24). The baking mode can be set to the following settings:
- Select "LOAF" to bake a loaf of bread.
- Select "DOUGH" and "RISE" to knead and rise the dough.
- Select "DOUGH" to knead the dough.
- Select "RISE" to rise the dough.
Press "MODE" 1x to bake a loaf of bread. • The baking mode indicator (25) indicates "LOAF".
Press "MODE" 2x to knead and rise the • dough. The baking mode indicator (25) indicates "DOUGH" and "RISE".
Press "MODE" 3x to knead the dough. • The baking mode indicator (25) indicates "DOUGH".
Press "MODE" 4x to rise the dough. The • baking mode indicator (25) indicates "RISE". Note! If the last possible setting has been reached, it is still possible to adjust the setting. Press "MODE" to go back to the first possible setting.
Setting the roast colour (fig. B)
The roast colour can be set using the "COLOR" button (26). The roast colour can be set to the following settings:
Press "COLOR" 1x to set a medium roast colour. The roast colour indicator (27) indicates "MEDIUM".
Press "COLOR" 2x to set a light roast colour. The roast colour indicator (27) indicates "LIGHT".
Press "COLOR" 3x to set a dark roast colour. The roast colour indicator (27) indicates "DARK".
Note! The roast colour can only be set with the following baking modes: "LOAF".
Note! If the last possible setting has been reached, it is still possible to adjust the setting. Press "COLOR" to go back to the first possible setting.
Setting the bread type (fig. B)
The bread type can be set using the "SEL" button (28). The bread type can be set to the following settings:
- Select "BASIC" to bake normal bread.
- Select "FRENCH" to bake French bread.
- Select "SWEET" to bake sweet bread.
- Select "WHOLE WHEAT" to bake whole-wheat bread.
- Select "PIZZA" to bake pizzas.
- Select "COOKIE" to bake cookies.
- Select "BAGUETTE" to bake baguettes.
- Select "COUNTRY" to bake country bread.
- Select "CROISSANT" to bake croissants.
- Select "BRIOCHE" to bake brioches.
Note! The bread type can only be set with the following baking modes: (a) "LOAF" / (b) "DOUGH" & "RISE".
Bread type: "LOAF"
Press "SEL" 1x to bake normal bread. The • bread type indicator (29) indicates "BASIC". Press "SEL" 2x to bake French bread. • The bread type indicator (29) indicates "FRENCH".
Press "SEL" 3x to bake sweet bread. The • bread type indicator (29) indicates "SWEET". Press "SEL" 4x to bake whole-wheat bread. • The bread type indicator (29) indicates "WHOLE WHEAT".
Bread type: "DOUGH" & "RISE"
Press "SEL" 1x to knead and rise dough for normal bread. The bread type indicator (29) indicates "BASIC".
Press "SEL" 2x to knead and rise dough for • French bread. The bread type indicator (29) indicates "FRENCH".
Press "SEL" 3x to knead and rise dough for • sweet bread. The bread type indicator (29) indicates "SWEET".
Press "SEL" 4x to knead and rise dough for • pizzas. The bread type indicator (29) indicates "PIZZA".
Press "SEL" 5x to knead and rise dough for • whole-wheat bread. The bread type indicator (29) indicates "WHOLE WHEAT".
Press "SEL" 6x to knead and rise dough for • cookies. The bread type indicator (29) indicates "COOKIE".
Press "SEL" 7x to knead and rise dough for baguettes. The bread type indicator (29) indicates "BAGUETTE".
Press "SEL" 8x to knead and rise dough for country bread. The bread type indicator (29) indicates "COUNTRY".
Press "SEL" 9x to knead and rise dough for • croissants. The bread type indicator (29) indicates "CROISSANT".
Press "SEL" 10x to knead and rise dough • for brioches. The bread type indicator (29) indicates "BRIOCHE".
Note! If the last possible setting has been reached, it is still possible to adjust the setting. Press "SEL" to go back to the first possible setting.
Setting the oven function (fig. B)
The oven function can be set using the "FUNC" button (30). The oven function can be set to the following settings:
- Select "TOAST" to toast food.
- Select "TOP" to use only the upper heating elements.
- Select "BOTTOM" to use only the lower heating elements.
- Select "TOP" and "BOTTOM" to use both the upper heating elements and the lower heating elements.
- Select "TOP", "BOTTOM", and "STEAM" to use both the upper heating elements and the lower heating elements, in combination with the steam function.
Press "FUNC" 1x to toast food. The oven function indicator (31) indicates "TOAST". Press "FUNC" 2x to use only the upper heating elements. The oven function indicator (31) indicates "TOP".
- Press "FUNC" 3x to use only the lower heating elements. The oven function indicator (31) indicates "BOTTOM".
Press "FUNC" 4x to use both the upper heating elements and the lower heating elements. The oven function indicator (31) indicates "TOP" and "BOTTOM".
Press "FUNC" 5x to use both the upper • heating elements and the lower heating elements, in combination with the steam function. The oven function indicator (31) indicates "TOP", "BOTTOM", and "STEAM".
Note! If the last possible setting has been reached, it is still possible to adjust the setting. Press "FUNC" to go back to the first possible setting.
Fixed oven settings (fig. B)
Fixed oven settings can be set using the "MENU" button (32). The fixed oven settings can be set to the following settings:
- Select symbol "A" to prepare frozen snacks.
- Select symbol "B" to prepare frozen pizzas.
- Select symbol "C" to prepare soup.
- Select symbol "D" to prepare potatoes.
- Select symbol "E" to prepare jam.
- Select symbol "F" to defrost food.
- Select "PIZZA" to bake pizzas.
- Select "COOKIE" to bake cookies.
- Select "BAGUETTE" to bake baguettes.
- Select "COUNTRY" to bake country bread.
- Select "CROISSANT" to bake croissants.
- Select "BRIOCHE" to bake brioches.
Press "MENU" 1x to prepare frozen snacks. • The cooking programme indicator (33) indicates symbol "A".
Press "MENU" 2x to prepare frozen pizzas. • The cooking programme indicator (33) indicates symbol "B".
Press "MENU" 3x to prepare soup. The cooking programme indicator (33) indicates symbol "C".
Press "MENU" 4x to prepare potatoes. The cooking programme indicator (33) indicates symbol "D".
Press "MENU" 5x to prepare jam. The • cooking programme indicator (33) indicates symbol "E".
Press "MENU" 6x to defrost food. The • cooking programme indicator (33) indicates symbol "F".
Press "MENU" 7x to bake pizzas. The • bread type indicator (29) indicates "PIZZA".
Press "MENU" 8x to bake cookies. The • bread type indicator (29) indicates "COOKIE".
Press "MENU" 9x to bake baguettes. • The bread type indicator (29) indicates "BAGUETTE".
Press "MENU" 10x to bake country bread. • The bread type indicator (29) indicates "COUNTRY".
Press "MENU" 11x to bake croissants. • The bread type indicator (29) indicates "CROISSANT".
Press "MENU" 12x to bake brioches. • The bread type indicator (29) indicates "BRIOCHE".
Note! If the last possible setting has been reached, it is still possible to adjust the setting. Press "MENU" to go back to the first possible setting.
Baking modes (fig. A & B) "LOAF"
Put the food into the cooking compartment • (2).
Insert the mains plug into the wall socket. • The digital display (34) indicates ":0".
Press "MODE" 1x. The roast colour indicator (27) indicates "MEDIUM".
The baking mode indicator (25) indicates "LOAF". The bread type indicator (29)
indicates "BASIC". The cooking process indicator (23) indicates "KNEAD". The digital display (34) indicates "4:00" (4 hours).
Press "COLOR" to set the roast colour.
The roast colour indicator (27) indicates the roast colour.
Press "SEL" to set the bread type.
The bread type indicator (29) indicates the bread type.
If required, press the time/temperature button (20) to set the time. The delayed finish time indicator (22B) comes on.
Subsequently, press the "+" and "-" buttons (21) to set the time (max. 13 hours).
Press "START/STOP" to start the process.
The cooking process indicators (23) indicate the phase of the process.
The digital display (34) counts down during the process.
If the process is completed, a buzzer will • sound to indicate the end of the process.
Press "START/STOP" to stop the process.
Note! If you do not press "START/STOP", the appliance will switch to the heat preservation mode automatically. The heat preservation indicator (22C) indicates that the appliance is in heat preservation mode. The digital display (34) counts down during the process. The appliance switches off automatically after 1 hour.
Remove the food from the cooking • compartment (2).
Remove the mains plug from the wall socket.
"DOUGH" / "RISE"
Put the food into the cooking compartment • (2).
Insert the mains plug into the wall socket. • The digital display (34) indicates ":0".
Press "MODE" 2x. The roast colour • indicator (27) is off. The baking mode indicator (25) indicates "DOUGH" and "RISE". The bread type indicator (29) indicates "BASIC". The cooking process indicator (23) indicates "KNEAD". The digital display (34) indicates "1:00" (1 hour).
Press "SEL" to set the bread type.
The bread type indicator (29) indicates the bread type. The digital display (34) indicates the time.
Press "START/STOP" to start the process.
The cooking process indicators (23) indicate the phase of the process.
The digital display (34) counts down during the process.
If the process is completed, a buzzer will • sound 3 times to indicate the end of the process. The appliance switches off and on automatically. The digital display (34) goes back to the initial state.
Remove the food from the cooking • compartment (2).
Remove the mains plug from the wall socket.
"DOUGH"
Put the food into the cooking compartment • (2).
Insert the mains plug into the wall socket. • The digital display (34) indicates ":0".
Press "MODE" 3x. The roast colour • indicator (27) is off. The baking mode indicator (25) indicates "DOUGH". The bread type indicator (29) is off. The cooking process indicator (23) is off. The digital display (34) indicates "15:00" (15 minutes).
If required, press the "+" and "-" buttons • (21) to set the time (max. 30 minutes).
Press "START/STOP" to start the process. • The digital display (34) counts down during the process.
If the process is completed, a buzzer will • sound 3 times to indicate the end of the process. The appliance switches off and on automatically. The digital display (34) goes back to the initial state.
Remove the food from the cooking • compartment (2).
Remove the mains plug from the wall socket.
"RISE"
Put the food into the cooking compartment • (2).
Insert the mains plug into the wall socket. • The digital display (34) indicates ":0".
Press "MODE" 4x. The roast colour • indicator (27) is off. The baking mode indicator (25) indicates "RISE". The bread type indicator (29) is off. The cooking process indicator (23) is off. The digital display (34) indicates "35°C".
If required, press the time/temperature • button (20) to set the time. Press the "+" and "-" buttons (21) to set the time (max. 2 hours).
Press "START/STOP" to start the process. • The digital display (34) counts down during the process.
If the process is completed, a buzzer will • sound 3 times to indicate the end of the process. The appliance switches off and on automatically. The digital display (34) goes back to the initial state.
Remove the food from the cooking • compartment (2).
Remove the mains plug from the wall socket.
Oven functions
"TOAST"
Insert the mains plug into the wall socket. • The digital display (34) indicates ":0".
Press "FUNC" 1x. The oven function • indicator (31) indicates "TOAST".
The digital display (34) indicates "5:10" (5 minutes, 10 seconds).
If required, press the "+" and "-" buttons • (21) to set the roast colour.
Press "START/STOP" to start the process. • The cooking process indicator (23) indicates "PREHEAT" while the appliance is preheating. If the appliance is preheated, put the food • into the cooking compartment (2).
The appliance continues the process • automatically. The digital display (34) counts down during the process.
If the process is completed, a buzzer will • sound 3 times to indicate the end of the process. The appliance switches off and on automatically. The digital display (34) goes back to the initial state.
Remove the food from the cooking • compartment (2).
Remove the mains plug from the wall socket.
"TOP"
Insert the mains plug into the wall socket. • The digital display (34) indicates ":0".
Press "FUNC" 2x. The oven function • indicator (31) indicates "TOP". The digital display (34) indicates "130°C".
If required, press the "+" and "-" buttons • (21) to set the temperature (100 - 150 °C).
If required, press the time/temperature button (20) to set the time. Press the "+" and "-" buttons (21) to set the time (5 - 90 minutes).
Note! If the time and the temperature are set, it is still possible to adjust the time and the temperature. Press the time/temperature button (20) to switch between time and temperature.
Press "START/STOP" to start the process. • The cooking process indicator (23) indicates "PREHEAT" while the appliance is preheating.
If the appliance is preheated, put the food • into the cooking compartment (2).
The appliance continues the process • automatically. The digital display (34) counts down during the process.
If the process is completed, a buzzer will • sound 3 times to indicate the end of the process. The appliance switches off and on automatically. The digital display (34) goes back to the initial state.
Remove the food from the cooking • compartment (2).
Remove the mains plug from the wall socket.
"BOTTOM"
Insert the mains plug into the wall socket. • The digital display (34) indicates ":0".
Press "FUNC" 3x. The oven function • indicator (31) indicates "BOTTOM". The digital display (34) indicates "150°C".
If required, press the "+" and "-" buttons • (21) to set the temperature (100 - 160 °C).
If required, press the time/temperature button (20) to set the time. Press the "+" and "-" buttons (21) to set the time (5 - 90 minutes).
Note! If the time and the temperature are set, it is still possible to adjust the time and the temperature. Press the time/temperature button (20) to switch between time and temperature.
Press "START/STOP" to start the process.
The cooking process indicator (23) indicates "PREHEAT" while the appliance is preheating.
If the appliance is preheated, put the food • into the cooking compartment (2).
The appliance continues the process • automatically. The digital display (34) counts down during the process.
If the process is completed, a buzzer will • sound 3 times to indicate the end of the process. The appliance switches off and on automatically. The digital display (34) goes back to the initial state.
Remove the food from the cooking • compartment (2).
Remove the mains plug from the wall socket.
"TOP" / "BOTTOM"
Insert the mains plug into the wall socket. • The digital display (34) indicates ":0".
Press "FUNC" 4x. The oven function • indicator (31) indicates "TOP" and "BOTTOM".
The digital display (34) indicates "220°C".
If required, press the "+" and "-" buttons • (21) to set the temperature (150 - 220 °C).
If required, press the time/temperature button (20) to set the time. Press the "+" and "-" buttons (21) to set the time (5 - 90 minutes).
Note! If the time and the temperature are set, it is still possible to adjust the time and the temperature. Press the time/temperature button (20) to switch between time and temperature.
Press "START/STOP" to start the process.
The cooking process indicator (23) indicates "PREHEAT" while the appliance is preheating.
If the appliance is preheated, put the food • into the cooking compartment (2).
The appliance continues the process • automatically. The digital display (34) counts down during the process.
If the process is completed, a buzzer will • sound 3 times to indicate the end of the process. The appliance switches off and on automatically. The digital display (34) goes back to the initial state.
Remove the food from the cooking • compartment (2).
Remove the mains plug from the wall socket.
"TOP" / "BOTTOM" / "STEAM"
Insert the mains plug into the wall socket. • The digital display (34) indicates ":0".
Press "FUNC" 5x. The oven function • indicator (31) indicates "TOP", "BOTTOM", and "STEAM". The digital display (34) indicates "220°C".
If required, press the time/temperature button • (20) to set the time. Press the "+" and "-" buttons (21) to set the time (5 - 90 minutes).
Press "START/STOP" to start the process. • The digital display (34) counts down during the process.
If the process is completed, a buzzer will • sound 3 times to indicate the end of the process. The appliance switches off and on automatically. The digital display (34) goes back to the initial state.
Remove the food from the cooking • compartment (2).
Remove the mains plug from the wall socket.
Fixed oven settings
Insert the mains plug into the wall socket. • The digital display (34) indicates ":0".
Press "MENU" to set the cooking • programme. The cooking programme indicator (33) and the bread type indicator (29) indicate the fixed oven setting.
If required, press the "+" and "-" buttons • (21) to set the time.
Note! It is not possible to set the time for the following cooking types: "FROZEN PIZZA", "PIZZA", and "BAGUETTE".
Press "START/STOP" to start the process. • The cooking process indicator (23)
indicates "PREHEAT" while the appliance is preheating.
If the appliance is preheated, put the food • into the cooking compartment (2).
- The appliance continues the process automatically. The digital display (34) counts down during the process.
If the process is completed, a buzzer will • sound 3 times to indicate the end of the process. The appliance switches off and on automatically. The digital display (34) goes back to the initial state. - Remove the food from the cooking compartment (2).
- Remove the mains plug from the wall socket.
Use
Breadmaker (fig. A & C)
Caution!
- Allow the cooking compartment (2) to cool down completely before making bread.
- Always keep the door (5) closed during use.
- If you use the appliance as a breadmaker, always remove the drip tray (14) from the cooking compartment (2).
- If you use the appliance as a breadmaker, make sure that the water reservoir (8) is empty.
Make sure that the water reservoir (8) is • empty.
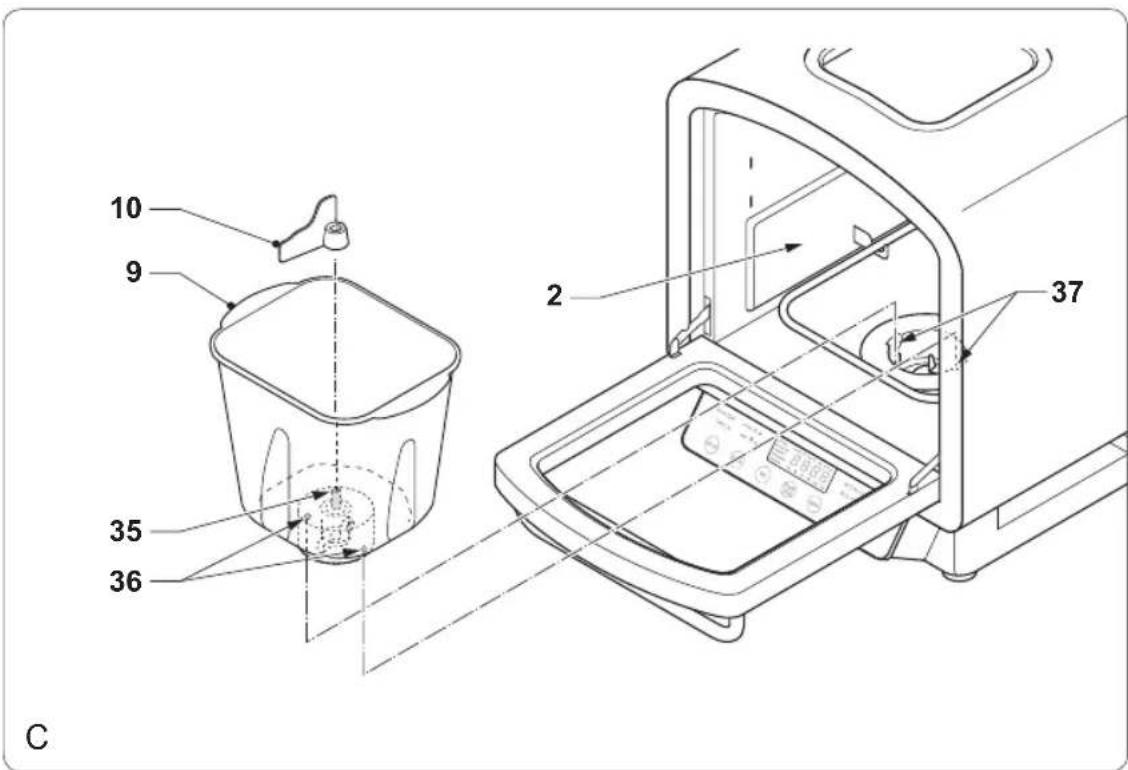
Mount the kneading paddle (10) onto the spindle (35) into the bottom of the bread pan (9).
- Put the ingredients into the bread pan (9) in the required order. If necessary, use the measuring cup (11) and measuring spoon (12) to add the ingredients.
Open the door (5) using the door grip (6).
- Remove the drip tray (14) from the cooking compartment (2).
- Mount the bread pan (9) into the bottom of the cooking compartment (2). Make sure that the pins (36) are inserted into the slots (37). Close the door (5) using the door grip (6).
Oven (fig. A, D & E)
Caution!
- Always keep the door (5) closed during use.
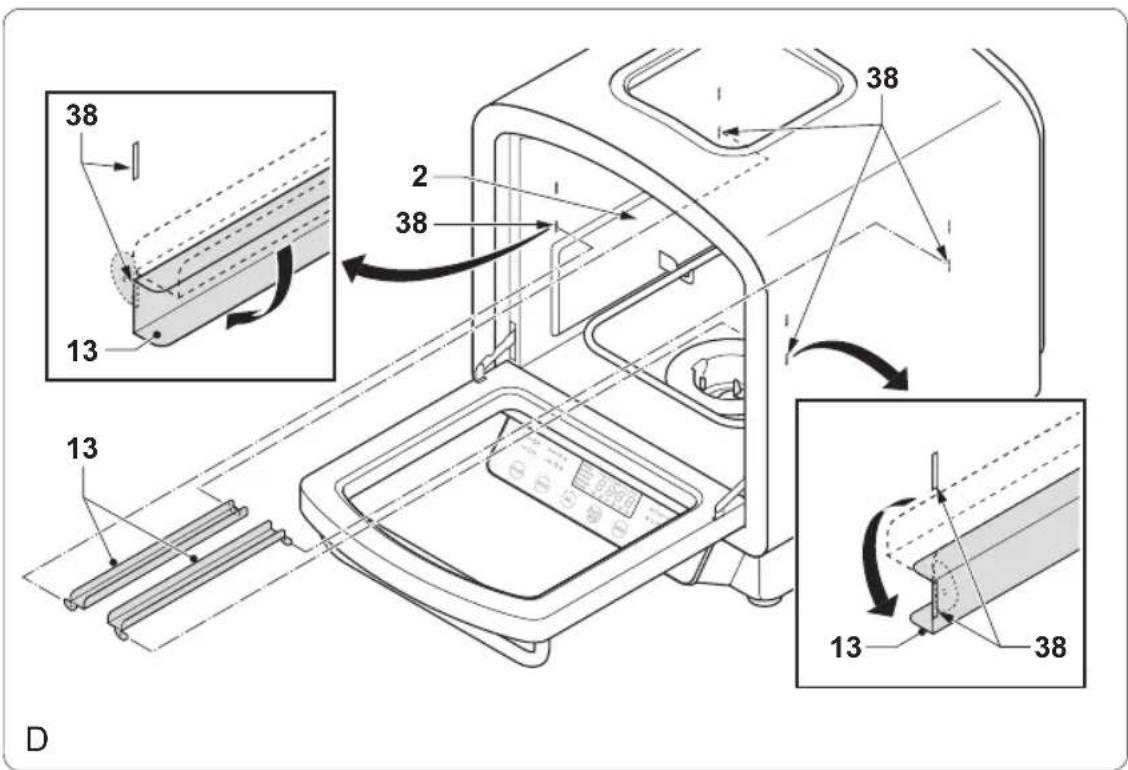
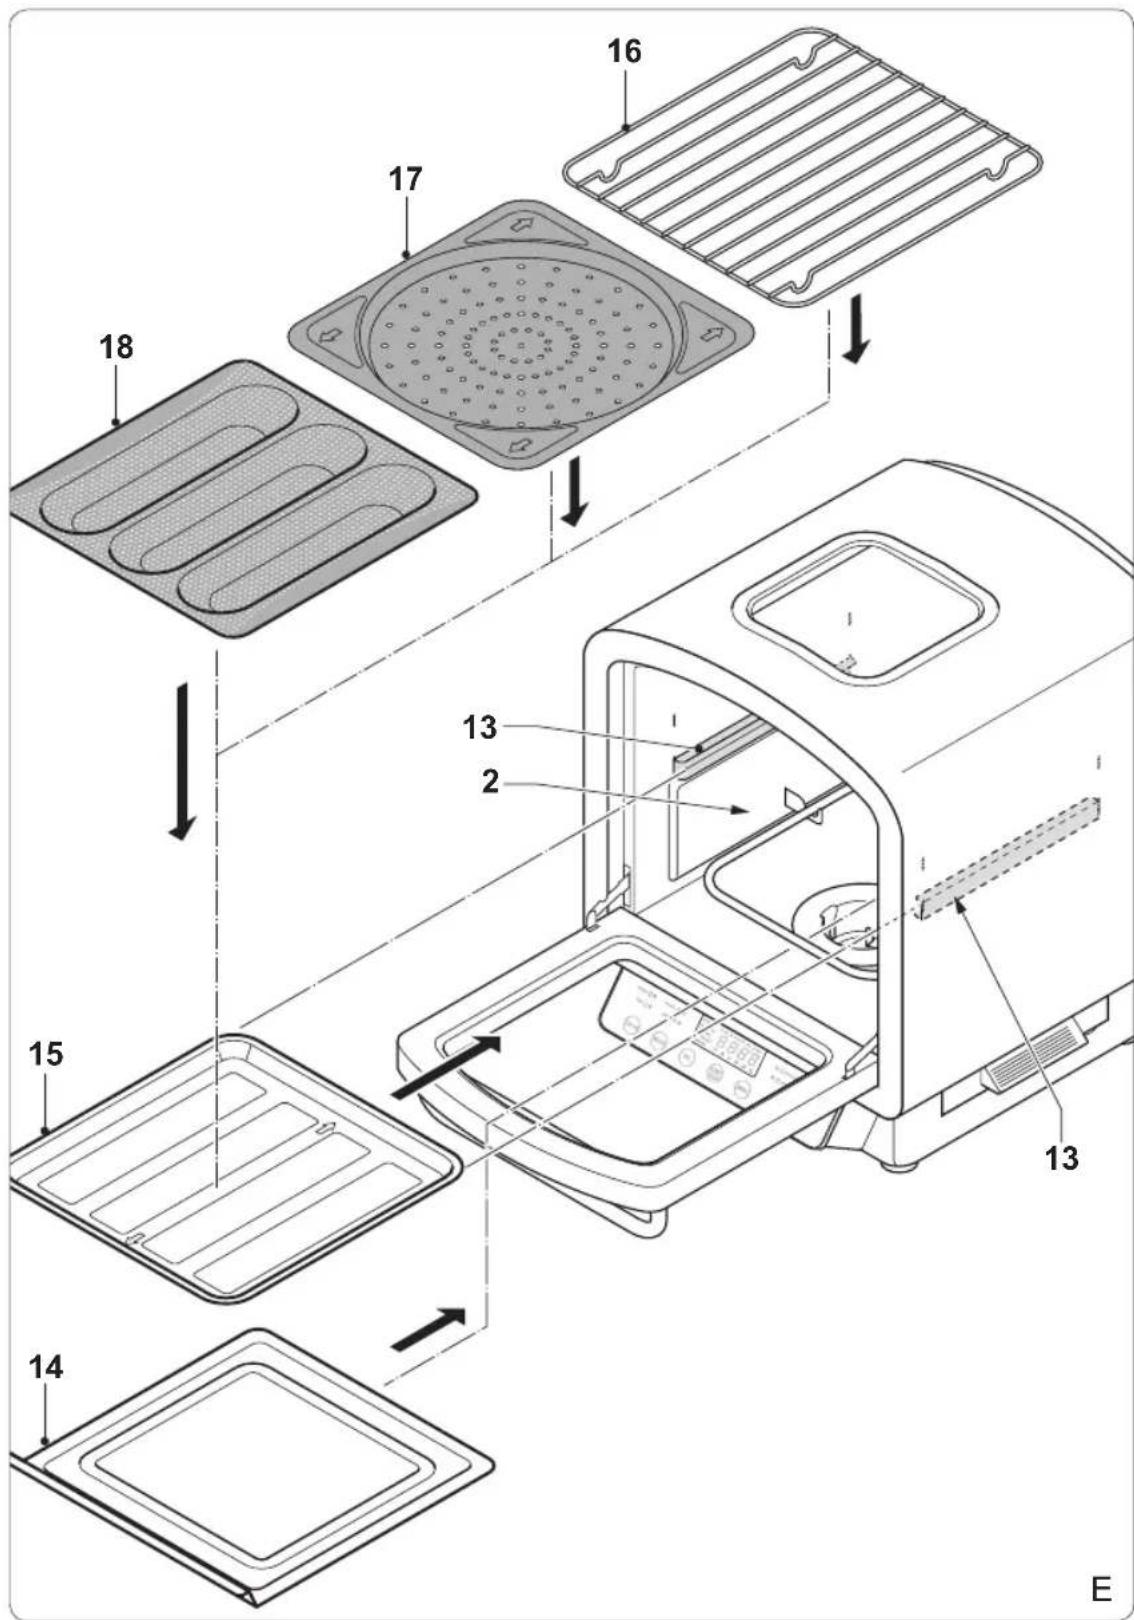
- If you use the appliance as an oven, always mount the support rails (13), the drip tray (14), and the baking plate (15) into the cooking compartment (2).
- If you use the appliance as an oven, make sure that the water reservoir (8) is full when you use the appliance in steam mode.
If you do not use the appliance in steam mode, make sure that the water reservoir (8) is empty.
Take one of the following actions:•
- If the steam mode is used, make sure that the water reservoir (8) is full.
- If the steam mode is not used, make sure that the water reservoir (8) is empty. If necessary, put some aluminium foil onto the required accessory.
Put the food onto the required accessory:•
- For baking bread, cookies, etc., use the baking plate (15).
- For grilling food, use the baking plate (15) and the grill rack (16).
- For baking pizzas, use baking plate (15) and baking plate (17).
- For baking baguettes, croissants, etc., use baking plate (15) and baking plate (18).
Open the door (5) using the door grip (6).• Mount the support rails (13) into the slots (38) • in the sides of the cooking compartment (2). Mount the drip tray (14) into the cooking • compartment (2).
Place the required accessory (16/17/18) • onto the baking plate (15).
Slide the baking plate (15) with the required accessory (16/17/18) into the support rails (13).
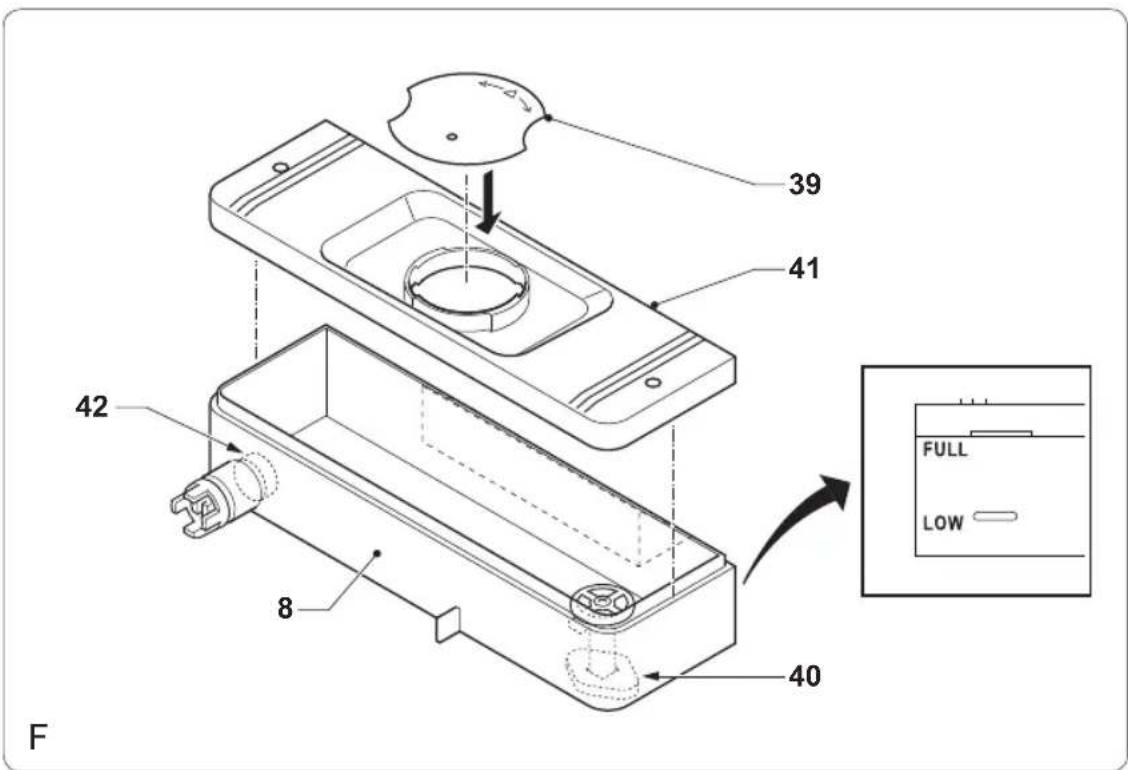
If you use the appliance as an oven, the water reservoir must be filled when you use the appliance in steam mode. The water level indicator (40) indicates the water level in the water reservoir.
Remove the water reservoir (8) from the • appliance.
Remove the lid (39) from the water reservoir • (8) by turning the lid counterclockwise.
Fill the water reservoir (13) with water up to • the maximum mark ("FULL").
Mount the lid (39) to the water reservoir (8) by turning the lid clockwise.
Place the water reservoir (8) into the • appliance.
Hints for use
Breadmaker
Make sure that the ingredients are of good • quality and at room temperature.
Place the appliance on a stable and flat surface.
Put the ingredients into the bread pan in • the required order:
- Put the liquid ingredients into the bread pan.
- Put a small amount of flour into the bread pan.
- Put the solid ingredients into the bread pan.
- Put the rest of the flour into the bread pan. Make sure that all solid ingredients are covered by the flour.
- Put the baking yeast into the bread pan.
- Preferably use bread-making flour. If you use heavy flour (wheat flour, rye flour, corn flour, etc.), the bread will rise less than if you use light flour. Use the correct amount of flour. If necessary, use a kitchen scale to measure the amount of flour.
- Use the correct amount of baking yeast. Use dried active baking yeast instead of baking powder. If you use fresh yeast, use thrice more yeast than if you use dried yeast and solve the yeast in a small amount of lukewarm water. Make sure that the baking yeast does not come into contact with water, milk, salt, or sugar.
- Use lukewarm water. If possible, use tap water. If you use eggs, break the eggs and add them to the water.
- If you use milk, use fresh milk or milk powder. If you use milk powder, add the required amount of water to the milk powder. If you want to add water to the fresh milk, the total amount of milk and water must be equal to the required amount for the recipe.
- If you use sugar, preferably use white sugar, brown sugar, or honey. Do not use refined sugar or sugar cubes.
If you use salt, the yeast will rise better and the bread will have more taste.
If you use butter or oil, the bread will become softer and have more taste. If you use butter, cut the butter into pieces or allow the it to become soft.
Keep the door closed during the process. If the process is completed, use oven gloves to remove the bread pan from the appliance and the bread from the bread pan.
Allow the bread to cool down before cutting the bread into slices. If you want to eat the bread when it is still warm, it is recommended to cut the bread into slices of 2.5 cm.
Use a serrated knife or an electric knife to cut the bread into slices.
Keep the bread in an hermetically sealed • container to keep the bread fresh as long as possible (approximately 2 days). If the bread contains eggs, the bread must be consumed the same day. If the bread contains neither butter nor oil, the bread must be consumed the same day. Do not keep the bread in the refrigerator.
If you want to keep the bread in the freezer, • put the bread into a freezing bag before putting it into the freezer.
Oven
Prepare the food.
Place the appliance on a stable and flat surface.
Put the food onto the required accessory.
Place the required accessories into the • appliance.
If necessary, preheat the appliance.
If there are more meals with (almost) the • same cooking temperature, it is possible to cook these meals at the same time.
Keep the door closed during the process • as much as possible. Only open the door to check whether the cooking process is finished.
If the process is completed, use oven gloves • to remove the food from the appliance.
Soup
The soup function can be used for warming up French soup bags which can be purchased from the super market.
Caution! Do not use the soup function for cooking soup.
Recipes
This recipe list provides a small overview of recipes which are specifically created for the appliance. For other recipes, please refer to a recipe book for the type of appliance.
Normal bread
| Ingredients | Quantity |
| High-gluten flour | 450 g |
| Yeast 1 tsp. | |
| Salt 2 tsp. | |
| Sugar 2.5 tbsp. | |
| Skim milk powder | 1.5 tbsp. |
| Unsalted butter 30 g | |
| Water 320 ml |
French bread
| Ingredients | Quantity |
| High-gluten flour | 395 g |
| Low-gluten flour | 55 g |
| Yeast 1 tsp. | |
| Salt 2 tsp. | |
| Unsalted butter 10 g | |
| Water 330 ml |
Sweet bread
| Ingredients | Quantity |
| High-gluten flour | 400 g |
| Yeast 1 tsp. | |
| Salt 1 tsp. | |
| Sugar 5 tbsp. | |
| Unsalted butter 25 g | |
| Egg | 2 |
| Water 160 ml |
Whole-wheat bread
| Ingredients | Quantity |
| High-gluten flour | 225 g |
| Whole-wheat flour | 225 g |
Yeast 1.5 tsp.
Salt 2 tsp.
Sugar 2.5 tbsp.
Unsalted butter 20 g
Water 340 ml
Put the ingredients into the bread pan.
Place the bread pan into the cooking • compartment.
Press "MODE" to select "LOAF".
Press "SEL" to select the correct bread • type: "BASIC", "FRENCH", "SWEET",
"WHOLE WHEAT".
Press "START/STOP" to start the process.
If the process is completed, a buzzer will sound to indicate the end of the process.
Press "START/STOP" to stop the process.
Note! If you do not press "START/STOP", the appliance will switch to the heat preservation mode automatically.
Remove the bread pan from the cooking compartment.
Remove the bread from the bread pan.
Note!
- If the room temperature is higher than 25 °C, decrease the amount of water by 10 ml.
- If the room temperature is higher than 30 °C , the quality of the bread will be reduced.
- If you make whole-wheat bread, do not use other flour than whole-wheat flour.
- The higher the proportion of whole-wheat flour, the lower the height of the bread. If the proportion of whole-wheat flour is lower than 30%, select the following bread type: "BASIC".
Baguette
| Ingredients | Quantity |
| High-gluten flour | 250 g |
| Yeast 1.5 tsp. | |
| Salt 1 tsp. | |
| Bread improver | 1 tsp. |
| Water 150 ml |
Put the ingredients into the bread pan. Place the bread pan into the cooking compartment.
- Press "MODE" to select "DOUGH" and "RISE".
- Press "SEL" to select "BAGUETTE". Press "START/STOP" to start the process • (60 minutes).
- If the process is completed, a buzzer will sound to indicate the end of the process.
- Remove the bread pan from the cooking compartment.
Remove the dough from the bread pan. - Divide the dough into 3 similar parts. Allow the dough to rest for 10 minutes.
- Use a rolling pin to press the parts of dough to rectangles.
Carefully roll up the dough. - Put the baguettes onto the corresponding baking plate.
Place the baking plate into the cooking compartment.
Press "MODE" to select "RISE".
Press "START/STOP" to start the process • (50 minutes). - If the process is completed, press "MENU" to select "BAGUETTE".
Press "START/STOP" to start the process • (30 minutes). - If the process is completed, a buzzer will sound to indicate the end of the process.
Croissant
| Ingredients | Quantity |
| High-gluten flour | 250 g |
| Yeast | 1.25 tsp. |
| Salt | 0.5 tsp. |
| Unsalted butter | 80 g |
| Egg | 1 |
| Water | 120 ml |
- Put the water, the flour, the yeast, the salt, and a small amount of unsalted butter into the bread pan.
- Place the bread pan into the cooking compartment.
- Press "MODE" to select "DOUGH" and "RISE".
- Press "SEL" to select "CROISSANT". Press "START/STOP" to start the process • (45 minutes).
- If the process is completed, a buzzer will sound to indicate the end of the process.
- Remove the bread pan from the cooking compartment.
Remove the dough from the bread pan. Allow the dough to rest for 10 minutes. Use a rolling pin to press dough to a square (25*25 cm).
Fold the frozen unsalted butter.
Use a rolling pin to press the dough to • a rectangle (50*20 cm).
Fold the dough into 3 similar parts.
Use a rolling pin to press the dough to • a rectangle (50*20 cm).
Fold the dough into 3 similar parts.
Put the dough into the refrigerator for • 10 minutes (depending on the surface of the dough).
Remove the dough from the refrigerator.
Use a rolling pin to press the dough to a • rectangle (50*20 cm). The thickness of the dough must be approximately 4 mm.
Use a knife to cut the dough to triangles • (90 - 110 g per triangle).
Put the dough into the refrigerator for 15 minutes.
Remove the dough from the refrigerator. Carefully roll up the dough.
Put the croissants onto the corresponding • baking plate.
Place the baking plate into the cooking • compartment.
Press "MODE" to select "RISE".
Press "START/STOP" to start the process • (50 minutes).
If the process is completed, remove the • baking plate from the cooking compartment.
- Use a spatula to spread the egg over the surface of the croissant.
Place the baking plate into the cooking • compartment.
- Press "MENU" to select "CROISSANT". Press "START/STOP" to start the process • (20 minutes). If necessary, the time can be adjusted (15 - 25 minutes).
- If the process is completed, a buzzer will sound to indicate the end of the process.
Country bread
| Ingredients | Quantity |
| Multi-grain flour | 280 g |
| Yeast | 1 tsp. |
| Unsalted butter | 180 g |
| Water | 150 ml |
- Put the ingredients into the bread pan. Place the bread pan into the cooking compartment.
- Press "MODE" to select "DOUGH" and "RISE".
- Press "SEL" to select "COUNTRY". Press "START/STOP" to start the process • (80 minutes).
If the process is completed, a buzzer will sound to indicate the end of the process. Remove the bread pan from the cooking compartment.
Remove the dough from the bread pan. Divide the dough into 3 or 4 similar parts.
Allow the dough to rest for 10 minutes. • Use a rolling pin to press the parts of • dough to circles or ellipses.
- Put the dough onto the corresponding baking plate.
Place the baking plate into the cooking • compartment.
Press "MODE" to select "RISE".
Press "START/STOP" to start the process • (50 minutes).
If the process is completed, press "MENU" to select "COUNTRY".
Press "START/STOP" to start the process (20 minutes). If necessary, the time can be adjusted (20 - 30 minutes).
If the process is completed, a buzzer will sound to indicate the end of the process.
Brioche
Ingredients Quantity
| High-gluten flour 250 g | |
| Low-gluten flour | 50 g |
| Yeast | 1.25 tsp. |
| Salt | 1.5 tsp. |
| Sugar | 5 tbsp. |
| Skim milk powder | 3 tbsp. |
| Unsalted butter | 60 g |
| Egg | 1 |
| Water | 100 ml |
- Put the ingredients into the bread pan. Place the bread pan into the cooking compartment.
- Press "MODE" to select "DOUGH" and "RISE".
Press "SEL" to select "BRIOCHE".
Press "START/STOP" to start the process • (30 minutes).
If the process is completed, a buzzer will sound to indicate the end of the process.
Remove the bread pan from the cooking compartment.
Remove the dough from the bread pan.
Divide the dough into 6 similar parts.
Allow the dough to rest for 10 minutes.
Use a rolling pin to press the parts of • dough to circles.
Put the brioches onto the corresponding • baking plate.
Place the baking plate into the cooking • compartment.
Press "MODE" to select "RISE".
Press "START/STOP" to start the process • (50 minutes).
If the process is completed, press "MENU" to select "BRIOCHE".
Press "START/STOP" to start the process • (20 minutes). If necessary, the time can be adjusted (15 - 25 minutes).
If the process is completed, a buzzer will sound to indicate the end of the process.
Pizza
Ingredients Quantity
| High-gluten flour 110 g | |
| Low-gluten flour | 60 g |
| Yeast | 0.65 tsp. |
| Salt | 0.5 tsp. |
| Sugar | 0.75 tsp. |
| Water | 110 ml |
- Put the ingredients into the bread pan. Place the bread pan into the cooking compartment.
- Press "MODE" to select "DOUGH" and "RISE".
- Press "SEL" to select "PIZZA". Press "START/STOP" to start the process • (45 minutes).
If the process is completed, a buzzer will sound to indicate the end of the process.
Remove the bread pan from the cooking • compartment.
Remove the dough from the bread pan.
- Allow the dough to rest for 10 minutes.
- Use a rolling pin to press the dough to a circle. The thickness of the dough must be approximately 8 mm.
- Put the dough onto the corresponding baking plate.
- Place the baking plate into the cooking compartment.
- Press "MODE" to select "RISE".
- Adjust the time to 30 minutes.
Press "START/STOP" to start the process.
- If the process is completed, remove the baking plate from the cooking compartment.
- Put the ingredients onto the dough.
- Place the baking plate into the cooking compartment.
- Press "MENU" to select "PIZZA".
Press "START/STOP" to start the process • (32 minutes).
If the process is completed, a buzzer will • sound to indicate the end of the process.
Cookies
Ingredients Quantity
| Handmade cookie powder | 500 g |
| Unsalted butter | 110 g |
| Egg | 1 |
- Mix the cookie powder with the egg and the unslated butter.
• Stir the cookies powder evenly. - Use a rolling pin to press the dough to a thickness of approximately 6 mm.
• Shape the dough to the required form. - Put the dough onto the corresponding baking plate (approximately 16 pieces).
- Press "MENU" to select "COOKIE". Press "START/STOP" to start the process • (5 minutes). If necessary, the time can be adjusted (5 - 12 minutes). The appliance starts to preheat automatically. The cooking process indicator indicates "PREHEAT" while the appliance is preheating.
- If the preheating is completed, a buzzer will sound to indicate the end of the process.
- Place the baking plate into the cooking compartment. The process continues automatically.
If the process is completed, a buzzer will sound to indicate the end of the process.
Apple jam
Ingredients Quantity
Apple (fresh) 500 g
Sugar 400 g
Lemon juice 10 g
Water 160 ml
Husk the apple and cut the apple into small • parts.
Use a juicer to mix half of the apple parts • with the water. Subsequently, mix the other half of the apple parts with the water.
Put the mashed apple, the sugar, and the lemon juice into the bread pan.
Place the bread pan into the cooking • compartment.
Press "MENU" to select the jam function.
Press "START/STOP" to start the process • (90 minutes).
If the process is completed, a buzzer will sound to indicate the end of the process.
Soup
Ingredients Quantity
French soup bag 2 pieces (600 g)
Put the soup bag into the bread pan.
Place the bread pan into the cooking • compartment.
Press "MENU" to select the soup function.
Press "START/STOP" to start the process • (50 minutes). If necessary, the time can be adjusted (40 - 90 minutes).
If the process is completed, a buzzer will sound to indicate the end of the process.
Cleaning and maintenance
The appliance must be cleaned after each use.
Warning!
- Before cleaning or maintenance, remove the mains plug from the wall socket and wait until the appliance has cooled down.
- Do not immerse the appliance in water or any other liquids for cleaning.
Caution!
- Do not use aggressive or abrasive cleaning agents to clean the appliance.
- Do not use sharp objects to clean the appliance.
- Do not use oven cleaners to clean the inside of the appliance.
Regularly check the appliance for possible damage.
Clean the appliance and the heating elements with a damp cloth. Dry the appliance and the heating elements with a clean, dry cloth.
Clean the accessories in soapy water. •
Fully dry the accessories.
Store the appliance with the accessories in • a dry place, out of the reach of children.
Cleaning the water reservoir (fig. A & F)
Caution! If you use the appliance as an oven, make sure that the water reservoir (8) is full when you use the appliance in steam mode.
Remove the water reservoir (8) from the • appliance.
Remove the lid (39) from the water • reservoir (8) by turning the lid counterclockwise.
If necessary, empty the water reservoir (8).
Remove the cover (41) from the water • reservoir (8).
- Pull out the plug (42) and clean the plug under running water.
Clean the water reservoir (8), the lid (39) and the cover (41) in soapy water.
• Fully dry the accessories. - Mount the cover (41) to the water reservoir (8).
Mount the lid (39) to the water reservoir (8) • by turning the lid clockwise. - Place the water reservoir (8) into the appliance.
Troubleshooting
Refer to the table below to solve problems yourself. If you are not able to solve the problem yourself, contact our service station.
The operation panel cannot be used.
- Make sure that the mains plug is properly inserted into the wall socket.
The time cannot be set.
- Press "SEL" until the bread type indicator indicates "BASIC". Set the time according to the bread type using the tid/temperatur button.
Error message: ERR1.
- Open the door. Wait until the temperature is lower than 35 °C.
Error message: ERR2.
- Fill the water reservoir with water.
Error message: ERR3.
- Make sure that the water reservoir is properly placed into the appliance.
The kneading paddle makes loud noises.
- Make sure that the kneading paddle is properly mounted onto the spindle into the bottom of the bread pan.
The kneading paddle does not work.
- If the kneading paddle is properly mounted but still does not work, contact the service station.
The flour cannot be mixed in the bread pan.
- Make sure that the kneading paddle is properly mounted onto the spindle into the bottom of the bread pan.
- If the kneading paddle is properly mounted but still does not work, contact the service station.
The dough leaks into the bottom of bread • pan.
- Make sure that the kneading paddle rotates normally.
- If the kneading paddle does not rotate normally, remove the mains plug from the wall socket and contact the service station.
Disclaimer
Subject to change; specifications can be changed without further notice.
Félicitations!

- Gefeliciteerd!
- Instructions for use
- Safety instructions
- Warning!
- Use
- Safety of others
- After use
- Inspection and repairs
- Safety instructions for breadmakers and ovens
- U.K. Wiring instructions Class 1
- BLUE NEUTRAL
- BROWN LIVE
- GREEN/YELLOW EARTH
- Description (fig. A)
- Initial use
- Preparation
- Operation panel (fig. A & B)
- Starting and stopping the cooking process (fig. B)
- Adjusting the time and the temperature (fig. B)
- Cooking function indicators (fig. B)
- Setting Indication
- Cooking process indicators (fig. B)
- Setting the baking mode (fig. B)
- Setting the roast colour (fig. B)
- Setting the bread type (fig. B)
- Bread type: "LOAF"
- Bread type: "DOUGH" & "RISE"
- Setting the oven function (fig. B)
- Fixed oven settings (fig. B)
- Baking modes (fig. A & B) "LOAF"
- "DOUGH" / "RISE"
- "DOUGH"
- "RISE"
- Oven functions
- "TOAST"
- "TOP"
- "BOTTOM"
- "TOP" / "BOTTOM"
- "TOP" / "BOTTOM" / "STEAM"
- Fixed oven settings
- Breadmaker (fig. A & C)
- Caution!
- Oven (fig. A, D & E)
- Hints for use
- Breadmaker
- Oven
- Soup
- Recipes
- Note!
- Apple jam
- Ingredients Quantity
- Cleaning and maintenance
- Cleaning the water reservoir (fig. A & F)
- Troubleshooting
- Disclaimer
- Félicitations!
Brand : PRINCESS
Model : 152002
Category : Bread maker