
Volta 2400 Plus - Iron SOLAC - Free user manual and instructions
Find the device manual for free Volta 2400 Plus SOLAC in PDF.
| Product type | Steam iron |
| Brand | Solac |
| Model | Volta 2400 Plus |
| Power | 2400 W (estimate) |
| Power supply | 220-240 V ~ 50-60 Hz |
| Soleplate | Metallic soleplate |
| Water tank | Capacity not specified, filling through top opening |
| Main functions | Dry ironing, adjustable steam, super steam, vertical steam, spray |
| Anti-scale system | On models PV2010 and PV2210 only (resin filter) |
| Anti-drip system | On model PV2210 only |
| Self-cleaning function | Yes, recommended once a month |
| Heating indicator light | Yes, indicates that temperature is reached |
| Safety | Unplug before filling or cleaning; do not immerse; do not use near a bathtub |
| Maintenance | Clean the soleplate with a damp cloth; preferably use demineralized water |
| Weight | Not specified |
| Dimensions | Not specified |
Frequently Asked Questions - Volta 2400 Plus SOLAC
User questions about Volta 2400 Plus SOLAC
0 question about this device. Answer the ones you know or ask your own.
Ask a new question about this device
Download the instructions for your Iron in PDF format for free! Find your manual Volta 2400 Plus - SOLAC and take your electronic device back in hand. On this page are published all the documents necessary for the use of your device. Volta 2400 Plus by SOLAC.
USER MANUAL Volta 2400 Plus SOLAC
PV1810
PV2010
PV2210


. ESPÁÑOL
SISTEMA ANTICAL (solo Mod. PV 2010 y PV2210)
- Read these instructions carefully before using the appliance.
- This manual is an integral part of the product. Keep it in a safe place for future reference.
- This appliance is exclusively for household use and not for industrial use. It is dangerous to use it for any purpose other than the one indicated.
Children must be supervised to ensure they do not play with the appliance. - This appliance is not to be used by persons (or children) whose physical, sensorial or mental capacities are impaired, or who have no experience or knowledge, unless supervised or instructed in the use of the appliance by a person responsible for their safety.
- Do not make any modifications or repairs to the appliance. In the event of any anomaly in the cord or any other part of the appliance, do not use it and take it to an authorised service centre.
- Do not use any parts or accessories not supplied or recommended by SOLAC.
- Before plugging the appliance into the mains, check that the indicated voltage is the same as in your home.
- Always unplug the appliance after use and before assembling or removing parts, and performing any maintenance or cleaning operations. Also unplug it in the case of a power cut. The appliance must be switched off before plugging or unplugging it into the mains
- Never pull the cord or use it to hang up the appliance. Always unplug the appliance by pulling the connection pin, and not the cord.
- Make sure the cord does not come into contact with sharp edges or hot surfaces. Do not leave the cord hanging over the edge of a table or worktop, to prevent children from pulling it and causing the appliance to fall.
- If the power cord is damaged, it should be replaced by the manufacturer or by your after-sales service shop or similar qualified personnel to prevent possible hazards.
- Remove all elements from the inside or outside of the appliance used for protection during transport or for sales promotions, such as paper or plastic bags, plastic sheets, cardboard and stickers.

Do not use near bathtubs, sinks, showers or other recipients containing water. If it falls into water, do NOT try to pick it up. Unplug it immediately.
- Do not touch the appliance with wet hands when in operation.
- The appliance must be connected to a power socket with a suitable ground connection.
- To fill the iron or top it up while ironing, please follow the instructions in the "BEFORE STARTING TO IRON" section, ensuring you first unplug the iron from the mains.
- The appliance might release a light steam and give off a slight smell of plastic during the first minutes of operation. This is normal and will disappear quickly.
- Do not discharge steam in the 'vertical' position onto a garment hanging in the wardrobe or on a person. For vertical ironing, place the garment on a hanger and away from other garments, items or people.
- Always iron on a stable surface.
-
When you finish ironing, always empty the water from the tank. If you want to empty the iron while ironing, always unplug the appliance from the mains first.
-
Always store the iron in a vertical position on its stand, resting it on a stable surface.
- The iron must not be used if it has been dropped, or if there is any crack or leak in the water tank. If you observe any of these problems, take the iron to a T.A.S. approved by the manufacturer.
- Do not leave the appliance unattended when switched on.
- The soleplate can get very hot when the appliance is in use. During operation, do not touch the soleplate and only hold the iron by its handle, and ensure the cord does not come into contact with the soleplate

CAUTION! When you want to dispose of the appliance, NEVER throw it in the rubbish bin. Take it to the CLEAN POINT or waste collection centre closest to your home for processing. You will thus be helping to take care of the environment.
MAIN COMPONENTS
1 Main body
2 P o w e r c o r
3 Metal soleplate
4 Spray outlet
5 Water filler opening
6 Water tank
7 Spray button
8 Supersteam button
9 Temperature selector
10 Steam/Self-clean selector
11 Temperature pilot light
12* Water beaker (only model PV2210)
BEFORE STARTING TO IRON
Always make sure the soleplate protector has been removed before starting to iron.
Due to the high levels of mains water hardness in most areas, Solac recommends that you always use demineralised water for ironing. In this way, you will guarantee that your iron remains in optimal condition for a longer period of time.
If, for any reason, you cannot find demineralised water, please ensure you use water with a low mineral content (soft water), or filter tap water using a water filter.
1 Do not use decalcifying agents or descaling products in the water tank. Do not use scented water or ironing water either. These products damage the interior of the steam generation system.
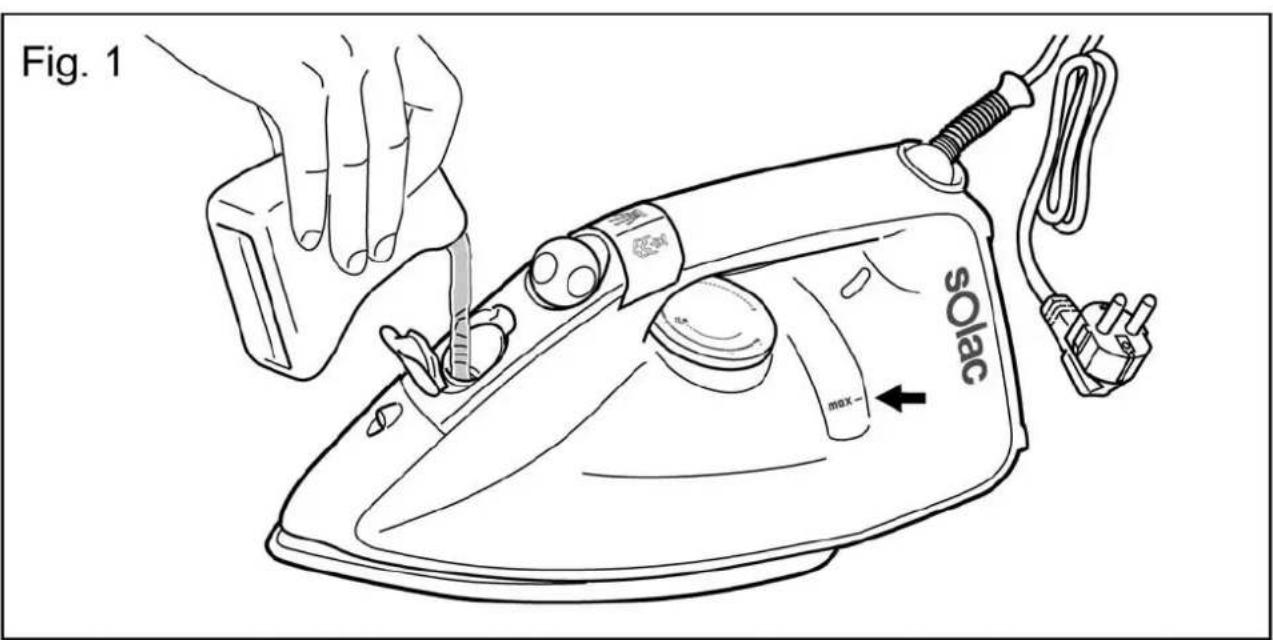
1 With the iron unplugged from the mains, rotate the steam selector (10) to the closed position (fig. 2).
2 Open the water filler opening (5). Fill the water tank without exceeding the maximum level, using the water beaker provided (12) and keeping the iron in the vertical position (Fig. 1). When the tank is full, close the cap.
When filling the tank, make sure that the water does not overflow from the water filler opening.
3 Check whether the garment to be ironed has a label indicating the ironing temperature.
We recommend you classify the garments according to their required ironing temperature and begin with the garments ironed on the lowest temperature () .
SYNTHETIC FIBRES, minimum temperature ()
SILK, WOOL, medium temperature ()
COTTON, high temperature (…)
LINEN, MAX temperature
NOTE: Ironing delicate garments at a temperature higher than necessary spoils the fabric and causes burnt residue to stick to the soleplate.
If you have any doubts about the temperature to use for a given garment, perform a test on a part, which will not be visible, beginning with the lowest temperature settings.
USE
This appliance has been designed exclusively for ironing clothes. Do not use it for any other purpose.
Completely remove all the elements use for transportation and packaging.
If the appliance is hot, handle it with care and do not touch the metal soleplate.
A Never leave the iron in a horizontal position when the soleplate is hot. Rest it on its rear end.
Take care with the steam; do not aim it at people, animals or delicate objects.
Always iron on stable, solid and smooth surfaces.
For very delicate garments, place a cloth between the iron and the delicate garment to avoid potential markings from the soleplate.
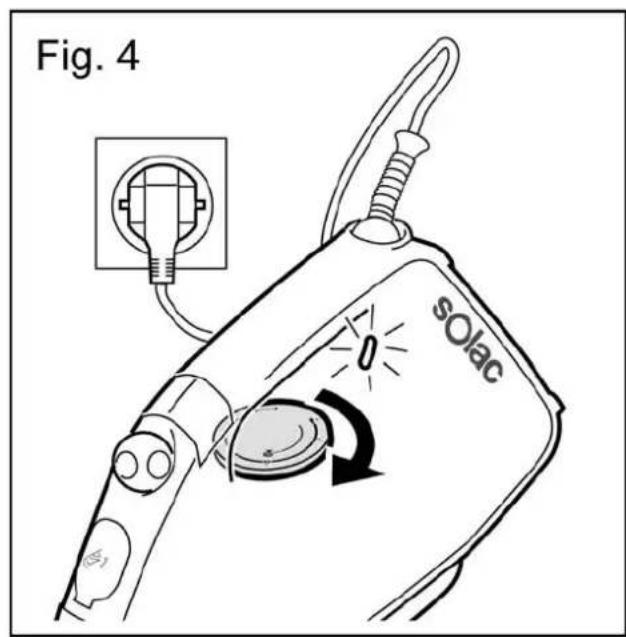
1 Extend the cord completely and plug it into the mains. The temperature pilot light will turn on (11). Place the iron in the vertical position.
2 Select the desired operating temperature according to the garment you wish to iron (see "TEMPERATURE SELECTION (fig. 4)").
3 Select steam ironing (medium maximum) or any ironing, as appropriate (see "STEAM SELECTION").
4 Hold the iron by the handle, and slide the soleplate over the garment to be ironed.
5 After using the iron, set the steam selector (10) to the closed position and the temperature selector (9) to position 0.
6 Unplug the power cord from the mains.
7 Empty the water tank (see "EMPTYING THE WATER TANK").
Wait until the iron is completely cold and store it in the vertical position in a safe place.
BEFORE FIRST USE
Before using it for the first time, use the appliance to iron an old cloth or clothing, to clean the system.
1 Set the temperature selector (9) to the Max position and wait a few minutes for the iron to reach the appropriate temperature (the temperature pilot light will go out).
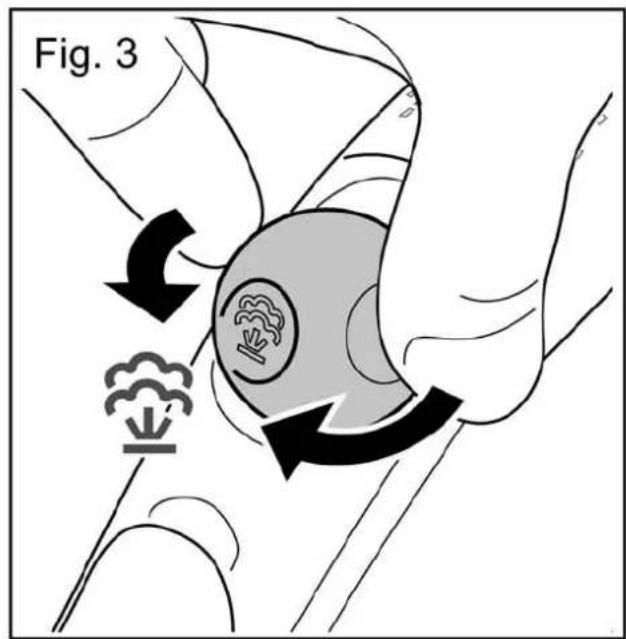
2 Rotate the steam selector (10) until it is in the completely open position. 3: steam will start to come out of the orifices in the soleplate.
3 Hold the iron by the handle and slide the soleplate over the old towel.
4 When the water tank is empty, no more steam will be produced. The iron is ready for use.
Do not worry if the iron gives off a little smoke when used for the first time. This will go away quickly.
TEMPERATURE SELECTION (fig. 4)
1 Turn the temperature selector (9) until it is in the desired position.
When changing the position of the temperature selector (9), to either increase or reduce the temperature, several minutes must pass before the iron reaches the selected temperature.
When the selected temperature is reached, the pilot light will go out (11).
STEAM SELECTION
To obtain steam, set the temperature selector (9) between the levels and Max, depending on the garment to be ironed.
The iron has 3 steam positions (dry ironing medium steam flow or maximum steam flow
1 When the pilot light (11) goes out, indicating that the desired temperature has been reached, rotate the steam selector (10) until the desired steam flow is obtained (fig. 5).
EMPTYING THE WATER TANK
When you finish ironing, always empty the water from the tank.
1 Set the steam selector (10) to the closed position and the temperature selector (9) to the 0 position.
2 Unplug the plug from the mains
3 Open the water filler opening (5) and place the iron face down over the sink, gently shaking it to completely empty the tank.
4 Wait until the iron is completely cold and store it in the vertical position in a safe place.
IRONING RECOMMENDATIONS
STEAM IRONING
For professional ironing results, we recommend you steam iron garments first and then dry iron them.
SUPERSTEAM
If you want more steam while ironing, press the button (8) two or three times, aim the supersteam at the desired area of the garment and pass the iron soleplate over it to dry it. Thus is useful for eliminating wrinkles.
The supersteam may not be released on the first occasions.
This is normal. Press the push-button a couple of times. Once the supersteam circuit has been primed, the jet of steam will be released.
- We recommend pressing the control at 5-second intervals.
VERTICAL STEAM
This allows you to remove creases from delicate garments without having to put them on the ironing board: jackets, overcoats, curtains, etc.
1 Fill the water tank as explained in the "BEFORE STARTING TO IRON" section.
2 Place the garment on a hanger, well away from other garments, people, animals, etc.
Do not discharge steam onto a garment hanging in the wardrobe or on a person.
3 Set the steam control (10) to the closed position and the temperature selector (9) to the Max position.
4 Bring the iron close to the garment, in the vertical position, (between 15 and 30~cm ) and press the supersteam button (8) once only. Do not position the iron too close to the garment, because you could damage it.
5 Wait a few seconds before pressing the button (8) again, so as not to damage the garment. Most wrinkles can be eliminated with three sprays of steam.
DRY IRONING
1 If there is water in the tank, turn the steam selector (10) to the closed position 2).
2 Plug in the iron and set the temperature selector (9) to the desired position.
The pilot light (11) will go off when the temperature is reached.
IRONING WITH SPRAY
Spray can be obtained by pressing the corresponding button (7) when dry ironing or ironing with steam. The iron is at any temperature level.
- Press the spray button (7) as many times as you want to use this function.
OTHER FUNCTIONS
ANTI-LIMESCALE SYSTEM (only Mod. PV 2010 and PV2210)
This iron has an innovative built-in anti-limescale system, consisting of a resin filter that retains the limescale substances from the water, so these cannot reach the steam chamber of the soleplate, thus extending the life of the iron.
The existence of this anti-limescale system does not mean that the recommendations about water hardness mentioned in the "BEFORE STARTING TO IRON" section can be ignored.
ANTI-DRIP SYSTEM (only Mod. PV2210)
The iron incorporates an anti-drip system that prevents the iron from dripping, even when it is switched off.
STORAGE AND CLEANING
Clean the appliance after using it for the first time, immediately after each use and after a long time without use.
en
SOLEPLATE
1 Disconnect the iron and allow the soleplate to cool down.
Use clay-based, environmentally friendly products to clean the soleplate.
EXTERNAL PART
1 To clean the external part of your iron, use a cloth dampened with soapy water.
i Do not use solvents or abrasive products to clean your iron, as these could damage some of the plastic parts and/or remove some of the marks
2 Store your iron in a vertical position, coiling the cord around the base and pressing the cable into the fixing clip.
Although the power cord is fitted with a 360^ swivel piece, NEVER FORCE this cord when coiling it around the appliance on the first turn.
SELF-CLEANING
It is advisable to carry out the self-cleaning operation about once a month, depending on the frequency of use and the hardness of the water used.
1 Ensure that the tank is half filled with water.
2 Place the iron in the vertical position.
3 Plug in the iron and turn the temperature selector (9) to the Max position.
4 Wait for the pilot light to go off (11) indicating that the desired temperature has been reached.
5 Turn the temperature selector (9) to the 0 position and unplug the iron from the mains.
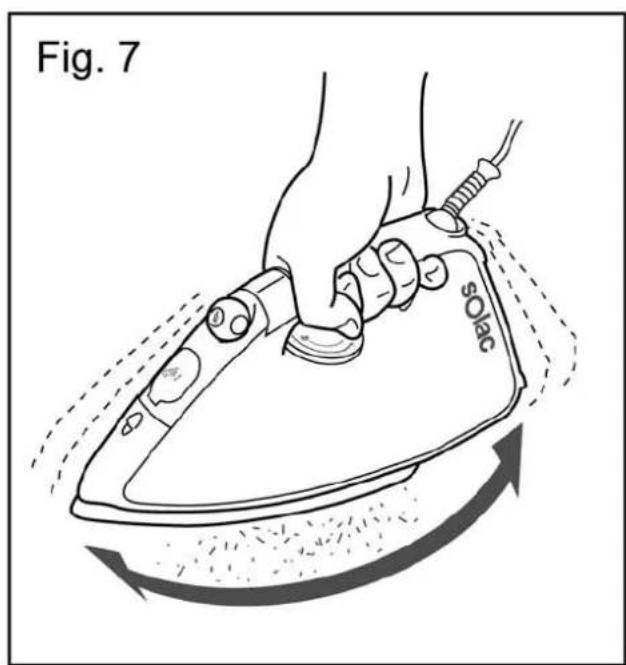
6 Place the iron in the horizontal position over the sink or a suitable receptacle.
7 Set the steam selector (10) to the self-cleaning position l open the water circuit. To do so, press the steam selector down and turn (fig. 6).
8 Swing the iron gently from side to side. Steam and water will come out of the holes in the iron, flushing out dirt and impurities (fig. 7).
A Be careful when performing this operation, as the water and steam are very hot and can cause burns.
9 Place the iron in the vertical position and wait for it to cool completely.
10 Wipe the soleplate with a damp cloth.
Remember that damage caused by the effects of limescale is not covered in the warranty.
. FRANÇAIS
ATTENTION
TROPFSCHUTZSYSTEM (nur Mod. PV2210)
ANTIDRUPPELSYSTEEM (alleen model PV2210)
VOLBA TEPLOTY (Obr. 4)
EMISJA PARY W PIONIE
VOLBA TEPLOTY (obr. 4)
ZEHLENIE S FUNKCIOU KROPENIA
SYSTEM PROTI KVAPKANIU (iba pre mod. PV2210)
EXTRA GOZ (super steam)


- ESPÁÑOL
- SISTEMA ANTICAL (solo Mod. PV 2010 y PV2210)
- MAIN COMPONENTS
- BEFORE STARTING TO IRON
- USE
- BEFORE FIRST USE
- TEMPERATURE SELECTION (fig. 4)
- STEAM SELECTION
- EMPTYING THE WATER TANK
- IRONING RECOMMENDATIONS
- STEAM IRONING
- SUPERSTEAM
- VERTICAL STEAM
- DRY IRONING
- IRONING WITH SPRAY
- OTHER FUNCTIONS
- ANTI-LIMESCALE SYSTEM (only Mod. PV 2010 and PV2210)
- ANTI-DRIP SYSTEM (only Mod. PV2210)
- STORAGE AND CLEANING
- SOLEPLATE
- EXTERNAL PART
- SELF-CLEANING
- FRANÇAIS
- ATTENTION
- TROPFSCHUTZSYSTEM (nur Mod. PV2210)
- ANTIDRUPPELSYSTEEM (alleen model PV2210)
- VOLBA TEPLOTY (Obr. 4)
- EMISJA PARY W PIONIE
- ZEHLENIE S FUNKCIOU KROPENIA
- SYSTEM PROTI KVAPKANIU (iba pre mod. PV2210)
- EXTRA GOZ (super steam)
Brand : SOLAC
Model : Volta 2400 Plus
Category : Iron