
Aficio SP C240SF - Printer RICOH - Free user manual and instructions
Find the device manual for free Aficio SP C240SF RICOH in PDF.
| Brand | Ricoh |
| Model | Aficio SP C240SF |
| Product Type | Color laser multifunction printer |
| Functions | Print, scan, copy, fax |
| Scanning | Scan to E-mail, Scan to FTP, Scan to Folder, Scan to USB |
| Fax | Fax send and receive, modes: Fax only, manual FAX/TEL, automatic FAX/TEL, FAX/TAD |
| Connections | USB 2.0, Ethernet 10/100 Base-TX |
| Network Configuration | IPv4: DHCP or manual, DNS, SMTP |
| Supported Operating Systems | Windows XP/Vista/7, Windows Server 2003/2008/2008 R2, Mac OS X |
| Control Panel | LCD screen, navigation keys, numeric keypad |
| Automatic Document Feeder (ADF) | Yes |
| Exposure Glass | Yes |
| USB Host Port | For USB media (scan to USB) |
| Scanner Address Book | Up to 100 entries (20 speed dials) |
| Fax Address Book | Up to 220 entries (20 speed dials, 200 quick dials) |
| Telephone Line Type | Tone or pulse, PSTN or PBX |
| PBX Access Number | Configurable |
| Internal Clock | Adjustable date and time, 12/24h formats |
| TWAIN Scanning | Yes (via USB or network) |
| Supplied Software | Presto! PageManager (on CD-ROM) |
Frequently Asked Questions - Aficio SP C240SF RICOH
User questions about Aficio SP C240SF RICOH
0 question about this device. Answer the ones you know or ask your own.
Ask a new question about this device
Download the instructions for your Printer in PDF format for free! Find your manual Aficio SP C240SF - RICOH and take your electronic device back in hand. On this page are published all the documents necessary for the use of your device. Aficio SP C240SF by RICOH.
USER MANUAL Aficio SP C240SF RICOH
The Region A symbol is used for information that is relevant only to the region A (mainly Europe and Asia) model machine, and the Region B symbol is used for information that is relevant only to the region B (mainly North America) model machine.
Modellhypen
Initial Guide for Scanner and Fax
1 Using the Scanner Function
2 Using the Fax Function
TABLE OF CONTENTS
Trademarks. 3
1. Using the Scanner Function
Guide to the Scanner Function 5
Scanning from a Computer. 5
Sending Scanned Files via E-mail. 6
Sending Scanned Files to an FTP Server. 7
Sending Scanned Files to a Computer's Shared Folder. 7
Sending Scanned Files to a USB Flash Disk. 8
Configuring the IPv4 Address Settings. 9
Registering Scan Destinations 11
Scanning Using the Control Panel. 16
Basic Operation for Scan to E-mail/FTP/Folder. 16
Basic Operation for Scan to USB. 17
Scanning from a Computer 18
Basic Operation for TWAIN Scanning. 18
2. Using the Fax Function
Guide to the Fax Function 19
Using as a Fax Machine 19
Using the Machine with an External Telephone 19
Sending Faxes from a Computer (LAN-Fax) 20
Connecting to a Telephone Line 21
Configuring Telephone Network Settings 23
Selecting the Telephone Line Type 23
Selecting the Telephone Network Connection Type 23
Setting the Outside Line Access Number 23
Setting the Date and Time. 25
Registering Fax Destinations 26
Registering Fax Destinations Using Web Image Monitor. 26
Basic Operation for Sending a Fax. 28
Receiving a Fax. 29
Selecting Reception Mode 29
Receiving a Fax in FAX/TEL Manual Mode 29
Receiving a Fax in Fax Only Mode. 30
Receiving a fax in FAX/TEL Automatic Mode 30
Receiving a Fax in FAX/TAD Mode 30
Trademarks
Microsoft®Windows®, Windows Server®, and Windows Vista® are either registered trademarks or trademarks of Microsoft Corporation in the United States and/or other countries.
Apple, Bonjour, Macintosh, Mac OS, TrueType, and Safari are trademarks of Apple Inc., registered in the U.S. and other countries.
"Presto! PageManager" and "NewSoft" are trademarks and/or registered trademarks of NewSoft Technology Corporation subject to trademark protection of domestic trademark laws and international trademark conventions.
Other product names used herein are for identification purposes only and might be trademarks of their respective companies. We disclaim any and all rights to those marks.
The proper names of the Windows operating systems are as follows:
The product names of Windows XP are as follows: Microsoft®WindowsXP Professional Edition Microsoft®WindowsXP Home Edition Microsoft®WindowsXP Professional x64 Edition
The product names of Windows Vista are as follows: Microsoft Windows Vista Ultimate Microsoft Windows Vista Business Microsoft Windows Vista Home Premium Microsoft Windows Vista Home Basic Microsoft Windows Vista Enterprise
The product names of Windows 7 are as follows:
Microsoft® Windows® 7 Starter
Microsoft® Windows® 7 Home Premium
Microsoft® Windows® 7 Professional
Microsoft® Windows® 7 Ultimate
Microsoft® Windows® 7 Enterprise
The product names of Windows Server 2003 are as follows: Microsoft Windows Server 2003 Standard Edition Microsoft Windows Server 2003 Enterprise Edition Microsoft Windows Server 2003 Web Edition Microsoft Windows Server 2003 Datacenter Edition
The product names of Windows Server 2003 R2 are as follows:
Microsoft® Windows Server® 2003 R2 Standard Edition
Microsoft® Windows Server® 2003 R2 Enterprise Edition
Microsoft® Windows Server® 2003 R2 Datacenter Edition
The product names of Windows Server 2008 are as follows:
Microsoft® Windows Server® 2008 Foundation
Microsoft® Windows Server® 2008 Standard
Microsoft® Windows Server® 2008 Enterprise
Microsoft® Windows Server® 2008 Datacenter
Microsoft® Windows Server® 2008 for Itanium-based Systems
Microsoft® Windows® Web Server 2008
Microsoft® Windows® HPC Server 2008
Microsoft® Windows Server® 2008 Standard without Hyper-V™
Microsoft® Windows Server® 2008 Enterprise without Hyper-vTM
Microsoft® Windows Server® 2008 Datacenter without Hyper-V™
The product names of Windows Server 2008 R2 are as follows:
Microsoft® Windows Server® 2008 R2 Foundation
Microsoft® Windows Server® 2008 R2 Standard
Microsoft® Windows Server® 2008 R2 Enterprise
Microsoft® Windows Server® 2008 R2 Datacenter
Microsoft® Windows Server® 2008 R2 for Itanium-based Systems
Microsoft® Windows® Web Server R2 2008
Microsoft® Windows® HPC Server R2 2008
1. Using the Scanner Function
This chapter describes the scanner functions.
Guide to the Scanner Function
There are two scanning methods: scanning from the computer (TWAIN scanning) and scanning using the control panel.
Scanning from the computer
TWAIN scanning allows you to operate the machine from your computer and scan originals into your computer directly.
TWAIN scanning can be performed using a TWAIN-compliant application, such as Presto! PageManager.
TWAIN scanning is available with both USB and network connections.
Scanning using the control panel
Scanning using the control panel allows you to send scanned files via e-mail (Scan to E-mail), to an FTP server (Scan to FTP), or to the shared folder of a computer on a network (Scan to Folder), or to a USB flash disk (Scan to USB).
The Scan to E-mail, Scan to FTP, and Scan to Folder functions are available only through a network connection. No network connection is required for the Scan to USB function; you can send scanned files directly to a USB flash disk inserted into the front of the machine.
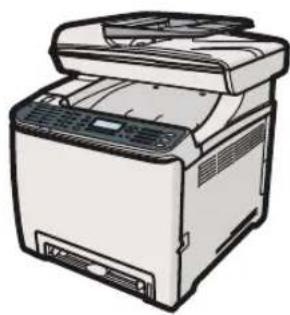
Scanning from a Computer
You can operate the machine from your computer and scan originals into your computer directly.
Preparation for scanning from a computer with USB connection
- Connect the machine to the computer using a USB cable, and install the scanner driver on the computer.
I
1
For details about installing the scanner driver, see the instructions provided on the driver CD-ROM.
- If a TWAIN-compliant application is not installed on the computer, install Presto! PageManager.
For details, see the instructions provided on the driver CD-ROM.
Preparation for scanning from a computer with network connection
- Connect the machine to the network.
- Specify the network settings, such as the machine's IP address.
For details, see p.9 "Configuring the IPv4 Address Settings".
- Install the scanner driver on the computer.
For details, see the instructions provided on the driver CD-ROM.
- If a TWAIN-compliant application is not installed on the computer, install Presto! PageManager.
For details, see the instructions provided on the driver CD-ROM.
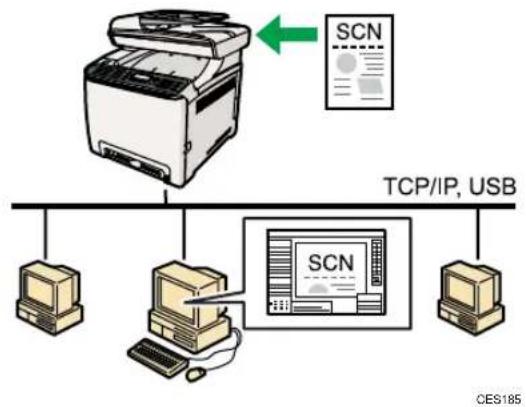
Sending Scanned Files via E-mail
You can send scanned files via e-mail using the control panel.
Preparation for sending scanned files via e-mail
- Connect the machine to the network.
- Specify the network settings, such as the machine's IP address.
For details, see p.9 "Configuring the IPv4 Address Settings".
- Configure the DNS and SMTP settings using Web Image Monitor.
For details, see "Configuring the DNS Settings" and "Configuring the SMTP Settings", User Guide.
- Register the destinations to the Address Book using Web Image Monitor.
For details, see p.11 "Registering Scan Destinations".
Sending Scanned Files to an FTP Server
You can send scanned files to an FTP server using the control panel.
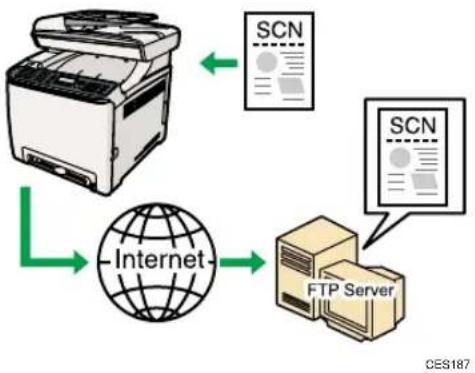
Preparation for sending scanned files to an FTP server
- Connect the machine to the network.
- Specify the network settings, such as the machine's IP address.
For details, see p.9 "Configuring the IPv4 Address Settings".
- Register the destinations to the Address Book using Web Image Monitor.
For details, see p.11 "Registering Scan Destinations".
Sending Scanned Files to a Computer's Shared Folder
You can send scanned files to the shared folder of a computer on a network using the control panel.
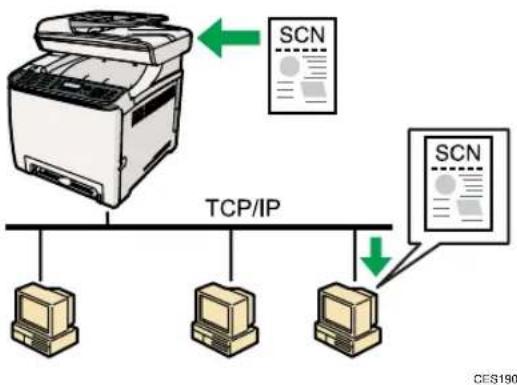
Preparation for sending scanned files to a computer's shared folder
- Connect the machine to the network.
- Specify the network settings, such as the machine's IP address.
1
For details, see p.9 "Configuring the IPv4 Address Settings".
- Create a destination folder on the computer's hard disk drive, and configure it as a shared folder.
For details, see your operating system's documentation.
- Register the destinations to the Address Book using Web Image Monitor.
For details, see p.11 "Registering Scan Destinations".
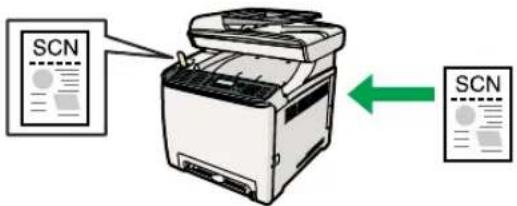
Sending Scanned Files to a USB Flash Disk
You can send and store scanned files on a USB flash disk using the control panel.
CES198
Preparation for sending scanned files to a USB flash disk
- Insert a USB flash disk in the machine.
For details, see p.17 "Basic Operation for Scan to USB".
Configuring the IPv4 Address Settings
The machine is set to obtain IPv4 address information automatically by the network by default (DHCP). If you want to assign IPv4 address information manually, follow the procedure below.

Important
-
If you are using the machine on a network that uses DHCP, print the configuration page to check the IPv4 address information assigned to the machine. Perform steps 15 to 18 of the procedure below.
-
Press the [User Tools] key.
- Press the [ ] keys to select [Network Settings], and then press the [OK] key.
- If you are requested to enter a password, enter the password using the number keys, and then press the [OK] key.
- Press the [ ] keys to select [IPv4 Configuration], and then press the [OK] key.
- Press the [ ] keys to select [DHCP], and then press the [OK] key.
- Press the [ ] keys to select [Inactive], and then press the [OK] key.
- Press the [ ] keys to select [IP Address], and then press the [OK] key. The current IPv4 address is shown.
- Enter the machine's IPv4 address using the number keys, and then press the [OK] key. Press the [?] keys to move between fields.
- Press the [ ] keys to select [Subnet Mask], and then press the [OK] key. The current subnet mask is shown.
- Enter the subnet mask using the number keys, and then press the [OK] key. Press the [?] keys to move between fields.
- Press the [ ] keys to select [Gateway Address], and then press the [OK] key. The current gateway address is shown.
- Enter the gateway address using the number keys, and then press the [OK] key. Press the [?] keys to move between fields.
- Press the [User Tools] key to return to the initial screen.
- If you are requested to restart the machine, turn off the machine, and then turn it back on.
- Press the [User Tools] key.
- Press the [ ] Keys to select [Print List/Report], and then press the [OK] key.
- Press the [ ] keys to select [Configuration Page], and then press the [OK] key.
18. Press [Yes] in the confirmation screen.
The configuration page is printed. The IPv4 address setting will appear under "TCP/IP" on the configuration page.
1
Registering Scan Destinations
This section describes how to register scan destinations in the Address Book. To send scanned files to an e-mail address (Scan to E-mail), FTP server (Scan to FTP), or a shared folder on a network computer (Scan to Folder), you must first register the destination in the Address Book using Web Image Monitor.

Important
- Depending on your network environment, the Scan to FTP and Scan to Folder functions may require a user name and password to be correctly entered in the destination information. In such cases, after registering destinations, check that the user name and password are correctly entered by sending test documents to those destinations.
The Address Book can contain up to 100 entries, including 20 Quick Dial entries.
Destinations registered as Quick Dial entries can be selected by pressing the corresponding One Touch button.
- Start the Web browser, and access the machine by entering its IP address.
- Click [Quick Dial Destination] or [Scan Destination].
- From the [Destination Type] list, select [E-mail Address], [FTP] or [Folder].
- Register information as necessary.
The information you must register varies depending on the destination type. For details, see the tables below.
- Enter the administrator password if required.
- Click [Apply].
- Close the Web browser.
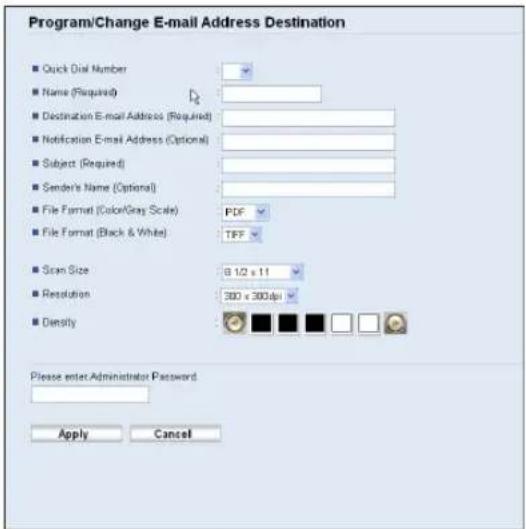
Scan to E-mail Settings

1
| Item Setting Description | ||
| Quick Dial Number Optional | Select when setting the destination as a Quick Dial entry. | |
| Name Required | Name of the destination. The name specified here will be shown on the screen when selecting a scan destination. | |
| Destination E-mail Address Required E-mail address of the destination. | ||
| Notification E-mail Address Optional | E-mail address to which a notification is sent after transmission. | |
| Subject Required Subject of the e-mail. | ||
| Sender's Name Optional Name of e-mail sender. | ||
| File Format (Color/Gray Scale) | Required File format of the scanned file when scanning in color. | |
| File Format (Black & White) Required | File format of the scanned file when scanning in black and white. | |
| Scan Size Optional Select the scanning size for the original. | ||
| Resolution Optional Select the scan resolution. | ||
| Density Optional | Specify the image density by clicking the right or left buttons. | |
Scan to FTP Settings

| Item Setting Description | ||
| Quick Dial Number Optional | Select when setting the destination as a Quick Dial entry. | |
| Name Required | Name of the destination. The name specified here will be shown on the screen when selecting a scan destination. | |
| Hostname or IP Address Required | Name or IP address of the FTP server. | |
| File Format (Color/Gray Scale) | Required File format of the scanned file when scanning in color. | |
| File Format (Black & White) Required | File format of the scanned file when scanning in black and white | |
| FTP User Name Optional | name for logging in to the FTP server. | |
| FTP Password Optional | name for logging in to the FTP server. | |
| Directory Optional | Name of the FTP server directory where scanned files are stored. | |
| Notification E-mail Address Optional | E-mail address to which a notification is sent after transmission. | |
| Scan Size Optional | the scanning size for the original. | |
| Resolution Optional | the scan resolution. | |
| Density Optional | Specify the image density by clicking the right or left buttons. |

Scan to Folder Settings

| Item Setting Description | ||
| Quick Dial Number Optional | Select when setting the destination as a Quick Dial entry. | |
| Name Required | Name of the destination. The name specified here will be shown on the screen when selecting a scan destination. | |
| Service Name Required | Path to the directory where scanned files will be stored. Consists of the IP address or name of the destination computer, and name of the shared folder. | |
| Domain Optional | If the destination computer is a member of an Active Directory domain, specify that domain name. | |
| Login User Name Optional | User name for logging in to the destination computer. | |
| Login Password Optional | Password for logging in to the destination computer. | |
| Directory Optional | Directory within the shared folder for storing scanned files. | |
| Notification E-mail Address Optional | E-mail address to which a notification is sent after transmission. | |
| File Format (Color/Gray Scale) | Required File format of the scanned file when scanning in color. |
| Item Setting Description | |
| File Format (Black & White) Required | File format of the scanned file when scanning in black and white. |
| Scan Size Optional Select the scanning size for the original. | |
| Resolution Optional Select the scan resolution. | |
| Density Optional | Specify the image density by clicking the right or left buttons. |
1

Note
- To send files via e-mail, SMTP and DNS settings must be configured properly.
- To send files to an FTP server or computer, the user name, password, and directory must be configured properly.
- On a network that uses a DNS server, specify a computer name in [Service Name] and the name of the domain to which the computer belongs in [Domain]. In this case, also configure the DNS related settings using Web Image Monitor.
- The Scan to Folder destination must operate on one of the following operating systems: Windows XP/Vista/7, Windows Server 2003/2003 R2/2008/2008 R2, or Mac OS X.
- Scan destinations cannot be registered using the control panel.
- The Scan to USB function does not require destinations registered in the Address Book.

Reference
- For details about SMTP and DNS settings, see "Configuring the DNS Settings" and "Configuring the SMTP Settings", User Guide
Scanning Using the Control Panel
Scanning using the control panel allows you to send scanned files via e-mail (Scan to E-mail), to an FTP server (Scan to FTP), or to the shared folder of a computer on a network (Scan to Folder), or to a USB flash disk (Scan to USB).
The Scan to E-mail, Scan to FTP, and Scan to Folder functions are available only through a network connection. No network connection is required for the Scan to USB function; you can send scanned files directly to a USB flash disk inserted into the front of the machine.
Scanning using the control panel is only available with network connection.
Basic Operation for Scan to E-mail/FTP/Folder
This section describes the basic operation for sending scanned files via E-mail, to an FTP server, or to a computer. The scanned file is sent via E-mail, to an FTP server, or a computer, depending on the specified destination.

Important
-
If a USB flash disk is inserted in the machine, scanning functions other than Scan to USB are not possible from the control panel. Make sure there is no USB flash disk inserted in the machine.
-
Press the [Scanner] key.
Confirm that "Specify Dest." is shown on the screen. - Place the original on the exposure glass or in the ADF.
If necessary, configure advanced scan settings. - Press the [Address Book] key.
- Search for the desired destination by pressing the [ ] keys to scroll the Address Book, and then press the [OK] key.
- Press the [B&W Start] key or the [Color Start] key.
To scan in black and white, press the [B&W Start] key.
To scan in color, press the [Color Start] key.
Depending on the machine's settings, you may be prompted to place another original on the exposure glass. In this case, proceed to the next step.
- If you have more originals to scan, place the next original on the exposure glass, and then press [Yes]. Repeat this step until all originals are scanned.
- When all originals have been scanned, press [No] to start sending the scanned file.

Reference
For complete information about the scanner function, see User Guide.
Basic Operation for Scan to USB
This section describes the basic operation for sending scanned files to a USB flash disk.

Important
-
Certain types of USB flash disks cannot be used.
-
Insert your USB flash disk into the USB flash disk port.
- Press the [Scanner] key.
"Loading..." appears on the display. Wait until the display changes to show "Save Scn Data to USB" (the duration depends on your USB flash disk).
- Place the original on the exposure glass or in the ADF.
If necessary, configure advanced scan settings.
- Press the [B&W Start] key or the [Color Start] key.
To scan in black and white, press the [B&W Start] key.
To scan in color, press the [Color Start] key.
Depending on the machine's setting, you will be asked to select the file format between TIFF and PDF (halftone black-and-white scanning mode), or JPG and PDF (color or gray scale black-and-white scanning mode).
- Press the appropriate selection key according to the desired file format.
Depending on the machine's settings, you may be prompted to place another original on the exposure glass. In this case, proceed to the next step. If not, proceed to step 8. - If you have more originals to scan, place the next original on the exposure glass, and then press [Yes]. Repeat this step until all originals are scanned.
- When all originals have been scanned, press [No] to start sending the scanned file.
- Confirm that "Ready" appears on the display.
The scanned file is created in the root directory of the USB flash disk.
- Remove the USB flash disk from the machine.

Reference
- For complete information about the scanner function, see User Guide


Scanning from a Computer
1
Scanning from a computer (TWAIN scanning) allows you to operate the machine from your computer and scan originals into your computer directly.
TWAIN scanning is available with both USB and network connections.
Basic Operation for TWAIN Scanning
This section describes the basic TWAIN scanning operation.
TWAIN scanning is possible if your computer is running a TWAIN-compatible application. Presto! PageManager, which is provided on the driver CD-ROM, can be used for TWAIN scanning.

Reference
- For details about the TWAIN scanning operation, see the manual provided with PageManager or other application of your choice.
2. Using the Fax Function
This chapter describes the fax functions.
Guide to the Fax Function
This section describes basic procedures for using this machine as a fax machine.
Using as a Fax Machine
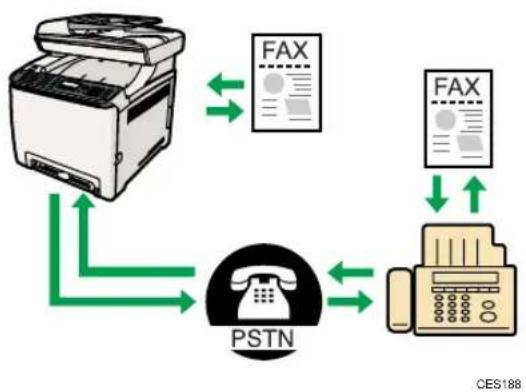
Preparation for using as a fax machine
- Connect the machine to the telephone line.
For details, see p.21 "Connecting to a Telephone Line".
- Configure the telephone network settings.
For details, see p.23 "Configuring Telephone Network Settings".
- Configure the time and date.
For details, see p.25 "Setting the Date and Time".
- Register the destinations to the Address Book using Web Image Monitor.
For details, see p.26 "Registering Fax Destinations".
Using the Machine with an External Telephone
You can use this machine as a fax machine and also use the same telephone line for voice calls.
2
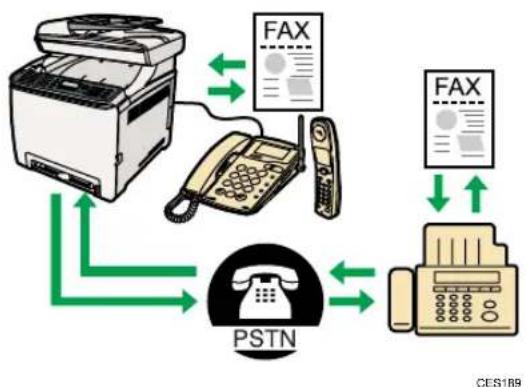
Preparation for using the machine with an external telephone
- Connect an external telephone to the machine.
For details, see p.21 "Connecting to a Telephone Line".
- Select the fax reception mode.
For details, see p.29 "Receiving a Fax".
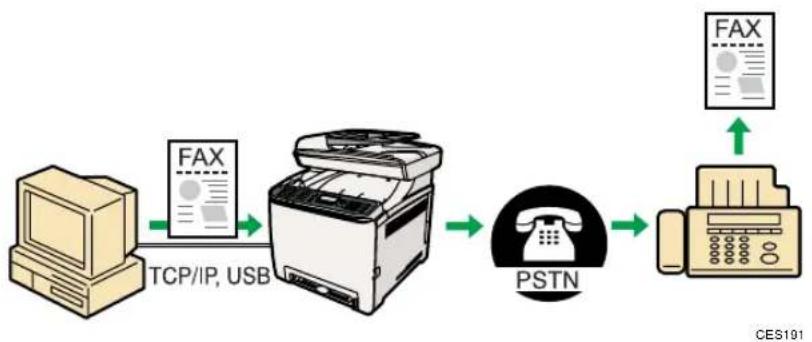
Sending Faxes from a Computer (LAN-Fax)
You can send a document directly from a computer through this machine to another fax machine, without printing the document.

Important
- This function is supported by Windows XP/Vista/7, and Windows Server 2003/2003 R2/2008/2008 R2. Mac OS X does not support this function.

Reference
- For details about the LAN-Fax function, see "Using the Fax Function from a Computer (LAN-Fax)", User Guide
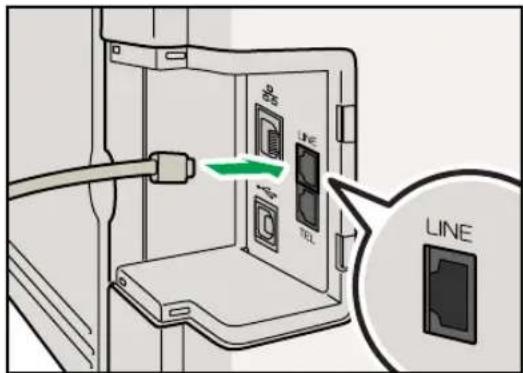
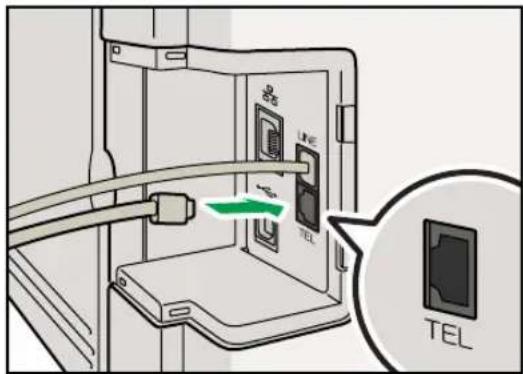
Connecting to a Telephone Line
You can connect the machine to the public switched telephone network (PSTN) directly or through a private branch exchange (PBX).
Also, you can connect an external telephone to use the same telephone line for voice calls.

CAUTION
To reduce the risk of fire, use only No. 26 AWG or larger telecommunication line cord.

ATTENTION
-
Make sure the connector is the correct type before you start.
-
Remove the cable cover.
- Connect a telephone line cord to LINE.
CES041
- If using an external telephone, connect the telephone to TEL.
CES040
- Re-attach the cable cover.
Configuring Telephone Network Settings
Selecting the Telephone Line Type
Select the telephone line type according to your telephone line service. There are two types: tone and pulse dial.
This function is not available in some regions.
- Press the [User Tools] key.
- Press the [ ] keys to select [Admin. Tools], and then press the [OK] key.
- If you are requested to enter a password, enter the password using the number keys, and then press the [OK] key.
- Press the [ ] keys to select [Dial/Push Phone], and then press the [OK] key.
- Press the [ ] keys to select the telephone line type appropriate for your telephone service, and then press the [OK] key.
- Press the [User Tools] key to return to the initial screen.
Selecting the Telephone Network Connection Type
Select the type of connection to the telephone network.
There are two types: public switched telephone network (PSTN) and private branch exchange (PBX).
- Press the [User Tools] key.
- Press the [ ] keys to select [Admin. Tools], and then press the [OK] key.
- If you are requested to enter a password, enter the password using the number keys, and then press the [OK] key.
- Press the [A]Keys to select [PSTN / PBX], and then press the [OK] key.
- Press the [A] keys to select [PSTN] or [PBX], and then press the [OK] key.
- Press the [User Tools] key to return to the initial screen.
Setting the Outside Line Access Number
If the machine is connected to the telephone network through a PBX, set the dial number to access the outside line.

Important
-
Make sure to set the outside line access number that matches the setting of your PBX. Otherwise, you may not be able to send faxes to outside destinations.
-
Press the [User Tools] key.
- Press the [ ] keys to select [Admin. Tools], and then press the [OK] key.
- If you are requested to enter a password, enter the password using the number keys, and then press the [OK] key.
- Press the [ ] keys to select [PBX Access Number], and then press the [OK] key.
- Enter the outside line access number using the number keys, and then press the [OK] key.
- Press the [User Tools] key to return to the initial screen.
2
Setting the Date and Time
This section describes how to set the time and date for the machine's internal clock, and how to select the display format.
- Date
Year, month, date, and date format (Month/Day/Year, Day/Month/Year, or Year/Month/Day)
Time
Hour, minute, time format (12- or 24-hour), and AM/PM stamp (when 12-hour time format is selected)
- Press the [User Tools] key.
- Press the [A][Y] keys to select [Admin. Tools], and then press the [OK] key.
- If you are requested to enter a password, enter the password using the number keys, and then press the [OK] key.
- Press the [ ] keys to select [Set Date/Time], and then press the [OK] key.
- Press the [ ] keys to select [Set Date], and then press the [OK] key.
- Press the [ ] keys to select the desired date format, and then press the [OK] key.
- Enter the current date using the number keys, and then press the [OK] key.
You can press the keys to move between fields.
- Press the [ ] keys to select [Set Time], and then press the [OK] key.
-
Press the [H] Keys to select the desired time format, and then press the [OK] key.
-
Enter the current time using the number keys, and then press the [OK] key.
If you selected [12-hour Format], press the [A] keys to select [AM] or [PM].
You can press the keys to move between fields.
- Press the [User Tools] key to return to the initial screen.
Registering Fax Destinations
This section describes how to register fax destinations in the Address Book using Web Image Monitor. The Address Book allows you to specify fax destinations quickly and easily.
The Address Book can contain up to 220 entries (20 Quick Dial entries and 200 Speed Dial entries).
Quick Dial entries
Destinations registered as Quick Dial entries can be selected by pressing the corresponding One Touch button.
Speed Dial entries
Destinations registered as Speed Dial entries can be selected by pressing the [Address Book] key, and then selecting the desired entry using the [4][9] keys.
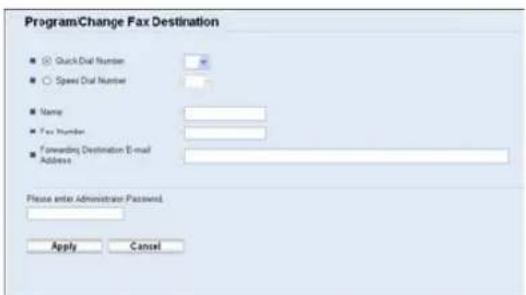
Registering Fax Destinations Using Web Image Monitor
This section describes how to register destinations using Web Image Monitor.
- Start the Web browser and access the machine by entering its IP address.
- Click [Quick Dial Destination] or [Fax Speed Dial Destination].
- From the [Destination Type] list, select [Fax].
- Select [Quick Dial Number] or [Speed Dial Number], and then select the registration number from the list.
- Register information as necessary.
- Enter the administrator password if required.
- Click [Apply].
- Close the Web browser.
Fax destination settings
| Item Setting Description | ||
| Quick Dial Number / Speed Dial Number | Required | Select the number to which you want to register Quick Dial or Speed Dial destination. |
| Name Optional | Name of the destination. The name specified here will be shown on the screen when selecting a fax destination. | |
| Fax Number Optional | Fax number of the destination. If the machine is connected to the telephone network through a PBX, make sure to enter the outside line access number specified in [PBX Access Number] before the fax number. | |
| Forwarding Destination E-mail Address | Optional | E-mail address of the destination of the Internet Fax. This setting appears only for the Type 2 model. |
2
Basic Operation for Sending a Fax
This section describes the basic operation for sending a fax.
- Press the [Facsimile] key.
- Place the original on the exposure glass or in the ADF.
If necessary, configure the advanced scan settings.
-
Enter the fax number (up to 40 characters) using the number keys, or specify a destination using the One Touch buttons or Speed Dial function.
-
If the machine is connected to the telephone network through a PBX, make sure to enter the outside line access number specified in [PBX Access Number] before the fax number.
-
To specify an Internet Fax destination, use the One Touch buttons or Speed Dial function.
-
Press the [B&W Start] key.
-
Depending on the machine's settings, you may be prompted to enter the fax number again if you manually entered the destination fax number. Enter the fax number within 30 seconds. If the fax numbers do not match, go back to step 3.
-
When using the exposure glass in Memory Transmission mode, you will be prompted to place another original. In this case, proceed to the next step.
-
If you have more originals to scan, press [Yes] within 60 seconds, place the next original on the exposure glass, and then press [OK]. Repeat this step until all originals are scanned.
If you do not press [Yes] within 60 seconds, the machine will start to dial the destination.
- When all originals have been scanned, press [No] to start sending the fax.
Reference
For complete information about the fax function, see User Guide.
Receiving a Fax
This section describes the reception modes and the basic operations for receiving a fax.
Selecting Reception Mode
This section describes how to select the reception mode.
The reception modes are as follows:
- Fax Only mode (auto reception)
- FAX/TEL Manual mode (manual reception)
- FAX/TEL Automatic mode (auto reception)
-
FAX/TAD mode (auto reception)
-
Press the [User Tools] key.
- Press the [▲][ keys to select [Fax Features], and then press the [OK] key.
- Press the [ ] keys to select [Reception Settings], and then press the [OK] key.
- Press the [ ] keys to select [Switch Reception Mode], and then press the [OK] key.
- Press the [ ] keys to select the desired reception mode, and then press the [OK] key.
- Press the [User Tools] key to return to the initial screen.

Note
- In FAX/TAD mode, the machine automatically starts to receive faxes after the external telephone answering device rings the number of times specified in [Overall Ringings w/ TAD] under [Fax Features]. Make sure to set the external telephone answering device to answer calls before the machine starts to receive faxes.
Receiving a Fax in FAX/TEL Manual Mode
This section describes the basic operation for receiving a fax when the reception mode is set to FAX/TEL Manual mode.
- Pick up the handset of the external telephone to answer the call.
A normal telephone call starts.
- When you hear a fax calling tone or no sound, press the [Facsimile] key, and then press the [B&W Start] key.
- Press [RX].
-
Press the [B&W Start] key.
-
Replace the handset.
Receiving a Fax in Fax Only Mode
When the reception mode is set to Fax Only mode, the machine automatically answers all incoming calls in fax reception mode.
Receiving a fax in FAX/TEL Automatic Mode
When the reception mode is set to FAX/TEL Automatic mode, the machine receives a fax automatically if the incoming call is a fax call and rings when it receives voice calls.
- When there is an incoming call, the machine tries to detect a fax calling tone for five seconds.
If a fax calling tone is detected, the machine starts to receive the fax automatically.
-
If a fax calling tone is not detected, the machine starts to ring, and continues to try to detect a fax calling tone for the period of time specified in [RX Mode Auto Switch Time] under [Fax Features].
-
If a fax calling tone is detected, or if you do not pick up the handset, the machine starts to receive the fax automatically.
- To start a normal telephone call, pick up the handset, press the [Facsimile] key, and then press the [Clear/Stop] key. If you hear a fax calling tone or no sound, receive the fax manually.
- If you pick up the handset but the time specified in [RX Mode Auto Switch Time] passes before a normal telephone call starts, the machine starts to receive the fax automatically.

Note
- After you pick up the handset to answer a call, make sure to press the [Facsimile] key to activate fax mode before pressing the [Clear/Stop] key. If the machine is not in fax mode, pressing the [Clear/Stop] key will not let you start a normal telephone call.
Receiving a Fax in FAX/TAD Mode
When the reception mode is set to FAX/TAD mode, the external telephone answering device answers and records messages when the machine receives telephone calls. If the incoming call is a fax call, the machine receives the fax automatically.
- When there is an incoming call, the external telephone answering device rings the number of times specified in [Overall Ringings w/ TAD] under [Fax Features].
If the external telephone answering device does not answer, the machine starts to receive the fax automatically.
-
If the external telephone answering device answers, the machine monitors silence on the line for 30 seconds (silence detection).
-
If a fax calling tone or no sound is detected, the machine starts to receive the fax automatically.
- If a voice is detected, a normal telephone call starts. The external telephone answering device records messages.
2
MEMO

SP C240SF/C242SF
- Modellhypen
- Initial Guide for Scanner and Fax
- TABLE OF CONTENTS
- Using the Scanner Function
- Using the Fax Function
- Trademarks
- Guide to the Scanner Function
- Scanning from the computer
- Scanning using the control panel
- Scanning from a Computer
- Preparation for scanning from a computer with USB connection
- 1
- Preparation for scanning from a computer with network connection
- Sending Scanned Files via E-mail
- Preparation for sending scanned files via e-mail
- Sending Scanned Files to an FTP Server
- Preparation for sending scanned files to an FTP server
- Sending Scanned Files to a Computer's Shared Folder
- Preparation for sending scanned files to a computer's shared folder
- Sending Scanned Files to a USB Flash Disk
- Preparation for sending scanned files to a USB flash disk
- Configuring the IPv4 Address Settings
- Important
- Press [Yes] in the confirmation screen.
- Registering Scan Destinations
- Scan to E-mail Settings
- Scan to FTP Settings
- Scan to Folder Settings
- Note
- Reference
- Basic Operation for Scan to E-mail/FTP/Folder
- Basic Operation for Scan to USB
- Basic Operation for TWAIN Scanning
- Guide to the Fax Function
- Using as a Fax Machine
- Preparation for using as a fax machine
- Using the Machine with an External Telephone
- Preparation for using the machine with an external telephone
- Sending Faxes from a Computer (LAN-Fax)
- Connecting to a Telephone Line
- CAUTION
- ATTENTION
- Configuring Telephone Network Settings
- Selecting the Telephone Line Type
- Selecting the Telephone Network Connection Type
- Setting the Outside Line Access Number
- Setting the Date and Time
- Registering Fax Destinations
- Quick Dial entries
- Speed Dial entries
- Registering Fax Destinations Using Web Image Monitor
- Fax destination settings
- Basic Operation for Sending a Fax
- Receiving a Fax
- Selecting Reception Mode
- Receiving a Fax in FAX/TEL Manual Mode
- Receiving a Fax in Fax Only Mode
- Receiving a fax in FAX/TEL Automatic Mode
- Receiving a Fax in FAX/TAD Mode
- SP C240SF/C242SF
Brand : RICOH
Model : Aficio SP C240SF
Category : Printer