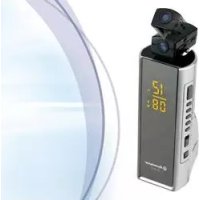
CLR2495P - Radio ROADSTAR - Free user manual and instructions
Find the device manual for free CLR2495P ROADSTAR in PDF.


| Product type | AM/FM digital alarm clock with LCD projection |
| Brand | Roadstar |
| Model | CLR2495P |
| Power supply | 230 V ~ 50 Hz, 5 W; backup battery 9 V (type 6F22/006P) |
| Radio frequencies | AM 530-1600 kHz, FM 87.5-108 MHz |
| Output power | 300 mW |
| Speaker impedance | 8 ohms |
| Backup battery | 9 V (not included), battery life 9-12 months |
| Projection | Time display on ceiling or wall, distance 1-3 meters, zoom adjustment |
| Main functions | AM/FM radio, clock, alarm, vibrator, snooze, sleep, time projection |
| Alarm setting | By ALARM SET/OFF, HOUR SET, MINUTE SET buttons; duration 1 h 59 min |
| Snooze function | Repeats after 9 minutes |
| Sleep function | Countdown up to 59 minutes |
| Maintenance | Replace the backup battery every 9-12 months |
| Safety | Do not expose to moisture or rain; do not open the case; use the specified voltage |
| Dimensions (estimated) | Approximately 200 x 120 x 80 mm |
| Weight (estimated) | Approximately 0.5 kg |
Frequently Asked Questions - CLR2495P ROADSTAR
User questions about CLR2495P ROADSTAR
0 question about this device. Answer the ones you know or ask your own.
Ask a new question about this device
Download the instructions for your Radio in PDF format for free! Find your manual CLR2495P - ROADSTAR and take your electronic device back in hand. On this page are published all the documents necessary for the use of your device. CLR2495P by ROADSTAR.
USER MANUAL CLR2495P ROADSTAR

AM/FM Digital Alarm Clock Radio with LCD Projection Clock
CLR-2495P
Instruction manual
Bedienungsanleitung
natural_image
Two horizontal bar designs with grayscale shades and a central crosshair (no text or symbols)INDEX
| English Page 1 | ||
| Deutsch Seite 9 | ||
| Français Page 17 | ||
| Italiano Pagina 25 | ||
| Español Página 33 | ||
| Português | Pagina | 41 |
CLR-2495P

natural_image
Pure graphical representation of a color bar with no text or symbolsEnglish English
WARNINGS

The exclamation point within the triangle is a warning sign alerting the user of important instructions accompanying the product.

The lightening flash with arrowhead symbol within the triangle is a warning sign alerting the user of "dangerous voltage" inside the unit.

To reduce the risk of electric shock, do not remove the cover. No user serviceable parts inside the unit. Refer all servicing to qualified personnel.

This unit operates on 230V \~ 50Hz. If the unit is not used for a long period of time, remove the plug from the AC mains.

This unit must not be exposed to moisture or rain.

The power switch in this unit is mounted on the secondary circuit and does not disconnect the whole unit from the mains in OFF position.

Ensure all connections are properly made before operating the unit.

This unit should be positioned so that it is properly ventilated. Avoid placing it, for example, close to curtains, on the carpet or in a built-in installation such as a bookcase.

Do not expose this unit to direct sunlight or heat radiating sources.

Make sure the battery is inserted according to the proper polarity.

If the unit is not used for a long period of time (more than 1 month), remove battery from its compartment to avoid possible leaking.
2
CLR-2495P
AM/FM LED ALARM CLOCK RADIO WITH LCD PROJECTION
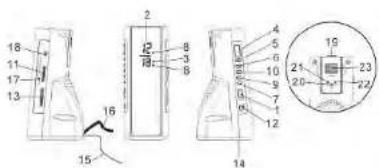
LOCATION OF CONTROLS
- ON/OFF/AUTO
- LED DISPLAY
- AUTO INDICATOR
- SNOOZE'SLEEP OFF
- ALARM SET/OFF
- RENTIM SET:OFF
- TIME SET
- SLEEP SET
- HOUR/MINUTE INDICATOR
- HOUR SET
- MINUTE SET
- VOLUME CONTROL / BUZZ
12 BAND SWITCH - TUNING CONTROL
- BATTERY BACK-UP
- FM ANTENNA WIR
- AC POWER CORD
- POINTER FOR TUNER
- PROJECTION ON/OFF
- PROJECTION
- TIME SET BUTTON FOR PROJECTION
- HOUR BUTTON FOR PROJECTION
- MINUTE BUTTON FOR PROJECTION
- FOCUS ADJUSTMENT

natural_image
Three horizontal bar designs with varying shades of gray and white, no text or symbols present.English English
POWERSUPPLY
This unit operates from a main supply of 230V \~ 50Hz. Connect the AC power cord to the AC household main outlet. Ensure that the voltage is as indicated on the rating plate on the rear of the unit.
Battery Back-up Power Failure Protection
This radio has a battery back up circuit that will keep the correct time and alarm settings in the event of a temporary power interruption. Install a 9-volt battery (type 6F 22/006P), not included, into the battery compartment located on the bottom of the unit.
Note: We recommend an alkaline battery for longer usable life. Change the battery every 9 to 12 months for best result and avoid possible battery leakage.
If power is temporarily interrupted the display will blink and the radio will not play. However, the battery back-up circuit will continue to maintain the clock and alarm settings. When power is restored the clock will display the correct time and alarm settings, and no adjustment is necessary.
Note: If power is interrupted and there is no battery in the compartment or the battery is exhausted. The time and alarm settings will be lost. When power is restored the clock will begin to flash indicating that the time and alarm settings must be corrected.
4
CLOCK
- Set the ON/OFF/AUTO switch (1) to 'OFF' connect the Main Cord to the power supply. The clock display will flash on and off indicating a power interruption and that the display time is incorrect.
- To set the correct time, press the TIME SET button (6) and MINUTE SET button (10), or HOUR SET button (9), together, until the correct time is displayed.
- Open the Clock Battery Compartment door and fit a 9V battery. The purpose of this battery is to store the information relating to alarm time. And to keep the clock functioning in the event of disconnection from the mains supply or power interruption. Should this occur. The clock will continue to keep time, but will not display.
NOTE: THE LED DIGITAL CLOCK AND THE PROJECTION CLOCK MUST BE SET SEPARATELY
TIME SETTING FOR PROJECTION
- Switch the projection switch to the 'ON' position.
- To preset the HOURS, press simultaneously the HOUR BUTTON (21) and the TIME BUTTON (20), keep them depressed until the hour digits to be preset are displayed.
- To preset the MINUTES, press simultaneously the MINUTE BUTTON (22) and the TIME BUTTON (20). Keep them depressed

natural_image
Three horizontal bar designs with varying shades of gray and white, no text or symbols present.English English
until the minute digits to be preset are displayed.
- Focus setting : To adjust the projection clock definition by turning the FOCUS (23) until the project's time is clearly shown on the ceiling or wall.
NOTE : PROJECTS TIME IMAGE ON THE CEILING OR WALL OF A DARKENED ROOM.
MAXIMUM PROJECTION DISTANCE IS 3-9 FEET.
TO SET OR RESET THE ALARM TIME
- Press and hold the ALARM SET/OFF button (5).
- While holding the ALARM SET/OFF button (5) press the HOUR SET button (9) and MINUTE SET button (10) to advance the time until the desired alarm time is shown on the display.
TO SETTHE ALARM TO WAKE TO RADIO
- Set the alarm time as previously instructed. Select a radio station and make sure the VOLUME is set as desired.
- Slide the ON/OFF/AUTO switch (1) to the AUTO position. When the actual time on the clock matches the selected preset alarm time, the unit automatically turns on for 1 hour and 59 minutes and then shuts off. The time of the porjection does not trigger the alarm.
6
Notes
- To shut off the alarm, press the ALARM SET/OFF button (5) once and alarm time will be reset for the next day. Slide the ON/OFF/AUTO switch (1) to the OFF position to turn off alarm and not set it for the next day.
- The radio can be temporarily turned off manually by pressing the SNOOZE button (4); the radio will turn back on automatically 9 minutes later.
TO SET THE ALARM TO WAKE TO BUZZER
- Set the alarm time as previously instructed. Slide the VOLUME / BUZZER (11) knob to the BUZZER position; a click is heard and the buzzer will now be activated.
- Slide the ON/OFF/AUTO switch (1) to the AUTO position. When the actual time matches the selected preset alarm time, the unit automatically turns on for 1 hour and 59 minutes and then shuts off.
TOSHUT ALARMOFF
- To shut off the alarm, press the ALARM SET/OFF button (5) once and alarm time will be reset for the next day. Slide the ON/OFF/AUTO switch (1) to the OFF position to turn off alarm and not set it for the next day.

natural_image
Three horizontal bar designs with varying shades of gray and white, no text or symbols present.English English
SNOOZEFUNCTION
- The alarm can be temporarily turned off manually by pressing the SNOOZE button (4); the buzzer will turn back on automatically 9 minutes later.
SLEEP
- Set the ON/OFF/AUTO switch (1) to 'OFF' or 'AUTO'.
- Press the Sleep Set button (7) and Minute Set button (10) together. The sleep time will be displayed and count down from 59 minutes to zero. Release the buttons when the required sleep time is dispalyed.
- The radio will now operate until the sleep time has elapsed or may be switched off by pressing the Snooze/Sleep Off button (4).
RADIO
The AM bands use an internal directional serial. Rotate the radio for best reception.
For best FM reception ensure that the FM cord antenna is completely uncoiled and extended.
- Set the ON/OFF/AUTO switch (1) to 'ON' position
- Set the Wave band switch (12) to the required wave band.
- Adjust the Tuning Control (13) to select the desired station.
- Adjust the Volume Control (11) is required.
8
- To turn off the radio, set the ON/OFF/AUTO switch (1) to 'OFF' position. If the radio does not switch off this may be caused by inadvertent operation of the Sleep Set button (7), to cancel this press the Snooze/Sleep Off button (4) once.
SPECIFICATIONS
Frequency Range : AM 530 - 1600 kHz
FM 87.5 - 108 MHz
Output Power : 300 mW
Speaker Impedance : 8 ohm
Battery Backup : 9V battery (for clock)
Power Source : AC230V \~ 50 Hz, 5 Watts
Specifications subject to change without notice.

Deutsch De

SICHERHEITSHINWEISE

natural_image
Three horizontal bar designs with varying shades of gray and white, no text or symbols present.Deutsch Deutsch
SPANNUNGSVERSORGUNG
natural_image
Three horizontal grayscale color swatches with a central crosshair (no text or symbols)Deutsch Deutsch
natural_image
Three horizontal bar designs with varying shades of gray and white, no text or symbols present.Deutsch Deuts5c
natural_image
Pure graphical representation of a color bar with no text or symbolsFrançais Fr nça
ATTENTION


230v\~


-
言
natural_image
Three horizontal grayscale color swatches with a central crosshair (no text or symbols)Français França
natural_image
Pure graphical representation of a color bar and a crosshair symbol without any text or labelsFrançais Fr aça
VEILLE
natural_image
Three horizontal bar designs with varying shades of gray and white, no text or symbols present.Italiano Ita

ATTENZIONE


natural_image
Three horizontal grayscale color swatches with a central crosshair (no text or symbols)Italiano Ita
:25
natural_image
Pure graphical representation of a color bar and a crosshair symbol without any text or labelsItaliano Ita
abib
natural_image
Pure graphical representation of a color bar with no text or symbolsEspañol Es

ATENCIÓN

natural_image
Three horizontal grayscale color swatches with a central crosshair (no text or symbols)Español Es

ALIMENTACIÓN
natural_image
Pure graphical representation of a color bar and a crosshair symbol without any text or labelsEspañol Es año
natural_image
Pure graphical representation of a color bar and a crosshair symbol without any text or labelsEspañol Es a##o
natural_image
Three horizontal grayscale color swatches with a central crosshair (no text or symbols)Português Porta
natural_image
Two horizontal grayscale color swatches with a central starburst symbol (no text or symbols)Português Porto
natural_image
Three horizontal grayscale color swatches with a central crosshair (no text or symbols)Português P
470
DEFINIR O ALARME PARA DESPERTAR COM O ZUMBIDO
natural_image
Pure graphical representation of a color bar and a crosshair symbol without any text or labelsPortuguês Porto

- CLR-2495P
- English English
- WARNINGS
- 2
- AM/FM LED ALARM CLOCK RADIO WITH LCD PROJECTION
- LOCATION OF CONTROLS
- POWERSUPPLY
- Battery Back-up Power Failure Protection
- 4
- CLOCK
- NOTE: THE LED DIGITAL CLOCK AND THE PROJECTION CLOCK MUST BE SET SEPARATELY
- TIME SETTING FOR PROJECTION
- TO SET OR RESET THE ALARM TIME
- TO SETTHE ALARM TO WAKE TO RADIO
- 6
- TO SET THE ALARM TO WAKE TO BUZZER
- TOSHUT ALARMOFF
- SNOOZEFUNCTION
- SLEEP
- RADIO
- 8
- SPECIFICATIONS
- Deutsch De
- SICHERHEITSHINWEISE
- Deutsch Deutsch
- SPANNUNGSVERSORGUNG
- Deutsch Deuts5c
- Français Fr nça
- ATTENTION
- Français França
- Français Fr aça
- VEILLE
- Italiano Ita
- ATTENZIONE
- :25
- abib
- Español Es
- ATENCIÓN
- ALIMENTACIÓN
- Español Es año
- Español Es a##o
- Português Porta
- Português Porto
- Português P
- DEFINIR O ALARME PARA DESPERTAR COM O ZUMBIDO
Brand : ROADSTAR
Model : CLR2495P
Category : Radio