
332836 - Vacuum Cleaner PRINCESS - Free user manual and instructions
Find the device manual for free 332836 PRINCESS in PDF.
| Brand | Princess |
| Model | 332836 (Black Rhino Cyclo Cleaner) |
| Type | Bagless Cyclonic Vacuum Cleaner |
| Color | Black (Black Rhino) |
| Supply Voltage | 220-240 V ~ |
| Frequency | 50/60 Hz |
| Main Filter | Washable HEPA filter (dishwasher safe) |
| Air Outlet Filter | Replaceable outlet filter (non-washable) |
| Dust Container Capacity | Approx. 2 L (estimate) |
| Included Accessories | Combined suction nozzle, crevice nozzle, small nozzle, parquet brush |
| Suction Power Adjustment | Yes, by rotary knob |
| Adjustable Air Inlet on Handle | Yes (air slide) |
| Telescopic Tube | Yes, adjustable length |
| Cord Rewinder | Automatic with button |
| Full Container Indicator | Indicator light |
| Usage | Domestic |
| Cleaning | Emptying container, cleaning HEPA filter, replacing outlet filter |
| Safety | Manual shut-off in case of overheating; do not vacuum liquids or burning objects |
| Storage | Telescopic tube holder under the appliance |
| Warranty | Not specified |
Frequently Asked Questions - 332836 PRINCESS
User questions about 332836 PRINCESS
0 question about this device. Answer the ones you know or ask your own.
Ask a new question about this device
Download the instructions for your Vacuum Cleaner in PDF format for free! Find your manual 332836 - PRINCESS and take your electronic device back in hand. On this page are published all the documents necessary for the use of your device. 332836 by PRINCESS.
USER MANUAL 332836 PRINCESS
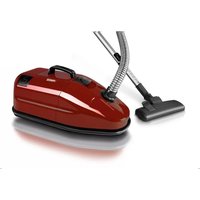
This powerful, compact vacuum cleaner is equipped with a complete range of useful accessories, so that you can thoroughly clean your house. This vacuum cleaner has a removable, easy-to-empty dust collector, so you no longer need to use a dust bag!
The vacuum cleaner is available in two different models:
- Red Panda Cyclo Cleaner (article number 332835). This model comes with a combi nozzle, a crevice tool and a small nozzle.
- Black Rhino Cyclo Cleaner (article number 332836). This model comes with a combi nozzle, a crevice tool, a small nozzle and a parquet brush.

Operation and controls
See figures 1, 2, 8, 9 and 10.
The appliance includes the following components:
1 V a c uum cleaner hose handle locking button
2 V a c uum cleaner hose handle
3 Air supply control slide
4 V a c uum cleaner hose
5 Front castor
6 Slot for the telescopic tube
7 Parquet brush
8 C r e vice tool
9 Small nozzle
10 Power cord with plug
11 Combi nozzle
12 Switch for the combi nozzle with a brush
13 Switch for the combi nozzle without a brush
14 Rear castor
15 Vacuum cleaner handle
16 Cord rewind button
17 On/Off switch
18 Button for adjusting the suction force
19 Telescopic tube holder
20 Telescopic tube locking button
21 Telescopic tube
22 Vacuum cleaner hose attachment piece
23 Vacuum cleaner hose connection
24 "Dust collector full" indicator
25 Dust collector
26 Dust collector base
27 Dust collector base unlocking button
28 Dust collector cover
29 Dust collector handle/unlocking device
30 Filter housing
31 HEPA filter
32 Outlet filter grille
33 Outlet filter holder
34 Outlet filter
Before using for the first time
- Read and follow these instructions. Keep this instruction manual in a safe place.
- Make sure the mains voltage is the same as the voltage on the appliance's type plate.
1 Remove all the packaging materials and stickers from the appliance.
2 Attach the vacuum cleaner hose to the appliance as follows (see figure 2). Slide the hose attachment piece into the connection on the appliance. The lips on the attachment piece must fit into the grooves in the connection. Secure the attachment piece by rotating it clockwise.
3 Attach the vacuum cleaner hose handle to the telescopic tube as follows (see figure 3). Press the locking button on the handle and slide the end of the handle into the end of the telescopic tube. Make sure the locking button clicks into the opening in the tube. You
can remove the tube from the handle by pressing the locking button and pulling the handle out of the tube.
Use
Always make sure all the filters and the dust collector are correctly fitted before using the appliance. Damaged or incorrectly fitted filters may cause damage to the appliance.
Preparations
1 Adjust the telescopic tube to the required length (see figure 4). Push the locking button in the direction indicated by the arrow on the button. Keep the locking button pressed and extend or retract the telescopic tube. Release the locking button to lock the telescopic tube to the desired length.
2 Fit the combi nozzle or one of the other accessories to the end of the tube. You can also fit the combi nozzle or one of the other accessories directly to the end of vacuum cleaner hose handle. The combi nozzle has two settings: with a brush for vacuuming hard floors (parquet, tiles, linoleum, etc.) and without a brush for vacuuming soft floors (carpet, etc.). Press the button on the combi nozzle to either vacuum with a brush (m) or without a brush () (see figure 5).
Vacuuming
1 The power cord has a yellow mark and a red mark on it (see figure 6). Extend the power cord beyond the yellow mark. The red mark indicates the end of the power cord. Never extend the cord beyond the red mark. This could damage the power cord.
2 Insert the plug into a plug socket and press the On/Off switch. Press the On/Off switch again to turn the appliance off.
3 Use the handle on the vacuum cleaner hose to move the appliance back and forth whilst vacuuming. You can lift the
appliance using the vacuum cleaner's handle. Note! Never lift the vacuum cleaner using the dust collector's handle!
4 The suction force can be adjusted whilst vacuuming using the button that adjusts the suction force. The suction force can also be temporarily reduced by opening the air supply control slide on the vacuum cleaner hose handle.
5 Press the On/Off button to turn the appliance off.
Accessories
Besides the combi nozzle for cleaning large surfaces, there are also two (Red Panda Cyclone Cleaner) or three (Black Rhino Cyclone Cleaner) accessories for cleaning smaller and special surfaces:
- A crevice tool, to clean radiators, window frames, crevices, small openings, etc.
- A small nozzle, to clean delicate or irregular surfaces, furniture, Venetian blinds, etc.
- A parquet brush, to clean parquet floors (only available with the Black Rhino Cyclone).
Storing the appliance
1 Remove the plug from the plug socket.
2 Lightly hold the end of the power cord. Press the cord rewind button and allow the cord to gently slide through your fingers back into the appliance. Note! You must guide the cord whilst it is rewinding. If you do not do so, the cord may become tangled or the plug may strike the back of the appliance. This can damage the appliance or the power cord.
3 Stand the vacuum cleaner upright. Fully retract the telescopic tube. A slot for the telescopic tube is located at the bottom of the vacuum cleaner, next to the front castor. Slide the holder on the telescopic tube into the slot (see figure 7). This avoids the need to dismantle the vacuum cleaner after use; you can store the assembled appliance and
retrieve it again quickly when you need it.

Maintenance and cleaning
- Clean the appliance thoroughly after use.
- Make sure the plug has been removed from the plug socket before cleaning the appliance.
- Make sure no moisture comes into contact with the appliance's electrical parts.
- Never immerse the appliance, the power cord or the plug in water or other liquids.
- Never use aggressive or scouring cleaning products or sharp objects (such as a knife or a hard brush) to clean the appliance.
Cleaning the appliance
1 Remove the plug from the plug socket.
2 Clean the exterior of all the components with a damp cloth. Only use cleaning products that are suitable for plastic.
3 Dry the appliance and the accessories thoroughly before storing them.
4 Over the course of time, dust and dirt can accumulate around the wheel axles, thereby preventing the wheels from turning easily. They should, therefore, be kept clean.
Emptying the dust collector
See figure 8.
The "Dust collector full" indicator indicates when the dust collector must be emptied.
1 Remove the plug from the plug socket.
2 Remove the dust collector by lifting the dust collector's handle and taking out the dust collector.
3 Hold the dust collector above a rubbish bin and press the dust collector base unlocking button.
4 Make sure the dust collector is completely empty. If necessary, shake the dust collector to remove all the waste.
5 Close the base of the dust collector by clicking it into place.
6 Place the dust collector back into the appliance. Push the handle of the dust collector's cover down as far as possible. This will lock the dust collector in the appliance.
Replacing the HEPA filter
See figure 9.
Regularly check whether the HEPA filter is blocked. If this is the case, clean the filter or replace it with a new filter.
1 Remove the plug from the plug socket.
2 Remove the dust collector by lifting the dust collector's handle and taking out the dust collector.
3 Remove the waste from the dust collector as described in 'Emptying the dust collector'.
4 Remove the cover from the dust collector (see figure 9A). Hold the cover in one hand and use your other hand to unscrew the dust collector by rotating it clockwise. The arrow on the cover will now be aligned with the arrow with the picture on the dust collector. Remove the cover from the dust collector.
5 Remove the filter tube and the filter from the dust collector's cover (see figure 9B). Hold the cover in one hand
and the end of the filter in your other hand. Unscrew the filter tube and the filter by rotating it anticlockwise. The arrow on the bottom of the cover will now be aligned with the arrow with the picture on the filter tube. Remove the cover from the filter tube.
6 Remove the filter tube from the dust filter (see figure 9C). Hold the filter tube in one hand and hold the end of the filter in the other hand. Unscrew the filter tube by rotating it anticlockwise. The arrow on the filter will now be aligned with the arrow with the picture on the filter tube.
7 Clean the filter or replace it with a new filter. The filter can be cleaned in a dishwasher. Allow the filter to dry thoroughly before placing it back in the appliance.
8 Put the filter, the filter tube and the dust collector back together.
9 Place the cover back on the dust collector.
10 Place the dust collector back in the appliance and lower the dust collector handle as far as possible. This will lock the dust collector in the appliance.
Replacing the outlet filter
See figure 10.
Replace the outlet filter when it becomes blocked. You cannot wash or rinse this filter.
1 Remove the plug from the plug socket.
2 Remove the grille at the back by pushing the unlocking button downwards and tilting the grille.
3 Remove the holder and the outlet filter from the appliance.
4 Remove the outlet filter from the holder and fit a new filter. The soft side of the filter must face the holder and the rough side must face the inside.
5 Place the holder and the new filter in the appliance.
6 Place the grille back in the appliance and click it into place.

Safety
General information
- Read and follow these instructions. Keep this instruction manual in a safe place.
- Only use this appliance in accordance with these instructions.
- Only use this appliance for domestic purposes.
- The use of this appliance by children or persons with a physical, sensory, mental or motor disability or with a lack of the necessary knowledge and experience may cause a hazard. Persons responsible for the safety of such people must give explicit instructions or supervise the use of the appliance.
- Keep the appliance out of the reach of children and persons who may not be able to operate it safely.
- Repairs may only be carried out by a qualified service technician. Never try to repair the appliance yourself.
- Only use accessories recommended by the supplier. The use of other accessories may result in damage to the appliance, thereby creating a hazard for the user.
Heat and electricity
- Before use, verify that the mains voltage is the same as that indicated on the appliance's type plate.
Always remove the plug from the plug socket when the appliance is not going to be used for a long period of time. - Always remove the plug from the plug socket by pulling the plug, not the power cord.
- Never pull the power cord to move the appliance.
- Do not use the appliance if the power cord or the appliance is damaged. Have a damaged power cord replaced by a qualified electrician.
- Make sure the appliance, the power cord and the plug do not come into contact with heat sources, such as a hot hob or a naked flame.
- Make sure the appliance, the power cord and the plug do not come into contact with water or chemicals.
- Do not touch the appliance if it has fallen into water. Remove the plug from the plug socket immediately. Do not use the appliance again..
- Make sure the air vents are not covered or blocked.
During use
- Never use the appliance outdoors.
- Never use the appliance in a humid room.
- Make sure your hands are dry before you touch the appliance, the power cord or the plug.
-
Switch off the appliance and/or remove the plug from the plug socket in the event of a malfunction during use, before cleaning the appliance and before storing it after use.
-
The power cord has a yellow mark and a red mark. Extend the power cord beyond the yellow mark.
The red mark indicates the end of the power cord. Never pull out the power cord beyond the red mark. This could damage the power cord. - Guide the power cord whilst it is being rewound, otherwise the cord could become tangled or the plug could strike the back of the appliance. This may damage the appliance or the power cord.
- Never use the appliance to vacuum smouldering or burning objects, pieces of broken glass or other sharp objects, pieces of plaster, cement, stone, soot and similar objects, or liquids and damp waste. These objects could cause serious damage to the appliance and the filter system and make the appliance unsafe to use.
- Do not use the vacuum cleaner to vacuum wet rugs or carpets.
- Never insert objects into the outlet openings.
- Make sure the suction and outlet openings are clear and the filters are not blocked. Blockages will cause the appliance to overheat. Switch off the vacuum cleaner if it overheats! Once you have rectified the problem, wait 20 to 30 minutes to allow the vacuum cleaner to cool down. The vacuum cleaner will then be ready for use again.
- Keep the nozzle, the end of the telescopic tube and the end of the vacuum cleaner hose away from your body when the vacuum cleaner is turned on. This could cause an injury, for example, to the eyes or ears.
- Never roll the appliance over the power cord.
U.K. WIRING INSTRUCTIONS
The wires in the mains lead are coloured in accordance with the following code:
As the colours of the wire in the mains lead of this appliance may not correspond with the colour markings identifying the terminals on your plug, proceed as follows:
- The wire which is coloured BLUE must be connected to the terminal which is marked with the letter N or coloured black.
- The wire which is coloured BROWN must be connected to the terminal which is marked with the letter L or coloured red.
WARNING: ON NO ACCOUNT SHOULD EITHER THE LIVE OR NEUTRAL WIRES BE CONNECTED TO THE EARTH TERMINAL
With this appliance, if a 13A plug is used a 13A fuse should be fitted. If any other type of plug is used, a 15A fuse must be fitted either in the plug or at the distribution board.

The environment
Dispose of packaging material, such as plastic and boxes, in the appropriate waste containers.
If you wish to dispose of the appliance whilst it still works properly or can be easily repaired, then ensure that the appliance is recycled.
When the appliance reaches the end of its useful life, it should be disposed of in a
responsible manner, thereby ensuring the reuse of the appliance or its parts. Do not dispose of the appliance with normal household waste, but hand it over to a recycling collection point. Contact your local authority for information about available disposal and collection systems in your area.

Généralités
Udskifting at HEPA-filter
Se fig 9.
Veja as figuras 1, 2, 8, 9 e 10.
4.251 cals 2018 Jdcll j.7V
a_i Q b = 1,2,3,4,5,6
4yj100000000000000000000000000000000000000
zai jiali zao.
HEPA
iiaai jao ic
jaiial jao Jala.
iiaai 1
0
- gai li yu li 10 ai
J 1
= a0 + b0t
j_4 = 27
Jaaalall, aaiill 1a aaii
[\therefore {k}_{2} = \frac{4}{3}]
jglal yil jyll uill gblj
a
jglly jalil Jgall
1
Jgall gall jall
a 1
aclwll jlaol
aikall g jie 120gall aiaai l.
wiil cai iaii yai jai jaiyiyaiy
aiial ayaiaiyaiyaiay
aiiyiyaiyaiyaiy
alii ayaiyaiyaiy
aiiyaiyaiyaiy
aiiyaiyaiyaiy
aiiyaiyaiyaiy
aiiyaiyaiyaiy
aiiyaiyaiyaiy
aiiyaiyaiyaiy
aiiyaiyaiyaiy
aiiyaiyaiyaiy
aiiyaiyaiyaiy
aiiyaiyaiyaiy
aiiyaiyaiyaiy
aiiyail ayaiyaiy
aiiyail ayaiyaiy
aiiyail ayaiyaiy
aiiyail ayaiyaiy
aiiyail ayaiyaiy
aiiyail ayaiyaiy
aiiyail ayaiyaiy
aiiyail ayaiyaiy
aiiyail ayaiyaiy
aiiyail ayaiyaiy
aiiyail ayaiyaiy
aiiyail ayal y
aikall ai
#
(Red Panda Cyclone Cleaner) Black Rhino Cyclone) Black Rhino (Cleaner
. (Black Rhino Cyclone
j
aiaaiiaiiaai jypa .1
. 4 aiallll aluaiiaaiuaiypa .
juiyaiyaiyaiyaiyaiyaiyaiyaiyaiyaiyaiyaiyaiyaiyaiyaiyaiyaiyaiyaiyaiyaiyaiyaiyaiyaiyaiyaiyaiyaiyaiyaiyaiyaiyaiyaiyaiyaiyaiyaiyaiyaiyaiyaiyaiyaiyaiyaiyaiyaiyAI yaiyaiyaiyaiyaiyaiyaiyaiyaiyaiyaiyaiyaiyaiyaiyaiyaiyaiyaiyaiyaiyaiyaiyaiyaiyaiyaiyaiyaiyaiyaiyaiyaiyaiyaiyaiyaiyai
5i. 1jlll BgBilai g aiaaiai jnag
aieae nnnn nn nnnn nnnn nnnn nnnn nnnn nnnn nnnn nnnn nnnn nnnn nnnn nnnn nnnn nnnn nnnn nnnn nnnn nnnn nnnn nnnn nnnn nnnn nnnn nnnn nnnn nnnn nnnn nnnn nnnn nnnn nnnn nnnn nnnn nnnn nnne
1
yj 1000000000000000000000000000000000000000000000000000000000000
#
gall Jgall 1
Jgall jj gJg.
Jgall jj gJg.
Jgall jj gJg.
Jgall jj gJg.
Jgall jj gJg.
Jgall jj gJg.
Jgall jj gJg.
Jgall jj gJg.
Jgall jj gJg.
Jgall jj gJg.
Jgall jj gJg
wisi
aIbll aIc eJaa 10xg Jaa 10xg
2aLo aIaIbll aIw ypa. (Jk)
aIgai IeJaaia 10axy .eJaaia 10axy
2aLo aIaIbll aIw ydaip .aIbll aIw
aIu cIy Jaa 10xg dJaa 10axg
aIbll
lc biai g Jaaia 10xg Jaaia 10xg
.(Jia/Je)On/Off Jia jia 10
(aj/Jj)On/Off Jj jia 10
.
.
4j510
1
a yj 10000000000000000000000000000000
10
a5 all jy yj yj 1000
gaaa aee
Lg150
.
Jckyj jia Jaa jai c0a cbe ia
y 1
.
HEPA
jia jia jia jia jia jia jia jia jia
eall gao jolal no adial
Jdall 1 Jn nn nnnn nn nn nn nn nn nn nn nn nn nn nn nn nn nn nn nn nn nn nn nn nn nn nn nn nn nn nn nn nn nn nn nn nn nn nn nn nn nn nn nn nn nn nn nn nn nn nn nn nn nn nn nn nn nn nn nn nn nn nn nn nn nn nn nn nn nn nn nn nn nn nn nn nn nn nn
111 111 111 111 111
aalee la gai tlll alu aal
.
aalbll aayg j 1jaaaiy
aalee lae aell
1 1
a
y 1g aol
1g jg jg jgi g
ailll 1s jgai
Cuiis jyjg jzj 2
oogssal 1j jie bai jia jia jai
g j 1 g j s j 1 1
Clls gjg jglg jg cui
aaiy aiae bciie g jilg qai
jgl 5ybi jbi g ciis oie
jglg jglg jglg jglg jglg
.
blwgl j lwl wis aical p
山
Jaiiai Caiia 1
a aalaae aee aa aae aalaa Laga
a 1yjbj jjgl jgljnl p
J 1
ailll lss sss ssas
jai jai aal 1
a 11
jagao jg jgl jgl 1aal aal
aaii aaii
gi aIalil slw gi jlgil juaill sia ssti
jglg 1a
5yjia 1aai jz
aillil lllng jgljll Juaai pse 0 siti
gglss glg sglslally g
y.1yaaal aiaa 1yaaai ai jy
.5jdi jla jlg21 piai
aagglil ciaia jaiui g aayi i 1
p1
jglg jgs jglg13a
aai jia jiaai aai iiai
aai
a 111j g/g jgjj
a
jg jgl 1 1
p121
gag g aal gag g aall b
aikai jiai iie aang jiaikai g
a
i 1
aallll jgjgl 12i

a 1
Aaiiall Caiagai Cui gla
j 13i jgai i aia oio

- Operation and controls
- Before using for the first time
- Use
- Preparations
- Vacuuming
- Accessories
- Storing the appliance
- Maintenance and cleaning
- Cleaning the appliance
- Emptying the dust collector
- Replacing the HEPA filter
- Replacing the outlet filter
- Safety
- General information
- Heat and electricity
- During use
- U.K. WIRING INSTRUCTIONS
- The environment
- Généralités
- Udskifting at HEPA-filter
- 0
- #
- j
- 1
- wisi
- HEPA
Brand : PRINCESS
Model : 332836
Category : Vacuum Cleaner