PDPS39 - Pregnant PIONEER - Free user manual and instructions
Find the device manual for free PDPS39 PIONEER in PDF.
User questions about PDPS39 PIONEER
0 question about this device. Answer the ones you know or ask your own.
Ask a new question about this device
Download the instructions for your Pregnant in PDF format for free! Find your manual PDPS39 - PIONEER and take your electronic device back in hand. On this page are published all the documents necessary for the use of your device. PDPS39 by PIONEER.
USER MANUAL PDPS39 PIONEER
Thank you for buying this Pioneer product.
Please read through these operating instructions before using your speaker system so you will know how to make the most of its performance. After you have finished reading the instructions, put them away in a safe place for future reference.
WARNING:
Handling the power cord on this product or cords associated with accessories sold with the product will expose you to lead, a chemical known to the State of California and other governmental entities to cause cancer and birth defects or other reproductive harm.
Wash hands after handling.
CAUTION
This product is designed exclusively for use with the Pioneer Plasma Display. For more information on compatibility, please consult with your nearest Pioneer authorized dealer or service center.
BEFORE USE
The nominal impedance of this speaker system is 8 ohms.
In order to prevent damage to the speaker system resulting from input overload, please observe the following precautions:
- Do not supply power to the speaker system in excess of the maximum permissible input. This can result in damage or a possible fire hazard.
- When connecting or disconnecting pin-plugs, be sure that amplifier power is OFF.
- When using a graphic equalizer to emphasize loud sounds of a high frequency range, do not use excessive amplifier volume.
Do not force a low-powered amplifier to produce a loud volume of sound (the amplifier's harmonic distortion will be increased, and you may damage the speaker).
- Please handle the speakers with sufficient care, as the grille net and the cabinet can become damaged or broken when they are subjected to strong external impacts.
- Placing a CRT computer screen or CRT monitor near to the speakers may result in interference or color distortion. If this happens, distance the monitor from the speakers.
Installation
- Consult your dealer if you encounter any difficulties with this installation.
- Pioneer is not liable for any damage resulting from improper installation, improper use, modification, or natural disasters.
CHECKING THE ACCESSORIES
■Speaker Cable·2

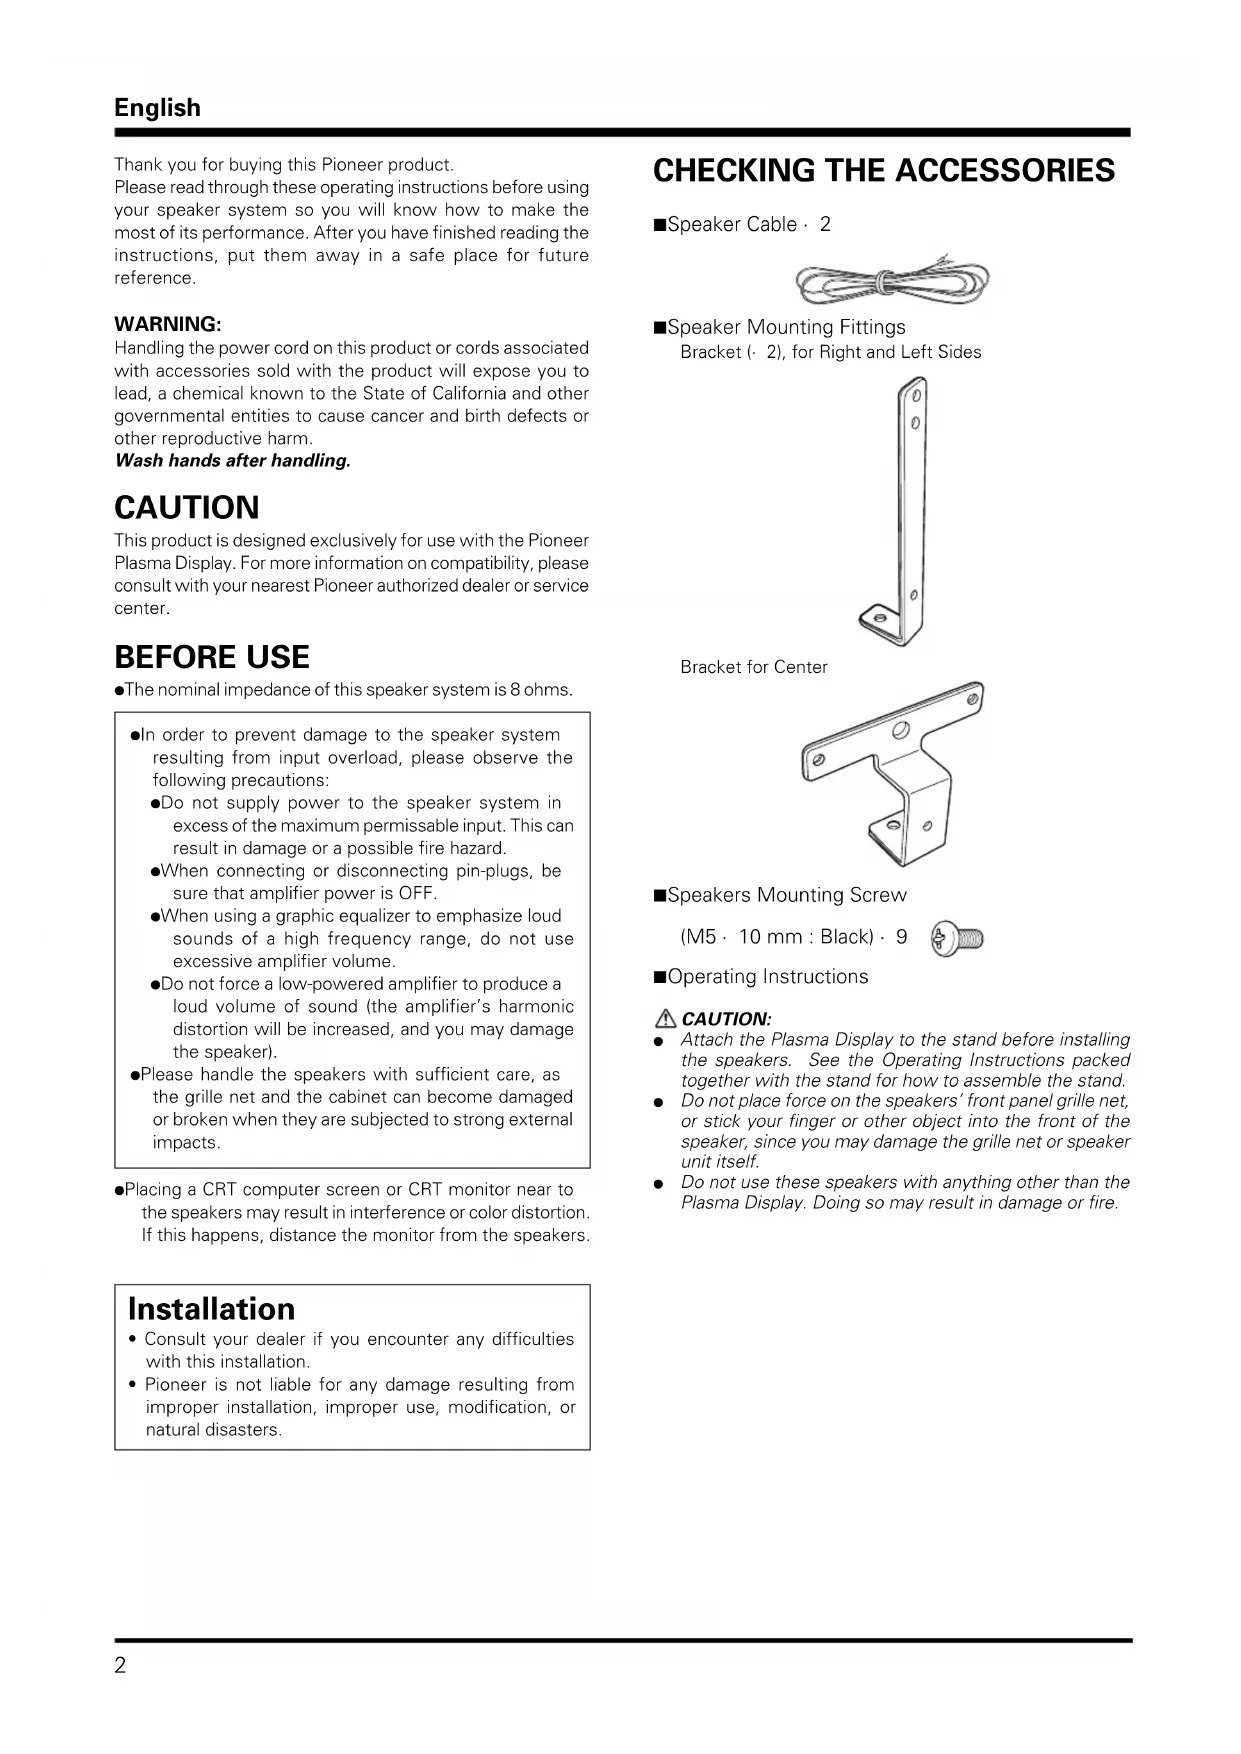
■Speaker Mounting Fittings Bracket (2), for Right and Left Sides
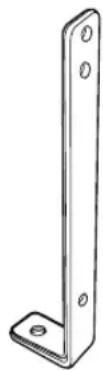
Bracket for Center
■Speakers Mounting Screw
(M5·10 mm:Black)·9

■Operating Instructions
CAUTION:
- Attach the Plasma Display to the stand before installing the speakers. See the Operating Instructions packed together with the stand for how to assemble the stand.
- Do not place force on the speakers' front panel grille net, or stick your finger or other object into the front of the speaker, since you may damage the grille net or speaker unit itself.
- Do not use these speakers with anything other than the Plasma Display. Doing so may result in damage or fire.
INSTALLATION ON THE PLASMA DISPLAY
Perform installation according to the following steps 1 to 5.
NOTE:
Before attaching the speaker, please attach the PDK-TS12 table top stand (or another Pioneer Plasma Display stand) to the Plasma Display unit.
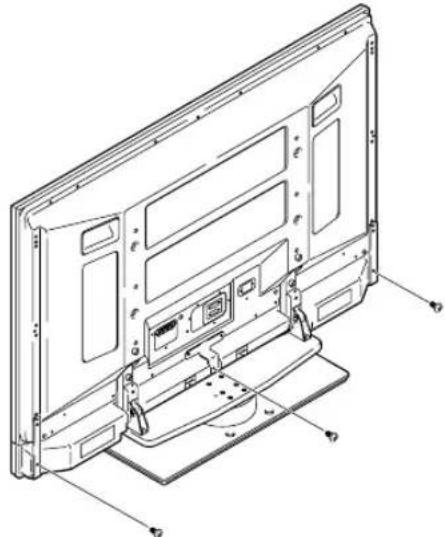
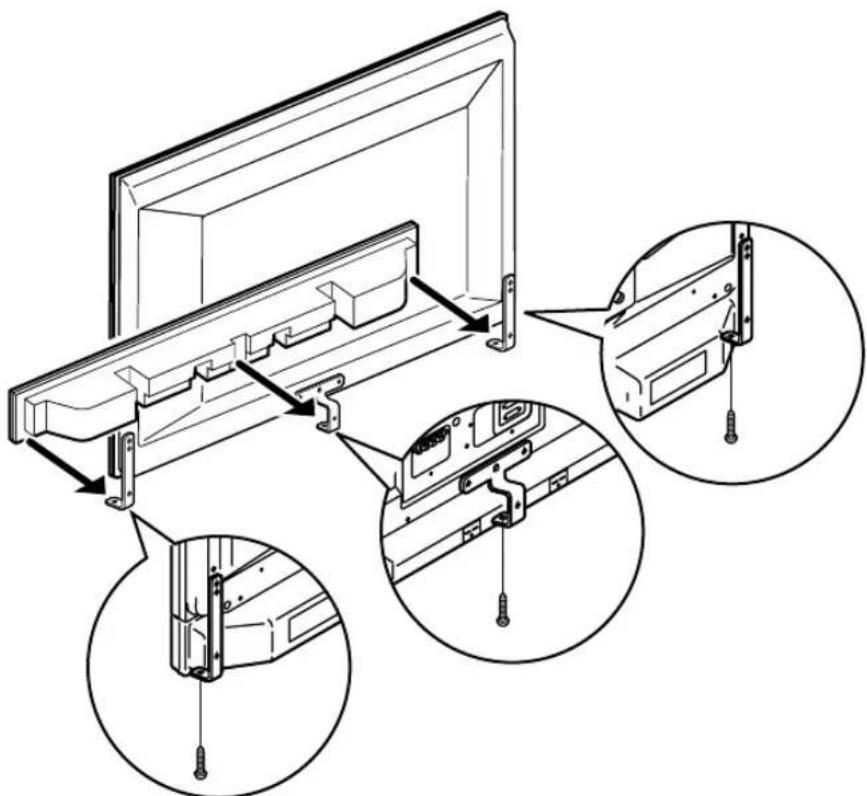
1 Attach the speaker mounting fittings to the rear of the Plasma Display.
① Attach the fittings for right and left sides to the Plasma Display as shown. The diagram below depicts the right side of the Plasma Display. Tighten the upper screws first and then tighten the lower screws.

② Attach the center fitting to the Plasma Display as shown. Tighten the right side screw first and then tighten the left side screw.
Note:
It may be necessary to use a short screwdriver depending on the stand used.
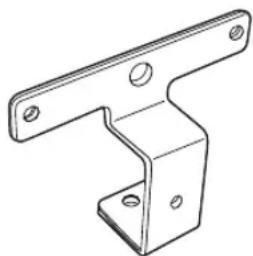
2 Connect the supplied speaker cables to the back of the Plasma Display.
See the following page (P.5) for more detailed information on connecting speaker cables.
3 Connect the other end of the speaker cables to the speakers.
See the following page (P.5) for more detailed information on connecting speaker cables.
4 Mount the speakers onto the speaker mounting fittings.
To avoid damaging the stand, cover it with the protective wrapping that covered the stand.
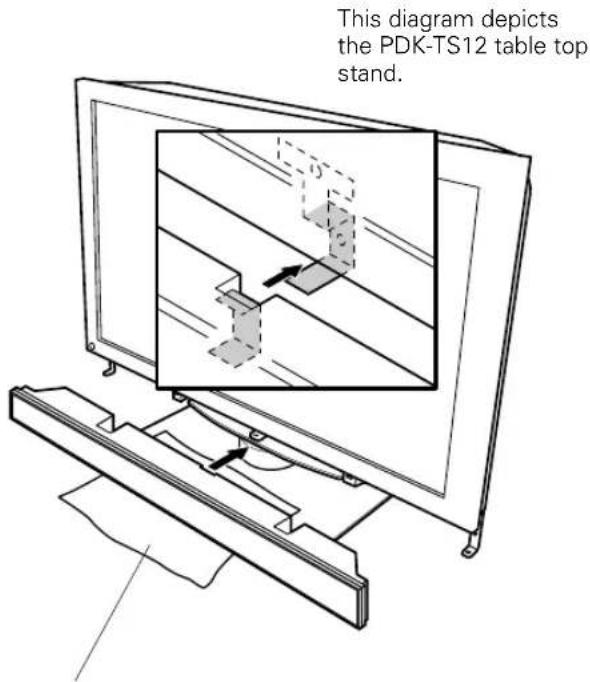
Protective wrapping (the PDK-TS12 table top stand only) Carefully, mount the speaker onto the mounting fittings.
Fix the speaker to the mounting fittings.
Use the supplied screws to fix the speaker to the mounting fittings as shown below (3 locations).
This illustration shows the PDK-TS12 table top stand.
NOTE: Do not use the screw hole located on the underside of the mounting fittings to fix the speaker.
When using the hung on wall unit:
First install the Plasma Display on the wall with only the speaker mounting fittings and speaker cable attached to the display, and then attach the speaker.
① Connect the speaker cable to the speaker terminal.
② Place the speaker on the speaker mounting fittings and then tighten from below using the screws provided (3 locations).

CAUTION
If you want to move the Plasma Display unit, make sure that you remove the speaker first. In addition, do not move the display holding on to the mounting fittings. This can result in injury or damage to the unit.
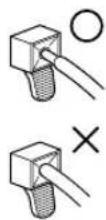
CONNECTION TO A PLASMA DISPLAY CONNECTING THE SPEAKERS
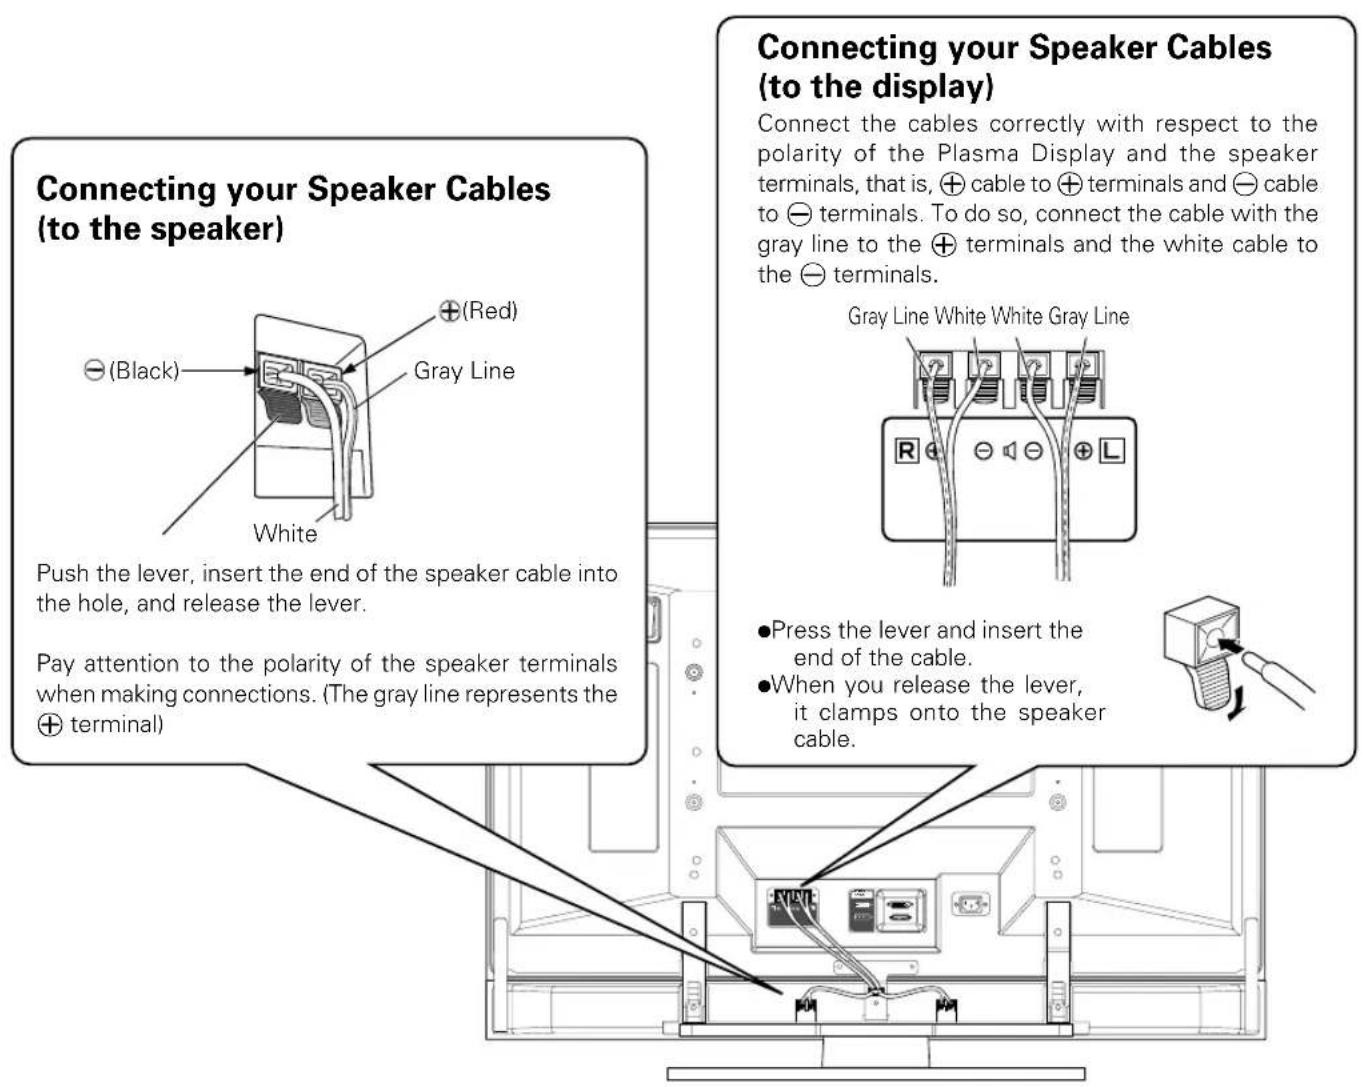
Warning
If you insert the speaker cable too far so that the insulation is touching the speaker terminal, you may not get any sound.
HOW TO ROUTE CABLES
Bead bands are included with the Plasma Display.
For tidying up your speaker cables, use the bead bands when needed.
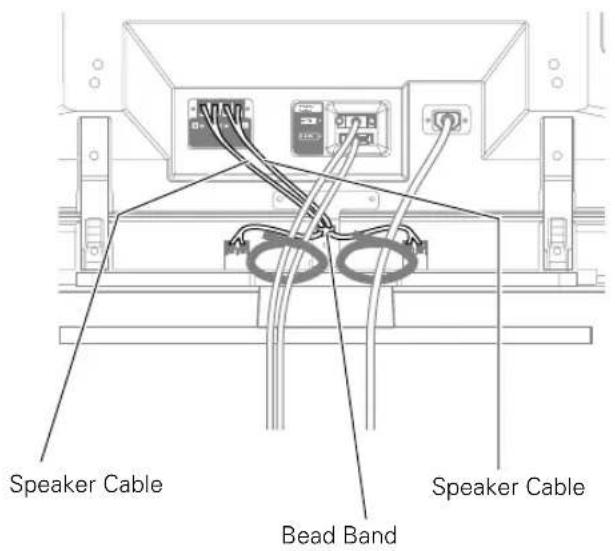
Rear of Display
CABINET MAINTENANCE
- Use a polishing cloth or dry cloth to wipe off dust and dirt.
- When the cabinet is very dirty, wipe with a soft cloth moistened with water-diluted cleanser; then wipe again with a dry cloth. Do not use furniture wax or cleaners. They may damage the surface of the cabinet.
- Never use thinner, benzine, insecticide sprays and other chemicals on or near the cabinets, since these will corrode the surfaces.
- When a chemical cloth is used, read the cautions for the chemical cloth carefully.
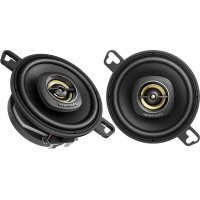
SPECIFICATIONS
Cabinet: Bass-reflex type
Used speakers (two-way system):
Woofer (for low tones) 4.8·13 cm cone type
Tweeter (for high tones) 2.5 cm semidome type
Nominal impedance 8Ω
Frequency Range. 70 to 30,000 Hz
Sensitivity (1w, 1m) 81 dB
Permissible input :
Max. input 13 W
Rated input 4W
Crossover frequency 3 kHz
External Dimensions 1076 (W) · 83 (H) · 92 (D) mm
Weight 2.7 kg
Accessory parts (for 2 speakers)
Speaker cable·2
Bracket
Side·2
Center·1
Screw (M5·10)·9
Operating Instructions - 1
NOTE:
Specifications and design subject to possible modification without notice, due to improvements.
IMPORTANT NOTICE - RECORD THE MODEL NUMBER AND SERIAL NUMBERS OF THIS EQUIPMENT BELOW. THE NUMBERS ARE ON THE REAR.
MODEL NO.
SERIAL NO.
KEEP THESE NUMBERS FOR FUTURE USE.
D1-4-2-6-2 En

If you want to dispose this product, do not mix it with general household waste. There is a separate collection system for used electronic products in accordance with legislation that requires proper treatment, recovery and recycling.
Private households in the 25 member states of the EU, in Switzerland and Norway may return their used electronic products free of charge to designated collection facilities or to a retailer (if you purchase a similar new one).
For countries not mentioned above, please contact your local authorities for the correct method of disposal.
By doing so you will ensure that your disposed product undergoes the necessary treatment, recovery and recycling and thus prevent potential negative effects on the environment and human health.
Published by Pioneer Corporation.
Copyright © 2005 Pioneer Corporation.
All rights reserved.


Dear Customer:
Selecting fine audio equipment such as the unit you've just purchased is only the start of your musical enjoyment. Now it's time to consider how you can maximize the fun and excitement your equipment offers. This manufacturer and the Electronic Industries Association's Consumer Electronics Group want you to get the most out of your equipment by playing it at a safe level. One that lets the sound come through loud and clear without annoying blaring or distortion-and, most importantly, without affecting your sensitive hearing.
Sound can be deceiving. Over time your hearing "comfort level" adapts to higher volumes of sound. So what sounds "normal" can actually be loud and harmful to your hearing. Guard against this by setting your equipment at a safe level BEFORE your hearing adapts.
To establish a safe level:
- Start your volume control at a low setting.
- Slowly increase the sound until you can hear it comfortably and clearly, and without distortion.
Once you have established a comfortable sound level:
- Set the dial and leave it there.
Taking a minute to do this now will help to prevent hearing damage or loss in the future. After all, we want you listening for a lifetime.
We Want You Listening For A Lifetime
Used wisely, your new sound equipment will provide a lifetime of fun and enjoyment. Since hearing damage from loud noise is often undetectable until it is too late, this manufacturer and the Electronic Industries Association's Consumer Electronics Group recommend you avoid prolonged exposure to excessive noise. This list of sound levels is included for your protection.
Decibel
Level Example
30 Quiet library,soft whispers
40 Living room, refrigerator, bedroom away from traffic
50 Light traffic, normal conversation, quiet office
60 Air conditioner at 20 feet, sewing machine
70 Vacuum cleaner, hair dryer, noisy restaurant
80 Average city traffic, garbage disposals, alarm clock at two feet.
THE FOLLOWING NOISES CAN BE DANGEROUS UNDER CONSTANT EXPOSURE
90 Subway, motorcycle, truck traffic, lawn mower
100 Garbage truck, chain saw, pneumatic drill
120 Rock band concert in front of speakers, thunderclap
140 Gunshot blast, jet plane
180 Rocket launching pad
Information courtesy of the Deafness Research Foundation.


Publication de Pioneer Corporation.
© 2005 Pioneer Corporation.
INSTALLATION AM PLASMA DISPLAY
Ubergangsfrequency 3 kHz
AüBere Abmessungen 1076 (B) 83 (H) 92 (T) mm
Gewicht: 2,7 kg
Copyright © 2005 Pioneer Corporation.
Copyright © 2005 Pioneer Corporation.
AFTER-SALES SERVICE FOR PIONEER PRODUCTS
Please contact the dealer or distributor from where you purchased the product for its after-sales service (including warranty conditions) or any other information. In case the necessary information is not available, please contact the Pioneer's subsidiaries (regional service headquarters) listed below:
PLEASE DO NOT SHIP YOUR PRODUCT TO THE COMPANIES at the addresses listed below for repair without advance contact, for these companies are not repair locations.
AMERICA
PIONEER ELECTRONICS (USA) INC.
CUSTOMER SUPPORT DIVISION
P.O. BOX 1760, LONG BEACH, CA 90801-1760, U.S.A.
EUROPE
PIONEER EUROPE NV
EUROPEAN SERVICE DIVISION
HAVEN 1087, KEETBERGLAAN 1, B-9120 MELSELE, BELGIUM
ASEAN
PIONEER ELECTRONICS ASIACENTRE PTE. LTD.
SERVICE DEPARTMENT
253, ALEXANDRA ROAD #04-01 SINGAPORE 159936
JAPAN AND OTHERS
PIONEER CORPORATION (HEAD OFFICE)
CUSTOMER SUPPORT CENTER
Published by Pioneer Corporation
Copyright © 2005 Pioneer Corporation
All rights reserved.