
TERRA 101 - Tablet GOCLEVER - Free user manual and instructions
Find the device manual for free TERRA 101 GOCLEVER in PDF.

| Product Type | Touchscreen Tablet |
| Brand | GoClever |
| Model | TERRA 101 (A1022) |
| Operating System | Android 4.1 (Jelly Bean) |
| Screen Size | 10.1 inches (approx. 25.7 cm) |
| Screen Type | Capacitive Multi-touch Touchscreen |
| Internal Memory (Flash) | Variable capacity depending on model (hidden part for system) |
| RAM Memory | Visible part + system part (not specified) |
| Memory Expansion | MicroSD card up to 32 GB |
| Internet Connection | Wi-Fi 802.11 b/g/n, optional 3G (external or built-in modem depending on model) |
| Bluetooth | Available on some models (check specifications) |
| USB Port | USB OTG for peripherals (mouse, keyboard, USB flash drive) - depending on model |
| Battery | Rechargeable lithium-ion, charging via original power adapter |
| Battery Life | Varies by usage (first charge 8-12 h) |
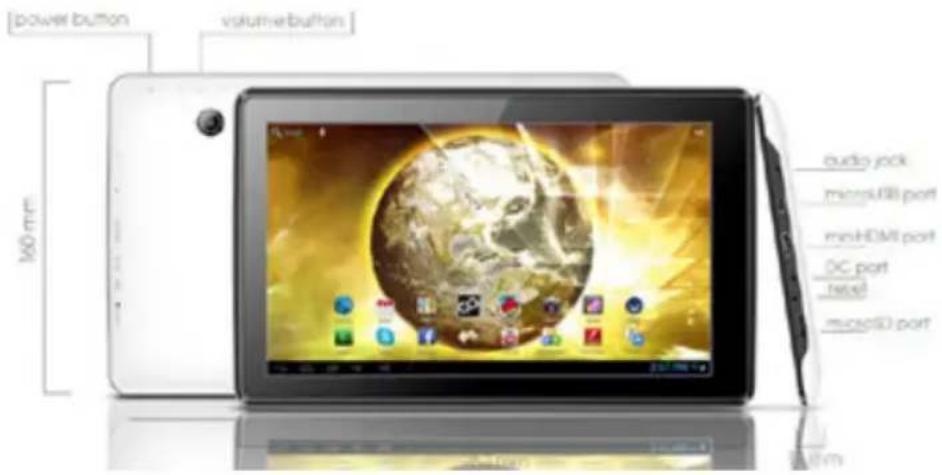
| Dimensions (estimated) | Approximately 240 x 170 x 10 mm |
| Weight (estimated) | Approximately 500 g |
| Care and Cleaning | Use a special LCD screen cleaner, avoid alcohol, water, and solvents |
| Security | Password screen lock, factory reset if forgotten |
| Warranty | 24 months manufacturer warranty, extension possible depending on country |
| Box Contents | Tablet, charger, USB cable, startup guide |
Frequently Asked Questions - TERRA 101 GOCLEVER
User questions about TERRA 101 GOCLEVER
0 question about this device. Answer the ones you know or ask your own.
Ask a new question about this device
Download the instructions for your Tablet in PDF format for free! Find your manual TERRA 101 - GOCLEVER and take your electronic device back in hand. On this page are published all the documents necessary for the use of your device. TERRA 101 by GOCLEVER.
USER MANUAL TERRA 101 GOCLEVER
Thank you for purchasing our product.
To ensure you a quick and convenient use of your new GOCLEVER TAB, please read these instructions carefully prior to use. This short manual describes general Android functions (depends on model) and GOCLEVER guarantee details.
CONTENTS:
English p.1
Polski p. 10
ykpaiHcbka p.20
Italiano p.30
Slovenský p. 40
Český p. 50
Deutsch. p. 60
Espanol p. 70
Français p.80
Portugues p. 90
Pycckn p. 100
Roman p. 110
BRAND NAME: TERRA 101
MODEL NUMBER: A1022

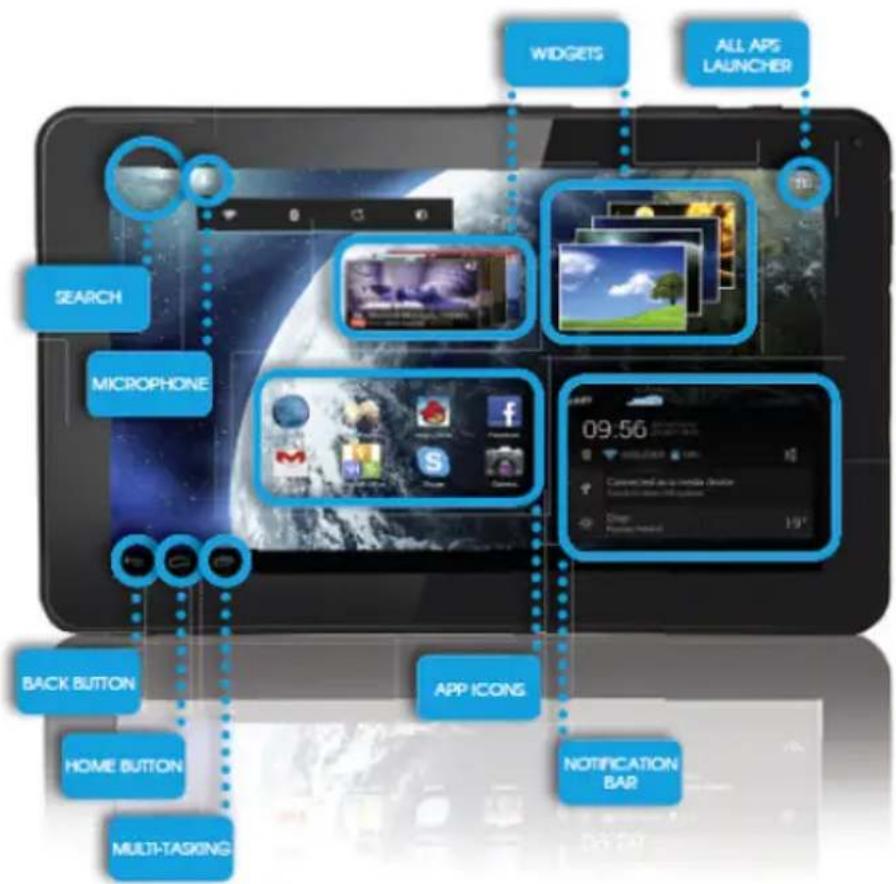
DEVICE OVERVIEW:
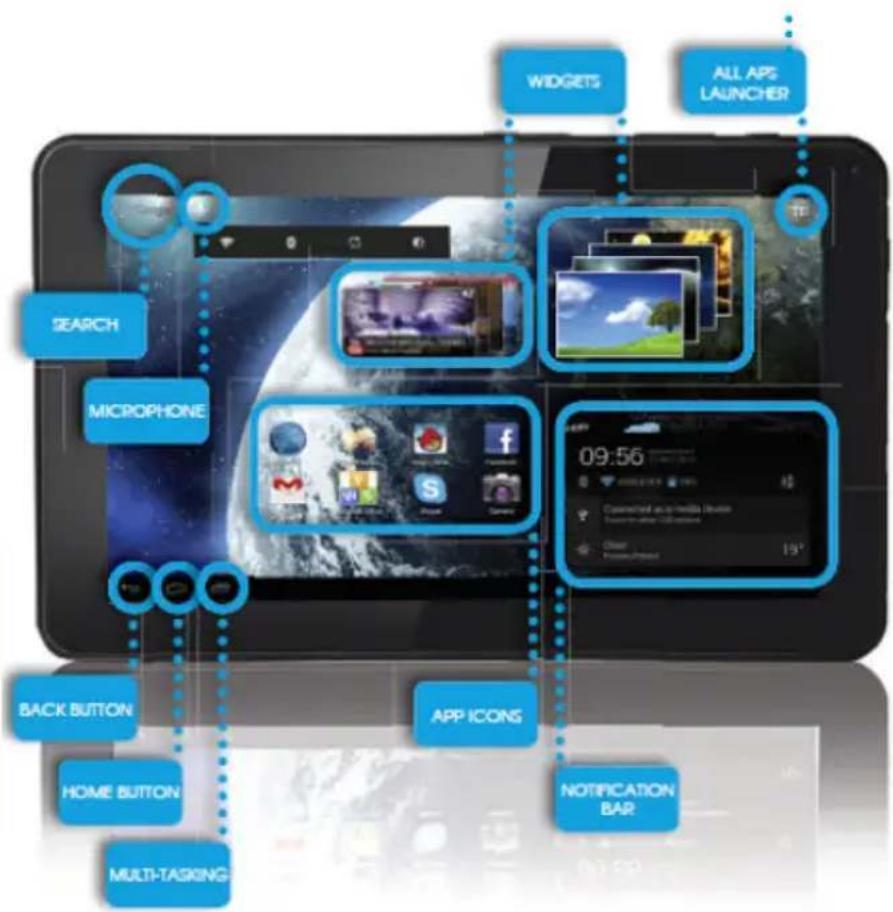
GOCLEVER TAB with ANROID 4.1 OS at a glance
BACK BUTTON - tap to go Back to the previous screen
HOME BUTTON - tap to return to your Home Screen
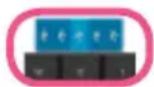
MULTI-TASKING - tap to view the recent apps list; tap to open an app, or swipe to close it
ALL APPS LAUNCHER - tap to view all your apps and widgets
SEARCH - tap to open an online search engine
MICROPHONE - tap to search using speech recognition
APP ICONS - tap to open the selected application
SETTING MENU - tap to view all available options
NOTIFICATION BAR - tap and swipe the down right of your screen to view the notification bar, informing you of updates, emails etc. Tap and swipe the top right of your screen to view the battery, Wi-Fi status etc.
WADGETs - tap the 'All apps' button, then select Widgets. These are small 'apps' that run on your home screen for instance showing live weather, photo gallery, new emails, you tube videos.
PERSONALISE - to change your wallpaper to a pre-loaded or downloaded wallpaper or a photo you've taken tap some blank space on your home screen and follow the on-screen Instructions.
Central Service
4g Sianowska Street
60-431 Poznqn, POLAND
email: serwls@goclever.com
fel.:+48618488767
Technical Support UK
fel.:0844 8566848
email:uk@goclever.com
Technical Support Ireland email: Ireland@goclever.com
Technical Support Spain
tel: 902104953
email:
rma@gocleverspain.com
Technical and warranty support Canary
Islands
tel: 902 050 255
Partner Services
Partner Services
BELARUS
220053, Republic of Belarus, Minsk,
V.Slufskoi 67-2
email: belarus@goclever.com
fel.:+375(17)3354883
Lithuanja, Estonia. Latvia
Servisq ICT
e-mail: suport@servlsalct.com
Tel. Lithuania: +370 (37) 329000, +370 (37)
337458
3705)2101160
Tel.:Latvia:+3/1(6/74)08838
Tel. Estonia: +372 (66) 71798
www.servisqict.com
Serbia
ET Servis d.o.o. Beograd
Member of Logo d.o.o. group Bulovskaya ulokandar 265, 11000
Bulevar kralja Aleksandra 265,11000
Burel 314
Beograd, Srbija 1021328
fe: +381 11 3820-535, +381 11 3820-536,
+381113820-537
www.elsevisirs.com
Bulgaria
Stemo
bul. Nikola Vaptsgrov 55, EXPO 2000
fel. (+359 2) 8162300
fax: 8162303
e-mail:main@sf.stemo.bg
www.stemo.bg
CZECH REPUBLIC
Bouncer s.r.o.
Slavonlcka 324,67531 Jemnice,
Czech Republic
email: servis@goclever.cz
tel.: +420 546 806 021
ROMANIA
S.C. Cordon Electronics S.R.L.
Str, Spataru Preda nr 12, sector 5.
Bucuresti
email: office@cordongroup.ro
tel.: +40 372324762, +40 213009905
UKRAINE
Service Center KROK-TTC
Geroey Dneprq 2A,04212 Kiev
email:info@krok-tfc.com
tel.: +380 800504504
Slovenia
BIROTEHNA
Liftijska cesta 259, 1261 Ljubljana-Do
brunje
tel:015853777
fax:015400130
e-mail: servis@biroftehna.sl
Croatia
PlayCom
Heinzelova,78b,10000Zagreb
fe1: +385 (0)1 5613-222+385 (0)1
5618-433, +385 (0) 16184-115
e-mail:info@play.com/hr
www.playcom.hf
Bosnia and Herzegovina
System One d.o.o. 10-71000
yilsonovo sefaliste 10,71000
Sarajevo
tel: +389 (0) 2-2653-270
fax:+387 33652781
e-mail: servis@itd.mk
www.slsee.com
www.ifd.mk
Hungary
E-careSolutions.
Szent 1102, Laszlo ter 20, Budapest
Tel: +36212524688
e-mail: e-care@e-care.hu
TECHNICAL SUPPORT
WEBSITE:
www.goclever.com/support
- USER GUIDES (have a look on
online user's manual, down
load and share with).
- SOFTWARE AND UPDATE
MANUALS (be up to date with
the latest OS software or use.
the backup files to solve your
software problems).
FREQUENTLY ASKED
QUESTIONS
- SERVICE CENTRE LOCATIONS
we recommend to use
GOCLEVER Central Service and
local partner services directly
than make a complaint
Technical inquiries to stores)
WARRANTY INFORMATION
(your GOCLEVER TAB includes
24 month guarantee. The
optional for selected countries
Is 12 month "door2door
guarantee. See our website
for details)
- SERVICE PROCEDURE
RMA APPLICATION (depends
on country).
REGISTER A PRODUCT
on register.goclever.com
Register your GOCLEVER product to get more!
Thank you for choosing GOCLEVER! We want you to enjoy your purchase to the fullest, and that starts with a few easy registration steps. Registration will take you a few minutes. Go to www.goclever.com and get more. Do not miss the chance to find a few of the benefits:
-
12 months of door-to-door warranty (for selected countries and products),
-
Handy tips and rapid technical support,
- Reminders about firmware updates that will keep your product up-to-the-minute,
- Exclusive previews of new products,
- Special offers and promotions - up to 30% of discount (for selected countries and products),
- Free map updates (for selected countries and products).
GENERAL ANDROID OPTIONS
FIRST START
When you switch on your tablet first time, the 'wizard menu' will guide you to configure your tablet and prepare it to the full use. Just choose your local / native language and then follow the successive instructions. You are able to log in the Google (or create a new Gmail account), configure your network standards, enter the user name etc. Note, that some of our tablets do not use wizard menu during first start. I that case, you need to configure it manually using Settings' options.
In order to ensure tablet's screen stays scratch-free during transport we use a screen protector. It can be easily removed in order to appreciate screen in full.
OVER-THE-AIR software update
You can keep your tablet up to date thanks to free software updates available via OTA (over-the-air) system. Just open OTA application on your tablet and choose 'ONLINE UPDATE' button. The application will scan the server in search of new updates. If the process succeed the application would ask your permission and start downloading. To start the installation just tap 'yes' and wait a few seconds - the tablet will restart and run the installation automatically.
In case of server error you have still a possibility to update your tablet on a standard basis via PC (using files available on our website) or tapping the 'LOCAL UPDATE' button placed in OTA application. 'LOCAL UPDATE' button opens 'File Manager' application. You should just choose the particular file (downloaded previously from our website) and start installation.
NOTE: Some of our tablets are not equipped with OTA application. Therefore you need to make updates via PC using files available on our website.
CHARGING THE BATTERY
Battery life depends on usage. Please note that only use an authorized charger (included) as incorrect voltage /am page can damage the GOCLEVER TAB, invalidating your guarantee. When the device is used for the first time we recommend you charge it for around 8-12 hours using the power adaptor provided and do not disconnect the charger until a device is fully charged. User can charge the battery when there is still power left. Note that while charging it is normal that both charger and tablet is heating up. If you hardly ever use the tablet, we recommend to charge it at least one per month to maintain a battery life.
TURNING ON/OFF
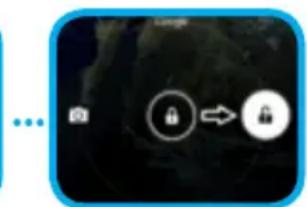
Simply press the power button for around 3 seconds and the GOCLEVER TAB will start up and display the lock screen. Slide the padlock icon to the right to unlock your home screen. Note: if the tablet is not starting, it probably requires to charge. To turn the device off simply press and hold the power button and press OK in the popup box that appears. Note: If you turn off the device all your running apps and documents will not be saved automatically.
STAND-BY MODE
You can put the tablet into standby mode by pressing the power button for 3 seconds. GOCLEVER TAB ups instantly by pressing the power button.
RESETTING
In case of software problemsyoucanresetyour tabletsimplypressingandholdingtheStart' button for a few seconds. Second way, simply press and hold *Reset' button for a few seconds till thedeviceturnsitselfoff.Theresetmodewillstart automatically.
FACTORY RESET
In the case where you lend/sell your device to somebody and want to delete all your personal data you can reset your tablet to the default settings. Please be aware that all your personal files, applications and data (multimedia, music, photos, videos) will be lost. If you hold SD card in the device's slot and want to keep your data on if you should remove the card from the tablet before a reset.
To make a factory reset simply press as follows:
- Settings
- 'Backup & reset'
- Factory data reset
- Reset tablet'.
UNLOCKING
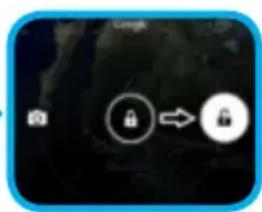
To unlock your GOCLEVER TAB simply press a 'Turn off/on' button. The blocking means that your device will go to the stand-by mode. After unblocking you are able to return to your previews tasks/websites/apps/docs. In order to unlock the device simply type and hold the 'closed padlock' icon on the screen and slide to the right "open padlock" icon.
LANGUAGE OF USE
GOCLEVER TAB is delivered with English language by default. You can change it into your native language using 'Settings' icon.
- Unlock the screen.
- Type 'All App Launcher' in the top right corner to view all apps.
- Choose 'Settings', then type 'Language & input' and 'Language'.
- Choose your language from the list.
TOUCHSCREEN
The GOCLEVER TAB has a capacitive touch-screen so you don't need to apply pressure to the screen to make it work. Using multi-touch technology you can use a flick of your fingertips to operate the tablet. Do not use any sharp or pointed instruments to use the touch screen as this could damage the screen and invalidate your guarantee.
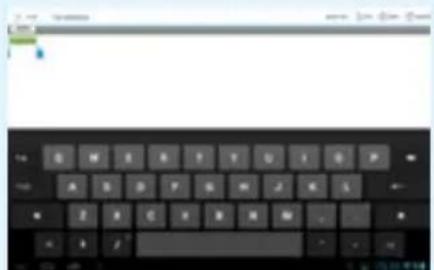
KEYBOARD
The GOCLEVER TAB uses QWERTY on-screen keyboard as default. To place a text on the screen simply press the particular symbol/letter or use the speech recognition application.
Type CAPITALS by pressing the 'Shift' button.
Type numbers by pressing the ?123 button
To use local/national symbols just press and hold an appropriate letter till the selection menu emerges.

7123
SD MEMORY
Your tablet comes with internal flash memory (the storage depends on a model). You can expand this storage space using a micro SD card (not included) up to a maximum size of 32GB (minimum 1GB). It is also a great way to transfer files to and from your tablet. To add a micro SD card carefully insert it in card slot with the label facing the same way as the screen. To remove it simply push the cards slightly until you feel a release of latch. Do not use to much force while pulling or pushing a memory SD card from card slot to avoid its damage. You can install Android app on your tablet using SD CARD (not included). Simply download the applications/files on SD memory card and insert it into the tablet. Afterwards open 'ES File Explorer' App and install app following the instructions.
If you want to uninstall any app from your GOCLEVER TAB simply open 'Settings' then 'Apps'. Choose the app you want to remove and tap 'Uninstall'.
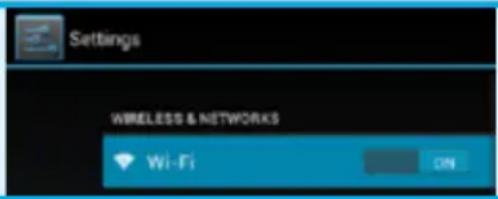
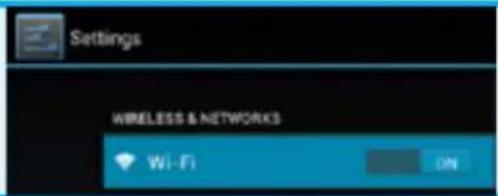
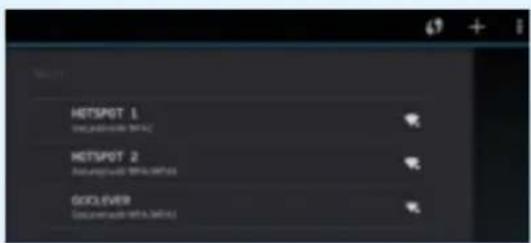
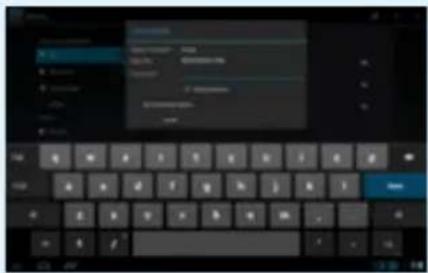
CONNECTING TO WI-FI
GOCLEVER TAB connects to the Internet using wireless connection. You can connect using a home network, or when you are out using the free hotspots that you can find in schools, restaurants, hotels etc.
To connect to Wi-Fi please follow these short instructions:
1 Tap the Setting icon. You should now see a screen that says 'Wireless&Networks'.

Slide the Wi-Fi button to the right so it is the blue ON' position.

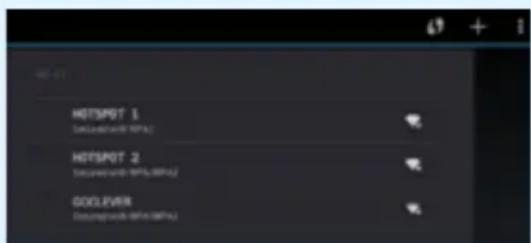
3 GOCLEVER TAB will scan the local area and display a list of all available Wi-Fi networks. Tap the name of the Wi-Fi network you wish to connect to. If your network does not appear tap the 'Scan' button at the top right.
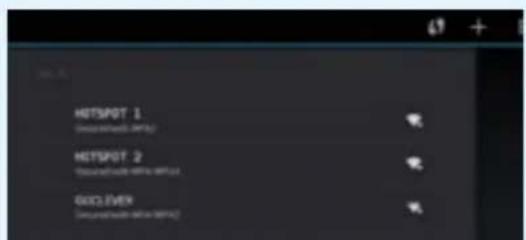
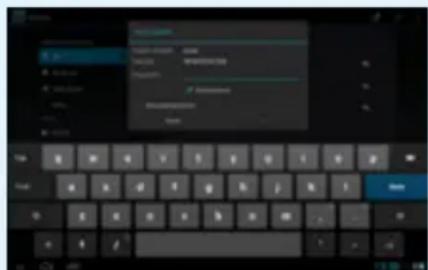
If the network is open, tablet will connect automatically. If the network is protected you need to get the Wi-Fi password and enter it in the popup box that appears and tap 'Connect'.
5 Tap the Home Button, then the Browser icon to connect the Internet. Tap the white box at the top and type website address or enter a search term to perform 'Google Search' of the Internet.
GOOGLE ACCOUNTS
Your Free Google Account is your key to updating your GOCLEVER TAB. Logging into your Google Account you are up to date with your e-mails and you are able to download thousands of applications (free and paid) from the Internet App Store, sync your calendar and much more.
If you already have your Google Mail you can use the existing login & password. If you don't have any, you can easily set up a new account using your GOCLEVER TAB/Settings/Accounts&Sync/Add Account. You need an Internet access if you want to create an account or log in.
CONNECTING TO 3G NETWORK (EXTERNAL MODEMS OR BUILT-IN 3G MODEM)
To connect to 3G network please follow these simple instructions:
- Tap the Setting icon and choose 'More'.
- Press 'Mobile networks'
- In the 'Mobile network settings' mark 'Data enabled' and 'Data roaming'.
- Open 'Access Point Names' and choose yours.
Data roaming" - Be aware that it provides extra costs for you.
- Check if your device is equipped with built-in 3G module or operates the external 3G modems. Note that some of GOCLEVER TABs are not equipped with USB OTG port and that causes an inability of 3G operation.
- Due to the fact that modem manufacturers' technical specifications may change we recommend our customers to verify compatibility before purchasing any modem. GOCLEVER guarantees compatibility of GOCLEVER GCM01 and GOCLEVER GCM02.
Note that every local telecommunication provider has its own access points (APN). If the device does not follow them automatically, please contact to your telecom service provider to gain them.
TRANSFER DATA VIA PC
You can transfer your personal data (apps, multimedia files) from the GOCLEVER TAB to your PC computer and in the reverse direction simply using USB cable (included). The tablet will be recognized by your PC as a "Multimedia/Portable device" in that case. Note that it is also possible to charge the tablet while data transferring (optional). If the devices do not automatically recognize each other, you should compare them manually. In such situation, simply open Settings/Storage and choose the 'USB MASS STORAGE' option simply following on-screen instructions. The tablet will be recognized by your PC as a "mass storage". In both cases The GOCLEVER TAB will be detected on your PC in 'My Computer' folder. Then you can open/delete files stored in a tablet memory and copy files from PC to the tablet and in the reverse direction. Use 'ES File Explorer' App to open multimedia files that have been copied/install apps in your tablet.
DISCLAIMER
As the GOCLEVER products are constantly updated and improved, your GOCLEVER TAB's software may have a slightly different appearance or modified functionality than presented in this Quick Start Guide. The newest software updates for your device you can find in the Support section on the GOCLEVER website.
NOTICE
GOCLEVER reserves the right to revise this publication or to change its contents without notice. Information contained herein is for reference only and does not constitute a commitment on the part of the manufacturer or any subsequent vendor. They assume no responsibility or liability for any errors or inaccuracies that may appear in this publication nor are they in anyway responsible for any loss or damage resulting from the use or misuse of this publication, malfunction, modification of the device or battery replacement.
- As we are improving our products constantly, the presented in this QSG device (software and hardware) is subject to change without notice for further improvement.
GOCLVER is not commitment to any mistakes or incidences caused by this Quick Start Guide. GOCLEVER nor any of its licensors shall not be liable for any loss of data or profits in result of using the tablet in inappropriate way. We are not responsible for any problems related to the functioning of Android System and applications operating under its control. -
Pictures are provided for reference only, product appearance and functionality may differ from that shown. Product operation and design are subject to change without prior notice.
PCB color and bundled software versions are subject to change without notice. -
Brand and product names mentioned are trademarks of their respective companies.
- All images and photos are given as an example and subject to change without notice. The feature/photos depend on the services offered by the operator and software version of the device.
This Quick Start Guide may not reflect your present device's operation.
GOCLEVER reserves the copyright of this Quick Start Guide, any random duplication or full/partial interpretation is forbidden in commercial activities.
PRECAUTIONS
As we cannot undertake any responsibility for a damage or loss of your personal data due to an inappropriate usage/repairing/damage, please backup your files systematically. To retain your warranty and prevent an unwanted damage, please become acquainted with below given instructions:
- Do not subject the tablet to great heat, direct sunlight, severe frost, sand, dust, humidity. The device is not waterproof.
- Avoid soaking/dropping / shaking / shocking.
- Always turn volume down before the earphones' using to avoid hearing damage, then insert the jack earphones and then increase the volume to the desired level.
Wi-Fi Internet access is not included. This may be a paid service. - Do not use the tablet near the strong electromagnetic sources (e.g. microwave ovens, TV, radio etc.)
- Do not break the connection (formatting, downloading, uploading) suddenly to avoid software errors.
- Do not clean the display by an alcohol, water or thinner. You should use special cleaning agents for LCDs.
- Do not use the GOCLEVER TAB in spaces where the using of electronic devices is strictly forbidden (e.g., aircrafts).
All downloaded apps are used at your own risk. - Data transferring and battery charging should be provided using dedicated GOCLEVER accessories and according to the proper instructions.
- You should connect the device to the power source in accordance to the parameters set out in the tech spec.
- Opening the tablet, attempting to disassemble and repairing in your own or using the tablet in a manner contrary to its purpose could be danger and will invalidate the GOCLEVER warranty.
For repair actions use an authorized services and qualified staff. The list of GOCLEVER partner services is available on our website.
CERTIFICATE OF CONFORMITY

GOCLEVER Ltd. hereby declares under our sole responsibility that the product GOCLEVER QUANTUM 785 (model number TAB A1022) is in conformity with the essential requirements of the following Directives is declared:
EMC DIRECTIVE 2004/108/EC
LVD DIRECTIVE 2006/95/EC
R&TTE DIRECTIVE 1999/5/EC
The full document with detailed information is available on our website: www.goclever.com. You should simply find the product sheet in the GOCLEVER product catalogue and the .pdf file with CE declaration is placed among the bookmarks.
Please read our Privacy Policy and Cookie Policy at www.goclever.com.

This product has been certified as RoHS Compliant.

MARK OF CONFORMITY - UKRAINE - National mark of conformity confirms that the specified product complies with the requirements of the technical regulations in Ukraine.
END OF LIFE DISPOSAL

Recycling facilities are now available for all customers at which you can deposit your old GOCLEVER devices or any other electrical products. This is a requirement under European legislation (the Waste Electrical and Electronic Equipment - or WEEE - Directive 2002/96/EU). Customers are able to take any old electrical equipment to waste recycling public centers or point of sales. Please remember that this devices/cables etc. will be further handled during the recycling process. To remind you to recycle, all electrical products are marked with a crossed out wheeled bin symbol. This symbol is on all GOCLEVER devices.
CONDITIONS OF WI-FI USAGE

When using the IEEE 802.11b/g/n Wireless LAN standard, channels 1 to 13 (2.4 GHz...2.4835 GHz) are selectable for both indoor and outdoor use, however with restrictive conditions applying in France, Italy and Norway, as follows:
France: When using this product indoor, all channels can be used without restrictions. Outdoor only channels 1 to 6 are allowed. This means that in Peer-to-Peer, the WLAN feature can only be used outside if the peer sets up the communication on an authorized channel (i.e., between 1 & 6). In infrastructure mode, please make sure the access point is configured to a channel from 1 to 6 before setting up the connection.
Italy: Use of the LAN network is governed: Disposal of Old Electrical & Electronic - with respect to private use, by the Legislative Decree of 1.8.2003, no. 259 ("Code of Electronic Communications"). In particular Article 104 indicates when the prior obtainment of a general authorization is required and Art. 105 indicates when free use is permitted; - with respect to the supply to the public of the WLAN access to telecom networks and services, by the Ministerial Decree 28.5.2003, as amended, and Art. 25 (general authorization for electronic communications networks and services) of the Code of electronic communications.
Norway: Use of this radio equipment is not allowed in the geographical area within a radius of 20km from the center of Ny-Alesund, Svalbard.
TROUBLESHOOTING
- I observe in the device's settings less RAM memory than is given on spec sheets.
RAM memory consists of two parts: the visible and the hidden for the User. Android settings inform about the visible one. Invisible memory is used by the device to carry out the Android system processes.
- FLASH memory in tablets' settings is different from the specifications.
Tablets' FLASH Memory (and PC's Hard Drive as well) is different from the formatted one as a result of preparation of the device for use. So the User receives already formatted tablet. FLASH memory is divided into three main parts: the first one is designed for data management and the Android operating system, while the other two parts constitute a place for apps and the space for videos, photos, music and other documents.
- My GOCLEVER tablet does not react well, it is freezing, work much slower than normal or does not responding at all.
We recommend to restart your device using turn on/off button (pressing 3-4 sec) or reset button (with a pointed object).
- G-SENSOR is not responding.
You should calibrate your device using Settings' / Display' or Gravity Calibration App (optional). Be aware that our offer includes models without this option.
- My GOCLEVER TAB is discharging faster than before.
The built-in battery is an operational component of the tablet. It is natural that its capacity shall be subject to reduction for long-time of usage.
- I want to download free applications from the Application Market.
In order to download free apps from the Application Market you should login or create Google Account firstly. Be aware that some of applications are paid.
- I want to use some external devices (mouse, keyboard, modem, pendrive).
To connect an external accessory / peripheral the tablet should be equipped with USB OTG port. Please be aware, that not every GOCLEVER TAB offers this option. Go to www.goclever.com to read a technical specification of your GOCLEVER TAB in details.
- I need to connect my GOCLEVER TAB with the other electronic device via Bluetooth.
To turn on a Bluetooth option you should open Settings' and move Bluetooth to ON' position (just like Wi-Fi). Please be aware, that not every GOCLEVER TAB offers this option.
- I have a dedicated Bluetooth Keyboard in the box (optional) which I have no idea how to connect.
To connect GOCLEVER TAB with GOCLEVER BLUETOOTH KEYBOARD you should turn on a KEYBOARD and press
'Connect' button on it. Then turn on Bluetooth on your tablet device. Find your GOCLEVER BLUETOTH KEYBOARD on the list and tap on it. Using KEYBOARD's hardware keys input 4 codes PIN number and press 'Enter' and the devices are connected successfully.
- The device cannot connect with the Wi-Fi network.
Make sure that your Internet source works perfectly. The distance between wireless router and your device should be within 50 meters and please make sure that there is no wall or any other barriers between them.
- Sometimes the temperature of the device is a little high.
It is natural that the tablet device warms up slightly while long-time usage without a break or while charging.
- The updating process takes too much time than usual starting.
While updating a device's software downloaded from GOCLEVER website it need some more time than usually. Do not break the processing which takes 2-3 minutes to make sure that finish properly.
- I want to improve my tablet (built-in operating system) using the dedicated software update.
Some of our tablets can be improved thanks to our original software updates based on www.goclever.com/support. In the ZIP file you can find the software file and the update manual. Please read the software's descriptions carefully, as the listed files can be different depending on the model and serial numbers.
- I am going to lend my device to my friend and want to delete all my private files/apps and Google Accounts personal details before it.
You should use 'Factory reset' function available in the Settings' App. The factory reset will help if your application causes the inappropriate operation of your device. Note, that all your files will be lost, so we suggest to copy them to the other device (pendrive, PC etc.).
WARRANTY CARD
DATE OF SOLD:
DATE OF MANUFACTURED:
BRAND NAME OD PRODUCT:
SERIAL NUMBER:
DEALER'S NAME / STAMP
SIGNATURE
Date and customer's signature
Repairs history
| Date | Confirmed defect | Made repairs | Servive sign and stamp |

GOCLEVER
INFINITE INVENTION
QUICK
Start Guide
STRONA: www.goclever.com/support
DYREKTYWA EMC 2004/108/EC
DYREKTYWA LVD 2006/95/EC
DYREKTYWA R&TTE 1999/5/EC
UTYLIZACJA I RECYKLING
OGOLNE WARUNKI GWARANCJI GOCLEVER
IOBEPHYTNCRA HAIOTATKOBYCTOPIHKY (HOME
BUTON) - HATNCHTb, 106 NOBEPHYTcHr Ha IOnaTKOBy CTOpIHky.
MylbTn3ADAHICTb (MULTI-TASKING)-HaTNCHTb, 06 neperyHytn HeoDaBHO BnkOpNCTOByBaHi nporpaMn, 3HOBy BIKpTN H3aKpTN IX.
CINCOK NPOPGAM (ALL APPS LAUNCHER) - HATNCHTb, 006 nepenJHHTN CINCOK YCX INPpOM PA T BIXKETB. NOUK - HATNCHTb, 006 nepeHTN B NOUKOBY OH-NaH CNTTEMY.
MIKPOOHOH-HATNCHTb,yOBYBMKHYTNrTOLOCBMnNOUHK 3HAHOKIPOPGPAMH-HATNCHTb,oOBBIDKPHTnObpaHy nporpamy.
KOHTPOJb XMBJIEHHHA (APP ICONS)-HATINCHIT, u06 yBMKHyTN cneiaIbHy onuio wBIMKORO BIMKHEHHA / yBMIKHEHHA pnpctpo.
MEHIO HAJIATYBAHb-HaTnCHiTB,io6 nepernyTu CNuCOK onui.
P4NOK CNOBIUEHb (NOTIFICATION BAR) - HATNCHTB i npoBeIDtNo BepxHn IiB1 qactHNI eKpHa, 060 nOaMnITcna naHeni OHObnEh, eNEKtpoHnI NOHTuTO O HATNCHTb i npoBeIDtNo BNH3y npabopyu qactHNI eKpaHa, 06 noDnBNTcCTatyc zapdKn 6atapei, Wi-Fi TOIO BIDXETN - HATNCHTb Ha CNmCk BCix nporpam Ta o6eptb OIQUI BIDKETN. Ue nporpAm, kki BN MoKTepehect HA NocAtKOBy CTopIHky (a Came, pOrTHoN porOdn, fOToTanepeR, HOBI eNEKtpoHHI NobIDOMLeHH, Bideo 3 you tube).
NEPCOHAJI3ALIJa -Jnra TOrO, 0p6 3MHNTn unanepe HaTCHITb HnBbHomy Mciu Ha NootaKoBI CTOpIHt Ta dOtpMNrTeB hCTpykui.
TEXHIUHA IITPUMKA
BEBCAI: www.goclever.com/support
NOCIBHNI KOPNUCTYBAUA (Tyt BN 3MOxTe nepeRJIHyTu Ta 3aBaHTaXHTu Noci6HNI KOpNUCTYBAUa B OH-NAH pexKMI)
PPOrPAMHE 3ABE3NEUHHRA TA OHOBJEHHI NOCIBHNIKA KOPNUCTYBAUA (Tyt BN MOxTe 3aHTu OCTaHHI OHOBJEHHI
PpOprPamHoro 3a6e3neueHHA OC Ta 3HaHTu BnPIeHHN npo6IeM, kki BuHnKaIOtB npn po6OtI.
NITAHNA BIDNOBIDI
PO3MIUEHHA CEPBICHNX CEHTPIB (Mn peKomeHdycmo cnepey 3BeptaTncsdo cepbichoro ceHTpy GOCLEVER nn haunnpTHePiB, aHIX do maraunHIB, de BN npud6annpOdyKT).
TAPAHTIHA IHOPMAUIAI (Baaw nlaanwet GOCLEVER nepe6yBaε Ha 2-piHni rapaHTII. IpoTe e neBHI kpaIHn, de rapaHTIcTaHOBTb Inwe 12 micauiB. Dna DetalbHOI IHOPMAUII BIDbidae Hau Be6caNT).
OBCLNYFOBYBAHH
IIOBEPHEHHY TOBAPY (aJIeKHTb BiD KpaHn)
EJEKTPOHHACKPNUHbKA
OToPmAtn 6IbWe MoKJInBocTe, 3apeeCTpyTe Baw nlaHweT GOCLEVER!
Дякуемо,ибоблг GOCLEVER! Мнхочим,ибьвспobha hacoloanncя можиноctamn GOCLEVER.Дяцboro 3apeectpynte npodykt. Ye 3aime liuwe dekiibka xblnn.
Ioo6 dHaTncs 6bnwe BIDBidaTe haw Be6caNT www.goclever.com.
He ynycitb moxnnBictb i3HaTncra npo nepebarn:
- Oco6nbocti 12 mic. rapaHTii (Iy neBHX npOdykTb Ta kpaIH),
-Kopnci npaT Ta TexHua niDtpmKa,
-HaraDyBaHHI OIO OHOBHeHH npOwHbK, 30 a6e3neuHT bAkyaJIbHiCTb BaWOrO nHaHWeTa - EKCKJIIO3NBHe npeB'IO HOBux npOdykTIB
Cneuiabhi npono3nucii ta akci -do 30% 3nHexK (na neBnx KpaH Ta npodykTIB),
-Be3KoUToBHi OHOBHeHHa KapT (JIra neBHX KpaIH Ta npOdyKTiB).
3AFAJIbHI ONUII ANDROID
NEPUNI CTAPT
KIO BV BMnkaeT nAnHwet nepwn pa3, MaNcTe HanaWtYBaHb> DonomOKe Bam HanaWtYBaTH i ndroTyBaTH noTo NobHOiHHo BnKOpncTahH. IpocTo Bn6epitb baw perioh / Moby i Dotpmytecb IHCTpykui. Bn MoXe Te yBHTB o6NIKOBn 3aInc Google (a6o CTbOpNTn HOBn obNIKOBn 3aInc Gmail), BnKoHaN HanaWtBuHn MEpeXi, BBeCTn im' KopnctyBaVa i T.d. 3BepHtB yBaIy, zo deKi hAIi PAnHwEt N He BnKOpncTByOt b, MaNcTe R HanaWtBuHaB>> niD cac npeworo 3anCky. Y cObmy BnAaKy, Bam notpiBHO HanaWtBuTa nPncptpi BpyHy y po3di, HanaWtBuHaH" kyn BN 3Haundete B rOJOBHOMy MeHNo pncptpoU.
3 MeToIO 3a6e3neueHHraXnCTy BiI NOpRanH Ha ekpaH INaHWeTa, iD Yac TpaHCnOpTyBaHHr M N BnKOpNCTOByEMO 3axnCHy nibKy. II MoXHa Ierko 3HrTn 3a Heo6xHocti.
OHOBHeHH nporpamHoro 3a6e3neueHHH «Over-The-Air»
PpOpaMHe 3a6e3neuHnBaWoTe 3abXdN 6yde aKtyaIbHm 3aB4aKn 6e3KoWTOBHOmy OHOBnHi nporpaMHoro 3a6e3neuHn, kpe3 CInCTeMy OTA (Over-The-Air). PpOTo 3aNyCTiB DpOAtOK OTA Ha pAnuWeTI o6epitb KhoNky. Online Update. DOnaTOK BnKoHae nepeBipKy cepBepi B Nowky OBOHb JnnpaMHRo 3a6e3neueHH. KaIO OHOBnHH. DoctynH, DOnaTOK BaWoRo DO3bony, 06pO3noTu 3aBaHTaeHH. Jn3aNYcKByCTAHOBnHH, npocTo HATNCtB «Tak» i 3aueKaHte KINbKa CeKYH - nAaHweT nepe3aBAHTaKNTbcj I 3aYCTNTb YCTAHOBKY ABOTMaTHNo.
Y BnnaKy, kIoo CTanacr nomnka cepbepa, y Bac 3aIIuwaETbcra MoKlnBicTb OHOBtN I3 PnAhnTe cy TaHapThmM MeToaMnYepe3 PIK (BnKOpncTObyOuyn faIIn, 10oDcTyNHHa HauOMy caTI) a6o HauChCyBUn KONkY «LOCAL UPDATE» rKa 3hAxoDntbCry y DoaTky OTA. KHonka «LOCAL UPDATE» BiKnpBaec MeHeJckep fauiB B JKOmy BN NobunHb Bn6paT NOKkpTeHN paHne 3 HaWoro caTu) i pONoTu YCTaHOBky.
PIMITKA: 3 hauxn pahwetib he niTprmyo tyfHKuio OHOBHeHRA OTA. Y TAKOMY BnnaKy Bam notpi6ho po6ntn OHOBHeHHcStemy cep3 3a donomoroio faimib, doctynnx Ha hawomy caTi.
3APJXEHHBAATAPEI
Yac po60tn akymyIaTopa 3anekntb BiD iHTeHcNBHOCTB BHKOpNCTAHn npNCTPO. BHKOpNCTOByTe, 6yNb Iaca, nIwe ABTOBAAHn 3apAHH npNCTPI, 0o Nde B KOMJIeKTI, aJxE B INwOMy BnAaKy Baw npNCTpi MoKe 6yTu NowKOJKeHo, a rapaHTi BKe 6yDe He diINCHOU.
Neped nepuHm BnKOpCTaHHM npCtpoI peKOMeHdyEYbc 63nepepeBHO 3apJxAtn Ioro npToTGM 8-12 rOHN. 3apJxATn pNCTpi NtPbHo TOni, KOJI INDkaTOP BkA3ye Ha Hn3bkn 3apJd AkyMylTota. 3BepHb Ybary: nHaHwET Ta 3apJHn PnCTpI MoKyTB HarpBtnci Nid qac 3apJdxHeHH. JxIO BPiKO Bn BnBnKOpCTOByBatumete nnahwe, peKoMeHdyEYcBc NobHCTO 3apJxATn Ioro XOVA 6 paH Maicu DnI TORO, Oo6 npDoobXHTn P06Ot AkyMylTota.
YBIMKHEHH / BUMKHEHH IPNCTPOIO
Utpmyte KONky JINBHeHn npotrrom 3 cekHy, 06 yBIMKHTn pncptpi. 06 po36NoKYbTu ekpaH, nepecyhbleTe 3AMOK BnpaBO. 3BepHtB yBaY: kIIO npctpi He BMkaetbcra, ce BkA3ye, 0o npctpi Po3pndKeHH. 06 BIMKHTn pncptpi, HaTNCHTb KONky JINBHeHH Ta HATNCHTb OK> y BnpHaOOMy BiKHi. 3BepHtB yBaRy: npn BIMKHeHH npcTpo BoDkPnti DokymeHTi nporpamn He 36peKxytcba ABTomatuHo.
PEXUM OUYIYBAHH
HaTnCHiB KhoNkY XuBHeHH, uo6 nepeHn B pexm OuyiBaHH. HATnCHiB II 3HOBy i npunctpi BnDe 3 pexmMy oikyBaHH.
IPE3ABAHTAXEHH
B pazi nomnkn nporpaamhoro 3a6e3neueHHN, BN MOxTeIerKo nepe3aBAHTaxNTn pnCTpIy, yTpmyuOu KNkONky NcK npotarom dekiNbkoX cekyHd, nOKn nnahwet He BmKHeTbcra. Pekn m pe3aBAHTaxHexHH po3nochETbcABOMatnuHO.
BIDHOBNITN 3ABODcBKI HAIJAWTYBAHHRA
YbnaKky, kOy Bn no3nueaTe y npdaTe npncpti, Ta 6kxaTe ctepn Bc0 ocobncty iHOpmaio, Bb6epitb oniuho BiIDHOBNEHRAOBcBHX HanaWtBAHb. Npu bOmy Bc Bi aai OcoBnCT foAHH, nporpamTa dahi (foto, BiJeO, My3Nka, MlybTmiedia) Bydyb Tbpaehu. KIoo y npncTpoi mictnbCk KapkTaNam'Ati 3 daHmM, kki Bu Xohe Te 3bepertn, BntarHITb 3 PnaHetapeD Tm, kN oovTu BiIDHOBNEHRAOBcBHX HanaWtBAHb.
Uo6 BiHOBHTN 3aBODcbki HalaWtYBaHHra,NOTPi6HO HaTnCHyTN:
1. 'Settings' (HanaHTyBaHHa)
2. 'Backup & reset' (Pe3epBHe koniIOBaHH Ta nepe3aBAHTaKeHH)
3. Factory data reset' (BIDHOBNi 3aBOcBi KaHaawTyBaHH)
4. Reset tablet' (Ipe3aBantaxnTn nlaHwet)
PO36LOKYBAHH
Uo6 po36nokybaTn nlaHwET GOCLEVER npocTo haTnciB, knaBiuy KnaBneHH. Npeed Bamn 3'raibc3 a6noKOBAHn ekpah. Ue o3Haatime, uo npucpi nepe6yBaE B pexmni oukybHH. Picra toro, kA bn po36nokyeTe ekpaH, BN MaTe 3Mory 3HOBy nepeuTn do 3aBdaH, nporpaTa dokymeHTB, 3aKIMn npauOBAHn do toro. Uo6 po36nokybaTn ekpaH, HATNCiB naIbceM ta nepetarHtB 3amok Bnpabo.

MOBA
B HanaHTyBaHnX nAaHWeTa GOCLEVER 3a 3AmOBuBaHHm ObpaHa aHrniCbKa MOb. IJra TOrO, 06nepeuTn Do HanaHTyBaHb Ta 3MiHnT MoBy, Notpi6HO BIKoHATN HactynHI II:
- Pɔ36nokynTe ekpan.
- Hatncitb 3aok y Bepxhbomy npabomy kyekpna, 66 biKpnocB BIKHO cncky nporpaM.
- 06epitb 'Settings' (HajauyBHH), notim 'Language & input'(MoBa Ta MeToD BBody) Ta HapewTi 'Language' (MoBa).
- Npeed Bamn 3'raBntbCnncok MOB. O6epiTB piHy MOBy.
KJABIATYPA
GOCLEVER TAB BnKopncToBye KlaiaIpy QWERTY 3a 3AmOyBaHHM.
Uo6 po3noaTN BBOInTN TeKCT HaTNCHITb NOTpi6Hm CNMB0N 6yKBy a60
BnKopncTaIte nporpamy po3ni3HaHHraIocy.
Uo6 BBecTN BeNkCy 6yKBy, HATNCiHb KhoNky 'Shift'
Uo6 BBecn uHpN, HATNCHTb KHOKNy ?123'.
Uo6 BBecn Oc06nBi Miuebi/HaiohoJIbHi CnMBOJN, HATNCHITb Ta yTPmMyTe NEBHy 6yKBy, nOKn He BiDkPmETbcr MeHIO Bn6Opy CnMBOJy.
CEHCOPHN EKPAH
GOCLEVER TAB o6laHaHn EmHcHm CehCOPHM ekpaHOM, TOMy He Ntpi6Ho cnIbHO HadaBIOBAtn Ha HbOro, 0o6 BkOHyBaTn DII. JakyouN HOBIthIM MyIbTN-CeHCOPHM TEXHOrIa, Ira SoBOrAM Ntpi6HO IInwe JERKO TopKHyTncs EkpAHa. He BnkOpNCTOByTe 3arOCTpeHi npEdMeTI npri p60ti 3 IpanHe TETAHn WkoDn ekpAhy, aJe ce p6oHTb BAwY rapaHTIO HeiCHOO.


SD NAM'RTb
Baw npncpti miCHTb BNYTPIuHNO fneuw-nam'rTB (po3mip na'm'rti 3aneKntb BiD moedJI). Bn mokeTe 36ilbwntn na'm'rTB, BVKOPNCTOBHyOn kapTKy na'm'rti micro SD (He nde B KOMnneKTi) po3mipom BiD 1 do 32 76. KapTKa - ce 3pyhnn cnoci6 36epirahna Ta nepeaui daHnx.
UoBCTaHOBTN KAPTKy naM'rTi, BCTaTE ii akypathO y BiINOBiDnH OTBp. UoB BNTaRHTN KAPTKy naM'rTi, 3nerKa HATNCiTb Ha He i BOHa Deio BucHyetbcra. He HATNCaTe CunbHo, aJe ce MoKe NowKOdUTn npncTpri.
3a Donomoroo KapTKB MoKTe 3aBaHTaKUTn Ha npncTpii nporpamn Android. Iyra boro npocTo 3aBaHTaKTe paHn q nporpamn Ha KapTKy na'Ti Ta BCTABte II B nHaWet. Dani Bidkpnte ES File Explorer'(MeheJkep paHnIB) Ta, BIKOHabu Bci IHcTpkyi, BCTAHOBiB noTpi6Hy nporpamy.
Ksio Bn 6aKaTe BnAalntn nporpamy 3 Baaworo npictpo, npocTo HataChitb 'Settings' (HanaWtBuHHa), a dani 'Apps' (Pporpam).BbepiB nporpamy, kky xoyete BnAalntu Ta haTchitb Uninstall' (BnAalntn).
WI-FI
3aB4n6e3dpoTObOMy 3'EnHaHHo GOCLEVER TAB MaE DoCTyn Do IHTepHety. Bu MoKeTe NiI'EdHaTncs 3a DonomoroHO DomauHboi Mepexi nn 6e3KoToBHNx ToOK WI-FI B HauaJIbHnx 3aknaadax, pectopahax, roTeJx i T.d.
HaTnChiB 3NaOc Setting (HanaWtBuHHa).Ipeed BamN BiKpnctbca BIKHO, de e onciy 'Wireless&Networks' (Be3dpoToBi mepeki).
2
Nepetarhitb nepemikaBnpaBO bno3uio ON' (YbimKneHo).
3
GOCLEVER TAB po3nohe nowyk DoctynHx MepeX. Bn6epiB cepen cncky notpi6Hy mepexy. Kaio Baowoi Mepexi He 3HaJdeHO, HATNCiTb Ha KHonci cKahyBaHHa, y BepxHbomy npabomy KyTKy.
4
Якwo Мерека He 3axueta NapoIem, npnctpii nii'EDHaetcdo Hei ABOTMaTHNo.Якwo Мерекa 3axueta, 3'ABtbcBnBuHauOy BIKHO, B yKOMy notpioho BBecTn napOB.пicra BBeDeHH HATNCITb Connect'(Pi'dEHaTnc).
5
Далі nobернісь са Поуаткову CTOPINKу Ta HATNCHITb Ha 3HAuKY Bpay3epa, zu6 po3noaTHpo6Oу 3 INTEpHETOM. Bberpy, HATNCHITb Ha 6iNoMу noni, zu6 BBecTN aDpecy notpi6Horo caIty a60 Jx, BnKOpNCTOByTe NOwYKOby CnCTemy 'Google Search'.
AKKAYHT GOOGLE
Baw 6e3KoWTOBnHgOgle akayHT - ue KInou do OHOBHeHH BaWoRo nnaHweta GOCLEVER. YbiDitb y Baw aKKayHT Ta i3HaBaIteCb npo HOBI eNeKtpOnHi nCTn. TaKox BN MoXeTe 3aBaHTaxHtN TucRy Iporpam (rki 6yBaIObYk 6e3KoWTOBHi, taK i nlaTHi) 3 Internet App Store, cHxPoH3yBaTn KaJeHap Ta 6arato Inoro.
Kxu Bn Bx e MaTe eneKtpOnHy cKpHbky Google, BBeiTcbi NorIH Ta npOy, 06 KopcTyBaTncr Heo HadaJI. Kxu Bn He MaTe II, CTBopITb HOBNI obNikOBNI 3aNtC, HATNCyBwn: /Settings/Accounts&Sync/Add Account. 06 CTBopTN uYbiTu B oBNIkOBNI 3aNtC, Bam Notpi6HO Matn DoCTyn Do IHTepHety.
ПИДКЛIOUЧЕНЯ DO MEPEKIX3G
(3OBHIUHIAABOBYIOBAHIMODEMNI 3G)
Uo6 niD'EDHaTncdo Mepeksi 3G, BnKoHaTe HAcTyHni dii:
- Hatachitb 3aok Setting (HanahtybaHHa) Ta Hatachitb onuio 'More' (Bilwe).
- Hatncitb Mobile networks' (Moibhi Mepeksi)
- B 'Mobile network settings' (HanaTsyBaHHa M6iBnHex Mepex) yBIMKHiTB Data enabled' ta Data roaming'.
-
BiikpnTe 'Access Point Names' (Ha3Ba ToKn DoCTyny) Ta o6epiB bawy.
-
"Data roaming" (Poymihr dānix) -目前国内 BAC ce doatakovi BHTpTaH.
IpekoHaTeC, 0BaW npctpiOcShaenB6yDobAHM 3G moynem a6o npaue i3 3OBHIm 3G moEmom. 3BepHitb yBary, 0o deki nnHwetn GOCLEVER He ochaeni noprom USB OTG, a ue B cBOHO epry yhemoxJInBnOe po60ty 3 3G mepexamn. - Y 3B'83ky 3 TmM, ΣO TexHiHx XapaKTEpncTkn MoDemiB Bnpo6HnKiM MoKyb Pi3HtncA, M N peKOMeHnyEmo nepeNOKykoNepeBipuTc ycmichictb npncptpo 3 MoDemom. GOCLEVER rapaHTye cymichictb 3 GOCLEVER GCM01 Ta GOCLEVER GCM02.
3BepHbYbary, 00 Koxhen Micuebn npoBaIep TeneKOMyHikaui Mae CBoI BnAchi ToKnDocTyny (APN). Raio npncptiH neiEdHyTcBArTOMaTHUHO, 6ydb NaCk, 3BepHbC4do BaWoRo nocTaaHbHka TeneKOMyHikaui Nocnyr.
3AXNCT BAWOTO ПЛAHWETA
Bm mojete 3axnctntn Bawy oc6ncty infopmaizio, BCTaHOBBn npoIb. TaKIM YHOM, kIIO BN He KOpNCTyBaTMetecnnpCTPOEM NEHN (HanaTobAHn Bam) uac, Bin ABtOMaTHNO nepeJe B pexIm OuykBaHH i nAanHET 3a6N0kyTcB. 106 po36nOKyBatn nnaHwet i npOobKHTn po6ToY, Bam Notpi6Ho 6yde BBecTN npoIb. 3BepHiB yBary: kIIO BN 3a6yDeTe npoIb, BN BtpaTne Yci daHI, ockilbkN, 063noBy KopNCTyBaTncr nnahwetom, Bam Notpi6Ho 6yde BiHOBITN 3aBODcBiHaJauSTyBAHHa.
BIDIOBIDAJIbHICTb
Ockibkn npodykui GOCLEVER noctiHNO OHOBIOEbC Ta BdoCKHOJIIOETbcN, nporpamHe 3a6e3neueHHBaWOro npuctpo MoKe Deio BiDpi3HrTcR BiI TORO, 00 ONCyETcB B DaHOMy Noc6Hky KopnCTyBaVa. Bc HauHObiw iHΦopMaiz MicNTbCn Ha HauOMy Be6caTI y po3dini PiTprMka.
3BEPHITb yBATy
KoMaHIGOCLEVER 36epirae 3a cobio npabo 3miHOBaTH iHΦopmauio, 0oMICNTbC B daHOMy nocihky, 6e3 nonepdken. IHOpmaia, 0o MicntbcB cboMY dokymenti, nne dIra doBIDKn Ta BaWORO O3HaonomnHe 3 npodykTOM. Tomy BnpobnKn He Hecytb BiNobidalbHOCTI 3a NOMIKn Ta Btpaty daHx nn npbiYkIB, a Takox 3a iHwi npami Ta onocepedkobahi 3bHTKN, nob'zahi 3 BNKOpNCtAHm cboRO dokymenty.
- Mn noctiHbDcKoHaIeMo Hauy npOykuio, Tomy iHΦopMaiz, 0m MCTnca B cboMy nocibNky, Moke 3miHOBaTncs 6e3 nonepdKeHH.
- GOCLVER He Hece BiDnobiAalbHocTi 3a 6y-b-ki NOMIKN qH iHI MOMENT, CNPUNHEHcI NOCi6HcKOM KOpNCtYBaHa. GOCLEVER H6y-b-xTo 3 liueh3iaTopiB He Hece BiDnOBiAalbHocTi 3a 6y-b-ki BTPaTN daHnx qH np6yTKiB, CNPUNHEHcI HENpaBnblHM BVKOPNCTAHNM npCtpoo. Mn He Hecemo BiDnOBiAalbHocTi 3a 6y-b-ki NOMIKN, NOB'z3aHI i3 fYHKcIOHyBaHHM CnCTeMn Android YN BVKOPNCTAHNN II nporpam.
- Maniohkn HadaoTbCnIne Dnlo BoHn MoKyTb BiPi3HraTnc Bid BaWOrO npctpo. EKcnnyataiia Ta du3aH npodkykTy MoKyTb 3miHOBaTncs6e3 nonepeDxehn.
-Брени Та На За Рожду КтЕТОproВIMМ МарКамИ ВIDповднХКOMпаи. - Bci noaHmIoHn Ta foTo noaIbCn Iy n npKnaTy ta Moxyt 3miHOBaTncs 6e3 nonepeJxehn. BOH 3aJIexaB BiD 3anponoHOBAHH nxocnyr Ta Bepcii nporpaMHorO 3a6e3neuHn.
-Дани посбнк корисьача може He BiIDOBiATN BaWOMу ппстю. - GOCLEVER reserves the copyright of this Quick Start Guide, any random duplication or full/partial interpretation is forbidden in commercial activities.
GOCLEVER 3aJIiHae 3a co6oI ABTOpcbKi npBa Ha ue noci6HKn KOpncTyBaCa i 6yDb-kae BnnaAdKObe du6HOBaHHa, noBHa / yactKOBaIHTepnpTaiaR B KomepuHnX cInx 3abopOHReTcR.
3ACTEPEXEHHA
Ockibn Mn He moKemno NoHcTn XoHoi BiinobiaIbHocTi 3a NowKOxKeHH a60 Btpaty Baunx OcoNCTnx daHnx cepes HEBiIOBIDHe BnKOpNCtAHn / peMOHT / nowKOxKeHH, 6yNb Iacka, po6It pe3epBHI konII Baunx faNIB cIeTMuHO. Dna 36epExHH rapaHTI i 3anO6irAHn HebaxAHm NowKOxKeHH, 6yNb Iacka, 03HaHOMTeC 3 daHOIO IHCTpyKciEIO:
He nidaabaTe pnaanWet BnInBy Tena, npmIX coHauHnx npomeHib, cnIbHoro MOpO3y, nicky, nIly, BonOrn. Pnictpi He e BoDoHenpoHnKHM.
- YnkaTe ydpia, TpaCINH, KndaHHa, HAMOyBaHH npictpoIO.
3aBxnd 3MeHuyTe 3Byk neped BNKOpncTahnram HabyuHnkiv, 06 He 3aBdaTu KkOdy cnyx. Notim BldperyIouTe 6axhany rychicTB.
- DocTy Do IHTePHeTу MoXe 6yTu nHaTHM.
- He BnKopncTobuYte npctpi 6iJa Dxepen eJektpomarHITHO BnnpomHeHHa (Ha npKna: MkpoxBnboBok, TeneBisopiB, pao i T.d.).
- He npinnnne 3'ednHH (ΦopMaTyBaHH, 3aBaHTaXeHH) pantBO, ξo6 yHKnHyTN NOMnKn B nporpaMHOy 3a6e3neuehHi.
He BnKOpncTobyIte IaayuHneHnEkpHa cnpT,BoY a6o po3HHNKn. Bn NobHHi BnKOpncTobyBaTHn Hnue cneuaJIbHi
3acobnIyLCD nobepxohb.
He BnKOpncTObyTe npncptpiB cybopo 3aboponeHnx Micx (Hanpukna, nItakaX)
Bci 3abaTaxKeHi Bamn nporpaMn BVKOpNCTOByBaTHMyTbCn Ha BaW pn3NK.
- Pereda a daHnx i 3apAka akymyIaTopa nobHHa 6tN 3a6e3neheha 3a donomoro cneiaIbHx akcecyapib GOCLEVER i BIDNOBIDHO do IHCTpyKci.
Bn noBHnHni ndkIOHTn npncpti do dxepeJia XNBHeHH y BiNobIDHOCTi 3 npaMeTpamn, BnknaedeHmB TexHiHX xapaKtepcntkak.
BikpnTn nAnHeTa, cnpo6a camoctiH nopeMOHTyBaTH uH po3i6paTH NOro MoKe 6yTu He6e3neuHm Ta po6ntb Bauy rapaHTIO HeiiochoIO.
- Дя ремонту викоростову调解 лиме обториobahi сөрbingи сөнгүлүлүлүлүлүлүлүлүлүлүлүлүлүлүлүлүлүлүлүлүлүлүлүлүлүлүлүлүлүлүлүлүлүлүлүлүлүлүлүлүлүлүлүлүлүлүлүлүлүлүlэп.
- Спсок napтressesх сөрbingи сөнгүлүлүлүлүлүлүлүлүлүлүлүлүлүлүлүлүлүлүлүлүлүлүлүлүлүлүлүлүлүлүлүлүлүлүлүлүлүлүлүлүлүлүлүлүлэп.
CEPTHΦIKAT BIDIOBIDHOCTI

KomnHIGOCLEVER3aBnE npo Te, 0o II npOyKT GOCLEVER QUANTUM 785 (Homep moDeni TAB A1021) BiIObiAe BcIM BaXKnBm BmOram Ta noLoKeHHM HAcTyNHx DnpeKtNB:
EMC DIRECTIVE 2004/108/EC
LVD DIRECTIVE 2006/95/EC
R&TTE DIRECTIVE 1999/5/EC
DeTalbHiwa iHOpMaJiMiCTNtbcraHa HauWOMy Be6caNTi.
Почиайт, 6уь lacka, hawi npabnla zuo BnKOpHCTaHHa Cooke ta npnbathocti ha hawomy caTl www.goclever. com.

Dana npodykui 6yna ceptnphiKOBaHa Ha BiNobiHicr RoHS.

3HaK KocTi - YKPAIHA
HaiohaIbHn 3nK BiIOBIDHOCTI nITBepdxye, 0o 3a3NaHeHn npOyKT BiIOBIDAe BIMoram TexHicHNx perameHTIB YkpaHn.
YTNII3AU1I

IeHTpn yTnI3aui 6bnaHannr TenepeocTynni Ira Bcix nokyniu. Tyr BN MoKeTe 3datu Bau npncptpi GOCLEVER u HniDnBaun, BiNobiHO do EBPoneCbKnx BmOr (npo yTnI3aui eJeKtpnuHoro Ta eJeKtpnuHoro yCTaTKyBaHH - a6o WEEE - DnpeKtNa 2002/96/EU). NpOkyneub MaE moKlnBicTB 3datu 6yd-ka6bn B taki CneuaJIbHI nyHKTN npinyomy. HaraDyBaHH npo oOcblNB yTnI3auio Micntbcra Ha npodykTaX y BnIJI pepeKpcSeHoro MycOpHoro KOnTeHepa Ha konecax (ui no3Haqun E ha BCIN npodykuGOCLEVER).

OCOBINBOCTI BKNOPUCTAHHA WI-FI
Bukopuntanha 6e3dpoToBoi Mepexi (IEEE 802.11b/g/n) B deaKnx KpaHax (ΦpaHci, Itania, HopBeria) Ma cboi oco6nBOcTi:
Фрази:ВЗakntomynpmiieni Do3BOLЯETbCBAKOPNCTOBYBaTN BcI KaHAn.Ha Bynui zi Nwhe 3 1do 6.YpeKIMi iHpactpykTpy,6yNb lacka,nepekoHaiTeC,io ToUka doctyn HaanTobHaHa KaHAn BiD 1do 6 nepeHaalTuBaHHM 3'EDHaHHa.
Itania: BnKopncToByte Mepeky LAN: YtniIiaZi cTaporo eNeKtpuHoro Ta eNeKtpoHHoro 6bnaHaHH - npBaTHe BnKopncTaHH 3rIdno 3aKoHOaBuro Yka3y 1.8.2003 Homep 259 (,KoDEc eNeKtpoHHnx KOMyHikaui).3Opema B CTATTI 104 NdeTbcra npo Te, IIO notpi6eH do3Bil Na BnKopncTaHH, a B CTATTI 105 3a3NaHacTbcR, KOIN Do3BOJRAETbcra 6e3KoWTOBHe BnKopncTaHH Mepeki.
Hopberia: BnKOpncTaHnHa 0bOro o6NaHnHn He dOnyckaTbcra y reorpaΦiHi 3oHi B paDi ci 20 KM BiD cIeHTpy HIO -OnecHH, Uniucpereh.
yMOBN rapaHTii
Ha niDctabi daHoro taIohora rapaHTyEcBraCoka kiciTb, i 6e3doarHe fynKciOHyBaHHn Bnpo6y, 3a yMOBNOTpMaHH npabNl ekCIIpyatauBkA3ahnx BInCTpykui KOpNCYbaya.CmR rapaHTiHm TaIOHOM niTBePdJxyeTbC npabHicTB cIbOro Bnpo6y i 6peTbcra 306OB'3aHHn 3 6e3KoWTOBHO yCyHeHH BCix HecnpaBHocTei, zo BnHKn 3 BHN Bnpo6Hnka, npotrrom 12 MicaizB 3 dH npodaxy.1. TapaHTiHi 306OB'3aHHn diiChi npi DToPmaHHi HAcTyHnx yMOB:
-HaBhicb po36ipnIBO i B NOBHomO 6c3i 3anOBHeHoro rapaHTiHoro TaHOHa;
- HadaHHa npiCTpoB NOBHOMy KOMnIeKti;
2. Be3koTobHn peMOHT npoBODNTscra TInbKn npOTaROM rapaHTiINHOrO TePMHy 3a3HaueHoro B rapaHTiINHomy TaIOnHi.
3. TpaHcnpOpTyBaHHHeCnpBaHOro Bnpo6y B cepBicHn ZeHTp 3diChHOETbC KJIeHTOM 3a NOrO paxyHOK.
4. Bnpi6 He niiIrae rapaHTiHOMy pemOHTy B HAcTyHNx BnnaKax:
- BnKopncTahnH npictpoHe 3a npn3HaueHHam; npuyenHn npabnl ekcnlyatau a60 36epiraHHBnpo6y;
-HaBhictb Mexahiunx ykoJKeHb (BM'ATHH, TpiuHH, noDpnnH), cnidib pemOHTHnx po6it, po3KpTTT i T.d.;
-HaBnHicb NowKoJKeHb, BnKlnKaHnx CTuxieIO (doi, BiTeP, 6nncKaBka i T.D.), noXeKeIO, no6yTOBmN
fakTopamn (HaMipHa BOnoricb, arpeCnBHe cepenobuue, 3anneHictb i T.D.);
- BnKopncTaHnB Bnpo6y 3 npuyweHHm npaBnE kcnnyataui, BiNobiDHO Do TexHiuHoi DokymeHTauii Ha Bnpi6;
- Pemont Bnpo6y Oc06oH He ynoBHOaKeHoB BuPo6HnKOM;
-HaBhictycepeDHHi CTOpOHHIX ppeMeTIB,piIN a60 KOMax;
- NowkoJxHnA abo BiCyTHiCt b nIOM6 (CTikepiB);
- UctahOBka nporpaM 6e3 Do3BOJy Bnpo6Hka, MoiΦikaia nporpaMHoro 3a6e3neueHHra;
- HenpaBnIbHa yCTaHOBKa Bnpo6y;
-Пдкючehнь Виpo6у До Heсправhoi, Уо He BiДnobiДаСТандapтам abo TexthiHm BnMOram Ha Bnpi6 6oToBoi МepekiЖИВлення (6oToBOi Мepeki ABtOMobiIЯ);
-BnKOpncTaHHHeOpnHaJIbHnxakcecyapiB;
- BiDcyTHiCTb rapaHTiHoro TaIHOHa, HeBiIDNOBiDHiCTb MoJeni Ta cepIHORO HOMepa Bnpo6y Bka3AHx B rapaHTiHOMy TaIHOHi.
5.「rapaHTiHa nooHIOCTbca Ha nporpaMHe 3a6e3neueHHa, 36epexehn DaHnx Ta KOhphiIpyaiciu npametpi HanaTuBaHb.「rapaTia TAKoK He nooHIOETbca Ha mIKpOcXemu, 10 BIDNobIdaOTb 3a po6oty nepupeipinoro o6naHahnra (Bideo BXid / Buxid, noptn i T.d. Ix npaue3daTHicTB Heo6xIdHO nepeBiprtn npnokynci).
6. rapaHTi He nooHIOeTbCn Ha BnTpAthi MaTePiaJn Ta akceCyapn (abTomO6IbHi i mepexeBi 3apdKn, TpImaqui, Ka6eni, eJeMeHTn KpinJIeHHN, NylbTN dInCTaHcIHOrO KepyBaHHN i T.d.), a TAKOX npuyweHHn Ipaue3dathOCTi, BnKlnKaHI HopMaJIbHM 3HOCOM.
7. RapaHTiHn TepmiH Ha akymyIaTOpHi 6aTapei, 10 BxOJaTB KOMnIeKT Do npncTroB, cKlaIaE 3 (TpN) MicraCi.
8. 3amHa MaTpuci (PK-dncnpey) y npictpoi npoBOntbc npu HaeBHocti 10 rpyn no 1 tocu, a6o 3 rpyn no 2 toku, a6o 1 rpynn no 3 toku.
9. Y rapaHTiHe 06cIyROByBaHH He BXOHTb HABuAHH 3aMOBnka po6oTI 3 npu6aHm 06laHaHHaM. 10. TepminrapaHTiHoro pemOnTy moKe 6ytN npoOBKeHn, 3 o6ob'3KOBUM onOBiueHHaM 3aMOBnka, uepe3 3aTpIMKn imnpToy 3anachnx qactnH, a Tak cAmo uepe3 iHwi, Henpeed6aueHi 06ctabHH, 0o He cynepeeATb 3akOHy npo 3axnCT PpaB CnoXnBaVa.
11. Tepmin cnlyx6n Bipo6y - 2 pokn.
ПИТАНТABAIDNOBIДI
1.ЯnomITIB,so onepatNBHa nam'Ят b npictpoMu MeHua,HIX 3aHaueHa y TexhiHx xapaKTePncTnKaX.
OnepatNBHa nam'rBCKnadaeTbC3 DBOX yactINH: BNDMOi npNXOBHOI nKOPNCTyBaHn. HanaWtYBaHH Android DEMOHCTpyE IInse BNDMnYnam'rB, PnIXOBaHx K nam'rB 3a6e3neUy E NKoHaHH p3HNx npocicB cnTeMn Android.
- Φλeew nam'raTb npucrpoB iDpi3HЯETbc BID Tiei, yka 3a3HaueHa B noci6Hnky KopncTyBaay.
Φneu nam'rBnnaHweta (Tak cmo, iK jokcTKn dNCK PK) BiDpi3HReTBcBri BID biDfopMaTOBOHOi na'Ti uee3 niIroTOBky do BkOpNCtAHn npncToIO. KopCTyBaU OTPmYe BxE BiDfopMaTOBAHn PnAhnTe. Φneu nAm'rBdiITbCra Ha 3 qactHH: nepwa BiNobiAda e 3a KepyBaHH daHmTu po60Ty onepauiHOi CnCTem Android, dBi IHnx NOKa3YIOb BInbHe Micce dnn nporpa, BiEO, foto, My3NK Ta IHNX DOKyMeHTIB.
- Mi nlaanwet GOCLEVER noraHO biDnobiae Ha komaHn, 3aBncae, nobInbno npauo e a60 30bcim He pearye.
Mn pekomehnye mo nepe3aBaHTaxnT npncpti, BnKOpNCTOByOu n KOnky xnbeneHna (yTpmyBaTu 3-4 cekyn) a6o KOnky nepe3aBaHTaxKeHHHaTCHyTN TohKnm 3arOCTpeHm npdeMetom).
4.G-cehcop He Biinobidae.
Bam notpi6Hb Bdkani6pyBaTn npncptri, HATNCHyBn HanaWtYBaHH / Dncnne / KanibpyBaHH (ua onci 3aJIeKHTb BiD moeni). 3BepHt b yBary, uo He BcI moEJI maoTb uO oniuio.
- Mi nlaheT GOCLEVER noaB wBnDwe po3pAkaTnc, Hix 3a3Bnuai.
B npicpi B6yodoaHO akymnylAToP, kN e Ioro onepauiHm KOMnoHeHToM. LIKOM npnpoHn, 0o Noro notyXhictb 3MeHwyeTbcra nCnT PnBaIoro BNKOpNCtAHHa.
6.Яху заразжити 6e3kowtobhi nporpamn 3 Application Market.
ДлгТOrO,ц63aBaHTaxKtN 6e3KoшТobHIn nporpamn 3 Application Market , cnoatky notpi6Ho CTbOpHTn cBn Google aKKayHT.MaTe Ha yBa3i,цо DeaKeI nporpamn moKytb 6yTu nlaTHmN.
- Jxouy niiknouhntu 30Bhiwhi npctpoi (MnKky, knaiaotypy, moem, fneuky).
Ipeep Tm, k niknkiuHTn 3OBHIHNI npncpti, nepeKoHaTecra, 0BaW nlaHwET MaE USB OTG nopT. He Bci nlaHwETn GOCLEVER nponohyToB cIO oncio. 06 di3HaTncra npocptpi 6Inbwe, nepernhaTe Ioro texhiHi xapaKtepntkn Ha hawomy Be6caaTI www.goclever.com.
- Meni notpi6no nid'ednato nnanwet GOCLEVER do iHoro npncptpoq uee3 Bluetooth.
Ioo yBIMKHyTN onuio Bluetooth, Bam notpi6Ho yBiTn B HanaWtBuHnra / Bluetooth Ta nepetaryHTn nepeMnkau Ha ON' (TaK cAmO Ja3 Wi-Fi). 3BepHITb yBary: He Bci nlaHwETn GOCLEVER nponoHyToB zuo onuio.
- B KOMnneKti 3 MoIM nlaHwTeom Nde knaBiaIypa BluTooth, aJe r He MaO yAIBeHHr, AKe HEO KopNCTyBaTucra.
Дя toro, i06 ni'EDHaTu KnaBiaTypoIy, yBIMKHiTb II ta HataNCHiTa H hi KNHcy 'Connect'(Pi'd'edHAtu). DaJI BAM cnID yBIMKHyTu Ha Bawomy nlaHwetI onciO Bluetooth. 3hauiTb Bawa BLUETOOTH KnaBiaType cepd cncKy Ta HataNCHiTa Hhi. BBeiTp 4 uΦpr PIN KoNy ta HataNCHiTb 'Enter' (YbiTu) i BiDyTeBc ni'EDHaHHa.
MARK OF CONFORMITY - UKRAINE - National mark of conformity confirms that the specified product complies with the requirements of the technical regulations in Ukraine.
MARK OF CONFORMITY - UKRAINE - National mark of conformity confirms that the specified product complies with the requirements of the technical regulations in Ukraine.

LIKVIDÁCIA NA KONCI ZIVOTNOSTI
Pre vsetkych zakznikov su k dispozicii recyklacne strediska, v ktorych mozte zlikvidovat vase zariadenie spravnym sposobom. Toto je poziadavka Europskej legislativy (Waste Electrical and Electronic Equipment - alebo WEEE - Smernica 2002/96/EU). Zakaznici mozu odniest staré zariadenia na zberné miesta alebo na miesto predaja zariadenia. Pamatajte, ze toto zariadenie /kable atd. budu d'alej spracované poças procesu recyklacie. Pre pripomenutie recyklacie je zariadenie označené symbolom preškrtnuteho koša. Tento symbol je na vsetkych zariadieniach GOCLEVER.

PODMIENKY POUZITIA WI-FI
MARK OF CONFORMITY - UKRAINE - National mark of conformity confirms that the specified product complies with the requirements of the technical regulations in Ukraine.

LIKVIDACE NA KONCI ZIVOTNOSTI
PÁGINA: www.goclever.com/support
CONEXION CON LA RED 3G (MODEMS EXTERNOS O INTERNOS)
PRESENTATION DU PRODUIT
SITE: www.goclever.com/support
MISES A JOUR DES LOGICIELS
PÁGINA: www.goclever.com/support
CONEXão COM INTERNET WI-FI
NONCK-KNKHHTeNoApbIKy,TObblOTKpbItbOHnAH
- NONCKOBVK
Mnckpooh - KlnKHTe NO uKOHKe dna paCno3HOBAHn
peu
IkoHKn npnIOXeHN - HaxMNTe DnB Bb6opa
pnpnoKeHn
KhONKa NITAHNA - ydepxkBaIte daHHyIO KnaBnWy B
TeueHHe HeCKoBKnX CekyHd IaB BKnIOUeHn/
BbIKIOUOeHnYcTPOyCTBa
MeHIO HAcTpoek -NcIOnb3yETcIaI npocMOTpa BceX IMeOuNXCA HAcTpoek
YBeOMnEHn - HaxMnte n npoBedeHne no BepxHeJneBnactn 3kpaHa, YTOb6I NOcMOTpeb naHEnO6HOBnEHn, 3JeKtPOHNOuTb nDp. HaxMeNTnpoBEdnTo pBexHN npaBOy cAteN kpaHa, YTOb6IOcMOTpeb CTATYC 3apAek 6bApTeW, Wi-Fi n Dp.
Budkctb - klnknte Ha Cnncok npunoKhenn, nocne cero Bb6epnte «Budkctb» 3to He60bnue npunoKhenn, KOTOpbe BbIOBATcH HdoMAuHIOCTpAHUY N OTObpaKaIOT TAKHe daHHBe, KaK norOda nouHa, foto ranepe, youtube Buaeo n apyrie.
NepcoHaH3aun - HcNoB3yeTcna nI3MeHeHn 06eB paOboTe cTOna (KAK dJe YCTAHOBKN UyKe IMeOuXcB B NaMTH NcPOtHcBA, TAK n DnA 3aPyr3Kn HObIX). TaIOKe dNe BblOpa 06oEB KInkHnTe No CBO6OHOMy npocpTaHCTBy Ha paoCHem CTone, NOCNE NOBLeHHn DnAIOROBOrO OKHa, CneDyHn MHCTpyKUn.

Texnuecka nopekk
Be6-cain: www.goclever.com/support
PykoBOcTBO noIb3ObaTeIa (o6paTnTe BHMaHHe Ha OHnH-NHCTpyKuH, BHMaTeNbHO npOHTne ee)
-Пограмнhoe ообсneyенue(6ydeToRObI KpaOte cHOBbIM nporpammbmOBocneueHnem)
-СаюзддбьБОПСБI
- Mectonolokhenie cepBnchbix ceHtpOB (Mb peKOMeHdyem o6paatbca HENOCpeDCTBeHHO B roJIOBHO CEHTp GOCLEVER n IokaIbHbIe cepBnchble ueHTpbI)
-Информazonу rapaHTHnom 06cnyxHBAHn(rapaHTHnoe 06cnyxHBAHne Ha nlaHweTHbIe KOMnbIOpTepy GOCLEVER TAB OcyueeCTBIAeTcB TteueHne12 MecaueB c DaTbI NOKyIKN).
-Пюценира сервс Horoоблжьаня
Bénapycb
220053, MInHcK
V.Slutskoi 67-2
belarus@qoclever.com
+375 (17) 3354883
3apernctpnyte Baw npodykT ha caite: register.goclever.com
PereCTpaun npOdykTa Ha caTte daet 60nbwe BO3MOXHOCTe!
Blaorapim Bac 3a Bb6op npoykun GOCLEVER! Perncptaun yctpoocTba Ha caTe 3aMeT hackoIbKO MnHT, HO OTKpoet 60JIbe Bo3MOxHocTe.
Ipeennte ha caT: www.goclever.com n y3naTe 6oJIbwe.
He ynucntte wanhc nojuyuNbBbIoDhble npednoxkeHna OT npon3BOOnTeHa:
12 mecaeB rapaHTnHoro 06cIyKbAHna,
Cobetbno camocToTebHomy yctpaHEnIO npo6nEM nTexHnuecka noDepKka,
- HanomnHaHnO 6o 6HOBHeHHI PO (nporpaMMHOrO oecneueHH),
3KCKNIO3NBbI 063Op HOBbIX yCTpoINCTB
CneuaNbHbIe npednoxehn aKun - cKnDn do 30 % (dna otdehBbix npoaykTOB)
-5ecnnaThbIe 6hOBJIeHnKapT (DononHntJeBHO)
Ochobhble onepaunn Ira cnCTembl ANDROID
NEPBbIb3ANYCK
Pn nepBOM BkIoueHnn yctpoiCTBa, nCOnb3yIte MacTe yctaHOBNKn), 706bl hactpoNTb nnAhnweT dIaIbHeWe pa6oTb (CneDyIte IHCTpyKUAM). BbiBepnte Heo6xOIMMbY3bIK BBODa. BoNDTE B Google (nIn co3dAnTe yyeTHyIO 3anncb Gmai) IJI BA XOA B CeTB INHTepHET N ONyEHHa DOcTyNa K npINIOKeHNM. CNeDyIte IHCTpyKUAM. O6paTIte BHImAHne, YTO HeKOtOpBle PnAhnweTb He ochaueHbl MacTepor yctaHOBNKn). B TAKOM Cnyae, HAcTPOKn HxKHO BblONHHTb BpyHyIO C NOMOsbIO MeHO HAcTpoE.K.
B cenx oecneuehenna 3auntbkpaHa (Bo n36eXaHne zapann), Ha yctpoiCTBe IMeETcra 3aunTHa rnnK, KOtopyu npn Heo6xoDMocTm MOxHO IerKO CHrTb.
06HOBJIeHHe nporpaMMHOro o6ecneueHn (I0)
BecnnaTbIe 06HOBLeHnI nporpaMMHOrO o6ceueHHnI c nmoUbIO CnCTembl OTA (Over-The-Air). OTkpoJIe npinooKeHHe «OTA» (Over-The-Air) n HaxMnte «Online Update» (OnJaH - 06HOBHeHne). PpInoXeHHe OTobpa3NT cnCOK doCTynbIX 06HOBHeHn. PpN 3aRpy3ke 06HOBHeHn IoTbepdnte, yTO Bbl DeiCTBnTeMbHO JxelaTe 3aYcTb npOcEe. HaxMnte «Ok» n PoJokdte HeckolbKO cekyHd - pAnHwET bblONHIT nepe3arpy3ky n ABToMaTHueCKn 3aNyCTNT npOeCC 06HOBHeHn.
B cnyuae, korga obnobnen He haJeHbI, nporpaMMHOe oecneueHne moKHO 6HOBnTB Ha cTaHapTHe OCHOb uepe3 PIK (C nCnoJIb3OBaHNEm faiIOB, dOCTyINbIX Ha Hwem caIte) IIN HxKaTb KhoNky «JokalbHOe 6OBnEHe», KOtOpoe HaxoDITcB B npInIOXeHH «OTA». 3aTeM hAXMITE «DncNETUep faiIOB» (File Manager), bIbepnte KOHKpeTbI aII (ckauHHpaHe) n NaHHTe yCTAHOBKY.
PIMMEUHNE: He Bce yctpoicTba OchauhehpiuOxehnem «OTA». B cnyae oTcYCTBna daHHoro npuOxehn o6HOBnte nporpaMMHoe o6ecneueHne uepe3 PK c nomoosbno foaiNoB, doCTynbix Ha hawem caTe.
3apkaakkymyITopH6atapei
Cpok cnkyb bakymyto hapmyo 3abnct ot npabunbnoctne ee ncohboaHna. ObaTne BnHmHane, cy npon3bOHTe rapaHTpyet mnpabhyo pa60ty toIbko opuHHalnbix 3apndbIX ycTroYCTB GOCLEVER. Npeed nepbim npimehenem peKOMeHdyETc 3apndtbc yctpoictBO B teueHne 8-12 cob n He cHmAtb ycTroYCTBO C 3apdKn, noka oHO nnHocTbO He 3apdntc. B pOcece 3apdKn kak PAnHeTHk KomblOteP, TaK n 3apdHoe ycTroYCTBO MOrYT HarpBaTc. 3To He onacHo. Pn peDkOM icNoB3OBaHnn ycTroYCTBa npOn3bOHTe peKOMeHdyET 3apkaTbe erO xot b pa3 B MecaU BO n36exAHne HncnPabHoctn akymytoTropOH 6atapei.
BkIoueHne/BbIKIOUeHne
YdepKnBAA KONKY NITAHNA B TeueHne 3 cekyHd, Bbl BkNIOUHTe yCTPOINCTBO GOCLEVER, kKpaH yCTPOINCTBA 6ydtB PexKmE 6IOKnPOBKn. Coklb3aunm DnXKeHem nalbua nepeTaunte NKOHky 6IOKnPOBKn BnpaBO. O6patNTe BHMaHHe: ecnn yCTPOINCTBO He BKIOUaETcA, BepoTHO, erO HxHO 3apAnTb. IyBaBkIOUeHry YCTPOINCTBA HaxMITE Ha KONKY NITAHNA U depKNaTe ee do noRBeHnDnAIOLOBOrO OKHa, rde HyKHO 6ydtNtBepdntb BkIOUeHne. O6patNTe BHMaHHe, TTO npu BBKIOUeHn paBoTaIOUne npIoJoxHn, OTkpBTbe DOKymEnTb ABOMaTnueeCKn He COxpaHOTcra.
Pexm oxndaHn
YtO6bI AKTNBnPOBaTb peKIM OxNHaHn, ydePKNBaTe KhONky NITaHnB B TeueHne 3 cekyH. YcTpoiCTBO GOCLEVER TAB mRHOBeHHo BepHeTcK pa6Ote, KOrda BbIOBtOpHTe DeJCTBne. DokymEtbl ABToMaTHueCKn He coXpaHnOTcR.
Ipeep3arpy3ka
B clyae kaKx-1n60 npo6nem c nporpaMMbIM
obecneueHem (3aBncahne), nepe3arpy3nte yctpoiCTBO,
ydepKXBra KHOKNy nIITAHN B TEUHHe HcckOlbKnx
cekyHd. BTOPO cnoc6: ydepXNBaTe KHOkny
pe3arpy3kn B TEUHHe HcckOlbKnx CeKYHa, NOKa
OHO ABOTMaTHueCKn He BbKJIQUHTcA. ABOTMaTHueCKn
BKJIQUHTcpeKIM C6poca.
C6poc daHbIX/BOcCTaHOBNeHne 3aBOdcknx HaCTpoek
EcnBbJKeJaTe NpepaTb KOMy-1n6o CBoe yCTpoiCTBO 6e3 CO6CTBeHHbIX faiIOB IN DOKyMeHTOB, BblONHtte «C6poc HAcTPOeK», TEM cAdbIM Bbl BOCCTaHOBtte 3aBODcKne HAcTPOIKN NO yMOUaHNIO. BydTe OCTopoXhBi, NoCKOJIbKY BCE DaHHbIe (MylbTImeDiNa, DOKyMeHTbI, KapTHKn, BInDeo, ayDIO, KOHTaKTbI) 6dyT yTEpAHbI. EcnBbl He XOTNte CTepeTb daHHbIe c SD kapTb, He 3a6yDbTe N3BLeuY ee nepe TEm, KaK BOCCTaHOBtB 3aBODcKne HAcTPOIKN.
ДяВOCSTaHOBHeH3aBOcKnxHAcTpoE,KcIeYTe HNCTpyKuIN:
1.《HactpoNn》
2. «ВocstahOBJIeHneI c6pOc»
3. «BocctaHOBnHeHne 3aBOcknx HacTpoek»
4. «C6poc Hactpoek»
CHATHE 6IOKUPOBKIN
3bIK
Cehcnpbni 3kpan (tau-ckpnH)
3Kpah nlaanheTOB GOCLEVER - emKocTHbI, yTo no3BOJnAET He npImeHrTb Oc6bIX ycNlIn npn pa60te (ceHCOPHbI 3KpAH 6bCTPO peaHpyET Ha npNKoCHOBENHa naIbueB). He npImeHraTe ocTpbX npedMeTOB npn pa6Ote CyCTPOnCTBOM, NOCKoJIbky 3TO MoKeT HABPeDnTB yCTPOnCTBY (NOBPexKDeHn 3KpaHa He JABLIOTc rapaHTnHbIM clyuaem).
KnaBnAtya

Дя сгета 6лokировки c устpoctba GOCLEVER TAB haxmite Ha KhoNKу nHTaHnI y,уderxnbay naibcem ukoHky 6lOKipobkn, ckOB3aunm DBNXeHnepeTaunte ee Bnpabo (cm. pnc.).БLOKIPOBka -yctpoCTBO haxoNTcB b peXnme OxndaHnna. Nocne toro kak yctpoCTBO pa36lOKpOBAHO, chorotoBO K pa6ote, bbl moXeTe npocmoTpeb nocneHne otKpbItbe npinloXeHn/Be6-CTpaHnCbI/ DokyMeHTb i np..
B nlaanwetnbix komnbioptepax ToproBo MapKn GOCLEVER no ymoJuaHHO yctaHObnen aHrnnckn 3bIK. Bbl moKeTe BbI6paTb Heo6xOuMbI Bam 3bIK, cneDyHacToPouKaM:
CHIMNTe 6JOKINPOBky 3KpaHa.
No ymoIaHnIO npOn3BodInTeIem Bb6paHa QWERTY - KnaBnAtypa (BnptyAnhA). IJra TOrO, YTO6bI HaneuataTb YTO-Im6o KnnHnTe NO TeKCTOBMy OKHy, Nocne Yero noRABTcKnaBnAtypa (TaKxMe MoXHO mCnObl3ObAtb npInOxoHe «Pacno3HaBHepeuN').
ДяТOrO,HTObi HaneyataTb 3aRnAbHbIe 6yKbI, nCnoB3yIte KnaBnUy «Shift».
Дя Вьда чиноьх СУВОЛОВ ИЗHAКОВ пpenHaHЯ
ИСПОЛБУТЕ КАВИЧУ «?123»
Toro,HTo6bHaneaTaBkKne-N60HaNHOHaBbHe CMBOblb,HaxMnteUyepKnBaTe COOTBeCTBYIOyIO 6kyBDo NOBHeHmMeHbB6opa.
Kapta namrtn (cbemhbl dNCK/HaKoNHTeJb namrtn)
Pnahwet noctabnreTco BCTpoeHHbIM BHytpenHeN namrBIO (B 3aBncmocn OT moJeH). Bbl mokepe paCwnpntb npoctpanCTBO dna coxpanehn daHHbx, nCnoB3yra Kapty micro SD (he ndet B kOMnnkTe C yctpoiCTBOM) oBeemom do 32 Gb. NcnoB3oBaHne cBemHoro dNcKa taKxe no3BOJareIerYe nepeHocntb faNb c NK ha nlaHweThb kOMnbOTep n HAO6OpOT. AkypatHO BCTabte KapTy naMrtn B cneunalhbl pa3bEm. Dnra toro uTo6bl n3bByt ee,doCTaTOUHO IERKO HaDaBNTb Ha kapTy. Bo n36exAHne npObnem He daBNTe Ha Hee cnIbHo, DoCTaTOHOr nenKoro HaxaTn, uTo6bl ee n3BNeyb. YctahabnBaTb Android npinloXeHn moXho npn nomou n KapTb (DOnonHInTeNbHO). IpocTo 3arpy3nte npinloXeHn/foHnHa KapTy naMaTn n BCTabte ee B yCTpoiCTBO dny UCTaHOKn. Pocne 3arpy3kn npinloXeHn OTKpoite «Dncnetuep foAioB», Bb6epnte foai/ npinloXeHne dny yCTaHOKn n CneDuYte IHCTpyKzum.
Ira TOrO yTo6bI ydaInb To nnnn HHOe npnloKeHne, OTKpoTe «HaCTpOKn», «PpUIOXeHnry» n BbIbePte To, KOTopoE Heo6xOIMO ydaInb, noTBePdnte ydaJeHne.
BecnpoBoHbIe cTeN (WI-FI)
Bbntn B nHTepnet c nomoubo nnaHwTeHoro kombiopepa GOCLEVER TAB npocto, nnoIb3yte 6ecnpobOHOe noKnIOueHne (WI FI). Bb moke Te noKJIouHTbcra C nomoubio domaHe cetn, IIO60, KOrDa Bbl BHe DOMa, C nomoubo 6ecnlaTHbIX «ropauix» Touek, KOtOpbe moXHO hain T b u konax, pectopahax/kafe, roctuHua x n. d.
Дя podкlioquhenя к cetu Wi-Fi cneyuTe nHCTpyKUIN:
1
- OTKpoTe «HactpoKn». 3aTeM «BecnpoObNbIe cTe N uYcTpoCTBa».
2
- Ydepxnbary KOKky Wi-Fi, nepetaune ee Bnpabo K nkoHke aKTHBaun.
3
3.YcTpoCTBO GOCLEVEROBHApYKNTBCEIOCTyNHbIe Wi-Fi cetn. Bb6epnte cetb, K KOtopoB BxOTnTe noDKNIOHTbcra. Ecn Baasa cetb He 6bila ObHApYKeHa, NOBTOPte NOnBTky NoCKa.
4
- KOrda ectb docyn k cetn, yctpoNCTBO noKnHouaETcABTOMaTHueckn. B cnuyae KOrda Heo6xOJIMO BBECTnIorHN/napOB, BBeNTe daHHbIe n noTBePdnte noKnIOUeHne.
5
- Haxmte Ha IKOHky 6pay3epa. KInKnHte no 6eIOMy nIO BBepx, yTO6b I BBeCTn aDpec toro nn HOrO Be6-caTa. BocnoB3yntecb cncTeMo nOcKa Google.
AkkayHTbl GOOGLE
Baun 6ecnnaThbE akKayHb Google -3To KIOU DOCTyna K O6HOBNEHnM nporpaMMHOrO o6eNeueHn M npINOxehnM. AKTNbIpOBaB akKayHT Google, Bbl NOnyHTe DOCTyn K 3JIeKTPoHHo NOHT E CMOXeTe cKauHBaTb TbcHn npINOxehn (KaK PNaTHbIX, TaK N BeCnnaThbIX) n3 PlayMarket, cnHXPOHN3IPoBAb KaHeHapb M Horoe dpyroe.
Ecnn y Bac yke ectb 3neKtpoHHa NOHTa Google, To Bbl MoXeTe NcNoB30BaTb yke cyueCTByuOnn JIorHn npoNb. Ecnn y Bac Het akKayHTa, co3daTe erO c NOMouSyIO nnAunHeTHoro KOMnbIoTepa GOCLEVER: HAcToPouK/N/AkkayHTb n CnHxpoHn3auN/ Do6aBntb akayHT. Ira Co3daHnAkkayHTa Bam Notpe6yETc DOcTyn B INTEpHet.
IopKnIOueHHe K 3G cTeN (BHeuHHe MoEmbI/BCTpOeHHbI 3G MoEm)
Ia nooknueHnK 3G cetn cneDynt HnCTpykun:
- OtkpoTe «HactpoKn»
- BbIepeTe «Mo6nIbHbIe cTeI»
- B Hactpoikax Mo6nIbHbIX cTei BbIepeHTe «BknIouTb nepeaay daHHbIX»
- OtkpojTe «Toukn Doctyna» n Bb6epnte CBOIO.
«Пepeda daHHbIX»-6ydbTe BHMateJIbHbI, NOCKoJIbKy 3TO BJIeUET OJIOJIHHTeJIbHbIe MaTePnaJIbHbIe 3aTpAToI.
- Поберьт, подөрхиаетл устpoшгв 3G моуль паботаet ИСКИQUHTeьно OT Всннх 3G мо demob.Орате вимане, уто некоторы устpoшгва GOCLEVER He ochaши USB OTG npotm, уто яялэгсп рчновНебзмoxhoctn noKDЛюЧЕня K CETN 3G.
B CNYIy TORO yTO texHnueckne oco6eHHocTH moDEMOB moryT meHrybca, peKOMeHNyEM Bam npoteCTnpoBaTB coBMeCTHMocCTMoDEMa c yCTpOcTBOM nepeD nOKynkO. GOCLEVER rapaHTnpyET COBMeCTHMocCTb pAnHeTbIX KOMNbIOTepOB C MoDEMaMTopROBo MappGOCLEVER, TaKnx KaK GOCLEVER GCM01 n GOCLEVER GCM02.
- 06patnte BHIMAHne, YTO y KAKDOI NOKAlbHOrO ONEpATOpa CBy3n CBOH HAcTPOmKn TOnKn DoCTyna (APN). Ecnn ycTpoiCTBO He NODKNIOUaETcR K Hm ABOTOMaTHueckn, 06patntecb B cnykby cepBnca dna nOnyehnna doCTyna.
3aunTa yctpOyCTBa
Для 3ациты усточьи xхаяшенья на He Hm Информачи BOCNOLbYteCB 6LOKINOBKOJ 3KpaHa. 3KpaH 6LOKINPYeTcABTOMATUeCKn, ecIn ystpoCTBO He nCNoIb3yETcB pa6ote B TeueHne OpeJeHHORO BPEMeHN, noCle Yero NOBHTc3aPoc Ha BBedeHne napoJI (ecIn taKOB NmeETc) dЯ BOCCTAHOBHeNHO DOCTyna. BydTe OCTopoXKn b C napoIe, Nockonbky ecIn bI erO NotepaTe, To daHbIe C nAunHeTHorO KOMNbIOTepa 6yET cLoxHObBOcCTaHOBNTb, NoCKONkY dIByBOcCTaHOBHeNHO DOCTyna K UcSTPOCTBY NOTpe6yeTc BblNOHNTb C6poc N BOCCTaHOBNTb 3AbODckne daHHble.
OTBetCTBeHHoCTb
Hn KOMnHaNna GOCLEVER Technology, HN ee NmueH3napbI He HecyT OTBeTCTBeHHocTH 3a noTepeD aHbIX nIN np6blnn, a TAKke 3a IIO6oB npyro yuep6 B pe3yIbTaTe NCnoNb3OBAHnO bOpdyOBaHn OTOROB MapKn GOCLEVER. GOCLEVER Tech- nology He Hecet OTBeTCTBeHHocTH 3a IIO6bIe np6IeMbl, CBraAHhble C HnPaBnIbHO pa6ToOn onepaunOHHO cnCTembl npINOKeHn, p6oTaIoUxN IO ee KOHTponE.
N3MeHeHn
GOCLEVER Technology octabJrEe3a c6oB npaBO nepeCMOTpeb daHbI DOKyMeHT n TexHueckne xapakTepnCTKn yctpoCTBa 6e3 npdBapntbHoro yBeOMHeN. DaHbIe xapaKTepnCTKn n 3O6paKeHn MOrTy BapbnpoBaTbcra B 3aBncmocTo OT ycnyr, npedlaeraMbx OepatOpom, n Bercnn nporpamMHO oecneHn yctpoCTBa.
- NockOblky GOCLEVER NOCToHNO pa6oTaET nA yUyWeHnEM CBOe npOdyKuIN, npEcdTaNHeHHO B daHHOM pyKOBoDCTBe yCtpoIcTBO (npOrpamMHO e annapaTHoe oecneueHne) moKet 6bTb N3MeHeno 6e3 npEdbapntelbHorO yBedomHeHn.
GOCLEVER He Hecet OTBeTCTBHeHOctn 3a Own6Kn, Bo3HnKaIOUe n3-3a HecO6IIODeHnpeKoMeHdau. Hn GOCLEVER, Hn OdnHn3 ee IunceH3napOB, He Hecyt OTBeTCTBHeHOctn 3a Kakyo-linbo Notepu daHHbIX nn npnbbln B pe3ybltaTe HnpabInbHorOncnoIb30BaHnna PAnhseTa. He Hecem Mbl OTBeTCTBHeHOctn Takke 3a npobEmbl, Bo3HnKaIOUe c FyHKcIOHpOBaHmE CnCTEmblAndroid n npinoKeHn, pa6otaioux Ha ee ochobe.
-ΦOTorpaΦnB pyKOBOCTBE npBODTcN CKJIOHTeBHO B INΦOpMaOnHHx CEJx, BHeHnBn pOyKta Ha Hnx nONCAHneero ΦyHKm MOrY OTnUaTcR O Tnpo6peTeHHORo npOyKta. ΦyHKm npOyKta n ERO BHeHn BnMory 6bIT b3MeHEb6e3 npEdBaPntEhHorO yBeDOMLeHn.
LbET yctpoCTBa HxOJaIero B KOMJIeKT IIO MoKet 6bITb N3MeHEn 6e3 npEaBapnteHoro YBeOMJeHra. - Ha3BaHnA ΦnPm Hx npOyKuHn YBnIOTc TOpROBbIMn MapkamN 3TNX dHnM.
Bce n3o6paekhenr, rpaikn u foTOrpaqnn npBEeHb B KaueCTBe npMepOB u MOry 8bT bN3MeHeHb 6e3 npEdBapntelbHorO yBeOMneHn. FyHKuun/foToRpaqnn 3aBncrT OT ycIyr, npednaeraembx OnepaTopom, u Bercn IIO ycTPOiCTBa. - PpOdyKT, OINCAHHB B DaHHOM pyKOBOcTBe, MoXeT He NOnHOCTbIO COOTBeTCTBOBaTb PnNo6peTeHHOMy yCTpoiCTBy.
Mepbippeoctopoxhocn
Tak kak npo3bOaTeJIb He Hecet OTBeTCTBHeHOctn 3a NobpeXdeHnna ytpaTy Baunx LnUhbx DaHHbx n3 -3a HecootBeTCTByUoIeRo NcNoIb3OBAHnA/peMOHT/NoBpeXdeHnna, noXaNyIcTa, cnCTemaTuYeCKn ocUyEcTBnTe KOnnpOBaHne daHHbx Ha CbEmhbl HocnteJIb/NepcoHaJIbHbl KomNbIoTeP BO n36ExaHne nx Notepn. Dnla coxpaHnraRapaHTm n IpeDoTbPaSeHnna HexeJatelbHbIX NobpeXdeHn, O3HaKOMbTEcB c DaHHoN HnHCTpyKuJeN:
O3HaKoMbTeCb C npaBnlaMn TexHnK 6e30NaChOCTn, n3IOJKeHHbIMN B daHHOM pyKOBoDCTBe
He noIb3yItecb nlaHwEThblk KomblOpem Ha aBTO3aPbAOuHbX cTaHcuaX.
He noIb3yItecb nlaHWeTHbIM KOMnbiTePOM 3a pyJem ABTomO6nJa.
- UCTPOCTBO MOKET 6bITb HCTOUYHKOM JPKORI NIN MIRAGUJERO CBeta.
CyueCTByET pnck npornaTbHnraMeNknx deTaNy yctpoCTBa.
3anpeetaetc ytnnnaaunnytemcxngarha.
-Планшетнь комьнорг может 6ыт bntocuHnKOM rpoMkOrTo 3Byka.
- N36eraiTe KOHTaTcMaHHTbIMn HOCHTeJIaMn INHΦOpMaIuN.
-ДерхиTe ПланшeТьн KOMпьОтep Ha paCSTоHm OТ KapdnoCTmMyJЯTopa И Дугnx NepeCoHaJIbHbIx МедцИнСКИx annapatOB.
- 06eperaIte ot BO3dEiCTBnA 3KCTpeMaIbNbIx TEMnepaTyp.
- BbiknouaTe nIaanweThbI KOMnbIoTeB 6oJIbHnuaX mEduHcknx yUpeJxdeHnax.
- 06eperaIte yctpoIcTBO OIT nonadHn BlaI, depKHe erO BCyXOM MeTe.
BbiknloayTe nlaanweThbIKOMnbIOTep BCamOnetax H aPonopTaX.
- He nbityaTaeB pa3o6paTB pnaHweTHbY KOMnbiOTep.
- BbiklouaTe pnaHweThbI KOMNbiOpTeB MeCtax npoBeDeHnB3pbHBx pa60T.
B Upe3bvyauHbix cntyaunex H cneJeT noIaratcbra Tolbko Ha nlaaHwTehbl kOmmbioTp
- IcnoIb3yIte TOLbKO peKoMeHDoBaHHbIe akceccyapbl.
CERTIFICADO DE CONFORMIDADE - PAISES DA UE

GOCLEVER Ltd. 3aBnAeT, yTo n3dene GOCLEVER ORION 101 (Homep moen A1042 TAB) noNHOCTbIO COOTBeTCTByET OCHOBHbIM Tpe6oHaHm CneDyUOxN DnpeKtNB:
EMC DIRECTIVE 2004 / 108 / EC
LVD DIRECTIVE 2006 / 95 / EC
R&TTE DIRECTIVE 1999/5/EC
C noDpO6Hoi HhOpMaueNe MoXHo O3HaKOMnTbcra Ha caIte: www.goclever.com.

T npodyKT pacnpoctpaHne Tc NapeKtnBa RoHS.

3NaK KaueCTBa - YkpanHa - 3NaK COOTBeTCTBnA NOITBepKdaE, YTO DaHHbI NPOyKT COOTBeTCTByET Tpe6oBaHnM TexHuecknx PerlameHToB YkpanHbI.

YTNIN3AUINIPEPABOTKA
Corlacho 3akohodaTeBCTBy EC (Waste Electrical and Electronic Equipment [OtXobI 3neKtpueckoro n 3neKtpoHHoro o6OpdyobAHn] - WEEE - dpekTbA 200/96/EG) Bcra 3neKtpoHn npodykun, B Tom uCne IpaHweTb GOCLEVER, doJNHA beCpNaTHO yTNINsnpoBaTcB C cneuaIbHO OTBeDEHNbIX MeCTax HA TeppntOpnn Baewe ObIaCTn. Nolb3OBATEnn 683aHb nepeDaTb CTapoe/NOBpeKdEHHoe 3neKtpueckoe n 3neKtpoHHoe 6opdyobAHn E B NyKtBi nepepa6OTKn OTxOIOB. CneyET NOMHTb, qTO BCE 3neKtpuueckne/3neKtpoHHbe YcTpoIcTBA u KaBenn, npedHa3HaueHhBe I py nepepa6OTKn, doJNKBH bMapKnPOBky C nepeuepKHytBm CmBONM MycOpHOn Kop3HbI. 3TOT CmBON npucytCTbyet H BCex fipmeHHbx PnaHwTeax GOCLEVER.

YcnoBnIpa6OtbiWI-FI
PnncnoB3OBaHn 6ecnpoBodHn loKaIbHO cTeN IEEE 802.11b/g/n, KaHaoB c 1 no 13 (2.4 Tc ... 2,4835 Tc) ycTpoCTBO MOKHO nCNoJIb3OBA Tb ka BHTpN, TaK N BHe nOMEeHn, Ondako cyseCTbYOT orpaHueHn BO PhaHn, ItaHn HOpBerHn, a mHeHo:
-
Φρaún: Ππη ΙCNoIb3ObaHmДaHHO npOуkTa B 3aKpbItom pOcTpaHCTBe, BCE KaHaIbMoγT 6bIb NcNoIb3ObaHbI 6e3 orpaHueHm. B OTKpbItom npOcTpaHCTBe dOnyckaetcKaHaIbI c 1 no 6. Npeed HactpoRko CoeINHeHry6eInTeCb, YTOB pexKIme INΦpactpykTypbToUka DocTyna HAcTpoEHa Ha KaHaIOT 1 do 6.
-
I HTaIIH : nCnOb3OBaHne cTe r LAN perynpyetc: yTnIIN3aIcnCTaporo 3eKtpuueckoro n 3eKtPOHHORo o6OpyobAHn - B OTHoUeHNn YactHO rncnB3oBAHn, 3aKoHODaTeNbHbM Yka3om 1.8.2003, N259 (KoKeKC 3eKtPOHHbIX KOMMyHkaI). B CACTHOCTn CTatbN N104 yKa3bBaET, TTO nepeD noJyuEHem doCTyna K cTeN tpe6yETcP a3peWeHne Ha ABtopn3aIIO. CTAbY N105 yKa3bBaET, TTO beCcnNtHoe nCnONb3OBaHne pa3peWaETc (no OTHoEHNIO K npedocTabHeHIO BCEo6Iero DoCTyA WLAN) dIra TeNeKOMMyKAuaOHnHbX cTeEN y cLyr Ha yOpBE Yka3a MmHnCTpoB OT 28.5.2003, C nonpaBkAm, n cTaBeN N25 (O6uee pa3peWeHne dIra 3eKtPOHHbX KOMMyHkaIooHHbx cTeEN y cLyr).
-
HopBerH: nCnoB3OBAHne 3Toro o6OpyDobAHn He dOnyckaetcB rEorpaΦnuecko 30He B paNcyce 20 KM ot ceHTpa HIO -OncyHH, Wnuc6epren OTHocntelbHO CeptnuKata COOTBeTCTBn.
Takke Ha caIte www.goclever.com MOxH0 O3HaKOMITbcr C NOJNTIKoI KOHpIeHuaJIbHoCTn.
PpO6JIeMbI INxpeWeHne
- BnepBbIe nCnoNb3y yCTpOYCTBO, 3aNyCK 3aHMaet OueHb MHOrO BpeMeHN.
-После obHOBlenna cnCTembl yctpoiCTba, yctaHOBka npiloxeHnra (nporpaMMHoro 6ocneueHnra) 3aIMeT 2-3 MmHytbl.
2.Иногда планшетный komьютс сиьно HarpeBaetcra.
-acto BCTpeaetc, KOrda OTKpbItb Cpa3y HeckolbKO npInloKeHn, ecn npkoctb 3kpaHa Ha BbICOKOM ypOBHe IIN60 PAnhWeTHbIKOMnbOTep B daHHbIMoMeHT 3apjXaETc. - YcTpoIcTBO He HaxoNT 6ecnpoBOnHbIe cTe Ni-Fi, He pa6OtaET INHTepHET
-убeintecbВ pa6oTe yctpoiCtBa,pa3daIouero cnHan.
-PacctoHne MeJy yCTpoIcTBOM n TOUKO JIOCTyNa/MapwpyTu3aTOPOM, pa3daIOuIM CNrHaJI, He doJXHO pReBbIaTb 50M, cNeIte 3a TeM, UTo6bl IJIpepaH CNrHaJI He 6blIO npERpaDbI (DBepb, CTeHa n dp.).
Y6eINTEcB B npaBnIbHOCTn napOJI N IOnHa.
4.CnCTema He 3anyckaetc.
-При установке нековские Stopоннх pa3pa60TuKOB, состema moket He pa6otatb.пepesanyctnte yctpoiCTBO, ydepxnBaJ KlaBnUy BkIoueHnB TeueHne 6 cek.
- Het doctyna K 3JneKtpoHNo nOte (E-mail).
WEBSITE: www.goclever.com/support
-MANUALE DE UTILIZARE (consultati tau descarcati manuaul online)
- MANUALE ACTUALIZARE SOFTWARE (fi la zi cu sistemas de operare sau foloseste fisierele de backup pentru a rezolva problemele de software).
-INTREBARI FRCVENTE (FAQ)
-LOCATII CENTRE DE SERVICE (va recomandam sa contactati service-ul central GOCLEVER si partenerii de service locali direct in locul inregistrarul unel reclamatii Sau cereri de support tehnic in magazine)
INFORMATI GARANTIE (tablet dvs GOCLEVER TAB are garantie 24 de luni. Optional pentru tarile selectate exista varian-ta de garantie 12 luni "Door to door". Verificati website-ul nostrum printru detalii)
-PROCEDURE DE SERVICE
-APPLICATIE RMA (in functie de tara)
mail: office@cordongroup.ro, tel. +40213009905; +40372324762