M 388 - Steam cleaner DIRT DEVIL - Free user manual and instructions
Find the device manual for free M 388 DIRT DEVIL in PDF.
| Product type | Steam cleaner with professional steam iron |
| Brand | Dirt Devil |
| Model | M 388 (Vapormate) |
| Dimensions (L x W x H) | 305 x 397 x 235 mm |
| Weight (without accessories) | 4.5 kg |
| Power supply | 230 V ~ 50 Hz |
| Power consumption | 1500 W |
| Max. steam pressure | 3.5 bars |
| Tank capacity | 1.6 liters max. |
| Continuous operation | Approximately 50 minutes per tank |
| Preheating time | Approximately 11 minutes |
| Steam flow rate | 40 g/min max. |
| Noise level | 30 dB(A) |
| Included accessories | Steam gun, steam iron, 3 extension tubes, floor nozzle, adapter, lance, high pressure nozzle, 2 brushes (plastic and metal), 2-in-1 combination nozzle, cotton cover, cloth, funnel, measuring cup, iron rest |
| Main functions | High-temperature steam cleaning, vertical and horizontal steam ironing, degreasing, disinfection, stain removal without chemicals |
| Safety | Safety valve on tank, child safety lock on gun, overheat protection (180 °C), thermal circuit breaker, automatic shut-off in case of overheating |
| Maintenance | External cleaning with damp cloth, rinse tank every 5 refills (hard water), descaling every 6 months with descaling tablets |
| Warranty | 24 months from date of purchase |
| Use | Household use only, do not use outdoors |
| Removable lance and brushes | Bayonet mount, quarter-turn locking |
Frequently Asked Questions - M 388 DIRT DEVIL
User questions about M 388 DIRT DEVIL
0 question about this device. Answer the ones you know or ask your own.
Ask a new question about this device
Download the instructions for your Steam cleaner in PDF format for free! Find your manual M 388 - DIRT DEVIL and take your electronic device back in hand. On this page are published all the documents necessary for the use of your device. M 388 by DIRT DEVIL.
USER MANUAL M 388 DIRT DEVIL
natural_image
Line drawing of a vacuum cleaner device with control panel and buttons (no text or symbols)Royal
Royal Appliance International GmbH
Itterpark 5-7
40724 Hilden
Germany
+49(0)2103/20 0710
GB Pressurised steam cleaner Operating Instructions
Hot surfaces, do not touch!
Hot steam Risk of scalding!
Varm damp Fare for skolding!
Please read operating instructions!
New safety concept ...... ii
Operating Instructions 1-20
To make your steam cleaner even safer, we have improved its safety concept from the one in the comprehensive operating manual enclosed. From this range onwards your Vapormate has a filler cap with a safety valve, the handling of which differs to that of the old cap (see below).
Remove filler cap after use
- Switch off the appliance with the on/off switch after use (1).
- Discharge the remaining pressure by pressing the steam button (2) until the flow of steam stops.
NOTE:
The mains plug must remain plugged in.
- Allow the appliance to cool for about half an hour (3).
- Screw the filler cap counter-clockwise off the water tank (4).
NOTE:
If the filler cap cannot be opened after steps 1-3, press down the red pin in the filler cap (5).
NOTE:
Please also follow these additional instructions.
About children
This appliance is not intended to be used by persons (including children) with impaired physical, sensorial or mental abilities or insufficient experience or knowledge, unless they are supervised by a person responsible for their safety or have been instructed in the proper use of the appliance by this person. Keep the appliance out of reach of people of these groups.
People with sensory problems, especially with reduced sensitivity for temperature differences, must use great caution when working with this appliance.
Children should be supervised in order to make sure that they don't play with the appliance.
Defective power cord
If the power cord of the appliance is damaged, it must be replaced by the manufacturer, their authorised service representative or a similarly qualified person to avoid danger.

REMARQUE:
natural_image
Line drawing of a device with a curved arrow indicating rotation or change (no text or symbols)natural_image
Technical diagram of a mechanical component with directional arrows indicating movement or force (no text or symbols present)natural_image
Illustration of a mobile phone with a USB port and ear adapter (no text or symbols)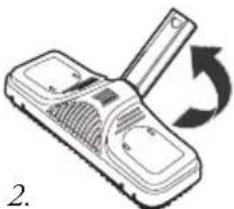
natural_image
Diagram of a mobile phone with a handle and scroll, showing a circular arrow indicating rotation (no text or symbols present)natural_image
Diagram of a handheld device with a tool inserted, showing internal components and a curved arrow indicating rotation (no text or symbols present)natural_image
Line drawing of a kitchen funnel pouring liquid into a container (no text or symbols)natural_image
Line drawing of a car interior showing dashboard controls and a water droplet entering the air gap (no text or symbols)1. Important Safety Regulations ...... 2
1.1 For the Power Supply 2
1.2 For Special Groups of People 2
1.3 For Operation of the Appliance 2-3
1.4 For Maintenance and Cleaning 3
2. Introduction
2.1 Thank You! 4
2.2 Unpacking the Appliance 4
2.3 Scope of Supply 4
2.4 Illustrations of Steam Cleaner and Accessories 5
3. Starting Up
3.1 Assembling the Accessories 6
3.1.1 Steam Hose 6
3.1.2 Extension Tubes 7
3.1.3 Floor Nozzle 7
3.1.4 Accessory Adaptor 8
3.1.5 Detail Nozzle 8
3.1.6 Jet Nozzle Attachment 8
3.1.7 Brush Nozzles 9
3.1.8 2-in-1 Nozzle ...... 9
3.1.9 Professional Steam Iron 10
3.2 Filing the Water Tank 11
4. Operation / Use
4.1 Connection to Mains Supply 12
4.2 Using the Steam Cleaner 12-13
4.3 Operating the Steam Iron 13-14
4.4 Topping Up with Water 15
4.5 Ending Operation and Storage 15
5. General
5.1 Cleaning and Maintenance 16
5.2 Troubleshooting 17
5.3 Spare parts 18
5.4 Technical Data 19
6. Warranty 20

Warning:
This refers to danger to the user.

Caution:
This refers to danger to the unit or objects.

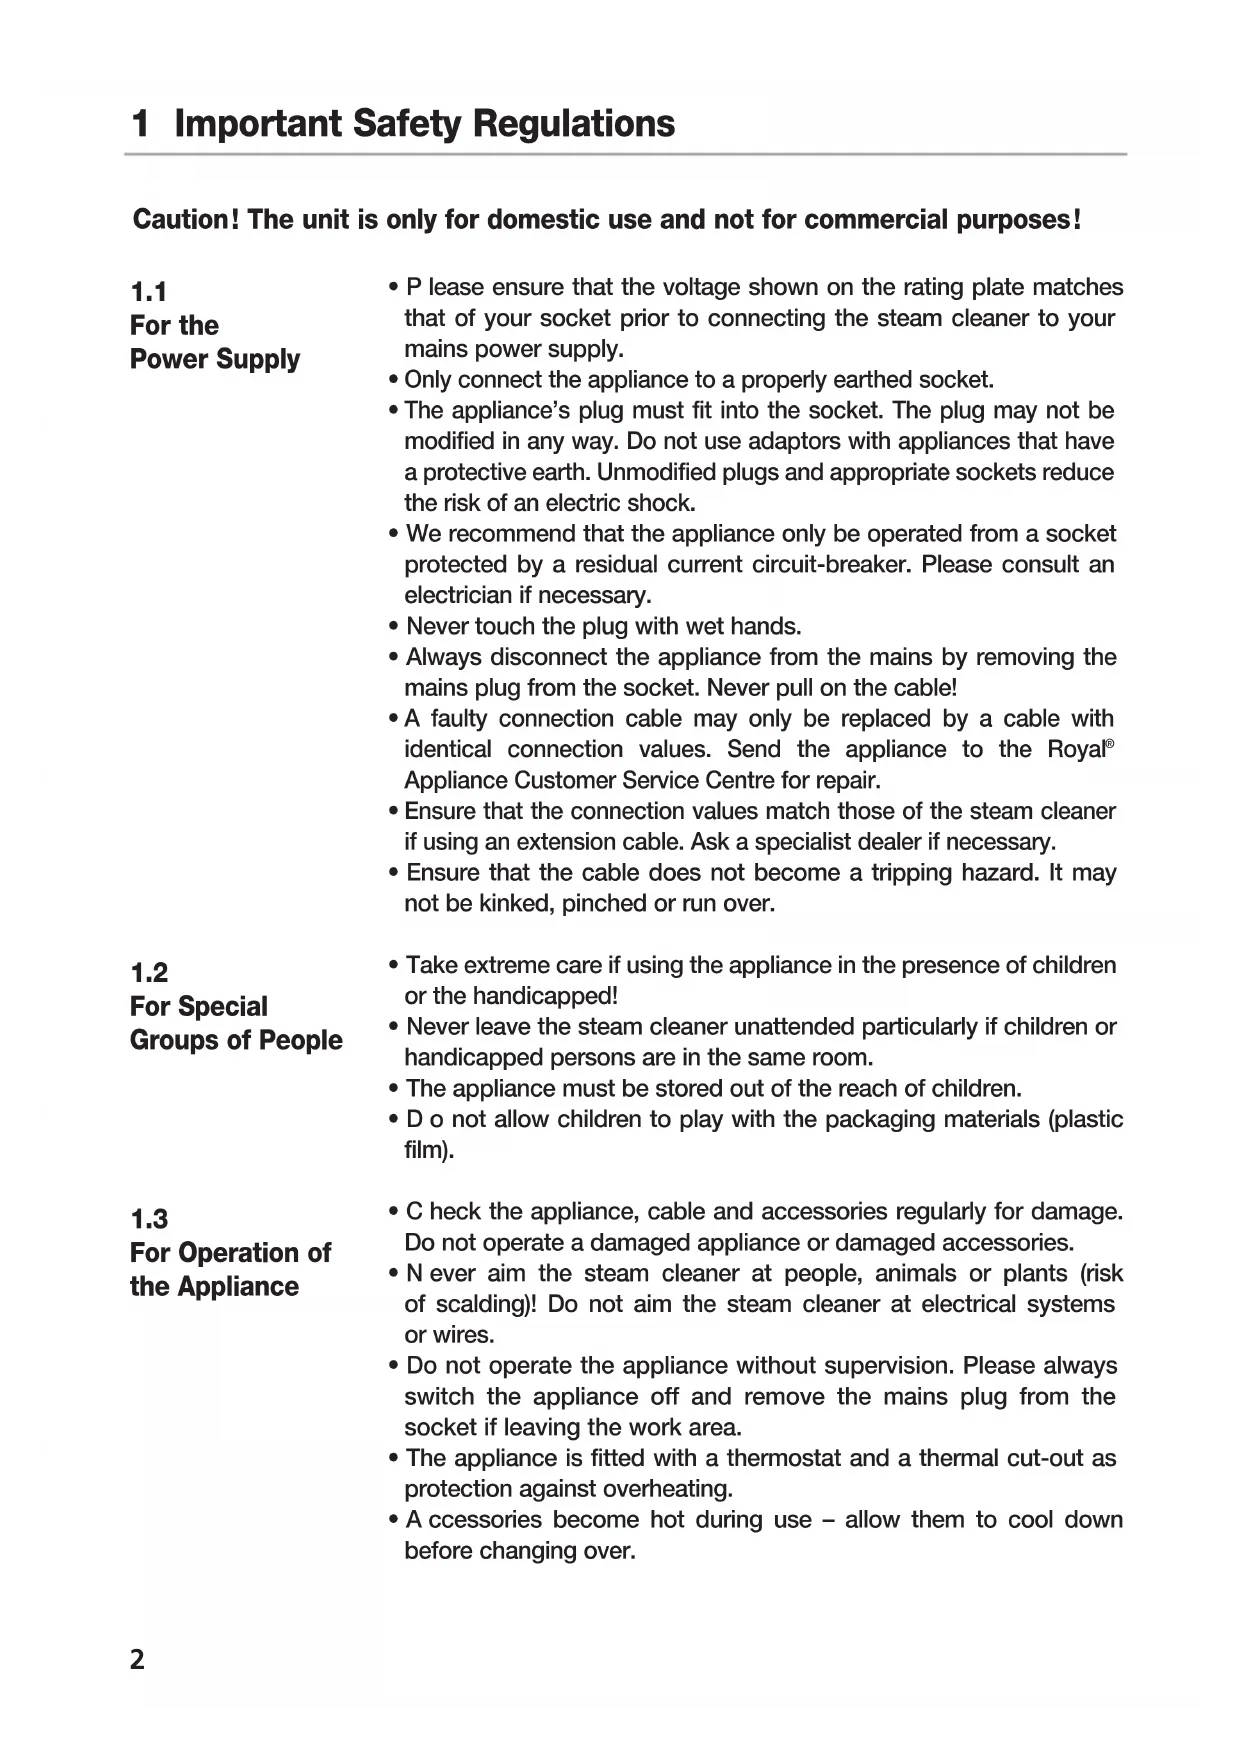
Caution! The unit is only for domestic use and not for commercial purposes!
1.1
For the
Power Supply
- P lease ensure that the voltage shown on the rating plate matches that of your socket prior to connecting the steam cleaner to your mains power supply.
- Only connect the appliance to a properly earthed socket.
- The appliance's plug must fit into the socket. The plug may not be modified in any way. Do not use adaptors with appliances that have a protective earth. Unmodified plugs and appropriate sockets reduce the risk of an electric shock.
- We recommend that the appliance only be operated from a socket protected by a residual current circuit-breaker. Please consult an electrician if necessary.
- Never touch the plug with wet hands.
- Always disconnect the appliance from the mains by removing the mains plug from the socket. Never pull on the cable!
- A faulty connection cable may only be replaced by a cable with identical connection values. Send the appliance to the Royal® Appliance Customer Service Centre for repair.
- Ensure that the connection values match those of the steam cleaner if using an extension cable. Ask a specialist dealer if necessary.
- Ensure that the cable does not become a tripping hazard. It may not be kinked, pinched or run over.
1.2
For Special
Groups of People
• Take extreme care if using the appliance in the presence of children or the handicapped!
- Never leave the steam cleaner unattended particularly if children or handicapped persons are in the same room.
- The appliance must be stored out of the reach of children.
- Do not allow children to play with the packaging materials (plastic film).
1.3
For Operation of the Appliance
- C heck the appliance, cable and accessories regularly for damage. Do not operate a damaged appliance or damaged accessories.
- N ever aim the steam cleaner at people, animals or plants (risk of scalding)! Do not aim the steam cleaner at electrical systems or wires.
- Do not operate the appliance without supervision. Please always switch the appliance off and remove the mains plug from the socket if leaving the work area.
- The appliance is fitted with a thermostat and a thermal cut-out as protection against overheating.
-
A accessories become hot during use – allow them to cool down before changing over.
-
N ever unscrew the tank cap during use. The tank is under pressure.
- The appliance may not be tilted by more than 45^ during operation.
- Never immerse the appliance in water or other liquids.
- Keep the appliance away from rain and moisture. The appliance is not suitable for outdoor use.
- Only use the appliance in containers/pools that are not filled with water or other liquids.
- Do not operate the appliance without water in the tank. Always top up with water in good time.
- Empty the water tank when the appliance is not in use.
- Never fill the tank with anything other than water. Never put additives (such as perfume, stain remover or products containing alcohol) in the water as they may damage the appliance or make it dangerous to use.
- A lways remove the mains plug from the socket and allow the appliance to cool down completely before topping up with water.
- Do not overfill the tank. Do not exceed the maximum prescribed filling level. Please use the measuring jug and funnel included in the appliance's scope of supply.
- Ensure that the water tank's closure cap has been screwed down carefully before use.
- Only carry the appliance by the handle.
- Do not touch any hot areas on the appliance. It is normal for the steam cleaner to heat up during operation.
- Do not use the Vapormate to treat any items of clothing that are still being worn on the body.
- A little water may drip out of the nozzle from time to time. This is completely normal and it is merely condensation.
- The force and heat of the steam may have an adverse effect on some materials. Always check whether a surface is suitable for treatment with the appliance by carrying out a test beforehand on a concealed area.
- Always include these operating instructions if passing the steam cleaner on to a third party.
1.4 For Maintenance and Cleaning
- Use only the original accessories that are part of the scope of supply.
- To avoid risks, never carry out repairs yourself. Consult the Royal® Appliance Customer Service Centre for this and have the appliance repaired by qualified skilled staff using original spare parts.
- A lways switch the appliance off, remove the mains plug and allow the steam cleaner to cool down before cleaning or maintaining it.

2.1
Thank You!
We are very pleased that you have decided to purchase the Vapormate M 388! Your new steam cleaner is a very versatile assistant for many different cleaning tasks. Only with the help of high-temperature steam is it possible to remove stubborn dirt quickly and without trace from smooth surfaces, e.g. wall and floor tiles, work surfaces, cooking utensils, windows and mirrors and at the same time to kill harmful bacteria. This is the environmentally acceptable way to remove baked on food, mould, grease, soap scum, solid and loose dirt completely without chemical solvents. The steam iron supplied is suitable for steam ironing all types of fabrics.
Thank you for purchasing the Vapormate M 388. We hope you will enjoy using it.
2.2
Unpacking the Appliance
Unpack the steam cleaner and all the accessories. Check the contents for completeness. If possible, keep the box and inner packaging so that the appliance may be protected during transport or if returned in the event of a warranty claim. Please dispose properly of any packaging material no longer required. Please contact your dealer immediately if you notice any transport damage whilst unpacking. The appliance must not be operated under any circumstances if it has sustained damage of any kind.

Warning! Ensure that the packaging materials (plastic film) do not get into the hands of children. Danger of suffocation!
2.3
Scope of Supply
The following parts are included in the scope of supply:
1 Funnel
2 Measuring jug
3 Steam gun with steam hose and steam connector
4 Professional steam iron including associated hose with steam connector and iron stand
5 Accessory adaptor
6 Detail nozzle
7 Jet nozzle attachment
8 Nylon brush
9 Metal brush
10 2-in-1 attachment (steam attachment)
11 Cotton cover
12 2-in-1 attachment (window attachment)
13 Large cleaning cloth
14 Floor nozzle
15 3 Extension tubes
16 Steam cleaner with mains plug and connection cable
Operating Instructions (not shown)
2.4 Illustration of Steam Cleaner and Accessories

3.1 Assembling the Accessories
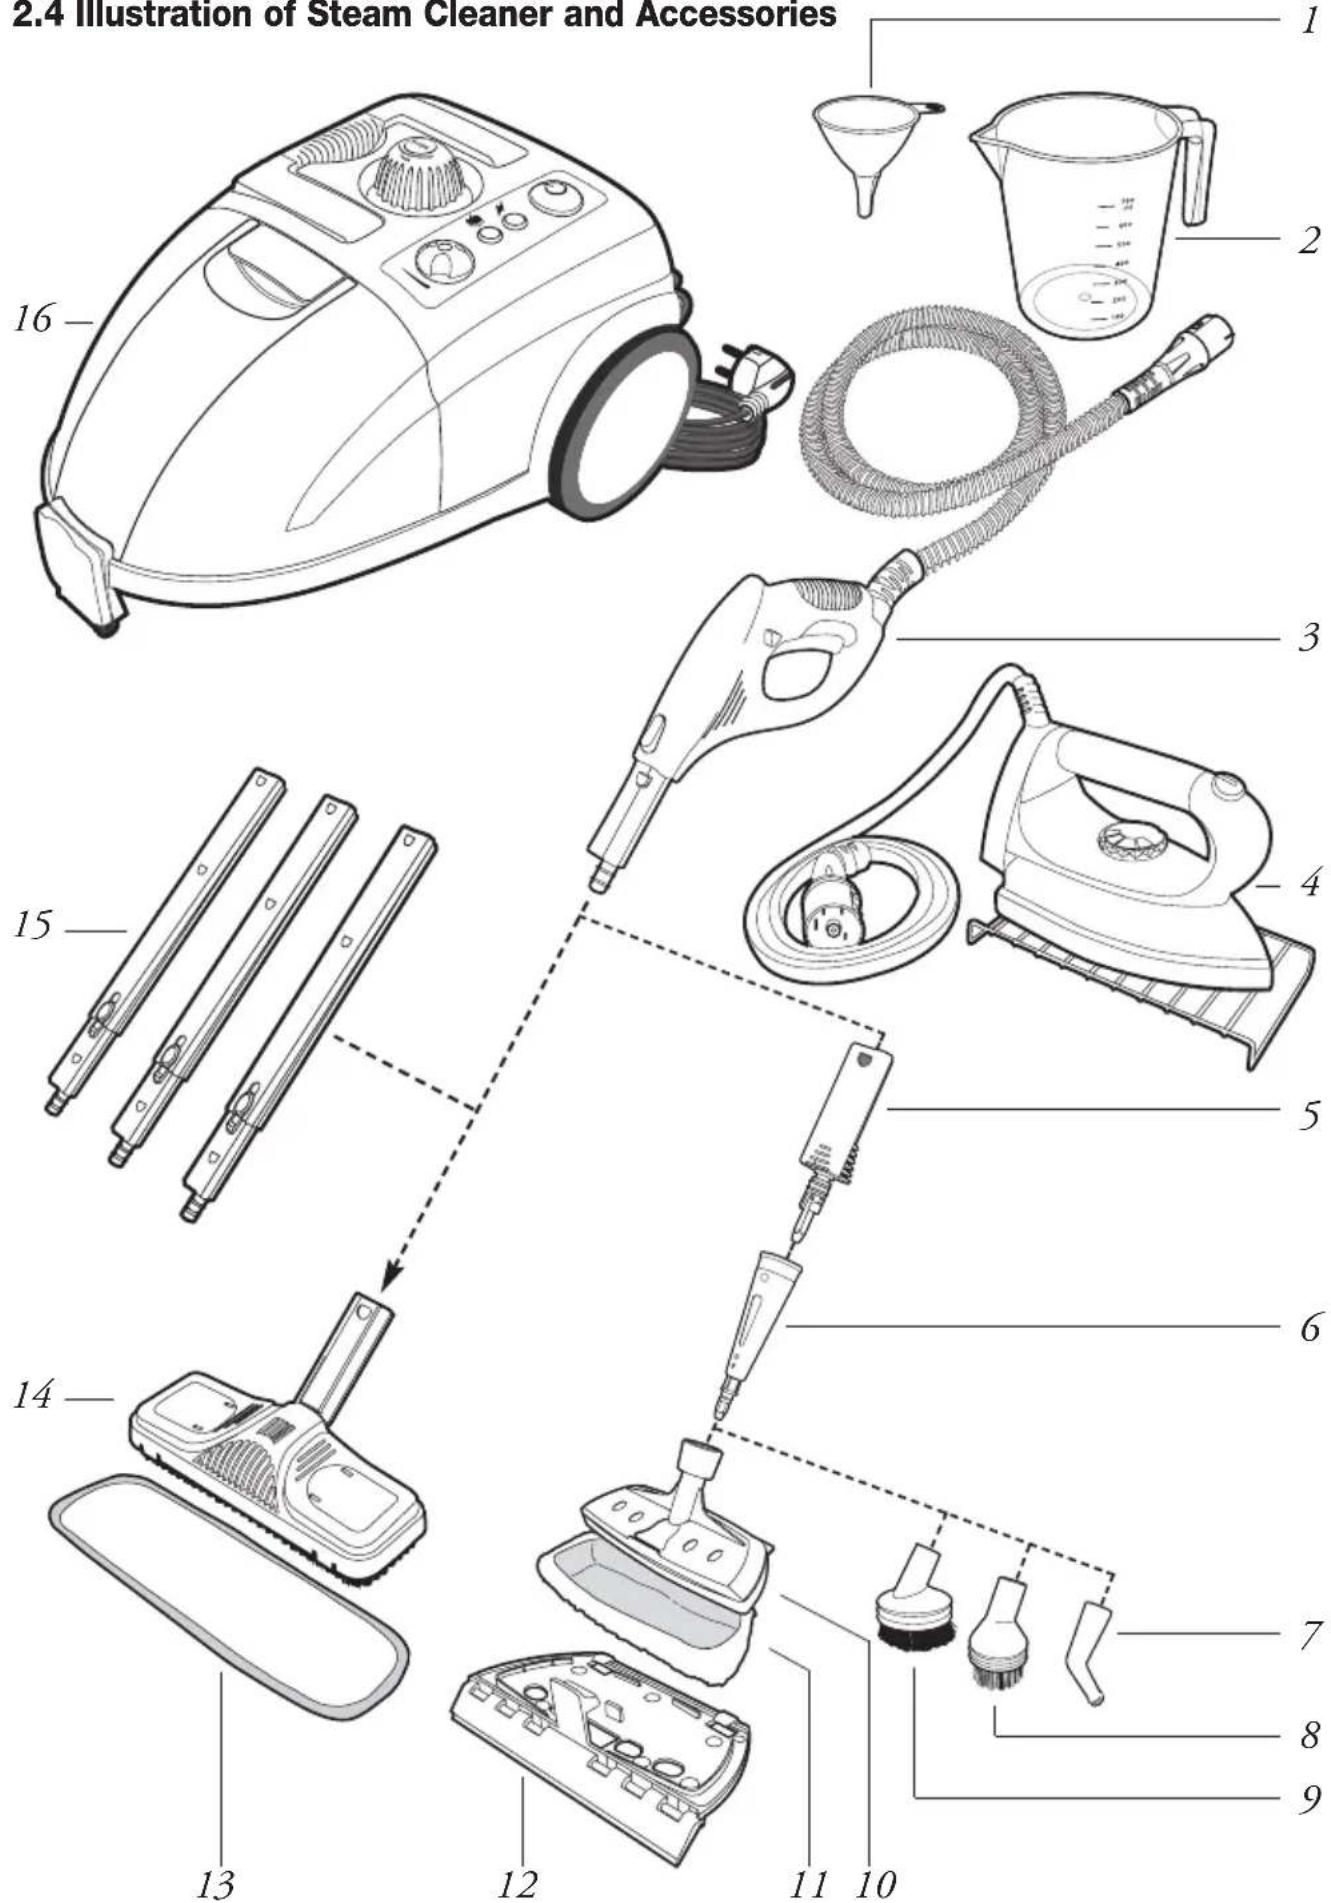
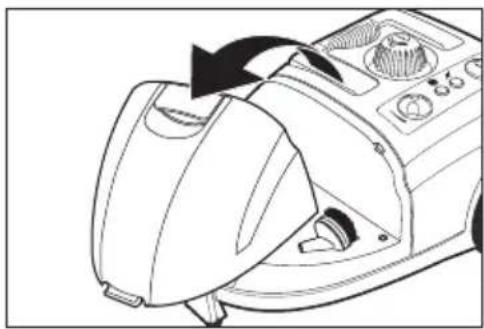
The steam hose with steam gun must be connected to the appliance and the desired accessory must be attached before the Vapormate can be used. The Vapormate M 388 has an accessories compartment that houses the detail nozzle, both brush nozzles, the jet nozzle and the 2-in-1 nozzle. Open the accessories compartment by pulling the yellow locking handle upwards and lifting the transparent cover of the accessories compartment off towards the front (Figs. 2 and 3).

natural_image
Line drawing of a device with a handle and control panel, showing a curved arrow indicating rotation (no text or symbols)Remove the required steam accessory and replace the cover. Slide the nose of the cover into the recess above the steam socket and press it down firmly at the back until the cover clicks into place.
3.1.1 Steam Hose
First of all connect the steam hose to the steam socket on the front of the Vapormate M 388. To do this, flip the black cover flap down and push the connector of the steam hose firmly into the steam socket until it clicks into place (Fig. 4).
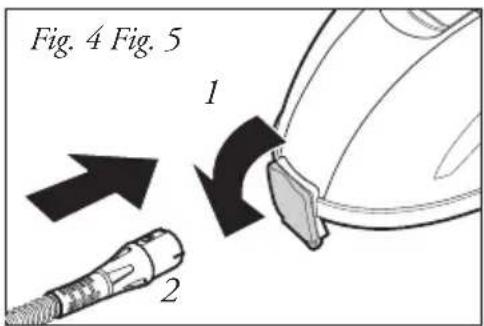
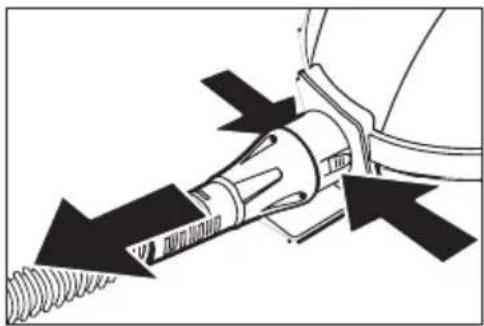
natural_image
Technical diagram of a mechanical assembly with arrows indicating direction (no text or symbols)To remove the steam hose, press in both release buttons on the right and left hand sides of the steam connector and pull it out of the steam socket (Fig. 5).
3.1.2 Extension Tubes
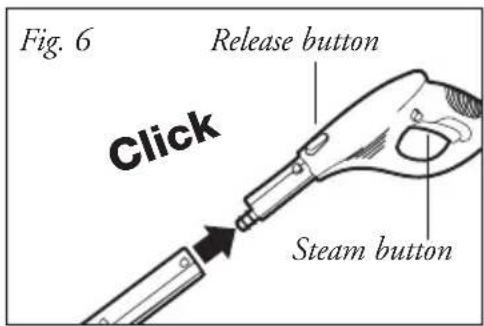
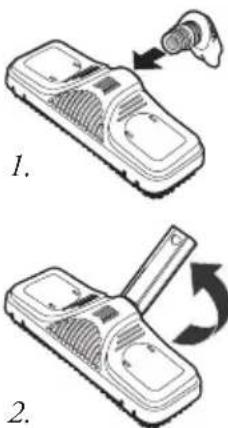
Assemble the extension hoses if the steam cleaner is to be used to clean floors or difficult to reach areas. To do this, push the open end of a tube onto the steam gun. Push it onto the steam gun until the release button of the steam gun clicks into place (Fig. 6). Add one, two or all three extension tubes as required.
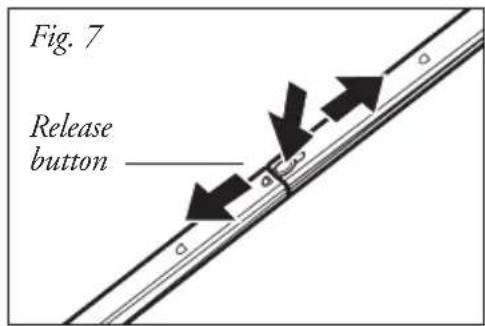
Press in the appropriate release button and pull the tubes apart with a downward movement to take the extension tube off again (Fig. 7).
3.1.3 Floor Nozzle
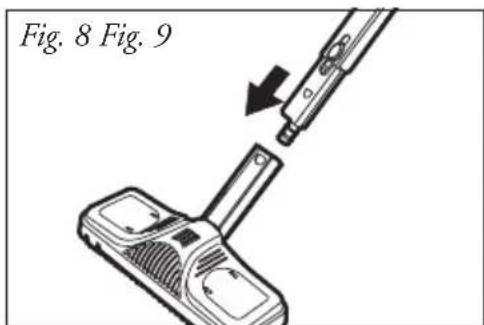
NOTE: The floor nozzle is delivered with a separate connector for packaging reasons. Assemble the connector as illustrated.
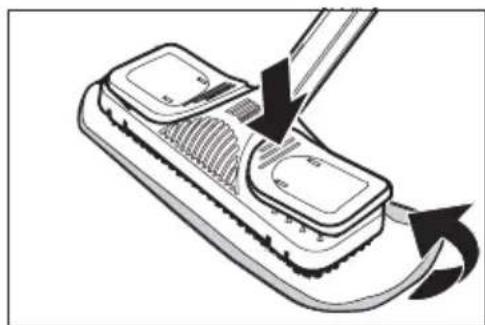
Attach the floor nozzle to the end of the extension tube. Ensure that the nozzle clicks into place on assembly (Fig. 8). The floor nozzle is ideal for cleaning washable wall and floor coverings. It may be used with or without the cleaning cloth. However, we recommend using the cloth to protect coverings in the case of sensitive surfaces such as wood or linoleum. Place the floor nozzle on the cleaning cloth and secure the overhanging material under the cleaning cloth clips on the left and right. Press on the inner sides of the yellow holder, then open the clips and the cleaning cloth can be secured in place (Fig. 9).
natural_image
Diagram of a handheld device with a screwdriver inserted, showing internal components and a curved arrow indicating rotation (no text or symbols present)To take the floor nozzle off again, press in the appropriate release button (see Fig. 7) and pull the nozzle off with a downward movement.

3.1.4 Accessory Adaptor
The steam cleaner has a range of very varied attachment nozzles to enable the most effective and thorough cleaning of different surfaces. First assemble the accessory adaptor so that these attachments can be connected to the steam hose. The accessory adapter can be attached directly to both the steam gun and the end of one or more extension tubes.
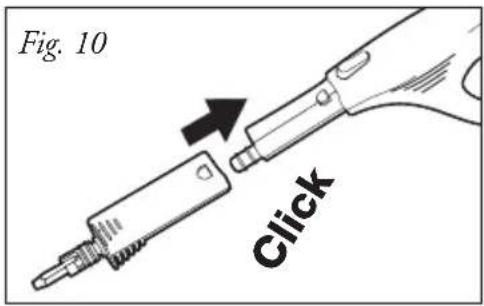
Ensure that the adaptor is firmly pushed on until it clicks into place (Fig. 10).
Press in the appropriate release button and pull apart with a downward movement to take the adapter off again.
3.1.5 Detail Nozzle
The detail nozzle may be used on its own for cleaning or may also be fitted with one of the brush nozzles, the jet nozzle or the 2-in-1 nozzle. This detail nozzle is attached using the bayonet principle. Push the nozzle onto the accessory adaptor and give it a firm quarter turn in the direction of the arrow stamped on the nozzle (Fig. 11).
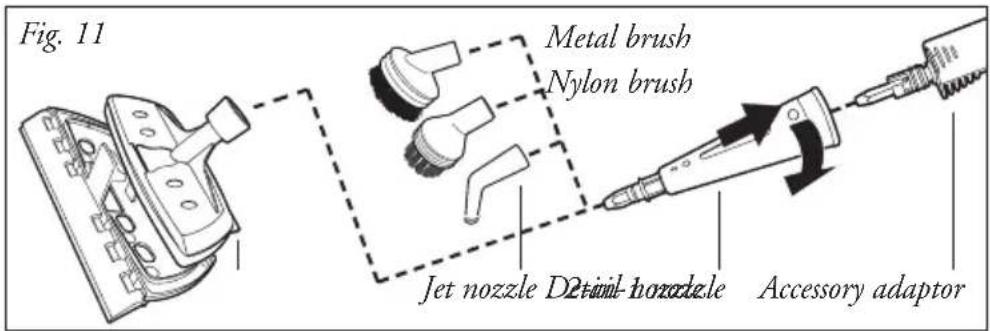
Reverse the sequence to take the detail nozzle off again: twist the nozzle a quarter of a turn in the opposite direction to the arrow and pull it off with a downward movement.
3.1.6 Jet Nozzle
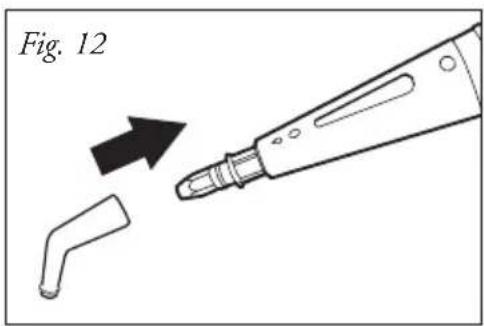
Simply push the jet nozzle firmly onto the detail nozzle to attach it (Fig. 12). This nozzle makes it possible to clean hard to reach places such as corners, joints and toilets with ease. The jet nozzle may be removed by pulling it off with a downward movement.
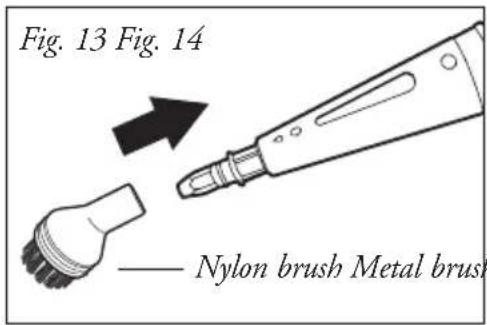
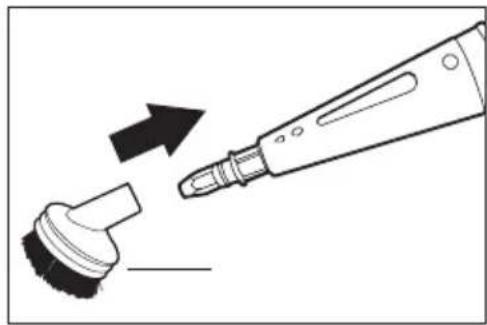
3.1.7
Brush Nozzles
The two brush attachments are pushed firmly onto the detail nozzle in the same way as the jet nozzle.
Even the most stubborn dirt can be removed, e.g. from blinds, central heating radiators, valves, etc. using the small nylon brush (Fig. 13). The larger metal brush (Fig.14) is suitable for heavy staining on less sensitive materials such as stainless steel or stone. The brush nozzles are removed by simply pulling them off with a downward movement.
natural_image
Diagram showing a brush applying material to a tool, with an arrow indicating process direction (no text or symbols)3.1.8
2-in-1 Nozzle
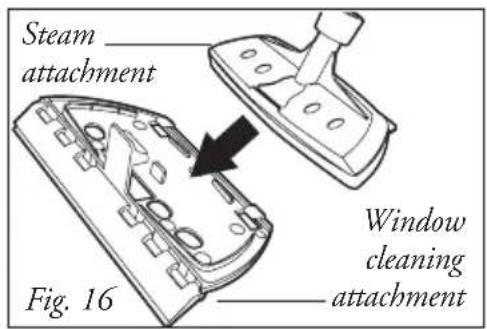
The 2-in-1 nozzle consists of a right-angled steam attachment onto which the window cleaner can be attached. Push the right-angled steam attachment firmly onto the detail nozzle. Pull the cotton cover over the nozzle for more thorough cleaning and to protect the work surface (Fig. 15). Fix the window cleaner with the rubber blade to the right-angled steam attachment if windows, mirrors or tiles are to be cleaned (Fig. 16).
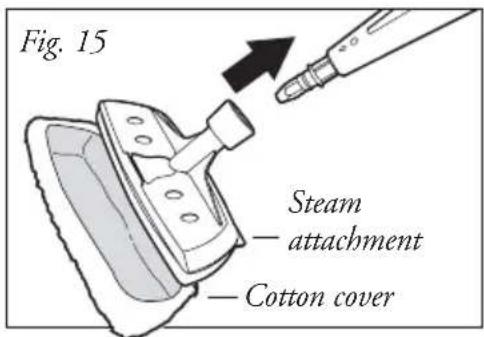

Caution:
Glass may crack if subjected to thermal shock! Pre-heat areas of glass prior to steam cleaning by spraying steam in a wider arc from a distance of 20 – 25 cm. Slowly reduce the distance to 10 – 15 cm to heat the glass up further.

3.1.9 Professional Steam Iron
Before using the steam iron
When using the iron for the first time, you may notice a slight amount of smoke coming from the appliance. This is normal and soon stops.
With initial use of the iron and after a lengthy period of storage, it should be tested out on an old piece of fabric to determine whether or not the ironing surface and the water container are clean.
The professional steam iron supplied with the appliance may also be connected to the Vapormate M 388 steam cleaner as an alternative to the steam hose. Stand the steam iron on the iron rest supplied, flip the black cover flap (1) down and push the steam connector on the end of the steam iron hose (2) firmly nose down into the steam socket on the front of the Vapormate M 388 until it clicks into place (Fig. 17).

As the iron may be used both vertically and horizontally, it is perfectly suited to steam cleaning curtains and items of clothing (see page 14, Fig. 24).

Warning! The steam iron must be set down on a heat-resistant rest when the steam cleaner is switched on.
Press in both release buttons on the left and right of the steam connector and pull it out of the steam socket to unplug the steam iron.
3.2 Filling the Water Tank
The Vapormate M 388 has a built-in water tank holding 1.6 litres. Switch the steam cleaner off and remove the mains plug from the socket. The steam cleaner must always be disconnected from the mains when filling or topping up with water. Unscrew the tank cap (Fig. 18) by pressing the cap down and simultaneously turning it anti-clockwise. Use the funnel and measuring jug supplied when filling with water (Fig. 19).
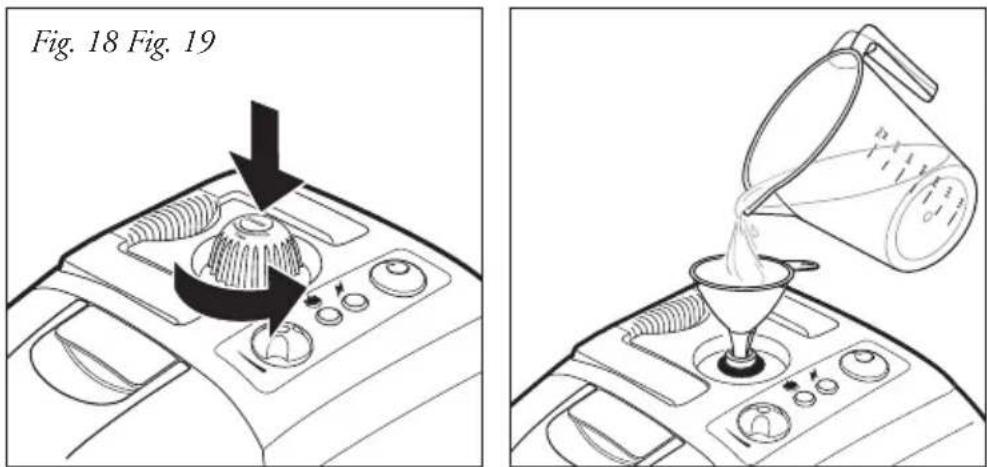
Only fill with pure water without additives of any kind, e.g. perfume, cleaning agents, alcohol, as they could damage the machine and make it dangerous to use. It is advisable to use distilled water to prevent lime-scale deposits if your water is very hard (over 2.5 mmol/l or 21 °dH). Otherwise boil the water first to extend the appliance's service life.

Caution: Do not exceed the maximum quantity of 1.6 litres when filling the tank!
Screw the tank cap firmly back on by turning it clockwise under pressure.
Tip: The heating up time will be shortened if warm water is used when filling.

4.1 Connection to Mains Supply
Plug the steam cleaner's mains plug into a properly installed socket (Fig. 20) and switch the appliance on by pressing the On/Off switch (Fig. 21).
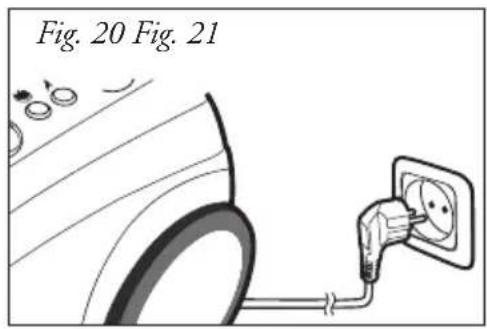
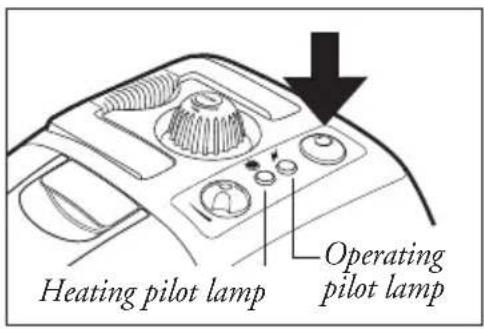
The green operating pilot lamp and the orange heating pilot lamp (Fig. 21) light up. The operating pilot lamp lights up as soon as the Vapormate M 388 has been plugged in and switched on. The heating pilot lamp indicates that the steam cleaner is currently heating up. The operating temperature is reached after approx. 11 minutes and the orange heating pilot lamp goes out. The appliance is now ready for use.
4.2 Using the Steam Cleaner

Warning:
Never aim the steam outlet of the steam gun at people, animals, plants or electrical systems (e.g. oven or socket). There is a risk of scalding or electric shock!
NOTE:
Residual steam continues to escape for a few seconds after switching off the steam function.

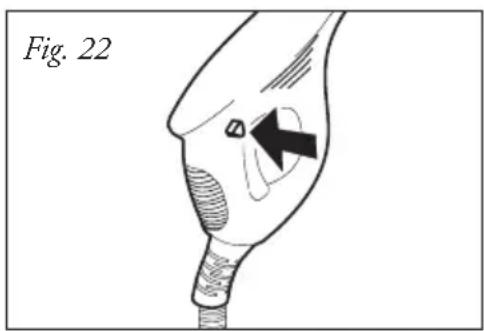
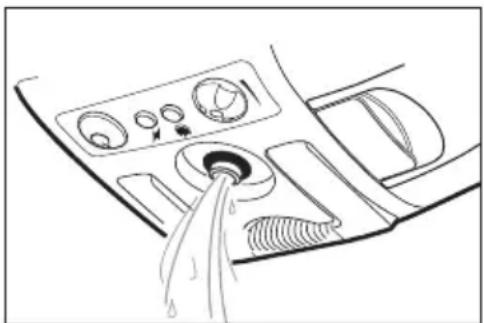
Release the locking device (child-proof device) by pushing the yellow triangular pin on the right-hand side of the steam gun in towards the left (Fig. 22). Hot steam now escapes if the steam button is operated. First of all hold the steam gun over an old cloth to absorb any initial spray water. Operate the steam button until the steam is emitted evenly. Cleaning can now begin.
Caution:
Always test the steam cleaner first on inconspicuous or invisible areas of the surfaces or fabrics to be cleaned to check their tolerance to hot steam.
- Steam may result in bleaching of painted/varnished wood.
- Steam may discolour shiny plastics.
- Acrylic, velvet and linen react very sensitively to the temperature of steam.
- Do not use the steam cleaner on Dralon fibres without first having carried out a suitability test on a concealed area.
For understandable reasons, the manufacturer cannot be held responsible for damage to objects, materials, people, animals or plants that occurs due to unsuitable use of hot steam or due to improper use of the appliance.
NOTE:
The Vapormate is fitted with an over-heating cut-out. The appliance switches off automatically on reaching a temperature of 180 °C to prevent overheating. Disconnect from the mains immediately by removing the plug. The appliance may be operated again after a 30-minute cooling period.
Do not aim the steam outlet at one point for too long. Loosen the dirt by moving the steam jet backwards and forwards. The flow rate of the steam emitted can be regulated by turning the steam controller and can be adjusted to the level of dirtiness. Turn the steam controller clockwise for less steam, and anti-clockwise for more steam (Fig. 23).


Do not tip or tilt the appliance by more than 45^ during use and ensure that the appliance always stands on a firm base. One full tank is enough for a maximum of 50 minutes use. Do not leave the machine unsupervised whilst switched on and if necessary use the childproof lock to secure the steam switch. To do this, press the triangular yellow pin on the left-hand side of the steam gun in to the right.
Warning:
The housing and accessories become hot during operation! Allow the appliance to cool down before changing the accessories. Never open the tank cap whilst the steam cleaner is switched on as the tank is under pressure!
4.3
Operating the Professional Steam Iron
Use an ironing board that is suitable for use with a steam iron. Steam irons have a grid-like rest that allows steam to circulate. The steam iron may be used to iron all types of fabrics. Set the required ironing temperature on the temperature controller below the handle of the iron.
Caution:
Always pay attention to information found on the fabrics to be ironed.
NOTE:
Place the iron on the iron stand supplied or stand the iron upright.
| Temperature | ● | ●● | [IMAGE] | ●●● | |
| Material | Silk | Fibres, e.g. synthetic wool fibres,e.g. nylon | Fibres, e.g. or cotton may polyester linen | Fabrics that be ironed at | high temperature |

The pilot lamp on the handle of the iron lights up and indicates that the sole plate of the iron is heating up. The pilot light goes out when the set ironing temperature has been reached. The iron is now ready for use. The heating switches back on if the temperature of the iron drops during use. Thus the iron maintains the correct temperature during the entire ironing process.
Tip: As the iron heats up more quickly than it cools down, it is practical to sort the washing beforehand and start with the fabrics that require the lowest temperature.
Generally speaking, steam operation is suitable for all items of clothing and household fabrics. All items of clothing that are identified with two or three dots on the ironing label can be treated with steam without any problems.

Caution: Polyacrylic und acetate/polyamide mixtures and similar materials may not be treated with steam.
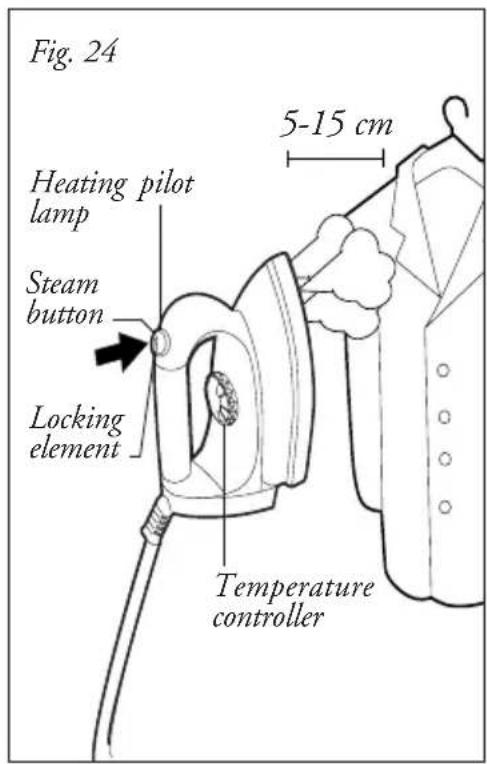
Vertical steam operation is particularly well suited to removing creases from hanging fabrics. Hold the iron vertically approx. 5-15 cm away from the material and press the steam button (Fig. 24). By pressing the steam button, steam flows out of the tip of the iron for as long as the button is pressed in. For continuous steam whilst ironing, push the black locking element on the steam button in the direction of the handle whilst keeping the steam button pressed in. Steam now flows out of the iron continuously. Push the locking element forward again to shut off the flow of steam.
Before storing the iron
Re-set the iron's temperature control to the 0 position and wait until the appliance has cooled down completely before storing it away.
4.4 Topping Up with Water
The tank must be topped up if the steam flow emitted starts to decrease.
Switch off the steam cleaner by pressing the On/Off switch. The green operating pilot lamp goes off. Press the steam button on the steam gun to release the remaining pressure and then lock the gun. Remove the mains plug from the socket and allow the appliance to cool down. Take care; the water in the tank is still hot even after 5 minutes! Open the tank cap by pressing it down and turning it anti-clockwise.


Warning: Hot steam may escape on opening! There is a risk of burns from the cap thread and the tank!
Top up with water using the measuring jug and funnel (see page 10 "Filling the Water Tank") then carefully close the tank cap again. The steam cleaner can now be plugged in again and switched on. The Vapormate M 388 is ready for use as soon as the heating pilot lamp goes off.
4.5 Ending Operation and Storage
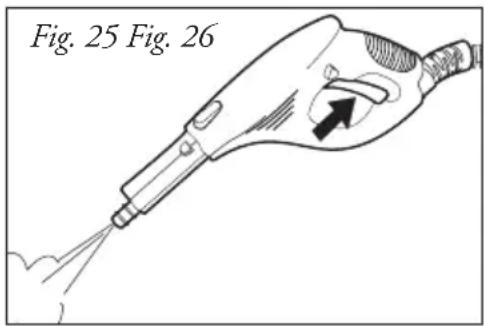
Switch the appliance off. The green operating pilot lamp goes off. Press the steam button on the steam gun (Fig. 25) to release the remaining pressure. Secure the steam gun by pushing the locking pin on the left-hand side of the handle in to the right. Remove the mains plug from the socket and allow the appliance to cool down. Empty the water tank so that no deposits can settle (Fig. 26).
natural_image
Line drawing of a car interior showing dashboard controls and a hand holding a water droplet (no text or symbols)Do not close the water tank until it has dried out completely. The steam cleaner must have cooled down completely before being put away. Store the appliance so that it is out of the reach of children. The extension tube with assembled floor nozzle may be inserted in the parking holder on the back of the appliance for storage purposes or for short breaks whilst working.
5.1
Cleaning and Maintenance

Warning:
Always ensure before cleaning or maintaining the steam cleaner that it is switched off and unplugged from the mains.
Only clean the appliance by wiping over the housing with a slightly moistened cloth. Do not use any cleaning agents, abrasives or alcohol since they may damage the housing.
We recommend that the tank be rinsed out after 5 filling operations at the latest if your water hardness is above 1.8 mmol/l ( 10^ dH). Information regarding local water hardness may be obtained from your water or utility company. We recommend filling the water tank with water and giving it a good shake to clean it. This will loosen any lime-scale that has been deposited on the bottom of the steam cleaner. Then pour out the water and allow the tank to dry out completely before closing it.
The water tank should be treated with limescale remover approx. every 6 months to prolong the steam cleaner's life.
Place one or at most two limescale removal sticks in 1 litre of warm water (50 °C) and fill the water tank with it. Allow the solution to work for approx. 30 minutes and then pour away the water with the dissolved solids. Repeat this process if necessary and then rinse out the tank with water.
Disposal After End of Useful Life:
If the appliance's useful life has come to an end, particularly if malfunctions have arisen, the worn out appliance should be rendered unusable by removing the plug from the socket and cutting off the power cable. Please dispose of the appliance properly through your public waste authority. Contact your local waste disposal service or the bulky refuse acceptance centre.
5.2 Troubleshooting
Check first of all whether you can remedy the fault yourself by consulting this list before sending your steam cleaner in to the Royal® Appliance Customer Service Centre.
| Fault Possible cause Remedy | ||
| The operating pilot The appliance is not plugged Insert the mains plug into a lamp fails to light up. into a socket or is not switched socket on. on.The socket is faulty.The power cable is damaged. Have the cable replaced by the Royal® Appliance Customer Service Centre. | ||
| No steam is emitted The childproof lock is Push the yellow pin on the when the steam button preventing release of the right-hand side of the steam is operated. steam button. gun in to the left.The water tank is empty. Top up with water (see Section 4.4, page 15). | ||
| Only a very small The steam controller is on minimum. Turn the steam controller amount of steam flows out. | Turn anticlockwise until sufficient steam is emitted. | |
| The steam iron fails to get hot. | The steam cleaner is not Switch switched on.The temperature controller is on minimum. | the steam cleaner on.Set the desired ironing temperature on the temperature controller. |
| The appliance takes a very long time to heat up. | The water tank is furred up. | Descale the water tank (see Section 5.1, page 16). |

5.3 Spare parts
All accessories such as the floor nozzle, accessory adaptor, detail nozzle, jet nozzle, nylon brush nozzle and metal brush nozzle may be ordered subsequently as spare parts.
| Article No. Description Contents | |
| 0388001 Professional steam iron complete 1 piece | |
| 0388002 Floor nozzle with connector 2 Teile | |
| 0388003 2-in-1 attachment (incl. window wiper) 2 pieces | |
| 0388004 Extension tubes, 3 part 3 pieces | |
| 0388005 Accessory adaptor and detail nozzle 2 pieces | |
| 0388006 2 circular brushes and jet nozzle attachment 3 pieces | |
| 0380006 Measuring jug and funnel 2 pieces | |
| M 384 Accessory set (1 floor cloth + 2 cotton covers) 3 pieces | |
| 0388007 Cover for accessory compartment 1 piece | |
| 0380011 Safety cap for tank 1 piece | |
| 0388008 Steam gun with hose 1 piece |
5.4 Technical Data
Type of appliance : Steam cleaner with professional steam iron
Model : Vapormate M 388
Voltage : 230V \~ 50Hz
Power consumption : 1500W nominal
Steam pressure : Max. 3.5 bar
Permissible pressure : 5 bar
Volume of water tank : Max. 1.6 l
Steam availability : Max. 50 minutes/tank
Heating time : Approx. 11 minutes
Steam flow rate : Max. 40g/min
Emission value : 30 dB(A) during use
Dimensions : Appliance 305 x 397 x 235 mm (W x L x H)
Weight : Appliance without accessories 4.5kg
Right to technical changes reserved
© Royal® Appliance International GmbH 2004 Status V 2.0


Warranty Conditions
We provide a 2-year warranty from the date of purchase for appliances we sell.
Within this warranty period, we will immediately rectify any manufacturing or material faults, either by repairing or replacing the equipment, at our discretion.
The warranty does not cover damage caused by improper use (operation with wrong type of current/voltage, connection to unsuitable power supplies, breakage etc.), normal wear and tear, or faults which have only a minor effect on the value or suitability for use of the equipment.
Attempted repair by unauthorised persons or the use of any other than original Royal® Appliance replacement parts will invalidate the warranty.
The warranty is only valid if the purchase date is confirmed by the dealer's stamp and signature on the warranty card, or if a copy of the repair invoice is provided.
In case of warranty claims:
Send the unit with an empty water tank and with a brief description of the fault (in block letters) to the following address. Please mark the packaging “Under warranty” and include the warranty card or copy of the invoice, and return it to the Royal® Appliance customer service or other service centre authorised by Royal® Appliance.
Royal®
Royal® Appliance International GmbH
Abt. Kundenservice
Itterpark 9
40724 Hilden
Germany

natural_image
Line drawing of a device with an open lid and control panel, showing a curved arrow indicating rotation (no text or symbols)natural_image
Mechanical assembly diagram showing a threaded component inserted into a housing with directional arrows indicating motion (no text or symbols)natural_image
Diagram of a handheld device with a screwdriver inserted, showing internal components and directional arrows (no text or symbols)natural_image
Line drawing of a cooking process showing pouring liquid into a funnel on an airstand (no text or symbols)natural_image
Anatomical illustration of a human head with an arrow pointing to a specific area, labeled 'Fig. 22' (no text or symbols on the diagram itself)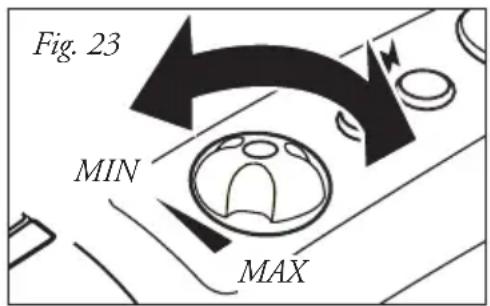
natural_image
Line drawing of a car interior showing dashboard controls and a water droplet entering the air gap (no text or symbols)The image contains no text or characters. It is a blank white rectangle with a black border.
Royal Appliance Espana, SL
Royal, Dirt Devil, Stellar
C/CRONOS, N° 20, PORTAL 2,3° 13
28037 MADRID
ESPAÑA
Tel: +34 - 902 - 43 06 63
The image contains a single, solid black rectangular outline on a white background. According to the correction guidelines, such stylistic or background lines must be ignored by the OCR result. Therefore, the corrected OCR text is: [Empty]
OPM France Nant'Est entreprise
TD "MEDJIMURKA" D.D.
Trg Republike 6
40000 Čakovec
HRVATSKA
Tel.: +385 - 40 - 31 27 60
Fax: +385 - 40 - 32 86 61
HU
Aspico Kft.
Puskás Tivadar út.4.
9027 Győr
MAGYARORSZÁG
Tel.: +36 - 96 - 51 12 91
szerviz@aspico.hu
NL
Z.E.S. Goes B.V.
T.a.v. afd. Service
Pearyweg 1
4462 GT Goes
NEDERLAND
Tel: +31 - 113 - 24 07 00
Fax: +31 - 113 - 24 07 50
dirtdevil@zesgoes.nl
PYCRUS
The image contains no text or characters. It is a blank white rectangle with a black border.
OOO RTC „Sovinservice“
127081 Moscow
Jasny proezd, 10
ROSSIJSKAJA FEDERAZIJA
Tel.: +7 - 495 - 47 39 003
SI
Strojinc Ciril s.p.
Koseskega ul. 1a
1000 Ljubljana
SLOVENIJA
Tel: +386 -1- 42 28 489
SK
Aspico Slovakia s r.o.
Kracanska 40/104
http://www.gerceklergroup.com
NUR GÜLTIG MIT RECHNUNGSKOPIE! • VALID ONLY INCLUDING A COPY OF THE PURCHASE SLIP! VALABLE UNIQUEMENT AVEC UNE COPIE DE LA FACTURE! • ALLEEN GELDIG MET KOPIE VAN DE REKENING! ¡VÁLIDO SÓLO CON COPIA DE FACTURA! • ДЕЙСТВИТЕЛЬНО ТОЛЬКО С КОПИЕЙ СЧЕТА! SADECE FATURA SURETÍ İLE GEÇERLİDİR! • PLATNOST POUZE S KOPIÍ FAKTURY! PLATÍ IBA S KÓPIOU POKLADNIČNÉHO DOKLADU! • VELJA SAMO S KOPIJO RAČUNA! VRIJEDI SAMO UZ PRILOŽENU KOPIJU RAČUNA! • CSAK A SZÁMLA MÁSOLATÁVAL EGYÜTT ÉRVÉNYES!

Vapormate
Garantiekarte
Warranty Card
Card de garantie
Garantiekaart