
Tuo - Stroller Foppapedretti - Free user manual and instructions
Find the device manual for free Tuo Foppapedretti in PDF.
| Brand | Foppapedretti |
| Model | Tuo |
| Category | Modular stroller |
| Maximum child weight (stroller) | 15 kg |
| Maximum child weight (car seat) | 13 kg |
| Recommended age (carrycot) | Less than 6 months |
| Compliance standards | EN 1888:2003 (stroller), ECE R44-04 (car seat) |
| Backrest position | Reclining, including horizontal position for newborns |
| Seat orientation | Forward-facing or parent-facing (car seat only parent-facing with adapters) |
| Handlebar adjustment | 3 positions |
| Hood | Yes, adjustable with rear sun visor |
| Parking brake | Yes, foot-operated |
| Safety harness | 5-point, height adjustable |
| Accessory compatibility | Tuo carrycot, Tuo car seat, adapters (sold separately for carrycot: car kit cod. 9700372000) |
| Folding | Yes, with locking latches; do not fold with accessories attached |
| Lower basket | Yes, capacity 4 kg |
| Wheel type | Front swivel with lock, rear fixed |
| Textile care | Clean with lukewarm water and mild detergent, soft brush; avoid machine washing |
| Lubrication | WD40 for moving parts (except wheels) |
| Spare parts | Wheels, adapters, hood, apron, leg cover, rain cover |
Frequently Asked Questions - Tuo Foppapedretti
User questions about Tuo Foppapedretti
0 question about this device. Answer the ones you know or ask your own.
Ask a new question about this device
Download the instructions for your Stroller in PDF format for free! Find your manual Tuo - Foppapedretti and take your electronic device back in hand. On this page are published all the documents necessary for the use of your device. Tuo by Foppapedretti.
USER MANUAL Tuo Foppapedretti
For children up to 13kg - Complies with ECE R44-04
F BASEPOURSIEG-AUTOGROUP 0+ (typeB9/0407113)-Notice d'utilisation
READ THE INSTRUCTIONS CAREFULLY AND KEEP FOR FUTURE REFERENCE
F. IMPORTANT!
LIRE ATTENTIVEMENT ET CONSERVERSOIGNEUSMENT A PORTEE DE MAINPOUR UNE UTILISATION ULTERIEURE
D. WICHTIG!
AUFMERKSAM LESEN UND FÜR ZUKUNFTIGE REFERENZEN AUFBEWAHREN
E. IMPORTANTE!
LEER ATENTAMENTE Y CONSERVAR PARA FUTURAS REFERENCIAS
NL. BELANGRIJK!
AANDACHTIG LEZEN EN BEWAREN VOOR TOEKOMSTIG GEBRUIK
GR. ΔIAB'AΣTE ΠPOΣEKTΙΚΑ KAI KPATHΣTE
AYTO TO EΓXEIPIDIO ΓIA NA TO ΣYMBOYAEYEETE ΣTO MEΛΑΝΟ
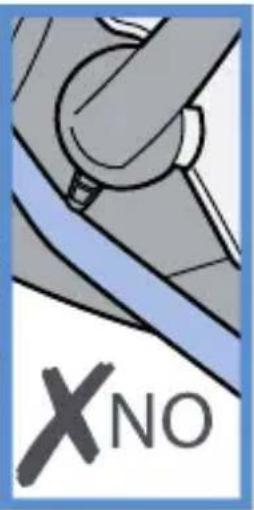
AVVERTENZA: NON UTILIZZARE QUESTO SEGGIOLINO PER BAMBINI SU SEDILI DOTATI DI AIRBAG.
WARNING: DO NOT USE THIS CHILD SEAT ON A PASSENGER SEAT Fitted with an AIRBAG.
ATTENTION: N'UTILISEZ PAS CE SIEGE ENFANT SUR UN SIEGE PASSAGER EQUPE D'UN AIRBAG.
WARNING: VERWENDEN SIE DIESEN KINDERSITZ NICTT AUF EINEM BEIFAHRERSITZ MIT AIRBAG.
ADVERTENCIA: NO UTILICE ESTE ASIENTO INFANTIL EN UN ASIENTO DE PASAJERO CON AIRBAG.
WAARSCHUWING: GEBRUIK DIT BABYAUTOSTOELTJE NIET OP EEN PASSAGIERSZETELMET EEN AIRBAG.
PPOEIANOIOIH: MHN XPHSIMOIOIEITE AYTO TO PAIAIKO KAOHMA
PIAN ΣE KAΘIΣMATA ΠOY ΔIAΘEYOYN AEOPOSKO.
2
3
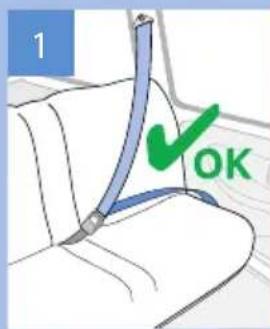
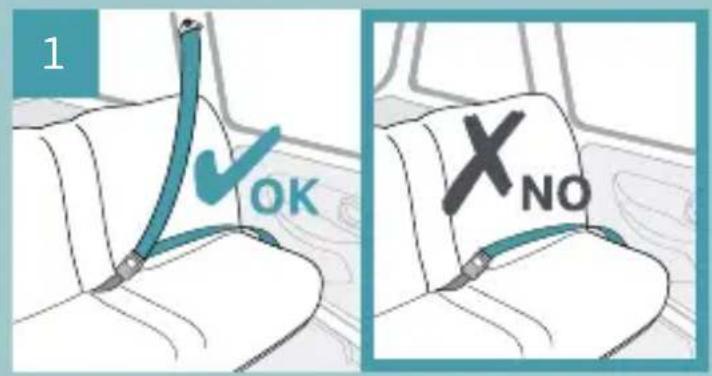
WARNING: Read these instructions carefully before use and keep this manual for future reference. Failure to comply with these instructions may put your child's safety at risk. This base must only be used with the Group 0+ infant car seat (type B9) designed for this base. This base must only be placed in a forward facing position on a car seat provided with a 3-point safety belt according to regulation ECE R16 or an equivalent standard (1).
WARNING: DO NOT USE THIS INFANT CAR SEAT ON SEATS EQUIPPED WITH AIRBAGS
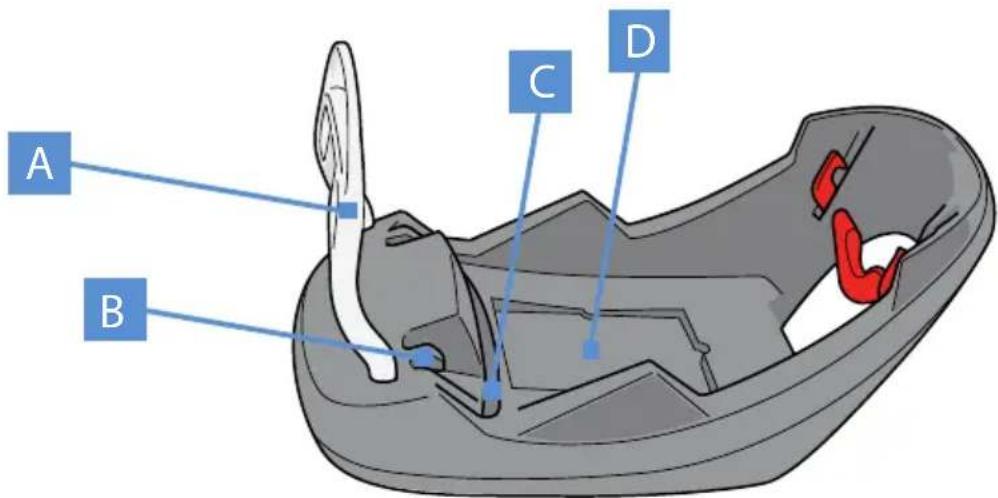
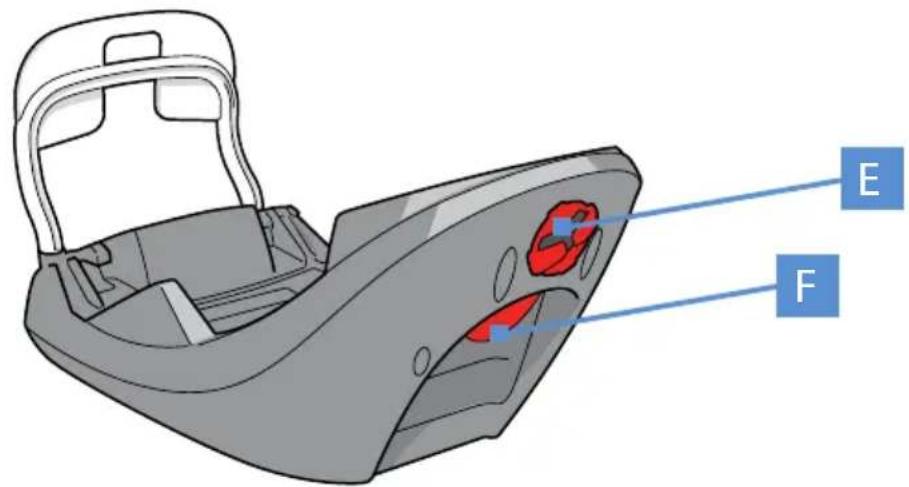
Base 0+ (2)
A. Anti-tipping bar
B. Locking mechanism (x2)
C. Passage for the lap belt
D. Compartment for the instruction booklet
E. Retainer for the diagonal belt
F. Locking/release handle for travel system infant car seat Group 0+
Fitting the base in the vehicle
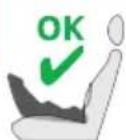
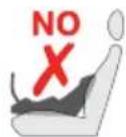
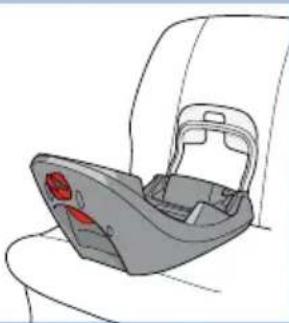
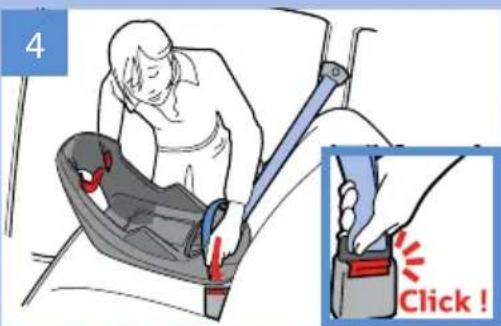
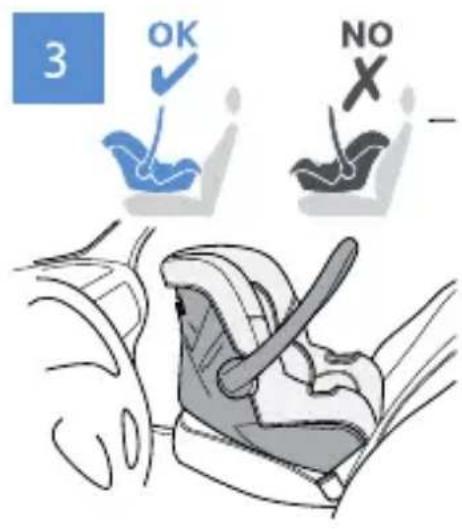
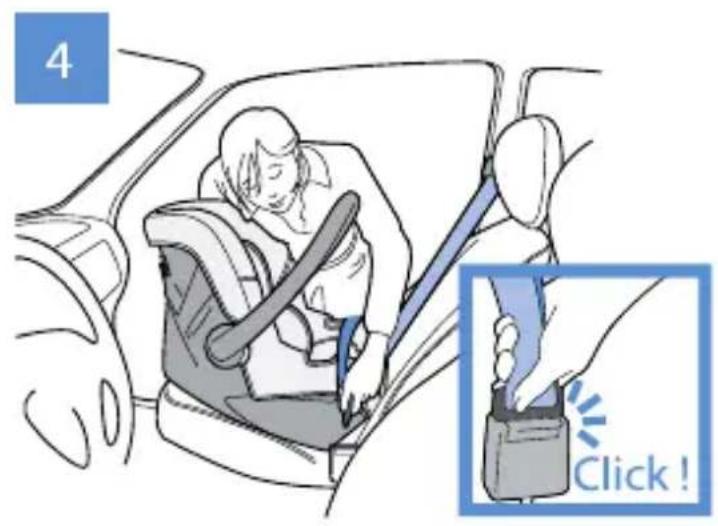
Place the Base 0+ on the front passenger seat or on the rear seat of the vehicle so that it is always positioned with the anti-tipping bar against the backrest of the seat (3). Pull and fasten the safety belt fitted in the vehicle (4).
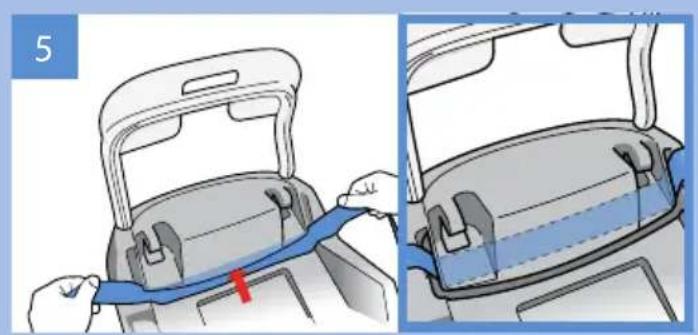
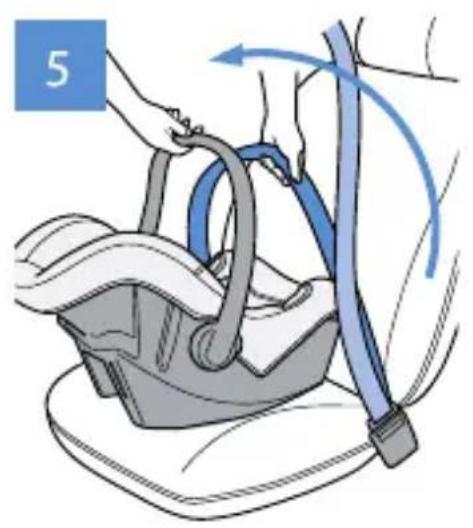
Insert the lap part of the belt inside the opening that is located in the front part of the base close to the anti-tipping bar (5). Tighten the diagonal belt.
Fitting the infant car seat on the base
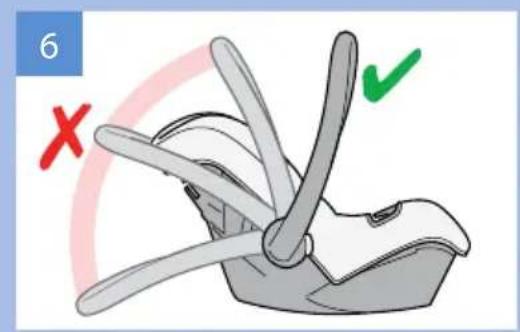
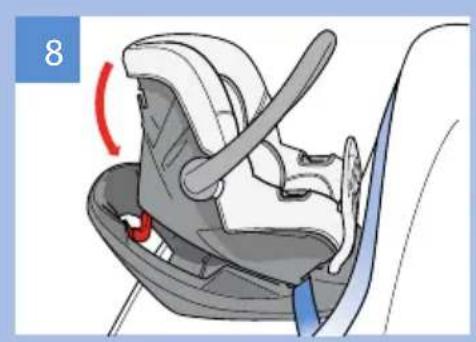
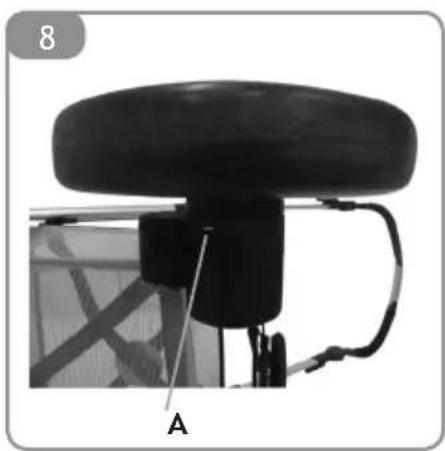
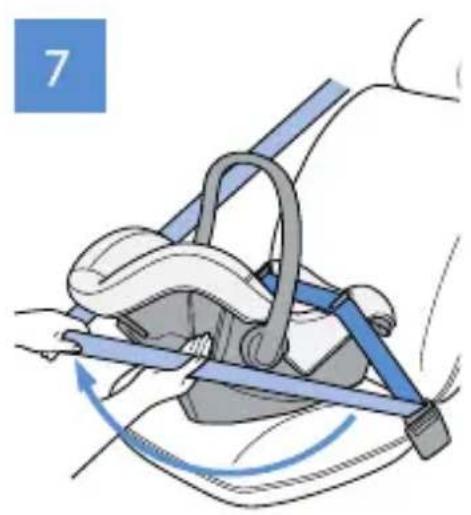
Important: Always make sure that the handle of the infant car seat group 0+ is in the vertical position before securing the infant car seat to the base 0+ (6).
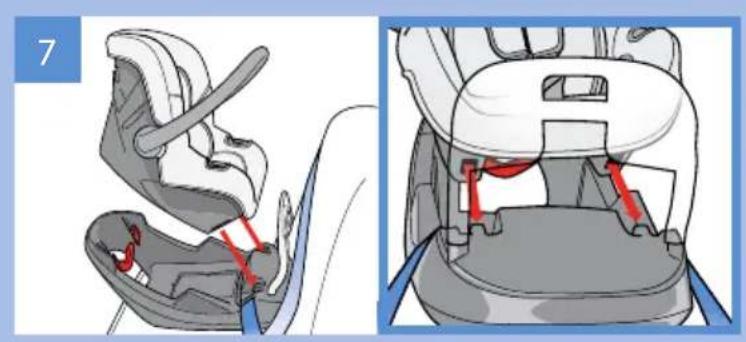
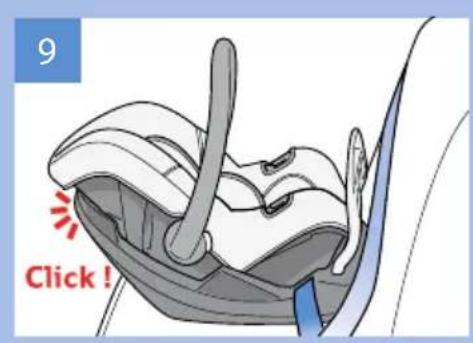
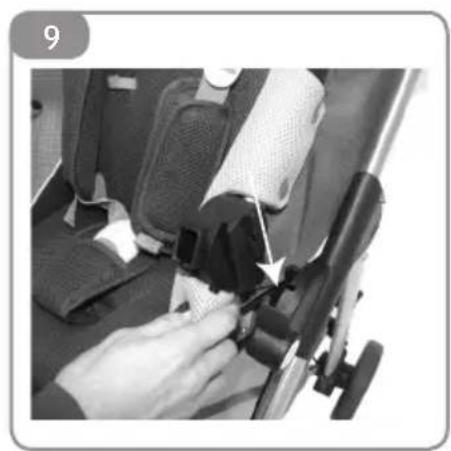
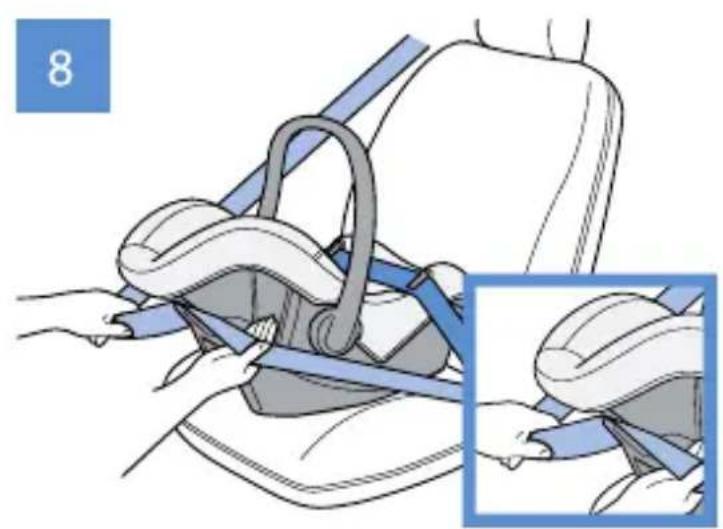
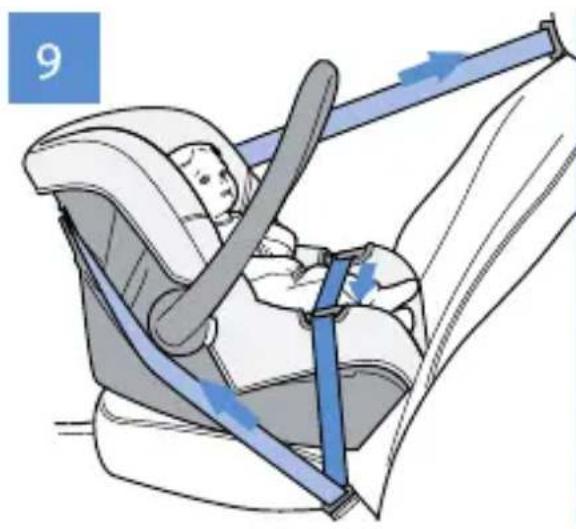
Position the infant car seat 0+ so that it faces towards the rear of the vehicle. Line up the locking mechanisms of the infant car seat with their respective slots on the base, close to the anti-tipping bar (7). Recline the infant car seat towards the base (8) fastening the backrest of the infant car seat to the locking/release handle, located on the base (9). A click will indicate that it has been fastened correctly.
To check it has been fastened correctly, lift the infant car seat using the handle. It should remain firmly secured to the base.
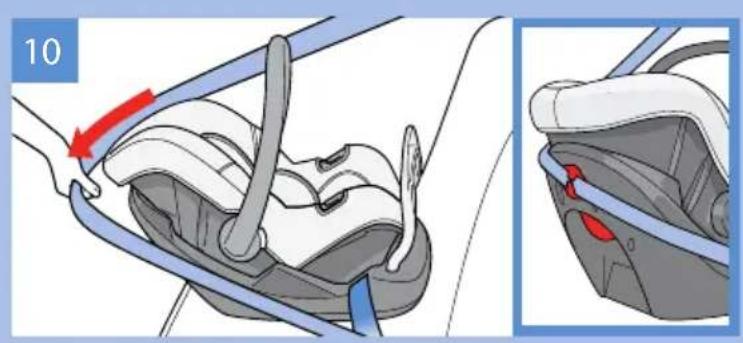
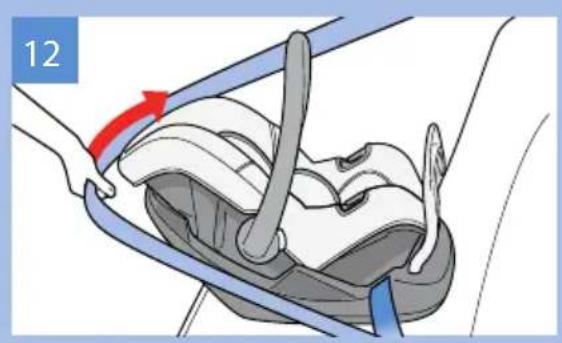
Pull the diagonal belt and insert it in the red retainer located on the backrest of the Base Group 0+ (10).
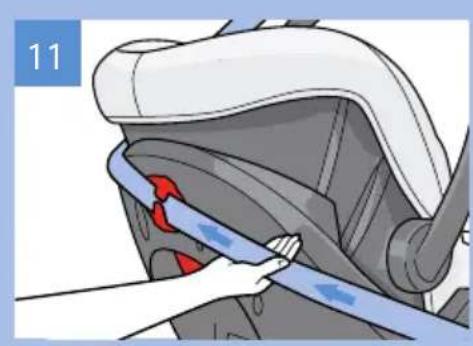
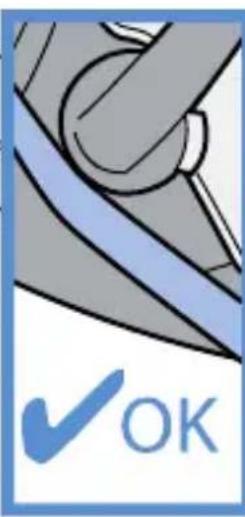
Make sure that the diagonal belt and the lap belt are not twisted and tighten them securely (11). Check that the infant car seat Group 0+ is fastened correctly to the base 0+ . When the infant car seat is lifted using the handle, it must remain firmly attached to the base.
Releasing the infant car seat Group 0+ from the base.
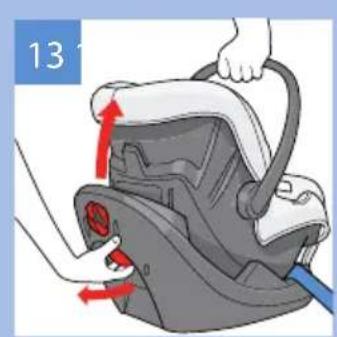
To release the infant car seat from the base, remove the diagonal belt fitted in the vehicle from the red retainer located on the backrest of the base (12), pull the red release handle located on
the backrest of the base and lift the infant car seat using the handle (13).
Instruction manual
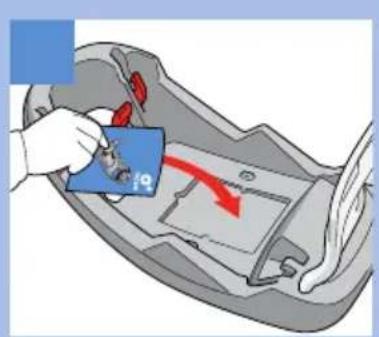
Keep the instruction manual in the compartment at the centre of the base (14) so that it can be consulted whenever necessary.
Additional information
Consult the infant car seat group 0+ and base 0+ instruction manual for information on how to install and secure the base 0+ correctly, how to fasten the infant car seat to the base, how to position and fasten baby in the infant car seat and how to regulate the handle of the infant car seat correctly.
Read the warnings on the products carefully and the instruction manual and keep for future reference.
Important
The base 0+ is standard approved according to the regulation ECE R44/04, the European regulation concerning the safety of infant car seats and it must only be used together with the infant car seat Group 0+ (type B9).
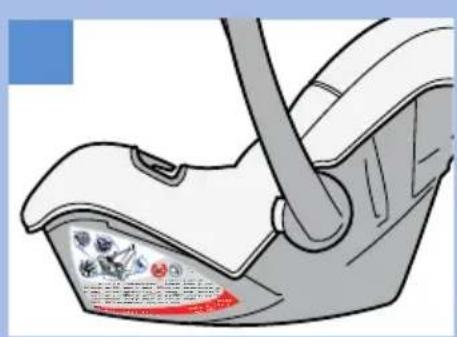
The model of the infant car seat is stated on the label fitted on the product (15).
Never leave the base of the child car seat unsecured in the car: it may hurt or injure the passengers.
CONSIGNES DE SECURITE
GB CARRY COT - Instructions for use
Suitable for children under 6 months of age
READ THE INSTRUCTIONS CAREFULLY AND KEEP FOR FUTURE REFERENCE
F. IMPORTANT!
LIRE ATTENTIVEMENT ET CONSERVISOIGNEUSMENT A PORTEE DE MAINPOUR UNE UTILISATION ULTERIEURE
D. WICHTIG!
AUFMERKSAM LESEN UND FÜR ZUKUNFTIGE REFERENZEN AUFBEWAHREN
E. IMPORTANTE!
LEER ATENTAMENTE Y CONSERVAR PARA FUTURAS REFERENCIAS
NL. BELANGRIJK!
AANDACHTIG LEZEN EN BEWAREN VOOR TOEKOMSTIG GEBRUIK
GR. ΣHMANTIKO: KPATHES TIE OΔHIEE ΓIA NA TIE ΣYMBOYAEYESETE ΣTO MEΛΑΝΙΝΟΥΤΙΕ BΗΜΑTEJIbHO

IT
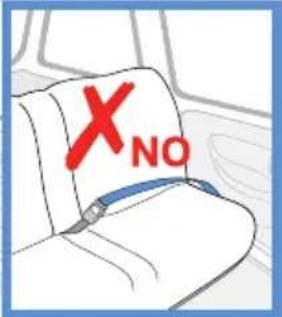
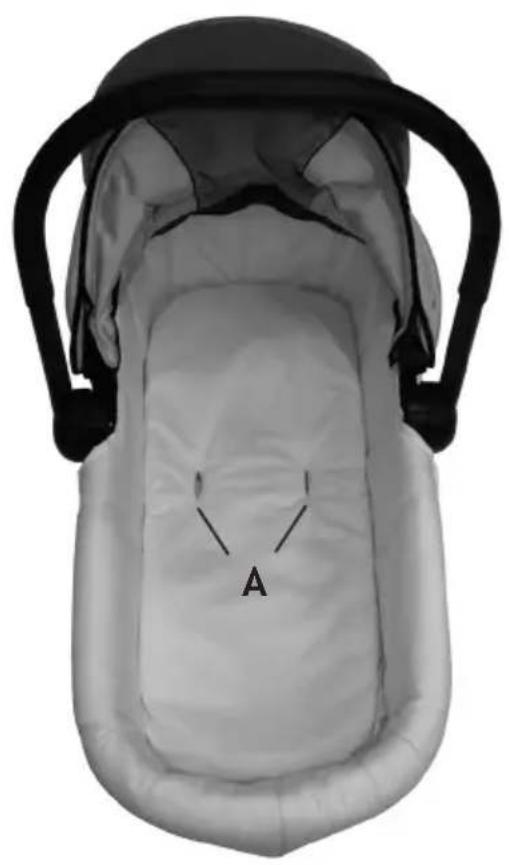
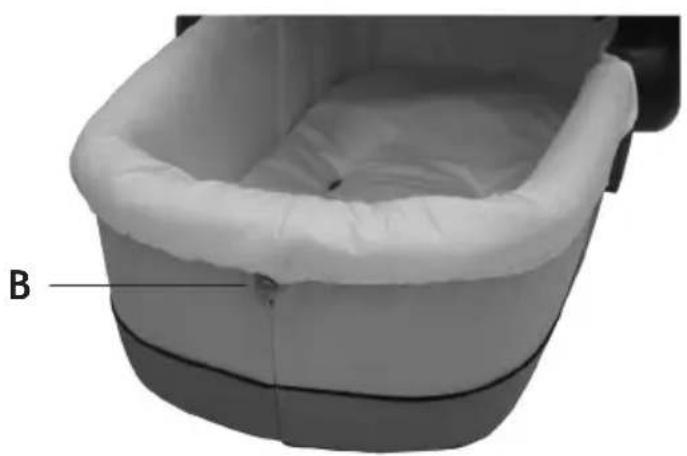
WARNING: The carrycot can be used for transporting baby in the car only if the "CAR KIT" cod. 9700372000 is used (sold separately).
Refer to the "CAR KIT" instruction manual for all the information concerning how to fit the "CAR KIT" on the carrycot and how to fit it in the car.
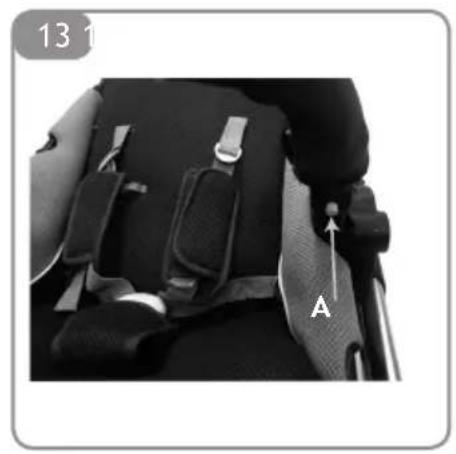
A Slots to insert the lap belt of the CAR KIT (sold separately)
B Fastening pin for the metal buckles of the CAR KIT (sold separately)
USING THE CARRYCOT
GB
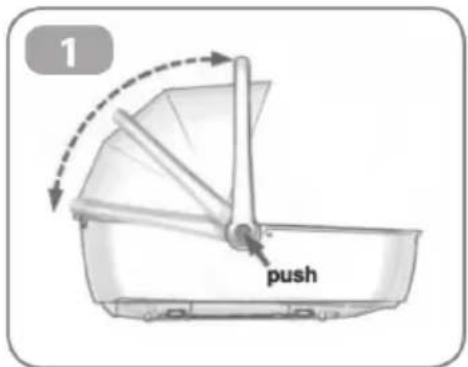
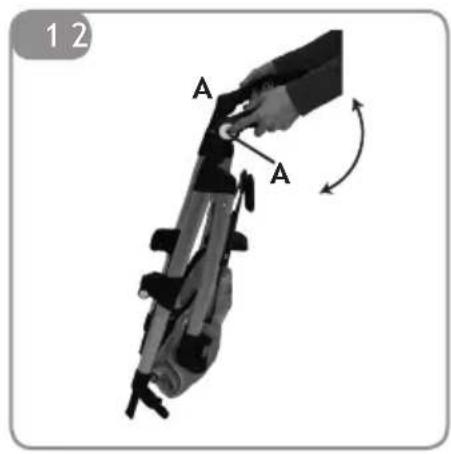
Handle adjustment [fig. 1]
Press the buttons at the side and adjust the handle into the new position, release the buttons and check that the handle is locked in place.
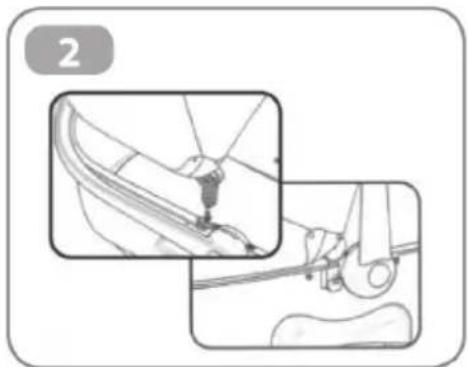
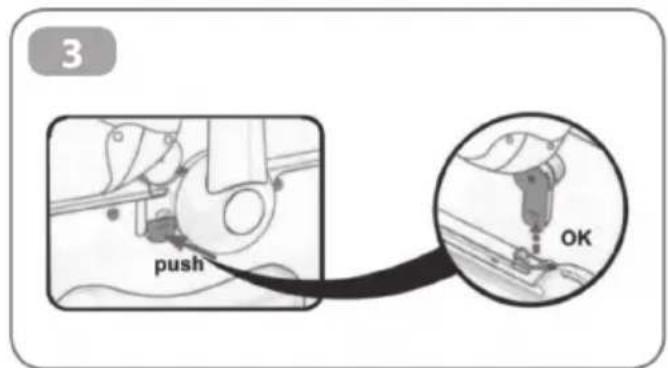
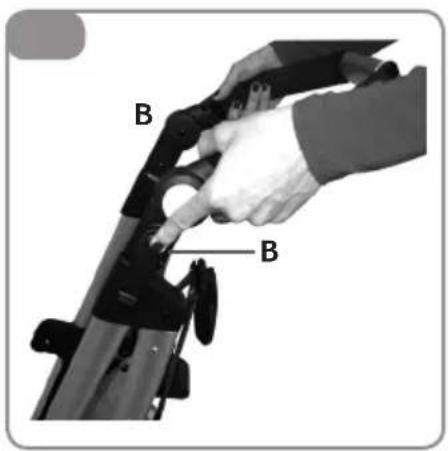
Assembling the hood [fig. 2 - fig.3]
Line up the pins of the hood and insert them into the slots at the side of the carrycot.
Press downwards, a click indicates the hood has been secured in place.
To remove the hood, press the lower part of the hood securing pin and at the same time remove the hood from its slot.
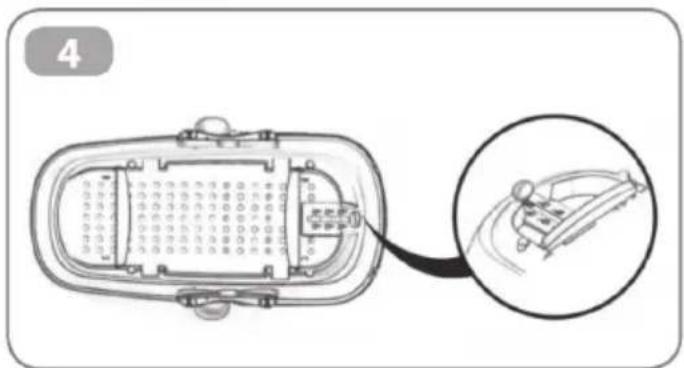
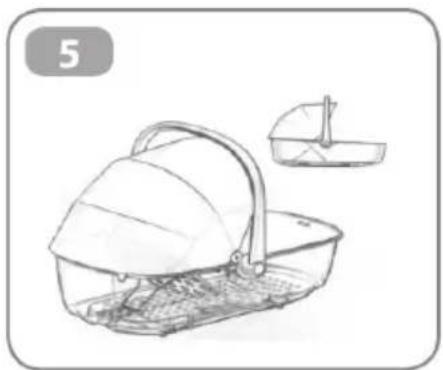
Backrest adjustment [fig. 4, fig.5]
To lift or recline the carrycot backrest, press and adjust the lever into the new position.
Make sure the backrest has been secured correctly in place, in the chosen position.
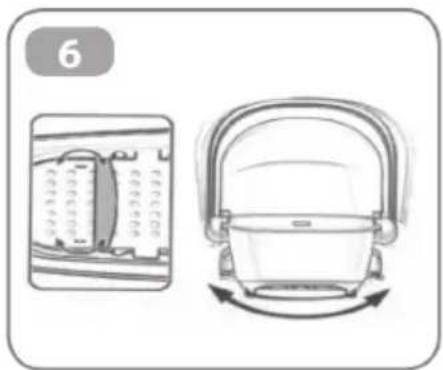
Rocking system [fig. 6]
Two supporting feet are located in the base; fold them both out to prevent the rocking movement, open both of the feet inwards to allow the rocking movement.
Both feet must be folded inwards or opened outwards.
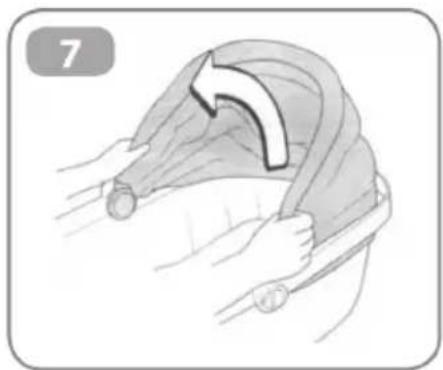
Hood adjustment [fig. 7]
Lower or lift the hood to achieve the required position.
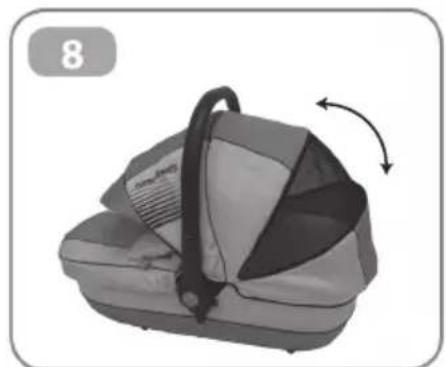
Ventilation [fig. 8]
Open the zip to ventilate the inside of the carrycot.
Cover [fig. 9]
Fit the cover on the carrycot using the press fasteners.
WARNING
Read the instructions carefully before use and keep for future reference.
Your baby's safety may be at risk unless these instructions are followed carefully.
WARNING: YOU ARE RESPONSIBLE FOR YOUR BABY'S SAFETY.
WARNING: It may be dangerous to leave baby unattended. Always keep baby under supervision when he is in the carrycot.
WARNING: The carrycot is suitable for use by babies up to 6 months of age or until they are able to sit up unaided.
WARNING: Suitable for children under 6 months of age.
WARNING: For newborn babies, do not regulate the backrest in the vertical sitting position (it should be set in the lie flat position) as baby is unable to keep his head upright at this age.
WARNING: Make sure that all the locking devices have been fastened correctly before use.
WARNING: Do not use an additional mattress with a thickness of more than 25mm
Do not use spare parts or accessories other than those supplied or approved by the manufacturer, as they may make the product unsafe.
Make sure that everyone using the product is familiar with how it works.
Pouon koukouac [EK.7]
Xaunawote n onkwote tn koukoula yia va anoktnoet e tnv enuunr theon.
Aepiouc [EK.8]
AvoiTe to yia va aepicetai o eowteipokc xwpoc tou nopT-μπeμne.
Kαλuμα [εικ.9]
GB PUSHCHAIR - Assembly instructions
This stroller is suitable for children with a maximum weight of 15kg - Complies with EN 1888:2003
BUGGY - Montageanweisungen
READ THE INSTRUCTIONS CAREFULLY AND KEEP FOR FUTURE REFERENCE
F. IMPORTANT!
LIRE ATTENTIVEMENT ET CONSERVERSOIGNEUSMENT A PORTEE DE MAINPOUR UNE UTILISATION ULTERIEURE
D. WICHTIG!
AUFMERKSAM LESEN UND FÜR ZUKUNFTIGE REFERENZEN AUFBEWAHREN
E. IMPORTANTE!
LEER ATENTAMENTE Y CONSERVAR PARA FUTURAS REFERENCIAS
NL. BELANGRIJK!
AANDACHTIG LEZEN EN BEWAREN VOOR TOEKOMSTIG GEBRUIK
GR. ΣHMANTIKO: KPATHES TIE OΔHIEE ΓIA NA TIE ΣYMBOYAEYEETE ΣTO MEΛΛON -ΠPOYTTE BHIMATEJIbHO

27b
27c
28b
28c
29a

29b
30
31
32 3
34a
34b
34c
34e

34f
35
- PPOs'HKEs
363
37b
38
394
41a
41b

42
43
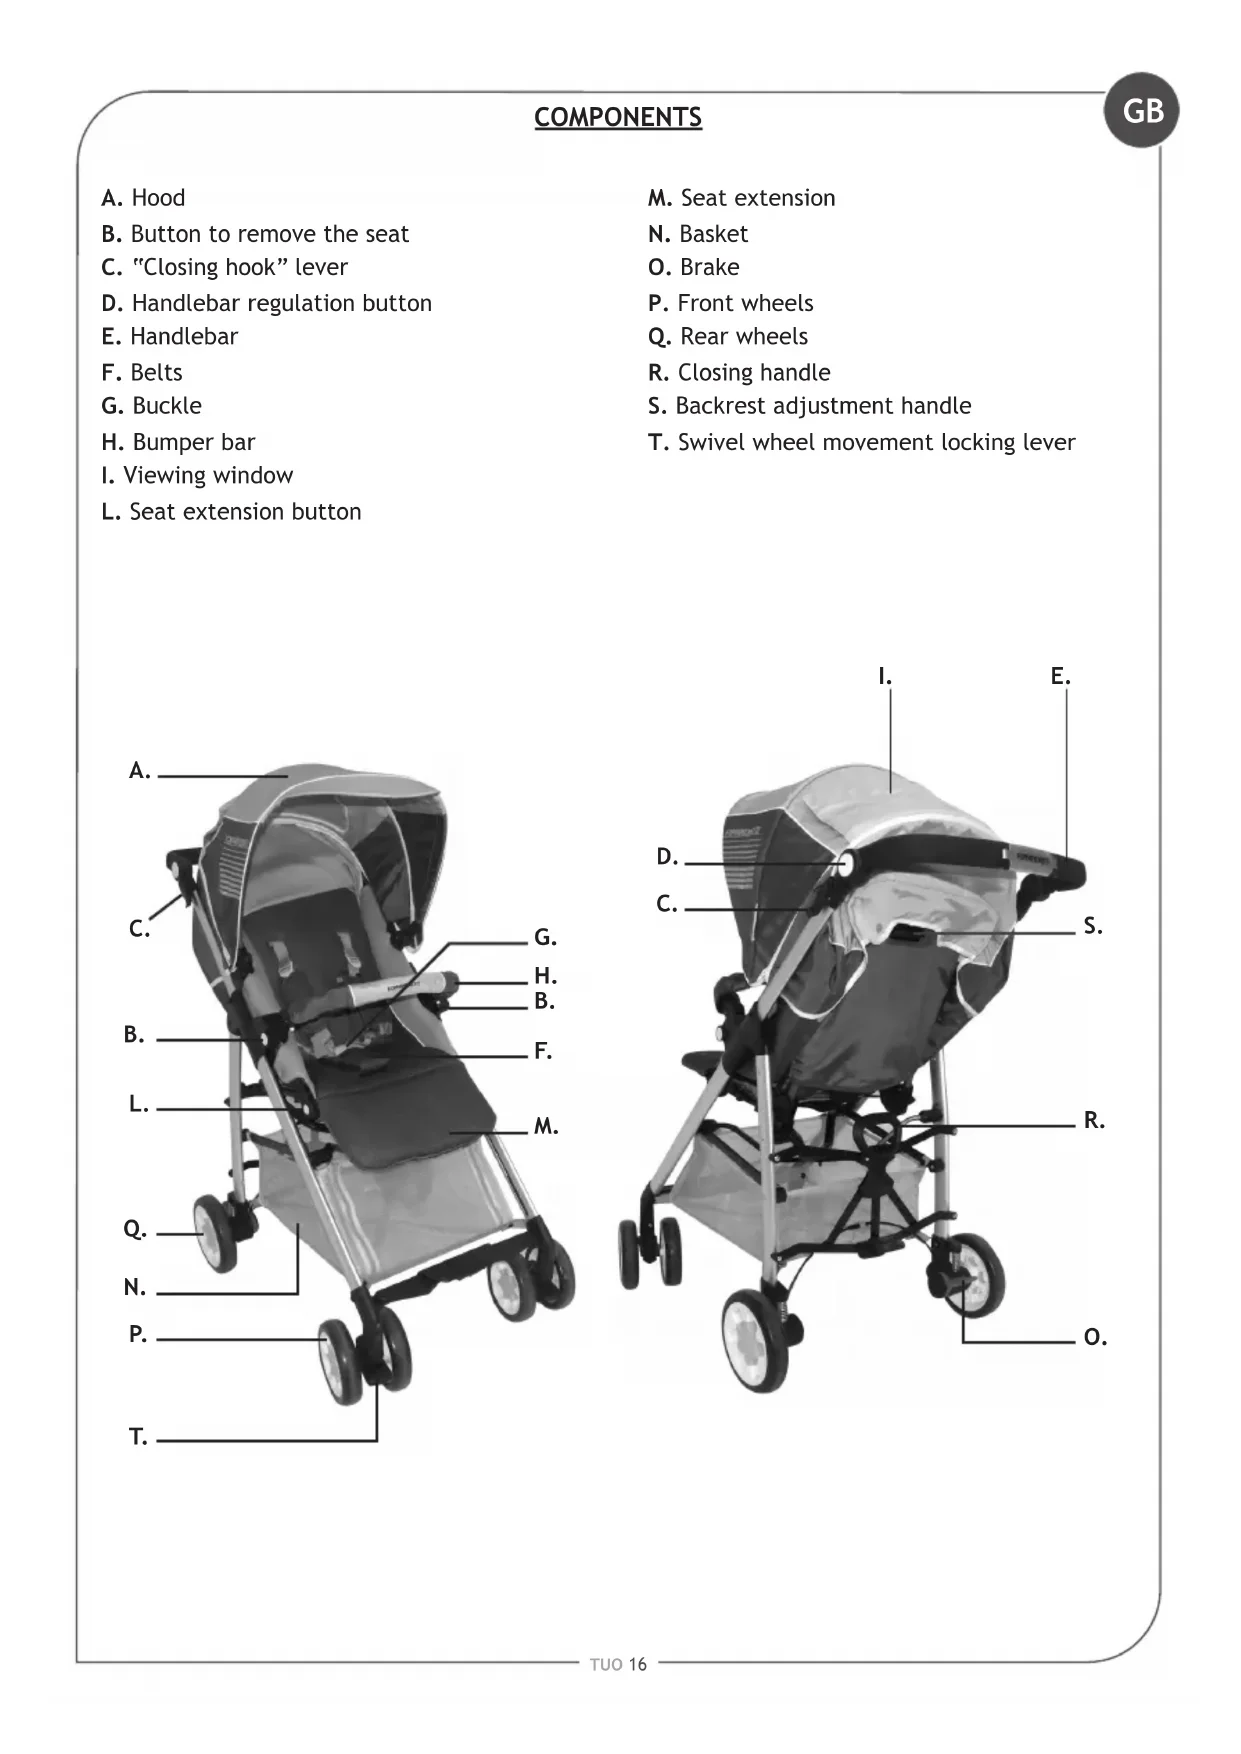
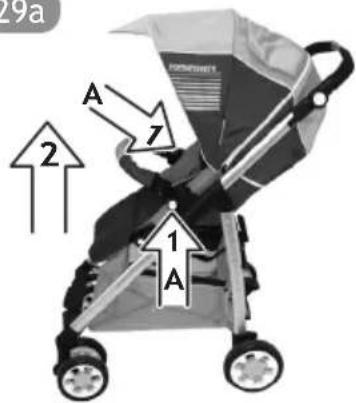
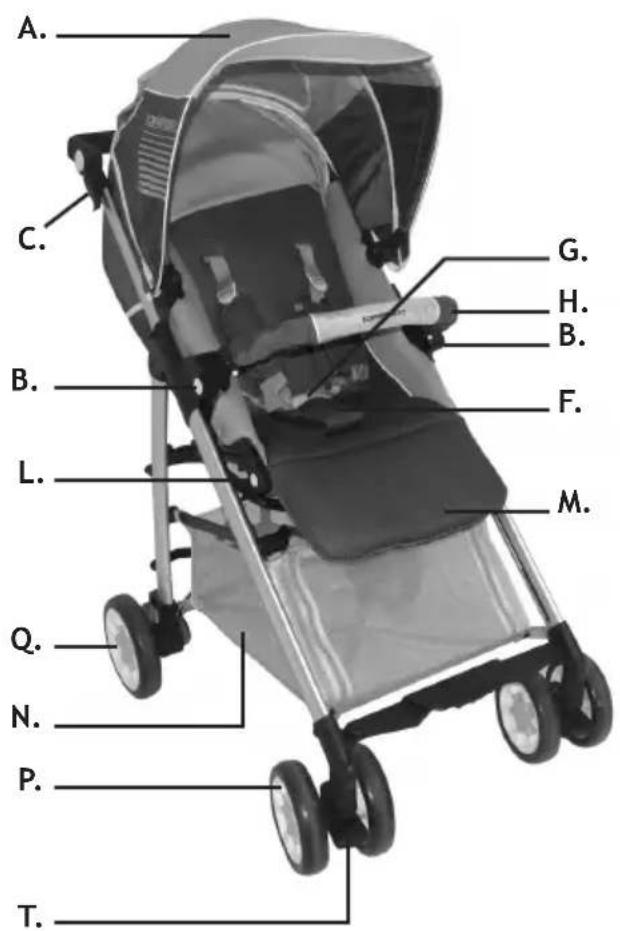
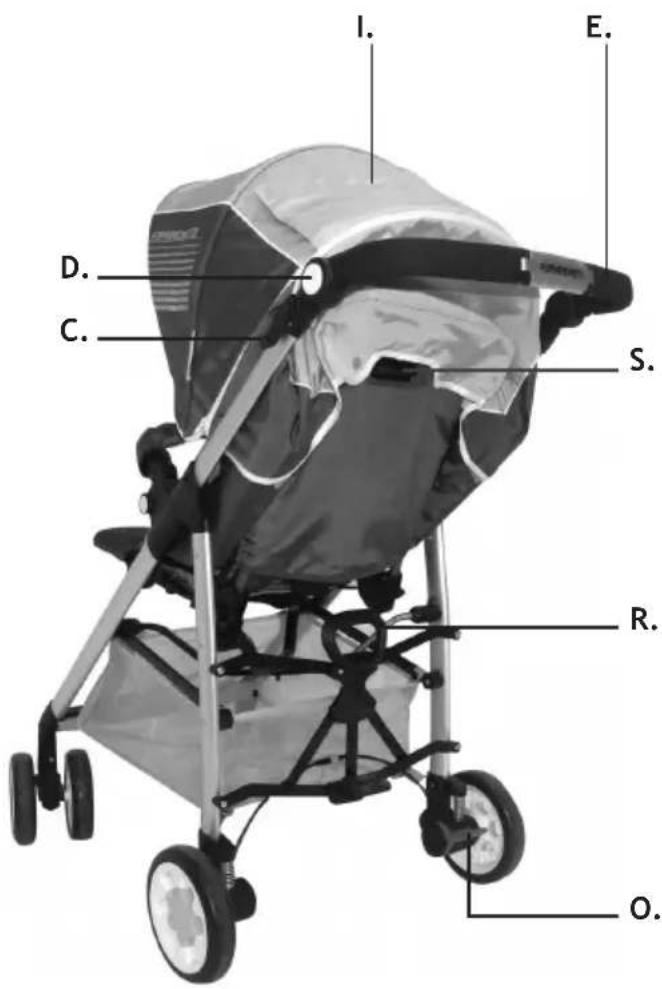
SEDUTA REVERSIBLE (fig.29a/b)
A. Hood
B. Button to remove the seat
C. "Closing hook" lever
D. Handlebar regulation button
E. Handlebar
F. Belts
G. Buckle
H. Bumper bar
I. Viewing window
L. Seat extension button
M. Seat extension
N. Basket
O. Brake
P. Front wheels
Q. Rear wheels
R. Closing handle
S. Backrest adjustment handle
T. Swivel wheel movement locking lever
TO INSTALL
HOW TO OPEN THE PUSHCHAIR (fig.1 - fig.2 - fig.3 - fig.4)
Press both the buttons at the side of handlebar "A" and turn the handlebar into positions 1, 2 or 3. A click will indicate that it has been fastened.
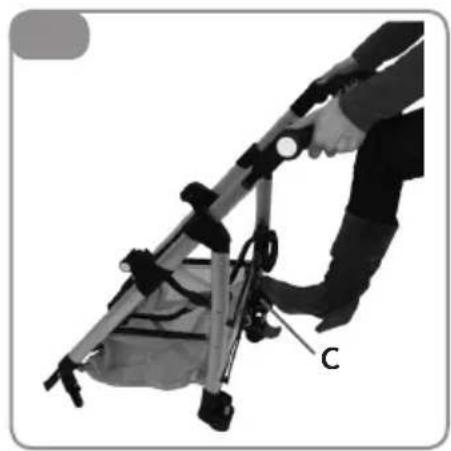
Press both the levers (closing hook) "B" and lift the chassis upwards, at the same time press the rear locking pedal "C" downwards with the foot, until it is completely open.
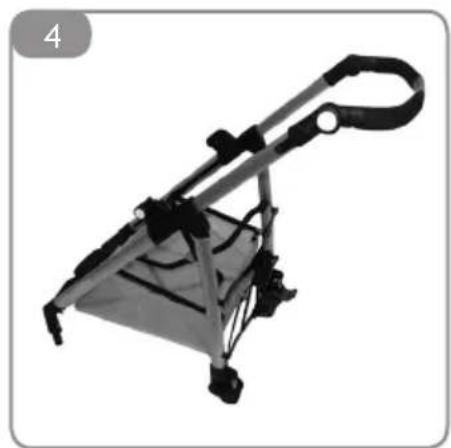
Make sure the pushchair has been opened correctly by pressing the handlebar at the sides, the chassis should remain locked in place. If one side has not been locked correctly, grip the handlebar on the side that has not been fastened and pull upwards to fasten the chassis correctly.
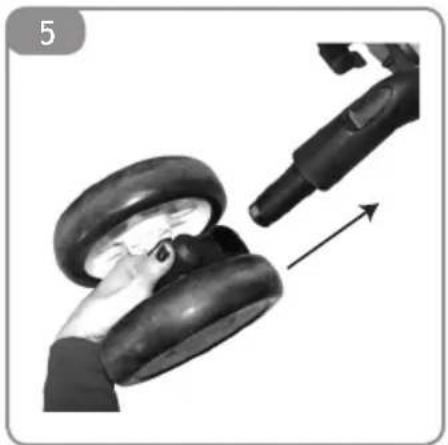
FRONT WHEELS
Fitting the front wheels (fig.5): Lift the chassis with one hand and insert the front wheels, with the locking lever turned upwards on the wheel hub. A click will indicate that it has been fitted correctly. Check that both the wheels have been fastened correctly, if they are pulled downwards they should not be released.
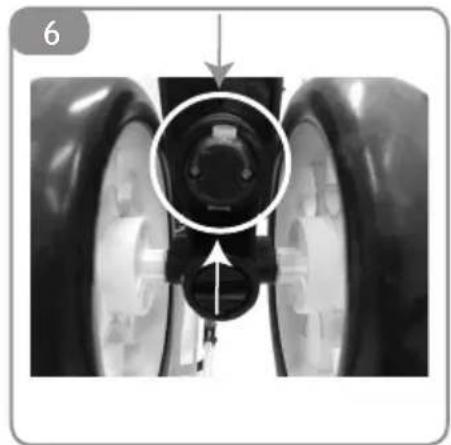
Removing the front wheels (fig.6): press the locking device, in the lower part of the wheel and keeping it pressed, remove the wheel from the hub.
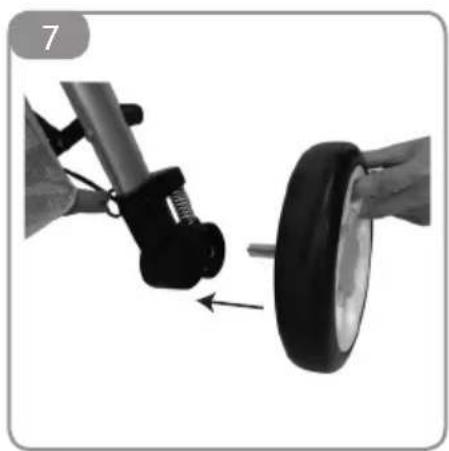
REAR WHEELS
Fitting the rear wheels (fig.7): Insert the wheel pin in the hole, a click will indicate it has been fastened in place. Make sure that the wheel has been secured correctly, it should not come away when it is pulled outwards.
Removing the rear wheels (fig.8): Press the metal lever on the wheel hub and, at the same time, remove the wheel.
FASTENING THE SEAT (for use as a pushchair)
Fitting the seat (fig.9 - fig.10): to fit the seat, place it in the position shown in the figure. Line up and insert the plastic connectors of the seat in the slots provided on the pushchair chassis. Press until a click is heard indicating that it has been fastened correctly.
WARNING: Before use, always check that both the seat supports are fastened correctly to the chassis.
When the seat is lifted upwards, it must not detach from the chassis.
Removing the seat (fig.11): press button "A" on both sides and remove the seat by lifting it.
Fitting the bumper bar(fig.12): line the bumper bar up with the slots and press on both sides. A click indicates that it has been fastened correctly.
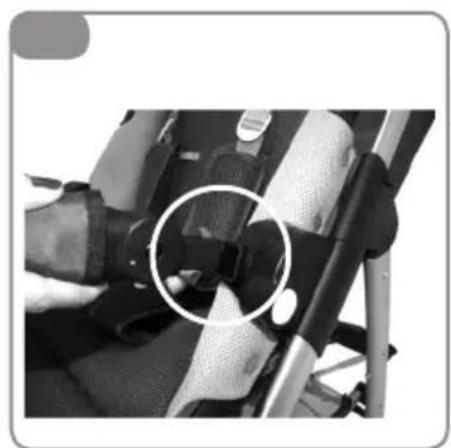
Removing the bumper bar (fig.13): press button A on both sides of the bumper bar and at the same time pull to remove it.
Opening the bumper bar on just one side (fig.14): press button "A" on one side of the bumper bar and pull to open it like a gate.
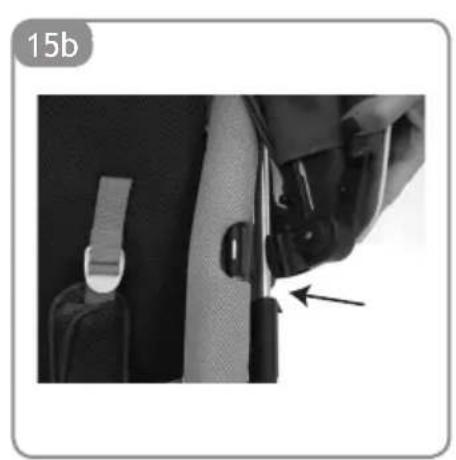
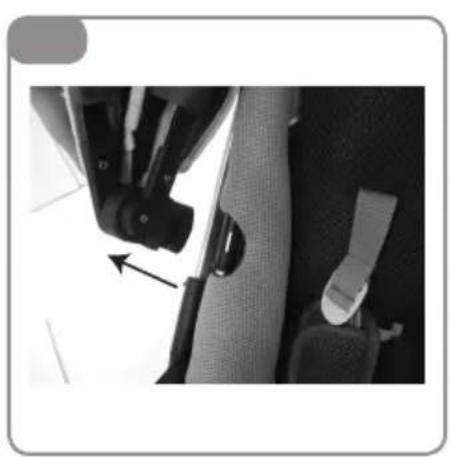
FITTING THE HOOD
Fitting the hood (fig.15): fasten the hood support to both sides of the chassis.
Fasten the press fasteners of the hood behind the backrest.
Removing the hood (fig.16): pull and release the hood support from both sides of the chassis.
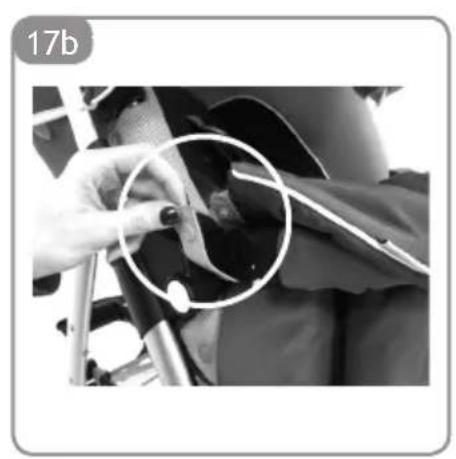
FITTING THE FOOTMUFF
For newborn babies (fig.17): Insert the lower part of the footmuff on the seat of the chassis.
Fold the upper part of the footmuff around the bumper bar.
TO INSTALL
GB
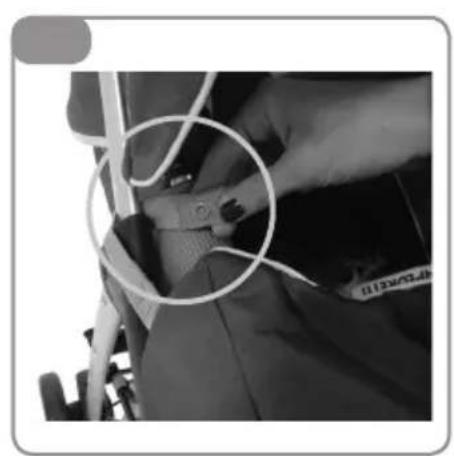
Secure the footmuff to the chassis of the pushchair using the press fasteners.
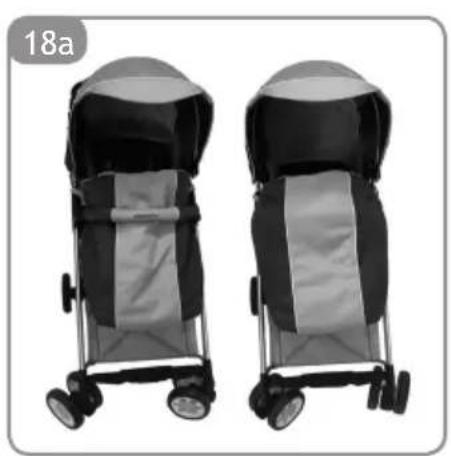
For children (fig.18a/b): Insert the lower part of the footmuff on the seat of the chassis.
The upper part of the footmuff can be left on the outside or inside the bumper bar as required.
Secure the footmuff to the chassis of the pushchair using the press fasteners.
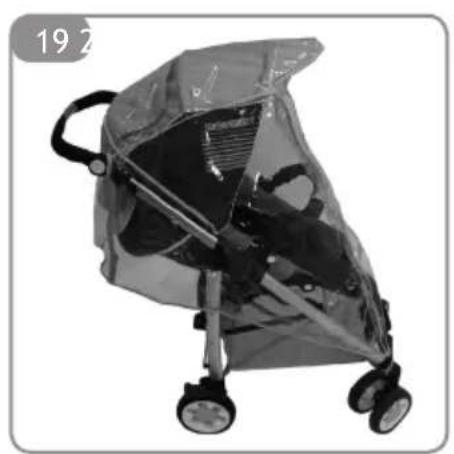
FITTING THE PUSHCHAIR RAINCOVER (fig.19)
Fit the raincover over the hood.
Fasten the edges at the back of the raincover using the Velcro tabs.
Fasten the front of the raincover to the chassis of the pushchair using the Velcro tabs.
USE
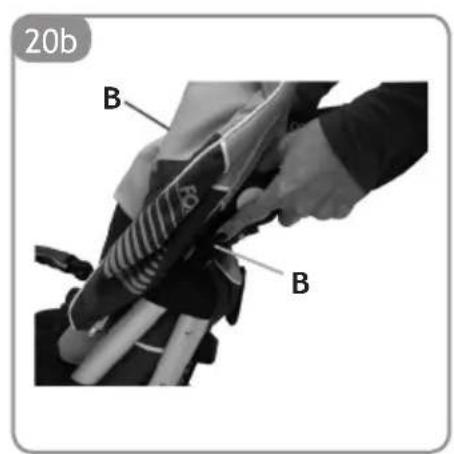
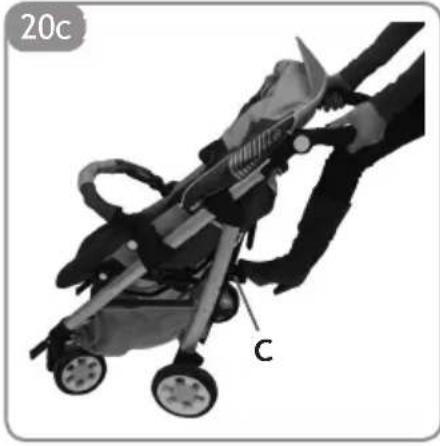
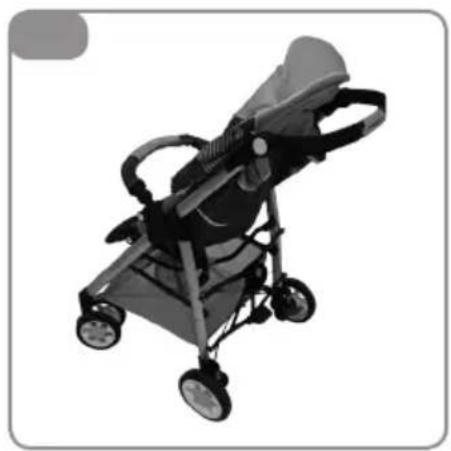
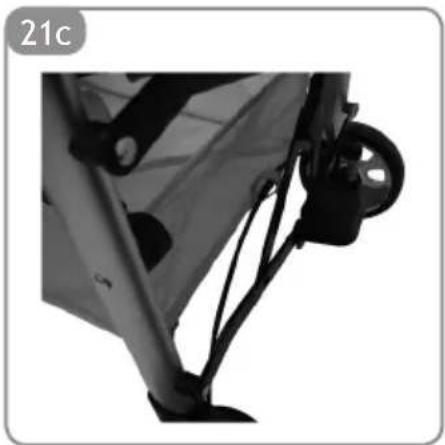
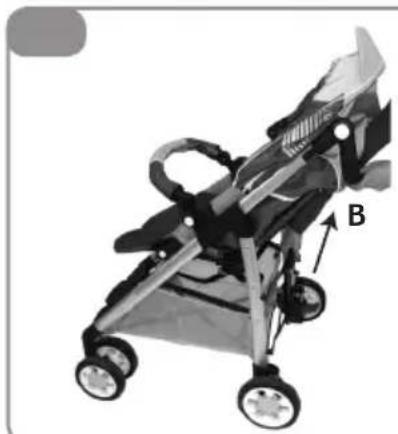
HOW TO OPEN THE PUSHCHAIR (fig.20 - fig.21a/b/c)
Press both the buttons at the side of handlebar "A" and turn the handlebar into positions 1, 2 or 3.
A click will indicate that it has been fastened.
Press both the levers (closing hook) "B" and lift the chassis upwards, at the same time press the rear locking pedal "C" downwards with the foot, until it is completely open.
Make sure the pushchair has been opened correctly by pressing the handlebar at the sides, the chassis should remain locked in place. If one side has not been locked correctly, grip the handlebar on the side that has not been fastened and pull upwards to fasten the chassis correctly.
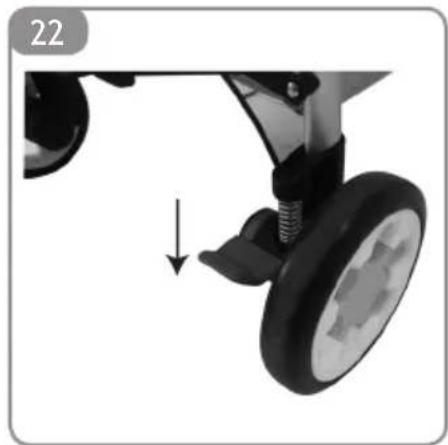
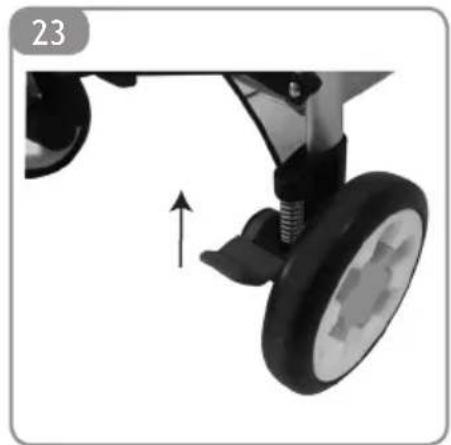
PARKING BRAKE
To apply the brake (fig.22): Press the brake lever, push the pushchair forward gently to ensure the brake has been applied correctly.
To release the brake (fig.23): lift the lever.
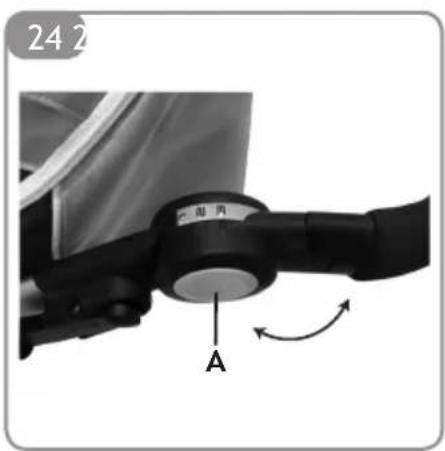
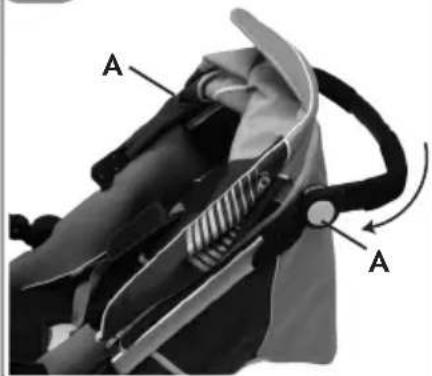
TO ADJUST THE HANDLEBAR (fig.24)
Lift the regulating lever located behind the backrest and recline the backrest to the required position. Release the lever and make sure the backrest is secured in position.
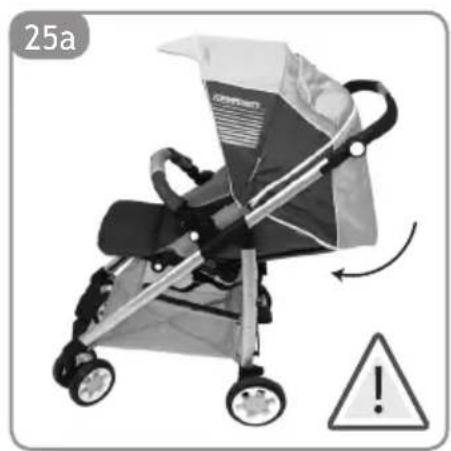
TO REGULATE THE BACKREST (fig.25)
Lift the regulating lever located behind the backrest and recline the backrest to the required position. Release the lever and make sure the backrest is secured in position.
WARNING (fig.25a): For babies under 6 months of age, the backrest must only be in the fully reclined, horizontal position at all times.
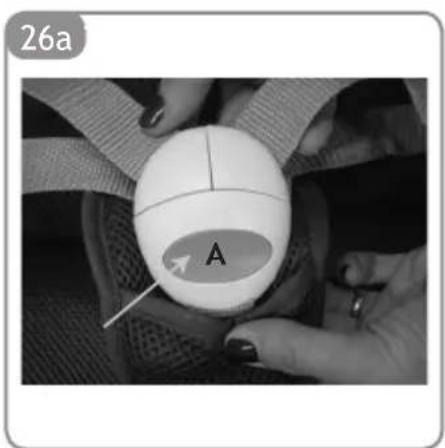
SAFETY HARNES
Apply the brake before placing your baby in the pushchair.
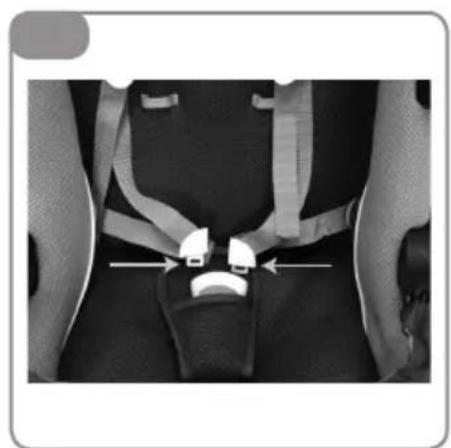
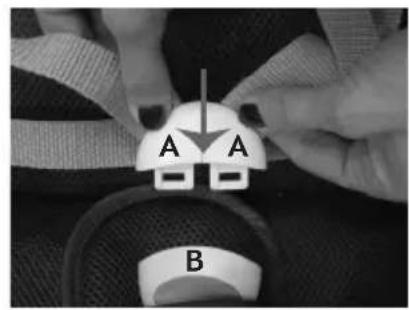
Release the buckle (fig.26a/b): press button "A" and remove the components
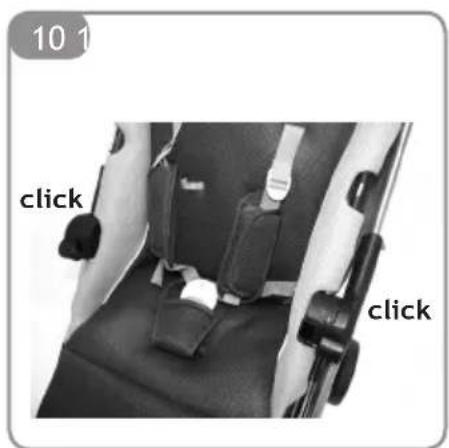
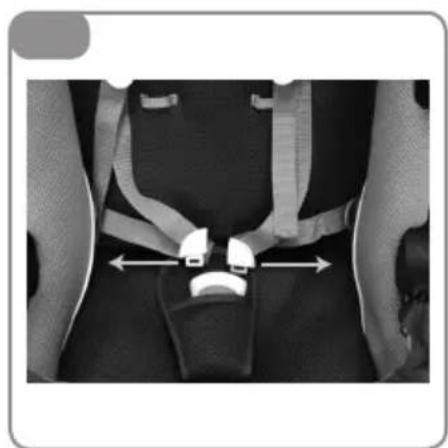
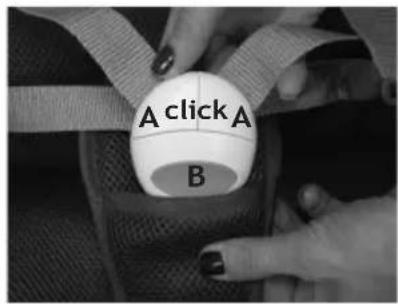
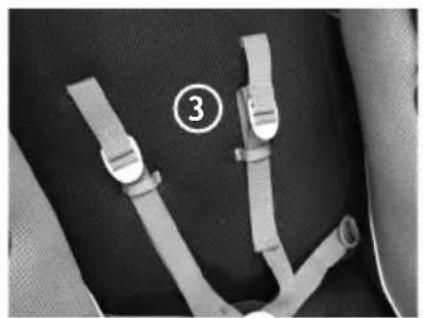
Fasten the buckle (fig.27a/b/c): by inserting part A in part B, a click will indicate that it has been fastened correctly.
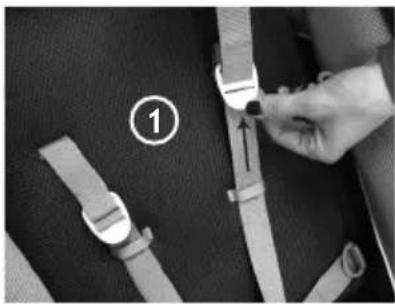
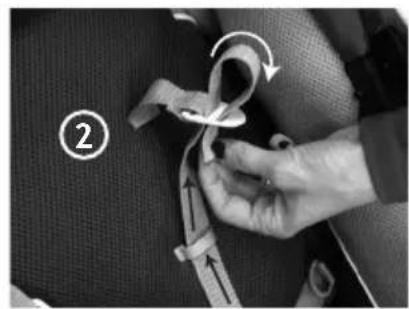
If baby is less than 6 months old, the harness belts must first be inserted through the lower slots and then through the rings of the harness regulating buckle (fig.28a/b/c).
IMPORTANT: For babies under 6 months of age, the backrest must only be regulated in the fully reclined, horizontal position at all times.
USE
GB
WARNING: Never use the crutch strap without the lap belt.
WARNING: The lap belt is provided with 2 side rings to be used for additional belts in compliance with the standard BS 6684.
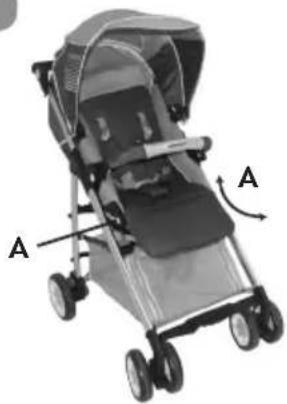
REVERSIBLE SEAT (fig.29a/b)
Press buttons "A" on both sides and remove the seat by lifting it.
Position the seat so that it is forward facing or parent-facing.
Replace the seat on the chassis of the pushchair, see the paragraph "fitting the seat" for correct assembly.
ADJUSTING THE FOOTREST (fig.30)
Press buttons "A" and adjust the footrest in the required position.
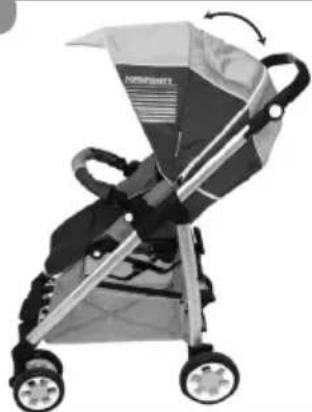
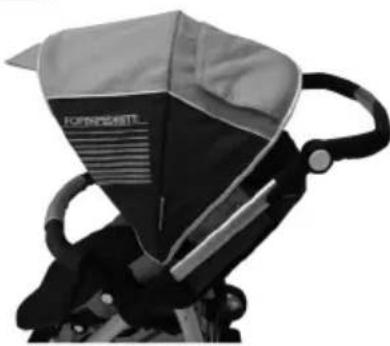
ADJUSTING THE HOOD (fig.31 - fig.32)
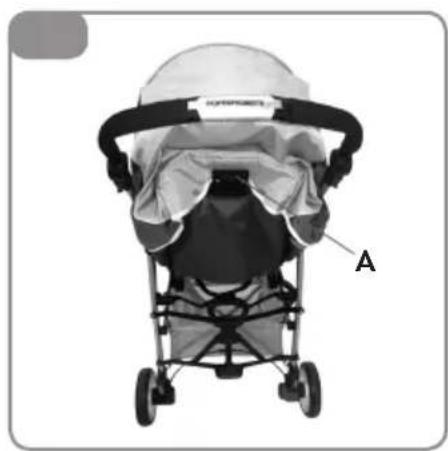
Extend the hood according to requirements to protect baby from the sun.
Note: babies' skin is very delicate. NEVER leave baby under direct sunlight. Always make sure that the hood has been adjusted correctly.
Remove the rear part of the hood to use it as a parasol.
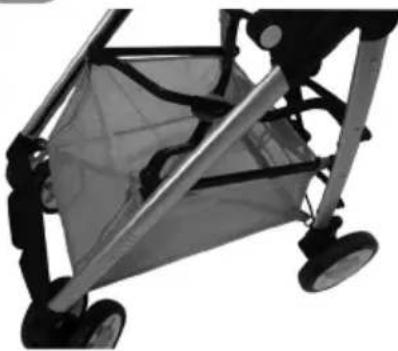
SHOPPING BASKET (fig.33)
The basket is fitted on the lower part of the chassis by means of press fasteners. To remove it, open the press fasteners.
The basket can be used to carry a maximum weight of 5kg
The basket should be emptied before folding the pushchair.
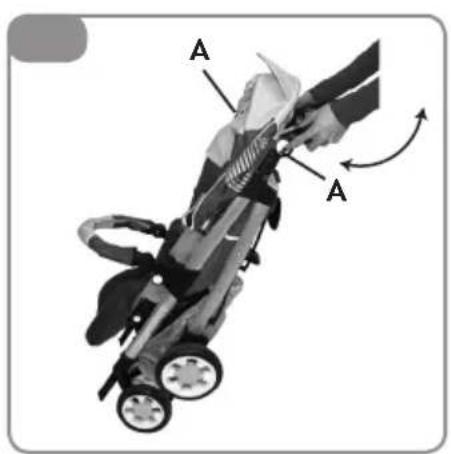
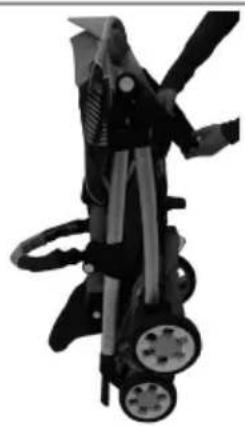
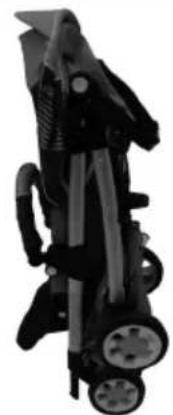
FOLDING THE PUSHCHAIR (fig.34a/b/c/d/e/f - fig.35)
Before folding the pushchair, make sure that:
The seat is forward facing
- The backrest is adjusted in the upright position
The hood is folded
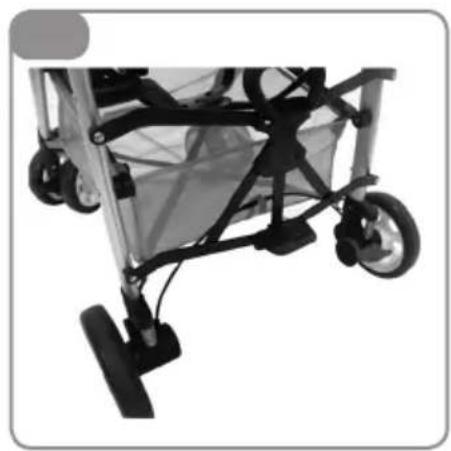
The front wheels are locked
Press both the buttons at the side of the handlebar and turn the handlebar completely downwards, so it is in the position with the fastener open.
Hold the handle at the back of the pushchair and lift it upwards to fold the pushchair.
Make sure that both the closing levers on both sides of the chassis have been fastened.
Note: It is NOT possible to close the pushchair with the travel system accessories, the infant car seat and carrycot, fitted on the chassis
USING THE TRAVEL SYSTEM ACCESSORIES
The TUO pushchair can be used with the following travel system accessories, TUO carrycot and TUO infant car seat.
Remove the seat from the chassis (see the paragraph "Fitting the seat").
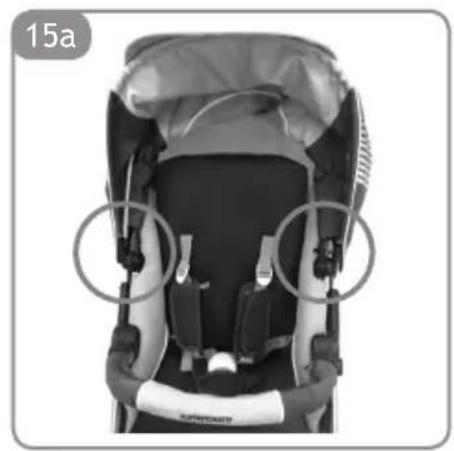
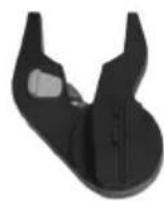
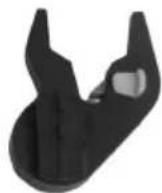
FITTING THE RIGHT AND LEFT ADAPTER (fig.36 - fig.37a/b)
Line up and insert the right and left adapter in the slots provided on the chassis of the pushchair.
USE
GB
Press until a click is heard indicating that the adapter has been secured correctly.
WARNING: Before use, always make sure that both the adapters have been secured correctly to the chassis. When lifted they must not detach from the chassis.
REMOVING THE ADAPTERS(fig.38): press button "A" to remove the adapter.
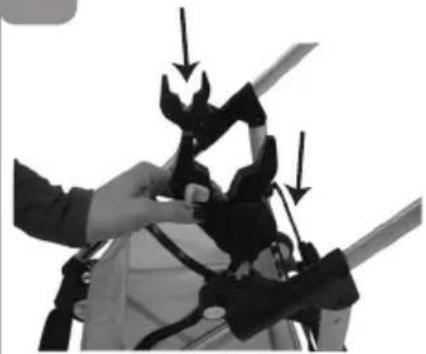
USING THE INFANT CAR SEAT AND CARRYCOT TRAVEL SYSTEM ACCESSORIES
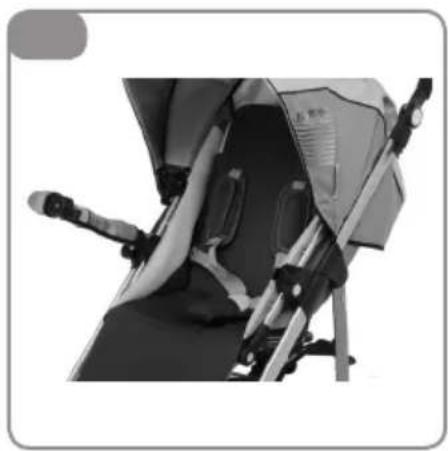
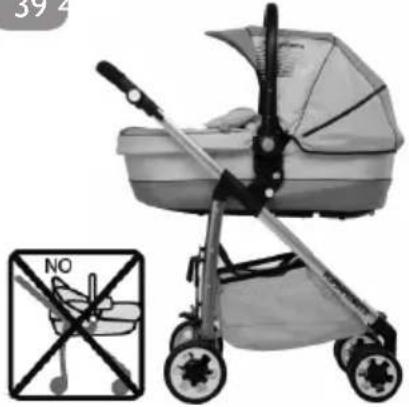
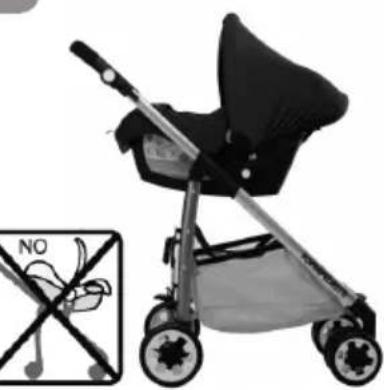
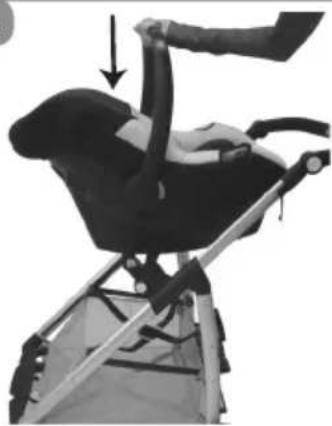
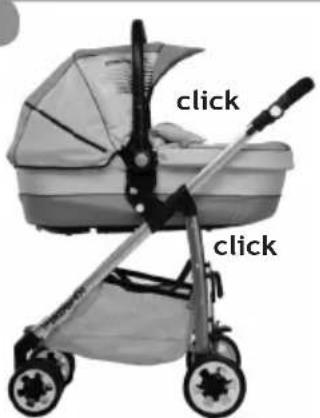
IMPORTANT: the travel system accessories must be secured to the chassis only in the parent-facing position (fig.39 - fig.40).
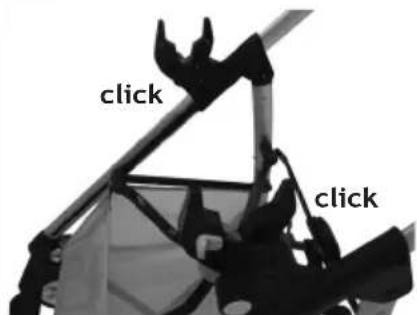
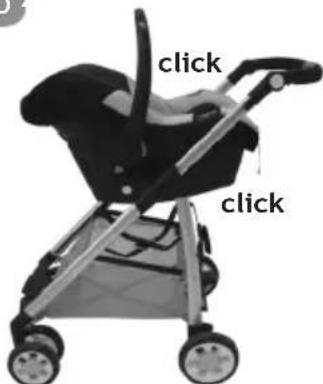
Fitting the accessory(fig.41a/b/c): Line up the locking mechanism fitted on the accessory with the adapters and press downwards until a click is heard indicating that the accessory has been fastened correctly to the pushchair chassis complete with adapters. Make sure that the accessory has been fastened correctly on both sides.
WARNING: Before use, always make sure that the accessory has been secured correctly. When the accessory is lifted upwards it must not detach from the pushchair chassis.
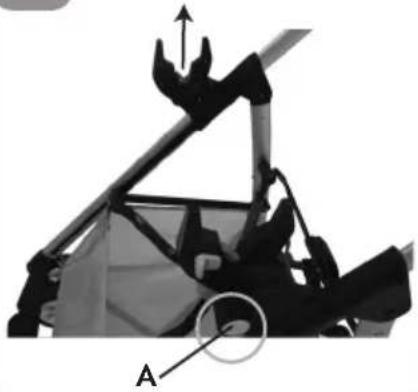
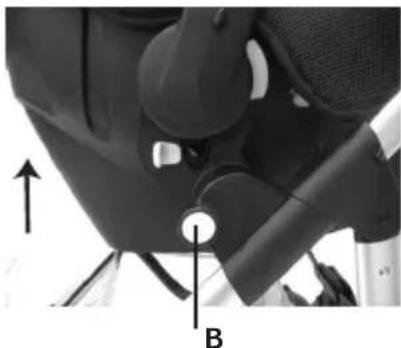
Removing the accessory(fig.42 - fig.43): pull levers "A" on both sides and remove the accessory by lifting it using the handle. As an alternative, the accessory can be removed by pressing button "B" on both sides. In this case the accessory is removed with the adapters fastened to it.
PRODUCT MAINTENANCE
This pushchair requires a minimum amount of regular maintenance.
The lifetime of the pushchair will be increased if the moving parts are lubricated and it will also make the opening and folding operations easier.
If any of the parts of the pushchair should become stiff or difficult to operate, apply a small quantity of spray lubricant, for example WD 40. Do not use oil or grease. The WD 40 should not be used to lubricate the removable wheels. If necessary, the wheels must be removed and cleaned with a soft, dry cloth.
Check the locking mechanisms, the brakes, the wheels, the harnesses, the levers, the seat regulators, the joints and the securing devices regularly to make sure that they are fastened correctly and in good operating order.
The wheels are subject to wear and should be replaced if necessary.
Carry out a careful inspection to check the pushchair is in good operating condition after 18 months of use, after a long period of storage and before using it for another baby.
CLEANING OPERATIONS
Clean the fabric with water, neutral detergent and a sponge.
Clean the fabric using warm water, a sponge and a neutral detergent.
The plastic and metal parts can be cleaned with warm water, a sponge and a neutral detergent.
Never use abrasive products for cleaning or ammonia based products, bleach or turpentine.
Brush the fabric rather than wash it.
WARNING
For the safety of your child, please read the following and keep for future reference.
The safety of your child can be at risk if not following the instructions with attention.
WARNING: A CHILD'S SAFETY IS YOUR RESPONSIBILITY.
WARNING: Never leave child unattended. Always keep child in view when in stroller.
WARNING: This stroller is suitable for children with a maximum weight 15kg.
For babies under 6 months of age, only use the pushchair with the backrest fully reclined or fit the travel system accessory using the adapters provided.
If the pushchair is used with the accessory, make sure it has been fastened correctly.
WARNING: If the pushchair is used with the travel system accessory, make sure it has been fastened correctly.
For new born baby, do not recline seat back to sitting position (should be in full reclining position) as the baby doesn't have ability to control its head.
WARNING: Use seat belt, avoid serious injury from falling or sliding out Always.
WARNING: Ensure your child wears a correctly fitted and adjusted harness at all times.
D-rings are provided on the existing harness for the attachment of a separate safety harness approved to BS 6684 or BS En 13210 should this be required.
Verify regularly that the safety belts are correctly fastened, not damaged or frayed.
WARNING: Ensure that all the locking devices are engaged before use.
WARNING: Only one child for one stroller.
WARNING: This product is not suitable for running or skating.
WARNING: Check that the seat unit attachment devices are correctly engaged before use.
WARNING: Do not add a mattress thicker than 25mm
WARNING: When folding, unfolding or adjusting before using stroller, keep child away from moving parts.
WARNING: Do not place or hang parcels, bags or accessories on any part of the stroller including the handle. Failure to comply with this warning may cause, hazardous, unstable conditions to exist.
WARNING: Always use the brakes when stroller is stopped.
WARNING: Never fold the stroller, not even partly, when your child is in it.
A basket is provided for the carriage of 4kg of goods, evenly distributed.
The product must be assembled by an adult.
Only the minder can operate the recline adjuster.
Never use the stroller if any part of it is damaged or any component is missing.
Do not allow children to play with or hang onto the stroller.
This vehicle requires regular maintenance by the user.
Do not use replacement parts or accessories other than those approved by the supplier as they may render the pushchair unsafe.
Overloading, incorrect folding, and the use of non-approved accessories or spare parts may damage or break this pushchair and could render the product unsafe. Read the instructions.
Do not overload this pushchair with additional children, goods or accessories. Bags and other items must not be hung from the handle.
Never leave rain covers on indoors, in a hot atmosphere or near a heat source as the baby could overheat.
Ensure all users are familiar with the products operation. It should always open and fold easy. If it does not, do not force the mechanism - stop and read the instructions.
Do not use your pushchair in a manner for which it is not designed.
Do not allow your child to climb unassisted into, play with or hang onto your pushchair.
Hold on to your pushchair when close to moving road vehicles or trains. Even with the brake on the draught from the vehicle may move the pushchair.
Exercise caution when mounting or dismounting a kerb.
WARNING
Remove your children and fold the pushchair when ascending or descending stairs or escalators.
Ensure the folded pushchair is stored away from children so that it does not fall and cause injury.
Do not use replacement parts or accessories, e.g. child seats, bags, hooks, trays, rain covers etc. other than those approved by the supplier, they may render the pushchair unsafe.
Never carry a third child on your pushchair.
Do not use any platforms or attachments that allow transportation of third child.
CARE: Your pushchair has been designed to meet safety standards and with correct use and maintenance will give many years of trouble free performance.
The chassis is strong but will weaken should the back wheels be bumped down stairs or kerbs. continual impact will cause damage.
If your child wears hard shoes these might damage the soft fabric.
Storing a damp pushchair will encourage mildew to form.
After exposure to damp conditions, dry off with a soft cloth, open fully and allow to dry thoroughly before storing.
Store your pushchair in a dry, safe place.
Do not leave the pushchair in sunlight for prolonged periods - some fabrics may fade.
SIÉGE RÉVERSIBLE (fig.29a/b)
SILLA REVERSIBLE (fig.29a/b)
OPENING (fig.20a/b/c - fig.21a/b/c)
SLUITING WANDELWAGEN (fig.34a/b/c/d/e/f - fig.35)
SYNTHPHEH TOY IPOIONTO
Auto to kapotoi anaitei takikn ouvtnpon ano tn nAeupa tou xphotn.
To npoiov aataei liyn ouvtnpon. H iinavon twv kivoumuewv mepwv thauufoi tn diapkeia tou kapotoiou kai tha kataotnoe iio ukoec tic evepyiec aoiymuotc kai klaioipatoc tou idiou.
Av opioeva tmuata tou kapotoioyivouv akamtna n duokola stn leitoupyia, aanwote mia kipn nooTnta liavikou oepn opiéi yia napadeyua WD 40. Mny xpnoiooite laodi npoiov WD 40 dev npenei va xnpoiopoietai yia tn liavon twv anooswov troxov. Av eiva anapaitto, oi troxoi npenei va aqapiethetauv kai kaqapiotouv eva maakocai oteyvo navaki.
Eéyxete taktiká touc unxavioouc aoipalionc, ta φpeva, touc troxouc, touc iavtec, touc mikoouc moxlouc, touc puθmuotec touk kaiopatoc, touc ouvdeouc kai touc unxavioouc oTepewongc kai βeβaωtheiTE navta 0ti éoxuv ouvδeoiomega tka βpiokovtai oε kañ kataoan λεitoupyiac.
Otroxoi unokevitai o opa kai npenei va avtikataofov, evxpeiaetai.
Ipaaymuatoonoiite eva npooektiko eleyxo, eni tnc owotnc leitoupyiac tou kapotoiou, meta ano 18 mvec
xphonc, mTa aTo eva eYaloo xpvikó diotma un xpnonc kai npiv to xpnoiopoioeTe yia eva dEUTepo naiδi.
KaapioTe upaOa vepo, to nio anoppunavtiko kvaouyapi.
KaapicTeTo upaoua eXiaapo vepo, oudeltapeo anoppunavtko kai eva oouyyapl.
For children up to 13kg - Complies with ECE R44-04
READ THE INSTRUCTIONS CAREFULLY AND KEEP FOR FUTURE REFERENCE
F. IMPORTANT!
LIRE ATTENTIVEMENT ET CONSERVER SOIGNEUSEMENT A PORTEE DE MAIN POUR UNE UTILISATION ULTERIEURE
D. WICHTIG!
AUFMERKSAM LESEN
UND FÜR ZUKUNFTIGE
REFERENZEN AUFBEWAHREN
E. IMPORTANTE!
LEER ATENTAMENTE Y CONSERVAR PARA FUTURAS REFERENCIAS
NL. BELANGRIJK!
AANDACHTIG LEZEN EN BEWAREN VOOR TOEKOMSTIG GEBRUIK
GR. ΔIAB'AΣTE ΠPOΣEKΤΙΚΑ KAI
KPATHE AYTO TO EIXEIPIAIO IIA NA TO SYMBOVYEESTE ΣTO MEΛΑΝΟ
AVVERTENZA: NON UTILIZZARE QUESTO SEGGIOLINO PER BAMBINI SU SEDILI DOTATI DI AIRBAG.
WARNING: DO NOT USE THIS CHILD SEAT ON A PASSENGER SEAT Fitted WITH AN AIRBAG.
ATTENTION: N'UTILISEZ PAS CE SIEGE ENFANT SUR UN SIEGE PASSAGER EQUipe D'UN AIRBAG.
WARNING: VERWENDEN SIE DIESEN KINDERSITZ NICTT AUF EINEM BEIFAHRERSITZ MIT AIRBAG.
ADVERTENCIA: NO UTILICE ESTE ASIENTO INFANTIL EN UN ASIENTO DE PASAJERO CON AIRBAG.
WAARSCHUWING: GEBRUIK DIT BABYAUTOSTOELTJE NIET OP EEN PASSAGIERSZETELMET EEN AIRBAG.
IPOEIAONOIH: MHN XPHSIMONIOIE AYTO TO PAIAIKO KAIGMA NANQ SE KAOTMATA IOY IAAGETOYN AEPOSAKO.
IMPORTANT: always ensure that the seat handle is locked in the vertical position before use.
WARNING: Read these instructions carefully before use and keep this guide in case you need to refer to it in the future. Failure to follow these instructions may affect your child's safety. To avoid any risk of falling, ensure that the handle of your Group 0+ is correctly locked and that your child's safety harness is always fastened. Only install your Group 0+ seat on a forward facing seat fitted with a 3 point safety belt (1).
DO NOT USE THIS CHILD SEAT ON A PASSENGER SEAT Fitted WITH AN AIRBAG.
- Rigid elements and plastic parts of the child restraint device must be positioned and installed so that they do not, under normal vehicle usage conditions, become jammed under a moveable seat or in the vehicle door.
- Keep all straps used to attach the restraint device to the vehicle taut, and adjust the straps used to restrain the child. It is also important that the the straps are not twisted.
- Replace the device when it has been subjected to violent stresses in anaccident.
- It is dangerous to modify or add to the device in any way without approval of the competent authority. It is also imperative to follow meticulously the instructions provided by the manufacturer concerning installation of the child restraint device.
- Keep the seat sheltered from sunlight, so that the child cannot get burned.
- Do not leave children unsupervised while in a child restraint device.
- Make sure that luggage and other objects likely to cause injuries to the occupant of the seat if impact occurs are firmly secured.
- Do not use the child restraint device without the seat cover.
- Do not replace the seat cover with a cover other than the one recommended by the manufacturer, as it directly influences the behaviour of the restraint device.
- If you are in any doubt about installation and proper use of your seat, please contact the manufacturer of the child restraint device.
- Install your child restraint system at the seating positions arranged in the 'Universal' category in the users' manual, using the primary path of the belt.
- Do not use load-bearing contact points other than those described in the instructions and marked on the restraint system.
- Always give preference to rear seats, even if the highway code allows installation at the front.
- Always make sure that the car seatbelt is fastened.
- Always check that there is no food debris or other such matter in the buckle.
- In winter take care not to secure the child in with clothes that are too bulky.
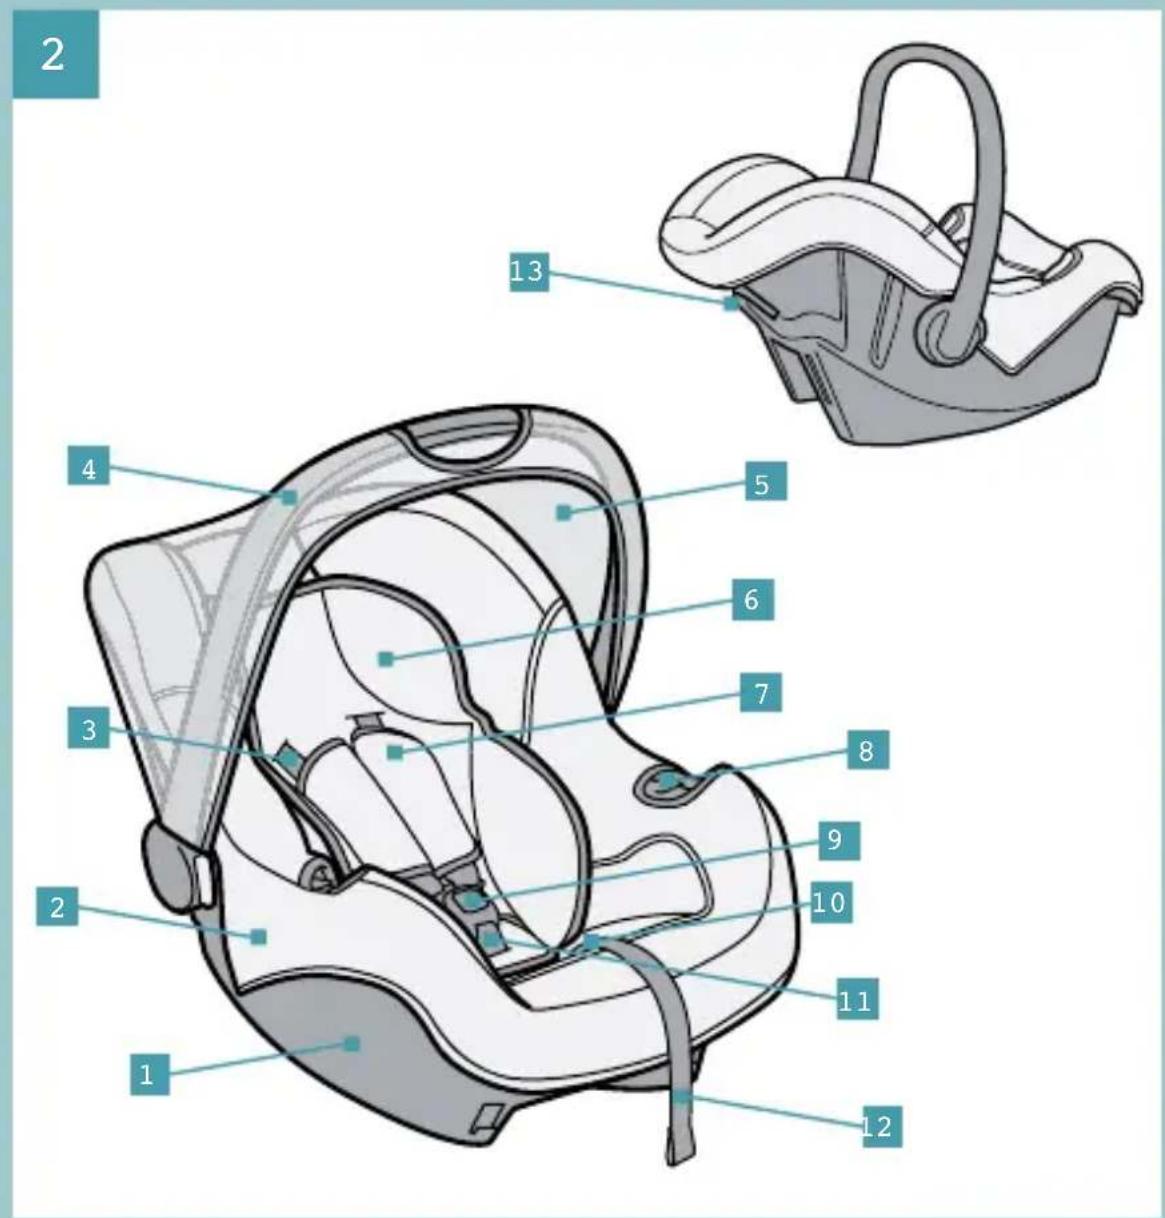
Your Group 0+ (2)
- Shell
- Cover
- Shoulder strap
- Ergonomic handle
- Sun canopy
- Support pillow
- Belt pad
- Lap belt guide (x2)
- Harness buckle
- Harness release button
- Crotch strap
- Adjustment strap
- Diagonal belt guide
In-car installation
WARNING! Do not install your Group 0+ seat on the front seat of a vehicle fitted with an AIRBAG. Always position your Group 0+ seat facing rearwards.
Place the child seat on the front or back seat of your vehicle, always facing rearwards, with the handle in the vertical position (3).
Buckle the belt (4).
Pull out the seat belt and pass the lap section through the side guides (5) (6). Pull and pass the diagonal section of the belt behind the car seat, and slide it into the guide at the back of the shell (7) (8). Ensure that the belt is not twisted and stretch it as tightly as possible (9).
Adjustment of the safety harness
The car seat harness must be adjusted to the size of your child. The shoulder harnesses can be adjusted to three heights, and they must be passed through the slots closest to your child's shoulders.
Pull the shoulder belts through the slots in the shell and cover (10) (11) (12).
Place the shoulder belts back, at the required height and use the same slots in both the shell and the cover.
- Loosen the harness: Press on the adjuster positioned between the legs at the front of the car seat, and pull on the two shoulder harnesses simultaneously (13).
- Tighten the harness: Pull on the adjustment strap at the front of the car seat; it is not necessary to press on the adjuster (14). A properly adjusted harness actively contributes to the best possible
protection for your baby. You must not be able to pass more than the thickness of a finger between the harness and the child.
Installing the child in the car seat
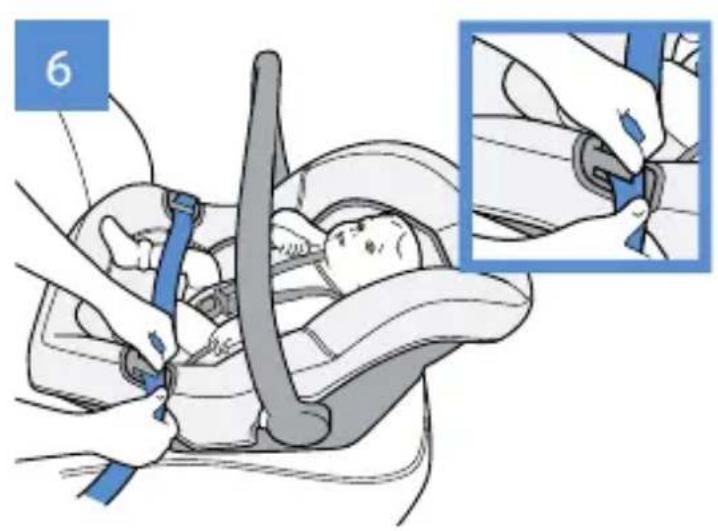
Open the harness buckle by pressing on the red button in the centre of the buckle (15). Install your child in the car seat, ensuring that his/her back rests correctly against the back of the car seat.
Bring together the two ends of the shoulder harnesses and close the harness buckle (16).
Pull on the harness adjustment strap so that the shoulder harnesses are tightened correctly against your child.
Adjustment of the ergonomic handle
The car seat handle has 4 positions.
To move from one position to another, press the buttons on both sides of the handle at the same time (17).
- Position 1: use in the car, for rocking and for carrying (18).
- Position 2: use for rocking (19).
- Position 3: use for storage (20).
- Position 4: use as a recliner in the fixed position (21).
Warning when using as a Recliner
Ensure that all the locking devices are engaged before use. It is dangerous to put this recliner on a surface above the ground.
Not recommended for children who can sit up unaided (aged around 9 months, or from around 9kg ). Never leave your child in the recliner unsupervised.
Storage of the user guide
Store this instruction manual between the shell and the cover of the Group 0+ car seat (22).
Maintenance advice
All the fabric parts are removable. In case of light staining, clean us - ing a sponge dampened with soapy water or wash by hand at 30^ in soapy water. Never use bleach, do not iron, do not machine wash, do not tumble dry.
NOTICE
- This is a 'Universal' Child restraint. It is approved to Regulation N° 44/04 series of amendments, for general use in vehicles and it will be most, but not all, car seats.
- A correct t is likely if the vehicle manufacturer has declared in the vehicle handbook that the vehicle is capable of accepting a 'Universal' child restraint for this age group.
- This child restraint has been classi ed as 'Universal' under more stringent conditions than those which applied to earlier designs wich do not carry this notice.
- Only suitable if the vehicle is fitted with a type approved 3 point static or retractor safety belt in compliance with standard UN/ECE 16 or other equivalent standards.
- If in doubt, consult either the child restraint manufacturer or the retailer.
F
CONSIGNES DE SECURITE


- IMPORTANT!
- WICHTIG!
- IMPORTANTE!
- BELANGRIJK!
- ΔIAB'AΣTE ΠPOΣEKTΙΚΑ KAI KPATHΣTE
- WARNING: DO NOT USE THIS INFANT CAR SEAT ON SEATS EQUIPPED WITH AIRBAGS
- Base 0+ (2)
- Fitting the base in the vehicle
- Fitting the infant car seat on the base
- Releasing the infant car seat Group 0+ from the base.
- Instruction manual
- Additional information
- Important
- CONSIGNES DE SECURITE
- LEER ATENTAMENTE Y CONSERVAR PARA FUTURAS REFERENCIAS
- AANDACHTIG LEZEN EN BEWAREN VOOR TOEKOMSTIG GEBRUIK
- ΣHMANTIKO: KPATHES TIE OΔHIEE ΓIA NA TIE ΣYMBOYAEYESETE ΣTO MEΛΑΝΙΝΟΥΤΙΕ BΗΜΑTEJIbHO
- USING THE CARRYCOT
- Handle adjustment [fig. 1]
- Assembling the hood [fig. 2 - fig.3]
- Backrest adjustment [fig. 4, fig.5]
- Rocking system [fig. 6]
- Hood adjustment [fig. 7]
- Ventilation [fig. 8]
- Cover [fig. 9]
- WARNING
- Pouon koukouac [EK.7]
- Aepiouc [EK.8]
- Kαλuμα [εικ.9]
- ΣHMANTIKO: KPATHES TIE OΔHIEE ΓIA NA TIE ΣYMBOYAEYEETE ΣTO MEΛΛON -ΠPOYTTE BHIMATEJIbHO
- - PPOs'HKEs
- TO INSTALL
- HOW TO OPEN THE PUSHCHAIR (fig.1 - fig.2 - fig.3 - fig.4)
- FRONT WHEELS
- REAR WHEELS
- FASTENING THE SEAT (for use as a pushchair)
- FITTING THE HOOD
- FITTING THE FOOTMUFF
- FITTING THE PUSHCHAIR RAINCOVER (fig.19)
- USE
- HOW TO OPEN THE PUSHCHAIR (fig.20 - fig.21a/b/c)
- PARKING BRAKE
- TO ADJUST THE HANDLEBAR (fig.24)
- TO REGULATE THE BACKREST (fig.25)
- SAFETY HARNES
- GB
- USING THE TRAVEL SYSTEM ACCESSORIES
- USING THE INFANT CAR SEAT AND CARRYCOT TRAVEL SYSTEM ACCESSORIES
- PRODUCT MAINTENANCE
- CLEANING OPERATIONS
- WARNING: A CHILD'S SAFETY IS YOUR RESPONSIBILITY.
- SIÉGE RÉVERSIBLE (fig.29a/b)
- SILLA REVERSIBLE (fig.29a/b)
- SLUITING WANDELWAGEN (fig.34a/b/c/d/e/f - fig.35)
- SYNTHPHEH TOY IPOIONTO
- READ THE INSTRUCTIONS CAREFULLY AND KEEP FOR FUTURE REFERENCE
- LIRE ATTENTIVEMENT ET CONSERVER SOIGNEUSEMENT A PORTEE DE MAIN POUR UNE UTILISATION ULTERIEURE
- ΔIAB'AΣTE ΠPOΣEKΤΙΚΑ KAI
- DO NOT USE THIS CHILD SEAT ON A PASSENGER SEAT Fitted WITH AN AIRBAG.
- Your Group 0+ (2)
- In-car installation
- Adjustment of the safety harness
- Installing the child in the car seat
- Warning when using as a Recliner
- Storage of the user guide
- Maintenance advice
- NOTICE
Brand : Foppapedretti
Model : Tuo
Category : Stroller