
ASiP70 - Docking station KENWOOD - Free user manual and instructions
Find the device manual for free ASiP70 KENWOOD in PDF.

User questions about ASiP70 KENWOOD
0 question about this device. Answer the ones you know or ask your own.
Ask a new question about this device
Download the instructions for your Docking station in PDF format for free! Find your manual ASiP70 - KENWOOD and take your electronic device back in hand. On this page are published all the documents necessary for the use of your device. ASiP70 by KENWOOD.
USER MANUAL ASiP70 KENWOOD
Declaration of Conformity with regard to the EMC Directive 2004/108/EC
Manufacturer :
Kenwood Corporation
2967-3 Ishikawa-machi, Hachioji-shi, Tokyo, 192-8525 Japan
EU Representative's :
Kenwood Electronics Europe BV
Amsterdamseweg 37, 1422 AC UITHOORN, The Netherlands
Made for

iPod

iPhone

Before applying power
⚠ Caution : Read this page carefully to ensure safe operation.
Units are designed for operation as follows.
Europe AC 230 V only
Safety precautions
WARNING : TO PREVENT FIRE OR ELECTRIC SHOCK, DO NOT EXPOSE THIS APPLIANCE TO RAIN OR MOISTURE.

CAUTION
RISK OF ELECTRIC SHOCK DO NOT OPEN

CAUTION: TO REDUCE THE RISK OF ELECTRIC SHOCK, DO NOT REMOVE COVER (OR BACK). NO USER-SERVICEABLE PARTS INSIDE. REFER SERVICING TO QUALIFIED SERVICE PERSONNEL.

THE LIGHTNING FLASH WITH ARROWHEAD SYMBOL, WITHIN AN EQUILATERAL TRIANGLE, IS INTENDED TO ALERT THE USER TO THE PRESENCE OF UNINSULATED "DANGEROUS VOLTAGE" WITHIN THE PRODUCT'S ENCLOSURE THAT MAY BE OF SUFFICIENT MAGNITUDE TO CONSTITUTE A RISK OF ELECTRIC SHOCK TO PERSONS.

THE EXCLAMATION POINT WITHIN AN EQUI- LATERAL TRIANGLE IS INTENDED TO ALERT THE USER TO THE PRESENCE OF IMPORTANT OPERATING AND MAINTENANCE (SERVICING) INSTRUCTIONS IN THE LITERATURE ACCOMPA- NYING THE APPLIANCE.
IMPORTANT SAFETY INSTRUCTIONS
Caution : Read this page carefully to ensure safe operation.
Read Instructions – All the safety and operating instructions should be read before the product is operated.
Retain Instructions – The safety and operating instructions should be retained for future reference.
Heed Warnings – All warnings on the product and in the operating instructions should be adhered to.
Follow Instructions – All operating and use instructions should be followed.
- Cleaning – Unplug this product from the wall outlet before cleaning. Do not use liquid cleaners or aerosol cleaners. Use a damp cloth for cleaning.
- Attachments – Do not use attachments not recommended by the product manufacturer as they may cause hazards.
- Water and Moisture – This product shall not be exposed to dripping and splashing – for example, near a bath tub, wash bowl, kitchen sink, or laundry tub; in a wet basement; or near a swimming pool; and the like. Do not place an object containing liquid, such as a flower vase, on the appliance.
- Accessories – Do not place this product on an unstable cart, stand, tripod, bracket, or table. The product may fall, causing serious injury to a child or adult, and serious damage to the product. Use only with a cart, stand, tripod, bracket, or table recommended by the manufacturer. Any mounting of the product should follow the manufacturer's instructions, and should use a mounting accessory recommended by the manufacturer.
A product and cart combination should be moved with care. Quick stops, excessive force, and uneven surfaces may cause the product and cart combination to overturn.

-
Ventilation – Slots and openings in the cabinet are provided for ventilation and to ensure reliable operation of the product and to protect it from overheating, and these openings must not be blocked or covered. The openings should never be blocked by placing the product on a bed, sofa, rug, or other similar surface. This product should not be placed in a built-in installation such as a bookcase or rack unless proper ventilation is provided or the manufacturer's instructions have been adhered to.
-
Power Sources – This product should be operated only from the type of power source indicated on the product. If you are not sure of the type of power supply to your home, consult your product dealer or local power company.
-
CAUTION – Polarization – This product may be equipped with a polarized alternating-current line plug (a plug having one blade wider than the other). This plug will fit into the power outlet only one way. This is a safety feature. If you are unable to insert the plug fully into the outlet, try reversing the plug. If the plug should still fail to fit, contact your electrician to replace your obsolete outlet. Do not defeat the safety purpose of the polarized plug.
-
Power Cord Protection – Power-supply cords should be routed so that they are not likely to be walked on or pinched by items placed upon or against them, paying particular attention to cords at plugs, convenience receptacles, and the point where they exit from the product.
-
Lightning – For added protection for this product during a lightning storm, or when it is left unattended and unused for long periods of time, unplug it from the wall outlet and disconnect the antenna or cable system. This will prevent damage to the product due to lightning and power-line surges.
-
Overloading – Do not overload wall outlets, extension cords, or integral convenience receptacles as this can result in a risk of fire or electric shock.
-
Object and Liquid Entry – Never push objects of any kind into this product through openings as they may touch dangerous voltage points or short-out parts that could result in a fi re or electric shock. Never spill liquid of any kind on the product.
-
Servicing – Do not attempt to service this product yourself as opening or removing covers may expose you to dangerous voltage or other hazards. Refer all servicing to qualified service personnel.
-
Damage Requiring Service – Unplug this product from the wall outlet and refer servicing to qualified service personnel under the following conditions:
a) When the power-supply cord or plug is damaged,
b) If liquid has been spilled, or objects have fallen into the product,
c) If the product has been exposed to rain or water,
d) If the product does not operate normally by following the operating instructions.
e) If the product has been dropped or damaged in any way, and
f) When the product exhibits a distinct change in performance – this indicates a need for service.
g) If an abnormal smell or smoke is detected.
- Replacement Parts – When replacement parts are required, be sure the service technician has used replacement parts specified by the manufacturer or have the same characteristics as the original part. Unauthorized substitutions may result in fire, electric shock, or other hazards.
- Safety Check – Upon completion of any service or repairs to this product, ask the service technician to perform safety checks to determine that the product is in proper operating condition.
- Wall or Ceiling Mounting – This product should be mounted to a wall or ceiling only as recommended by the manufacturer.
- Heat – This product should be situated away from heat sources such as radiators, heat registers, stoves, or other products that produce heat. Do not place a flaming object, such as a candle or lantern, or near the product.
- PowerLines – An outside antenna system should not be located in the vicinity of overhead power lines or other electric light or power circuits, or where it can fall into such power lines or circuits. When installing an outside antenna system, extreme care should be taken to keep from touching such power lines or circuits as contact with them might be fatal.
- Outdoor Antenna Grounding – If an outside antenna or cable system is connected to the product, be sure the antenna or cable system is grounded so as to provide some protection against voltage surges and built-up static charges. Article 810 of the National Electrical Code, ANSI/NFPA 70, provides information with regard to proper grounding of the mast and supporting structure, grounding of the lead-in wire to an antenna discharge unit, size of grounding conductors, location of antenna-discharge unit, connection to grounding electrodes, and requirements for the grounding electrode.
EXAMPLE OF ANTENNA GROUNDING AS PER NATIONAL ELECTRICAL CODE
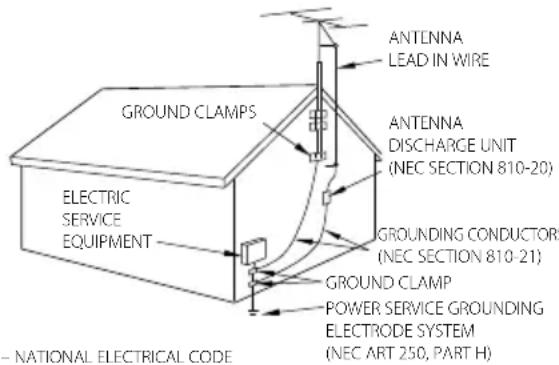
Notes:
- Item 7 is not required except for grounded or polarized equipment.
- Item 19 complies with UL in the U.S.A.
Contents
Before applying power ...... 2
IMPORTANT SAFETY INSTRUCTIONS ..... 2
Accessories 5
Installation....6
Installation Precautions 6
Storage and Maintenance 6
Connection 7
Connection precautions 7
Component Names and Functions ..... 8
Clock Setting 10
Setting the time display/date/time (Time display format/Date/Time) ..... 10
Screen Display 11
Selecting the display brightness (BRIGHTNESS) 11
Selecting the clock display mode (CLOCK) 11
Listening to USB/SD 12
Music Playback 12
Switching the music playback setting 13
Viewing USB/SD 14
Photo Playback 14
Selecting the Photo Playback Setting ... 14
Setting Background Music 15
Listening to iPod/iPhone 16
Music Playback 16
Viewing iPod/iPhone 17
Photo/Video Playback 17
Listening to Radio 18
Radio Reception 18
Presetting Stations Automatically (Auto preset) 18
Viewing Preset Stations (Load preset) ... 18
Presetting Stations Manually (Add to preset) ....19
Deleting Station(s) from Preset Memory (Delete one/Delete all) ....19
Timer Settings 20
Setting the Alarm Timer (Alarm 1 setting/Alarm 2 setting) ..... 20
Setting the Sleep Timer (SLEEP) 21
Other System Settings 22
Setting Slide show/Wallpaper (Slide show/Wallpaper) 22
Switching the Display Language/Resetting the Unit (Language/Reset all setting) 22
Basic Knowledge You Need 23
Troubleshooting 26
Specifications 27
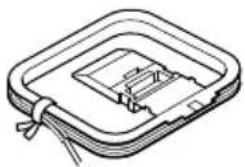
Accessories
AM loop antenna (x 1)
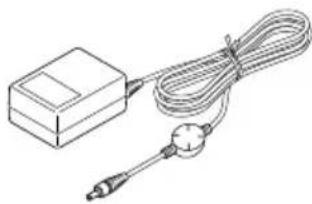
natural_image
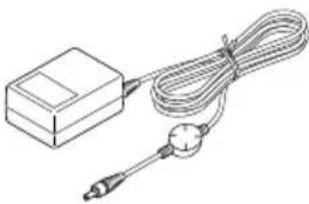
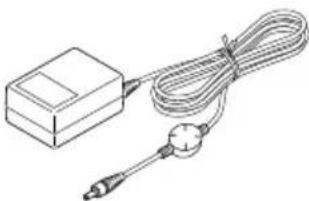
Isometric line drawing of a mechanical component with a spring and base (no text or symbols)AC adapter
(AC-059300A:×1)

natural_image
Line drawing of a sensor or probe device with coiled cable and probe (no text or symbols)Dry cell batteries
("AAA" or R03: x 2)

Information on Disposal of Old Electrical and Electronic Equipment and Batteries (applicable for EU countries that have adopted separate waste collection systems)
Products and batteries with the symbol (crossed-out wheeled bin) cannot be disposed as household waste.
Old electrical and electronic equipment and batteries should be recycled at a facility capable of handling these items and their waste byproducts.
Contact your local authority for details in locating a recycle facility nearest to you. Proper recycling and waste disposal will help conserve resources whilst preventing detrimental effects on our health and the environment.
Notice: The sign "Pb" below the symbol for batteries indicates that this battery contains lead.
Pb
Installation Precautions
• Install this unit on a level, stable position. If this unit is installed on a bench or tabletop, be sure to confirm the strength in advance.
- The magnetism generated from the speakers may produce color irregularities on the screen of a TV or PC in proximity. Install the speakers at a distance from a TV or PC.

CAUTION
Observe the following cautions when installing the equipment including the AC adapter. Insufficient ventilation builds up heat inside them and may cause malfunction or a fire hazard.
Do not place an object hindering heat radiation on the equipment.
Do not lay the equipment on the rear or side panel or upside down.
Do not cover the equipment with a cloth or place it on a carpet or cushion.
Do not use the equipment in a poorly ventilated location.
Leave a space of 50 cm or more above the equipment.
Install the equipment so that the power outlet is easily accessible. In the case of an abnormality, immediately unplug the AC adapter from the power outlet. It is required to unplug the AC adapter to shut off the power supply to the equipment completely.
Storage and Maintenance
Do not leave this unit in the following locations.
Place exposed to direct sunlight.
Place with high humidity or excessive dust.
Place exposed directly to the heat of heating equipment.
Precaution against condensation
When there is a large difference between the temperatures inside and outside this unit, water drops (dew) may be condensed inside the unit, in which case this unit may malfunction. If this happens, leave this unit for a few hours until the condensation inside it dries up. Special care is required against condensation when this unit is transported between locations with a large temperature difference or into a room with high humidity.
When the equipment gets dirty
When the front panel or case is dirty, wipe with a soft, dry cloth. Do not use lacquer thinner, benzine, alcohol or contact revitalizer for these chemicals may cause discoloration or deformation.
Connection precautions
Do not plug the power cord of the AC adapter until all connections have completed. Before disconnecting a connected cord or cable, be sure to turn this unit off (by pressing the OFF button) and unplug the power cord from the power outlet
flowchart
graph TD
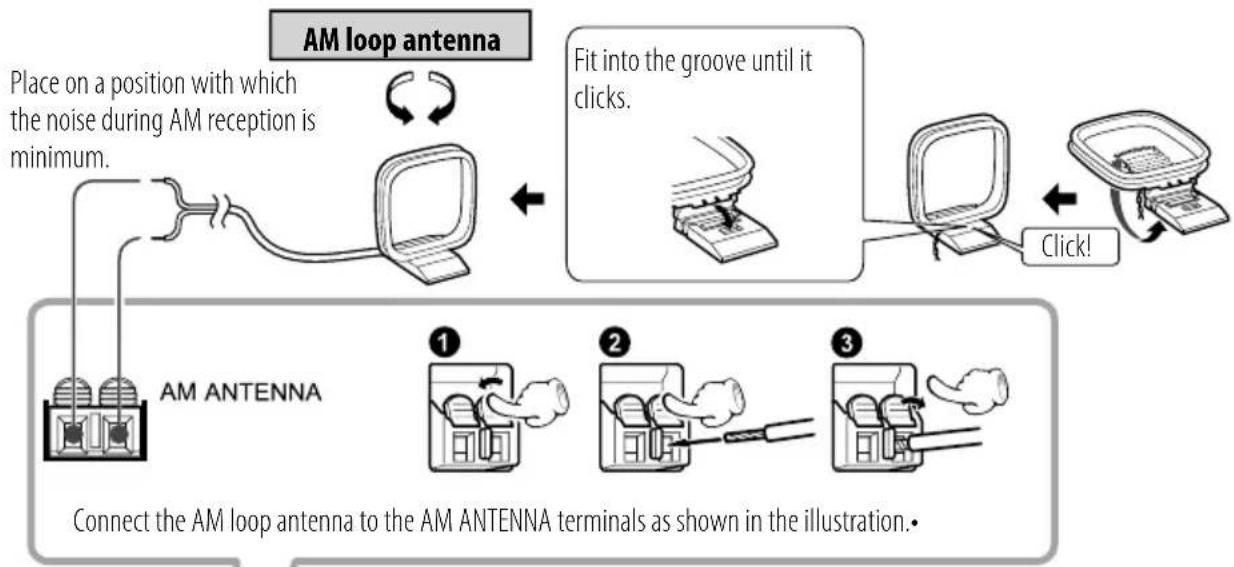
A["Place on a position with which the noise during AM reception is minimum."] --> B["AM loop antenna"]
B --> C["Fit into the groove until it clicks."]
C --> D["Click!"]
D --> E["AM ANTENNA"]
E --> F["Connect the AM loop antenna to the AM ANTENNA terminals as shown in the illustration."]
Always use the provided AC-059300A AC adapter with this product. The provided AC adapter is designed for exclusive use with the AS-IP70. Do not use the provided AC adapter with other products, as this may cause a fire or electric shock hazard. The battery pack or batteries shall not be exposed to excessive heat such sunshine, fire or the like.
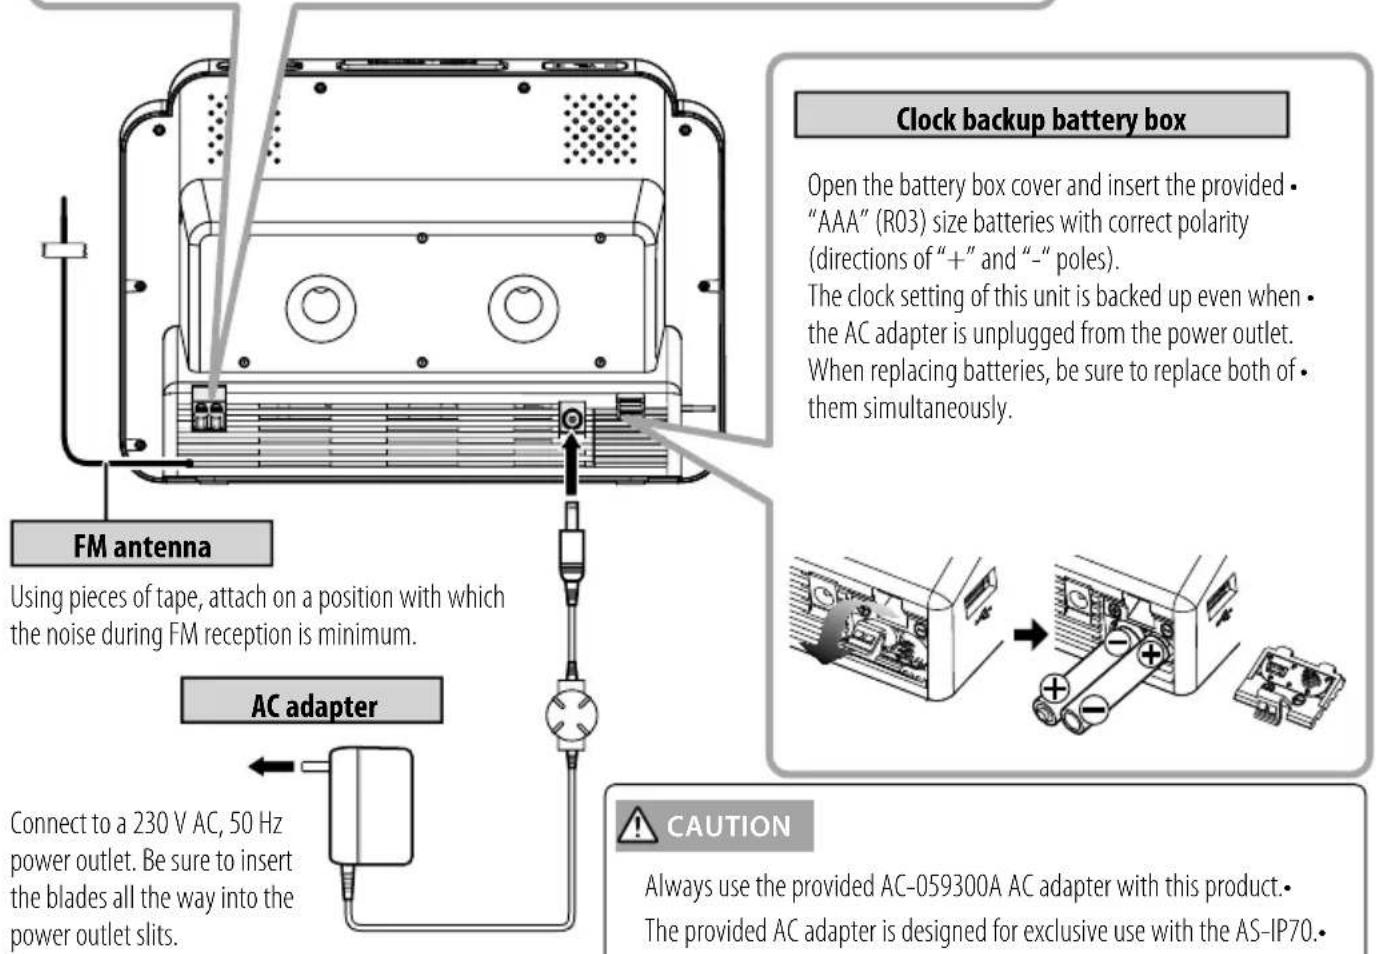
Connect to a 230 V AC, 50 Hz power outlet. Be sure to insert the blades all the way into the power outlet slits.
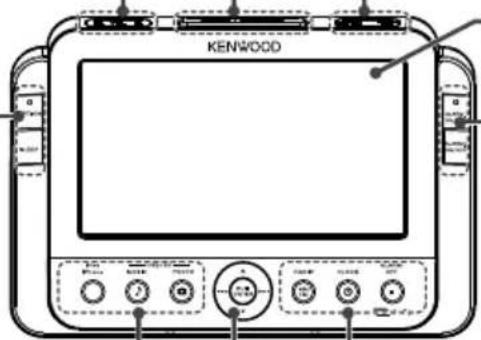
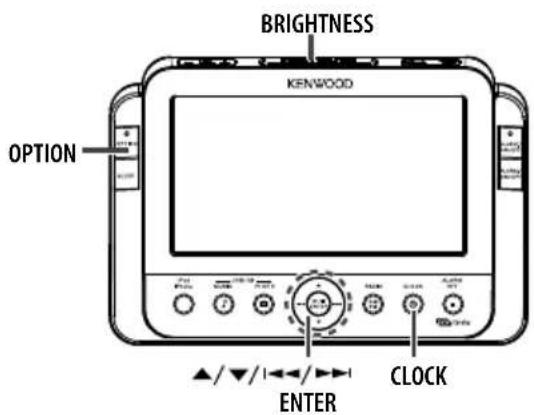
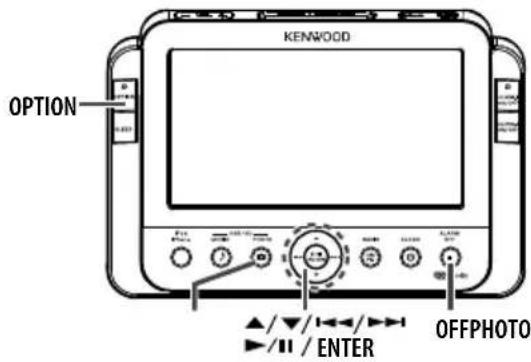
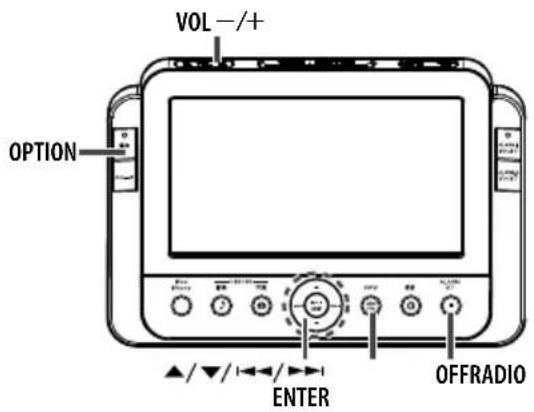
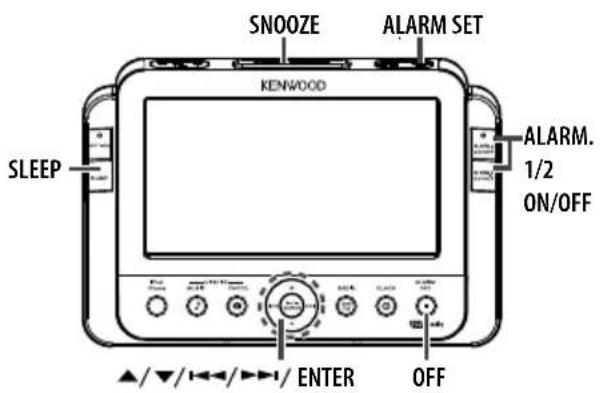
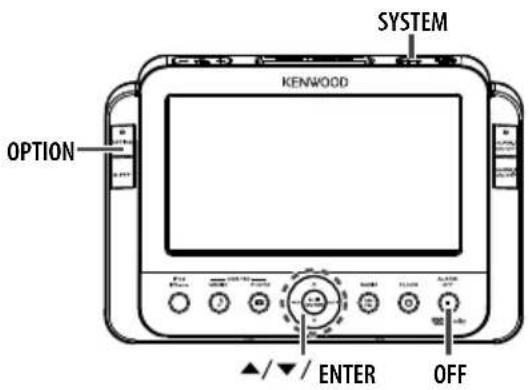
Component Names and Functions
Turning power ON
- This unit is turned on at the moment the AC adapter is connected. After playing music or viewing photos or video, press the ALARM/OFF button to turn this unit off. This unit displays the current time.
Eco standby mode
- Press and hold the [ALARM/OFF] button to put this unit to the Eco standby mode, in which the clock display is also switched off to save the power consumption. To cancel this mode, press any buttons.
- iPod/iPhone, USB device battery can no be charged in this mode.
VOL -/+ (Volume control)
Press to adjust the volume. Pressing the + segment increases the volume and pressing the - segment decreases it.
SNOOZE/BRIGHTNESS
When the alarm operation is started at the alarm set time, pressing this button postpones the alarm operation for the time period set with the "Snooze" setting. The alarm operation can be postponed for up to five times. When the alarm operation is not started, pressing this button varies the display brightness in three steps.
SYSTEM
Press to change the language • setting or to reset all settings.
ALARM SET
Press to start setting the alarm • timer.
OPTION
- Press when setting the clock, wallpaper or the USB/SD play mode.
SLEEP
- Press to set the sleep timer. Each press switches the sleep timer period in sequence of 90 min./60 min./30 min./15 min./off.
DISPLAY
ALARM. 1/2 ON/OFF
- Press to switch ALARM 1 or 2 on or off. Each press toggles the alarm on and off alternately.
iPod/iPhone
Press to play music of iPod/iPhone or view photos or video.
USB/SD (MUSIC)
Press to play music of USB device or • SD card.
USB/SD (PHOTO)
Press to view photos of USB device or • SD card.
▶/II or ENTER
Press to play or pause the USD device, • SD card, iPod or iPhone.
- Press to enter a setting item.

- Press to skip an audio file, photo or video.
- Press and hold to fast reverse or fast forward.
Press during radio reception to select a station. - Press to select a setting item.

- Press to select a setting item.
RADIO (AM/FM)
Press to switch the receiving radio band between AM and FM.
CLOCK
Press to display the clock. Each press • toggles the clock display mode.
ALARM/OFF
Press to cancel an alarm setting. Press to end playing music, photos or radio. Press and hold to put this unit to the Eco standby mode.
Left side panel Right side panel
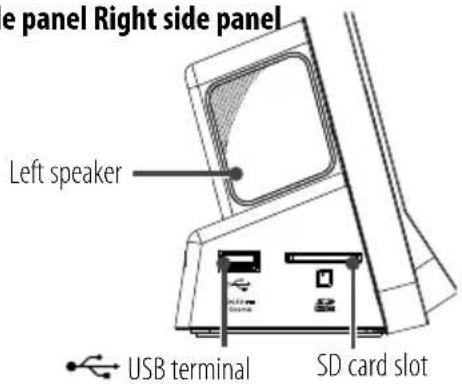
(USB) terminal
Connect a USB flash memory or a USB Mass Storage-compatible digital audio player.
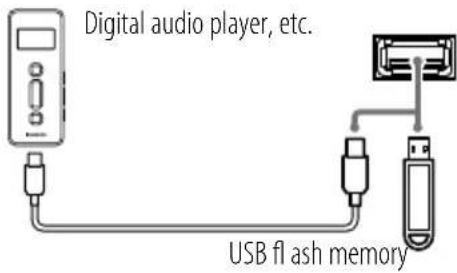
■o disconnect the USB device...
Pull out the USB device after stopping the play.
Recognition may take time with certain devices.
The USB connection mode selection menu may be displayed with certain devices. In this case, select "Storage mode."
This unit cannot recognize a USB device through a USB hub, etc.
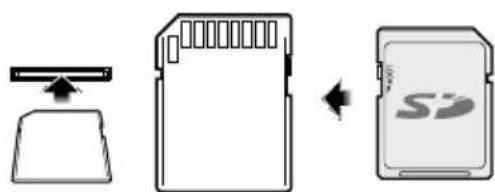
SD card slot
Insert an SD card containing music or photos into the SD card slot so that the label side of the card faces downward.
flowchart
graph LR
    A["Image File"] --> B["Physical Memory Card"]
    B --> C["Storage Card"]
To disconnect the SD card... ■
Pull out the SD card after stopping the play.
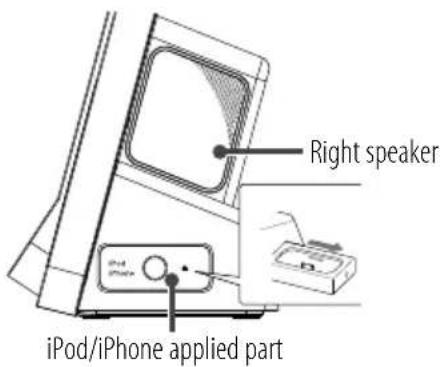
iPod/iPhone applied part
The iPod/iPhone applied part can be ejected by pushing the case on the right side panel. Attach the dock adapter, which is provided with iPod/iPhone or commercially available, and then install iPod/iPhone on the dock adapter.
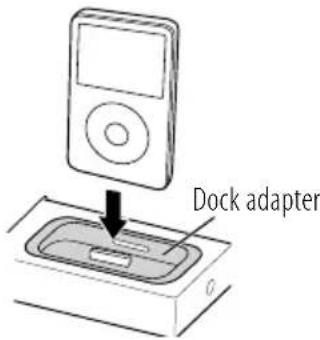
■ to disconnect the dock adapter...
Insert the blade of a fl at-blade screwdriver into the slit on the dock adapter and lift it.
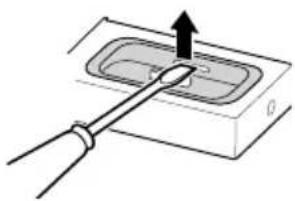
natural_image
Diagram of a mechanical or electrical component with a lever and arrow indicating direction (no text or symbols)
If iPod/iPhone is connected directly to this unit without using the dock adapter, the connector may be damaged. Be always sure to use the dock adapter.
iPod/iPhone cannot be connected together with accessories such as the cover or case. Be sure to remove the accessories before connecting.
Insert or remove the iPod gently into/from the dock adapter. Update the software of your iPod/iPhone to the latest version before use.
It is required to set the external video output setting of iPod/iPhone for use with this unit. When iPod/iPhone is disconnected from this unit, be sure to set iPod/iPhone to the original setting before playing video on it.
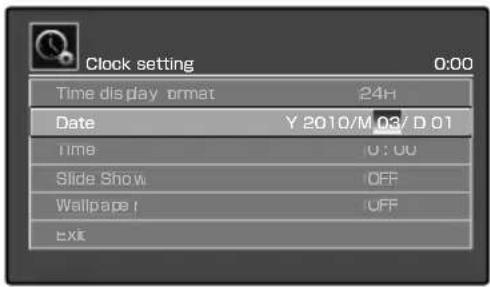
Setting the time display/date/time (Time display format/Date/Time)
This unit has a clock and alarm timer function. To use them, it is required to set the time display format (12-hour/24-hour clock), the current date and the current time.
1 Enter the clock setting mode.
Press [OPTION] to display the "Clock setting" menu.
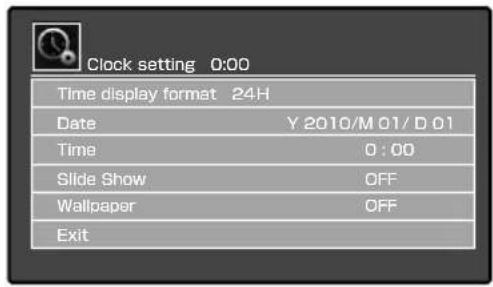
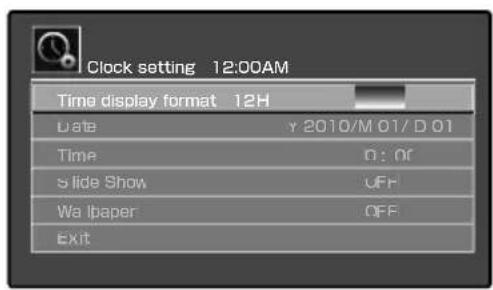
2 Set the time display format.
The default is the 24-hour display. The following operation is required if you want to change it to the 12-hour display.
Press [▲/▼] to select "Time display format" and press [ENTER]. Press [▲/▼] to select "12H" or "24H" and press [ENTER].
3 Set the current date (year/month/day).
Press [▲/▼] to select "Date" and press [ENTER].
Set the figures of date in order of Year, Month and Day.
Press [▲/▼] to set each figure and press
[1◄◄◄ /►►►] to move to the next figure.
After completing the date setting, press [ENTER].
4 Set the current time (hour/minute).
Press [▲/▼] to select "Time" and press [ENTER].
Set the figures of time in order of hour and minute.
Press [▲/▼] to set each figure and press
[1◄◄◄ /►►►] to move to the next figure.
After completing the time setting, press [ENTER].
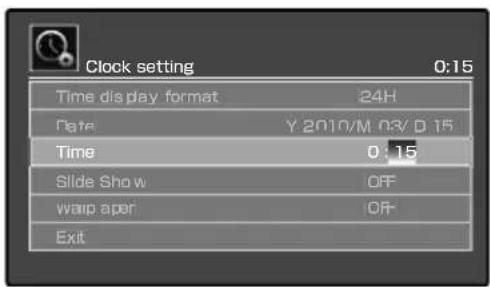
To exit from the setting... ■
Press [▲/▼] to select "Exit" and press [ENTER].

- The clock should be set again after unplugging/plugging of the power cord or a power failure.
- As the clock involves certain errors, it is recommended to execute the clock setting periodically.
Selecting the Display Brightness (BRIGHTNESS)
The display brightness can be set to one of the 3 steps.
1 Select the brightness.
Press [BRIGHTNESS].
Each press switches the display brightness in cycle.
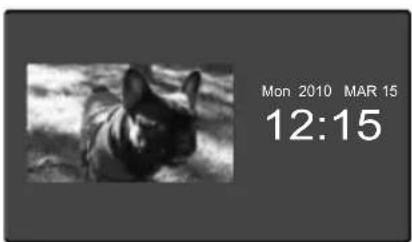
Selecting the Clock Display Mode (CLOCK)
You can view photos and listen to music while displaying the clock.
1 Select the clock display mode.
Press [CLOCK].
Each press switches the clock display mode in cycle.
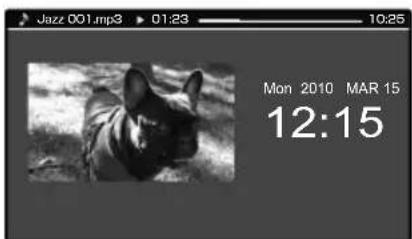
Examples of clock display
(See page 22 for the wallpaper setting.)
Mode 1
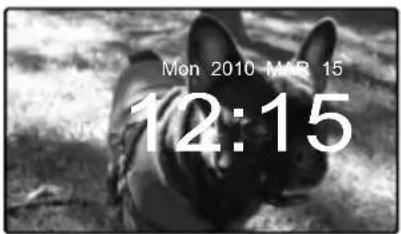
Mode 2

natural_image
Black-and-white photo of a person lying on grass, no visible text or symbolsMode 3

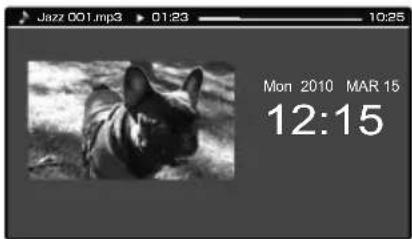
Examples of simultaneous music play/clock display (See page 22 for the wallpaper setting.)
Mode 1
Music information display
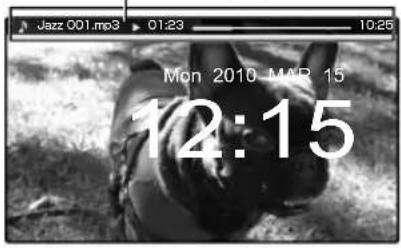
Mode 2
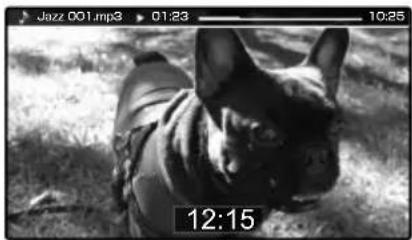
natural_image
Black-and-white photo of a person lying on grass, no visible text or symbolsMode 3


If the clock display mode is switched during playback of photos or video from iPod/iPhone, iPod/iPhone stops the play.
Music Playback
This unit can play music stored in a USB device or SD card.
Connect a USB device or insert an SD card before proceeding to the following steps.

1 Select music playback.
Press [MUSIC].
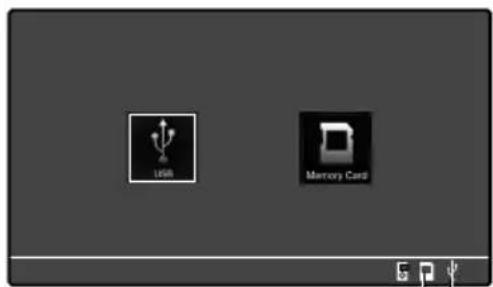
2 Select USB or SD (memory card).
Press [I◄◄/►►I] to select "USB" or "Memory Card" (SD) and press [ENTER].

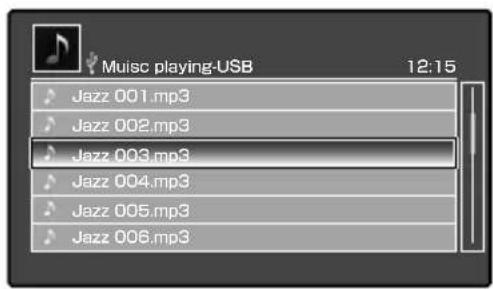
3 Select and play music.
Press [▲/▼] to select the audio file and press [ENTER].

Example of display during playback ■
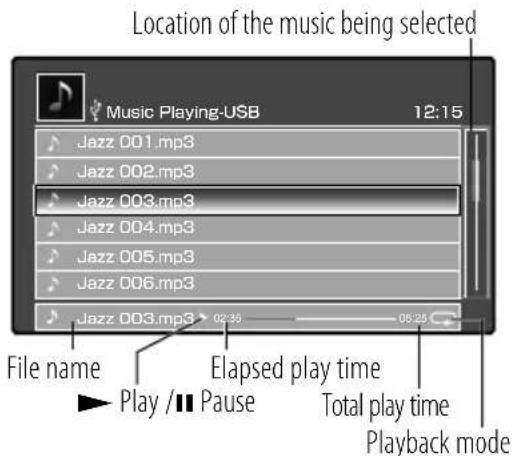
Operations available during playback ■
| Pause | Press [▶/■] during playback. Press again to cancel pause. |
| Fast Forward/Fast Reverse | Press and hold [▶/▶] during playback. |
| Skip Forward Press | [▶]. |
| Skip Reverse Press | [▶] successively twice or more. |
| Restart Press [ | ▶] once. |
■ To stop playback...
Press [OFF].

- Playback is not started when there are no playable audio files. For the playable music (audio files), see "Files Playable with this Unit" (page 24).
- When a digital HDD audio player is connected, a brief gap in the audio may appear during resumed playback after pause. This is due to the property of the HDD system.
Switching the Music Playback Setting
The "Music Setting" menu allows you to play audio fi les repeatedly or in a random order.
Press [MUSIC] and select either "USB" or "Memory Card" (SD) before proceeding to the following steps.
1 Open the "Music Setting" menu.
Press [OPTION] during playback or when playback is stopped.
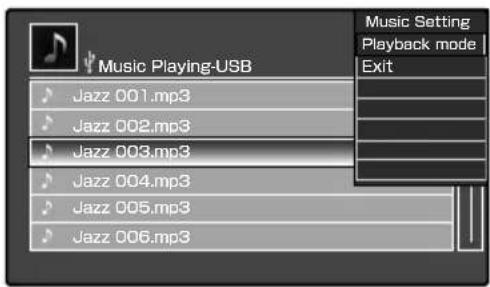
2 Select the playback mode.
[▲/▼] to select one of the playback modes and press [ENTER].
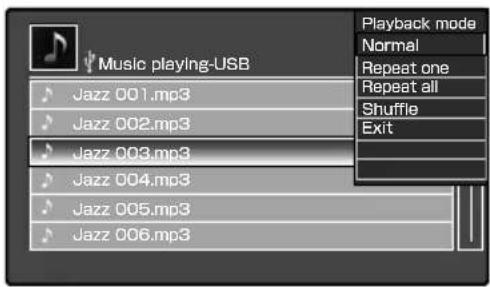
| "Normal" | Normal playback. |
| "Repeat one" The audio fi le being played is played repeatedly. | |
| "Repeat all" | All audio fi les are played repeatedly. |
| "Shuffle" | Audio fi les are played in a random order. |
| "Exit" Exits from music setting. | |
to exit from the setting...
Press [▲/▼] to select "Exit" and press [ENTER].
Photo Playback
This unit can play photos stored in a USB device or SD card in a slide show in order of fi lenames.
Connect a USB device or insert an SD card before proceeding to the following steps.
1 Select photo playback.
Press [PHOTO].
2 Select USB or SD (memory card).
Press [1◄◄/►►I] to select "USB" or "Memory Card" (SD) and press [ENTER].
SD/USB indicator
3 Select and play the photo.
Press [▲/▼/I◄◄/►►I] to select the image file and press [ENTER].

Operations available during playback ■
| Pause slide show | Press [▶/■] during playback. Press again to cancel pause. |
| Skip Forward Press [ | ▶▶-]. |
| Skip Reverse Press [ | I◀◀]. |
■ To stop playback...
Press [OFF].
- Playback is not started when there are no playable image files. For the playable image files, see "Files Playable with this Unit" (page 24).
Selecting the Photo Playback Setting
The "Photo Setting" menu allows you to rotate a photo or set the photo playback modes such as slideshow.
- Press [PHOTO] and select either "USB" or "Memory Card" (SD) before proceeding to the following steps.
1 Open the "Photo Setting" menu.
Press [OPTION] during playback or when playback is stopped.
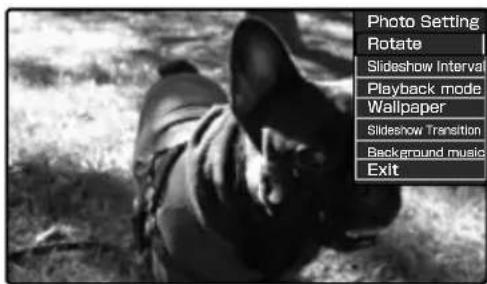
2 Select the photo setting.
Press [▲/▼] to select one of the photo settings and press [ENTER].
| "Rotate" | The image fi le being played can be rotated. "No Change"/ "90° Clockwise"/ "180° Clockwise"/ "270° Clockwise" |
| "Slide show Interval" | Image fi les are played in order of fi lenames at the intervals set with this setting: "5 s"/ "10 s"/ "15 s"/ "30 s"/ "1 min" |
| "Playback mode" | The mode of displaying the photos can be selected: "Fit to screen" (which displays the whole of a photo)/ "Full screen mode" (which displays the photo to fi ll the screen) |
| "Wallpaper" The photo used as the wallpaper of this unit can be selected. Before this setting, it is required to enable the "Wallpaper" setting of this unit (page 22). |
| "Slideshow Transition" The visual effect of slide show can be selected: "Roll" (which switches photos by rolling up each)/ "Page Switch" (which switches photos by fl ipping each)/ "Zoom Switch" (which switches photos from the center of each) |
| "Background music" Music in the USB device, SD memory card or iPod can be played during photo playback: "ON"/"OFF"/"Playback mode" |
to exit from the setting...
Press [▲/▼] to select "Exit" and press [ENTER].
The slide show finishes when "Wallpaper" is set.
Setting Background Music
This unit can play music in a USB card, SD memory or iPod while displaying photos.
Press [PHOTO] and select either "USB" or "Memory Card" (SD) before proceeding to the following steps.
1 Open the "Photo Setting" menu.
Press [OPTION] during playback or when playback is stopped.
2 Select the background music setting.
Press [▲/▼] to select "Background music" and press [ENTER].
3 Select the background music setting option.
Press [▲/▼] to select "ON" and press [ENTER].
4 Select the played medium.
Press [I◄◄/►►] to select the medium and press [ENTER].
5 If "USB" or "Memory Card" (SD) is the selected medium, select the audio fi le(s) to be played.
Press [▲/▼] to select the audio file and press [ENTER].
to select the playback mode...
In step 3 above, select "Playback mode" and press [ENTER].
Press [▲/▼] to select one of the playback modes and press [ENTER].
| "Normal" | Normal playback. |
| "Repeat one" | The audio fi le being played is played repeatedly. |
| "Repeat all" | All audio fi les are played repeatedly. |
| "Shuffle" | Audio fi les are played in a random order. |
| "Exit" Exits from music setting. | |
exit from the setting...
Press [▲/▼] to select "Exit" and press [ENTER].
The music information is not displayed during the slideshow. To change the played medium, set the "Background music" setting temporarily to "OFF" and restart it from the beginning.
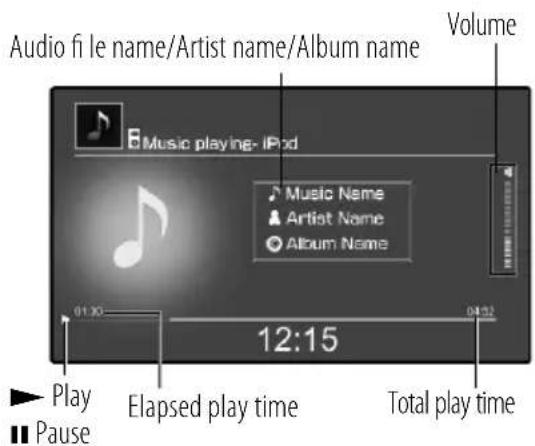
Listening to iPod/iPhone
Music Playback
This unit can play music stored in iPod/iPhone.
Connect iPod/iPhone to this unit before proceeding to the following steps.

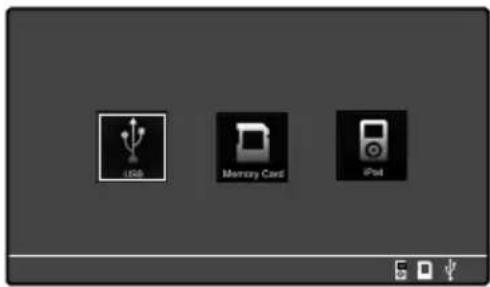
1 Select iPod/iPhone.
Press [iPod/iPhone].
2 Select music playback.
Press [1◄◄/►►1] to select "Music" and press [ENTER].
iPod/iPhone indicator
Example of display during playback
Operations available during playback ■
| Pause | Press [▶/■] during playback. Press again to cancel pause. |
| Fast Forward/Fast Reverse | Press and hold [1◀◀/▶▶▶] during playback. |
| Skip Forward Press | [ ▶▶▶]. |
| Skip Reverse Press | [ 1◀◀] successively twice or more. |
| Restart Press [ | 1◀◀] once. |
■ To stop playback...
Press [OFF].

- Be sure to minimize the volume of this unit before connecting or disconnecting iPod/iPhone.
- The volume setting specified on iPod/iPhone is invalid while it is connected to this unit.
- Do not disconnect iPod/iPhone during playback as this may cause malfunction.
- Some functions of iPod/iPhone may not be usable depending on the iPod/iPhone models.
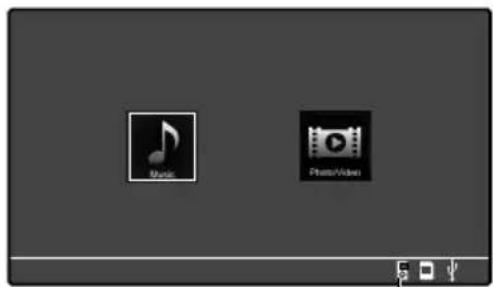
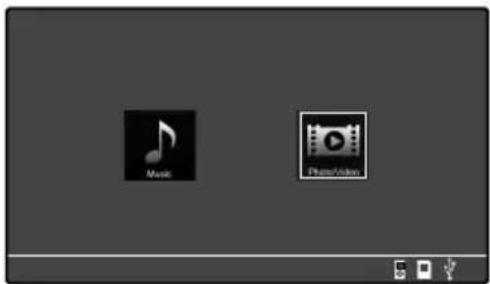
Photo/Video Playback
This unit can play photos or video stored in iPod/iPhone.
Connect iPod/iPhone to this unit before proceeding to the following steps.
1 Select iPod/iPhone.
Press [iPod/iPhone].
2 Select photo/video playback.
Press [I◄◄/►►I] to select "Photo/Video" and press [ENTER].
3 Select and play the photo or video.
On iPod/iPhone, select the photo or video to be played.
For the operation of iPod/iPhone, read its instruction manual.
Operations available during playback ■
| Pause | Press [▶/■] during playback. Press again to cancel pause. |
| Fast Forward/Fast Reverse | Press and hold [1◀◀/▶▶▶] during playback. |
To stop playback...
Press [OFF].

Be sure to minimize the volume of this unit before connecting • or disconnecting iPod/iPhone.
The volume setting specified on iPod/iPhone is invalid while it is connected to this unit.
Do not disconnect iPod/iPhone during playback as this may cause malfunction.
Some functions of iPod/iPhone may not be usable depending • on the iPod/iPhone models.
Radio Reception
This unit can receive broadcast stations in the FM and AM bands.
1 Select the FM or AM radio reception.
Press [RADIO].
Each press switches the FM and AM receiving bands alternately.
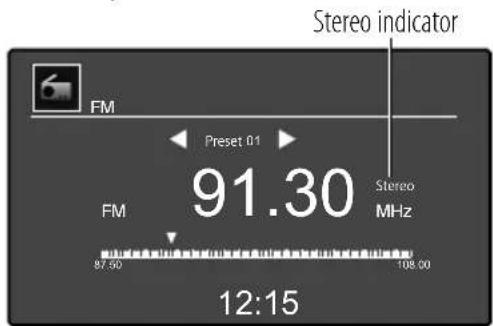
2 Select one of the preset stations.
Press [▲/▼].
Each press recalls the next station stored in the preset memory.

To receive a station that has not been preset in ■ memory...
Press [▲/▼].
Press and hold a button to scan stations automatically. The radio station name is not displayed.
Presetting Stations Automatically (Auto preset)
This unit can automatically select the radio stations with good receiving conditions and store them in the preset memory.
Select the FM or AM radio reception before proceeding to the following steps.
1 Select the auto preset setting.
Press [OPTION].
Press [▲/▼] to select "Auto preset" and press [ENTER].
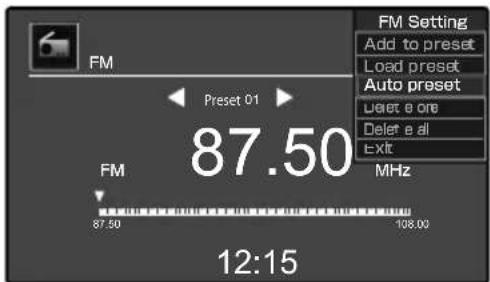
"Auto preset" is displayed and this unit stores the radio stations with good receiving conditions as the preset stations.
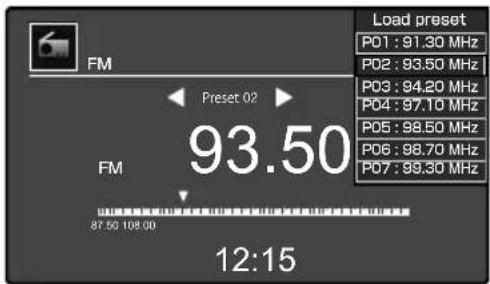
Viewing Preset Stations (Load preset)
This unit can display the list of preset stations in the memory.
1 Select the function for viewing preset stations.
Press [OPTION].
Press [▲/▼] to select "Load preset" and press [ENTER].
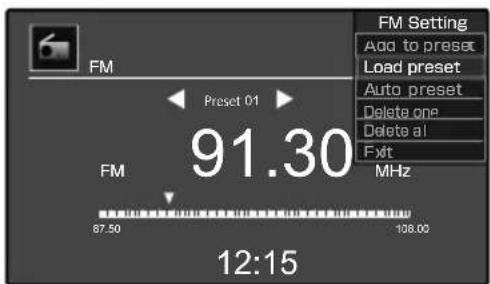
2 View the list of preset stations.
Press [▲/▼] to scroll the list of preset stations. Press [ENTER] to receive the station being selected.
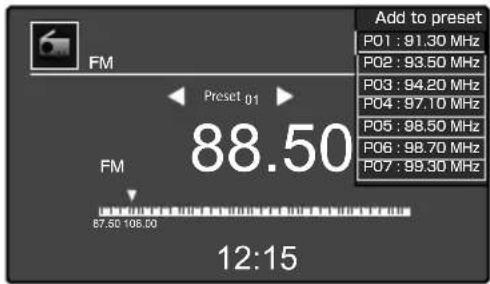
Presetting Stations Manually (Add to preset)
You can add the radio station being received to the preset station memory by specifying the preset number. If a station is added to a preset number that has already been used to store another preset station, the station stored under that number is replaced by the newly added station.
Up to twenty FM and ten AM stations can be stored in the preset • memory.
1 Receive the station to be added to the preset stations.
2 Select function for addition to preset stations.
Press [OPTION].
Press [▲/▼] to select "Add to preset" and press [ENTER].
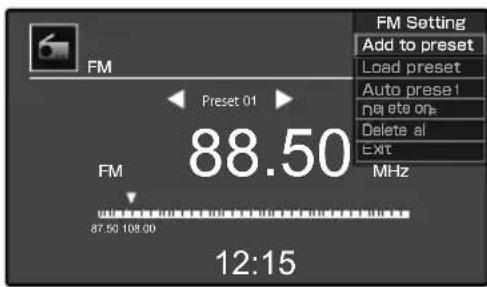
3 Select the preset number in which you want to add the station from P01 to P20 (FM) or P01 to P10 (AM).
Press [▲/▼] to select the preset number and press [ENTER].
To add other stations to the preset memory, repeat steps 1 to • 3 for each of them.
Deleting Station(s) from Preset Memory (Delete one/Delete all)
You can delete all of the stations from the preset memory or one of them by specifying its preset number.
Select the FM or AM radio reception before proceeding to the following steps.
1 Select the function for deleting one or all of the preset stations.
Press [OPTION].
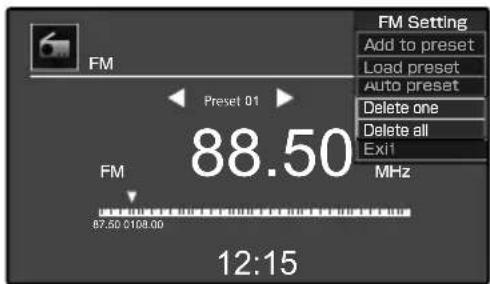
To delete one station by specifying its preset ■ number...
Press [▲/▼] to select "Delete one" and press [ENTER].
■ To delete all of the preset stations...
Press [▲/▼] to select "Delete all" and press [ENTER].
2 Select the preset number in which you want to delete the station from P01 to P20 (FM) or P01 to P10 (AM).
Press [▲/▼] to select the preset number and press [ENTER].
■ To exit from the setting...
Press [OPTION].
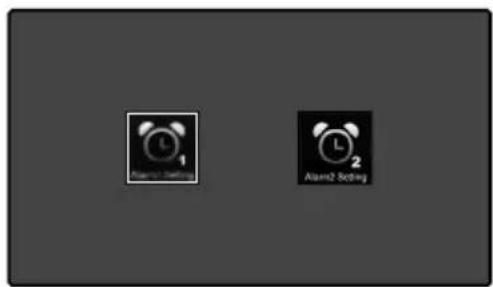
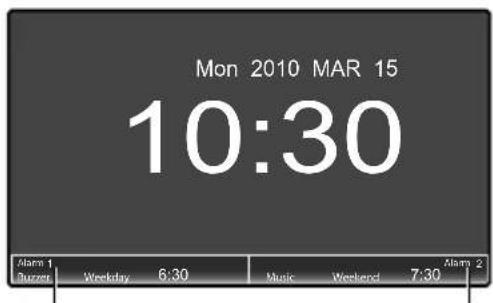
Setting the Alarm Timer (Alarm 1 setting/Alarm 2 setting)
This unit can generate a buzzer tone or start playback of radio, SD card, USB device or iPod/iPhone at the time reserved using the alarm timer function. Up to two alarm timer programs can be set.
1 Enter the alarm setting mode.
Press [ALARM SET].
2 Select the alarm program number 1 or 2.
Press [▲/▼] to select "Alarm1 setting" or "Alarm2 setting" and press [ENTER].
3 Set the alarm setting items.
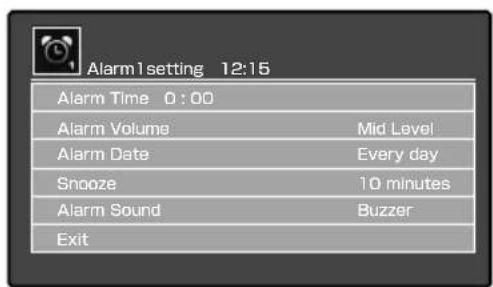
Press [ENTER].
Press [▲/▼] to select an option and press [ENTER].
In the "Alarm Time" setting, press [▲/▼] to move from one figure to another.
To move across the setting items... ■
Press [▲/▼] to select a setting item and press [ENTER].
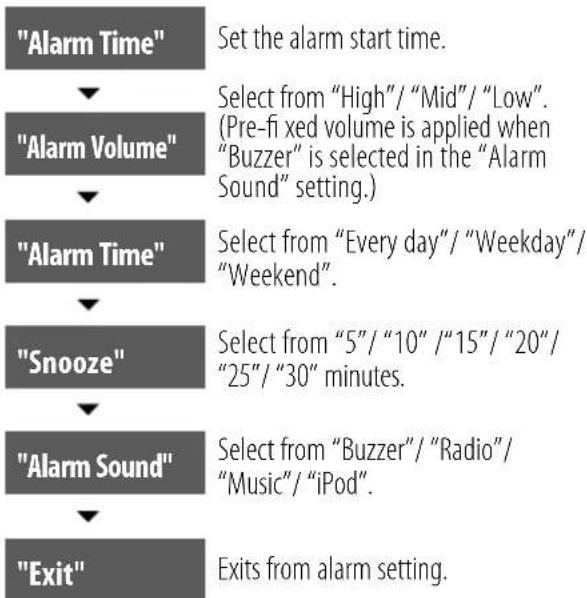
flowchart
graph TD
    A["Alarm Time"] --> B["Alarm Volume"]
    B --> C["Alarm Time"]
    C --> D["Snooze"]
    D --> E["Alarm Sound"]
    E --> F["Exit"]
    style A fill:#999,stroke:#333
    style B fill:#999,stroke:#333
    style C fill:#999,stroke:#333
    style D fill:#999,stroke:#333
    style E fill:#999,stroke:#333
    style F fill:#999,stroke:#333
When you select "Music" in the "Alarm Sound" ■ setting...
Select either "USB" or "SD" and then select the audio file to be played.
When you select "Radio" in the "Alarm Sound" ■ setting...
The last radio station received before the alarm setting will be received.
4 Return to the clock display mode. Press [OFF].
5 Activate the alarm timer.
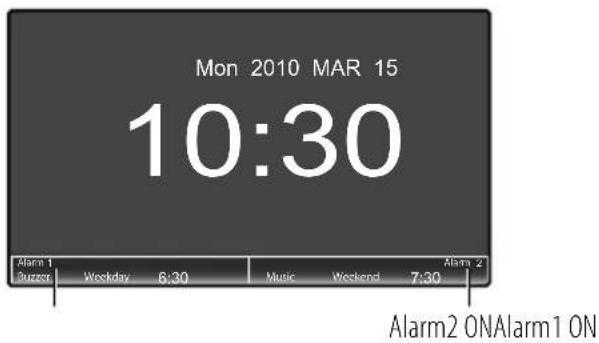
To deactivate the alarm timer...
Press [ALARM.1 ON/OFF] or [ALARM.2 ON/OFF].
Each press of button switches the alarm timer ON/OFF alternately.
To postpone the alarm operation after it has ■ started...
Press [SNOOZE].
To stop alarm operation...
Press [OFF].

It is required to set the clock for the correct time of day in • advance. See "CLOCK SETTING" (page 10).
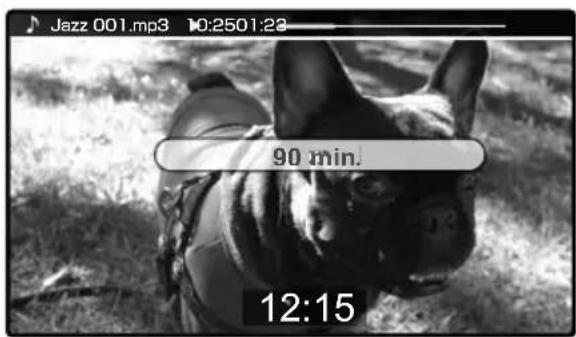
Setting the Sleep Timer (SLEEP)
When the sleep timer is set during or before playback, this unit can stop playback after the time period set with the sleep timer.
Select the clock display mode (page 11) before proceeding to the following.
1 Set the sleep timer.
Press [SLEEP].
Each press of the button switches the sleep timer period in the following cycle.
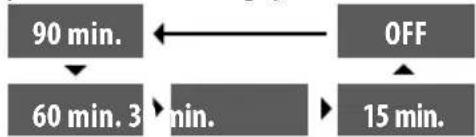
flowchart
graph TD
    A["90 min."] --> B["60 min. 3 min."]
    B --> C["15 min."]
    C --> D["OFF"]
    D --> A
Setting Slide show/Wallpaper (Slide show/Wallpaper)
The following procedure makes it possible to select the wallpaper displayed on the background of the clock display can be selected or play photos in order of their fi lenames (slideshow).
1 Enter the clock setting mode.
Press [OPTION] to display the "Clock setting" menu. Press [▲/▼] to select "Slide Show" or "Wallpaper" and press [ENTER].
Press [▲/▼] to select an option and press [ENTER].
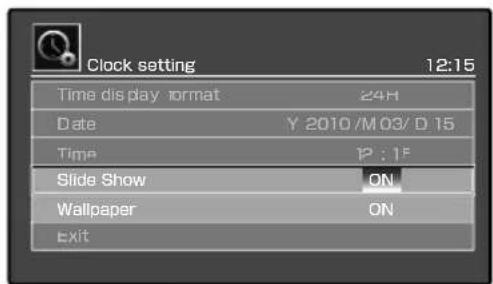
| "Slide Show" | Switches the slideshow in the clock display mode ON/OFF. |
| "Wallpaper" Switches the wallpaper display in the clock display mode ON/OFF. | |
When you select "Wallpaper"... ■
Select either "USB" or "SD" and then select the photo to be used as the wallpaper.
To exit from the setting...
Press [▲/▼] to select "Exit" and press [ENTER].

The slideshow plays the photos in the USB device or SD memory card selected in the "Wallpaper" setting.
Switching the Display Language/Resetting the Unit (Language/Reset all setting)
The language used in the display of this unit can be switched and all of the settings of this unit can be reset to the factory settings (the conditions when you purchased it).
1 Enter the system setting mode.
Press [SYSTEM] to display the "System" setting menu.
Press [▲/▼] to select "Language" or "Reset all setting" and press [ENTER].
Press [▲/▼] to select an option and press [ENTER].
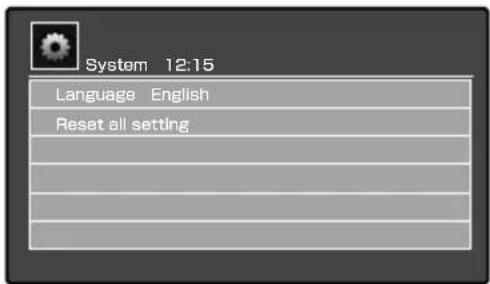
| "Language" | Select the display language from "English"/ "French"/ "Italian"/ "German"/ "Spanish"/ "Dutch". |
| "Reset all setting" | Resets this unit to the factory setting. |
When you select "Rest all setting"...
Select "Yes" if you want to reset all of the settings of this unit.
To exit from the setting... ■
Press [OFF].
Basic Knowledge You Need
Glossary
| Term Meaning | |
| JPEG | Still image data compression format with compression rates from 1/10 to 1/100. Applied to the image storage of digital cameras, this format is effective for compression of natural images including photos. |
| MP3 | International standard for sound data compression, established by MPEG, which is a working group of ISO (International Standardization Organization). This format offers compression rates from about 1/10 to 1/12 (@ 128 kbps). |
| USB | Standard for interfacing between a personal computer and peripherals. This unit is compliant to USB 1.1, 2.0. |
| USB hub Adapter for connecting multiple USB devices simultaneously. | |
| USB Mass Storage Class | USB device type that is classified as a large-capacity storage. A large-capacity storage such as a hard disk belongs to the "USB Mass Storage Class." |
| VBR | Stands for Variable Bit Rate. Refers to data allocation by varying the bit rate according to the amount of information of music. |
| WAV Non-compressed audio format that is the standard for Windows. | |
| WMA | Stands for "Windows MediaTM Audio. An audio compression coding method developed by Microsoft Corporation, USA. |
| Sampling frequency | Figure expressing the number of conversions from analog signal to digital signal per second. It is 44.1 kHz with the CD. In general, the audio quality increases as the sampling frequency increases. |
| SNOOZE | Function of this unit for postponing the alarm operation for a certain period (snooze set time). When [SNOOZE] is pressed, the alarm operation stops temporarily but restarts after the snooze set time has elapsed. |
| Slideshow | Function of this unit for displaying photos in an SD card or USB device in sequence at a certain interval (set in setting item "Slideshow Interval"). |
| Bit rate | Figure expressing the amount of information per second. The audio quality increases as the bit rate increases. |
Message List
| Displayed Message Meaning/Treatment | |
| No iPod/iPhone connected. | iPod or iPhone is not connected.Check the connection. |
| The selected device is not connected. | The SD card is not inserted or the USB device is not connected.Check the connection. |
| This file has broken. | An attempt is made to play a file that is not playable with this unit. For the playable files, see “Files Playable with this Unit” (page 24). |
Media Usable with this Unit
SD
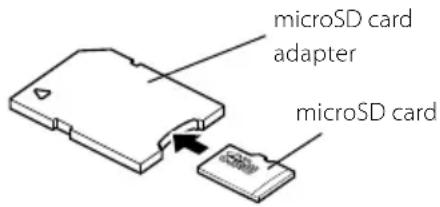
Media: SD/SDHC card, miniSD™ card, microSD/SDHC card. SD/SDHC cards with capacities from 512 MB to 32 GB can be used. A special adapter is required to insert a miniSD/microSD card. Insert a miniSD/microSD card into a commercially available special adapter and insert the adapter into this unit. The insertion direction is identical to the standard SD card.
USB
Media: USB flash memory, USB Mass Storage Class-compatible digital audio player.
The ⬆ (USB) connector of this unit is compatible with USB2.0 (Full Speed).
This unit cannot use a USB device through a USB hub.
Do not connect a device other than a USB flash memory or USB •
Mass Storage Class-compatible digital audio player to the (USB) connector of this unit.
The following restrictions are applicable to the type of usable USB devices and their operating method.
The connected USB device must be USB Mass Storage Class • compatible. To identify if the USB device you are going to use is USB Mass Storage Class compatible, consult its dealer.
The maximum current consumption should be no more than "500 mA."
If a USB device that does not meet the restrictions above is used, it would be impossible to play audio or image files correctly. Even when a USB device meet the restrictions above, it may not be playable normally depending on the type or conditions.
Files Playable with this Unit
This unit can play SD cards and USB devices storing the following types of audio/image files.
MP3 (MPEG 1/2 Audio Layer 3)
File extension: .mp3
Sampling frequencies: 48/44.1/32/24/22.05/16/12/11.025/8 kHz
Bit rates: 32 - 320 kbps
WMA (Windows Media Audio)
File extension: .wma
Sampling frequencies: 48/44.1/32 kHz
Bit rates: 32 - 320 kbps
This unit cannot play fi les created using any of the following • functions released in Windows Media™ Player 9 and after.
- WMA Professional
- WMA Lossless
- WMA Voice
WAV (Linear PCM)
File extension: .wav
Sampling frequencies: 44.1 kHz
Quantization bits: 16 bit
Channels: Stereo, monaural
JPEG (Image files)
File format: JPEG
File extension: .jpeg / .jpg
This unit is not compatible with progressive JPEG and CMYK color • formats.
SD/USB-compatible file system
FAT16
FAT32
Limits in number of files
Maximum number of folders: 255
Maximum number of files: 999
Limits in number of displayed characters
File name: 255 characters (including extension)
- This unit displays the non-displayable characters incorrectly or as blanks.
Other cautions
- Files under control of DRM (Digital Rights Management) cannot be played.
- Audio files encoded in VBR (Variable Bit Rate) may use bit rates that are incompatible with this unit. The audio fi les containing bits rates outside the compatible range of this unit cannot be played. The fi lenames should carry correct fi lename extensions. Files • without extension cannot be played. Files other than audio/image fi les should not carry fi le extensions. For the fi lename extensions, see "Files Playable with this Unit."
Notes on iPod/iPhone
Usable iPod/iPhone models
Unless otherwise specified, the device called "iPod" in this manual refers to the iPod or iPhone unit connected to the iPod applied part of this unit.
The following iPod/iPhone models can be connected to this unit • (as of May 2010).
Made for
iPod touch (2nd generation)•
iPod touch (1st generation)•
iPod nano (5th generation)
iPod nano (4th generation)•
iPod nano (3rd generation)•
iPod nano (2nd generation)•
iPod nano (1st generation)•
iPod classic•
iPod with video•
iPod (4th generation)•
Phone 3GS•
iPhone 3G•
iPhone •
Disclaimer
- The data stored in the SD card/USB device/iPod/iPhone may be lost under certain usage conditions of this unit. At Kenwood, we do not assume any liabilities for the damages incurred by the loss of stored data.
Transport/Movement Precaution
Perform the following steps before transporting or moving this unit.
1 Press the [OFF] button and remove the external device such as an SD card, USB device or iPod/iPhone.
② Wait a few seconds, and then disconnect the AC adapter.
③ Remove the AM loop antenna.
A trouble with the unit does not always mean a failure. In case of a trouble, check the following lists before calling for service.
Amplifi er/Speakers
| Symptom Remedy Page | ||
| Audio is not output. | Connect the cords properly.• | 7 |
| Increase the volume setting.• | 8 | |
| Clock is not displayed. Perform clock setting.• | 10 | |
Tuner
| Symptom Remedy Page | ||
| Radio stations cannot be received. | Connect the antennas.• | 7 |
| Set the correct radio reception band (receiving mode).• | 18 | |
| Tune the frequency of the desired station.• | 18 | |
| Noise interferes. | Install the antenna at a distance from the road.•Turn off the electrical equipment used in proximity of this unit.•Use the unit at a distance from a TV set. | — |
| Preset stations cannot be displayed. | Perform Auto Preset of radio stations again.•Perform Manual Preset of the radio stations of receivable frequencies. | 1819 |
USB/SD/iPod/iPhone
| Symptom Remedy Page | ||
| Music, photo or video is not output even after an SD card/USB flash memory/iPod/iPhone is connected. | Connect the SD card/USB flash memory/iPod/iPhone properly.•Connect the USB cable properly.Confirm that the USB Mass Storage Class-compatible digital audio player is turned on. | 99— |
How to Reset the Unit
| Symptom | Check Point/Treatment |
| The unit malfunctions (impossibility of control, erroneous display, etc.) | This unit may malfunction due to disconnection of a cord while the unit is on or to other extraneous factors. If this happens, reset the unit with the following steps.1 Remove the external device such as an SD card, USB device or iPod/iPhone from the unit.2 Disconnect the AC adapter, wait for some tens of seconds and then connect the AC adapter again. |
Specifications
[Display panel]
LCD screen 7-inch, TFT drive Aspect ratio 15:9
[Amplifi er]
Max. practical power....1.5 W + 1.5 W (8 Ω)
[Tuner]
FM tuner Receiving frequency range 87.5 MHz - 108.0 MHz AM tuner Receiving frequency range 531 kHz - 1,602 kHz
[USB]
Compatible USB devices ....USB Mass Storage Class devices Interface ..... ....USB 2.0 (Full Speed), USB 1.1 compatible Compatible fi le systems ..... ....FAT 16/32 Supply current ..... ....Max. 500 mA
[SD]
Compatible SD cards: ....SD/SDHC, miniSD, microSD/SDHC card A special adapter is required with the miniSD/microSD cards. Compatible fi le systems ....FAT 16/32
[Speakers]
Speakers 40 mm cone type
[Power supply, etc]
Provided AC adapter DC5.9V (AC230 V, 50 Hz) Rated power consumption (incl. AC adapter) 15 W Dimensions: Width220 mm (When the iPod applied part is open) Width 295 mm Height 157 mm Depth 100 mm Weight 0.8 kg (net)
- Following the future technological development, the design and specifications are subject to change without prior notice.
- Although the TFT display panel is fabricated with high precision technology, some dots (pixels) may be lit or extinguished permanently. (This is not malfunction.)
-
The unit may not be able to manifest the full performance in an extremely cold place (at or below the freezing temperature).
-
Windows Media is a trademark of Microsoft Corporation registered in the U.S. and other countries.
• The SDHC logo is a trademark. - "Made for iPod" and "Made for iPhone" mean that an electronic accessory has been designed to connect specifically to iPod or iPhone, respectively, and has been certified by the developer to meet Apple performance standards. Apple is not responsible for the operation of this device or its compliance with safety and regulatory standards.
- iPhone, iPod, iPod classic, iPod nano, and iPod touch are trademarks of Apple Inc., registered in the U.S. and other countries.
Other system names and product names are generally trademarks or registered trademarks of their respective developers/manufacturers. The text in this manual omits the use of the TM and ^® marks.
KENWOOD
For your records
Record the serial number, found on the back of the unit, in the spaces designated on the warranty card, and in the space provided below. Refer to the model and serial numbers whenever you call upon your dealer for information or service on this product.
Model____Serial
Number
KENWOOD
MULTIMEDIA AUDIO SYSTEM
AS-IP70
MODE D'EMPLOI
Kenwood Corporation

Suppression de station(s) de la mémoire (Delete one/Delete all) ......19
natural_image
Isometric line drawing of a mechanical component with a central housing and coiled cable (no text or symbols)Adaptateur secteur
(AC-059300A:×1)
natural_image
Line drawing of a rectangular device connected to a coiled cable with a sensor or probe (no text or symbols)Piles sèches
ATTENTION
natural_image
Diagram of a mechanical component with an arrow indicating upward motion (no text or symbols)
natural_image
Black-and-white photo of a dog lying on grass, no visible text or symbolsMode 3
natural_image
Black-and-white photo of a person lying on grass, no visible text or symbolsMode 3

Indicateur SD/USB
Indicateur SD/USB
Suppression de station(s) de la mémoire de stations (Delete one/Delete all)
Sélectionnez "Every day" / "Weekday" / "Weekend".
"Snooze"
Alarme2 en serviceAlarme1 en sei
iPod touch (2nd generation)•
iPod touch (1st generation)•
iPod nano (5th generation)
iPod nano (4th generation)•
iPod nano (3rd generation)•
iPod nano (2nd generation)•
iPod nano (1st generation)•
iPod classic•
iPod with video•
iPod (4th generation)•
Phone 3GS•
iPhone 3G•
iPhone •
87,5 MHz - 108,0 MHz
Radio AM
[Alimentation, etc.]
• Windows Media is a trademark of Microsoft Corporation registered in the U.S. and other countries.
• The SDHC logo is a trademark.
- "Made for iPod" and "Made for iPhone" mean that an electronic accessory has been designed to connect specifically to iPod or iPhone, respectively, and has been certified by the developer to meet Apple performance standards. Apple is not responsible for the operation of this device or its compliance with safety and regulatory standards.
- iPhone, iPod, iPod classic, iPod nano, and iPod touch are trademarks of Apple Inc., registered in the U.S. and other countries.
Manuelle Sendervorwahl (Add to preset) ...19
natural_image
Isometric line drawing of a mechanical component with a spring and base (no text or symbols)natural_image
Line drawing of a cable-winding sensor connected to a rectangular device (no text or symbols)! ACHTUNG
■btrennen des Dock-Adapters...
natural_image
Diagram showing a tool interacting with a rectangular object, with an arrow indicating direction (no text or symbols present)
natural_image
Black-and-white photo of a person walking on grass, no visible text or symbolsModus 3

natural_image
Black-and-white photo of a dog lying on grass, captured at 12:15 (no visible text or symbols)Modus 3


SD/USB-Anzeige
SD/USB-Anzeige
Manuelle Sendervorwahl (Add to preset)
Alarm2 ONAlarm1 ON
iPod touch (2nd generation)
iPod touch (1st generation)•
iPod nano (5th generation)
iPod nano (4th generation)•
iPod nano (3rd generation)•
iPod nano (2nd generation)•
iPod nano (1st generation)•
iPod classic•
iPod with video•
iPod (4th generation)•
Phone 3GS•
iPhone 3G•
iPhone •
Haftungsausschluss
natural_image
Isometric line drawing of a mechanical component with a spring and base (no text or symbols)Netstroomadapter
(AC-059300A:×1)
natural_image
Line drawing of a rectangular device connected to a coiled cable with a sensor or probe (no text or symbols)Batterijen
("AAA" of R03: x 2)

flowchart
graph LR
    A["File Icon"] --> B["Memory Card"]
    B --> C["Storage Card"]
■osmaken van de dockadapter...
natural_image
Diagram showing a tool interacting with a rectangular object, with an arrow indicating direction (no text or symbols present)
natural_image
Black-and-white photo of a person lying on grass, no visible text or symbolsStand 3

natural_image
Black-and-white photo of a dog resting on grass, with timestamp '12:15' visible at bottom left (no readable text or symbols in the image)Stand 3


SD/USB-indicator
SD/USB-indicator
1 Selecteer de iPod/iPhone.
Druk op [iPod/iPhone].
1 Selecteer de iPod/iPhone.
Druk op [iPod/iPhone].
Druk op [ALARM.1 ON/OFF] of [ALARM.2 ON/OFF].
Alarm2 AANAlarm1 AAN
Druk op [ALARM.1 ON/OFF] of [ALARM.2 ON/OFF].
Wanneer u "Wallpaper" selecteert...
Wanneer u "Rest all setting" selecteert...
Bemonsteringsfrequencies: 48/44,1/32/24/22,05/16/12/11,025/8 kHz
Bemonsteringsfrequencies: 48/44,1/32 kHz
iPod touch (2nd generation)•
iPod touch (1st generation)•
iPod nano (5th generation)
iPod nano (4th generation)•
iPod nano (3rd generation)•
iPod nano (2nd generation)•
iPod nano (1st generation)•
iPod classic•
iPod with video•
iPod (4th generation)•
Phone 3GS•
iPhone 3G•
iPhone •
LCD-scherm 7-inch, TFT
87,5 MHz - 108,0 MHz
AM-ontvanger
Frequentiebereik
531 MHz - 1602 MHz
[USB]
Impostazione Slide show/Wallpaper (Slide show/Wallpaper) 22
natural_image
Technical line drawing of a mechanical component with a coiled spring and housing (no text or symbols)Alimentatore CA (AC-059300A: x 1)
![KENWOOD ASiP70 - [USB] - 1](/content/2026/02/357381/images/87a6de720014abdd464bbd723db0ced7d2abbe59568889221d224e1496553cf3.jpg)
natural_image
Line drawing of a rectangular device connected to a coiled cable with a sensor or probe (no text or symbols)Batterie a secco ("AAA" o R03: x 2)

ATTENZIONE
flowchart
graph LR
    A["File Icon"] --> B["Memory Card"]
    B --> C["Storage Card"]
natural_image
Diagram showing a tool interacting with a rectangular object, with an arrow indicating direction (no text or symbols present)
natural_image
Black-and-white photo of a person lying on grass, no visible text or symbolsModalità 3

natural_image
Black-and-white photo of a dog-like animal resting on grass, with timestamp '12:15' at bottom (no readable text or symbols in the image)Modalità 3

3 Select and play music.
Press [▲/▼] to select the audio file and press [ENTER].
Indicatore SD/USB
Impostazione Slide show/Wallpaper (Slide show/Wallpaper)
iPod touch (2nd generation)•
iPod touch (1st generation)•
iPod nano (5th generation)
iPod nano (4th generation)•
iPod nano (3rd generation)•
iPod nano (2nd generation)•
iPod nano (1st generation)•
iPod classic•
iPod with video•
iPod (4th generation)•
Phone 3GS•
iPhone 3G•
iPhone •
Avvertenza
natural_image
Technical line drawing of a mechanical component with a coiled spring and housing (no text or symbols)Adaptador de CA (AC-059300A: x 1)
natural_image
Line drawing of a rectangular device connected to a coiled cable with a sensor or probe (no text or symbols)Pilas secas ("AAA" o R03: x 2)

Para desconectar la tarjeta SD...
natural_image
Diagram showing a tool interacting with a rectangular object, with an arrow indicating direction (no text or symbols present)
natural_image
Black-and-white photo of a person standing on grass, no visible text or symbolsModo 3

natural_image
Black-and-white photo of a dog lying on grass, captured at 12:15 (no visible text or symbols)Modo 3


Indicador SD/USB
1 Seleccione iPod/iPhone.
Pulse [iPod/iPhone].
Pulse [iPod/iPhone].
iPod touch (2nd generation)•
iPod touch (1st generation)•
iPod nano (5th generation)
iPod nano (4th generation)•
iPod nano (3rd generation)•
iPod nano (2nd generation)•
iPod nano (1st generation)•
iPod classic•
iPod with video•
iPod (4th generation)•
Phone 3GS•
iPhone 3G•
iPhone •