
PocketCinema N100 - Projector AIPTEK - Free user manual and instructions
Find the device manual for free PocketCinema N100 AIPTEK in PDF.
| Product type | DLP pico projector |
| Display technology | DLP (Digital Light Processing) |
| Light source | RGB LED |
| Native resolution | 854 x 480 pixels (WVGA) |
| Screen format | 16:9 |
| Contrast ratio | 1000:1 |
| Brightness | Up to 100 lumens |
| Projected image size | 36 cm to 305 cm (14" to 120") |
| Projection distance | 50 cm to 425 cm (20" to 167") |
| Focus | Manual (lever) |
| Connections | HDMI (MHL compatible), VGA (mini D-sub 15-pin), USB (charging), 3.5 mm audio output |
| Speaker | Built-in, mono |
| Power supply | Input 100-240 V~, output 12 V / 2 A |
| Battery | Built-in Li-polymer, 7.4 V / 2000 mAh |
| Battery life | Approximately 90 min (Boost), 120 min (Normal), 150 min (Eco) |
| Dimensions (L x W x H) | 132 x 95 x 25 mm |
| Weight | 270 g |
| Operating temperature | 5°C to 35°C |
| Humidity | 20% to 80% without condensation |
| Included accessories | Power adapter, remote control (CR2025 battery), HDMI cable, MHL cable, carrying case, user guide |
| Maintenance | Clean the lens with a soft cloth, avoid dust, do not block ventilation |
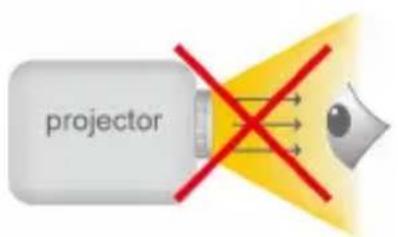
| Safety | Do not look directly at the light source, use only the provided adapter, do not expose to moisture |
| Repairability | Have any repairs carried out by an authorized service center; the battery should only be replaced by a professional |
Frequently Asked Questions - PocketCinema N100 AIPTEK
User questions about PocketCinema N100 AIPTEK
0 question about this device. Answer the ones you know or ask your own.
Ask a new question about this device
Download the instructions for your Projector in PDF format for free! Find your manual PocketCinema N100 - AIPTEK and take your electronic device back in hand. On this page are published all the documents necessary for the use of your device. PocketCinema N100 by AIPTEK.
USER MANUAL PocketCinema N100 AIPTEK
Thank you very much for purchasing this product. Before you start, you are recommended to read this manual step by step to obtain the best results with your new Pico projector. We wish you enjoy it.
About the product
This is the latest generation of Pico projector with DLP technology inside. Known for great cinema projectors, the DLP technology provides rich colours and enhances the contrast of the image. The Pico projector offers versatile connection options including HDMI, MHL and VGA port and projecting the images up to 120" (300 cm) in size. This Pico projector is the best solution for mobile use in business and entertainment.
Safety Notice
- Keep the device and packaging materials out of the reach of infants and children.
- Avoid subjecting the power adapter and other contacts to dripping or splashing water and dry your hands before you use it. Do not place objects filled with liquids such as vases, etc. on or near the device.
- Make sure that the used power outlet is always readily available and never hidden. In case of emergency, use the power adapter to separate the device from the power network.
- Keep your device away from all flames such as candles and do not set them up in the vicinity of the device.
- Keep the unit at least 10cm away from other objects. Make sure the ventilation is not covered by newspapers, tablecloths, curtains, etc.
- For your own safety, do not use the projector during thunderstorms or lightning.
- Relative Humidity is 20% 80% , non-condensing.
- The battery is integrated with the device. Do not disassemble and modify. The battery should be replaced by an authorized service center only.
- Ensure that the ambient room temperature is within 5 35^
- Wait before using if the device has been moved from a cold location into a warm one. Any condensation that has formed may in certain circumstances destroy the device. As soon as the device has reached room temperature it can be used without risk.
- Handle the product with care. Avoid contact with sharp objects. Keep device away from metallic objects.
- Place the projector on a flat surface. Any collision or falling to the ground is likely to damage the product.
- Do not drop or disassemble the product otherwise the warranty voids. Opening or removing covers may expose you to dangerous voltage or other hazards. Refer all servicing to an authorized service center.
-
Use only the accessories supplied by the manufacturer.
-
Both product and user's manual are subject to further improvement or supplement without further notice.
Care and Safety Information for Pico Projectors
- Avoid facing directly into the projector's lens.
- During the operation, this product may heat lightly, which is normal.
- The device should not be used in a very dusty environment. Dust particles and other foreign objects may damage the unit.
- Do not expose the device to extreme vibrations. It may damage the internal components.
- Use the enclosed power adapter (see technical data): Check whether the mains voltage of the power supply matches the mains voltage available at the setup location. This equipment complies with the voltage type specified on the unit.
Avoid Hearing Damage:
Listening at high volume for a long period of time could cause damage to your ears.

Notice for Long-time Projection
The built-in battery supports approximately 150 mins of projection. For long time projection, you are recommended to use AC adapter.
When the battery is too weak to stay in operation, the low battery capacity icon ( ) will flash. You need to charge the product while the icon showed.
It's normal that the projector will feel warm with continuous use due to its high performance. If the projector runs for a long time and over-heated, the High-Temperature icon (A) will appear on the screen. The system will automatically enter the standby mode.
FCC Compliance Statement:
This device complies with Part 15 of the FCC Rules. Operation is subjected to the following two conditions: (1) this device may not cause harmful interference, and (2) this device must accept any interference received, including interference that may cause undesired operation.

This equipment has been tested and found to comply with limits for a Class B digital device, pursuant to Part 15 of the FCC rules. These limits are designed to provide reasonable protection against harmful interference in residential installations. This equipment generates, uses, and can radiate radio frequency energy, and if not installed and used in accordance with the instructions, may cause harmful interference to radio communications.
However, there is no guarantee that interference will not occur in a particular installation. If this equipment does cause interference to radio or television equipment reception, which can be determined by turning the equipment off and on, the user is encouraged to try to correct the interference by one or more of the following measures:
- Reorient or relocate the receiving antenna.
- Move the equipment away from the receiver.
- Plug the equipment into an outlet on a circuit different from that to which the receiver is connected.
- Consult the dealer or an experienced radio/television technician for additional suggestions.
You are cautioned that any change or modifications to the equipment not expressly approved by the party responsible for compliance could void your authority to operate such equipment.
Table of Content
| About the Product, Safety Notice | 1 |
| Package Content | 4 |
| Knowing Your Device | 5 |
| Getting Started | 7 |
| Projecting from External Video Input Source | 8 |
| HDMI, VGA | 9 |
| Smartphone & Tablets | 12 |
| Charging the external mobile devices | 12 |
| Trouble Shooting | 13 |
| Specifications | 14 |
Package Content
Please check if the following items are located in your packaging:
Pico Projector
- Power Adapter
Exchangeable Power Plug
Remote Control
HDMI Cable (A to A type)
- MHL Cable (HDMI A to USB D type)
- Carry Bag
- User's Manual
Knowing your Device
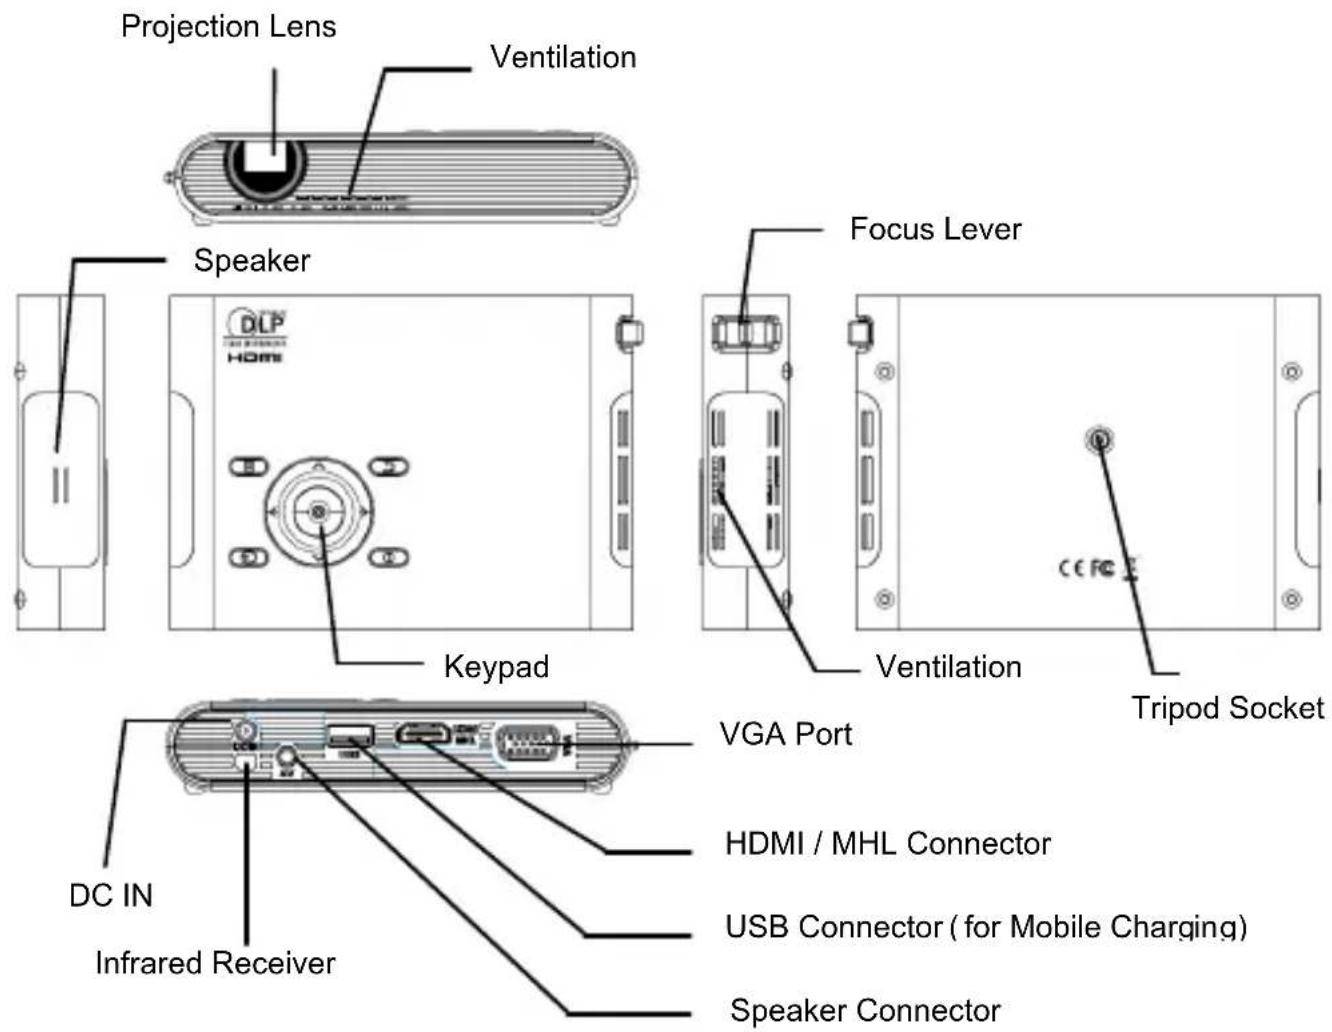
Projectile
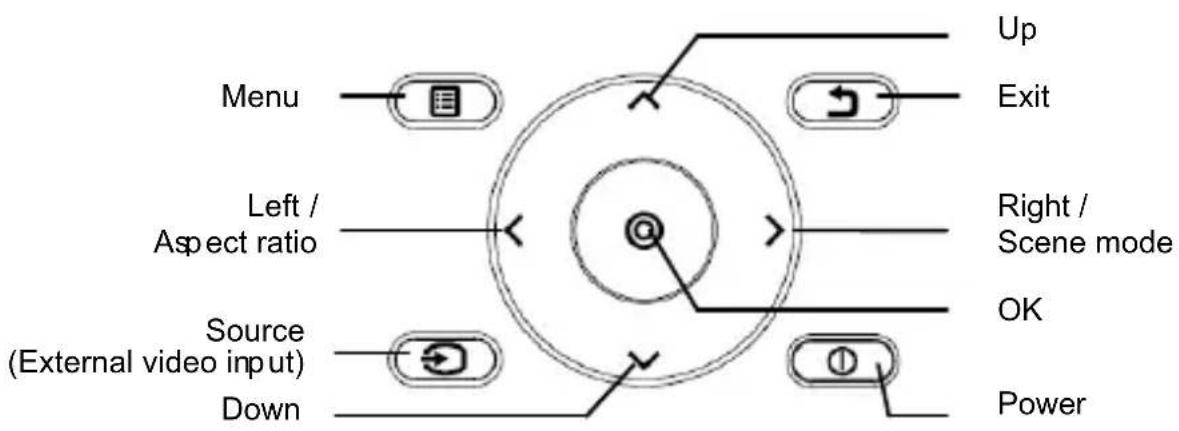
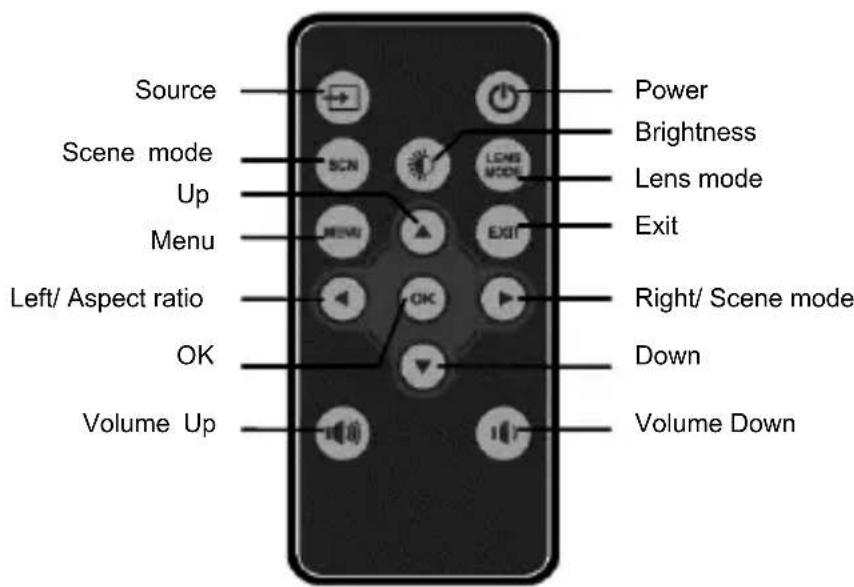
Control Panel
Remote Control
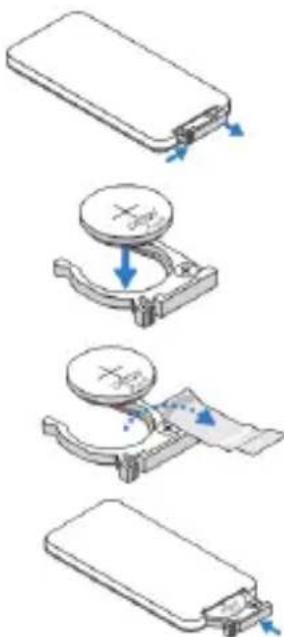
Installing the Remote Control Battery
-
Remove the battery holder by holding down the side releasefirmly and pulling out the battery holder.
-
Insert a CR2025 coin cell battery and align the polarity correctly according to the marking in the battery holder.
Note: When you use the remote control for the first time, there is a plastic sheet between the battery and its contact. Remove the sheet before use.
- Insert the battery holder.
Warning:
Improper use of the battery may cause overheating, explosion or ignition, which can result in an injury or a fire. Battery leakage may damage the remote controller.
Do not expose the remote controller unit to direct sunlight.
Do not expose the battery to fire or water.
Immediately replace the exhausted battery.
Take out battery when the remote is not in use for a long time.
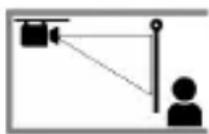
Operating Range with Remote Control
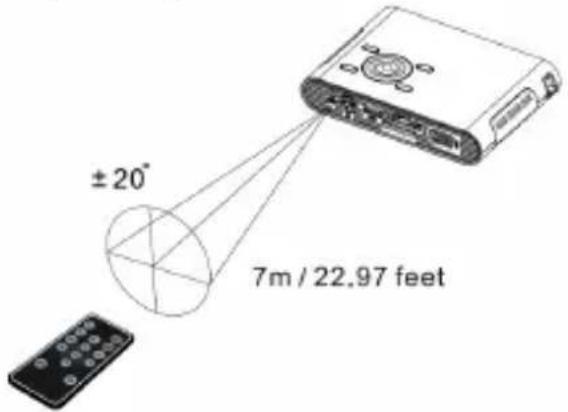
Note: Actual operating range may slightly differ from the diagram. Additionally, a weak battery reduces or eliminates the operating range of the remote control.
Getting Started
Charging the product
The projector is built in a Li-Polymer battery for mobile use. Please charge the projector for 8 hours prior to its first use. Repeat charging will take around 4 hours. The battery will be charged

only when the projector is not in use (Power off). Connect one end of the supplied AC adapter to DC IN jack and the other end to a power outlet to start charging.
Exchange the plug (EU, US and etc.) of AC adapter that accommodates the type of power outlet in your country if it's different.
Charging LED Indicator
During charging, the LED on Power button turns Orange. It turns to Green when the battery is fully charged.
Turn On / Off the Projector
Push the Power button for 2 seconds to turn on the projector.
To turn off the projector, push the Power button downward for 2 seconds.
Standby mode: Push the Power button for 1 second to turn on/ off the projector lamp for a short break to save the battery and system reboot time. (The LED on buttons are still on when the projector is in standby mode.)
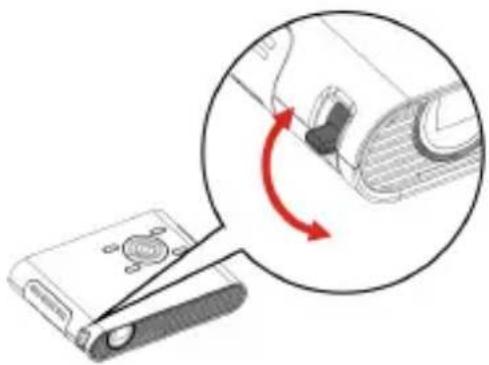
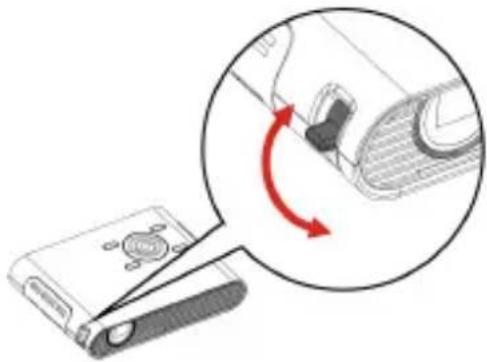
Adjusting the Focus according to distance
Place the projector on a flat surface and toward a wall or a projection screen. The projectional distance and projectional size are:
Distance : 50 cm ~ 425 cm (20 ” ~ 167 ”)
Image size: 36cm 305cm (14 120
Adjust the focus by turning the Focus Lever upward or downward to get a sharp and clear picture.
Note: Use a tripod (not included) to increase the height of the projectional image when necessary. The tripod socket is located under the projector.
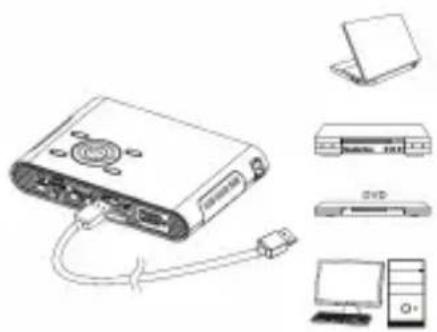
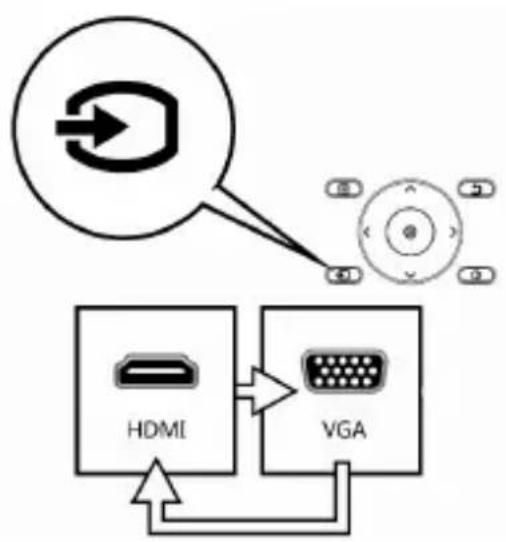
Projecting from External Video Input Source
The projector has built-in multiple interface on the rear side. You can connect your external video Input source to the projector by using the appropriate cable and press the Source key on the control panel of the projector to select the input source.
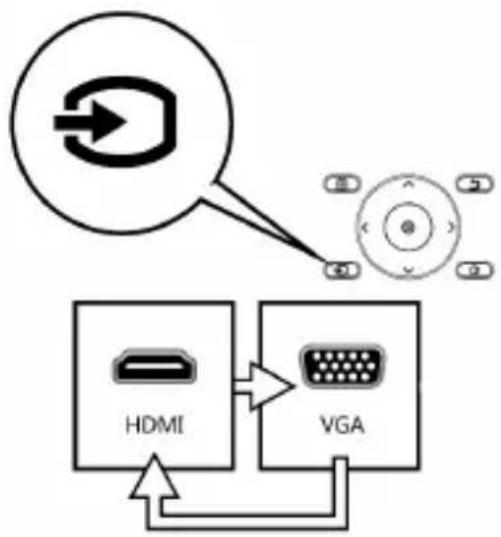
HDMI
Use the HDMI cable to connect the HDMI port on the rear panel of the projector to the external HDMI signal source. After connected, the screen switches to HDMI source automatically.
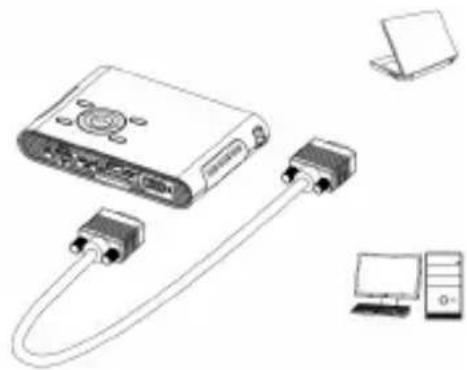
VGA
Use a VGA cable to connect the VGA port on the rear panel of the projector to the external VGA signal source. After connected, press the Source button on the remote control or control panel to select VGA source.
Note: VGA cable is not included in standard package.
Changing Playback Setting for External Video Source
Press menu on control panel or remote control to enter the playback setting.
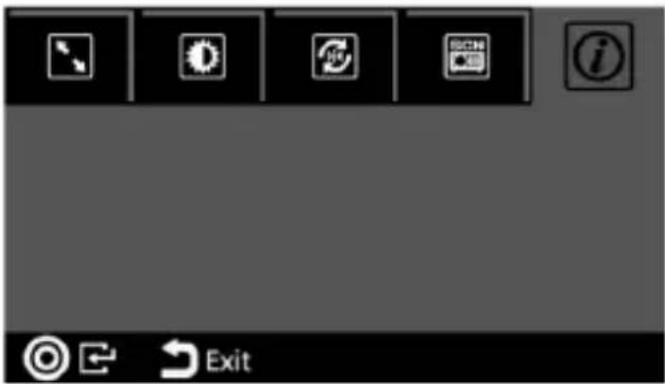
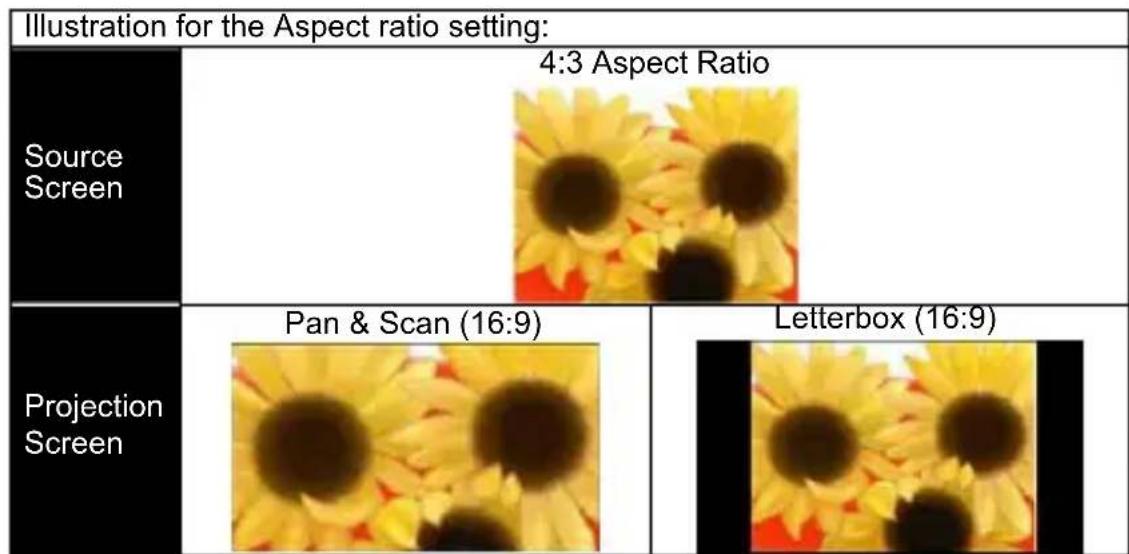
1. Aspect ratio
When the video file is in 4:3 aspect ratio, this function allows you to adjust how the image should appear on the 16:9 screen.
Press IOK to display the options.
1) Pan & Scan: the image is scaled up to fit to 16:9 screen.
2) Letterbox: the image is displayed by original aspect ratio.
2. Brightness
It allows you to change the brightness according to the environment and the power consumption.
1) Enhanced: Select this mode when external power supply is available to maximize the performance.
2) Normal: The default mode for optimizing the projection performance and battery capacity.
3) Eco: This mode is recommended when the projector is operated under battery mode to save power.
Note: The projector is automatically switched to Enhanced mode when It's powered by the power adapter.
3. Projection (Lens) mode
It allows you to select the projection mode, depending upon how the projector is mounted.
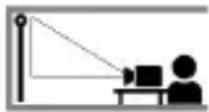
Front: This is the most common way to position the projector for quick setup and portability.
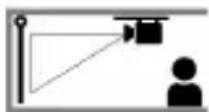
Front Ceiling: The projector turns the image upside down for ceiling-mounted projection.
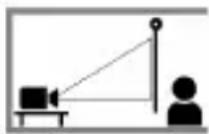
Rear: The projector reverses the image so that it can project from behind a translucent screen.
Rear Ceiling: The projector reverses and turns the image upside down. It can project from behind a translucent screen in the ceiling-mounted position.


4. Scene selection
It allows you to select the ideal mode for watching movie, photo slideshow, or reading the text with balanced brightness, color, and contrast.
Cinema: ideal for watching movie Normal: ideal for photo slideshow Text: ideal for image with text
5. Information
Shows firmware version: Txxxx
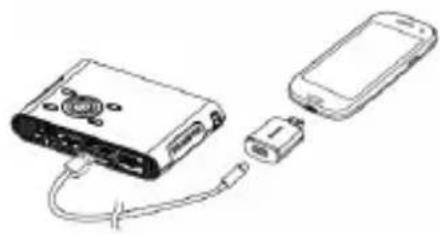
Projecting from Smartphones or Tablets
- Connect smartphones supported MHL (Mobile High-Definition Link) for projection.
Connect Samsung Galaxy S2, Note; new HTC one, one X^+ ,one X, one S; or Sony Xperia Z with the projector via MHL (A to USB D type HDMI) cable.
Connect Samsung Galaxy S4, Note II with the projector via MHL (A to USB D type HDMI) cable and Samsung 5 to 11 pin MHL converter (as illustration shows) for projection.
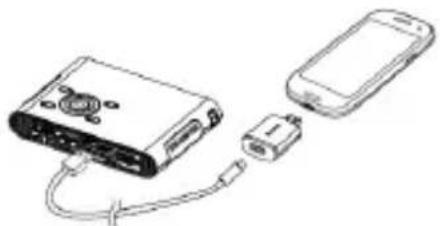
Note: It's normal that the projector is automatically charging the smartphones or tablets when connected with the MHL cable for projection.
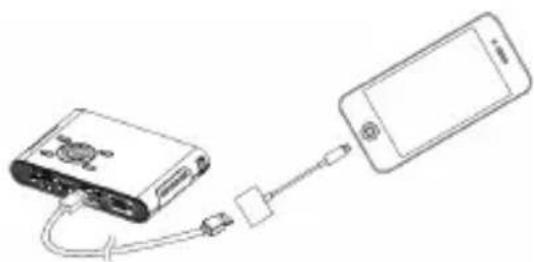
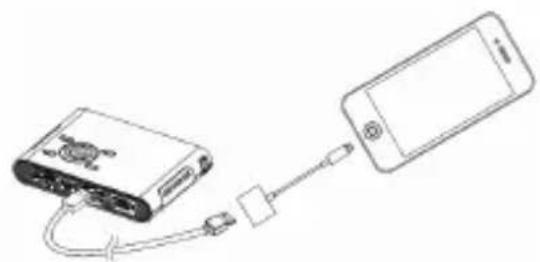
- Connect iPhone 5 for Mirror projection (with Lightning connector)
Connect iPhone 5, iPad 4th, iPad mini and iPod touch 5th with the projector via Apple Lightning Digital AV adapter and A-to-A type HDMI cable.
iPhone 4S, 4, New iPad, iPad 2, and iPod
touch (4^th) can connect with projector with Apple 30-pin digital AV adapter and A-to-A type HDMI cable
Charging the External Mobile Device
The internal battery of the projector cannot only be used for projection, but also charge your mobile device.
- Connect your mobile device to the projector via the USB cable with the end of Type A connector plugged into the USB port on the rear side of projector.
- When the projector is powered on, the device will be charged automatically.
- When the projector is powered off, please press the Source button ( ) to start or stop charging.
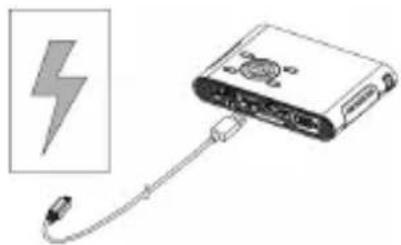
Note: The projector provides 5V/500mA output power for charging the mobile devices.
Troubleshooting
If your projector does not seem to be functioning properly, check the items below before you contact an authorized service center.
| Symptom Check | Point |
| The projector does not work when connecting to a notebook or PC with cable. | 1. Check if the HDMI cable is plugged correctly. 2. Make sure the PC has been switched to projectordisplay. |
| The projected image is too dark. | 1. Use the projector in a darker environment. 2. Increase the brightness by using the AC power adapter. 3. Scale down the projectional image size. |
| The projected image is blurred. | 1. Adjust the focus. Please refer to “Adjusting the Focus”. 2. Check if the lens is dirty. |
| The surface temperature of projector is high. | Because of the high-luminance LED, it is normal that this projector generates heat in long-time use. It will not affect the performance of the projector. Always keep the ventilation slots free of dirt or obstructions and operate the projector in a properly ventilated environment. |
| Recovering from abnormality | This can be useful when the projector is freezing, crashing or locking up during the operation. Press the Power button for 8 seconds to reboot your projector. |
Specifications
| Item Description | |
| Optical Technology | DLP |
| Light Source | RGB LED |
| Aspect ratio 16:9 | |
| Resolution 854 x 480 Pixels (WVGA) | |
| Contrast Ratio 1000:1 | |
| Projection Image Size 36 | cm ~ 305 cm (14" ~ 120") |
| Projection Distance 50 cm | ~ 425 cm (20" ~ 167") |
| Throw Ratio (Diagonal: Distance) | 1.6 (Projection Distance/Width of Image) |
| Brightness Up to 100 Lumens | |
| Focus Manual | |
| Offset 100% | |
| Connections | HDMI / MHL: Comply with HDMI v1.3 and MHL v2.0 VGA: Mini D-sub 15-pin AV port: Audio out: 3,5mm mini jack USB port: Charging the mobile devices |
| Internal Speaker Mono | |
| Power Supply Input: 100 ~ | 240V AC Output: 12V, 2A DC |
| Battery Type Embedded 7.4V/2000 mAh Li-polymer battery | |
| Battery Life Enhanced mode : 90 min Normal mode: 120 min Eco mode: 150 min | |
| Power Consumption AC mode: 10.5 W Battery mode: 6.5 W ~ 10.5 W | |
| Dimensions (L x W x H) 132 x 95 x 25 mm | |
| Weight | 270 g |
| Humidity | 20 - 80%, 80% (Max.), non-condensing. |
| Operating Temperature | 5 °C - 35 °C. |
Willkommen
CoOTBeTCTBnE Tpe6oBaHnIaFCC:
Данhoe yctpoiCTBO OTBeueaET Tpe6oBaHnЯm Yactn 15 npabn CFR 47 FCC. 3KcnpyaTauN RA3MOxHa npn CO6IIOHeHn CneDyUOxN x DByx yCNoBn: (1) 3TO yCTPOICTBO He DOJXHO CO3DaBA Tb NOMex, OTPuataJIbHO BInraOuIX Ha dpyrHe yCTPOICTBa n (2) 3TO yCTPOICTBO DOJXHO IMeMb 3aunTy OT NOMex, CnOCO6HbIX Bbl3Ba Tb c60n B erppa6ote.

3TO yCTPOIcTBO hCnblTaHO n npu3HaHO COOTBeTCTByUoHm ORpaHnueHnM dIy IuΦpOBbIX yCTPOIcTB KJIacCa B corlacho Yactn 15 PpaBnFCC. 3Tu orpaHnueHnI DOJXhbl OeBceNHTb pa3ymHyIO 3aunTy OT BpeDhbIX NOMex npn 3KcnIpyaTauIN O6OpYDoBaHnB B Xnblx paNoHax. DaHHoe o6OpYdoBaHne CO3daet, INcnoJb3yeT n MOKeT N3nyaTb paAnOBONHbI, n ecn OHO yCTaHO HNe HIn 3KcnIpyaTnpyETc HApUHeHem IHCTpyKUn pOn3BOIDTeJI, OHO MoKeT CO3DaBaTb NOMEXn DJI cpeIcTB paAnocBra3N.
Ondako Het rapaHTn, YTO NOMEXH He BO3HNKHyT B OTDeJIbHbIX Clyuayx yCTaHOBKn DaHHoro o6OpyIDOBaHn. Ecnn 3TO o6OpyIDoBaHne cTaHeT npUHnOH HexeJatbHbIX NOMEx B pa6ote TeJe- n paINOyCTpOInCTB, YTO MOXHO ONpeJNTb, BBIKIOuHBn CHOBa BKIOuHB yCTpOInCTBO, peKOMeHdyeTcR nonbITaTbcraYCTpaHtB NOMEXn CNeDyUoUM o6pa30M:
- IpeheHapabbTe nI npemecHTe npmHyO aHTEHy.
- Y6epnte yctpOInCTBO OT TeJe- nn paAnOpnpemHnka.
- PoiKJIIOUHTe yCTPOINCTBO K dpyroI PO3ETKE TAK, YTO6bI OHO I npHEMHK NITaJIINCBOT pa3hIx cIeNeI.
- 06paTntecb 3a nOMOuK TOpROBMy npedCTaBnTeHNo uN K CneuaNtCy no TeJe/paDnOo6opyDoBaHIO.
Bb npedynpekdeHb, yTO IIO6bIe N3MeHnI INN MoINΦnKaun, OΦnuaJIbHO He Odo6peHHbIe yNOIHOMOeHHo CTOpOH MOrT JINuNTb Bac npaBa NCIOJIb3OBaTB 3TO yCTpoiCTBO.


IIO OKOHuaHn Cpoka Cnyx6bl 3TOrO
H3dJIINr CNeDyET yTNIN3NpOBaTB BCE
ero KOMnoHENTbI. BaTapeu H
Ipee3apJxKaemble akKymJrTOpbbl
3anpe7aETCBbIbpaCbIBaTB BMeCTe C
6bITOBIM OTXoJam! YTNIN3NpyTe INx
B 6nJaMn PnHKTe yTNIN3aUHN.

B202
IaBaIte BMeCTe yUacTBOBaTb B 3aUnte HaWei npnpObl.
CodepkaHue
Cebuyu 6aTapeo CneDyeT HemeJeHHO 3aMeHHTb.
BbHMaTe 6aTapeo n3 nyIbTa, ecn OH dOnIroe Bpemr He 6yDenT cNoIb3ObaTbcra.
3oHa deiCTBnIyIbTa
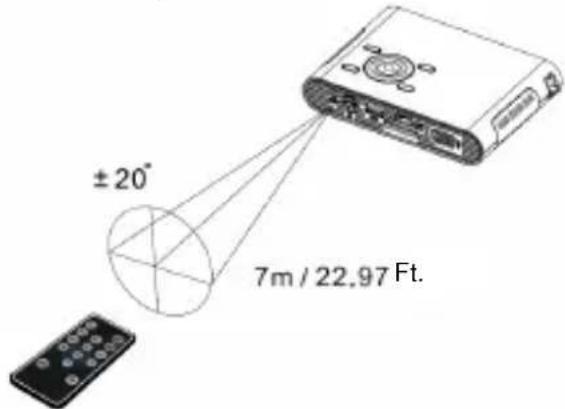
Примechаиме: PeaJIbHЯ 30Ha DeIeCTBnIpyЛbTa MoKeT HEmHOrO OTIIuHaTbCra OT nOKa3aHHoH Ha pIscyHke. KpOME TOrO, DaJIbHOcTb DeIeCTBnI pyJIbTa yMeHbShaetc, KOrDa pa3PraJxAeTc8 BaTape.
Hauano pa6oTbI
3apraKa yctpoiCTBa
Mo6nIbHocTb npoeKTopa obecneuBaetcBCTpoeHHoJ IHTN-NOLmepHO Batapee. Ipeed nepBbIM nCNOJb3OBaHHeM npoeKTopa cNedyET BbINONHTb 3aprky 6atapEn B TeueHne
Ecni BnIka aadantepa nHTaan He COOTBETCTByeT TnNy 3NeKTPopo3eTKn, npImHeMoB B BaWe CtpaHe (EC, CUSA n T.D.), cneDyET 3AmEHt b ee Ha COOTBETCTBYOuO CMeHHyO BnIKy.
CД-индикaTop 3apяdkn
Bo Bpem 3apAKn CД-ннДиКaTOp Ha KHONK NITaHnI RopNT OpaHXeBbIM CBETOM. Korda 6aTapeЯ NOHocTbIO 3apXeHa, OH 3aropaetc 3eJIeHbIM.
BknoueHne/BbIKnOueHne npoeKtopa
PnKMTe KONky nHTAHnHa 2 cekyHdbI, yTo6bI BKnIOuHTb npoeKTOp.
JIa BbIKJIOueHnA npoeKTopa CHOba npixkmtE KONky nHTAHnHa 2 cekyHdbI.
Jduyu npexm: PnKny nTaHna Ha 1 ckyHy dny BpeMeHHoro OTKnIOyeHn JaMnbl C ueIbIO kOHOOMn BpeMeHN, 3aTpauNBAeMOro Ha 3aRpy3kCnCTeMbI, N 3Heprnn 6aTapeN. (CBeToOnoDbHa KhoNKax B JdyUeem peXmme npoDOnjkaOT CBeHTbcra.)
PerynpoBka 0okyca B 3aBncmocTn OT daNbHOCTn npoeunpoBaHna
Pa3MeCTIte npoEKTop Ha poBHOI NOBepXHOCn B HApRaBJIeHN CTeHbI IIN npoEKUHOHOrO 3KpaHa. PpoeKUHOHoe pacCTOJHne I pa3Mep N3O6paJxehNBAbIPaOTcB CJeDyUSeM DnAna3OHe:
PacctoHne: 50 425cm (20"~167")
Pa3Mep n3o6paXeHn: 36 ~ 305 cm (14" ~ 120")
Otperynpyte fokyc noboporom peynatopa fokyca Bbepx nBn3 do noIyehna yeTKoro n pe3Koro n3o6paXeHna.
Примechанe:ЕспгТpe6yeTcR yBelenuHTb BblCOTy npoeцированя n3o6paжehny, Испь3уITE TpeHory (He npilaraetcR).Гнздд.TpeHorn HaxODNTcR Chn3y npoeKTopa.
IJIIOCTpaCnB BapnaHToB HAcTpoKn fOpMaTa I3o6paJKeHn:


2.RpkocTb
I03B0JraT HAcTpOuTb RaKoCTb B COOTBeTCTBn C OKpyKaIOUm OCBeUeHHeM uYPOBHeM 3HeprONOTpe6JIeHnA.
1)Ярки:ВыбраiteэтotpeхиmpnпntaHnOTBHeшнero nCTOHTNka, YTO6blOBecneuHTbMaKcImaJIbHyIOApKOCTb.
2) ObIyHbI: CtaHapTHbI peKIM c ONTUM3aUnei rkOCTn I 6atapeHoro nHTAHn.
3) Θko: ΘTOT pexim pekomehyetcЯ Дя зкohomn эл ektpoэheprn, korda npoeKTop pa6oTaET b 6aTapeHOM pexime.
Приимechан: Прөктор aВТOMaTичесКи пeрклHочаeТсЯВ ржIM «ЯркИ》, KOrДа nITaHne nOdaeTcя OТ aДanTeРa nITaHnI.
3. Pexim npoeunpoBaHna (obekTnBa)
One, One X+, One X, One S uJn Sony
Xperia Z K npoeKtopy C nOMOuBIO Ka6eJMAHL (HDMI Tnna «A—USB-D»).
PoiKIOUHTe CMapoH Samsung
Galaxy S4 n Note II K npoeKtopy c
nomooukaebmaMHL (HDMI tuna
«A—USB-D»), a cMapTΦoH Samsung
5—c nOMOUIbIO 11-KoHTaKTHOrO
MHL-aanTepa (cm. pncyHok).

Примechанe: Пи пдкючeнн K поektopy cmapфоHOB nIN nIIaHWeTHbIX PIK abTomatnueckn ocyujectBJIЯETcRnx 3apdka. 3To HopmaJIbHoe YBHeHne.
ailll lal 100000000000000000000000000000
aiaall jio jaojagaiol lalal 14
.15
g k g j 8
g
2
y 3
yIyI yIyI yIyI yIyI yIyI
4
J51]Lo jaiy 1111 Jao.5
1 1

:
aaiy aaiy yaiy caiy gaiy
y
a
150 150
4j 100000000000000000000000000000000000000
j 1 j 1 j 1 1 1 1 1 1 1 1 1 1
CIN 1
a
i 1
1
gaiy
a
1
j 1 j 1
y
$$ (" (1 2 0 \sim " 1 4) \sim 3 0 5 \sim \sim 3 6 : \text {d} _ {\text {d}} $$
y 1 y
a 1
jgl jll jll l jll jll jll jll jll jll jll jll jll jll jll jll jll jll jll jll jll jll jll jll jll jll jll jll jll jll jll jll jll jll jll jll jll jll jll jll jll jll
HDMI
one S one X one X+ new HTC one
(HDMI USB D A) MHL
2 Samsung Galaxy S4
USBD A) MHL
11 MHLJ Samsung 5 (HDMI
1a
y
JMLH
SaiyblawxiPhone5 2.
(olio!
iPad 4th iPhone 5

- About the product
- Safety Notice
- Care and Safety Information for Pico Projectors
- Avoid Hearing Damage:
- Notice for Long-time Projection
- FCC Compliance Statement:
- Package Content
- Knowing your Device
- Remote Control
- Installing the Remote Control Battery
- Warning:
- Operating Range with Remote Control
- Getting Started
- Charging the product
- Charging LED Indicator
- Turn On / Off the Projector
- Adjusting the Focus according to distance
- Projecting from External Video Input Source
- HDMI
- VGA
- Changing Playback Setting for External Video Source
- Aspect ratio
- Brightness
- Projection (Lens) mode
- Scene selection
- Information
- Projecting from Smartphones or Tablets
- Charging the External Mobile Device
- Troubleshooting
- Willkommen
- CoOTBeTCTBnE Tpe6oBaHnIaFCC:
- CodepkaHue
- 3oHa deiCTBnIyIbTa
- Hauano pa6oTbI
- 3apraKa yctpoiCTBa
- CД-индикaTop 3apяdkn
- BknoueHne/BbIKnOueHne npoeKtopa
- PerynpoBka 0okyca B 3aBncmocTn OT daNbHOCTn npoeunpoBaHna
- 2.RpkocTb
- Pexim npoeunpoBaHna (obekTnBa)
- g k g j 8
- a
Brand : AIPTEK
Model : PocketCinema N100
Category : Projector