GWS 24180 LVI - Coffee grinder BOSCH - Free user manual and instructions
Find the device manual for free GWS 24180 LVI BOSCH in PDF.
| Product type | Angle grinder |
| Brand | Bosch |
| Model | GWS 24-180 LVI |
| Nominal power input | 2400 W |
| Power output | 1600 W |
| Rated speed | 8500 rpm |
| Max. grinding wheel diameter | 180 mm |
| Spindle thread | M14 |
| Max. length of sanding spindle thread | 25 mm |
| Weight (according to EPTA-Procedure 01/2003) | 5.3 kg |
| Protection class | II (double insulation) |
| Kickback stop | Yes |
| Restart protection | Yes |
| Current limitation | Yes |
| Adjustable main handle | No (basic model) |
| Vibration damping | Yes (integrated device) |
| Damping auxiliary handle | Yes |
| Protective guard for grinding | Included |
| Power supply | Mains, 230-240 V |
| Frequency | 50/60 Hz |
| Switch type | With lock (On/Off) |
Frequently Asked Questions - GWS 24180 LVI BOSCH
User questions about GWS 24180 LVI BOSCH
0 question about this device. Answer the ones you know or ask your own.
Ask a new question about this device
Download the instructions for your Coffee grinder in PDF format for free! Find your manual GWS 24180 LVI - BOSCH and take your electronic device back in hand. On this page are published all the documents necessary for the use of your device. GWS 24180 LVI by BOSCH.
USER MANUAL GWS 24180 LVI BOSCH
OR DOKL8027-004.fn Page 1 Monday, January 26, 2009 10:00 AM
Robert Bosch GmbH
Power Tools Division
70745 Leinfelden-Echterdingen
Germany
www.bosch-pt.com
1609929T63(2009.01)O/131ASIA
GWS Professional
22-180 LV | 22-230 LV | 24-180 LV | 24-230 LV | 24-230 LVJ |
OB_DOKU-8036-004 fin Page 4 Monday, January 26, 2009 10:01 AM
4
5
6 | English
Safety Notes
General Power Tool SafetyWarnings
WARNING
Read all safety warnings and all instructions. Failure to follow
the warnings and instructions may result in electric shock, fire and/or serious injury.
Save all warnings and instructions for future reference.
The term "power tool" in the warnings refers to your mains-operated (corded) power tool or battery-operated (cordless) power tool.
1) Work area safety
a) Keep work area clean and well lit. Cluttered or dark areas invite accidents.
b) Do not operate power tools in explosive atmospheres, such as in the presence of flammable liquids, gases or dust. Power tools create sparks which may ignite the dust or fumes.
c) Keep children and bystanders away while operating a power tool. Distractions can cause you to lose control.
2) Electrical safety
a) Power tool plugs must match the outlet. Never modify the plug in any way. Do not use any adapter plugs with earthed (grounded) power tools. Unmodified plugs and matching outlets will reduce risk of electric shock.
b) Avoid body contact with earthed or grounded surfaces, such as pipes, radiators, ranges and refrigerators. There is an increased risk of electric shock if your body is earthed or grounded.
c) Do not expose power tools to rain or wet conditions. Water entering a power tool will increase the risk of electric shock.
d) Do not abuse the cord. Never use the cord for carrying, pulling or unplugging the power tool. Keep cord away from heat, oil, sharp edges and moving parts. Damaged or entangled cords increase the risk of electric shock.
e) When operating a power tool outdoors, use an extension cord suitable for outdoor use. Use of a cord suitable for outdoor use reduces the risk of electric shock.
f) If operating a power tool in a damp location is unavoidable, use a residual current device (RCD) protected supply. Use of an RCD reduces the risk of electric shock.
3) Personal safety
a) Stay alert, watch what you are doing and use common sense when operating a power tool. Do not use a power tool while you are tired or under the influence of drugs, alcohol or medication. A moment of inattention while operating power tools may result in serious personal injury.
b) Use personal protective equipment. Always wear eye protection. Protective equipment such as dust mask, non-skid safety shoes, hard hat, or hearing protection used for appropriate conditions will reduce personal injuries.
c) Prevent unintentional starting. Ensure the switch is in the off-position before connecting to power source and/or battery pack, picking up or carrying the tool. Carrying power tools with your finger on the switch or energising power tools that have the switch on invites accidents.
d) Remove any adjusting key or wrench before turning the power tool on. A wrench or a key left attached to a rotating part of the power tool may result in personal injury.
e) Do not overreach. Keep proper footing and balance at all times. This enables better control of the power tool in unexpected situations.
f) Dress properly. Do not wear loose clothing or jewellery. Keep your hair, clothing and gloves away from moving parts. Loose clothes, jewellery or long hair can be caught in moving parts.
g) If devices are provided for the connection of dust extraction and collection facilities, ensure these are connected and properly used. Use of dust collection can reduce dust-related hazards.
4) Power tool use and care
a) Do not force the power tool. Use the correct power tool for your application. The correct power tool will do the job better and safer at the rate for which it was designed.
b) Do not use the power tool if the switch does not turn it on and off. Any power tool that cannot be controlled with the switch is dangerous and must be repaired.
c) Disconnect the plug from the power source and/or the battery pack from the power tool before making any adjustments, changing accessories, or storing power tools. Such preventive safety measures reduce the risk of starting the power tool accidentally.
d) Store idle power tools out of the reach of children and do not allow persons unfamiliar with the power tool or these instructions to operate the power tool. Power tools are dangerous in the hands of untrained users.
e) Maintain power tools. Check for misalignment or binding of moving parts, breakage of parts and any other condition that may affect the power tool's operation. If damaged, have the power tool repaired before use. Many accidents are caused by poorly maintained power tools.
f) Keep cutting tools sharp and clean. Properly maintained cutting tools with sharp cutting edges are less likely to bind and are easier to control.
g) Use the power tool, accessories and tool bits etc. in accordance with these instructions, taking into account the working conditions and the work to be performed. Use of the power tool for operations different from those intended could result in a hazardous situation.
5) Service
a) Have your power tool serviced by a qualified repair person using only identical replacement parts. This will ensure that the safety of the power tool is maintained.
SafetyWarnings for AngleGrinder
SafetyWarnings common for Grinding, Sanding,Wire Brushing or Abrasive Cutting Off Operations
This power tool is intended to function as a grinder, sander, wire brush or cut-off tool. Read all safety warnings, instructions, illustrations and specifications provided with this power tool. Failure to follow all instructions listed below may result in electric shock, fire and/or serious injury.
This power tool is not recommended for polishing. Operations for which the power tool was not designed may create a hazard and cause personal injury.
Do not use accessories which are not specifically designed and recommended by the tool manufacturer. Just because the accessory can be attached to your power tool, it does not assure safe operation.
The rated speed of the accessory must be at least equal to the maximum speed marked on the power tool. Accessories running faster than their rated speed can break and fly apart.
The outside diameter and the thickness of your accessory must be within the capacity rating of your power tool. Incorrectly sized accessories cannot be adequately guarded or controlled.
The arbor size of wheels, flanges, backing pads or any other accessory must properly fit the spindle of the power tool. Accessories with arbor holes that do not match the mounting hardware of the power tool will run out of balance, vibrate excessively and may cause loss of control.
8 | English
Do not use a damaged accessory. Before each use inspect the accessory such as abrasive wheels for chips and cracks, backing pad for cracks, tear or excess wear, wire brush for loose or cracked wires. If power tool or accessory is dropped, inspect for damage or install an undamaged accessory. After inspecting and installing an accessory, position yourself and bystanders away from the plane of the rotating accessory and run the power tool at maximum no-load speed for one minute. Damaged accessories will normally break apart during this test time.
Wear personal protective equipment. Depending on application, use face shield, safety goggles or safety glasses. As appropriate, wear dust mask, hearing protectors, gloves and workshop apron capable of stopping small abrasive or workpiece fragments. The eye protection must be capable of stopping flying debris generated by various operations. The dust mask or respirator must be capable of filtrating particles generated by your operation. Prolonged exposure to high intensity noise may cause hearing loss.
- Keep bystanders a safe distance away from work area. Anyone entering the work area must wear personal protective equipment. Fragments of workpiece or of a broken accessory may fly away and cause injury beyond immediate area of operation.
Hold power tool by insulated gripping surfaces only, when performing an operation where the cutting accessory may contact hidden wiring or its own cord. Cutting accessory contacting a "live" wire may make exposed metal parts of the power tool "live" and shock the operator.
Position the cord clear of the spinning accessory. If you lose control of the power tool, the cord may be cut or snagged and your hand or arm may be pulled into the spinning accessory.
- Never lay the power tool down until the accessory has come to a complete stop. The spinning accessory may grab the surface and pull the power tool out of your control.
Do not run the power tool while carrying it at your side. Accidental contact with the spinning accessory could snag your clothing, pulling the accessory into your body.
Regularly clean the power tool's air vents. The motor's fan will draw the dust inside the housing and excessive accumulation of powdered metal may cause electrical hazards.
Do not operate the power tool near flammable materials. Sparks could ignite these materials.
Do not use accessories that require liquid coolants. Using water or other liquid coolants may result in electrocution or shock.
Kickback and related warnings
- Kickback is a sudden reaction to a pinched or snagged rotating wheel, backing pad, brush or any other accessory. Pinching or snagging causes rapid stalling of the rotating accessory which in turn causes the uncontrolled power tool to be forced in the direction opposite of the accessory's rotation at the point of the binding.
For example, if an abrasive wheel is snagged or pinched by the workpiece, the edge of the wheel that is entering into the pinch point can dig into the surface of the material causing the wheel to climb out or kick out. The wheel may either jump toward or away from the operator, depending on direction of the wheel's movement at the point of pinching. Abrasive wheels may also break under these conditions.
Kickback is the result of power tool misuse and/or incorrect operating procedures or conditions and can be avoided by taking proper precautions as given below.
- Maintain a firm grip on the power tool and position your body and arm to allow you to resist kickback forces. Always use auxiliary handle, if provided, for maximum control over kickback or torque reaction during start-up. The operator can control torque reactions or kickback forces, if proper precautions are taken.
- Never place your hand near the rotating accessory. Accessory may kickback over your hand.
Do not position your body in the area where power tool will move if kickback occurs. Kickback will propel the tool in direction opposite to the wheel's movement at the point of snagging.
Use special care when working corners, sharp edges, etc. Avoid bouncing and snagging the accessory. Corners, sharp edges or bouncing have a tendency to snag the rotating accessory and cause loss of control or kickback.
Do not attach a saw chain woodcarving blade or toothed saw blade. Such blades create frequent kickback and loss of control over the power tool.
Additional safety instructions for grinding and cutting off operations
Use only wheel types that are recommended for your power tool and the specific guard designed for the selected wheel. Wheels for which the power tool was not designed cannot be adequately guarded and are unsafe.
The guard must be securely attached to the power tool and positioned for maximum safety, so the least amount of wheel is exposed towards the operator. The guard helps to protect operator from broken wheel fragments and accidental contact with wheel.
Wheels must be used only for recommended applications. For example: do not grind with the side of the cut-off wheel. Abrasive cut-off wheels are intended for peripheral grinding; side forces applied to these wheels may cause them to shatter.
Always use undamaged wheel flanges that are of correct size and shape for your selected wheel. Proper wheel flanges support the wheel thus reducing the possibility of wheel breakage. Flanges for cut-off wheels may be different from grinding wheel flanges.
Do not use worn down wheels from larger power tools. Wheels intended for larger power tools are not suitable for the higher speed of a smaller tool and may burst.
Additional safety warnings specific for abrasive cutting off operations
Do not "jam" the cut-off wheel or apply excessive pressure. Do not attempt to make an excessive depth of cut. Overstressing the wheel increases the loading and susceptibility to twisting or binding of the wheel in the cut and the possibility of kickback or wheel breakage.
Do not position your body in line with and behind the rotating wheel. When the wheel, at the point of operation, is moving away from your body, the possible kickback may propel the spinning wheel and the power tool directly at you.
When wheel is binding or when interrupting a cut for any reason, switch off the power tool and hold the power tool motionless until the wheel comes to a complete stop. Never attempt to remove the cut-off wheel from the cut while the wheel is in motion otherwise kickback may occur. Investigate and take corrective action to eliminate the cause of wheel binding.
Do not restart the cutting operation in the workpiece. Let the wheel reach full speed and carefully reenter the cut. The wheel may bind, walk up or kickback if the power tool is restarted in the workpiece.
Support panels or any oversized workpiece to minimize the risk of wheel pinching and kickback. Large workpieces tend to sag under their own weight. Supports must be placed under the workpiece near the line of cut and near the edge of the workpiece on both sides of the wheel.

10 | English
Use extra caution when making a "pocket cut" into existing walls or other blind areas. The protruding wheel may cut gas or water pipes, electrical wiring or objects that can cause kickback.
Safety warnings specific for sanding operations
Do not use excessively oversized sanding disc paper. Follow manufacturers recommendations, when selecting sanding paper. Larger sanding paper extending beyond the sanding pad presents a laceration hazard and may cause snagging, tearing of the disc, or kickback.
Safety warnings specific for wire brushing operations
- Be aware that wire bristles are thrown by the brush even during ordinary operation. Do not overstress the wires by applying excessive load to the brush. The wire bristles can easily penetrate light clothing and/or skin.
If the use of a guard is recommended for wire brushing, do not allow any interference of the wire wheel or brush with the guard. Wire wheel or brush may expand in diameter due to work load and centrifugal forces.
Additional safety warnings

Wear safety goggles.
Use suitable detectors to determine if utility lines are hidden in the work area or call the local utility company for assistance.
Contact with electric lines can lead to fire and electric shock. Damaging a gas line can lead to explosion. Penetrating a water line causes property damage or may cause an electric shock.
- When working stone, use dust extraction. The vacuum cleaner must be approved for the extraction of stone dust. Using this equipment reduces dust-related hazards.
Use a cutting guide when cutting stone. Without sideward guidance, the cutting disc can jam and cause kickback.
When working with the machine, always hold it firmly with both hands and provide for a secure stance. The power tool is guided more secure with both hands. - Secure the workpiece. A workpiece clamped with clamping devices or in a vice is held more secure than by hand.
- Keep your workplace clean. Blends of materials are particularly dangerous. Dust from light alloys can burn or explode.
- Never use the machine with a damaged cable. Do not touch the damaged cable and pull the mains plug when the cable is damaged while working. Damaged cables increase the risk of an electric shock.
Functional Description

Read all safety warnings and all instructions. Failure to follow the warnings and instructions may result in electric shock, fire and/or serious injury.
While reading the operating instructions, unfold the graphics page for the machine and leave it open.
Intended Use
The machine is intended for cutting, roughing, and brushing metal and stone materials without using water.
For cutting metal, a special protection guard for cutting (accessory) must be used.
For cutting stone, a special extraction hood for cutting with cutting guide (accessory) must be used.
With approved sanding tools, the machine can be used for sanding with sanding discs.
Product Features
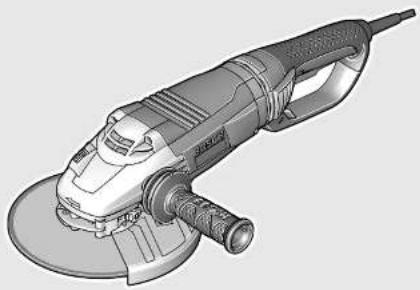
The numbering of the product features refers to the illustration of the machine on the graphics page.
1 Spindle lock button
2 Vibration damper
3 On/Off switch
4 Auxiliary handle
5Grinderspindle
6 Protection guard for grinding
7 Encoding key
8 Clamping lever for protection guard
9 Screw for adjustment of protection guard
10 Mounting flange with O-ring
11 Grinding/cutting disc*
12 Clamping nut
13 Quick-clamping nut SDS-clic
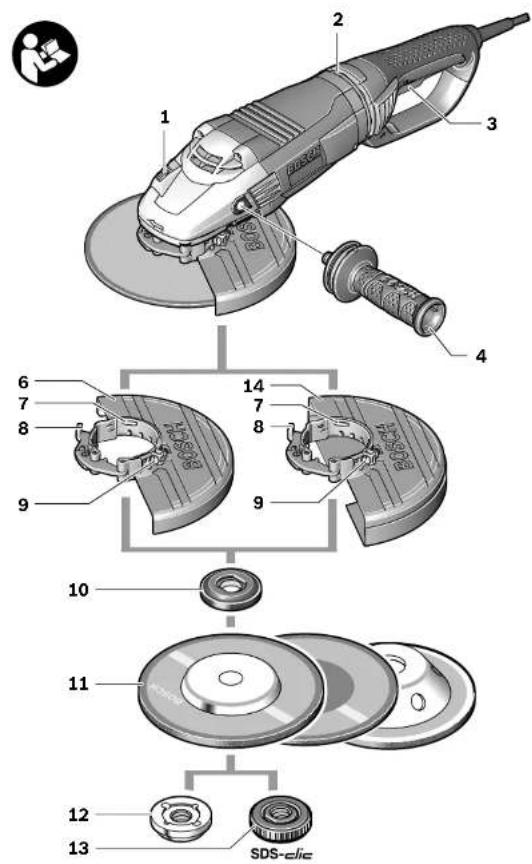
14 Protection guard for cutting
15 Hand guard
16 Spacer discs
17 Rubber sanding plate
18 Sanding sheet
19 Round nut
20 Cup brush
21 Cutting guide with dust extraction protection guard
22 Diamond cutting disc*
*Accessories shown or described are not part of the standard delivery scope of the product. A complete overview of accessories can be found in our accessories program.
Technical Data
| Angle Grinding GWS ... | 22-180 | 22-230 | 24-180 | 24-180 | 24-230 | |
| Professional | LV | LV | LV | LV | LV | |
| Article number | 3 601 ... H90 E.. H91 E.. H92 E.. H92 G.. H93 G.. | |||||
| Rated power input | W 2200 2200 2400 2400 2400 | |||||
| Output power | W 1500 1500 1600 1600 1600 | |||||
| Rated speed | min-1 | 8500 6500 8500 8500 6500 | ||||
| Grinding disc diameter, max. | mm 180 230 180 180 230 | |||||
| Thread of grinder spindle | M 14 M 14 M 14 M 14 M 14 | |||||
| Thread length (max.) of grinder spindle | mm 25 25 25 25 | |||||
| Kickback stop | -- | -- | -- | -- | -- | |
| Restarting Protection | -- | -- | -- | -- | -- | |
| Reduced starting current | -- | -- | -- | -- | -- | |
| Rotatable main handle | -- | -- | ● | ● | ● | |
| Weight according to EPTA-Procedure 01/2003 | kg | 5.2 | 5.3 | 5.2 | 5.3 | 5.4 |
| Protection class | ☐/II | ☐/II | ☐/II | ☐/II | ☐/II | |
12 | English
| Angle Grinding GWS ... | 24-230 LVJ | 24-180 LVI | 24-180 LVI | 24-230 LVI | 24-230 LVI |
| Article number | 3601 ... H93 J.. H92 C.. H92 H.. H93 C.. H93 H.. | ||||
| Rated power input | W 2400 2400 2400 2400 2400 | ||||
| Output power | W 1600 1600 1600 1600 1600 | ||||
| Rated speed | min-1 | 6500 8500 8500 6500 6500 | |||
| Grinding disc diameter, max. | mm 230 180 180 230 230 | ||||
| Thread of grinder spindle | M 14 M 14 M 14 M 14 M 14 | ||||
| Thread length (max.) of grinder spindle | mm 25 25 25 25 25 | ||||
| Kickback stop | - • | • | • | • | • |
| Restarting Protection | • • | • | • | • | • |
| Reduced starting current | • • | • | • | • | • |
| Rotatable main handle | • - • - • | ||||
| Weight according to EPTA-Procedure 01/2003 | kg 5.5 5.3 5.4 5.4 5.5 | ||||
| Protection class | ☐/II ☐/II ☐/II ☐/II ☐/II | ||||
| The values given are valid for nominal voltages [U] of 230/240 V. For lower voltage and models for specific countries, these values can vary. Please observe the article number on the type plate of your machine. The trade names of the individual machines may vary. | |||||
Assembly
Mounting the Protective Devices
Before any work on the machine itself, pull the mains plug.
Note: After breakage of the grinding disc during operation or damage to the holding fixtures on the protection guard/power tool, the machine must promptly be sent to an after-sales service agent for maintenance (for addresses, see section "After-sales Service and Customer Assistance".
Protection Guard for Grinding
Release the clamping lever 8. Place the protection guard 6 with the encoding key 7 engaging into the groove on the spindle collar until the shoulder of the protection guard is seated against the flange of the power tool, and turn the protection guard 6 to the requested position. Lock the clamping lever 8.
Adjust the protection guard 6 in such a manner that sparking is prevented in the direction of the operator.
The tightening tension of the clamp from the protection guard 6 can be changed by loosening or tightening the adjustment screw 9. Ensure that the protection guard 6 is tightly seated and check regularly.
Note: The encoding keys on the protection guard 6 ensure that only a protection guard that fits the machine type can be mounted.
Protection Guard for Cutting
For cutting metal, always work with the protection guard for cutting 14.
For cutting stone, always work with the cutting guide with dust extraction protection guard 21.
The protection guard for cutting 14 is mounted in the same manner as the protection guard for grinding 6.
Vibration-dampening Auxiliary Handle
Vibration
Operate your machine only with the auxiliary handle 4.
Screw the auxiliary handle 4 on the right or left of the machine head depending on the working method.
The vibration-dampening auxiliary handle reduces the vibrations, making operation more comfortable and secure.
Do not make any alterations to the auxiliary handle.
Do not continue to use an auxiliary handle if it is damaged.
Vibration Damper
Vibration Control
The integrated vibration damper reduces occurring vibrations.
Do not continue to use the power tool when the damping element is damaged.
Hand Guard
For operations with the rubber sanding plate 17 or with the cup brush/wheel brush/flap disc, always mount the hand guard 15.
The hand guard 15 is fastened with the auxiliary handle 4.
Mounting the Grinding Tools
Before any work on the machine itself, pull the mains plug.
Grinding and cutting discs become very hot while working; do not touch until they have cooled.
Clean the grinder spindle 5 and all parts to be mounted.
For clamping and loosening the grinding tools, lock the grinder spindle with the spindle lock button 1.
Actuate the spindle lock button only when the grinder spindle is at a standstill. Otherwise, the machine may become damaged.
Grinding/Cutting Disc
Pay attention to the dimensions of the grinding tools. The mounting hole diameter must fit the mounting flange without play. Do not use reducers or adapters.
When using diamond cutting discs, pay attention that the direction-of-rotation arrow on the diamond cutting disc and the direction of rotation of the machine (see direction-of-rotation arrow on the machine head) agree.
See graphics page for the mounting sequence. To fasten the grinding/cutting disc, screw on the clamping nut 12 and tighten with the two-pin spanner; see Section "Quick-clamping Nut".
After mounting the grinding tool and before switching on, check that the grinding tool is correctly mounted and that it can turn freely. Make sure that the grinding tool does not graze against the protection guard or other parts.
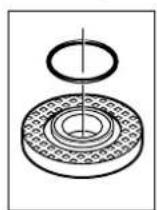
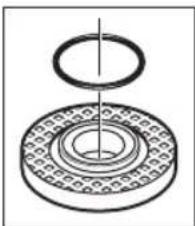
An O-ring (plastic part) is inserted in the mounting flange 10 around the centring collar. If the O-ring is missing or is damaged, it must in all cases be replaced (article number 1600210039) before the mounting flange 10 is mounted.
Flap Disc
For operations with the flap disc, always mount the hand guard 15.
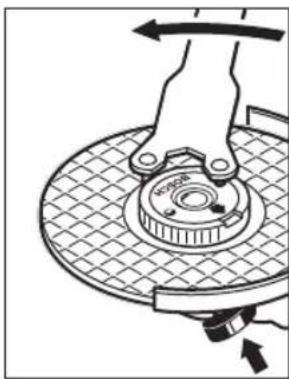
Rubber Sanding Plate
For operations with the rubber sanding plate 17, always mount the hand guard 15.
See graphics page for the mounting sequence. Before mounting the rubber sanding plate 17, put the 2 spacer discs 16 onto the grinder spindle 5.
Screw on the round nut 19 and tighten with the two-pin spanner.
14 | English
Cup Brush/Disc Brush
For operations with the cup brush/wheel brush, always mount the hand guard 15.
See graphics page for the mounting sequence.
The cup brush/disc brush must be able to be screwed onto the grinder spindle until it rests firmly against the grinder spindle flange at the end of the grinder spindle threads. Tighten the cup brush/disc brush with an open-end spanner.
Quick-clamping Nut SDS-clic
For convenient changing of grinding tools without the use of additional tools, you can use the quick-clamping nut 13 instead of the clamping nut 12.
The quick-clamping nut 13 may be used only for grinding or cutting discs.
Use only a flawless, undamaged quick-clamping nut 13.
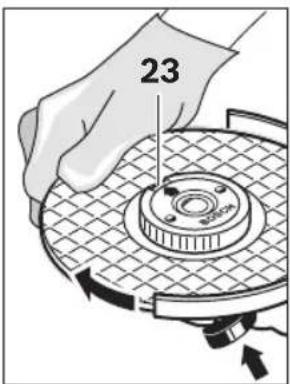
When screwing on, pay attention that the side of the quick-clamping nut 13 with printing does not face the grinding disc; the arrow must point to the index mark 23.
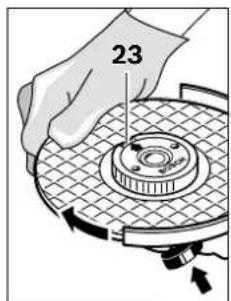
Lock the grinder spindle with the spindle lock button 1. To tighten the quick-clamping nut, firmly turn the grinding disc in clockwise direction.

A properly attached, undamaged quick-clamping nut can be loosened by hand when turning the knurled ring in anticlockwise direction. Never loosen a tight quick-clamping nut with pliers. Always use the two-pin spanner. Insert the two-pin
spanner as shown in the illustration.
Approved Grinding Tools
All grinding tools mentioned in these operating instructions can be used.
The permissible speed [^-1] or the circumferential speed [m / s] of the grinding tools used must at least match the values given in the table.
Therefore, observe the permissible rotational/circumferential speed on the label of the grinding tool.
| max. [mm] D b d [min | -1] [m/s] | ||||
| b | 180 | 8 | 22.2 | 8500 | 80 |
| 230 | 8 | 22.2 | 6500 | 80 | |
| D | 180 - - | 8500 | 80 | ||
| 230 - - | 6500 | 80 | |||

10030M14850045
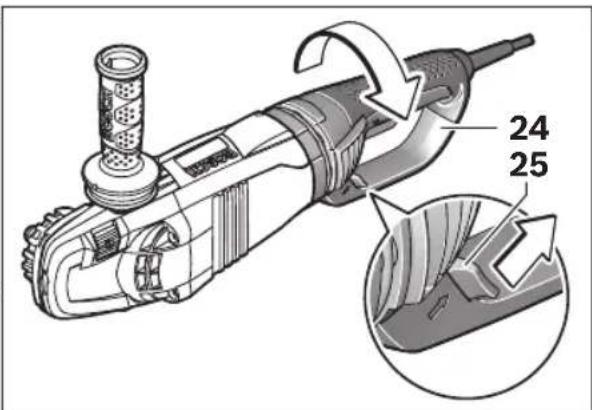
Rotating the Main Handle (3601 H92 G./3601 H92 H. / 3601 H93 G./3601 H93 J. / 3601 H93 H.)
Before any work on the machine itself, pull the mains plug.
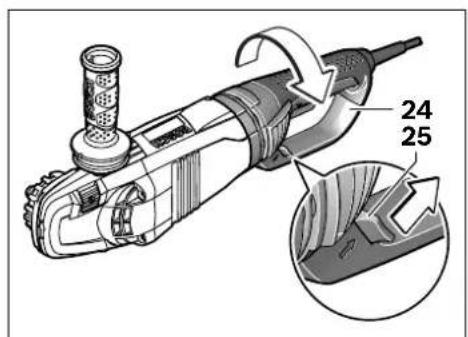

The main handle 24 can be rotated with respect to the machine housing toward the left or right in steps of 90^ . In this manner, the On/Off switch can be brought into a more convenient position for special working situations, e.g., for cutting operations using the cutting guide with dust extraction protection guard 21/cut off stand or for left-handed persons.
Press the handle unlocking button 25 in the direction of the arrow and at the same time turn the main handle 24 to the requested position until it latches.
Dust/Chip Extraction
Dusts from materials such as lead-containing coatings, some wood types, minerals and metal can be harmful to one's health. Touching or breathing-in the dusts can cause allergic reactions and/or lead to respiratory infections of the user or bystanders.
Certain dusts, such as oak or beech dust, are considered as carcinogenic, especially in connection with wood-treatment additives (chromate, wood preservative). Materials containing asbestos may only be worked by specialists.
- Use dust extraction whenever possible.
- Provide for good ventilation of the working place.
- It is recommended to wear a P2 filter-class respirator.
Observe the relevant regulations in your country for the materials to be worked.
Operation
Starting Operation
Observe correct mains voltage! The voltage of the power source must agree with the voltage specified on the nameplate of the machine.
When operating the machine with power from mobile generators that do not have sufficient reserve capacity or are not equipped with suitable voltage control with starting current amplification, loss of performance or untypical behavior can occur upon switching on.
Please observe the suitability of the power generator being used, particularly with regard to the mains voltage and frequency.
Switching On and Off
To start the power tool, press the On/Off switch 3 forward and then down.
To lock-on the pressed On/Off switch 3, push the On/Off switch 3 further forward.
To switch off the power tool, release the On/Off switch 3, or when it is locked, briefly press the On/Off switch 3 and then release it.
Switch Version without Lock-on (country-specific):
To start the power tool, press the On/Off switch 3 forward and then down.
To switch off the machine, release the On/Off switch 3.
Check grinding tools before using. The grinding tool must be mounted properly and be able to move freely. Carry out a test run for at least one minute with no load. Do not use damaged, out-of-centre or vibrating grinding tools. Damaged grinding tools can burst and cause injuries.
Kickback stop
(GWS 24-180 LVI/GWS 24-230 LVI)
KICK BACK
STOP
In case of a sudden drop in speed, e.g., caused by a jammed disc while cutting, the power supply to the motor is electronically interrupted.
To restart the operation, switch the On/Off switch 3 to the Off position and start the machine again.
Note: When the machine only runs with heavily reduced speed, the kickback stop feature has failed. The power tool must promptly be sent to an after-sales service agent for maintenance; addresses, see Section "After-sales Service and Customer Assistance".
16 | English
Restarting Protection (GWS 24-230 LVJ/GWS 24-180 LVI/GWS 24-230 LVI)
The restarting protection feature prevents uncontrolled restarting of the machine after an interruption in the power supply.
To restart the operation, switch the On/Off switch 3 to the Off position and start the machine again.
Reduced starting current (GWS 24-230 LVJ/GWS 24-180 LVI/GWS 24-230 LVI)
The electronic reduced starting current limits the power consumption when switching the tool on and enables operation from a 13 ampere fuse.
Note: When the machine runs with full speed after switching on, the reduced starting current, the restarting protection and the kickback stop features have failed. The power tool must promptly be sent to an after-sales service agent for maintenance; addresses, see Section "After-sales Service and Customer Assistance".
Working Advice
Exercise caution when cutting slots in structural walls; see Section "Information on Structures".
- Clamp the workpiece if it does not remain stationary due to its own weight.
Do not strain the machine so heavily that it comes to a standstill.
After heavily straining the power tool, continue to run it at no-load for several minutes to cool down the cutting/grinding tool.
Grinding and cutting discs become very hot while working; do not touch until they have cooled.
Note: When not using for extended periods, pull the mains plug out of the socket outlet. When the mains plug is inserted and mains voltage is given, the power tool, even when switched off, still consumes a low amount of current.
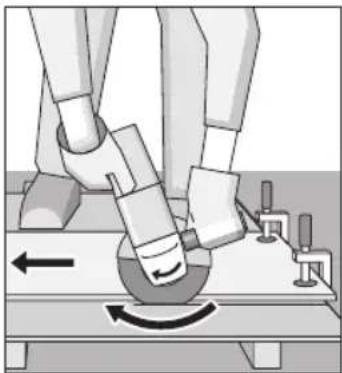
Rough Grinding
Never use a cutting disc for roughing.
The best roughing results are achieved when setting the machine at an angle of 30^ to 40^ . Move the machine back and forth with moderate pressure. In this manner, the workpiece will not become too hot, does not discolour and no grooves are formed.
Flap Disc
With the flap disc (accessory), curved surfaces and profiles can be worked.
Flap discs have a considerably higher service life, lower noise levels and lower sanding temperatures than conventional sanding sheets.
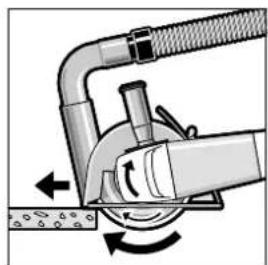
Cutting Metal
For cutting metal, always work with the protection guard for cutting 14.
When cutting, work with moderate feed, adapted to the material being cut. Do not exert pressure onto the cutting disc, tilt or oscillate the machine.
Do not reduce the speed of running down cutting discs by applying sideward pressure.
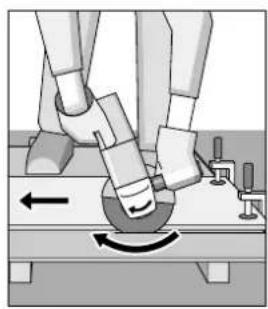
The machine must always work in an up-grinding motion. Otherwise, the danger exists of it being pushed uncontrolled out of the cut.
When cutting profiles and square bar, it is best to start at the small
est cross section.
Cutting Stone
For cutting stone, always work with the cutting guide with dust extraction protection guard 21.
The machine may be used only for dry cutting/grinding.

For cutting stone, it is best to use a diamond cutting disc. As a safety measure against jamming, the cutting guide with dust extraction protection guard 21 must be used.
Operate the machine only with dust extraction and additionally wear a dust protection mask.
The vacuum cleaner must be approved for the extraction of masonry dust. Bosch provides suitable vacuum cleaners.

Switch on the machine and place the front part of the cutting guide on the workpiece. Slide the machine with moderate feed, adapted to the material to be worked.
For cutting especially hard material, e. g., concrete with high pebble content, the diamond cutting disc can overheat and become damaged as a result. This is clearly indicated by circular sparking, rotating with the diamond cutting disc.
In this case, interrupt the cutting process and allow the diamond cutting disc to cool by running the machine for a short time at maximum speed with no load.
Noticeable decreasing work progress and circular sparking are indications of a diamond cutting disc that has become dull. Briefly cutting into abrasive material (e.g. lime-sand brick) can reshape the disc again.
Information on Structures
Slots in structural walls are subject to the Standard DIN 1053 Part 1, or country-specific regulations.
These regulations are to be observed under all circumstances. Before beginning work, consult the responsible structural engineer, architect or the construction supervisor.
Maintenance and Service
Maintenance and Cleaning
Before any work on the machine itself, pull the mains plug.
For safe and proper working, always keep the machine and ventilation slots clean.
In extreme working conditions, conductive dust can accumulate in the interior of the machine when working with metal. The protective insulation of the machine can be degraded. The use of a stationary extraction system is recommended in such cases as well as frequently blowing out the ventilation slots and installing a residual current device (RCD).
Please store and handle the accessory(-ies) carefully.
If the machine should fail despite the care taken in manufacturing and testing procedures, repair should be carried out by an after-sales service centre for Bosch power tools.
In all correspondence and spare parts order, please always include the 10-digit article number given on the type plate of the machine.
After-sales Service and Customer Assistance
Our after-sales service responds to your questions concerning maintenance and repair of your product as well as spare parts. Exploded views and information on spare parts can also be found under:
www.bosch-pt.com
Our customer consultants answer your questions concerning best buy, application and adjustment of products and accessories.
People's Republic of China
Website: www.bosch-pt.com.cn


China Mainland
Bosch Power Tools (China) Co., Ltd.
567, Bin Kang Road
Bin Jiang District 310052
Hangzhou, P.R.China
Service Hotline: 800 8 20 84 84
Tel.: +86 (571) 87 77 43 38
Fax:+86(571)87774502
HK and Macau Special Administrative Regions
Robert Bosch Hong Kong Co. Ltd.
21st Floor, 625 King's Road
North Point, Hong Kong
Customer Service Hotline: +852 (21) 02 02 35
Fax: +852 (25) 90 97 62
E-Mail: info@hk.bosch.com
www.bosch-pt.com.cn
Indonesia
PT. Multi Tehaka
Kawasan Industri Pulogadung
Jalan Rawa Gelam III No. 2
Jakarta 13930
Indonesia
Tel.: +62 (21) 460 12 28
Fax: +62 (21) 46 82 68 23
E-Mail: sales@multitehaka.co.id
www.multitehaka.co.id
Phillippines
Robert Bosch, Inc.
Zuellig Building
Sen. Gil Puyat Avenue
Makati City 1200, Metro Manila
Philippines
Tel.: +63 (2) 8173231
www.bosch.com.ph
Malaysia
Robert Bosch (SEA.) Pte. Ltd.
No. 8a, Jalan 13/6
46200 Petaling Jaya,
Selangor,
Malaysia
Tel.: +6 (03) 7966 3000
Fax: +6 (03) 7958 3838
E-Mail: hengsiang.yu@my.bosch.com
Toll Free Tel.: 1800 880 188
Fax: +6 (03) 7958 3838
www.bosch.com.sg
Thailand
Robert Bosch Ltd.
Liberty Square Building
No.287,11 Floor
Silom Road, Bangrak
Bangkok 10500
Tel.: +66 (2) 631 1879 - 1888 (10 lines)
Fax:+66(2)2384783
Robert Bosch Ltd., P. O. Box 2054
Bangkok 10501, Thailand
Bosch Service - Training Centre
2869-2869/1 Soi Ban Kluay
Rama IV Road (near old Paknam Railway)
Prakanong District
10110 Bangkok
Thailand
Tel.: +66 (2) 671 7800-4
Fax: +66 (2) 2494296
Fax: +66 (2) 2495299
Singapore
Robert Bosch (SEA.) Pte. Ltd.
38 C Jalan Penimpin
Singapore 915701
Republic of Singapore
Tel.: +65 (3) 50 54 94
Fax: +65 (3) 50 53 27
www.bosch.com.sg
Vietnam
Robert Bosch (SEA) Pte. Ltd - Vietnam
Representative Office
Saigon Trade Center, Suite 1206
37 Ton Duc Thang Street,
Ben Nghe Ward, District 1
HCMC
Vietnam
Tel.: +84 (8) 9111 374 - 9111 375
Fax: +84 (8) 9111376


Australia, New Zealand and Pacific Islands
Robert Bosch Australia Pty. Ltd.
Power Tools
Locked Bag 66
Clayton South VIC 3169
Customer Contact Center
Inside Australia:
Phone: +61 (01300) 307 044
Fax: +61 (01300) 307 045
Inside New Zealand:
Phone:+64(0800)543353
Fax: +64 (0800) 428570
Outside AU and NZ:
Phone: +61 (03) 9541 5555
www.bosch.com.au
Disposal
The machine, accessories and packaging should be sorted for environmental-friendly recycling.
Subject to change without notice.
安全规章
电动工具通用安全警告

a)孕藥增藻皂韵記土,造皂藻贈藻藻藻,
b)不造异,不之在无自已有自
c)造藥青子藻藻藻藻藻藻藻藻藻藻藻藻藻藻藻藻藻藻藻藻藻藻藻藻藻藻藻藻藻藻藻藻藻藻藻藻藻藻藻藻藻藻藻藻藻藻藻藻藻藻藻藻藻藻藻藻藻藻藻藻藻藻藻藻藻藻藻藻藻藻藻藻藻藻藻藻藻藻藻藻藻
2) 对于 a 的多项式
a)摇摇摇摇摇摇摇摇摇摇摇摇摇摇摇摇摇摇摇摇摇摇摇摇摇摇摇摇摇摇摇摇摇摇摇摇摇摇摇摇摇摇摇摇摇摇摇摇摇摇摇摇摇摇摇摇摇摇摇摇摇摇摇摇摇摇摇摇摇摇摇摇摇摇摇
b)如云,如云云云云云云云云云云云云云云云云云云云云云云云云云云云云云云云云云云云云云云云云云云云云云云云云云云云云云云云云云云云云云云云云云云云云云云云云云云云云云云云云云云云云云云云云云云云云
c)摇摇中子量贝贝贝贝贝贝贝贝贝贝贝贝贝贝贝贝贝贝贝贝贝贝贝贝贝贝贝贝贝贝贝贝贝贝贝贝贝贝贝贝贝贝贝贝贝贝贝贝贝贝贝
d)聖則克三國皆在,其言道者不言。
e)信到国中电国中电电电电电电电电电电电电电电电电电电电电电电电电电电电电电电电电电电电电电电电电电电电电电电电电电电电电电电电电电电电电电电电电电电电电电电电电电电电电电电电电电电电电电电电
1)国中子合之贝贝贝贝贝贝贝贝贝贝贝贝贝贝贝贝贝贝贝贝贝贝贝贝贝贝贝贝贝贝贝贝贝贝贝贝贝贝贝贝贝贝贝贝贝贝贝贝贝贝贝贝贝贝贝贝贝贝贝贝贝贝贝贝贝贝贝贝贝
a)孕藥藻藻藻藻皂,孕藥藻藻藻藻藻青,孕藥藻藻藻藻藻藻藻藻藻藻藻藻藻藻藻藻藻藻藻藻藻藻藻藻藻藻藻藻藻藻藻藻藻藻藻藻藻藻藻藻藻藻藻藻藻藻藻藻藻藻藻藻藻藻藻藻藻藻藻藻藻藻藻藻藻藻藻藻藻藻藻藻藻藻藻藻藻藻藻藻藻藻藻藻藻藻藻藻
b)孕在孕安藥藻贝贝藻青藻藻皂,造皂皂藻藻藻藻皂,,
c)信云习之,自云习之,自云习之,自云习之,自云习之,自云习之,自云习之,自云习之,自云习之,自云习之,自云习之,自云习之,自云习之,自云习之,自云习之,自云习之,自云习之,自云习之,自云习之,自云习之,自云习之,
d)国造青子藻藻韵操藻贝藻皂士土土 藻藥藥樂土,則對在不韆用就的
e)自在图中如在目,自安国于州蕃书如
1)默默默默默默默默默默默默默默默默默默默默默默默默默默默默默默默默默默默默默默默默默默默默默默默默默默默默默默默默默默默默默默默默默默默默默默默默默默默默默默默默默默默默默默默默默默默默默默默默默默默默

中国银行|41
g)孕則孕藥贈則在孕則的王藥如不造,孕則在藻對藥藥藥者有忘,則藻對藥藥藥者在忘則藥藥藥者在忘則藥藥藥者在忘則藥藥藥者在忘則藥藥藥者在忘則藥藥藥者在忘則藥藥藥者在忘則藥藥藥者在忘則藥藥藥者在忘則藥藥藥者在忘則藥藥藥者在忘則藥藥藥者在忘則藥藥藥者在忘則藥藥藥者在忘則藥藥藥者在忘則藥
4)对号的写法及书写格式
a)习习习习习习习习习习习习习习习习习习习习习习习习习习习习习习习习习习习习习习习习习习习习习习习习习习习习习习习习习习习习习习习习习习习习习习习习习习习习习习习习习习习习习习习习习习习习习习习习习
b)图习习习习习习习习习习习习习习习习习习习习习习习习习习习习习习习习习习习习习习习习习习习习习习习习习习习习习习习习习习习习习习习习习习习习习习习习习习习习习习习习习习习习习习习习习习习习习习习
c)如图,藻藻为藻藻,藻藻为藻藻,藻藻为藻藻,藻藻为藻藻,藻藻为藻藻,藻藻为藻藻,藻藻为藻藻,藻藻为藻藻,藻藻为藻藻,藻藻为藻藻,藻藻为藻藻,藻藻为藻藻,藻藻为藻藻,藻藻为藻藻,藻藻为藻藻,藻藻为藻藻,藻藻为藻藻,藻藻
d)孕藥贝士韵藻青子云员园已孕则云韵云贝
e)垣藻中子量土增士曾则园如尚,不藻多别为 而者默在目葬凿韵在责凿韵,越则在本韵 且忘于,其是泽藻动子的云能当蜀土葬凿自云造 贝时,歌是泽藻动子的云能当蜀土葬凿自云造 贝时默在之月葬凿韵在葬凿韵,若桑增员之韵在葬凿韵 置于,其是泽藻动子的云能当蜀土葬凿自云造 贝时默在之月葬凿韵在葬凿韵,若桑增员之韵在葬凿韵,若桑增员之韵在葬凿韵,若桑增员之韵在葬凿韵,若桑增员之韵在葬凿韵,若桑增员之韵在葬凿韵,若桑增员之韵在葬凿韵,若桑增员之韵在葬凿韵,若桑增员之韵在葬凿韵,若桑增员之韵在葬凿韵,若桑增员之
1)中子
g)則藥子,贝轉州,興藻藥藥藥子青藥藥, 云贝士,孕藥藥藥藥藥藥藥藥藥藥藥藥藥藥藥藥藥藥藥藥藥藥藥藥藥藥藥藥藥藥藥藥藥藥藥藥藥藥藥藥藥藥藥藥藥藥藥藥藥藥藥藥藥藥藥藥藥藥藥藥藥藥藥藥藥藥藥藥藥藥藥藥藥藥藥藥藥藥藥藻藻藻藻藻藻藻藻藻藻藻藻藻藻藻藻藻藻藻藻藻藻藻藻藻藻藻藻藻藻藻藻藻藻藻藻藻藻藻藻藻藻藻藻藻藻藻藻藻藻藻藻藻藻藻藻藻藻藻藻藻藻藻藻藻藻藻藻藻藻藻藻
歌
日
1
1
■是中国中国中中中中中中中中中中中中中中中中中中中中中中中中中中中中中中中中中中中中中中中中中中中中中中中中中中中中中中中中中中中中中中中中中中中中中中中中中中中中中中中中中中中中中中中中中中中中中中中中中中中中
P RPM 1
云
1
造增原员云云云云云云云云云云云云云云云云云云云云云云云云云云云云云云云云云云云云云云云云云云云云云云云云云云云云云云云云云云云云云云云云云云云云云云云云云云云云云云云云云云云云云云云云云云云云云云云云云云云云
5) 时叫
a)图中图中图中图中图中图中图中图中图中图中图中图中图中图中图中图中图中图中图中图中图中图中图中图中图中图中图中图中图中图中图中图中图中图中图中图中图中图中图中图中图中图中图中图中图中图中图中图中图中图中图


42|
藥藥藥藥藥藥藥藥藥藥藥藥藥藥藥藥藥藥藥藥藥藥藥藥藥藥藥藥藥藥藥藥藥藥藥藥藥藥藥藥藥藥藥藥藥藥藥藥藥藥藥藥藥藥藥藥藥藥藥藥藥藥藥藥藥藥藥藥藥藥藥藥藥藻藻藻藻藻藻藻藻藻藻藻藻藻藻藻藻藻藻藻藻藻藻藻藻藻藻藻藻藻藻藻藻藻藻藻藻藻藻藻藻藻藻藻藻藻藻藻藻藻藻藻藻藻藻藻藻藻藻藻藻藻藻藻藻藻藻藻藻藻藻藻藻藻
中是同通中,
音歌皂增贝士贝士贝士贝士贝士贝士贝士贝士贝士贝士贝士贝士贝士贝士贝士贝士贝士贝士贝士贝士贝士贝士贝士贝士贝士贝士贝士贝士贝士贝士贝士贝士贝士贝士贝士贝士贝士贝士贝士贝士贝士贝士贝士贝士贝士贝士贝士贝士贝士贝士贝
开国
是国中自日人
告云
中
()
刊号的异且对
青藥的半,
摇摇摇摇呈星摇摇(GWS24-230LVJ/
GWS 24-180 LVI/GWS 24-230 LVI)
中
Robert Bosch Korea Mechanics and Electronics Ltd.
中国
国电国电国电国电国电国电国电国电国电国电国电国电国电国电国电国电国电国电国电国电国电国电国电国电国电国电国电国电国电国电国电国电国电国电国电国电国电国电国电国电国电国电国电国电国电国电国电国电国电国电国
:+82312704143/4148/4620
:+82312704144
卫国
:+82312704680/4681/4682
明:+82312704686
E-Mail: Bosch-pt.hotline@kr.bosch.com
Internet: www.bosch.co.kr
刘引
H
习学是学的,学是习的,习是学的。
mna 51
nuee uanuun
nunnnnnnnnnnnnnnnnnnnnnnnnnnnnnnnnnnnnnnnnnnnnnnnnnnnnnnnnnnnnnnnnnnnnnnnnnnnnnnnnnnnnnnnnnnnnnnnnnnnnnnnnnnnnnnnnnnnnnnn
A
aenrnnnne nnnnne
aannnnnnaanennn nnnn nn ananen annne
nnaa nannnnnnae
Wn Wwwh Wwwnnnnnnnnnnnnnnnnnnnnnnnnnnnnnnnnnnnnnnnnnnnnnnnnnnnnnnnnnnnnnnnnnnnnnnnnnnnnnnnnnnnnnnnnnnnnnnnnnnnnnnnnnnnnnnnnnnnnnnnnnnnnnnn
1)annuaaunwn
n)nnnnnnnnnnnnnnnnnnnnnnnnnnnnnnnnnnnnnnnnnnnnnnnnnnnnnnnnnnnnnnnnnnnnnnnnnnnnnnnnnnnnnnnnnnnnnnnnnnnnnnnnnnnnnnnnnnnnnnnnnnnnnnnnnnnnnnnnnnnnnnnn
u) ennnnne nnnnnnnnnnnnnnnnnnnnnnnnnnnnnnnnnnnnnnnnnnnnnnnnnnnnnnnnnnnnnnnnnnnnnnnnnnnnnnnnnnnnnnnnnnnnnnnnnnnnnnnnnnnnnnnnnnnnnnnnnnnnnnnnnn nn
a) mnnnne nnnnnnnnnnnnnnnnnnnnnnnnnnnnnnnnnnnnnnnnnnnnnnnnnnnnnnnnnnnnnnnnnnnnnnnnnnnnnnnnnnnnnnnnnnnnnnnnnnnnnnnnnnnnnnnnnnnnnnnnnnnnnnnnnnnn nn
2) Annuuaen annn
n) 1nnnnnnnnnnnnnnnnnnnnnnnnnnnnnnnnnnnnnnnnnnnnnnnnnnnnnnnnnnnnnnnnnnnnnnnnnnnnnnnnnnnnnnnnnnnnnnnnnnnnnnnnnnnnnnnnnnnnnnnnnnnnnnnnnnnnnnnnnnnnnnnnnnnnnnnnnn
nnaeae nne aen eae ne ene nee
n nn nnnnnnnnnnnnnnnnnnnnnnnnnnnnnnnnnnnnnnnnnnnnnnnnnnnnnnnnnnnnnnnnnnnnnnnnnnnnnnnnnnnnnnnnnnnnnnnnnnnnnnnnnnnnnnnnnnnnnnn
1) 1
)
nunnnnnnnnnnnnnnnnnnnnnnnnnnnnnnnnnnnnnnnnnnnnnnnnnnnnnnnnnnnnnnnnnnnnnnnnnnnnnnnnnnnnnnnnnnnnnnnnnnnnnnnnnnnnnnnnnnnnnnnnnnnnnnnnnnnnnnnnnnnnnnnn nn nannnne nannnne nannnne nannnne nannnne nannnne nannnne nannnne nannnne nannnne nannnne nannnne nannnne nannnne nannnne nannnne nannnne nannnne nannnne nannnne nannnne nannnne nannnne nannnne nannnne nannnnee nannnne nannnne nannnne nannnne nannnne nannnne nannnne nannnne nannnne nannnne nannnne nannnne nannnne nannnne nannnne nannnne nannnne nannnne nannnne nannnne nannnne nannnne nannnne nannnne nannnae
3)
n) nunnuuuguaanwauwaaa aannnnnnae annnnae ane annnne ane ane ane ane ane ane ane ane ane ane ane ane ane ane ane ane ane ane ane ane ane ane ane ane ane ane ane ane ane ane ane ane ane ane ane ane ane ane ane ane ane ane ane ane ane ane ane ane ane ane anee
u) uunnnnne nnnnnnnnnnnnnnnnnnnnnnnnnnnnnnnnnnnnnnnnnnnnnnnnnnnnnnnnnnnnnnnnnnnnnnnnnnnnnnnnnnnnnnnnnnnnnnnnnnnnnnnnnnnnnnnnnnnnnnnnnnnnnnnnnnnnnnnnnnnn nn
a) Jannnnnne nnnnne nnne nee annnnnne nnnnne nnnnne nnnnne nnnnne nnnnne nnnnne nnnnne nnnnne nnnnne nnnnne nnnnne nnnnne nnnnne nnnnne nnnnne nnnnne nnnnne nnnnne nnnnne nnnnne nnnnne nnnnne nnnnne nnnnne nnnnne
aannnnnnaeennnnn nnnnnnnnnnnnnnnnnnnnnnnnnnnnnnnnnnnnnnnnnnnnnnnnnnnnnnnnnnnnnnnnnnnnnnnnnnnnnnnnnnnnnnnnnnnnnnnnnnnnnnnnnnnnnnnnnnnnnnnnnnnnnnnn nn
52
nnaanannnnnnaaennnnae nnnnnnnnnaaee
n nn nnnnnnnnnnnnnnnnnnnnnnnnnnnnnnnnnnnnnnnnnnnnnnnnnnnnnnnnnnnnnnnnnnnnnnnnnnnnnnnnnnnnnnnnnnnnnnnnnnnnnnnnnnnnnnnnnnnnnnnnnnnnnnnnnnnnnnnnnnnnnnnnnnn
uunnnnnaaennnnnnnnnnnnnnnnnnnnnnnnnnnnnnnnnnnnnnnnnnnnnnnnnnnnnnnnnnnnnnnnnnnnnnnnnnnnnnnnnnnnnnnnnnnnnnnnnnnnnnnnnnnnnnnnnnnnnnnnnnnnnnnnnnnnnn
4)muaaemuaaunnnaeialwh
n) 1w wwnnnn nn nnnn nn nnnnnnnnnnnnnnnnnnnnnnnnnnnnnnnnnnnnnnnnnnnnnnnnnnnnnnnnnnnnnnnnnnnnnnnnnnnnnnnnnnnnnnnnnnnnnnnnnnnnnnnnnnnnnnnnnnnnnnnnnnn
u) eaiiiaaii iiniiiniiinie aiee
n nnunnnnnnnnnnnnnnnnnnnnnnnnnnnnnnnnnnnnnnnnnnnnnnnnnnnnnnnnnnnnnnnnnnnnnnnnnnnnnnnnnnnnnnnnnnnnnnnnnnnnnnnnnnnnnnnnnnnnnnnnnnnnnnnnnnnnnnnnnnnnnnnnnnnnnnnnnnn
1) Jauanrnnnnaaassalwth Linnnneasolunnnnnuuue aaeuaynyanennnnae nnnnnnnae nnnee anannnnnnae nnnnnnnnnae
aannnnnnaanennnnnne aannnnnnnnnnnnnnnnnnnnnnnnnnnnnnnnnnnnnnnnnnnnnnnnnnnnnnnnnnnnnnnnnnnnnnnnnnnnnnnnnnnnnnnnnnnnnnnnnnnnnnnnnnnnnnnnnnnnnnnnnnnnnnnnnnnnnnnnnnnnnnnnnnnn
nnnnnnnnnnnnnnnnnnnnnnnnnnnnnnnnnnnnnnnnnnnnnnnnnnnnnnnnnnnnnnnnnnnnnnnnnnnnnnnnnnnnnnnnnnnnnnnnnnnnnnnnnnnnnnnnnnnnn
a) laeolw qunssnau uae aue quan eunu nnunu uuaunu anu nnnn uunnuu uunnuu uunnuu uunnuu uunnuu uunnuu uunnuu uunnuu uunnuu uunnuu uunnuu uunnuu uunnuu uunnuu uunnuu uunnuu uunnuu uunnuu uunnuu uunnuu uunnuu uunnuu uunnuu uunnuu uunnuu uunnuuu
5) mui
n) aaiiaialwihinuueyauanrnnnnae 1auiiueaunnuu uunnuuuauie 1aeanelewhneuywnnweep
nnuuunnnnnnnnnnnnnnnnnnnnnnnnnnnnnnnnnnnnnnnnnnnnnnnnnnnnnnnnnnnnnnnnnnnnnnnnnnnnnnnnnnnnnnnnn
Hn
Wnwnnnnwnnnn nn nnnnnnnnnnnnnnnnnnnnnnnnnnnnnnnnnnnnnnnnnnnnnnnnnnnnnnnnnnnnnnnnnnnnnnnnnnnnnnnnnnnnnnnnnnnnnnnnnnnnnnnnnnnnnnnnnnnnnnnnnnnnnnnnnnnnnn nn nannn nn nannn nn nannn nn nannn nn nannn nn nannn nn nannn nn nannn nn nannn nn nannn nn nannn nn nannn nn nannn nn nannn nn nannn nn nannn nn nannn nn nannn nn nannn nn nannn nn nannn nn nannn nn nannn nn nannn nn nannn nn nennn nn nannn nn nannn nn nannn nn nannn nn nannn nn nannn nn nannn nn nannn nn nannn nn nannn nn nannn nn nannn nn nannn nn nannn nn nannn nn nannn nn nannn nn nannn nn nannn nn nannn nn nannn nn nannn nn nannn nn nannn nn n ann
aalwulnunnaanrnnnne nnnnne
aenunnsnneauuueauuua uuae nnnnnae aennnnnneae eaeae
nannnnnnnnnnnnnnnnnnnnnnnnnnnnnnnnnnnnnnnnnnnnnnnnnnnnnnnnnnnnnnnnnnnnnnnnnnnnnnnnnnnnnnnnnnnnnnnnnnnnnnnnnnnnnnnnnnnnnnnnnnnnnnnnnnnnnnnnnnnnnnn nn nannnne aenennnne ene e

mnu 53
Lnnnnaaannnnaanennnnae annnnnne nnnn nnne aannnnnne anannnnnne anannnnnne anannnnnne anannnnnne anannnnnne anannnnnne anannnnnne anannnnnne anannnnnne anannnnnne anannnnnne anannnnnne anannnnnne anannnnnne anannnnnne anannnnnne anannnnnne anannnnnne anannnnnne anannnnnne
Jauunununununununununununununununununununununununununununununununununununununununununununununununununununununununununununununununununun
1 1 1 1 1 1 1 1 1 1 1 1 1 1 1 1 1 1 1 1 1 1 1 1 1 1 1 1 1 1 1 1 1 1 1
aannnnnnaanennnnnne aannnnnnnnnnnnnnnnnnnnnnnnnnnnnnnnnnnnnnnnnnnnnnnnnnnnnnnnnnnnnnnnnnnnnnnnnnnnnnnnnnnnnnnnnnnnnnnnnnnnnnnnnnnnnnnnnnnnnnnnnnnnnnnnnnnnnnnnnnnnnnnnnnn nn nannn nannn nannn nannn nannn nannn nannn nannn nannn nannn nannn nannn nannn nannn nannn nannn nannn nannn nannn nannn nannn nannn nannn nannn nannn nannn nannn nannn nannn nannn nannn nannn nannn nannn nn ann
nuyananeaglnneelwagluszraaennnnn n uunnuuauanenannnnnnnnnnnnae aangnnaa ananen ananen ananen ananen ananen ananen ananen ananen ananen ananen ananen ananen ananen ananen ananen ananen ananen ananen ananen ananen ananen ananen ananen ananen ananen ananen ananen
Hnnnnaaannnnaanennnnnnnnnnnnnnnnnnnnnnnnnnnnnnnnnnnnnnnnnnnnnnnnnnnnnnnnnnnnnnnnnnnnnnnnnnnnnnnnnnnnnnnnnnnnnnnnnnnnnnnnnnnnnnnnnnnnnnnnnnnnnnnnnnnnnnnnnnnnnnn nn nannnne aannnne aannnne aannnne aannnne aannnne aannnne aannnne aannnne aannnne aannnne aannnne aannnne aannnne aannnne aannnne aannnne aannnne aannnne aannnne aannnne aannnne aannnne aannnne aannnne aannnne
aunnnaanennnnnnsaaannnnnnaannnnnnnnnnnnnnnnnnnnnnnnnnnnnnnnnnnnnnnnnnnnnnnnnnnnnnnnnnnnnnnnnnnnnnnnnnnnnnnnnnnnnnnnnnnnnnnnnnnnnnnnnnnnnnnnnnnnnnnnnnnnnnnnnnnnn nn nannnne aannnne aannnne aannnne aannnne aannnne aannnne aannnne aannnne aannnne aannnne aannnne aannnne aannnne aannnne aannnne aannnne aannnne aannnne aannnne aannnne aannnne aannnne aannnne aannnne aannnne
aenanaealwwnnnnaanennnne aenannnne nnnnne ennnnne
aenlndnne nnnnne nnnnne nnnnne nnnnne nnnnne nnnnne nnnnne nnnnne nnnnne nnnnne nnnnne nnnnne nnnnne nnnnne nnnnne nnnnne nnnnne nnnnne nnnnne nnnnne nnnnne nnnnne nnnnne nnnnne nnnnne nannnee
nannnnnnaeennnnnne nnnnne nnnnne nnnnne nnnnne nnnnne nnnnne nnnnne nnnnne nnnnne nnnnne nnnnne nnnnne nnnnne nnnnne nnnnne nnnnne nnnnne nnnnne nnnnne nnnnne nnnnne nnnnne nnnnne nnnnne nnnnne
eannnnnne nnnnnnnnne
unnnnne nnnnnnnnnnnnnnnnnnnnnnnnnnnnnnnnnnnnnnnnnnnnnnnnnnnnnnnnnnnnnnnnnnnnnnnnnnnnnnnnnnnnnnnnnnnnnnnnnnnnnnnnnnnnnnnnnnnnnnnnnnnnnnnnnnnnnnn
mnnnnaaahnnae
nnae aen anen nne enanen ne anen nne nne nne nne nne nne nne nne nne nne nne nne nne nne nne nne nne nne nne nne nne nne nne nne nne nne nne nne nne nne nne nne nne nne nne nne nne nne nne nne nne nne nne nne nne nne nne nne nne nne nae


54 | mertnne
nnae nnnnne nee nnnnne nnnnne nnnnne nnnnne nnnnne nnnnne nnnnne nnnnne nnnnne nnnnne nnnnne nnnnne nnnnne nnnnne nnnnne nnnnne nnnnne nnnnne nnnnne nnnnne nnnnne nnnnne nnnnne nnnnne nnnnne nnnnnee nnnnne nnnnne nnnnne nnnnne nnnnne nnnnne nnnnne nnnnne nnnnne nnnnne nnnnne nnnnne nnnnne nannne nannne nannne nannne nannne nannne nannne nannne nannne nannne nannne nannne nannne nannne nannne nannne nannne nannne
aennnnnneannnnnneennnnnneennnneennnneennnnnneennnnnneennnnnneennnnnneennnnnneennnnnneennnnnneennnnnneennnnnneennnnnneennnnnneennnnnneennnnnneennnnnneennnnnneennnnnneennnnnneennnnnneennnnnneennnnnneennnnnneennnnnneennnnnneennnnnneennnnnneenn
mnnnne nnnnnnnnnnnnnnnnnnnnnnnnnnnnnnnnnnnnnnnnnnnnnnnnnnnnnnnnnnnnnnnnnnnnnnnnnnnnnnnnnnnnnnnnnnnnnnnnnnnnnnnnnnnnnnnnnnnnnnnnnnnnnnnnnnnnnnn
nannnnnne nnnnnnne nnnnnnne nnnnnnne nnnnnnne nnnnnnne nnnnnnne nnnnnnne nnnnnnne nnnnnnne nnnnnnne nnnnnnne nnnnnnne nnnnnnne nnnnnnne nnnnnnne nnnnnnne nnnnnnne nnnnnnne nnnnnnne nnnnnnne nennnnnne nnnnnnne nnnnnnne nnnnnnne nnnnnnne nnnnnnne nnnnnnne nnnnnnne nnnnnnne nnnnnnne nnnnnnne nnnnnnne nnnnnnne nannnne nannnne nannnne nannnne nannnne nannnne nannnne nannnne nannnne nannnne
aunnnaeulnnnneanennnnnne aannnnnne nnnnnnnnne
n
anuunununununununununununun unnnnne nannnnnnnnnnnnnnnnnnnnnnnnnnnnnnnnnnnnnnnnnnnnnnnnnnnnnnnnnnnnnnnnnnnnnnnnnnnnnnnnnnnnnnnnnnnnnnnnnnnnnnnnnnnnnnnnnnnnnnnnnnnnnnnnnnnnnnnnnnnnnnnnnnnnnnnnnnnnnnnnnnnnnnnnnnn nn
aannnnnnaanennnnnne aannnnnnn nnnnnnnn nn nnnnnnnn nnnnnnnn nnnnnnnn nnnnnnnn nnnnnnnn nnnnnnnn nnnnnnnn nnnnnnnn nnnnnnnn nnnnnnnn nnnnnn nnnnnn nnnnnn nnnnnn nnnnnn nnnnnn nnnnnn nnnnnn nnnnnn nannn nannn nannn nannn nannn nannn nannn nannn nannn nannn nannn nannn nannn nannn nannn nannn nannn nannn nannn nannn nannn nannn nannn nannn nannn nannn nannn nannn nannn
aannnnnnaeennnnne nnnnnnne annnnnne aannnnnne
Lnnnnaaannnnnnae annnnnne nnnnne aannnnnne anennnne nnnnnnne nnnnnnne nnnnnnne nnnnnnne nnnnnnne nnnnnnne nnnnnnne nnnnnnne nnnnnnne nnnnnnne nnnnnnne nnnnnnne nnnnnnne nnnnnnne nnnnnnne nnnnnnne nnnnnnne nnnnnnne nnnnnnne nnnnnnne nnnnne nnnnne nnnnne nnnnne nnnnne nnnnne nnnnne nnnnne nnnnne nnnnne nannnee
aannnnnnaanennnneaae aennnnnae nnnnnae annnnnnae anannnnae aannnnnnae
1
nanaananaananaananaananaananaananaananaananaananaananaananaananaananaananaananaananaananaananaananaananaananaananaananaananaananaananaananaananaananaananaananaananaananaananaananaananaananaananaananaananaananaananaananaananaananaananaananaananaananaanana anannnnnaaannnnnnnnnnnnnnnnnnnnnnnnnnnnnnnnnnnnnnnnnnnnnnnnnnnnnnnnnnnnnnnnnnnnnnnnnnnnnnnnnnnnnnnnnnnnnnnnnnnnnnnnnnnnnnnn
nannnnnnnnnnnnnnnnnnnnnne nannnnnnnnnnnnnnnnnnnnnnnnnnnnnnnnnnnnnnnnnnnnnnnnnnnnnnnnnnnnnnnnnnnnnnnnnnnnnnnnnnnnnnnnnnnnnnnnnnnnnnnnnnnnnnnnnnnnnnnnnnnnnnn nn
nannnnnnaaannnnnnaanennnnnnaanennnnnnaanennnnnnaanennnnnnaanennnnnnaanennnnnnaanennnnnnaanennnnnnaanennnnnnaanennnnnnaanennnnnnaanennnnnnaanennnnnnaanennnnnnaanennnnnnaanennnnnnaanennnnnnaanennnnnnaanennnnnnaanennnnnnaanannnnnnaanannnnnnaanannnnnnaanannnnnnaanannnnnnaanannnnnnaanannnnnnaanannnnnnaanannnnnnaanannnnnnaanannnnnnaanannnnnnaanannnnnnaanannnnnnaanannnnnnaanannnnnnaanannnnnnaanannnnnnaanannnnnnaanannnnnnaanenn
aenlalwwhnwnananaananaananaan anananaananaananaananaananaananaananaananaananaananaananaananaananaananaananaananaananaananaananaananaananaananaananaananaananaananaananaananaananaananaananaananaananaananaananaananaananaananaananaananaananaananaananaananaananaananaananaananaananaananaanaraannnnnnnnnnnnnnnnnnnnnnnnnnnnnnnnnnnnnnnnnnnnnnnnnnnnnnnnnnnnnnnnnnnnnnnnnnnnnnnnnnnnnnnnnnnnnnnnnnnnnnnnnnnnnnnnnnnnnnnnnnnnnnnnnnnnnnnn
yununununununununununununununununununununununununununununununununununununununununununununununununununununununun
"naananaananaananaananaananaananaananaananaananaananaananaananaananaananaananaananaananaananaananaananaananaananaananaananaananaananaananaananaananaananaananaananaananaananaananaananaananaananaananaananaananaananaananaananaananaananaananaananaananaananaanaraannnnaaannnnnnaaaannnnnnaaaannnnnnaaaannnnnnaaaannnnnnaaaannnnnnaaaannnnnnaaaannnnnnaaaannnnnnaaaannnnnnaaaannnnnnaaaannnnnnaaaannnnnnaaaannnnnnaaaannnnnnaaaannnnnnaaaannnnnnaaaannnnnnaaaannnnnnaaaannnnnnaaaannnnnnaaannnnnnaaaannnnnnaaaannnnnnaaaannnnnnaaaannnnnnaaaannnnnnaaaannnnnnaaaannnnnnaaaannnnnnaaaannnnnnaaaannnnnnaaaannnnnnaaaannnnnnaaaannnnnnaaaannnnnnaaaannnnnnaaaannnnnnaaaannnnnnaaaannnnnnaaaann


mnnn 55
1
aennnnne nennnne ennnnnnne nnnnnnne nnnnnnne nnnnnnne nnnnnnne nnnnnnne nnnnnnne nnnnnnne nnnnnnne nnnnnnne nnnnnnne nnnnnnne nnnnnnne nnnnnnne nnnnnnne nnnnnnne nnnnnnne nannnne nannnne nannnne nannnne nannnne nannnne nannnne nannnne nannnne nannnne nannnne nannnne nannnne nannnne nannnne nannnne nannnne nannnne nannnne nannnne nannnne nannnne nannnne nannnne nannnne nennnne nannnne nannnne nannnne nannnne nannnne nannnne nannnne nannnne nannnne nannnne nannnne nannnne nannnne nannnne nannnne
H
WnHnnn nn nnnnnnnnnnnnnnnnnnnnnnnnnnnnnnnnnnnnnnnnnnnnnnnnnnnnnnnnnnnnnnnnnnnnnnnnnnnnnnnnnnnnnnnnnnnnnnnnnnnnnnnnnnnnnnnnnnnnnnnnnnnnnnnnnnnnnnnnnnnnnnnnnnnnnn
nannnnnnnnnnnnnnnnnnnnnnnnnnnnnnnnnnnnnnnnnnnnnnnnnnnnnnnnnnnnnnnnnnnnnnnnnnnnnnnnnnnnnnnnnnnnnnnnnnnnnnnnnnnnnnnnnnnnnnnnnnnnnnnnnn
国

y
I 1
Jauuuaaunuu uuiuuaaagauoan aou
Wu
nannnnnnae annne nnnnnnne aen
aennnnnae nnne nnnnne ne nnnnne nnnnne nnnnne nnnnne nnnnne nnnnne nnnnne nnnnne nnnnne nnnnne nnnnne nnnnne nnnnne nnnnne nnnnne nnnnne nnnnne nnnnne nnnnne nnnnne nnnnne nnnnne nnnnne nnnnne nnnnne nnnnnee nnnnne nnnnne nnnnne nnnnne nnnnne nnnnne nnnnne nnnnne nnnnne nnnnne nnnnne nnnnne nnnnne nnnnne nnnnne nnnnne nnnnne nnnnne nnnnne nnnnne nnnnne nnnnne nnnnne nannnee
aannnnn

nunnnnnaaannnnnnaanennnnae nnnnne nnnnnnnaaannnnnnaaannnnnnae nnnnnnnaaannnnnnaaannnnnnae
aennnnnne nannnne ennnnnnnnnnnnnnne
Jusunnnnnaaannnne
WuHua Hua Hua Hua Hua Hua Hua Hua Hua Hua Hua Hua Hua Hua Hua Hua Hua Hua Hua Hua Hua Hua Hua Hua Hua Hua Hua Hua Hua Hua Hua Hua Hua Hua Hua Hua Hua Hua Hua Hua Hua Hua Hua Hua Hua Hua Hua Hua Hua Hua Hua
56
ouuunnnn
aunnnnne nannnnnnnnnnnnnnnnnnnnnnnnnnnnnnnnnnnnnnnnnnnnnnnnnnnnnnnnnnnnnnnnnnnnnnnnnnnnnnnnnnnnnnnnnnnnnnnnnnnnnnnnnnnnnnnnnn
1
2
3
4
4
6 nssnneunnnnne nnne
7
8 1
9 anganuunlunununununununun
10 1
11 97
12
13 13
14 naii estnneanrnnn
15 mandevan
16 www.njmsa.com
17 1
18 nnnnne
19 询
20 untrangicn
21 www.cnnnepineeunneaeonepie
22 1
Pakailah kaca mata pelinding.
Jalan Rawa Gelam III No. 2
Jakarta 13930
Indonesia
Tel.: +62 (21) 460 12 28
Fax: +62 (21) 46826823
E-Mail: sales@multitehaka.co.id
www.multitehaka.co.id
Cara membruang
Canh Bao An Toan cho May Mai Hinh Goc
Caccanh bao an toan dung chung cho cac hoat dong mai, cha nham, cha bang ban chai kim loai hay cat bang da cat
Dung cu dien cam tay nay duoc thiet ke de the hi en chuc nang nhu mot may mai, may chanham,ban chai kim loai hay may cat. Xin hay doc tatal ca cacanh bao an toan, chi dan,hinh anh minh hoa va cac dac tinh ky thai ducc ung cap kem theo dung cu dien cam tay nay. Khong tuan thu cac huong dan duoc liet ke duoi day co the dan den vie bi dien giut, gay chay/hoac bi thuong tich nghiem trong.
Dung cu dien cam tay nay khong nen su dung de danh bong. Van hanh theo cach ma dung cu dien cam tay khong durc thiet ke de su dung co the dan den viec gap nguy hiem va gay thuong tich cho ban than.

80 | Tiếng Viet
Khong su dung loai phu tung khong duoc thiet ke chuyen dung va da duoc nha san xuat may khuyen cao. Chi vi phu tung co the lap vao duoc dung cu dien cua ban, no khong dam bao su v an hanh an toan.
Toc do dans dinh cua phu tung thai la bang voi toc do toi da duoc ghi tren dung cu dien cam tay. Phu tung chay nanh hon toc do dans dinh cua chung co the vang roa.
Duong kinh ngoai va do day phu tung cua ban phai nam trong cóng suat danh dinh cua dung cu dien cua ban. Khong the bao vé hay dieu khien dung cach ducc voi phu tung khong dung kich co.
Tamlo cua dia, bich lap, mieng dem hay bat ky loai phu tung nao khac phai vua vn phu hop voi truc quay cua dung cu dien. Phu tung co tamlo cua dia khong phu hgp voi mam lap cua dung cu dien se chay mat thang bang, rung lac manh va co the lam mat sur dieu khien.
Khong duoc su dung phu tung da bi hong. Trucmian sur dung,kiemtra phu tung giad u nhu la dia hat mai xem co bi sut me hay ran nut, mieng dem xem co bi rach hay qua mon, ban chai kim loai xem rau co bi gay hay dinh khong chat.Neu dung cu dien hay phu tung bi roi xuong, kiemtra xem co hr hong hay lap phu tung cno nguyen vao. Sau khi kiem tra va lap phu tung vao,bo tri ban than ban va nhung ngoi gan do ra xa khoicac diem tiep can duoc cua phu tung dang quay va cho dung cu dien cua ban chay voi toc do khong taito da trong mot phut.Phy tung bi hong thuong thi se bi vang vo ra tong thai diem kiem tra nay.
Hay mang trang bi bao hovao. Tuy theo loai cong viec, su dung chan che mat, kinh chup mat hay kinh bao h.De thich hop, mang mat na chong bui, do dung bao hotai nghe, gang tay va quan ao bao ho co kha nang ngan bui da hay cac manh vo cua vatgia cong ban vao. Su bao ve mat la phai co kha nang ngan duoc cac manh vovang raturcac ung dung khac nau tao nen. Mat na chong bui hay khau tranq phai co kha nang loc ducc cac hat nhophat sinh ra tu
chinh cac hoat dong may cua ban. Keo dai thoi gian de tai tran tiep xuc voi tieng on co cuong do manh co the gay diec.
Bortinhngnguo'dungxemkhoang cach an toan raxa khoi noi lam vic.Nhung ai dia vao khu vuc lam viec phai co trang bj bao h canhan.Manh vdua vatgia cong hay cu phu tungco kha nang vang ra va gay thuong tich ben ngoai khu vuc van hanh may.
Chi nam giu dung cu dien o phan nam da duoc cach dien, khi van hanh may o noi ma dung cu cat co the cham thai day diu dc thiet ké dau khong nhin thay duoc hay chinh day dan cua may. Dung cu cat cham thai "co dien" co the lam cho cac bo phan kim loai khong duoc bao boc "co dien" va giut nguoi van hanh may.
De day dien tranh xa phu tung dang quay. Neu su kiem soat dung cu dien bi mat, day dien co the bi cat, tay hay canh tay cua ban co the bi quan lai va bi loi vao phu tung dang quay.
Khong bao giou duroc dat dung cu dien xuong cho den khi phu tung da ngung quay hoan toan. Phu tung dang quay co the an vao vao be mat vat lieu va keo dung cu dien ra khoi su dieu khien cua ban.
Khong cho dung cu dien hoat dong khi dang mang ben hong. Vo tinh cham vao phu tung dang quay,quan ao ban co the bi quan vao,keo phu tung xia vao minh ban.
Thuong xuyen lam sach cac khe thong gio cua dung cu dien. Quat gio moto se keo bui nam trong vo may ra va su tich tu qua nhieu bot kim loai co the gay nen cac nguy hiem v dien.
Khong duoc vanh dung cu dien gan noi co cac chat de chay. Tia lua bān ra co the gay chay cac nguyen lieu nay.
Khong su dung phu tung loai cang co chat long lam mat. Su dung nuoc hay cac loai chat long lam mat khac co the dan den viec chet do dien giunt hay bi dien giunt.

Tieng Viet | 81
Luc doi nguc vacac canh bao lienquan
Doi nguc la mot phan ung dot ngot do dia dang quay, mieng dem, choi cha hay bat cu phy tung nao khac bi ket lai hay gap tro ngai bat ngo. Su co bi kep lai hay gap tro ngai bat ngo lam cho phu tung dang quay nanh chong ngung ngay hoat dong, hau qua la lam cho dung cu dien cam tay bi mat dieu khien nen quay nguc lai chiueu quay cua phu tung ngay thoi diem bi kep chat. Vi du, nu mot dia hat mai bi vatgia cong chen chat hay bi kep lai, canh cua dia dang tien vao diem bi kep co the bap len be mat cua vat lieu lam cho dia leo ra hay bat nguc lai. Dia co the nhay chom ve phia truncc hay vang ra khoi ngoi dieu khien may, tuy theo hurong chuyen dong cua dia ngay thoi diem bi kep. Trong truong hop nay, cac dia dang hat co kha nang bi vo. Sur doi nguc la hau qua cua viec sur dung dung cu dien cam tay khong dung chuc nang va/hay qui trinh thao tac khong dung cach hoac do dieu kien xau va co the tranh duoc bang cach tuan theo cac cach phong tramh thich hop duoc trinh bay duroi day.
Luong gu chac dung cu dien va tao tu the than he va canh tay cho phep ban chiu duoc luc doi nguc. Luon luon su dung tay nam phu, neu co kem theo may, de khong che toi da cac phan ung doi nguc hay van xoan tong thoi diem khoi dong. Nguoi van hanh may co the kiem soat duoc cac phan ung van xoan hay luc doi nguc neu tuan thu cac chi dan phong tranh dung cach.
Khong bao gio duoc de tay cua ban gan phu tung dang quay. Phu tung co the dong nguc len tay cua ban.
Khong de nguoi cua ban po ra trong pham vima dung cu dien se toi duoc neu su doingucxayra.Sdui ngucse lam quay dungcu dien ve chieu nguc voi chiueu chuyen dongcua dia tai thoi diem gap su co.
Hay dát biét luu y khi gia cóng cac goc canh, canh ben v.v. Tranh khong de phu tung bin nay len hay bi chen chat. Cac goc, canh ben hay su nay len co khuynh hóng lam cho phu tung dang quay bi tro ngai va lam mat dieu khien hay bi dai nguc.
Khong lap luoi cua xich, dao khac go hay luoi cua rang vao. Nhung loai luoi nhu vay thuong xuyen tao ra su doi nguc va lam mat su dieu khién dung cu dien.
Cac canh bao phu them

Hāy mang kinh bó hó.
Dung thiét bi do tim thich hop de xac dinh nou co cac cóng trinh cóng cóng lap dat ngam trong khu vu c lam vièc hay lien hé voi Cty cóng trinh Cóng cóng dia phu'ong de nhô htro'. Dung cham duong dan dien co the gay ra hoa hoan va dien giut. Lam hu'hai duong dan khi ga co the gay no. Lam thung duong dan nuoc gay hu hong tai san hay co khā nang gay ra dien giut.
Khi thao tac voi da, hay sur dung thet bi hut bui. May hut bui phai la loai thich hop cho viec hut bui da. Sur dung thet bi nay lam giam cac nguy co do bui sinh ra.
Hay sudung duong cat khi cat da. Khong co duong cap canh, dia cat co the bi kep lai va gay ra su dongucc.
Khi su dung may, luon luon gi chat may bang ca hai tay va tao tu the dung vung chai. Dung cu dien cam tay van hanh an toan hon khi dung ca hai tay.
Kep chat vatgia cong. Vat gia cong duoc kep bang mot thiét bi kep hay bang eto thi vung chac hon giu bang tay.


Giou noi lam viec cua ban gon gang. Vat lieu co cau tao hon hop la dat biét nguy hiem. Bui tur hop kim nhe co the chay hay no.
Khong bao giu duoc su dung may co day dan bi hong. Khong duoc cham vao day dan bi hong va keo phich cam dien ngon ra trong luc van hanh ma day dan bi hong. Day dan bi hong lam tang nguy co bi dien giut.
Mô tá chuc näng

Doc ky moi canh bao an toan va moi huong dan. Khong tuan thu moi canh bao va huong dan duoc liet ke duoi day co the bi dien giut, gay chay va/hay bi thuong tat nghiem trong.
Trong khi doc cac hóng dān su dung, mo tranggap hinh anh may va de mo nguyen nhur vay.
Danh su dung cho
May ducg thiet ke de cat, cha tho, cha vat lieuu kim loai va da ma khong su dung den nuoc.
Décat kim loai,phai su dung loai chan bao ve dat biét (phu kien) dung cho viec cat.
Décatda,phai su dung loaj chup hut dat biét dung cho vièc cat cung voi duong cat (phu kien).
Cung voci cac dung cu mai duc chap nhan, may co the su dung de cha cung voi dia cha.
Bieu trung cua san pham
Su dān h so cac bieu trung cua san pham la de tham khao hinh minh hoa cua may tren trangh hinh anh.
1 Nút khóa truc
2 Bô phàn giam chan
3 Cong tac Tāt/Mo
4Taynamphu
5 Truc may mai
6 Chán bao vê dung de chu nhám
7 Mä khoa
8 Can kep cua chan bao ve
9 Vit dieu chinh chan bao vê
Chan Bao Vé Dung De Cát
De cat kim loai, luon luon lam viec co tranq bi chan bao ve de cat 14.
De cat da, luon luon lam viec co trang bi duong cat co chan bao ve viec hut bui 21.
May hut buj phai thich hop cho viec hut bui dansh cho cong trinh ne. Hang Bosch co cung cap loai may hut buj thich hop.
Bat cong tac len va dura phan truc cua duong cat len trenvatgia cong.Day nhe may toi cho an vao vua phai, tuy theo loai vat lieu gia cong ma thich nghi.
De cat loai vat lieu dat biét ran, v., be-tong co mat do soi cao, dia cat hat kim cuong co the bi qua nong va hau qua la bi hong. Su conay ducg bieu hién ro bang tia lua ban ra vong tron, quay cung voi dia cat.
Trong truong hop nay, ngung ngay cong viec cat va lam cho dia cat nguoi xuong bang cach cho may chay voi toc do toi da khong tai mot thai bian gian ngan.
Tien do gia cong bi giam thay ro v tia la ban ra vongtron la bieu hien cua dia cat da bat dau cun. Cat lui nhanh gon vao vat lieu co chat mai mon (v.d., gach voi pha cat) co the mai cho dia ben lai.
Thong Tin Vè Cái Truc
Cát rānh trén cánc vach tóng có két cαu phuc hop
phai tuan theo Tieu chuán DIN 1053 Phàn 1, hay
theo qui dinh cua nuoc sδ tai.
Nhùng qui dinh nay phai ducc tuan thu trong moi tinh huóng. Truc khi tién hanh cóng viéc, hay tham khao y kien cua ky sur thiét ké, kien truc sur hay ngu diqiam sat cóng trinh co trach nhiem.

90 | Tiếng Viết
aalaae aee aee ae eae
ailll jll lglg 1000
i 1
a
.FI-
S_ OBC = 12 · CO · BC = 12 × CD × 5
y
a15, aodj s j 10000000000000000000000000000000000
24
J 1
a
jlljgs
y
jloalglssdallgwwll
a^2 + 3b^2 - 2 无解
www.bosch-pt.com
a a
aegg g aagaae 1
y
.
y
a aaa a a a a a a a a a a a a a
y y 1
y
21 21
1
e 1
12 21
ab = 12

3 100000000000000000000000000000000000000
aai jai 11 11 11 11 11 11 11 11 11 11 11 11 11 11 11 11 11 11 11 11 11
.
/GWS24-230LVJ) (GWS 24-230 LVI / GWS 24-180 LVI
- pSui 100 25y,85u1 100 100 100 100 100 100 100 100 100 100
3 1 1 1 1 1 1 1 1 1 1 1
/GWS 24-230 LVJ) (GWS 24-230 LVI / GWS 24-180 LVI
16
1 1 1 1 1 1 1 1 1 1 1 1 1 1 1 1 1 1 1 1 1 1 1 1 1 1 1 1 1 1 1 1 1 1 1
10 : 0.23x^2 + x = 8
1 1
A
J 1
J 1 J.5 1
1
J
y
jgld1 j1rbsa 100000000000000000000000000000000000000
y 1 aed 2 1 1 w 1 1 1 1 1 1 1 1 1 1
1 1 1 1 1 1 1 1 1 1 1 1 1 1 1 1 1 1
Jin
y
1 11 11 11 22
Labyly
3 15y j 1000
= = 35
jiee 1
3ably,
j 15 13 1ably jnnnll
1 3 1
.
:()
3 10
AD = AQ, PAQ = 90^ PQA 为等腰三角形
- 3ab1y jnssll cia 2a y
e aee eae
J 1411. 352111111111111
e 100000000000000000000000000000
L
s
(3601 H92 G../ 3601 H92 H../
3601 H93 G../ 3601 H93 J../
3601 H93H.)
A. 1,2,3 , 4,5 , 6,7
90° 24
g j 111111111111111111111111
a = 3k ②
a 1
.21.5y,8y 8y
bai/(cui)
1
aai jai jai jai jai xhagai paai
e e 1
()
()
aee aee eae
12 10
i 1
y j 15
pde 1.37N2, 2015 14.5kU, 15.15 15.15 pue
- | x - 2| = | x + 3| .
i
.
a a a a a a a a a a a a a a a a a a a a a a a
8 6 1
paleol 105y jj yllb6 aagl lalb
6 6
6 8 9
Ia 1
auiuui 1
14 15
1 21 21
14 1
6.6
1212xu uaiyui
Vibration
j0s j0s1 j0s2 j0s3 j0s4 j0s5 j0s6
aieaeae
1
2
3
4
5
6
2015 7
8
9
10
* 11
12
*SDS-e/ie 13
14
* 15
*o 16
* 17
* 18
* a 19
* 20
* 21
22
aIgllgl 12
abla 2j
aie pluiei jie aie jaiiaai iaiai
.
aai jie 150
a 100
e 1
1
aalal jao aalal ayuayy
i
Joull
1
y
1 1
.8
15j1j1j1j1j1j1j1j1j1j1j1j1j1j1j1j1j1j1j1j1j1j1j1j1j1j1j1j1j1j1j
- 1.
Jannnnn
aannnnn nnnnnnnnnnnnnnnnnnnnnnnnnnnnnnnnnnnnnnnnnnnnnnnnnnnnnnnnnnnnnnnnnnnnnnnnnnnnnnnnnnnnnnnnnnnnnnnnnnnnn
a1 = 1,a2 = 2, ,a_n + 1 = n + 1
- slal ala sie (gill j) alal lol a 20 g 20
100 100
= 1
2000 1
outical
Jaaal aabla f 1a bla la aaiy klll alal y
e 1 Jau 1 Jau 1 Jau 1 Jau 1 Jau 1 Jau 1 Jau 1 Jau 1 Jau 1 Jau 1 Jau 1 Jau 1 Jau 1 Jau 1 Jau 1 Jau 1 Jau 1 Jau 1 Jau 1 Jau 1 Jau 1 Jau 1 Jau 1 Jau 1 Jau 1 Jaa 1 a a a a a a a a a a a a a a a a a a a a a a a a a a a a a a a a a a a a a a a a a a a a a a a a a a a a a a a a a a a a a a a a a a a a
a 1
auiuull aaiiabuoy jiuil uolz iie cuius
aJ 15
b1 = 32,b2 = - 32
.

a 1 a 1 a 1 a 1 a 1 a 1 a 1 a 1 a 1 a 1 a 1 a 1 a 1 a 1 a 1 a 1 a 1 a 1 a 1 a 1 a 1 a 1 a 1 a 1 a 1 a 1 a 1 a 1 a 1 a 1 a 1 a 1 a 1 a 1 a
gally iinw wol jil
J 1 J 1 J 1 J 1 J 1 J 1 J 1 J 1 J 1 J 1 J 1 J 1 J 1 J 1 J 1 J 1 J 1 J 1 J 1 J 1 J 1 J 1 J 1 J 1 J 1 J 1 J 1 J 1 J 1 J 1 J 1 J 1 J 1 J 1
- aedd 1
1 1 1 1 1 1 1 1 1 1 1 1 1 1 1 1 1 1 1 1 1 1 1 1 1 1 1 1 1 1 1 1 1 1 1 1 1 1 1 1 1 1 1 1 1 1 1 1 1 1 1
J 1 J 1 J 1 J 1 J 1 J 1 J 1 J 1 J 1 J 1 J 1 J 1 J 1 J 1 J 1 J 1 J 1 J 1 J 1 J 1 J 1 J 1 J 1 J 1 J 1 J 1 J 1 J 1 J 1 J 1 J 1 J 1 J 1 J 1
a 1 a 1 a 1 a 1 a 1 a 1 a 1 a 1 a 1 a 1 a 1 a 1 a 1 a 1 a 1 a 1 a 1 a 1 a 1 a 1 a 1 a 1 a 1 a 1 a 1 a 1 a 1 a 1 a 1 a 1 a 1 a 1 a 1 a 1 a
J 1 J 1
1 1 1 1 1 1 1 1 1 1 1 1 1 1 1 1 1 1 1 1 1 1 1 1 1 1 1 1 1 1 1 1 1 1 1 1 1 1 1 1 1 1
- aJl J 25 1s 1s 1s 1s 1s 1s 1s 1s 1s 1s 1s 1s 1s 1s 1s 1s 1s 1s 1s 1s 1s 1s 1s 1s 1s
J 1 J 1 J 1 J 1 J 1 J 1 J 1 J 1 J 1 J 1 J 1 J 1 J 1 J 1 J 1 J 1 J 1 J 1 J 1 J 1 J 1 J 1 J 1 J 1 J 1 J 1 J 1 J 1 J 1 J 1 J 1 J 1 J 1 J 1 J
1 1
1 1 1 1 1 1 1 1 1 1 1 1 1 1 1 1 1 1 1 1 1 1
J 1 J 1 J 1 J 1 J 1 J 1 J 1 J 1 J 1 J 1 J 1 J 1 J 1 J 1
aill 2y 5x 5x 5x 5x 5x 5x 5x 5x 5x 5x 5x 5x
a
- | x,y| = 1| x,y| = 1 ②
y
jcbbl 1 cwlal 13 jcll 12000000000000
15
S_ OBC = 12 · CD · BC = 12 × CD × 3
a 1
51 5037 60 60
1.
J 1
jaiidde jinaiidji buii jaiid jinaiil jis
3x12y
1 1
Jie 1
j 1
aill jai gajl jai jai lde ginae jaojol
1
ailll 1
auiuuiiuiui iuiuui uuae
(4
aiee eae aee
abwgloljglaJlKuJau
15 15
aill lalgaiie 15 2
e 1
.
jie1 1 j0s s g j/og aai
c. l j 1
Ae Jauu Jauu Jauu Jauu Jauu Jauu Jauu Jauu
2yaa
Jie jie jie jie jie jie jie jie jie jie jie jie jie jie jie jie jie jie jie jie jie jie jie jie jie jie jie jie jie jie jie jie jie jie jie jie jie jie jie
Jaa Jaa Jaa Jaa Jaa Jaa Jaa Jaa Jaa Jaa Jaa Jaa Jaa Jaa
1
.8j 8j0000000000000000000000
1
j 1
jz jz jz jz jz jz jz jz jz
1j 1000
100000000000000000000000000000000000000
0.52 J 41100
111 111
Jef JScu JScu Zucu Lcui 10000000000000000000000000000
S ACD = S COD + S_ BDO
aie aie 1
auii jai jai jai jai bgi i
e 1
( x - 1) ( x + 3) = 0
a15 (5
a
a
j1k2 = 1 l1l2 = 1
J 1 J 1 1 1 1 1 1 1 1 1 1 1 1 1 1 1 1
1 1
Jolj
a 111111111111111111111111111111111111111111
1 1 1 1 1 1 1 1 1 1 1 1 1 1 1 1 1 1 1 1 1 1 1 1 1 1 1 1 1 1 1 1 1 1
a 10000000000000000000000000000000000000000000000000000000000000000000
e
1 1 1 1 1 1 1 1 1 1 1 1 1 1 1 1 1 1 1 1 1 1 1 1 1 1 1 1 1 1
1053 JLoJLgDjLo 1
WuOwOoOoOoOoOoOoOoOoOoOoOoOoOoOoOoOoOoOoOoOoOoOoOoOoOoOoOoOoOoOoOoOoOoOoOoOoOoOoOoOoOoOoOoOoOoOoOoOoOoOoOoo
s 0
0()
aLwgs 11 jg jgs L a g 1j
1L 201000000000000000000000000000000000000000
1jLgJw 9
14 14
JL 15 a b Jyio L y wio g Jolio Jb j p 15
Jwgi j n 25 .j B A s 0g j j j Jlcl j
.
Jol5 1 a g Jg jn Jaaas
11 1
1
1
1
1
1
1
1
1
iWg15
() 21
g 21
Lwloagle:osolg:wsj0la:wlIbfoSj:sJlJyJ 1s oolaiwJc sGioo
ol:Ws wglJLwOg SsO yBdOoSsOws
aSoo
Lac gLo gLaio
JLaisLw aaiagjI glaigydo yLgai pie 1 Ls
1 1
45 1234567890123456789012345678901234567890123456789012345678901234567890123456789012345678901234567890123456789
10
Lg 11 j0s0s0s0s0s0s0s0s0s0s0s0s0s0s0s0s0s0s0s0s0s0s0s0s0s0s0s0s0s0s0s0s0s0s0s0s0s0s0s0s0s0s0s0
J 1

9 90° L g g o a b d y jy g o o 24
g gol/s/18 g 18 18 18 18 18 18 18 18 18 18 18 18 18 18 18 18 18 18 18 18 18 18 18 18 18 18 18 18 18 18 18 18 18 18
aiwJooaog 25 aWJooaies
a00j 2
Lg jy b y sgl g 10sgo Lg g 2
Lg g 10000000000000000000000000000000000000000000000000000000000000000000000000000000000000000000000000000
g g g g g g g g g g g g g g g g g g g g g g g g g g g g g g g g g g g g g g g g g g g g g g g g g g g g g g g g g g g g g g g
()
cbnnn nnnn nn nnnn nnnn nnnn nnnn nnnn nnnn nnnn nnnn nnnn nnnn nnnn nnnn nnnn nnnn nnnn nnnn nnnn nnnn nnnn nnnn nnnn nnnn nnnn nnnn nnnn nnnn nnnn nnnn nnnn nnnn nnnn nnnn nnnn nnnn
g 1 g 1 aLs g
15 1000000000
Lw
5g 1 L bcbn w g s 4wLs w y
c 50 50 50 50 50 50 50 50 50 50 50 50 50 50 50 50 50 50 50 50 50 50 50 50 50 50 50 50 50 50 50 50 50 50
ABD = 12
SDS-clic 4
13
13 10
13 0000
0400000000000000000000000000000000000000000000000000000000000000
01s 1 s1a a5o
101 o1s:wo (c1w) 20
g101,olE:wo cwiL i
o500s. 5y..50
SiW anw. g000
aac S-000
j(i)
a a a a a a a a a a a a a a a a a a a a a a a a a a a a a a a a a a a a a a a a a a a a a a a a a a a a a a a a a a
y
12 0000000000000000000000000000000000000000000000000000000000000
J 1 J 1 J 1 J 1 J 1 J 1 J 1 J 1 J 1 J 1 J 1 J 1 J 1 J 1 J 1 J 1 J 1 J 1 J 1 J 1 J 1 J 1 J 1 J 1 J 1 J 1 J 1 J 1 J 1 J 1 J 1 J 1 J 1 J 1 J
01,1gjzjL 5i j J Lai 10
SjwJy aJ. 1
1600210039
sOy EIN
15 10000000000000000000000000000000000000000000000000
17 15
17 5 (a) 16 a 19
JLej JolSg jSs
Vibration Control
0aaiw4 gao aio 1 ofoa jao jg jj
4 sas
105 1 Lwog g wlej Jy. wol 5 y Sos
aai p1s 5q5 ainnn ggiig
aaii i j 5 aai
jL10aiolS
Vibration Control
oogoojololsscllyai jleoiols
ydi yjbjrjololosgacdjil
C. , = 0
a a a a a a a a a a a a a a a a a a a a a a a a a
S_ OBC = S_ COD + S_ BOC - S_ BOC
4bogoo.o0ooloo yoo 45 ofoofoo
1
2
3
4
5
()j ()
7
8
9
SijO 10
* 11
12
*SDS-elic 13
* 14
* 15
*alolglssu 16
0aiw aai 17
*oJ 18
*0000 19
*(51dL)20
21
*
* 22
ololololololololololololololololololololololololololololololololololololololololololololololololololololololololololololololololololololololol
aLwog aJL aebc aJgws Jspsosoljks ae
j. 100000000000000000000000000000000000000
451i Li. guiyoo 411034ji jiaao Jgaiyao
a a a 8
jLg0jagloglo jogj
g 1 L 1
.
0aaii j1. aaiy
g0g0g0g0g0g0g0g0g0g0g0g0g0g0g0g0g0g0g0g0g0g0g0g0g0g0g0g0g0g0g0g0g0g0g0g0g0g0g0g0g0g0g0g0
1JLaiA Lg 2
j 1
i0
015: 1000
aJLIOI,Lo glaioi, ggiolggius dls
glgiuws jy Clc, pucj ydi cldluyd i
g sivw. qiyc cy ci w yciy

alg jgl a1,laol,ajj0o o0o l aaiol
olwj0lawl2jgo
gJLgS g()
wol wolio jol oslawl gay
gaaa aai blaa 12 j 12a 12j gaaa
s0oLaiol (Laiio)
J 1 J 1 J 1 J 1 J 1 J 1 J 1 J 1 J 1 J 1 J 1 J 1 J 1 J 1 J 1 J 1 J 1 J 1 J 1 J 1 J 1 J 1 J 1 J 1 J 1 J 1 J 1 J 1 J 1 J 1 J 1 J 1 J 1 J 1 J
Jg Jg 10000000000000000000000000000000000000000000000000000000000000000
J 1 J 1 J 1 J 1 J 1 J 1 J 1 J 1 J 1 J 1 J 1 J 1 J 1 J 1 J 1 J 1 J 1 J 1 J 1 J 1 J 1 J 1 J 1 J 1 J 1 J 1 J 1 J 1 J 1 J 1 J 1 J 1 J 1 J 1 J
45 gaiLaj 121 Lg y g SjSjI jy 45i j1 45i j1 45i j1 45i j1 45i j1 45i j1 45i j1 45i j1 45i j1 45i j1 45i j1 45i j1 45i j1 45i j1 45i j1 45i j1 45i j1 45
g 15 g 15 g 15 g 15 g 15 g 15 g 15 g 15 g 15 g 15 g 15 g 15 g 15 g 15 g 15 g 15 g 15 g 15 g 15 g 15 g 15 g 15 g 15 g 15 g 15 g 15
Lg Lg g Jg Jg Jg Jg Jg Jg Jg Jg Jg Jg Jg Jg Jg Jg Jg Jg Jg Jg Jg Jg Jg Jg Jg Jg Jg Jg Jg Jg Jg Jg Jg Jg Jg Jg Jg Jg Jg Jg Jg Jg Jg Jg Jg Jg Jg Jg Jg Jg Jg Jg J
1 1 1
Lacg (s15 1000000000000000000000000000000000000000000000000000
J 1 J 1 J 1 J 1 J 1 J 1 J 1 J 1 J 1 J 1 J 1 J 1 J 1 J 1 J 1 J 1 J 1 J 1 J 1 J 1 J 1 J 1 J 1 J 1 J 1 J 1 J 1 J 1 J 1 J 1 J 1 J 1 J 1 J 1 J
sL cI aI y bI aI bI aI bI aI aI aI aI aI aI aI aI aI aI aI aI aI aI aI aI aI aI aI aI aI aI aI aI aI aI aI aI aI aI aI aI aI aI aI aI aI aI aI aI aI aI aI aI aI aI aI aI aI aI
()sL sL sL sL sL sL sL sL sL sL sL sL sL sL sL sL sL sL sL sL sL sL sL sL sL sL sL sL sL sL sL sL sL sL sL sL sL sL sL sL sL sL sL sL sL sL sL sL sL sL sL
Jg 1000000000000000000000000000000000000000000000000000000000000000000000
J 1 1 1 1 1 1 1 1 1 1 1 1 1 1 1 1 1 1 1 1 1 1 1 1 1 1 1 1 1 1 1
aaiiaaiiaaiiaaiiaaiiaaiiaaiiaaiiaaiiaaiiaaiiaaiiaaiiaaiiaaiiaaiiaaiiaaiiaaiiaaiiaaiiaaiiaaiiaaiiaaiiaaiiaaiiaaiiaaiiaaiiaaiiaaiiaaiiaaiiaaiiaaiiaaiiaaiiaaiiaaiiaaiiaaiiaaiiaaiiaaiiaaiiaaiiaaiiaaiiaaiiaai
f 100000000000000000000000000000000000000000000000000000000000
alwglg jglc g 5o Jilwog jlgao a5jgws (g
gwhn ao ly. oai olwos ay oai j
oai w. igw go ooiaww y g wai Jilwog j45
g yj rj Lao wigao jg y s o Jilwog j
..
a
(b)
c 100000000000000000000000000000000000000000000000000000
(d 1g2gLiJrJLgJLgJLgJLgJLgJLgJLgJLgJLgJLgJLgJLgJLgJLgJLgJLgJLgJLgJLgJLgJLgJLgJLgJLgJLgJLgJLgJLgJLgJLgJLgJLgJLg
e 10000000000000000000000000000000000000000000000000000000000000000000
d 10000000000000000000000000000000000000000000000000000
j1,2,3,4,5,6,7,8,9,10,11,12,13,14,15,16,17,18,19,20,21,22,23,24,25,26,27,28,29,30,31,32,33,34,35,36,37,38,39,40,41,42,43,44,45,46,47,48,49,50,51,52,53,54,55,56,57,58,59,60,61,62,63,64,65,66,67,68,69,70,71,72,73,74,75,76
2
a 10000000000000000000000000000000000000000000000000000000000000000
JIOJ 1 JIJI 100000000000000000000000000000000000000000000000000000000000
1 1 1 1 1 1 1 1 1 1 1 1 1 1 1 1 1

Bosch Power Tools 1609929T63| (26.1.09)
130
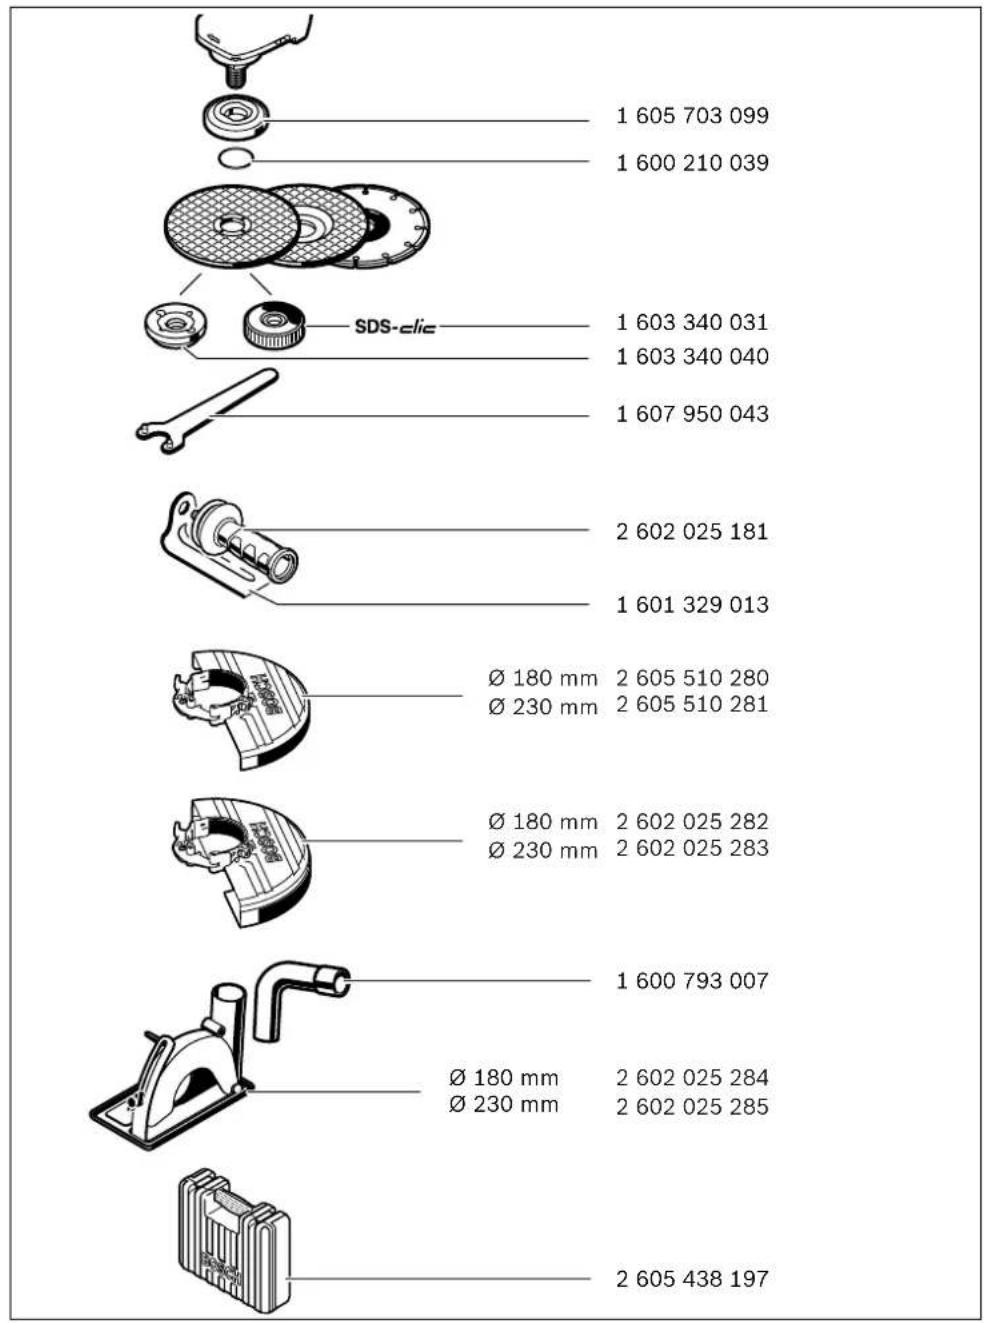
1609 929 T63 | (26.1.09) Bosch Power Tools