M820 - Smartphone SWITEL - Free user manual and instructions
Find the device manual for free M820 SWITEL in PDF.
| Product Type | Clamshell smartphone (slider phone) |
| Brand | Switel |
| Model | M820 |
| Network | Dual band GSM 900 MHz / DCS 1800 MHz |
| SIM Card Type | Dual SIM (2 SIM cards) |
| Display | Main display (size not specified) with status icons |
| Battery | Rechargeable lithium, improved battery life after 3 cycles |
| Charger | Micro USB, charges via mains or computer |
| Main Functions | Phone, SMS/MMS, SOS, FM radio, camera, video, music, Bluetooth, flashlight, voice recorder, games, e-book reader, calculator, alarm, calendar, stopwatch, converter |
| Bluetooth Connection | Yes, for headphones and other accessories |
| Storage | Micro SD memory card (not included) |
| Storage Temperature | -30°C to +60°C |
| Ambient Humidity | 10% to 95% |
| Noise Level | ≤ 80 dB(A) |
| Maintenance and Cleaning | Soft, dry, clean cloth; avoid chemicals and solvents |
| Safety | Turn off in explosive areas, aircraft, pacemakers; do not disassemble |
| Spare Parts and Repairability | Switel-specific battery and charger; repair by authorized professional |
| Package Contents | Phone, battery, charger, data cable, earphones, user manual |
| Warranty | 24 months from date of purchase |
Frequently Asked Questions - M820 SWITEL
User questions about M820 SWITEL
0 question about this device. Answer the ones you know or ask your own.
Ask a new question about this device
Download the instructions for your Smartphone in PDF format for free! Find your manual M820 - SWITEL and take your electronic device back in hand. On this page are published all the documents necessary for the use of your device. M820 by SWITEL.
USER MANUAL M820 SWITEL
COMMUNICATIONPRODUCTS
Mobilefon
Telephone mobil
Telefonocellulare
Cellular telephone

M 820
Bedienungsanleitung Mode d'emploi Istruzioni per l'uso Operating Instructions
Inhalt
MaBe:102mm54mm18mm
GSM---Global System of Mobile Communication
SIM---Subscriber Identity Module
PIN---Personal Identification Number
Appeler et receivevoir des appeals
Envoyer et receivevoir des SMS/MMS
Dimensions:102mm54mm18mm
Batterie:1050mAh Poids:env.120g (batterie comprise)
Adaptateur electrique: AC 100V-240V 50Hz/60Hz, DC 5V 0.5A
Temperaturereservice: -10^ +40^
GSM---Global System of Mobile Communication.
SIM---Subscriber Identity Module.
PIN--- Personal Identification Number.
3.4 Insert the SIM card. 9
3.5 Charge the battery (Two Methods) 10
3.6 Power on/off 10
- Basic Functions 10
4.1 Make a call 10
4.1.1 Dial a Number 10
4.1.2 Dial a number saved in Phonebook............11
4.1.3 Dial a Number saved in Call History............11
4.2 Speed dial 11
4.3 Adjust volume. 11
4.4 Answer and end a call 11
- Text input. 11
- Menu function 12
6.1 Care 12
6.1.1 SOS Key 12
6.1.2 Quick Number 14
6.2 Phonebook 14
6.2.1 New Entry 14
6.2.2 Phonebook 14
6.3 Messaging 14
6.5.1 FM radio 16
6.5.2 Camera 17
6.5.3 Image viewer 17
6.5.4 Video recorder 17
6.5.5 Video player 17
6.5.6 Audio player 17
6.5.7Sound recorder 18
6.6User profiles. 18
6.7 Settings 18
6.7.1 Dual SIM settings. 18
6.7.2 Phone settings 18
6.7.3 Network settings 18
6.7.4 Security settings 18
6.7.5Restore factory settings. 19
6.8 Organizer 19
6.8.1 Alarm 19
6.8.2 Tasks 19
6.8.3 Bluetooth 19
6.8.4 Calculator 19
6.8.5 Calendar 19
6.8.6 World clock 20
6.8.7 Unit Converter 20
6.8.8 Currency Converter 20
6.8.9 Stopwatch 20
6.8.10 Fun & Games 20
6.8.11 Ebook reader 20
6.8.12 File manager 21
6.9 Services 21
6.9.1 Internet services 21
6.9.2 Data account 21
7. SMS Remote Control Function 22
7.1 Setting Quick Number 22
7.2 Setting SOS Number 22
7.3 Adding New Entry 22
7.4 Setting Alarm 23
8.Key lock 23
9. Shortcut Key 23
9.1 Electric Torch 23
9.2 Hearing aid. 23
- Basic Spec. 24
11.Packing list. 24 - Care and Maintenance 24
12.1 Battery and Charger Safety 24
12.2 Phone Maintenance 25
- FAQ 26
14.Disposal 27 - In case of problems 28
16.Guarantee 28
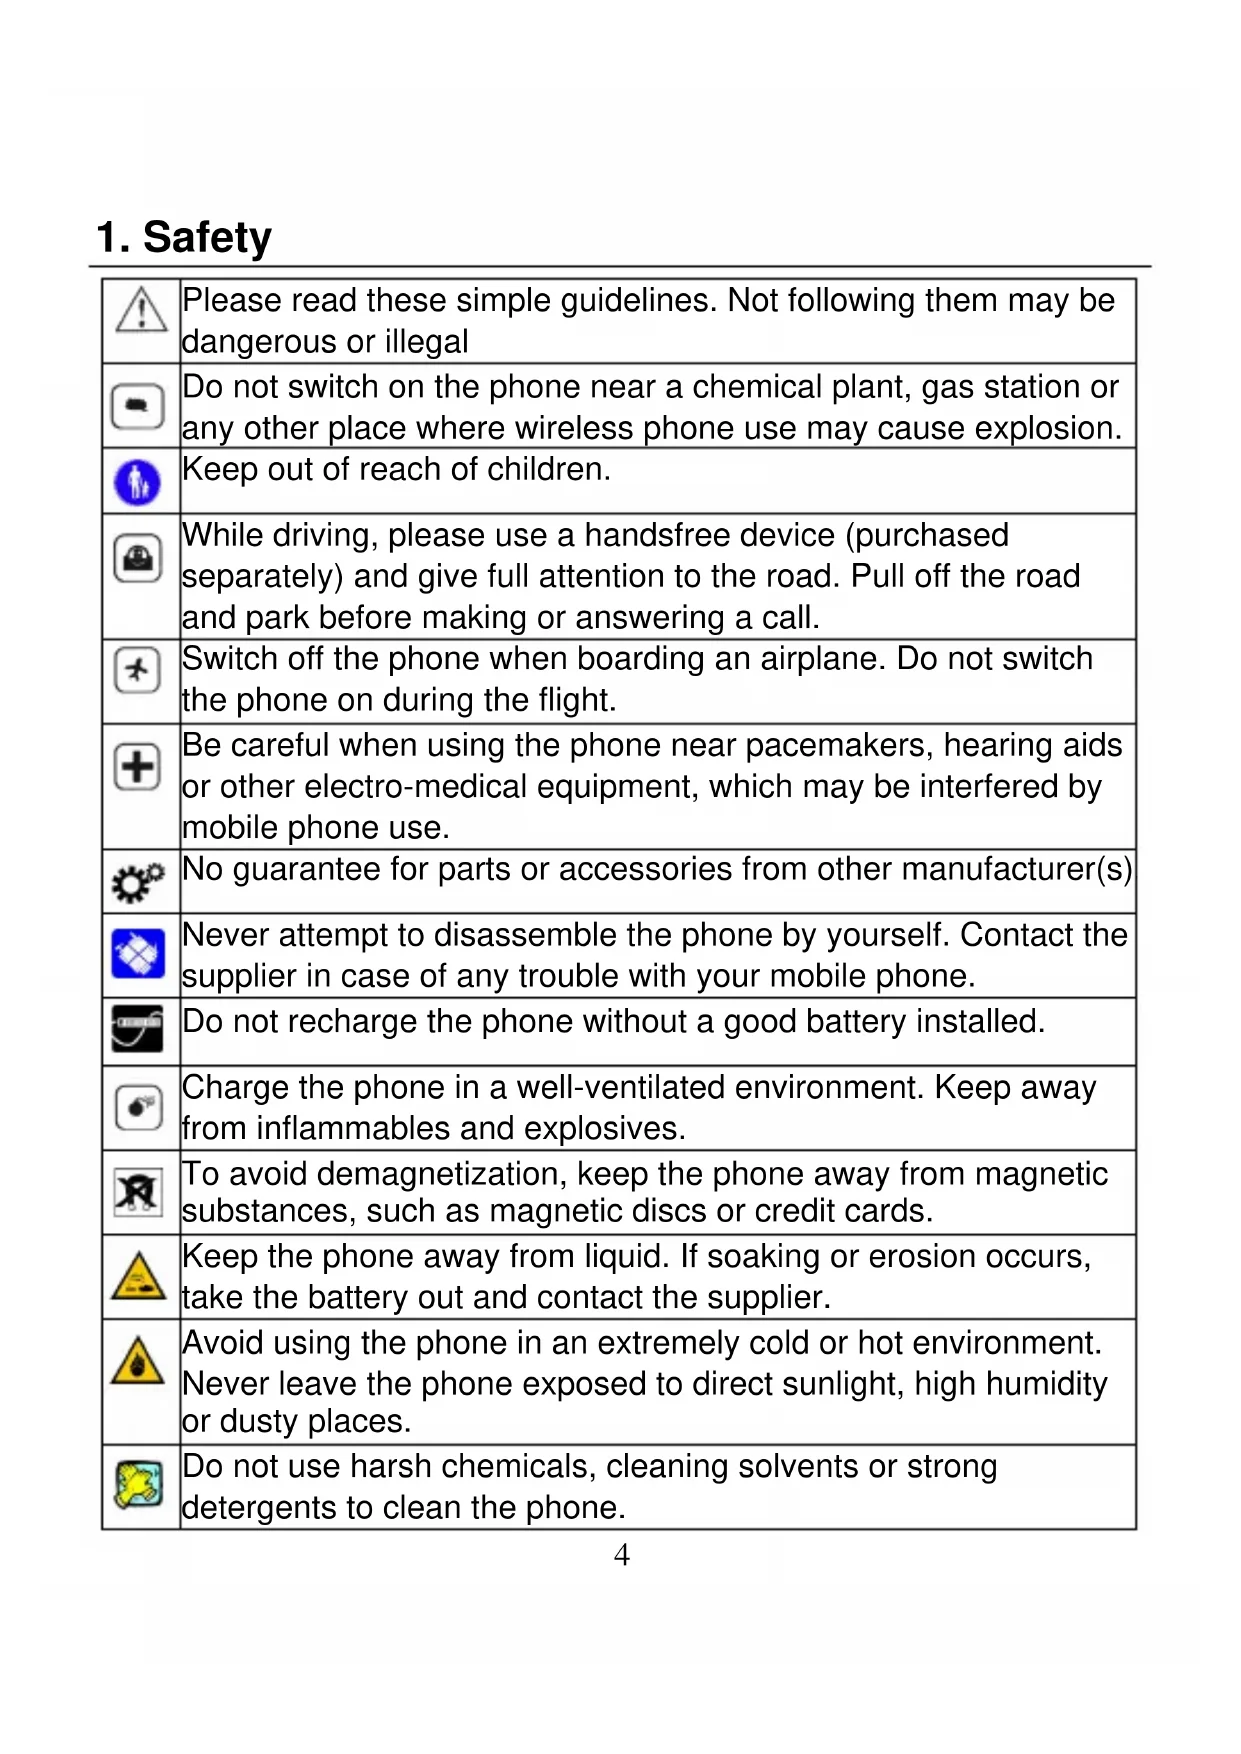
1. Safety
| Please read these simple guidelines. Not following them may be dangerous or illegal | |
| Do not switch on the phone near a chemical plant, gas station or any other place where wireless phone use may cause explosion. | |
| Keep out of reach of children. | |
| While driving, please use a handsfree device (purchased separately) and give full attention to the road. Pull off the road and park before making or answering a call. | |
| Switch off the phone when boarding an airplane. Do not switch the phone on during the flight. | |
| Be careful when using the phone near pacemakers, hearing aids or other electro-medical equipment, which may be interfered by mobile phone use. | |
| No guarantee for parts or accessories from other manufacturer(s) | |
| Never attempt to disassemble the phone by yourself. Contact the supplier in case of any trouble with your mobile phone. | |
| Do not recharge the phone without a good battery installed. | |
| Charge the phone in a well-ventilated environment. Keep away from inflammables and explosives. | |
| To avoid demagnetization, keep the phone away from magnetic substances, such as magnetic discs or credit cards. | |
| Keep the phone away from liquid. If soaking or erosion occurs, take the battery out and contact the supplier. | |
| Avoid using the phone in an extremely cold or hot environment. Never leave the phone exposed to direct sunlight, high humidity or dusty places. | |
| Do not use harsh chemicals, cleaning solvents or strong detergents to clean the phone. |
2. Welcome
Thank you for purchasing our product!
The phone is a new concept slide phone for simple everyday use. It comes with the following key features:
SOS alert, message and call function
Dual SIM
- Big keys / Big fonts
One touch dial to call your frequently used numbers
FM Radio listening and recording
- Torchlight
Music player
- Camera/Video
Sound recorder
- Bluetooth
You can use the phone to:
Make and receive calls
Send and receive SMS/MMS
Listen to radio or music
Take pictures and record videos
Watch videos
Check Calendar and Agenda
Browse Internet
U Play games
Read Ebooks and more....
3. Your phone
3.1 Keys
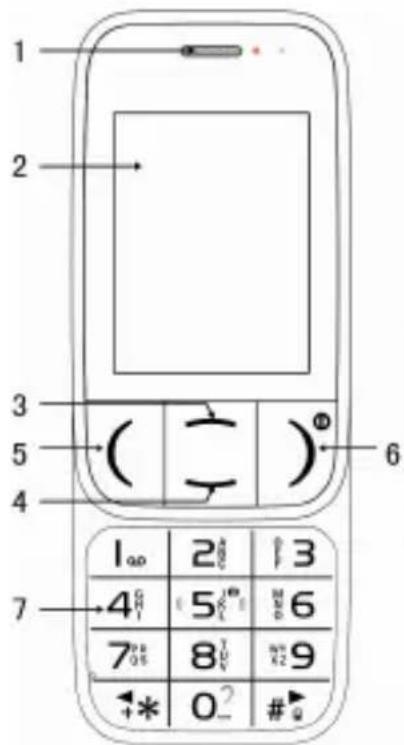


This phone has the following keys:
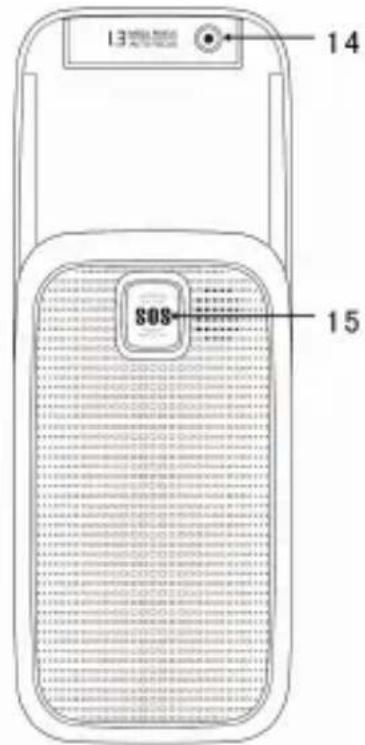
| 1 | Loudspeaker | 2 | Main screen | 3 | Up key |
| 4 | Down key | 5 | Send key | 6 | End key |
| 7 | Keypad | 8 | +/- side key | 9 | Torch light |
| 10 | Indicator Light | 11 | Charger/Data transfer connector | 12 | Headset connector |
| 13 | Torch button | 14 | Camera | 15 | SOS key |
| No. | Name | Annotations |
| 1 | Send key | Make or answer a call. In the standby mode, press the key to view All calls. In other mode: press to select the function shown above it on the display. |
| 2 | End key | End a call. Switch the phone on or off. In the standby mode: press the key to view phonebook. In other mode: press to select the function shown above it on the display. |
| 3 | Up/Down Key | In the standby mode, press the Up/Down key to view the main menu or Quick Number menu. Scroll the function list of the main menu. In Edit mode, press the key to move the cursor. In Calculator mode, press the key to select "+"、“-”、“x” or “4”. During a call, press the Up key to switch on speaker. |
| 4 | Keypad | Used to input numbers, letters and characters. In standby mode, press and hold the “#” key to set the phone to vibrate for incoming calls. Press and hold “1” to activate the voicemail server. In the Edit mode, press “#” to change input method; press “*” to use the Symbol Input interface. In Calender mode, press “#” to input dates. |
3.2 Screen Icons
| Signal Strength | Earphones in use | ||
| New SMS received | Alarm on | ||
| Keypad locked | Battery power level | ||
| Bluetooth on | Ring and vibration | ||
| Vibration on | Ring on |
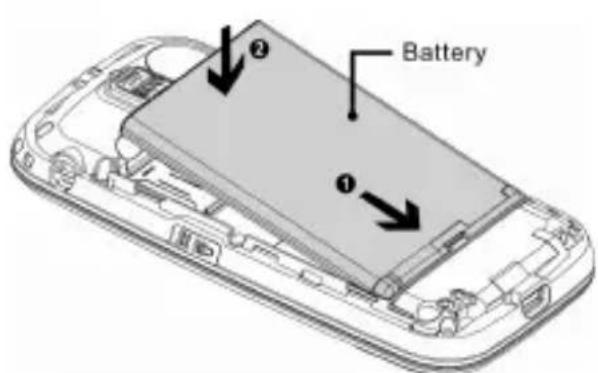
3.3 Battery
The lithium battery of the phone is available right after unpacking. A new battery performs best after 3 full charges/discharges.
3.3.1 Insert the battery
Back of the phone has an opening at the bottom
Buckle and lift up
Insert the battery by aligning the gold contacts on the battery with the gold contacts inside the phone.
I Push down on the upper section of the battery until it clicks into place.
Press down the cover
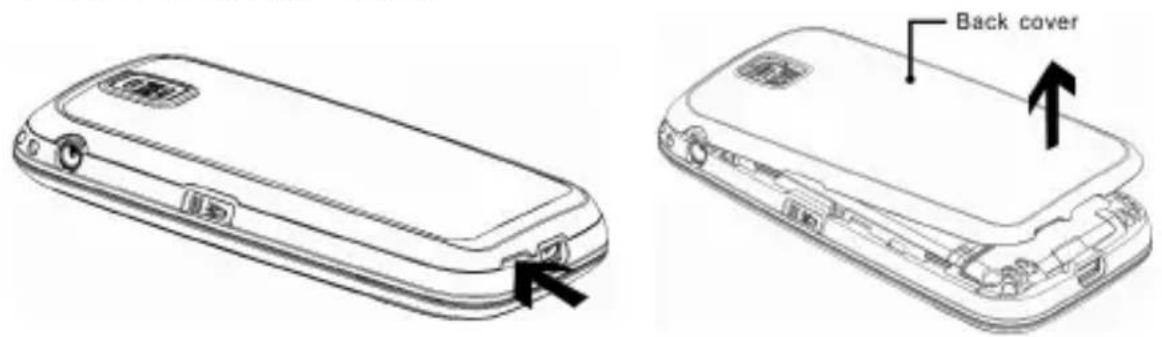

3.3.2 Remove the battery
Switch off the phone.
I Remove the battery cover.
Pull the battery up and remove it.
3.4 Insert the SIM card
This mobile phone supports two SIM cards at the same time. How to insert SIM cards:
Switch off the phone and disconnect it from the charger.
Remove the battery cover and take out the battery.
Hold your SIM card with the chamfer oriented as the following picture and slide it into the card holder with metal interface down.
Put the battery back and close the back cover.

SIM card
Every mobile phone supports a SIM card (Subscriber Identity Module). This is a micro-chip that save your personal information such as names and phone numbers. Your phone won't work without it. If you already have contacts on your SIM card, they can be transferred in most cases.
3.5 Charge the battery (Two Methods)
Method 1:
I Connect the charger to a wall outlet.
I Connect micro USB of the charger to the phone. The charging indicator starts scrolling. When the battery is fully charged, the indicator will stop scrolling.
After the battery is fully charged, disconnect the charger.
Method 2:
Connect the data line to a PC.
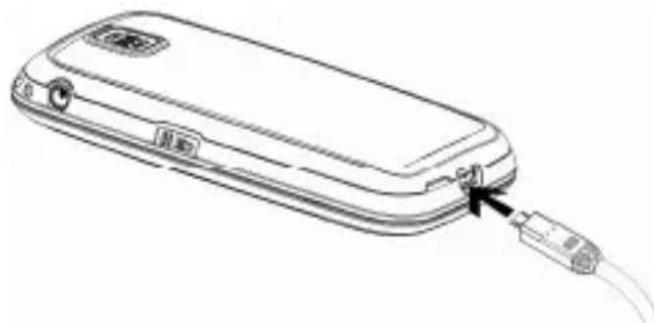
Note: charge the battery at least 12 hours for the first time.
3.6 Power on/off
Press and hold End key to switch on/off the phone.
Note: Make sure the SIM card and the battery have been inserted properly before startup.
If the phone is switched on but no SIM card is inserted, the screen will display "Insert SIM1/SIM2".
4. Basic Functions
4.1 Make a call
4.1.1 Dial a Number
In standby mode, enter the phone number and press Send key twice to make a call. (When you install two SIM cards, press Send key again to choose SIM1 or SIM2 voice call.)
Press End key or slide down this mobile phone to end the call.
4.1.2 Dial a number saved in Phonebook
How to search a number from the Phonebook: Enter the first letters of the name, and press Up/Down key to scroll to the name desired. Press Send key twice to make a call (When you install two SIM cards, press Send key again to choose SIM1 or SIM2 voice call.)
4.1.3 Dial a Number saved in Call History
Menu Call history SIM1(SIM2) history Missed calls / Dialled calls/ Received calls. Or in standby mode, Press Send key to view the Call history. Press Up/Down key to select your desired number. Press Send key twice to make a call. (When you install two SIM cards, press Send key again to choose SIM1 or SIM2 voice call.)
4.2 Speed dial
Edit the speed dial numbers in "Menu Phonebook Option Setup Speed dial". In standby mode, hold on press the numerals (2-9), and you'll dial a number preset in the Speed dial submenu.
4.3 Adjust volume
Press + side key to adjust the volume during a call.
4.4 Answer and end a call
The phone will ring or vibrate when there is an incoming call. Press Send key or slide up the phone to answer the call. Press End key to print the call.
Input Symbol: Press the key to select the symbol.
Input Space: Press key "0" to enter a space. (Except "123" mode.)
Delete characters: Press End key to clear a character in the front of cursor. Press and hold End key to delete all characters in the front of cursor.
Move cursor: Press Up/Down key to move the cursor left or right.
6. Menu function
6.1 Care
6.1.1 SOSKey
Press and hold the SOS key for 3s to dial an emergency number under all circumstances, even if the phone is locked. You can go to Menu Care SOS Key to set this function.
Settings:Activate or Deactivate is optional.
SOS Alarm Ring: Activate or Deactivate is optional.
SOS Number: 5 emergency numbers can be set at most. If you have been set SOS number, press Send key to select Edit or Erase. Press Send key again to edit this current number. You can change User name and Phone number. Press Send key to save it. Press End key to clear a character in the front of cursor.
SOS SMS: Activate or Deactivate is optional.
SOS Content: The content can be edited. The default message is
- If the SOS number can't be connected, the phone will dial next SOS number until the call be answered. If no SOS number answers, the phone will continue dialing the SOS number one by one until the call connected.
- The SOS operation can be cancelled by pressing the End key.
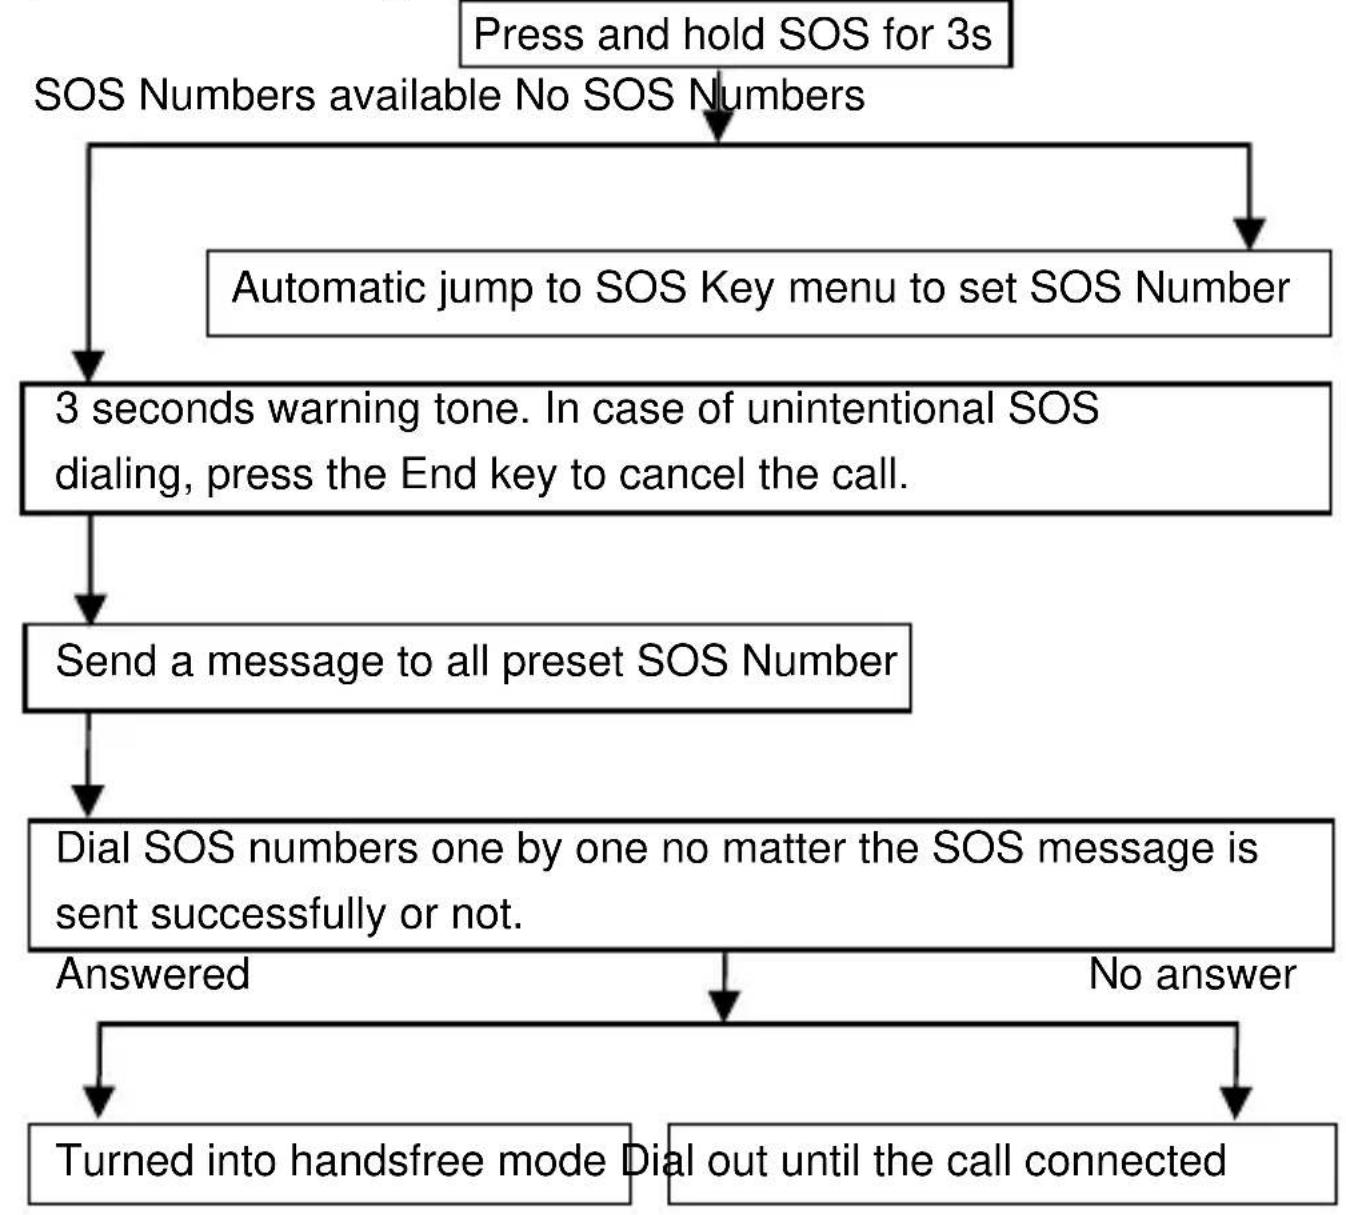
Tips for SOS Dialoging
6.1.2 Quick Number
You can go to Menu Care Quick Number to set 5 frequently used numbers. Press Down key to view the list of quick numbers in standby mode, press Up/Down key to select the desired one. When you're viewing the quick numbers, you can press Send key to:
Call: You can press Send key twice to dial a quick number, press the End key to end the call.
Edit: You can edit a contact's name and phone number.
Delete: You can delete the quick number.
6.2 Phonebook
6.2.1 New Entry
You can save names and phone numbers on SIM1/ (SIM2) or memory card of the phone.
Menu Phonebook New Entry.
Press Send key and select Edit.
Enter a contact's name, enter the number and confirm it by pressing the Send key.
Select To SIM1, To SIM2 or To phone.
Press Send key to select saving the entry or not. Press Send key again to save the entry. Press End key to cancel saving the entry.
6.2.2 Phonebook
Pae Enday to ararthe Phonahok manu in stnthy mode and rae
Send key to send the message.
念 Inbox: Read received messages.
Drafts: Read messages you've saved.
Outbox: Read messages that failed to be sent.
Sent messages: Read messages sent successfully. (You must set in Menu Messaging SMS Setup SIM1/SIM2 message settings Common settings Save sent message is On. Phone default Off, the message can't be saved)
0 Broadcast message: You can receive and read Broadcast message.
Setup: You can do SMS settings. (Some of your SMS settings are dependent on the service you subscribe with the network provider. Consult your network provider for more information regarding the settings.)
6.3.2 MMS
You can write multimedia messages in this mode (local network support is required). After a multimedia message is written, you can choose By SIM1 or By SIM2 to send it.
Write message: You can write multimedia messages in this mode. Then press End key, you can select Send only, Save and send, Save to Drafts, Send options and Exit.
念 Inbox: You can receive and read multimedia messages in this submenu.
Outbox: Read multimedia messages that failed to be sent.
6.4.1 SIM1 history
Missed calls: You can view the list of the latest 20 missed calls.
Dialled calls: You can view the list of the latest 20 dialled calls.
Received calls: You can view the list of the latest 20 received calls.
Call timers: You can select Last call, Dialled calls, Received calls, or Reset all call timers.
GPRS counter: You can select Last sent, Last received, All sent, All received, Reset counter.
Delete call logs: You can delete Missed calls, Dialled calls, Received calls, or Delete all.
6.4.2 SIM2 history
SIM2 history menu operate likes SIM1 history.
6.4.3 Call settings
Press Up/Down key to select SIM1/ SIM2 call settings or Advance settings. Press Send key to confirm your selection.
SIM1 call settings: You can select Caller ID, Call waiting, Call divert, Call barring, Line switching.
SIM2 call settings: Operate likes SIM1 call settings.
Advance settings: You can select Call Firewall Settings, Auto redial, Call time display, Call time reminder and Auto quick end.
6.5 Multimedia
Press Up/Down key to select FM radio, Camera, Image viewer, Video recorder, Video player, Audio player or Sound recorder. Press Send key to confirm your selection. (If your phone memory is not enough, please insert a memory micro SD card)
6.5.1 FM radio
When you plug in earphone, you can listen to FM radio. Press Send key again to select Channel list, Manual input, Auto search, Settings, Record, Append, File list or Schedule FM record.
When the radio is playing back:
Press UP key will Start record.
Press "1~9" key will select new channel from channel list. (you must been set in channel list before)
6.5.2 Camera
You can use this phone to take photos. Press Send key to select Photos, Camera settings, Image settings, White balance, Scene mode, Effect settings, Storage or Restore default.
When access camera to waiting for take photo:
Press "1" key change Image size.
Press "2" key change Image quality.
Press "4" key change white balance.
Press "6" key change delay timer.
Press "7" key change Cont. shot.
6.5.3 Image viewer
Press Send key to select View, Browse style, Send, Use as, Rename, Delete, Sort by, Delete all files or Storage.
When you viewing photo, press 3 key rotary photo.
6.5.4 Video recorder
Press Send key to select Camcorder settings, Video settings, White balance, Effect settings, Storage or Restore default.
When access video recorder to waiting for record short video clips:
Press "5" key to start recording.
Press "5" key again to pause/continue recording.
Press Up/Down key to zoom in or zoom out.
Press “*” or “#” key to reduce or increase exposure.
6.5.5 Video player
Press Send key to select Play, Send, Rename, Delete, Delete all files, Sort by or Storage.
When is playing back video:
Press "0" key will change rotary of the video direction.
Press“#”key skip video.
Press *key skip back.
6.5.6 Audio player
Press Send key to select Play, Details, Add to ringtones, Refresh list or Settings.
When is playing back audio:
Press Up key to pause/restart the audio.
Press Down key to stop.
Press “*” to skip back to the previous song.
Press“#”to skip forward to the next song.
6.5.7 Sound recorder
Here you can record sound files. Press Send again to select New record, Play, Append, Rename, Delete, List, Settings, Use as or Send.
6.6 User profiles
Different user profiles are optional as required. Press Up/Down key to select General, Meeting or Outdoor. Press Send key to enter the Customize submenu, and you can set Tone settings, Volume, Alert type, Ring type or Extra tone. Then you can return to Profile options menu, select Activate to activate it.
User cannot select Bluetooth. When you connect a Bluetooth earphone, the phone will be in Bluetooth mode automatically.
6.7 Settings
This menu features convenient settings. Press Send key to view submenus as below.
6.7.1 Dual SIM settings
Here you can do dual SIM card settings. Press Send and Up/Down key to select Dual SIM open, Only SIM1 open or Only SIM2 open.
6.7.2 Phone settings
Here you can do basic mobile phone settings. Press Send and Up/Down key to select Time and date, Schedule power on/of, Language, Display Settings, Auto update of date and time or LCD backlight.
6.7.3 Network settings
Here you can do network settings. Press Send key to select SIM1 or SIM2 network settings. Press Send key to enter SIM1 network settings, press Up/Down key to select Network selection and Preferences. (Local network support is required.) SIM2 network settings are similar to SIM1 network settings.
6.7.4 Security settings
Your phone is equipped with a versatile security system to prevent unauthorized use of the phone or SIM card. Press Send and Up/Down key to select PIN Code (Default password: please check with your network
service provider.), Phone lock (Default password: 0000), Change password or Privacy firewall.
6.7.5 Restore factory settings
If you restore factory settings, the phone will be back to original setting. (Default password: 0000)
6.8 Organizer
This menu offers convenient tools. Press Send key to obtain submenus as below.
6.8.1 Alarm
5 alarms can be set at most. You can press Send key to Edit, press Up/Down key to select On(Off), 00:00(Time), Repeat, Snooze (min) or Alert type.
6.8.2 Tasks
Here you can add new tasks. In Task list, press Up/Down key to select one task. Then press Send key to select View, Add, Edit, Search, Delete, Delete all, Jump to date, View uncompleted, Send Calendar or Save as file.
6.8.3 Bluetooth
Here you can do Bluetooth settings. Press Send and Up/Down key to select Power, Visibility, Paired Devices, Search device, My Phone's name or Advanced.
Note: Must insert SIM1 card, the phone can be use the function.
6.8.6 World clock
The World clock allows you to check the current date and time of many cities around the world and show the position relative to your time zone. Press or key to change the time zone or city. Press Send key to select Daylight saving time for foreign city On/Off.
6.8.7 Unit Converter
Here you can use the unit converter. You can select Weight or Length to convert measurements.
In Weight submenu, you can press 串 or # key to select Kg<>pound or Kg<>ounce. Input numerical value, Press Send key to get result. Press End key to Reset.
In Length submenu, you can press "..." or "#" key to select Km<->mile, M<>yard, M<>foot and Om<>inch. Input numerical value, Press Send key to get result. Press End key to Reset.
6.8.8 Currency Converter
Here you can use the currency converter. You can input Rate, and then press Send key to enter submenu. Press Down key to choose Local input numerical value, press Send key to get the currency conversions.
6.8.9 Stopwatch
Here you can use stopwatch. Press Send and Up/Down key to select Typical stopwatch or 4Way stopwatch.
6.8.10 Fun & Games
Here you can play games. Press Send key to enter Games menu. Press
select Find, Jump to, Go to bookmark, Add bookmark, Delete bookmark, Book info, Settings, Apply global settings, Help or Close.
6.8.12 File manager
Here you can manage your memory easily. Press Send and Up/Down key to select Phone or Memory card. (When you insert memory card)
6.9 Services
To use this function, please contact your local service provider.
6.9.1 Internet services
Homepage: This function enables you to surf the internet. It connects to the homepage you set directly.
Bookmarks: Display bookmark list. You can Press Send key to select Go to, Edit, Send, Delete, Delete all or Add bookmark.
Recent pages: You can check recent pages.
Input address: You can enter an address.
Service inbox: You can check service inbox.
Settings: You can do Internet services settings. For example, you can press Send key to select Profiles. Select SIM1 and press OK. Select a submenu do setting. Press Send and Down key to select Edit, you can do Profile name, Homepage, Data account (select set Data account before), Connection type (you can select HTTP, then press Send to select do Use proxy, Proxy address, Proxy port settings), User name, Password settings. (Note: you must do Data account settings at first.) Activate the setting.
Note: Support WAP and WEB by javascript or html format.
6.9.2 Data account
Here you can set MMS/WAP network parameter. Press Send key to select Edit. Then you can set Account name, APN, User name, Password, Auth. type, Primary DNS or Secondary DNS.
7. SMS Remote Control Function
Anyone with a phone can enable remote settings of this phone by means of SMS orders. Such remote settings include: quick numbers, SOS numbers, contacts, and alarm clock.
7.1 Setting Quick Number
Edit:AT ^+ L:name:name:password
[For example:] AT+L:Jack:13333333333:1234
Jack's quick number is 13333333333.
At most, 5 quick numbers can be stored. If a quick number set by remote SMS and this entry has the same name but with different number, the old quick number will be replaced by the new one.
Note: when the phone had saved up to 5 quick numbers, If you wants to add another quick number with the same name but different number, then the old one will be replaced by the new one. Yet, if the quick number is new, the care phone will be replaced the foremost saved quick number.
7.2 Setting SOS Number
Edit: AT+S:name:name:password
[For example:] AT+S:Jack:13333333333:1234
At most, 5 SOS numbers can be stored. If a SOS number set by remote SMS and this entry has the same name but with different number, the old SOS number will be replaced by the new one.
Note: when the phone had saved up to 5 SOS numbers, If you want to add another SOS number with the same name but different number, then the old SOS number will be replaced by the new one. Yet, if the SOS number is new, the care phone will be replaced the foremost saved SOS number.
7.3 Adding New Entry
Edit: AT+P:name:name:password
[For example:] AT+P:Jack:13333333333:1234
If this entry has the same name but with different number, the old number will not be replaced by the new one.
7.4 Setting Alarm
Edit: AT+A:hh:mm:ss:password
[For example:] AT+A:06:30:Good Morning:1234
The alarm time is 6:30. The content is "Good Morning".
Time format: 24-hour.
The content: not more than 70 characters.
Note:
Default password: 1234. It can be changed in
Menu>Settings>Security settings>Change password>SMS set password.
Above letters (AT + L,AT + S,AT + P,AT + A) need input Capital
characters.
Name: if the character of a name exceeds 15 characters, it will cut
the character from 16th; (New entry is saved in SIM card at first. If
the character of a name exceeds 14 characters, it will cut the
character from 15th)
Number: if the character of a number exceeds 40 characters, it
will cut from 41st;
When the phone under remote control receives an order of remote
setting, the phone will send a message to the controller phone,
indicating successful or unsuccessful setting.
8. Key lock
Slide down/up this mobile phone to lock/unlock the keypad.
When the keypad is locked, press Send and Up to unlock the keypad.
9. Shortcut Key
9.1 Electric Torch
Press the Torch button up/down to switch on/off the electric torch. (Even
off the phone can used this function)
9.2 Hearing aid
In standby mode, press and hold the Key "0" to switch on/off hearing aid.
The hearing aid can't be activated until you plug into headset.
10. Basic Spec
Network: GSM 900MHz/DCS1800 MHz Dual Band
Dimension: 102mm54mm18mm
Battery: 1050mAh Weight: about 120g (including battery)
Power Adapter: AC 100V~240V 50Hz/60Hz, DC 5V 0.5A
Operating Temperature: -10°C ~ +40°C
Ambient Humidity: 10~95% Storage Temperature: -30°C ~ +60°C
Noise level: ≤60dB(A)
Pressure: 86-106Kpa
SAR: <1.0W/kg
Standby time: About 300 hours / Talk time: About 6 hours
*Variation in operation times may occur depending on SIM card, network, and usage settings, usage style and environments.
11. Packing list
Check all the components according to the packing list when you open the package. Please contact with the dealer or seller in time when you find missing or destroyed parts.
Handset
DATA line
Adaptor
Battery
Earplug
Manual
12. Care and Maintenance
12.1 Battery and Charger Safety
Leaving the battery in hot or cold place, such as in a closed car in summer or winter conditions, will reduce the capacity and lifetime of the battery. A device with a hot or cold battery may not work temporarily, even when the battery is fully charged. Battery performance is particularly limited in temperatures well below freezing.
1 Do not short-circuit the battery. Accidental short-circuiting can occur when a metallic object causes a direct connection between the + and - terminals of the battery. Short-circuiting the terminals may damage the battery or the mobile phone.
I Do not dispose of the battery in a fire.
12.2 Phone Maintenance
Your device is a product of superior design and chairmanship and should be treated with care. The suggestions below will help you protect your warranty coverage.
Keep the phone and all the parts and accessories (for example, SIM card) out of the reach of small children.
Do not use or store the phone in dusty or dirty locations. Its moving parts and electronic components can be damaged.
Do not use or store the phone in excessively hot places. High temperatures will shorten the life-span of the phone, damage the battery, and warp or melt the plastic used in the phone's manufacture.
Do not store the phone in excessively cold places. When the phone returns to its normal temperature, moisture can form inside the phone, causing damage to the electronic circuits.
Do not mishandle or abuse the phone. Dropping, knocking or shaking it can damage the internal circuits.
Do not use harsh chemicals, strong detergents, or cleaning solvents to clean the phone. If you must clean it, then use a soft, clean and dry cloth.
Do not paint the phone. Paint can clog the moving parts and prevent proper operation.
Use only the supplied or an approved replacement antenna.
Unauthorized antennas, modifications, or attachments could damage the device and may violate regulations governing radio devices.
If the phone or any of the accessories are not working as they should, please consult your dealer who can provide you with the expert
assistance required.
All of the above suggestions apply equally to your device, battery, charger, or any enhancement. If any device is not working properly, take it to the nearest authorized service facility for service.
13. FAQ
If there is something wrong with your phone, please refer to these FAQs for solutions. If these FAQs are not helpful, please contact the distributor or service provider of your phone.
| Trouble | Possible reasons |
| The phone cannot be switched on | 1. Is there any power in the battery? 2. Is the battery installed properly? |
| Battery cannot be charged | 1. Check if the charger is connected with the phone correctly. 2. Is the battery usable? The performance of the battery be reduced after used for several years. 3. Is the battery completely discharged? The phone need to be connected to the charger for a while before it can be charged. |
| Fails to register to the network | 1. The signal is too weak, or there may be some radio interference around. Check the signal strength meter on the screen to see whether vertical lines are displayed. 2. Is the SIM card installed properly, poorly contacted or damaged? If the SIM card is damaged, please ask your network operator for replacement. |
| Cannot call out | 1. Is the SIM card registered in the network? 2. Is call barring enabled? 3. Calling prohibited due to call charges not paid? 4. Have you enabled the function of FDN? 5. Have you selected line 2 though your network operatodoesn't provide this service? |
| Cannot call in | 1. Is the SIM card registered in the network? 2. Incoming call prohibited due to call charges not paid? 3. Is call diverting enabled? 4. Is the "Bar incoming call" function in call barring enabled? |
| PIN locked | Input the PUK code supplied with the SIM card to unlock or contact the network operator. |
| Call charge meter invalid | No metering pulse is transmitted. Please contact your network operator. |
| SIM error | 1. SIM card is dirty. Clean it. 2. Reinstall the SIM card. 3. SIM card is damaged. Replace it. |
Appendix II Abbreviations and explanations
GSM---Global System of Mobile Communication.
SIM---Subscriber Identity Module.
PIN--- Personal Identification Number.
Usually refers to PIN1. Supplied with SIM card. Used to unlock the SIM card.
PUK---Personal Unblocking Key.
PUK code and the universal personal unblocking key (UPUK) code (8 digits) are required to change a blocked PIN code and UPIN code, respectively. The PUK2 code is required to change a blocked PIN2 code. If the codes are not supplied with the SIM card, contact your local service provider for the codes.
14.Disposal
In order to dispose of your device, take it to a collection point provided by your local public waste authorities (e.g. recycling centre). The adjacent symbol indicates that the device must not be disposed of in normal domestic waste!
According to laws on the disposal of electronic and electrical devices, owners are obliged to dispose of old electronic and electrical devices in a separate waste container.
Batteries must be disposed of at the point of sale or at the appropriate collection points provided by the public waste authorities.
Packaging materials must be disposed of according to local regulations.


15. In case of problems
Should problems arise with the phone, please refer to the following information first. In the case of technical problems, you can contact our hotline service, Tel. 0900 00 1675 within Switzerland (cost via Swisscom at time of going to print: CHF 2.60/min). In the case of claims under the terms of guarantee, please contact your sales outlet. There is a 2 year period of guarantee.
16. Guarantee
SWITEL equipment is produced and tested according to the latest production methods. The implementation of carefully chosen materials and highly developed technologies ensure trouble-free functioning and a long service life. The terms of guarantee do not apply where the cause of equipment malfunction is the fault of the telephone network operator or any interposed private branch extension system. The terms of guarantee do not apply to the batteries or power packs used in the products. The period of guarantee is 24 months from the date of purchase.
All deficiencies related to material or manufacturing errors within the period of guarantee will be redressed free of charge. Rights to claims under the terms of guarantee are annulled following tampering by the purchaser or third parties. Damage caused as the result of improper handling or operation, normal wear and tear, incorrect positioning or storage, improper connection or installation or Acts of God and other external influences are excluded from the terms of guarantee. In the case of complaints, we reserve the right to repair defect parts, replace them or replace the entire device. Replaced parts or devices become our property. Rights to compensation in the case of damage are excluded where there is no evidence of intent or gross negligence by the manufacturer.
If your device shows signs of defect during the period of guarantee, please return it to the sales outlet in which you purchased the SWITEL device together with the purchase receipt. All claims under the terms of guarantee in accordance with this agreement can only be asserted
at the sales outlet.
No claims under the terms of guarantee can be asserted after a period of two years from the date of purchase and hand-over of the product.
SWITEL Declaration of conformity
This equipment complies with the European R&TTE directive. To view the complete Declaration of Conformity, please refer to the free download available at our web site: www.switel.com
Service Hotline
In the event of technical problems, you can contact our hotline service, Tel. 0900 00 1675 within Switzerland (cost via Swisscom at time of going to print: CHF 2.60/min).