M200 - Smartphone SWITEL - Free user manual and instructions
Find the device manual for free M200 SWITEL in PDF.
User questions about M200 SWITEL
0 question about this device. Answer the ones you know or ask your own.
Ask a new question about this device
Download the instructions for your Smartphone in PDF format for free! Find your manual M200 - SWITEL and take your electronic device back in hand. On this page are published all the documents necessary for the use of your device. M200 by SWITEL.
USER MANUAL M200 SWITEL
Overstroombbeveiling
Preface 21
Introduction 22
Safety instructions and danger warnings 23
Safeguards 24
Appliances and the environment 26
- General 26
1.1 A quick look at the appliance 26
1.1.1 Most important parts 26
1.1.2 Control panel 26
- Technical details 27
3.Installation 27
3.1 Unpacking 27
3.2 Installation 28
3.2.1 Preparation for positioning the appliance 28
3.2.2 Electrical connection 28
3.2.3 Connection to the water mains 28
3.2.4 Water drainage 28
3.2.5 First time use 28
3.2.6 Height setting model MT200v 29
3.2.7 Setting the descale indicator 30
3.2.8 Resetting the descale indicator light 30
4.Daily use 31
4.1 Drip stop 31
4.2 Coffee quantity 31
4.3 Making coffee 32
4.4 Making tea 32
4.5 Termination of the brewing process? 32
- Settings 33
5.1 Setting of the amount of coffee 33
5.2 Setting of the display to show cups of litres 33
5.3 Setting of the prewet function 33
6.Maintenance. 34
6.1 Cleaning of the appliance and accessories 34
6.1.1 Removing coffee deposits from glass jug and filter 34
6.1.2 Removing coffee deposits from thermos jug 34
6.2 Descaling 35
6.2.1 Switching-off the descending indicator light 35
- Troubleshooting 36
- Ordering consumer articles and accessories 38
© 2009 Animo
All rights reserved.
No part of this document may be reproduced and/or publicized by means of printing, microfilm, electronic or any other means whatsoever without the prior written permission of the manufacturer. This also applies to the accompanying drawings and/or diagrams.
Animo reserves the right to change parts at any time without giving prior or direct notification to the customer. The contents of this manual can also be changed without prior notification.
This manual covers the standard model of the appliance. Animo can therefore not be held liable for any losses arising from the fact that the specifications of the appliance supplied to you deviate from the standard model. Please contact your supplier's service department for information concerning adjustment, maintenance or repairs not covered by this manual.
Although this manual was produced with the greatest possible care, the manufacturer is unable to accept liability For errors in this document or their consequences.
You are advised to carefully read the instructions in this document: they contain important information about safety when installing, using and maintaining the appliance. Keep this document in a safe place so that you can consult it when necessary.
Preface
Purpose of this document
This document serves as a manual that enables qualified personnel to safely install, program and maintain the coffee maker.
- 'Qualified personnel' are defined as people that can program the appliance, perform maintenance on it and repair minor faults.
All of the chapters and paragraphs are numbered. The various illustrations to which the text refers are given in the fold-out sheets or at the back of this booklet or under the particular subjects.
Icons and symbols
NOTICE
General instruction for: IMPORTANT, NOTE or REMARK.
!
CAUTION!
Warning of possible damage to the appliance, the surroundings or the environment.

WARNING
Warning of possible serious damage to the appliance or physical injury.

WARNING
Warning of electricity hazard.
Introduction
Congratulations on your purchase and welcome to Animo! To fully benefit from the support that Animo offers, register your product at www.animo.eu/warranty
Models
This manual covers the following coffee makers:
M200
M
2021T00200
1,85
2.1/2.2
2.4Lt
Double model height-adjustable
Purpose of the appliance
The sole purpose of this appliance is to make coffee and/or tea.
The use of the appliance for other purposes is not permitted and may be hazardous.
The manufacturer cannot be held liable for losses caused by using the appliance for purposes other than those indicated here or by incorrect use.
Service and technical support
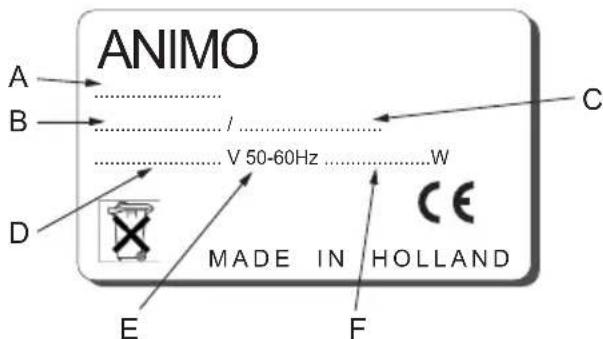
Please contact your dealer for information not given in this document regarding specific adjustment, maintenance and repairs. Before contacting your dealer you should note the following appliance details, marked with a # . You will find these details on the type plate attached to your appliance (11).
A-Type#
B - Article number #
C - Machine number #
D - Supply voltage
E - Frequency
F - Output
Guarantee conditions
The guarantee conditions applicable to this appliance form an integral part of the general terms of delivery.
Directives
This appliance meets the requirements of the EMC Directive 89/336/EEC, and the Low Voltage Directive 72/23/EEC.
Safety instructions and danger warnings
This appliance meets the mandatory safety regulations. Inexpert use can result in personal injury and material damage. The following warnings and safety instructions must be observed before using the coffee maker.
Instructions for use
Read these instructions for use carefully, before using this appliance. This will protect your safety and prevent damage being caused to the appliance. Perform the various actions in the order given. Always keep this manual close by the appliance.
Installation
- Place the appliance at buffet height and on a firm, level base, in such a way that it can be connected to the water supply and power supply.
- Connect the appliance to an earthed wall socket.
Position the appliance in such a way that no damage can be caused if it leaks. - Do not tilt the appliance, always position and move the appliance upright.
- The coffee maker is fitted with an overflow device that discharges at the bottom of the appliance - take this into account when positioning the appliance.
- Water always remains in the heating system: for this reason the appliance must not be placed in an area where the temperature can fall below freezing point.
- When installing the appliance, always observe the local rules and use approved materials and parts.
- The 'Installation' chapter must again be followed when repositioning the appliance.
- Connect the appliance to the cold water mains.
Usage
Inspect the appliance before using it and check it for damage.
- Never submerge or spray the appliance.
- Do not press the buttons with a sharp object.
- Protect the controls against dirt and grease.
- It is advisable to take the plug out of the socket and close the water tap if the appliance is not going to be used for longer periods of time.
Maintenance and troubleshooting
- Observe the descending intervals indicated by the descending indicator light. Overdue maintenance to the heating system can result in high repair costs and annulment of the guarantee.
Always follow the manufacturer's instructions when using the descaling agent. - Do not leave the appliance unattended when maintenance is being performed.
- When descending the appliance, it is advisable to wear safety glasses and protective gloves.
- Never clean the hot plates (if present) with an abrasive or sharp object. This way scratches on the teflon surface will be prevented.
- Flush the appliance at least twice after descending it.
- Wash your hands thoroughly after descending the appliance.
Always have repairs carried out by a qualified service engineer.
- The plug must be taken out of the socket if the appliance has to be opened for cleaning or repairs.
The manufacturer cannot be held liable for losses caused as a result of failure to observe these safety instructions.
Safeguards
The appliance is fitted with the following safeguards:
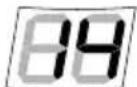
Dry-boil protection (14)
This appliance is equipped with a dry-boil protection. This protection triggers if the heating element overheats owing to a fault. Once the fault has been resolved, the dry-boil protection can be reset at the back of the appliance. The most common cause of the dry-boil protection being triggered is not descaling the heating system in time.
If the heating system does not switch back on, proceed as follows:
- Allow the appliance to cool down.
- Unscrew the protective cap.
- Press the button which is now visible and firmly screw the protective cap back on.
If the dry-boil protection triggers owing to increased scale deposits, descale the appliance. See chapter 6.2 Consult your dealer if the fault was caused by a problem other than the dry-boil protection being triggered.
On/off switch (1)
The on/off switch is used to switch the appliance on and off. Remember that the appliance can still be live after switching it off! For this reason you should always remove the plug from the socket to render the appliance voltage-free.
Start/stop button (5.5)
The coffee making process can be interrupted at any point using the start/stop button located on the control panel.
Jug detector (9)
This appliance is fitted with a jug detector that operates the leak stop under the filter. This jug detector also ensures that the appliance only makes coffee if there is a jug under the filter. If the jug is removed during the coffee brewing process, the process will be interrupted and the filter will stop dripping.
Overflow safeguard
The amount of water required is regulated and monitored by flow and level sensors. If one of the two sensors detects an irregularity, the appliance switches off and both indicator lights will flicker.
Appliances and the environment
The packing material
Your new coffee maker has been carefully packaged to protect it against damage. The packing is not harmful to the environment and consists of the following materials:
Corrugated cardboard
- Filler elements made of polyurethane foam
Discarding the appliance
No appliance lasts forever. When the time comes to discard your appliance it will usually be possible to return it to your dealer. If this is not the case, ask your municipal council about the alternatives for recycling the materials. All plastic parts have been given standard codes. The parts of the appliance such as the printed circuit board and accompanying parts form electrical and electronic waste. The metal body is made of stainless steel and can be completely dismantled.
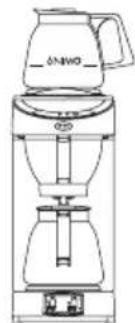
1. GENERAL
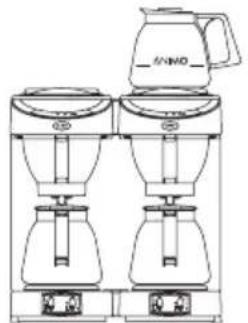
1.1 A quick look at the appliance
The most important parts of the appliance are shown in the fold-out sheet in this manual. Keep the fold-out sheet open when reading the instructions.
1.1.1 Most important parts
- Appliance on/off switch coffee making 6. Top hot plate section and bottom hot plate 7. Glass jug/thermos flask
- On/off switch for top hot plate 8. Descaling opening
- Basket filter with drip stop device 9. Jug detector
- Basket filter paper 10. Bottom hot plate
- Control panel coffee maker 11. Type plate
5.1 Display 12. Water drain
5.2 Descale indicator light
5.3 Brewing process indicator light
5.4 Selection button
5.5 Start/stop button
- Connection cable with plug
- Dry-boil protection
- Water connection
1.1.2 Control panel
The control panel has the following functions:
CAUTION!
- Never press de buttons with a sharp object.
- Protect the controls against dirt and grease.
Display (5.1); The display shows the selected amount of coffee, in terms of cups. For display in litres, see chapter 5.2.
While the coffee is being made the display alternately shows the selected amount and the amount of coffee that has already been made.
Descale indicator light (5.2); The red indicator light will light up if the appliance needs to be descaled. The appliance will continue to work so that it can be descaled when it is not being used. See also chapter 6.2.

Brewing process indicator light (5.3); The green indicator light lights up when the coffee passes through the system. At the end of the coffee making process a signal sounds three times and the green indicator light goes out. The indicator light flickers if the jug is temporarily removed during the coffee making process. A signal will also sound indicating that the coffee making process has temporarily stopped.

Sound signals; Sounds three times at the end of the coffee making process. Sounds once if the jug is removed during the coffee making process.
A long signal sounds when the appliance is switched on.

Selection button (5.4); The selection button is used to reduce the amount of coffee set in the display. When the lowest value is reached the display returns to the maximum amount.

Start/stop button (5.5); The start/stop button is used to start and (emergency) stop the coffee making process.
2. TECHNICAL DETAILS
Model M200 M202 MT200 MT202v
Article number 10551 10562 10572 10587
Buffer stock coffee 3.6 l./28 cups 7.2 l./56 cups - -
Hourly coffee capacity 18 l./144 cups 36 l./288 cups 18 l./144 cups 18 l./144 cups
| Jug filling time | approx. 6 min. | approx. 8 min. | approx. 7,5 min./2.2 l. | approx. 7,5 min./2.2 l. |
| coffee amount | 1 -3 l. | 1 -3 l | 1 -3 l. | 1 -3 l. |
| Supply voltage | 220-240V~ | 220-240V~ | 220-240V~ | 220-240V~ |
| Frequency | 50-60Cy | 50-60Cy | 50-60Cy | 50-60Cy |
| Total output | 2250W | 3500W | 2100W | 2100W |
| Filter paper | 90/250 | 90/250 | 90/250 | 90/250 |
| Min. water pressure | 0.2 MPa (2 bar) | 0.2 MPa (2 bar) | 0.2 MPa (2 bar) | 0.2 MPa (2 bar) |
| Max. water pressure | 1 MPa (10 bar) | 1 MPa (10 bar) | 1 MPa (10 bar) | 1 MPa (10 bar) |
| Dimensions | See fig. 1 | See fig. 2 | See fig. 3 | See fig. 4 |
| Empty weight | 7,5 kg. | 13,6 kg. | 7 kg. | 9 kg. |
| Transport dim. (lwxwh) | 600x275x530 mm | 600x490x540 mm | 440x270x670 mm | 440x270x670 mm |
| Transport weight | 9,6 kg. | 17,9 kg. | 9 kg. | 11 kg. |
All technical details are subject to change
3. INSTALLATION
3.1 Unpacking
The machine has been carefully packed to prevent damage being caused to your new coffee maker. Remove the packing carefully without using sharp objects. Check if the appliance is complete. The appliance is delivered with the following accessories:
| M200 | M202 | MT200 | MT200v | |
| Glass jug | 2 | 4 | - | - |
| Basket filter | 1 | 2 | 1 | 1 |
| Filter paper (25 pcs.) | 1 | 1 | 1 | 1 |
| Coffee measuring cup | 1 | 1 | 1 | 1 |
| Funnel | 1 | 1 | 1 | 1 |
| Water connection hose | 1 | 1 | 1 | 1 |
| Coffee fur remover | 1 | 1 | 1 | 1 |
| Scale remover | 1 | 1 | 1 | 1 |
| Manual | 1 | 1 | 1 | 1 |
Please contact your dealer if any parts are missing or damaged.
3.2 Installation
CAUTION
Water always remains in the heating system: for this reason the appliance must not be placed in an area where the temperature can fall below freezing point.
3.2.1 Preparation for positioning the appliance
- Position the appliance at buffet height on a firm, level base that can bear the weight of the appliance when it is filled.
- Position the appliance level and in such a way that it cannot cause any damage if it leaks.
- The water supply pipe (G3/4" pipe 15mm) and the power connection must be situated within half a metre of the appliance.
- The owner must have these installation-technical preparations performed by qualified engineers in accordance with general and local regulations.
- The service engineer may only connect the appliance to the prepared connections.
3.2.2 Electrical connection
Supply voltages and frequencies can differ between countries. Check if the appliance is suitable for connection to the local power mains. Check if the details on the type plate correspond. Connect the appliance to an earthed wall socket.
3.2.3 Connection to the water mains
Connect the appliance using the water hose to an easily accessible aeration tap that can be quickly closed if problems arise.
3.2.4 Water drainage (18)
If the reservoir of the coffee maker is overfilled owing to a defect, the excessive water will be discharged via the water drain (18) at the bottom of the appliance. Make allowance for this when positioning the appliance!
WARNING
- Ensure that the mains lead does not come into contact with the hot plates (if present).
3.2.5 First time use
When used for the first time the appliance works according to the standard factory settings. The various settings can be altered by authorised personnel. See chapter 5. Settings.
- Connect the water connection hose (supplied) to the swivel nut on the back of the appliance and to a manually-operated aeration tap. NB! Only cold water. Open the water tap and check the connection for leaks.
- Slide an empty basket filter (3) into the appliance and place an empty jug (with lid) under it. NB! For the MT200 model, open the lid of the thermos jug with pump and leave the riser tube in the jug. Adjust the height of the MT200(v) model before positioning it, see 3.2.6.
- Check if all on/off switches (1 + 2 ,if present) are at the O position.
- Put the plug in the socket.
- Switch on the appliance by setting the on/off switch (1) to position I. The indicator lights (5.2) and (5.3) lights will light up and you will hear a signal. The display (5.1) will then show the preset standard number of cups.
- Press the start/stop button and the internal reservoir will fill up. Press the start/stop button again if water has not started flowing after three minutes.
- The green indicator light (5.3) will now light up until the appliance has finished making the coffee.
- Once the appliance has completed the process a signal will sound after about 1.5 minutes and the green indicator light (5.3) will go out.
- Follow the above procedure again for the other coffee making section if the model has a double coffee making system (M202).
- Once the jug has been emptied, the appliance is ready for use.
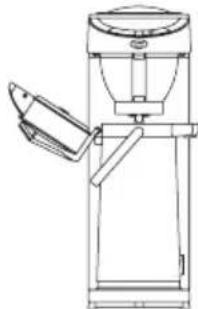
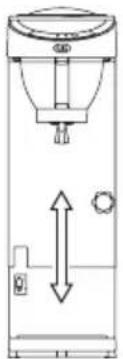
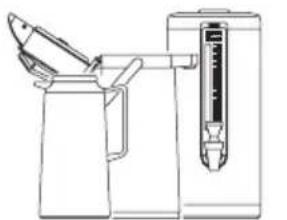
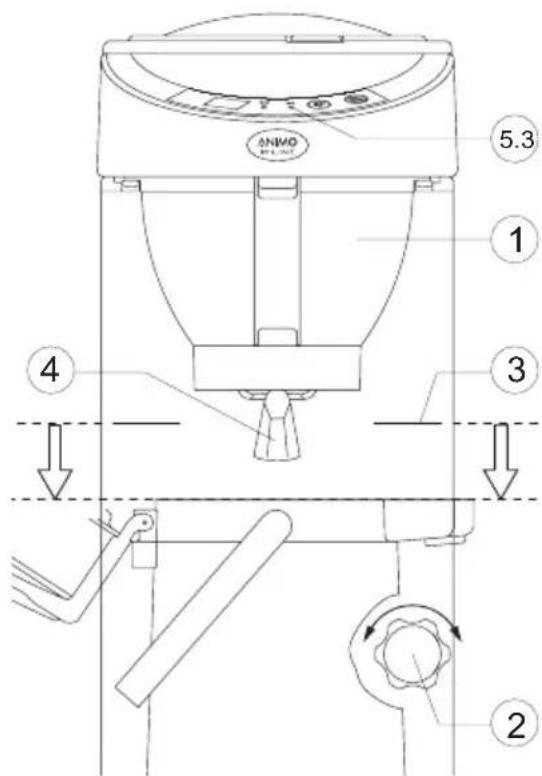
3.2.6 Height setting model MT200v
The MT200v model is in height adjustable. Follow the steps below to optimally set the appliance to the height of the thermos flask being used.
- Slide the basket filter (1) into the appliance.
- Grasp the top part of the appliance and turn the adjustment button (2) a half-turn anti clockwise.
- Lift the top part of the appliance upwards.
- Place the thermos jug you intend to use at the base of the appliance.
- Now slowly allow the top section to go down until the marking line (3) on the column is level with the top side of the thermos jug. (This column height adjustment must be done with the top open if the appliance is used in combination with a thermos jug with a pump).
- Tighten the adjustment button (clockwise).
- After repositioning, check if the thermos jug properly presses in the jug detector handle (4) (the green indicator light (5.3) must not blink when a coffee making process begins).
3.2.7 Setting the descale indicator
Scale deposits are left in the heating system when the appliance is used. The amount of scaling depends on the hardness of the water being used. The coffee maker is fitted with a descale indicator light (5.2), which lights up when the heating system has processed a certain quantity of water and has to be descaled. The appliance continues to work so that it can be descaled when it is not being used.
| Position | Indication lights | Brewing processes | Hardness | °C mmol/l °f | |
| Soft | 512 | < 8 | < 14 | ||
| Normal* | 256 | 8 - 12 | 14-21 | ||
| Hard | 128 | >12 | >2,16 | >21 |
*Standard setting
If you are unaware of the hardness of your tap-water, you are advised to contact your local water supply company.
Set the appliance to your water hardness as follows, using the table above as a guideline.
- Switch off the appliance (1)
- Hold in the Selection button (5.4) and switch the appliance back on.
- Press the Selection button (5.4) until the right indicator light (5.2 / 5.3) lights up. (E.g., only the red lamp should light up for hard water).
- Wait for 6 seconds. The water hardness has now been set.
3.2.8 Resetting the descale indicator light
After the descending procedure (see chapter 6.2.1) hold in the selection button for 6 seconds. The descale indicator light will now go out.
4. DAILY USE
When using the appliance you may find that certain settings do not entirely match your requirements.
Chapter 5 explains how all settings can be adjusted by qualified personnel.
Chapter 6 explains how the appliance must be maintained by qualified personnel.

NOTICE
- The leak stop can only work if the jug detector is pressed in sufficiently by the jug. If you use a coffee jug with a narrow neck the jug detector will not be pressed in sufficiently and the appliance will not start.
4.1 Drip stop
This appliance is fitted with a drip stop that ensures that no coffee drips out of the filter when you:
- Briefly take away the jug during the brewing process: the jug detector (9) 'sees' that you have removed the jug and interrupts the brewing process.
A short audible signal will sound and the green indicator light (5.3) will flicker.
The brewing process will resume when you replace the jug.
Take away the jug after making coffee.
After making coffee take the filter out of the appliance to empty it.
4.2 Coffee quantity

NOTICE
Basic instructions for brewing coffee
Use fine-grind coffee.
- Keep the jugs and the basket filter clean.
The amount of coffee can be measured using the coffee measuring cup supplied and generally amounts to 35 to 50 grams per litre.
| Jug Glass jug Thermos jug Thermos jug with pump Thermos container | ||||
| Content | 1.8 litres | litres | 2.2 litres | 2.4 litres |
| Coffee | 65-90 grams | 65-90 grams | 75-110 grams | 85-120 grams |
4.3 Making coffee
- Place a sheet of basket filter paper containing the desired amount of coffee (fast filter type) in the basket filter. See the table above for the amount of coffee required. A level coffee measure is approximately 80 grams.
- Slide the basket filter (3) into the appliance.
- Place the jug, with the lid on it, under the filter. NB! For the MT200 model, leave the lid of the thermos jug with pump open, and leave the riser tube in the jug.
- Switch on the coffee maker using the on/off switch (1). The light in the switch will come on and the lower heating plate will switch on.
- Select the desired amount in the display (5.1) using the selection button (5.4).
- Press the start/stop button, the green indicator light (5.3) will switch on and the appliance will start making coffee. While the appliance is making coffee the display (5.1) will alternately show the selected quantity and the amount of coffee that has already been made.
- Once the coffee making process has been completed the green indicator light (5.3) will go out and an audible signal will sound three times, indicating that the coffee is ready. The jug can be removed before the filter has been completely emptied, but there will be no audible signal if this is done. Once the filter has been cleaned you can immediately carry on making coffee.
- Pour out the coffee or place the jug on the top hot plate (6) (except for the MT models). The top hot plate is switched on separately using the on/off switch (2). Always switch off the extra hot plate when it is not being used.
- After cleaning the basket filter the appliance can immediately be used to make the next serving of coffee.
4.4 Making tea
This appliance can of course also be used to make tea using teabags.
- Basic rule: never use a basket filter or a (thermos) jug that has already been used to make coffee. The coffee remnants will adversely affect the flavour of the tea.
- To make tea you should therefore always use a separate glass jug/thermos jug and basket filter that have not been used to brew coffee!
- Place the teabags in the basket filter without using a paper filter or place/hang them in the jug. Tea is made using the same method as for brewing coffee, but without using paper filters or coffee.
4.5 Termination of the brewing process?
The process can be stopped at any moment.
- By once again pressing the start/stop button (5.5). If the start/stop button is then pressed again, the process will start again from the beginning! To avoid abor ting an interrupted coffee making process, use the selection button (5.4) to select a smaller quantity of coffee so that the amount already made does not overflow.
- Remove the jug from under the filter. The jug detector (9) will temporarily interrupt the coffee making process and the leak stop will prevent the filter (3) from dripping. The green indicator light (5.3) will flicker, and a short audible signal will sound. When the jug is replaced under the filter the coffee brewing process resumes and will be completed.
5. SETTINGS
WARNING
The jug will overflow if the set coffee quantity is too high.
- The manufacturer is unable to accept any liability for the consequences of altered settings.
5.1 Setting of the amount of coffee
Both the M and the MT models are supplied as standard set to make coffee using 1.8 litres of water (14 cups). If this is too much or too little, or if you are using an MT model in combination with a thermos jug with a greater capacity, you can adjust the quantity as follows:
- Press the selection button (5.4) and hold it in, and then press the start/stop button (5.5) once. A number will appear in the display.
- Release both buttons. The display will show the set value. The standard setting is 20 (1.8 I. / 14 cups).
- Press the selection button (5.4) to increase the amount. Each increase in the display puts approximately 4 ml more water in the jug. Use the table at the back of this manual. To reduce the quantity: go through the table until it restarts after 50. The range runs from 0, 1, 2, 3, 4,..., 50.
- Now wait for 6 seconds. The selected quantity is has been saved.
5.2 Setting of the display to show cups or litres
The appliance is factory set to display the number of cups.
If you want the display to show litres, you can adjust it as follows:
- Press the selection button (5.4) and hold it in, then press the start/stop button (5.5) once. A number will appear in the display.
- Release both the buttons and then press the start/stop button once again.
- A "C" (Cups) will appear in the display. Change the "C" to an "L" with the selection button.
- Now wait for 6 seconds. The adjustment has been saved.
5.3 Setting of the prewet function
This appliance can make coffee using two methods:
Continue-brew ("Cb") (factory setting); The coffee making process begins immediately and will pour hot water over the ground coffee without a waiting time.
Prewet-brew ("Pb"); part of the hot water is first poured onto the ground coffee. This causes the coffee to rise so that the smells and flavours are released. The coffee making process then begins. If you want to set the appliance to Prewet brew, this setting can be changed as follows:
- Press the selection button (5.4) and hold it in. Then press the start/stop button once. A number will appear in the display.
- Release both buttons and then press the start/stop button twice. "Cb" (Continue-brew) will appear in the display.
- Use the selection button to change "Cb" into "Pb" (Prewet-brew).
- Now wait for 6 seconds. The adjustment has now been saved.
6. MAINTENANCE
WARNING
The appliance must not be submerged or sprayed.
- Never clean the hot plates (if present) with an abrasive or sharp object. This way scratches on the teflon surface will be prevented.
6.1 Cleaning of the appliance and accessories
- Clean the outside of the appliance with a clean, damp cloth, if necessary using a mild (non-abrasive) cleaning agent.
- Do not use an abrasive, as this will leave scratches and dull patches.
- The glass jugs and the basket filter can be washed normally and rinsed clean. Please note, however, that it is inadvisable to clean the basket filter in an industrial dish washer as its lightness may cause it to float and sustain damage.
- The thermos jug, thermos jug with pump and the filter can be rinsed with hot water.
- The coffee deposit in the coffee jugs and the filter can be cleaned with Animo coffee fur remover. The appliance is supplied with one sachet of coffee fur remover. It is easy to use.
6.1.1 Removing coffee deposits from glass jug and filter
- Fill a tray with approx. 5 litres of warm water and dissolve a sachet of coffee funnel remover in it.
- Place the parts you want to clean in this solution and leave them to soak for 15 to 30 minutes.
- Then rinse them several times with hot water, and repeat when necessary.
- Sprinkle the powder on to heavily soiled parts and clean them with a wet brush.
6.1.2 Removing coffee deposits from thermos jug
- Dissolve a quantity of coffee fur remover in warm water: use approx. 2 grams per litre.
- Fill the thermos jug with this solution.
- Leave the solution to soak for 15 to 30 minutes, then pour it away.
- Rinse the jug thoroughly with hot water and repeat this several times.
CAUTION
- Stay close to the appliance when performing maintenance.
- It is advisable to wear safety glasses and protective gloves when descaling the appliance.
- Flush the appliance at least two times after descending it.
- Wash your hands thoroughly after descending the appliance.
6.2 Descaling
Scale deposits are left in the heating system when the appliance is used. The amount of scaling depends on the hardness of the water being used. The appliance is fitted with a descale indicator light (5.2), which lights up when the heating system has processed a certain quantity of water and has to be descaled. The appliance continues to work so that it can be descaled when it is not being used.
#
NOTICE
-
Observe the descending intervals indicated by the descale indicator light. Overdue maintenance to the heating system can result in high repair costs and annulment of the guarantee.
-
Before descending the appliance, carefully read the instructions for use on the descending agent. We advise you to use the tried and tested Animo descending agent.
- Slide an empty basket filter (3) and place an empty jug under it.
- Remove the cap (8) and place the funnel (supplied) into the descending opening.
- Dissolve one 50 gram sachet of Animo descaling agent in 0.5 litre of warm water (approx. 60 - 70^ ).
- Carefully pour half of the solution into the descending opening (8) using the funnel
- Switch on the appliance using the switch (1). Select 2 cups using the selection button (5.4) and press the start/stop button (5.5). The solution will now run through the heating system and discharge into the jug.
- Wait until the 'coffee ready' signal sounds. The solution will now react with the deposit in the heating system.
- After the waiting time, repeat points 5 and 6.
- Wash away the solution in the jug once the filter has finished dripping.
- Remove the funnel and replace the cap.
- After descending the appliance, flush the system by following the coffee making procedure twice but without using filter paper or coffee. Remember to empty the jug in the mean time.
- Switch off the appliance and thoroughly clean the basket filter and the jug.
- The appliance is now ready for use.
6.2.1 Switching-off the descale indicator light
- Press the selection button (5.4) for 6 seconds; the descale indicator light (5.2) will go out.
- The control system resumes registering the number of brewing processes.
7. TROUBLESHOOTING
WARNING
- Have all repairs to the electrical system performed by a qualified service technician.
If your appliance is not functioning correctly, use the troubleshooting guide below to see whether you can resolve the problem yourself. If not, please contact your dealer.
| Troubleshooting guide coffee making selection | ||
| Symptom: Possible cause: | Action: | |
| The appliance is not working and the lamps in the switch are not lighting up. | The fuse in the fuse box has been triggered, the group is loaded too heavily. | Replace the fuse or reset it. Connect the appliance to a separate group. |
| The brewing process indicator light (5.3) is flickering, no water is getting into the filter. | The jug indicator is not registering a jug. There is no jug under the filter. | Position a jug, use the correct jug. |
| The brewing process indicator light (5.3) is on, but no water is getting into the filter. | The dry-boil protection has been triggered. | Reset the dry-boil protection (14). See page 24. Safeguards; dry-boil protection. |
| The descale indicator light (5.2) has come on. | The scale deposits in the heating system exceed the set limit. | Descale the appliance, see chapter 6.2 Descaling. |
| The descale indicator light (5.2) remains on after descaling the appliance. | The appliance has not yet been reset. | Press the programme button (5.4) for 6 seconds. The light will go out. See chapter 3.2.7 Resetting the descaling indicator light. |
| Steam is coming from the filter. | The appliance was not descaled when indicated by the descale indicator light or the wrong water setting has been applied. | Descale the appliance, see chapter 6.2 Descaling. See chapter 3.2.6 Setting the descaling indicator. |
| Coffee is dripping out of the filter when there is no jug under it. | The leak stop valve on the outlet of the filter is soiled or damaged. | Clean the filter and check the leak stop valve for damage. |
| The coffee is too strong. | Too much coffee has been placed in the filter. | Reduce the amount of coffee. |
| The coffee is too weak. | Not enough coffee has been placed in the filter. | Increase the amount of coffee. |
| The water distributor is soiled, so that the coffee is not being completely drenched. | Unscrew the water distribu- tor and clean it. | |
| The coffee is not hot enough There is no lid on the jug.Use the lid. | ||
| The jug is too full or is overflowing. | The set quantity is too high. | Lower the quantity. See chapter 5.1 Setting the amount of coffee. |
| Not enough coffee is getting into the jug. | The set quantity is too low. | Increase the quantity. See chapter 5.1 Setting the amount of coffee. |
| E1 (filling time error). | Appliance fills too slowly. The water supply is blocked | Check the water supply. Fully open the tap. Increase the water pressure. Switch the appliance on and off. The error report will dispar- pear. |
| E8 (minimum water sensor fault) from software version 1.4 | Reservoir does not fill during the brewing process. | |
| An E2, 3, 4, 5, 6, 7 appears in the display and both indi-cator lights flickers. | The control unit is reporting a defect that can only be resolved by a service technician. | Contact dealer or service technician. |
8. CONSUMER ARTICLES AND ACCESSORIES
See the list below for the consumer articles and accessories available for the appliance. You can order these parts via your dealer, stating the details of the appliance given on the type plate, a description of the item, article number and quantity.
Consumer articles
| Description Art.No. Qty | ||
| Filter paper 90/250 01088 | 1 box 1000 pcs. | |
| Coffee fur remover 49009 | 1 box 100 sachets (10 grams) | |
| Scale remover 49007 | 1 box 48 sachets (50 grams) | |
Accessories
| Description Art.No. Qty | ||
| Filter with leak stop 99232 1 | ||
| Permanent filter 01060 1 | ||
| Coffee measuring cup 08090 1 | ||
| Water measuring cup 2 ltr. 03341 1 | ||
| Glass jug 1.8 ltr 08208 | 1 | |
| Thermos jug with pump 2.1 ltr 10419 1 | ||
| Thermos jug with pump 2.2 ltr 10420 1 | ||
| Thermos container 2.4 ltr. | 50241 1 | |
| Drip tray thermos container | 07942 1 | |
| Funnel | 07947 1 | |
| Water connection hose | 08165 1 | |
Inhaltsangabe
Service et assistance technique
Table for setting the amount of coffee see chapter 5.1