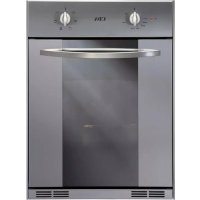
SC145SS - Oven CDA - Free user manual and instructions
Find the device manual for free SC145SS CDA in PDF.


User questions about SC145SS CDA
0 question about this device. Answer the ones you know or ask your own.
Ask a new question about this device
Download the instructions for your Oven in PDF format for free! Find your manual SC145SS - CDA and take your electronic device back in hand. On this page are published all the documents necessary for the use of your device. SC145SS by CDA.
USER MANUAL SC145SS CDA
Operating instructions for: Installation - Maintenance - Use
FR
FOUR VENTILÉ
Before leaving the factory this appliance was checked and prepared by expert and specialized personnel in order to give the best functioning results.
Any repairs or adjustment which might be necessary is to be carried out with the utmost care and attention. For this reason we recomend you always contact the dealer where the appliance was sold ort our nearest Customer Service Centre, specifying the type of problem and the model of your appliance. Do not forget that the original spare parts are only to be found at our Customer Service Centres. Do not leave the packing unguarded for, both children safety and environment.
The symbol on the product or on its packaging indicates that this product may not be treated as household waste. Instead it shall be handed over to the applicable collection point for the recycling of electrical and electronic equipment. By ensuring this product is disposed of correctly, you will help prevent potential negative consequences for the environment and human health, which could otherwise be caused by inappropriate waste handling of this product. For more detailed information about recycling of this product, please contact your local city office, your household waste disposal service or the shop where you purchased the product.
Notes for the installation 18-19
Instructions for use 20-21
Instructions for cooking 22-24
Cleaning and maintenance 25-26
Furniture and technical data 27
FR
Indication generales pag. 28
Instructions de service 31-32
Thank you for choosing our product. This appliance is easy to use; read this handbook carefully before installing and using it, however. You will find the correct indications for the best installation, use and maintenance of the product.
- Very important: keep this instruction booklet with the appliance in case you pass it on to someone else.
- This appliance is designed for non professional use by private individuals at home. It must be used by conscious adults, do not allow children to play with it. The front accessible parts of the equipment could overheat during use.
- Supervise children and non self-sufficient people when it is being used so that they do not touch hot surfaces and are not near the appliance while it is in use.
- Don't touch the heating elements inside the oven.
- The product installation must be performed by competent and qualified installers who are aware of the installation regulations in force.
- Before maintenance or cleaning disconnect the appliance from the mains and wait for it to cool down.
- The user must not change the appliance supply cable. For replacement contact only a qualified engineer.
- Never line the oven with aluminium sheets as the slots preset for keeping fast the thermic exchange may clog, thus damaging the enamel.
WARNING: accessible parts may become hot during use. Young children should be kept away. - For any repairs always contact an authorised Technical Customer Service Centre and ask for original spare parts. Repairs by untrained people can lead to damage.
ELECTRICAL CONNECTION
The appliances are provided with a three-pole feeding cable and work with alternate current and single-phase voltage indicated on the "rating plate of the product "report at the end of the instruction manual and on the product. The grounding conductor of the cable is marked with the colours yellow/green.
CONNECTION OF THE FEEDING CABLE TO THE MAINS
Connect the feeding cable of the oven to a plug suitable for the load indicated on the rating plate of the product. In case of a direct connection to the mains (cable without plug), it is necessary to insert a suitable omnipolar switch before the appliance, with minimum opening between contacts of 3mm (the grounding wire should not be interrupted by the switch).
Before connecting to the mains, make sure that:
- the electrical counter, the safety valve, the feeding line and the socket are adequate to withstand the maximum load required (see rating plate).
- the supply system is regularly grounded, according to the regulations in force.
- the socket or the omnipolar switch can easily be reached after the installation of the oven
- after carrying out the connection to the mains, check that the supplying cable does not come into contact with parts subject to heating.
- never use reductions, shunts, adaptors which can cause overheating or burning.
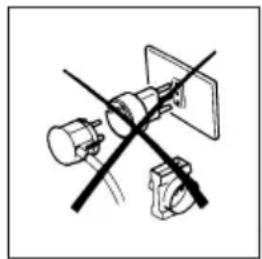
The manufacturer is not liable for any direct or indirect damage caused by faulty installation or connection. It is therefore necessary that all installation and connection operations are carried out by qualified personnel complying with the local and general regulations in force.
This appliance complies with EEC Specification:
- 73 / 23 + 93 / 68 (low voltage equipment)
- 89/336 (electromagnetic compatibility)
- 89/109 (components coming in contract with foodstuffs)
-2002/96 (WEEE)
INSERTION AND ASSEMBLY
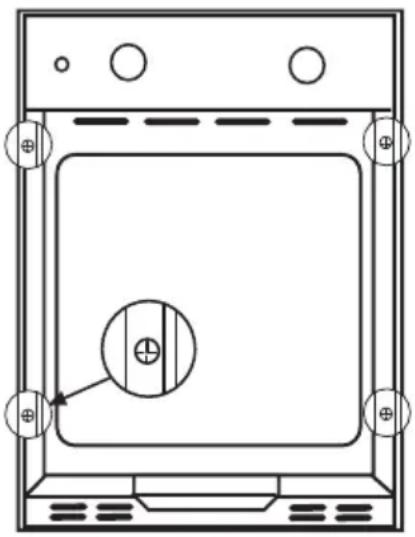
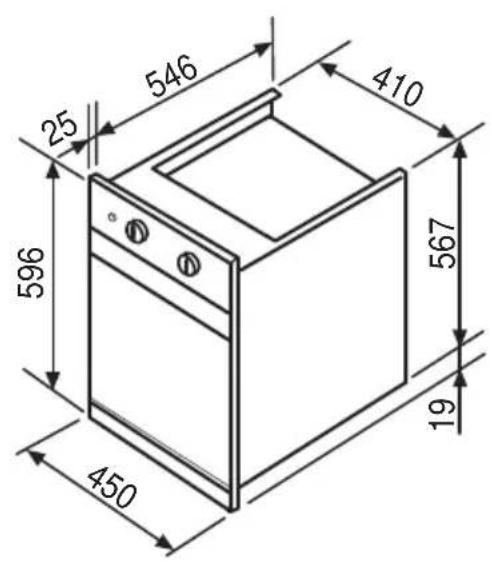
Insert the oven into the opening of the furniture, resting it on the base and pushing it as far as the ledge of the side stanchions against the shoulder of the piece of furniture. For the dimensions of the oven see furniture and technical data.
- Open the door and fix the oven with four wood screws to be screwed up through the holes in the side stanchions of the oven.
Pay attention to fix the oven in an absolutely firm way, as above indicated, and to insulate the electrical elements in order to avoid an eventual contact with metallic parts.
Moreover, the bonding agent joining the rolled sections to the piece of furniture has to stand temperatures no lower than 90^ to avoid deformations and coating disjunction. In case a plane is inserted, the electrical connection of the plane and that of the oven should be carried out separately, both for electrical reasons and to facilitate the frontal extractibility of the oven.
Once the electrical connection has been carried out, apply voltage to the oven only after installing it.
Before using the oven, we suggest to:
- remove the special film covering the oven door glass (when provided)
- heat the empty oven at max. temperature for 45 minutes (to remove unpleasant smell and smoke caused by working residues and by the thermal insulation)
- carefully clean inside the oven with soapy water and rinse it.
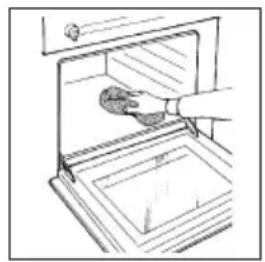
IMPORTANT: When running, the front side of the appliance gets quite hot. See that children do not get near the oven.
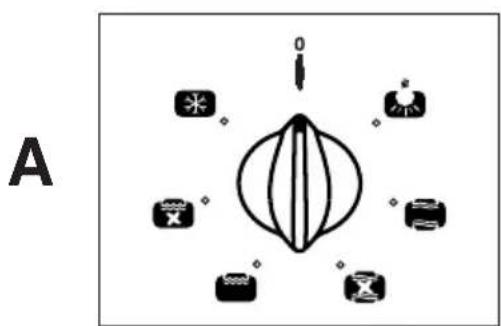
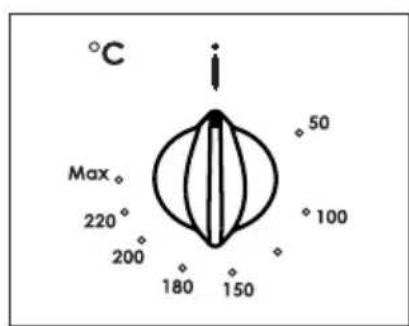
The selector A and thermostat B control is used to select the various oven functions and to choose the cooking temperatures best corresponding to the food to be cooked. During oven operation the lamp will always remain on.

The lamp of the oven is on, with no heating elements operated (electrical resistances). During oven operation the lamp will always remain on.
TRADITIONAL COOKINGS

Upper and lower heating elements operated; temperature adjustable from 50^ to MAX on the thermostat.
CONVECTION COOKINGS

Upper and lower heating elements operated and the motor-fan; temperature adjustable from 50^ to MAX on the thermostat.
GRILL COOKINGS
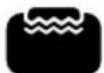
Grill element operated; turn the thermostat to position 200^ .

Cut in the grill element and the motor-fan. Turn the thermostat to position 200^ .
DEFROSTING
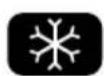
The motor-fan is operated; by stirring the cold air inside the oven, it favours a quick defrosting of the freezed aliments. No heating elements is operated.
The oven door must be closed for all cooking methods
B
PILOT LIGHT OF THE THERMOSTAT (^)
It comes on any time the thermostat settles the cooking temperature inside the oven and it is switched off when the oven reaches the preset temperature.
SAFETY THERMOSTAT
It cuts out the electric supply for preventing possible overheatings when the appliance is not correctly used. In this case, wait that the oven cools down before using it again. On the other hand, if a fault is present on the appliance's components, we advise calling the Technical Assistance Service.
COOLING MOTOR
The equipment comes with a motor for cooling the inside elements. This motor starts automatically when using the oven.
OVEN COOKINGS
For a perfect cooking it is necessary to pre-heat the oven to the preset cooking temperature. Only vary fat meat can be placed into a cold oven. Never use low-edged containers nor trays as baking-pan for roasts, in order to soil the minimum possible the walls of the oven, thus preventing fat splashes, sauce burning and smoke production. Use instead high-edged containers, preferably terracotta containers, put on the grate at about half
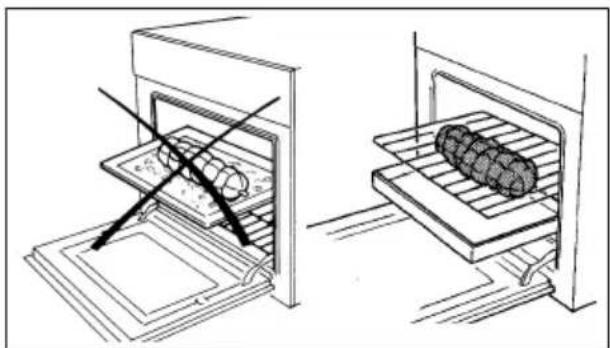
the height of the oven. The table shows some examples of how to set the thermostat and the cooking time. The cooking times vary according to the type of food, its homogeneity and volume. We are sure that, after a few endeavours, the experience will suggest possible variations to the values shown on the table.
Practical hints to save energy
The oven can be switched off some minutes before cooking end; the residual temperature is enough to complete cooking. Open the oven door only when it is absolutely necessary; to check the cooking phase, look through the glass (the oven lamp is always on).
Pieces of general advice
The oven offers various kinds of heating:
- the traditional heating for the cooking of special roasts
- the ventilated heating for the cooking of cakes, biscuits and similar.
If the ventilated heating is chosen, it is recommended to take advantage of it for cooking of roasts on more shelves or for the preparation of complete menus, with time and energy economy.
Ventilated heating

By this function a continuous circulation of warm air is created, fit for the cooking on more shelves. The temperature are inferior to the traditional ones.
Traditional heating

It is especially suitable for the cooking of furred and feathered game and as well as for the cooking of bread and sponge cakes.
It is advisable to insert the aliments to be cooked into the oven when this is reached the cooking temperature, that is to say when the pilot light of the thermostat extinguishes.
GRILL COOKINGS
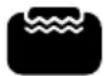

To cook on the grill or on the grate, pre-heat the oven for about 5 minutes. During grill operation the heat comes from above; it is based on the infrared radiation and is fit for low thickness meat and for toasts. The meat and the fish to be grilled are to be slightly oiled and always placed on the grate; this is to be arranged on the nearest or on the farthest guide from the grill element, according to the thickness of the meat to be cooked. The table shows some examples of cooking times and food positions. The cooking times vary according to the type of food, its homogeneity and volume.
COOKING OF THE PASTRY
The air circulation of the oven assures an instantaneous and uniform heat distribution. The forewarming of the oven is no longer necessary. However for specially delicate pastry, the oven can be forewarmed. More trays can be inserted into the oven together with the pastries, taking care not to use the first grid starting from above. Together with the pastry, also other alimentents of different nature can be cooked at the same time (fish, meat, etc.) without any transmission of smells and savours. These multiple cookings can be carried out only provided that, although having different cooking times, the alimentents to be cooked have the same cooking temperature.
GRATINATING

By this term is meant the surface alteration of an aliment, often forecooked, when, after being introduced into the oven, it takes a golden-brown and crisp aspect. "Gnocchi alla romana", polenta pasticciata", rice, lasagnas, noodles and vegetables dressed with bechamel are typical preparation for this type of cooking.
DEFROSTING

The defrosting takes place in the same way as at room temperature, but with the advantage that is much more rapid. The ten hours of the refrigerator are reduced to an hour for a kilogram of meat. Put the meat envelope into its packing on a dish. Introduce it into the oven.
COOKING TIMES
The table shows some examples for the adjustment of the thermostat and of the cooking time.
The cooking times can vary according to the type of food, its homogeneity and volume. We are sure that, after a few endeavours, the experience will suggest possible variations to the values shown on the table.
REMARK:
- For the beef, veal, porc and turkey roasts, with bones or rolled, add about 20 minutes to the times shown in the table.
- The indication suggested on the table for the use of the steps is the preferential one in the case of the cooking of several aliments.
- The times indicated in the table refer to the cooking of one aliment only; for more than one aliment, the cooking times should be increased by 5 - 10 minutes.
Table of cooking times
| Nature of food | Guide No. | Oven Temp. | Time Minutes |
| FOOD | |||
| Long-cooking roast | 2 | 220-230 | dep. on qty |
| Quick cooking roast | 2 | 225-230 | 50-60 |
| Fowl (Guinea hen, duck, etc) | 1 | 210-230 | 150-180 |
| Poultry | 2 | 225-230 | 50-60 |
| Game | 1 | 200-225 | dep. on qty |
| Fish | 1 | 180-200 | 20-25 |
| PASTRIES | |||
| Christmas cake | Base only | 160-200 | 60-70 |
| Plum-cake | “ | 170-180 | 90-100 |
| Orange cake | “ | 170-180 | 80-100 |
| Savoy biscuits | 2 | 200 | 40-45 |
| Brioches | 2 | 215-230 | 35-40 |
| Puff pastry | 2 | 215 | 30-40 |
| Sponge cake | 2 | 200-215 | 30-35 |
| Meringues | 1 | 140 | 60-80 |
| Cream puff pastry | 2 | 215-230 | 30 |
| Fruit cake (unleavened pastry) | 2 | 230 | 30-35 |
| Fruit cake (leavened pastry) | 2 | 230 | 20-30 |
Table of grill cooking times
| Nature of food | Qty.Kg | Guide No. | Temp.°C | Pre-heat time in minutes | Time in min. |
| Veal cutlet | 1 | 3 | 200 | 5 | 8-10 |
| Lam cutlet | “ | “ | “ | “ | 12-15 |
| Liver | “ | “ | “ | “ | 10-12 |
| Chopped meat roulades | “ | “ | “ | “ | 12-15 |
| Veal heart | “ | “ | “ | “ | 12-15 |
| Roast in the net | “ | “ | “ | “ | 20-25 |
| Half-chicken | - | “ | “ | “ | 20-25 |
| Fish fillet | - | “ | “ | “ | 12-15 |
| Stuffed tomatoes | - | “ | “ | “ | 10-12 |
Caution: before any operation, disconnect electrically the oven.
General cleaning
To keep the characteristics of brightness of the enamelled parts for a long time it is necessary to clean the oven after each cooking. Once the oven is cold, you will be able to easily remove the fat deposits by means of a sponge or a cloth damp with warm soapy water and eventually a detergent to be found on the market. Never use abrasive cloths or sponges, that could irreparably damage the enamel. On white ovens even the parts of the dash board such as handgrip and knob have to be cleaned each time because they may become yellow due to the emissions of fat vapours. After the use, rinse thoroughly with water the parts in stainless steel and dry them with a soft cloth or with a bockskin. In case of persistent stain, use the normal non-abrasive cleaning agents or one of the specific products for stainless steel or some warm vinegar. Clean the door glass only with warm water, avoiding the use of rough cloths.
"Do not use jet of steam for cleaning."
Cleaning the oven door
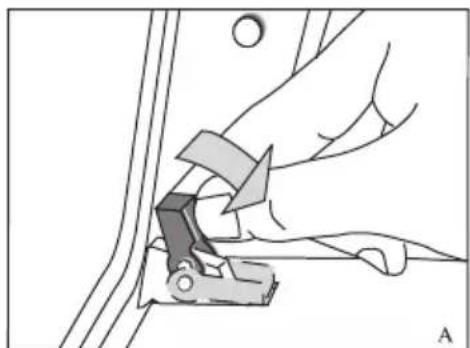
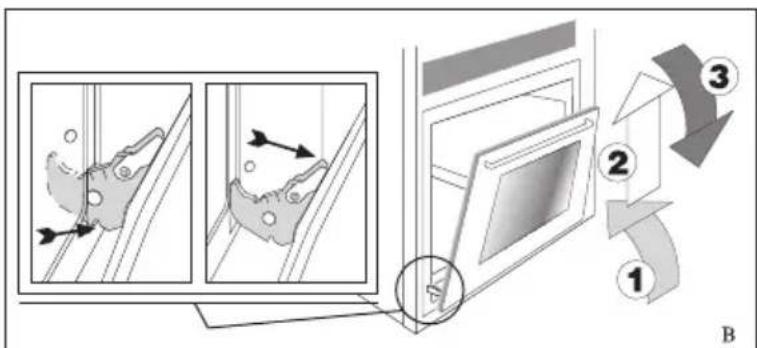
Unhooking the doors.
- Set the oven's door wide open.
- Lift the hinge jumpers by your thumb and index fingers, then turn them fully outwards to the end of stroke (Fig.A).
- Turn the door towards the closure position and lay it on the jumpers: in this way the hinge's spring results as blocked. By fully closing the door the hinges are unhooked from the connection slits which are integral with the oven's muffle (sequence 1,2,3 of fig.B).
Hooking the doors
- Insert the door by hooking the hinges to the connection slits set on the muffle front.
- Fully open the door when inserted, then push and turn the cross connections which fasten the springs full scale in the oven direction.
- Close the door and check its correct operation.
Replacing the oven bulb
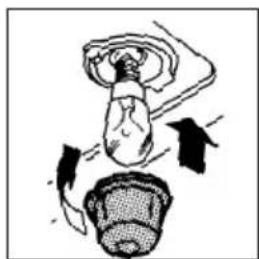
Once the oven has been electrically disconnected, unscrew the glass protection cap and the bulb, replacing it with another one suitable for high temperatures (300°C / E14). Reassemble the glass cap and reconnect the oven.
Furniture and technical data
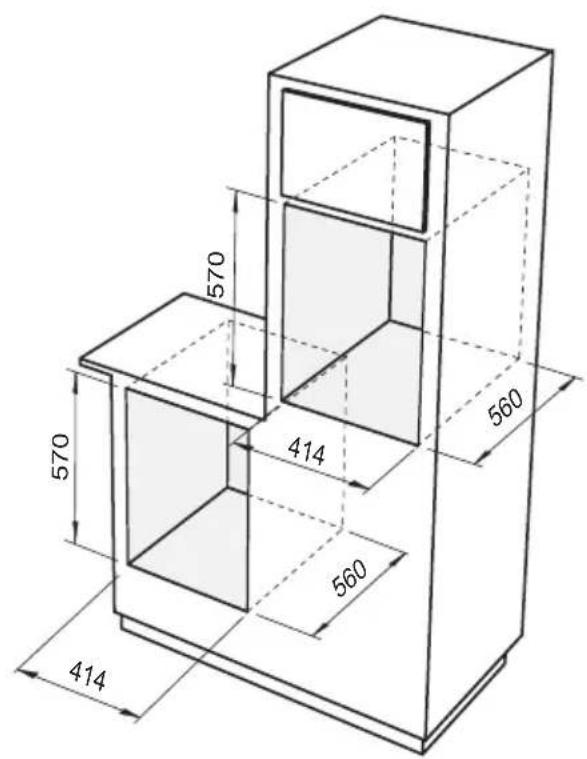
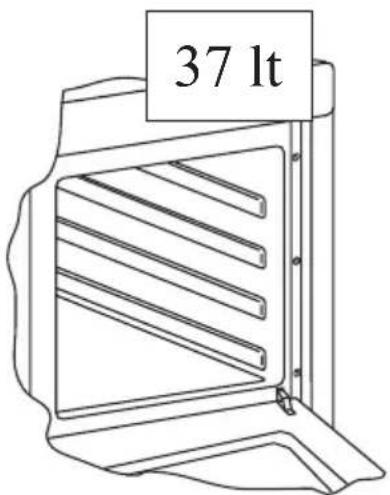
Working volume of the oven
| Electrical features | |
| Lighting bulb | max 25 W |
| Upper resistance | 600 W |
| Lower resistance | 800 W |
| Grill resistance | 1400 W |
Cher Client,