
VME 9125 NAV - Browser AUDIOVOX - Free user manual and instructions
Find the device manual for free VME 9125 NAV AUDIOVOX in PDF.

| Product Type | Mobile Multimedia Player |
| Brand | Audiovox |
| Model | VME 9125 NAV |
| Screen Size | 6.2 inches (16 cm) diagonal |
| Screen Type | LCD touchscreen with LED backlight, 16:9 aspect ratio |
| Screen Resolution | 800 × 3 × 480 pixels (1,152,000 sub-pixels) |
| Disc Drive | DVD+R/RW, CD-R/RW, CD-DA, MP3, VCD, SVCD, Xvid, AVI, MPEG 1/2/4 formats |
| Radio Tuner | FM 87.5-107.9 MHz, AM 522-1620 kHz |
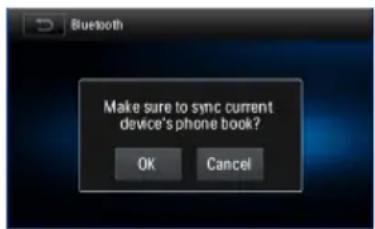
| Bluetooth | Yes (hands-free and A2DP/AVRCP audio streaming) |
| GPS Navigation | Built-in (iGO Primo 2) |
| Output Power | 4 × 40 W max |
| Auxiliary Inputs | USB, SD/MMC, front AV input (3.5 mm jack), rear camera input |
| Audio Outputs | 4 speaker channels, subwoofer output |
| Power Supply | 11-16 V DC, negative ground |
| Fuse | 15 A (mini ATO type) |
| Chassis Dimensions | 178 × 178 × 100 mm |
| Operating Temperature | -20°C to +65°C |
| Equalizer | 8 presets (User, Jazz, Techno, Optimal, Rock, Pop, Classic, Flat) |
| RDS Functions | AF, EON, TA, CT, PTY |
| Steering Wheel Controls | Programmable (SWC) |
| Touchscreen Calibration | Yes (built-in) |
| Maintenance | Clean with a clean silicone cloth and mild detergent |
| Safety | Video function disabled while driving (except rear camera) |
| Spare Parts and Repairability | Replaceable fuse, cleaning discs, optional AV cables |
Frequently Asked Questions - VME 9125 NAV AUDIOVOX
User questions about VME 9125 NAV AUDIOVOX
0 question about this device. Answer the ones you know or ask your own.
Ask a new question about this device
Download the instructions for your Browser in PDF format for free! Find your manual VME 9125 NAV - AUDIOVOX and take your electronic device back in hand. On this page are published all the documents necessary for the use of your device. VME 9125 NAV by AUDIOVOX.
USER MANUAL VME 9125 NAV AUDIOVOX
At the end of the product's useful life, please dispose of it at appropriate collection points provided in your country.
- [ 个
Seite 2 des Menüs


Hinweise:
EON (Enhanced Other Networks)

Audio-Dateien
Wiedergabeinformationen
Direkte Titelwahl
Eingehender Anruf
Hinweis:
AVRCP
![SWC 14:20~ Key1 > Key2 > Key3 > Key4 > Key5 > Key6 > Press any key on your steering wheel [ ↑ ],for 1 second to finish setting Previous 1 / 6 Next](/content/2026/02/353583/images/0954101330e2df4373b3287008ee6bbe2006d6597488c2370345333aa16dffa7.jpg)
FEHLERBEHEBUNG
Thank you for choosing an Audiovox product. We hope you will find the instructions in this owner's manual clear and easy to follow. If you take a few minutes to look through it, you'll learn how to use all the features of your new Audiovox VME 9125 NAV Mobile Multimedia Receiver for maximum enjoyment.
CONTENTS
Warnings 33
Expanding Systems 33
Controls and Indicators 34
Operating Instructions....35
Tuner Operation....38
Playback Mode....41
Bluetooth Operation....45
Sound Adjustments....47
Settings 48
Navigation Quick Start....51
Other Modes....53
Troubleshooting 54
Care and Maintenance 56
Specifications 57
WARNING!
Never install this unit where operation and viewing could interfere with safe driving conditions.
WARNING!
To reduce the risk of a traffic accident (except when using for rear view video camera) never use the video display function while driving the vehicle. This is a violation of federal law.
WARNING!
To prevent injury from shock or fire, never expose this unit to moisture or water.
WARNING!
Never disassemble the unit.
WARNING!
Never use irregular discs.
WARNING!
To prevent damage to the mechanism inside this unit, avoid impact to the unit's monitor.
WARNING!
Using an improper fuse may cause damage to the unit and result in a fire.
EXPANDING SYSTEMS
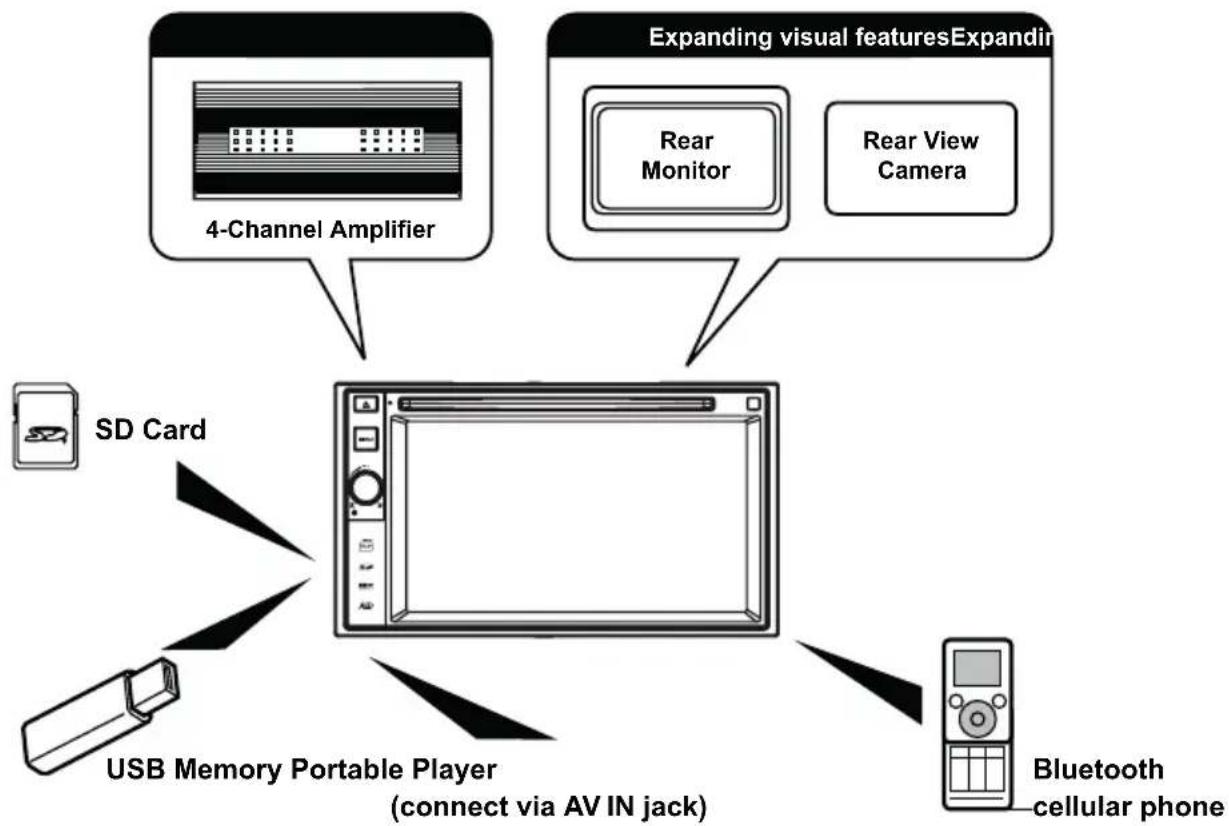
flowchart
graph TD
    A["SD Card"] --> B["USB Memory Portable Player (connect via AV IN jack)"]
    C["4-Channel Amplifier"] --> D["Expanding visual features Expanding"]
    E["Bluetooth cellular phone"] --> F["Rear Monitor"]
    G["Rear View Camera"] --> H["Bluetooth cellular phone"]
Note:
The items listed outside of the frame are the commercial products generally sold.
CONTROLS AND INDICATORS

- [ ]Button
Press to eject a disc.
- [MENU] Button
Press to switch between the available audio/video sources applied to the unit.
- [VOL//] Knob
Rotate to adjust the volume. Press momentarily to activate the MUTE function. Press again to resume normal listening.
Press to turn the unit ON. Press and hold to turn the unit OFF.
- Reset Button
Press to reset system settings to factory default (except password).
- SD Interface Connector
Insert an SD card for playback of music/video files.
- Map Slot
The Mini SD card is used for the Navigation Map only, not for music or other files. This may be used for firmware updates if required.
- A/V Input
Accepts a 3.5 mm jack through which signals from various audio/video devices can be applied to the unit.
- USB Connector
Connect a USB device for playback of music/video files.
-
Disc slot
-
Internal Microphone
Internal microphone for Bluetooth calls.
OPERATING INSTRUCTIONS
Parking Brake Inhibit
When the green/white “Parking” wire is connected to the vehicle Parking Brake circuit, the front TFT monitor will display video when the Parking Brake is engaged. (When the green/white wire is grounded via the Parking Brake circuit, video will be displayed.)
Power On / Off
Press and hold the [VOL/①/②] button on the front panel to turn the unit on. The buttons on the front of the unit light up for a moment and the current mode status appears in the LCD.
Press and hold the [VOL/1] button on the front panel to power off the unit.
Audible Beep Confirmation
An audible beep tone confirms each function selection. The Beep tone can be disabled through the Setup menu.
Mute
Press [VOL/V] knob to mute the volume from the unit. Press again to restore the volume. [ ] is displayed on the LCD. Adjusting the volume or using any of the audio setup features cancels the mute function.
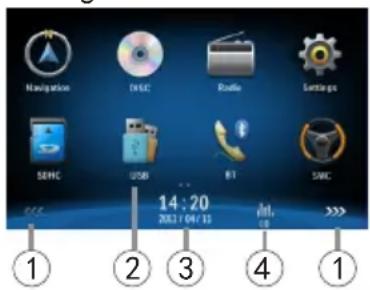
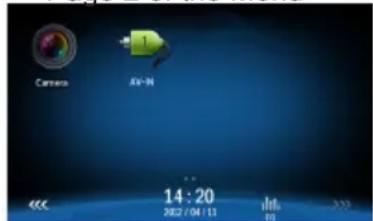
Playing Source Selection
Press the [MENU] button on the front panel to change between available playing sources. The playing mode is displayed on the screen.
- 1/2 or 2/2: Touch this page button to view the first or second page of on-screen buttons.
- Function icons
- Clock
- Touch for quick access to Equalizer level settings.
Page 1 of the Menu
Page 2 of the Menu

Volume Adjustment
To increase or decrease the volume level, turn the [VOL/J] knob on the front panel. The volume ranges from "0" to "50". The LCD screen displays the volume level for 3 seconds.
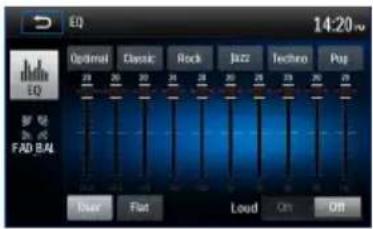
EQ Menu
The Audio Control feature allows you to easily adjust your audio system to meet the acoustical characteristics of your vehicle, which vary depending on the type of vehicle and its measurements. Proper setting of the Fader and Balance boosts the effects of the cabin equalizer.
Selecting Preset Equalizers
-
To enter the EQ setup mode Touch the [icon in the user interface and the EQ setup interface will display on the screen.
-
Selecting EQ mode Touch the desired EQ selection: [Optimal] / [Classic] / [Rock] / [Jazz] / [Techno] / [Pop], and the EQ mode will change.
Adjusting EQ Parameters
To adjust EQ parameters, touch and drag the parameters adjustment bar.
[ User ]: Set the desired audio effect.
[ Flat ]: Select the original audio effect.
[ Reset ]: Cancel the equalizer function settings.
[Loud] On/Off: When listening to music at low volumes, this feature will selectively boost certain bass and treble frequencies.
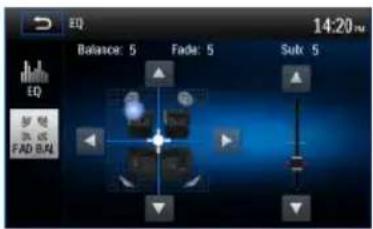
Adjusting FAD BAL
You can adjust front/back/left/right balance of the speaker and the subwoofer volume to get larruping listening effect according to the surroundings and your interest.
-
To enter the EQ setup mode: Touch the [icon] in the user interface and the EQ setup interface will display on the screen.
-
Adjusting subwoofer volume Touch [▲]/[ ] or drag [ ] t adjust the subwoofer volume from -12 to +12.
-
Adjusting fader/balance value Touch [▲] / [ ]▼[ ] / [ ] to adjust fader / balance value from -20 to +20.
[▲: Front speaker
[▼]. Rear speaker
[◀: Left speaker
[▶]: Right speaker
Notes:
- The parameters of the EQ modes has been preset and you cannot change them besides 'User'.
- The EQ mode will change to 'User' automatically when you adjust the frequency value under the modes besides 'User'.
- The value of Sub is independent of EQ mode and can be adjusted solely.
Setting Date /Time
- Touch

- Touch [Time].
The date/time setup menu is displayed.
Setting Date
- Touch [Date].
- Touch the date information on the screen. A submenu is displayed.
- Touch [▲] or [ ] No set year, month and day.
Setting Clock Mode
- Touch [Clock mode].
- Touch [12Hr] or [24Hr] to switch clock mode.
Setting Time
- Touch [Time].
- Touch the time on the screen, a submenu is displayed.
- Touch [▲] or [ ] to set hour and minute.
When date/time is set, touch [ Save ] to confirm or [ Cancel ] to exit.
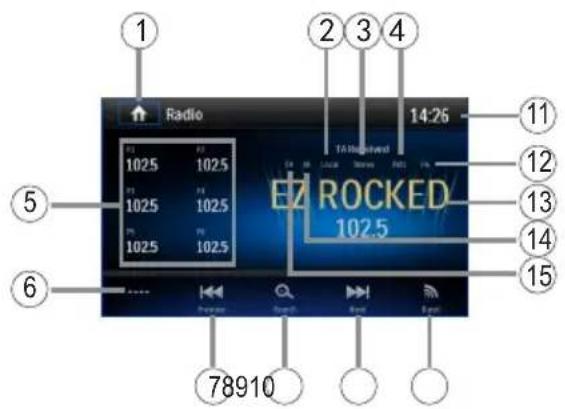
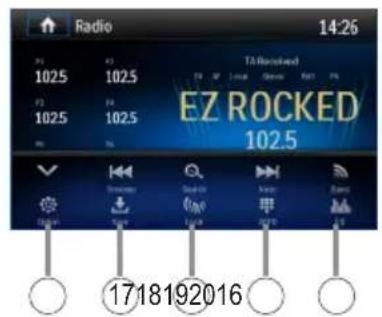
TUNER OPERATION
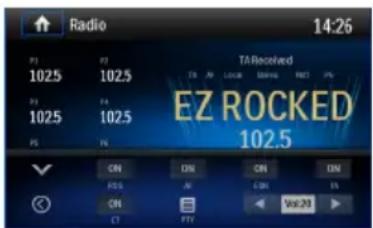
Tuner TFT Display
- Touch to view the MAIN MENU and select a new playback source
- Distance/Local signal broadcasting indicator
- Stereo broadcasting indicator
- Current radio band indicator
- Broadcaster information stored at the preset
- Touch to view more on-screen buttons
- Touch to seek backward
- Search stations automatically
- Touch to seek forward
- Touch to change between AM/FM bands
- Clock
- Current preset radio station
- Current radio information
- AF: Alternative Frequency indicator
- TA: Traffic Announcement indicator
- RDS setting options
- Save the desired radio station
- Touch to change between Local and Distance
- Enter frequency directly
- Touch for quick access to Equalizer level settings
Selecting Radio as Playing Source
Open the Main Menu and then touch [Radio].
Selecting FM/AM Band
Touch the [icon] icon on the user interface to select one radio band among FM1, FM2, FM3, AM1 and AM2.
Tuning
Auto Tuning
Touch and hold [◀] / [ ▶] on the user interface more than 1 second to seek a higher / lower station.
To stop searching, repeat the operation above or press other keys having radio functions.
Note:
When a station is received, searching stops and the station is played.
Manual Tuning
Method 1:
During manual tuning, the frequency will be changed in steps.
Touch the [◀] / [▶]con on the user interface to tune in a higher / lower station.
Method 2:
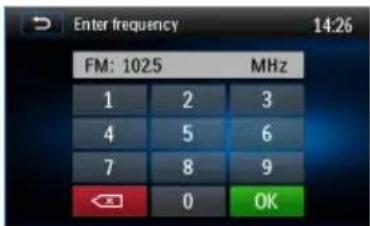
- Touch the numeric keypad icon [●]. Numeric keyboard is displayed, touch number to input frequency.
- Touch [ ] to delete the input number step by step.
- Touch [OK] to enter.
Preset Stations
The unit has 5 bands, such as FM1, FM2, FM3, AM1, AM2, and each band can store 6 stations; hence the unit can store 30 stations in total.
Searching Stations Automatically
Touch [°] to search station and store 6 strongest stations in current band automatically.
Manually Storing a station
- Tune to a station.
- Touch [↓]
- Touch one of the channels P1 to P6 to save the station in the selected band.

Tuning to a Preset Station
- Touch [Radio].
- Select a band (if needed).
- Touch one of the preset channels (P1 to P6) on the screen.
Search for Station by Program Type
- Touch the [PTY] icon to display the Program Type Screen.
- Touch a program type. The unit searches for the respective stations and stops when a station is found.
Local Seeking
Touch the [("A")icon and choose Local or Distance.
When the [1A] icon turns bright, only stations with sufficient signal strength will be detected.
EQ Selection
Press the [icon and enter the EQ setup.
RDS Basics
Radio Data System (RDS) enables traffic reports to be received and provides many facilities, including enabling the radio station name to be displayed on the radio display.
Adjusting RDS Settings
-
In Radio menu, touch [ ] The option menu is displayed.
-
Touch on the selected option to change the setting.
· [RDS]: To turn on or off "RDS" function.
- [AF]: To turn on or off "AF" function.
- [CT]: To turn on or off "Clock Time" synchronization function.
· [EON]: To turn on or off "EON" function.
- [TA]: To turn on or off "TA" function.
- [PTY]: To show PTY list.
- [VOL]: Touch [◀] / [▶] to adjust TA volume.
AF
The receiver can automatically switch to an alternative frequency (AF) of the same station if the reception becomes poor. Press the OFF/ON touch-point to turn the automatic scanning for alternative frequencies of an RDS broad-cast station off and on.
EON (Enhanced Other Networks)
When EON data is received, the EON indicator lights and the TA and AF functions are enhanced. TA: Traffic information can be received from the current station or stations in other network.
AF: The frequency list of preset RDS stations is updated by EON data. EON enables the radio to make fuller use of RDS information. It constantly updates the AF list of preset stations, including the one that currently tuned into. If you preset a station around the area at your home, you will later be able to receive the same station at an alternative frequency, or any other station serving the same program, EON also keeps tracking of locally available TP (Traffic Program) stations.
TA
Press the TA ON/OFF button to switch the priority for traffic announcements on or off.
VOL (TA Volume)
In the OPTION menu, press the TA VOL button. Adjust the desired volume with the ▲ or ▼ button. Press the OPTION button. The radio menu is displayed again, the set volume is stored.
CT ON/OFF
(Clock Time, RDS feature) When enabled the radio system clock is synchronized with broadcasters time signal setting the clock automatically. In some regions where daylight savings time is not adhered to, the system clock will be off by 1 hour. In these cases, set CT to OFF and manually set the clock.
PTY
Program type (PTY) allows users to find similar programming by genre. Touch the PTY icon to access the program type search screen. If no matched PTY has been found, the unit will return to the original radio frequency.
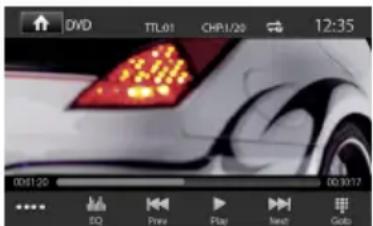
PLAYBACK MODE
Loading a disc
You can play video, audio or images stored on the following discs:
• DVD Video, DVD-R, DVD-RW
• VCD
• Audio CD, CD-R, CD-RW
Note: Ensure that the disc contains playable content.
Ejecting a Disc
Press the [▲] key on the front panel to eject the disc. When the disc is ejected, the unit switches to the previous source.
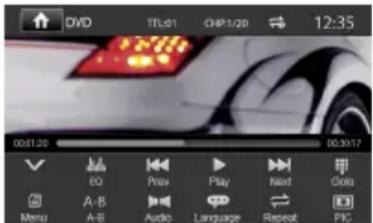
Touchscreen Controls
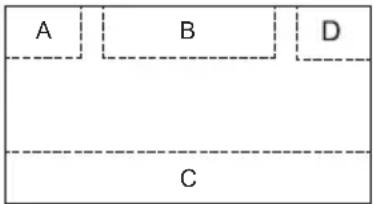
The touch key areas for DVD playback are outlined below:
A: Return to the main menu
B: Play the video and display playback information
C: Display onscreen control menu
D: Time display
Controlling Playback
To access the on-screen controls, touch the screen except upper left corner, and touch again to cancel display. Touch [**] to view all function icons.
Connecting a USB Device
- Open the USB cover.
- Insert the small end of the USB cable to the radio's USB socket, then connect the other end of the cable to your USB device.
Removing a USB Device
- Select other source on the main menu.
- Remove the USB device.
Inserting a SD/MMC Card
- Open SD/MMC card cover.
- Insert the SD/MMC card into the SD/MMC card slot.
- Playback starts automatically.
Removing a SD/MMC Card
- Select other source on the main menu.
- Press the card unit you hear a click sound.
- Remove the SD or MMC card.
Play/Pause
- Once a disc, USB or SD/MMC card is inserted, playback starts automatically.
For DVD movie, if a menu appears, press [▶] to start playback.
- To pause playback, touch [1]. To resume playback, touch [▶].
- Skip to previous / next track / chapter, press [◀]/[ ]▼key.
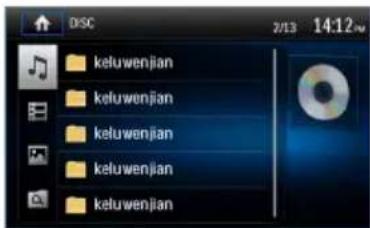
Search for a Folder
For Video Files
- Touch [ ] to display all available video folders.
- Touch a folder, then touch the desired file.
- Touch the file again to start playback.
For Audio Files
- Touch [ ] to display all available audio folders.
- Touch a folder, then touch the desired file.
- Touch the file again to start playback.
For Picture Files
- Touch [ ] to display all available picture folders
- Touch a folder, then touch the desired file.
- Touch the file again to start playback.
For Folder Control
- Touch [ ] to display all available folders
- Touch a folder, then touch the desired file.
- Touch the file again to start playback.
Repeat
For DVD/VCD movie disc:
- Touch bottom half of the screen to display menu on the screen, if necessary.
- Touch [•] to display the 2nd page of the menu.
- Touch [→] repeatedly to select:
DVD
[ ] Repeat chapter: Play the current chapter repeatedly.
[ ]Repeat title: Play all chapters in the title repeatedly.
[ ] Repeat off: Play all repeatedly.
[ ] Repeat off: Cancel repeat play
VCD
[ ⟹ ] Repeat single: Play the current track repeatedly.
[ ]Repeat all: Play all repeatedly.
[ ] Repeat off: Cancel repeat play.
For CD/MP3 files:
- Touch anywhere except the upper left corner to display menu on the screen, if necessary.
- Touch [→] repeatedly:
[ ⇌ ] Repeat single: Play the current single repeatedly.
[ ]Repeat all: Play all in the all repeatedly.
[ ] Repeat off: Cancel repeat play.
Repeat A-B
You can repeat a specific portion of a video file (repeat A-B).
- Touch the screen to display control menu, if necessary.
- Touch [•] to display the 2nd page of the menu, if necessary.
-
Touch [A-B] repeatedly to mark: Repeat A-: the start of the section to repeat. Repeat A-B: the end of the section to repeat. The selected section plays repeatedly.
-
To exit A-B repeat mode, touch A-B repeatedly, [Repeat A-B off] is displayed.
Shuffle (Random) Play
You can play audio tracks/files in random order.
- Touch the screen to display control menu, if necessary.
- Touch [•] to display the 2nd page of the menu, if necessary.
- Touch [×] on the screen repeatedly to turn random play on or off.
Selecting Audio Mode
When you play VCDs, you can select an audio mode (R/L/Stereo).
- During playback, touch bottom half of the screen to display menu on the screen, if necessary.
- Touch [•] to display the 2nd page of the menu. Touch [▶] repeatedly until the audio mode is selected.
Selecting Subtitle Language
For DVDs that contain two or more subtitle languages.
- During playback, touch the screen to display menu on the screen, if necessary.
- Touch [•] to display the 2nd page of the menu.
- Touch [ ] repeatedly to select a language.
The selected language is displayed.
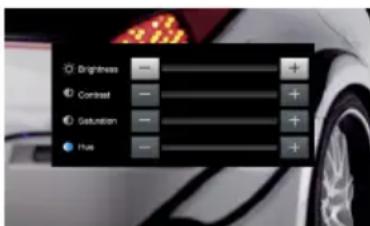
Video Setup
- During playback, touch the screen to display the control menu. Touch [•] to access the 2nd page of the menu.
- Touch [ ] to access video setup mode, touch [ ] or [ ] to set the desired effect.
You may set the brightness, contrast, saturation, and hue of the video output from 1 to 20.
Playback Information
Touch the screen when playing back DVD and VCD discs and the playback information will be displayed on the top area of the TFT.
For DVD
-
Disc type.
-
DVD Title information. "01/08" indicates that this DVD has 8 titles and the title playing back now is the first title.
-
DVD Chapter information. "005/012" indicates that current title has 12 chapters and the chapter playing back now is the fifth chapter.

For VCD
-
Disc type.
-
VCD Track information. "01/08" indicates that this VCD has 8 tracks and the track playing back now is the first title.
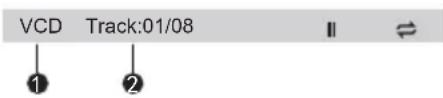
Elapsed Time
-
Elapsed time of the current track.
-
Total time of the current track.

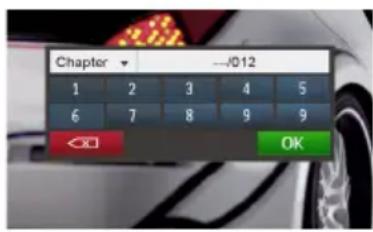
Direct Track Entry
To select a track directly, touch the [icon on screen control to display the Direct Entry menu. Enter the desired track using the on-screen number pad. Press [OK] to start placback of the selected track.
- Hinweise:
- EON (Enhanced Other Networks)
- Audio-Dateien
- Wiedergabeinformationen
- Direkte Titelwahl
- Eingehender Anruf
- Hinweis:
- AVRCP
- CONTENTS
- WARNING!
- CONTROLS AND INDICATORS
- OPERATING INSTRUCTIONS
- Parking Brake Inhibit
- Power On / Off
- Audible Beep Confirmation
- Mute
- Playing Source Selection
- Volume Adjustment
- EQ Menu
- Selecting Preset Equalizers
- Adjusting EQ Parameters
- Adjusting FAD BAL
- Notes:
- Setting Date /Time
- Setting Date
- Setting Clock Mode
- Setting Time
- TUNER OPERATION
- Tuner TFT Display
- Selecting Radio as Playing Source
- Selecting FM/AM Band
- Tuning
- Auto Tuning
- Note:
- Manual Tuning
- Method 1:
- Method 2:
- Preset Stations
- Searching Stations Automatically
- Manually Storing a station
- Tuning to a Preset Station
- Search for Station by Program Type
- Local Seeking
- EQ Selection
- RDS Basics
- Adjusting RDS Settings
- AF
- TA
- VOL (TA Volume)
- CT ON/OFF
- PTY
- PLAYBACK MODE
- Loading a disc
- Ejecting a Disc
- Touchscreen Controls
- Controlling Playback
- Connecting a USB Device
- Removing a USB Device
- Inserting a SD/MMC Card
- Removing a SD/MMC Card
- Play/Pause
- Search for a Folder
- For Video Files
- For Audio Files
- For Picture Files
- For Folder Control
- Repeat
- For DVD/VCD movie disc:
- DVD
- VCD
- For CD/MP3 files:
- Repeat A-B
- Shuffle (Random) Play
- Selecting Audio Mode
- Selecting Subtitle Language
- Video Setup
- Playback Information
- For DVD
- For VCD
- Elapsed Time
- Direct Track Entry
Brand : AUDIOVOX
Model : VME 9125 NAV
Category : Browser