NVX226 - Browser AUDIOVOX - Free user manual and instructions
Find the device manual for free NVX226 AUDIOVOX in PDF.


| Product Type | Portable GPS Navigator |
| Brand | Audiovox |
| Model | NVX226 |
| Display Size | 4.3 inches |
| Display Resolution | 480 x 272 pixels |
| Dimensions (W x H x D) | 4.92 x 3.15 x 0.67 inches |
| Weight | 7.0 oz (198 g) |
| Power Source | Rechargeable Lithium-Ion battery |
| Battery Life | Up to 3 hours |
| Maps | Preloaded maps of North America (US and Canada) |
| Points of Interest (POI) | Built-in database with millions of POIs |
| Voice Guidance | Text-to-speech with street name pronunciation |
| Touchscreen | Yes, resistive touchscreen |
| Memory Expansion | microSD card slot |
| Connectivity | USB 2.0 for computer connection |
| Mounting | Windshield suction cup mount included |
| Maintenance | Clean with a soft, dry cloth |
| Safety | Use only approved chargers; avoid exposure to direct sunlight |
| Spare Parts / Repairability | Contact Audiovox customer support for replacements |
Frequently Asked Questions - NVX226 AUDIOVOX
User questions about NVX226 AUDIOVOX
0 question about this device. Answer the ones you know or ask your own.
Ask a new question about this device
Download the instructions for your Browser in PDF format for free! Find your manual NVX226 - AUDIOVOX and take your electronic device back in hand. On this page are published all the documents necessary for the use of your device. NVX226 by AUDIOVOX.
USER MANUAL NVX226 AUDIOVOX
natural_image
Abstract blue and white geometric logo with triangular and curved elements (no text or symbols)AUDIOVOX®
ELECTRONICS CORP.
NVX226
Navigation System
User's Manual
Contents
Getting started 1
Charging the battery 1
Starting the AUDIOVOX NVX226 system 3
Using the AUDIOVOX NVX226 system buttons 5
Getting a GPS signal----5
Entering data on the AUDIOVOX NVX226 system---- 7
Moving through the screens 7
Working with the map----8
Map view 8
Maneuver detail 8
Panning the map 9
Route list 9
Location and POI information 11
Planning your route---- 13
Setting a single destination 13
Using an address as a destination 13
Using an intersection as a destination---- 18
Using a Point of Interest (POI) as a destination 24
Using a Favorite destination as a destination 30
Using a Recent destination as a destination 30
Using a City Center as a destination 31
Adding detours and stopovers 35
Detours 35
Stopovers 36
Managing your favorites list 38
Setting your options 40
Display options 40
Route options 43
Volume 45
Localization 46
System specifications----48
Getting started
Congratulations on your purchase of the AUDIOVOX NVX226 system.
Your AUDIOVOX NVX226 system can guide you to the destination of your choice using signals from Global Positioning Satellites (GPS) orbiting the earth.
There are 24 GPS satellites orbiting the earth. A GPS device can calculate your position on the earth if it can receive signals from at least three of these satellites. When it receives at least four signals, a GPS device can also calculate your altitude (height above sea level).
To use the AUDIOVOX NVX226 system for the first time you need to charge the battery, and install the map loader into your computer only when you require Canadian mapping. You can install the map loader while the battery is charging. When using the unit in the United States, map loader is not required to be loaded on your PC. The map for the United States is pre-installed on the 1 Gig memory card.
Charging the battery
To charge the battery, plug the power cable into the AUDIOVOX NVX226 system and into a power outlet. Let the battery fully charge (approximately 4 hours).
Starting the AUDIOVOX NVX226 system
Once you have charged the battery and loaded map data, you are ready to start the AUDIOVOX NVX226 system.
To start the AUDIOVOX NVX226 system:
- If the AUDIOVOX NVX226 system is being used for the first time, set the power ON/OFF slide switch on the bottom of the device to ON.

The AUDIOVOX NVX226 screen appears.

- The AUDIOVOX NVX226 system will auto start the Navigation program, and the following warning screen appears:
Warning
Do not enter data or work the software's controls while operating a vehicle. It is dangerous to do so. Park vehicle prior to operating this software. Netropa takes no responsibility for the consequences of any use that is inconsistent with this warning or the end user agreement.
Copyright © 2005 NAVTEQ Corporation


- Tap OK after you have read and agreed to the warning. The map view then appears and you are ready to set your first destination.

Using the AUDIOVOX NVX226 system buttons
The buttons on the AUDIOVOX NVX226 system have been set up to quickly show you key information.

Zoom In and Zoom Out buttons
Wheel button: Up: toggles 3D display on/off Right: displays the Route List Left: displays the GPS Info Down: toggles the mute on/off Center: tap for OK
Main Menu button
Set destination button
System On/Off button
Acquiring a GPS signal
To use the AUDIOVOX NVX226 system to guide you to a destination, the system's GPS antenna must be receiving GPS signals. These signals can be obstructed by ceilings, trees, and nearby tall buildings. The roof of your vehicle can also obstruct signals. For best results, position your
AUDIOVOX NVX226 system where a clear view of the sky is available.
Receiving an initial GPS signal may take several minutes. In addition, the further away the unit is from the last location of use, the longer it will take to obtain a GPS signal for your current location.
You can quickly view the GPS Info screen by pressing the right side of the
wheel button.
The GPS info screen appears
If you continue to tap the right button, the following screens appear in succession: map screen → GPS Info → Almanac → Location Information → Route list → map screen.

Almanac

Information


Route List

Save

Tap the left button: the screens appear in reverse order. Whichever current screen is displayed, tapping the OK button changes to the map screen.
Entering data on the AUDIOVOX NVX226 system
The AUDIOVOX NVX226 system doesn't have a keyboard. Instead, you tap the screen to enter data, for best result use the stylus provided.
When you are entering data, a screen containing the letters of the alphabet appears:

As you tap the buttons on the keyboard, the list at the top of the screen scrolls to show the next item that matches the letters you've tapped.
If you need to enter numbers, tap the 123 button, and the numeric keyboard appears:

Moving through the screens
The AUDIOVOX NVX226 system shows you one screen at a time. Each time you tap a button, a new screen appears. If you want to return to the
previous screen, tap the button in the center of the wheel button.
Working with the m
The AUDIOVOX NVX226 system presents many ways of looking at the map. You can view your current position, you can view any of the maneuvers on a route, and you can pan the map to view other areas. You can also zoom in and out, and you can find information about specific locations.
Map view
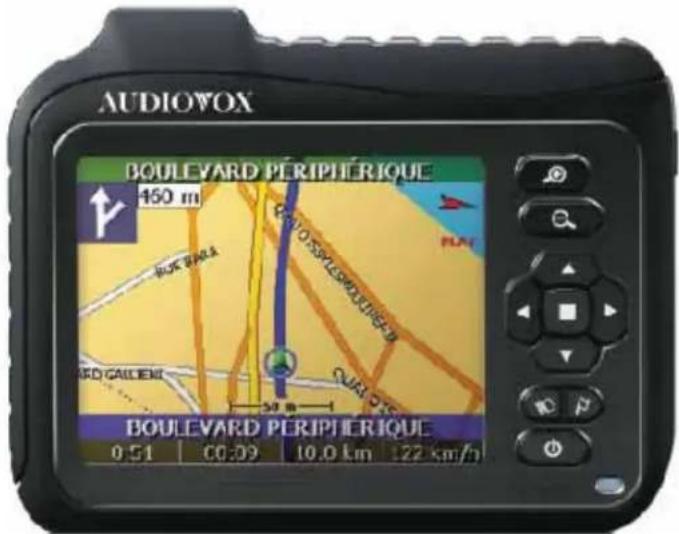
If you have acquired a GPS signal, the map view on the AUDIOVOX NVX226 system shows you your current location, indicated by a green arrow. If the arrow is red, no GPS signal is being received, and if the arrow is yellow the GPS signal is weak.

The bottom of the map presents a scale indicating your current zoom level.
Maneuver detail
If you have set a destination, the map displays additional information. As you navigate to a destination, the top of the map displays the name of the next street, the direction of your next turn, and the distance to that turn.

At the bottom of the map, you can also see the time, an estimate of how much time before you arrive at your destination, the remaining distance to your destination, and your current speed.
Panning the map
You can pan the map by tapping and dragging the map.

To return to the regular map view, press the center of the wheel button.
Route list
If you have set a destination, you can view a list of the maneuvers that make up your route by pressing the left side of the wheel button. Tapping an item on the list and then tapping Map will display the maneuver detail screen for that maneuver.

Main menu and set destination button

Every time, you press a Main Menu screen appears.
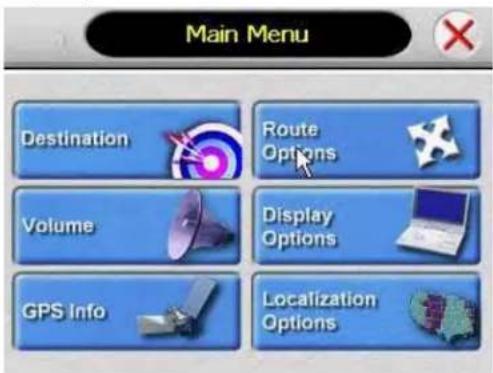
Press, if you have set a destination, a Destination Options screen appears.

If not, a Set Destination screen appears, and then you can set a destination using any of the following methods:
Location and POI information
You can find location information about any point on the map by pressing firmly on the map. A screen appears giving you the opportunity to set the location as the Start or the Destination. Save this location to your Favorites list, or view information (Info).

From the Information screen you have several options:
- Set start location
- Set destination
- Save this location
- Information
Setting the location as a starting point is useful if you are trying to find the distance between two locations. Setting the location as your destination is a quick way to set a destination. Saving the location adds the location to your Favorites list (you'll learn more about Favorites later in this manual).
To view location information:
- To view information about a location on the map, press firmly on the map. The address information screen appears.
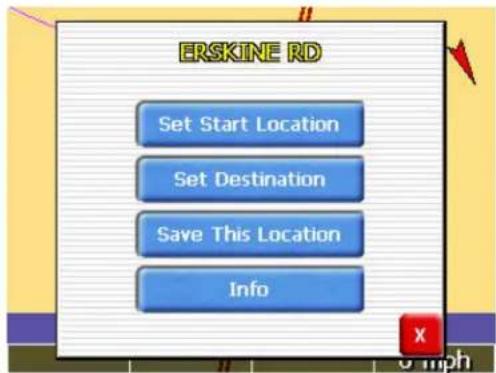
- Tap Information. The Information screen appears, giving you block information about the location, including latitude and longitude.

To view Point of Interest (POI) information:
- To view information about POI on the map, press firmly on the icon on the map. The POI(S) screen appears.

You can set a destination with the AUDIOVOX NVX226 system many different ways. Once you have set a destination, you can add a detour or a stopover.
The AUDIOVOX NVX226 system also offers an Itinerary feature, where you can enter up to 50 destinations and use the Itinerary screen to arrange the addresses in any order you prefer.
Setting a single destination
You can set your destination the following ways:
- Address
- Intersection
- Point of Interest (POI)
- Favorites
- Recent
- City Center
When you have found your destination, you have several options:
- Nav
- Fav
- Map

Nav Calculate the route from your current location (or the location you set as a starting point) to the destination.

Fav Add the destination to your Favorites list. Your Favorites list is a list to which you can add destinations. You can also enter a name for a destination and delete destinations from the list.

Display the location on the panning map without calculating a route.
Using an address as a destination
When you use an address for a destination, you must know at least the name of the street and the city. Guidance directions will be more accurate if you also know the street number of the destination.
Note: If you already have a destination, you can tap New to set a new destination.
There are two ways to enter the address: by selecting the street first, or by selecting the city first. If you use Street First and too many records match, you will be asked to use City First.
To enter an address as a destination using Street First:
- Press F. The Set Destination appears.

- Tap Address. The Input Method screen appears.

- If you need to change the region:
- Tap Change. The Enter State Name screen appears.

- Tap the letters to enter the name of the region, or tap the name of the region.
- Tap OK when you have selected the region. You return to the Input Method screen.
- Tap Street First. The Enter Street Name screen appears.

- Tap the letters to enter the name of the street. Tap OK when you have selected the street. The Enter House Number screen appears.

- Select the address that matches the location you want to go to and tap Nav. The map appears, and the guidance directions begin.
To enter an address as a destination using City First:

- Press F. The Set Destination screen appears.

- Tap Address. The Input Method screen appears.
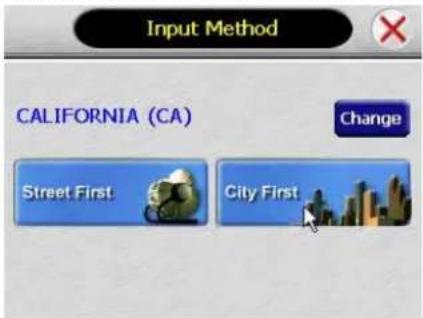
- If you need to change the region:
- Tap Change. The Enter State Name screen appears.

- Tap the letters to enter the name of the region, or tap the name of the region.
-
Tap OK when you have selected the region. You return to the Input Method screen.
-
Tap City First. The Enter City Name screen appears.

- Tap the letters to enter the name of the city. Tap OK when you have selected the city. The Enter Street screen appears.

- Tap the letters to enter the name of the street. Tap OK when you have selected the street. The Enter House Number screen appears.

- Tap the numbers to enter the house number. Tap OK when you have finished. The Select Address screen appears.
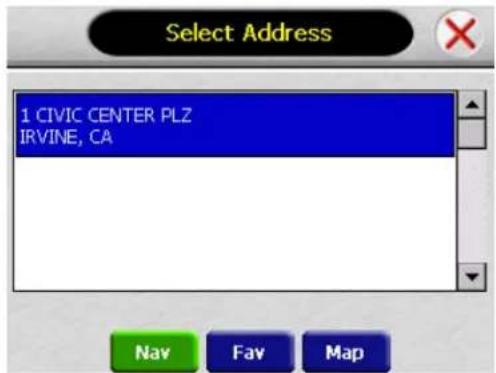
- Select the address that matches the location you want to go to and tap Nav. The map appears, and the guidance directions begin.
Using an intersection as a destination
When you use an intersection for a destination you must know the names of both streets. If there are many cities that have streets with the first name you enter, you might be asked to select the city first.
There are two ways to enter the intersection: by selecting the street first, or be selecting the city first. If you use Street First and too many records match, you will be asked to use City First.
To enter an intersection as a destination using Street First:
- Press F. The Set Destination screen appears.

- Tap Intersection. The Input Method screen appears.

- If you need to change the region:
- Tap Change. The Enter State Name screen appears.
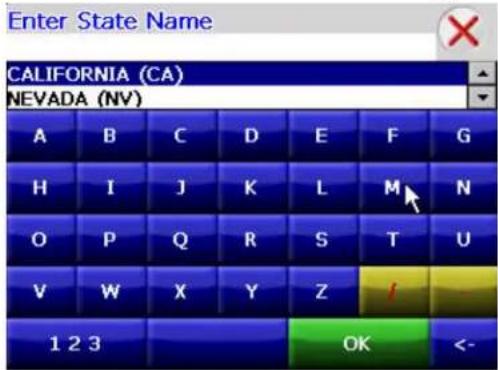
- Tap the letters to enter the name of the region, or tap the name of the region.
-
Tap OK when you have selected the region. You return to the Input Method screen.
-
Tap Street First. The Enter Street Name screen appears.
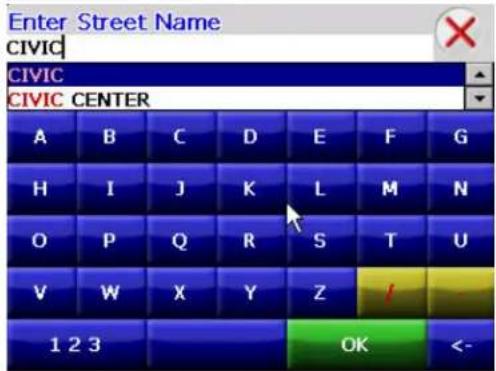
- Tap the letters to enter the name of the street. Tap OK when you have selected the street. The Enter 2nd Street Name screen appears.

- Tap the letters to enter the name of the second street. Tap OK when you have selected the street. The Select Address screen appears.

- Select the intersection that matches the location you want to go to and tap Nav. The map appears, and the guidance directions begin.
To enter an intersection as a destination using City First:

- Press F. The Set Destination screen appears.

- Tap Intersection. The Input Method screen appears.

- If you need to change the region:
- Tap Change. The Enter State Name screen appears.
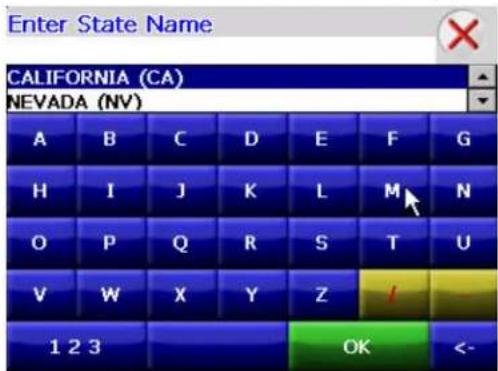
- Tap the letters to enter the name of the region, or tap the name of the region.
- Tap OK when you have selected the region. You return to the Input Method screen.
- Tap City First. The Enter City Name screen appears.

- Tap the letters to enter the name of the city. Tap OK when you have selected the city. The Enter Street Name screen appears.
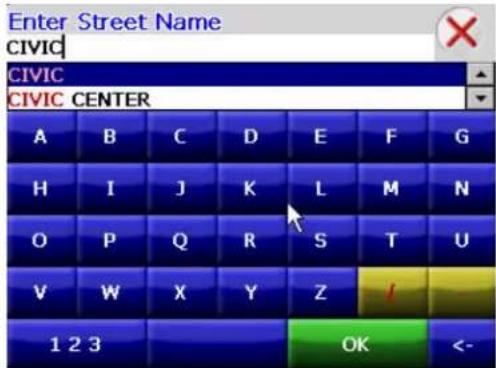
- Tap the letters to enter the name of the street. Tap OK when you have selected the street. The Enter 2nd Street Name screen appears.

- Tap the letters to enter the name of the second street. Tap OK when you have selected the street. The Select Address screen appears.

- Select the intersection that matches the location you want to go to and tap Nav. The map appears, and the guidance directions begin.
Using a Point of Interest (POI) as a destination
There are many points of interest that you can select as a destination. Generally, you choose a category and then choose one of four methods of selecting the specific point of interest. Sometimes you must first select a subcategory (such as Museum within the category of Attractions) before you can choose a selection method.
Because there are so many different types of restaurants, choosing a subcategory of restaurant is more like selecting a street.
The four methods of selecting a specific point of interest include two for nearby POIs and two for all POIs in a region.
To select a nearby POI as a destination:
- Press The Set Destination screen appears.
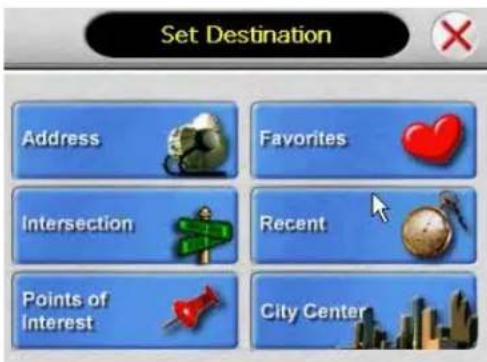
- Tap Points of Interest. The Points of Interest screen appears.

- Tap a category. Usually a subcategory screen appears.

Note: If you choose Restaurant, tap the letters to enter a type of restaurant. If you choose Hotel, there is no subcategory screen. Go to the next step.
- Tap a subcategory. The POI Options screen appears.

- To select a nearby POI from an alphabetical list:
- Tap Alphabetical. The Enter POI Name screen appears.

- Tap the letters to enter the name of the POI. Tap OK when you have selected the POI. The POI Select screen appears, displaying the address of the POI.

- Tap Nav. The map appears, and the guidance directions begin.
- To select a nearby POI by distance:
- Tap By Distance. The POI List screen appears, listing the closest POIs first.
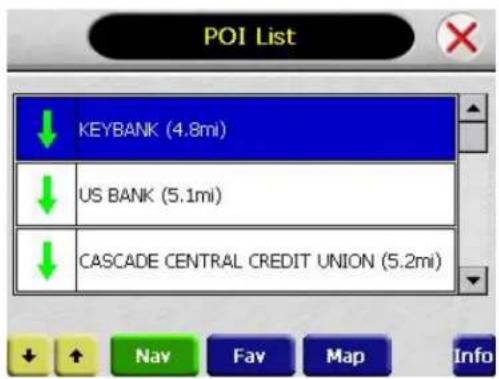
- Tap the POI that you want to go to and tap Nav. You may need to scroll down the list by tapping the scroll bar. The map appears, and the guidance directions begin.
To select from all POI in a region:

- Press The Set Destination screen appears
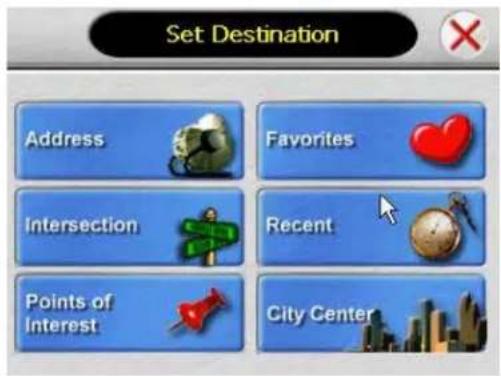
- Tap POI. The Points of Interest screen appears.

- Tap a category. Usually a subcategory screen appears.
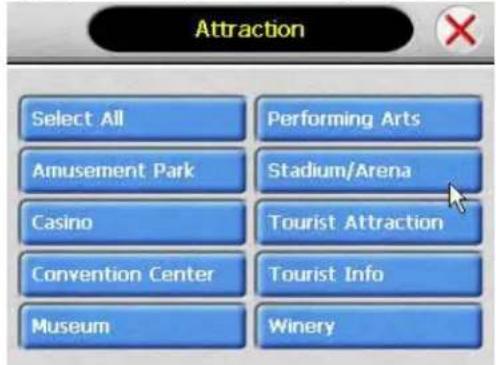
Note: If you choose Restaurant, tap the letters to enter a type of restaurant. If you choose Hotel, there is no subcategory screen. Go to the next step.
- Tap a subcategory. The POI Options screen appears.
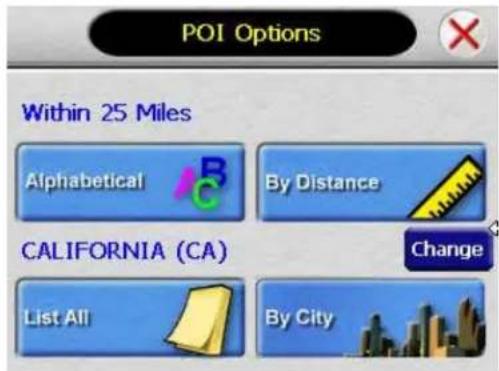
- To select a POI from an alphabetical list:
- Tap List All. The Enter POI Name screen appears.
- Tap the letters to enter the name of the POI. Tap OK when you have selected the POI. The POI Select screen appears.

- Tap Nav. The map appears, and the guidance directions begin.
- To select a POI by city:
- Tap By City. The Enter City Name screen appears.

- Tap the letters to enter the name of the city and tap OK. The Enter POI Name screen appears.

- Tap the letters to enter the name of the POI and tap OK. The POI Select screen appears.

- Tap Nav. The map appears, and the guidance directions begin.
Using a Favorite destination as a destination
Favorite destinations are locations you add to a list on the AUDIOVOX NVX226 system. You can add locations to your Favorites list as you set a destination from the POI(S) screen, and from the Location Information screen. You can then easily select one of these locations as a destination.
To select a favorite as a destination:
- Press F. The Set Destination screen appears.

- Tap Favorites. The Favorites screen appears.

- Tap on the favorite you want to use as a destination and tap Nav. The map appears, and the guidance directions begin.
Using a Recent destination as a destination
Recent destinations are locations you have navigated to recently. You can easily select one of these locations as a destination.
Managing your recent destinations list is covered later in this section.
To select a destination from your list of recent destinations:

- Press F. The Set Destination screen appears

- Tap Recent. The Recent screen appears.
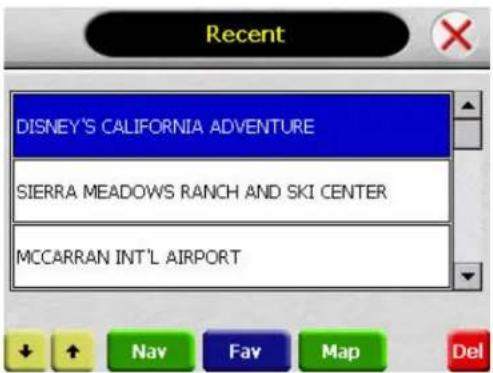
- Tap on the recent destination you want to go to and tap Nav. The map appears, and the guidance directions begin.
Using a City Center as a destination
Sometimes you may want to use the AUDIOVOX NVX226 system to get to a city, but not to a specific location within the city. To do this you select a City Center as a destination.
As with selecting a Point of Interest, there are several methods of selecting a city center: two for nearby city centers and one for all city centers in a region.
To select a nearby City Center as a destination:

1. Press F. The Set Destination screen appears

2. Tap City Center. The City Center screen appears.
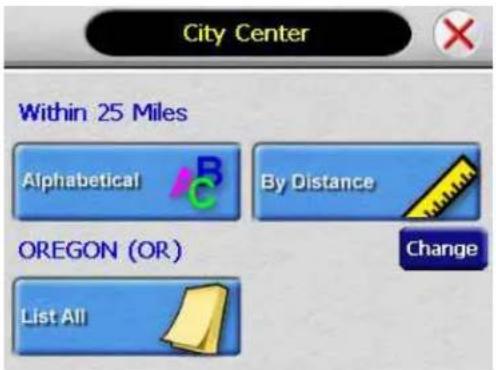
3. To select a nearby city center from an alphabetical list:
• Tap Alphabetical. The Enter City Name screen appears.
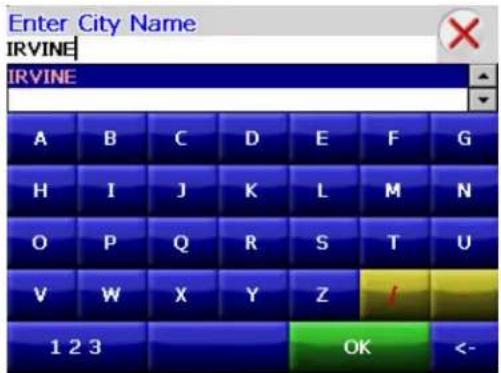
- Tap the letters to enter the name of the city. Tap OK when you have selected the city. The City Center screen appears.

- Tap Nav. The map appears, and the guidance directions begin.
- To select a nearby POI by distance:
- Tap By Distance. The City List screen appears, listing the closest city centers first.
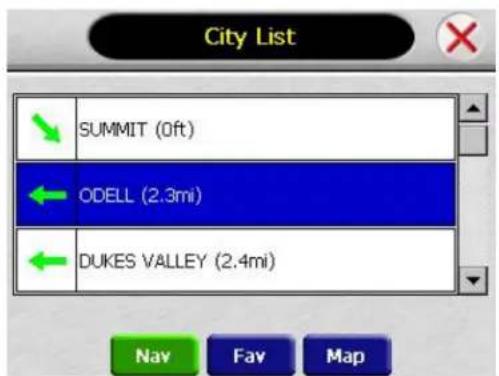
- Tap the city that you want to go to and tap Nav. You may need to scroll down the list by tapping the scroll bar. The map appears, and the guidance directions begin.
To select from all City Centers in a region:

1. Press The Set Destination screen appears

2. Tap City Center. The City Center screen appears.

3. To select a city center from all available in a region:
- Tap List All. The Enter City Name screen appears.

- Tap the letters to enter the name of the city. Tap OK when you have selected the city. The City Center screen appears.
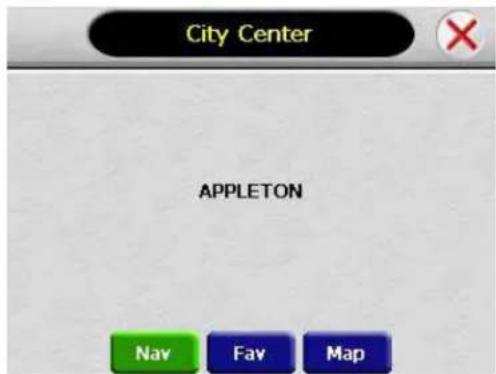
- Tap Nav. The map appears, and the guidance directions begin.
Adding detours and stopovers
The detour feature lets you tell the AUDIOVOX NVX226 system about roads on a route that you do not want to use. Stopovers are stops you add to your trip to make prior to reaching your destination.
Detours
Once you have set a destination you can look at the list of streets and determine if you need to mark one or more as unavailable. If you mark a section as unavailable, the AUDIOVOX NVX226 system will calculate a new route that avoids the section you marked.
Note: You cannot create a detour if you do not have a current destination.
To create a detour:
- Press The Destination Options screen appears.
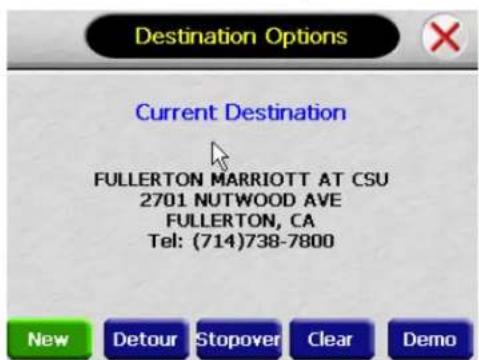
- Tap Detour. The Detour screen appears.

- Mark any segments that you do not want included:
- Tap on a route instruction to highlight it.
- Tap Avoid. A do not enter symbol appears.
- When you have finished marking segments, tap Nav. Your route is recalculated, the map appears, and the guidance directions begin.
Stopovers
Once you have set a destination you can add a stopover. Adding a stopover does not cancel your original destination.
To create a stopover:
- Press The Destination Options screen appears.

- Tap Stopover. The Set Stopover screen appears.

- Set your stopover destination using any of the methods explained earlier in this section.
To cancel a stopover:
- Press The Destination Options screen appears.

-
Tap Stopover.
-
Tap the ✗ in the top right corner. A confirmation message appears asking if you want to continue to your final destination.

- Tap Yes. The map appears and navigation continues.
Managing your favorites list
You can edit the destinations you add to your favorites list to give them descriptive names. You can also remove destinations from your favorites list.
To manage your favorites list:
- Press The Set Destination screen appears


- Tap Favorites. The Favorites screen appears

- Tap on the favorite you want to edit.
- Tap Edit. The Edit Favorites screen appears.

- Enter a descriptive name for this favorite.
- Tap OK when you are done.
- To delete a destination from your favorites list:
- Tap on the favorite you want to delete.
- Tap Del. The favorite is removed from the list.
- Tap X to close the Favorites screen.
Setting your options
You can set many different options to customize the AUDIOVOX NVX226 system and make it work your way. These options include:
- Display options
- Route options
• Volume - Localization
Display options
The display options give you control over the appearance of the map. You can change the following:

- Orientation
• Guidance
• Day/Night - POI Icons
- Color
• 3D View
There are two orientation settings. Heading turns the map as you drive so that you are always moving toward the top of the screen. North keeps the map oriented with North at the top of the map, the same as a traditional paper map.
There are two guidance settings, which control whether or not the maneuver detail screen appears when you near your next maneuver. If you use the auto setting, the maneuver detail screen appears.
The day/night setting controls the background of the screen. If you choose auto, the AUDIOVOX NVX226 system will automatically switch to a darker version of your color scheme soon after sunset, to reduce the glare in the vehicle. You can instead choose to use either the day or night setting at all times.
There are three options for displaying POI icons. If you choose default, the most commonly displayed categories of POI icons will appear on the map at zoom levels of 1000 ft and closer. If you choose off, no POI icons are displayed. If you choose custom, you can choose which categories of POI icons you want displayed.
The color settings control the background color of the map. You can choose from four different colors.
The 3D view settings control your view of the map. Off shows you the map in traditional 2D mode. 1, 2, and 3 show you a 3D version of the map, with a different angle for each value. If you use any of the 3D settings you will not be able to tap on a location to view location information. You can toggle the 3D view on and off using the up button on the wheel button.


To set your display settings:
- Press The main menu appears.
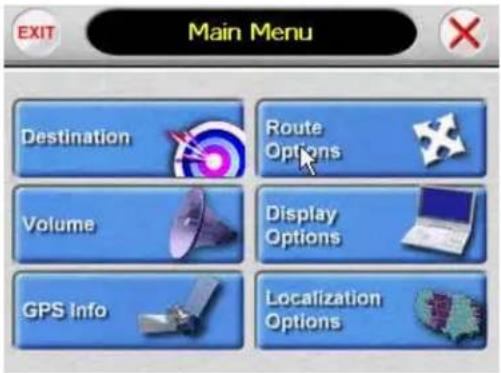
- Tap Display Options. The Display Options screen appears.

- Tap your Orientation preference: Heading or North.
- Tap your Guidance preference: Auto or Manual.
- Tap your Day/Night preference: Auto, Night, or Day.
- Tap your POI Icons preference: Default, Off, or Custom.
- When you tap Custom the POI Options screen appears.

- Tap on the categories you want displayed. The categories to be displayed are highlighted. You can use Select All and Clear All to quickly highlight or clear categories.
- When you have highlighted the categories you want displayed, tap OK. You return to the Display Options screen.
-
Tap your Color preference: Yellow, Grey, White, or Purple.
-
Tap your 3D View preference: Off, 1, 2, or 3.
-
When you have finished choosing your options, tap OK.
Route options
The route options give you control over the appearance of the map. You can change the following:

- Method
- Ferries
- Toll roads
- Carpool
- Turns
There are four method settings. The quickest setting calculates the route that should take the least amount of time. Major calculates a route that uses major roads whenever possible. Shortest calculates the route that is shortest in distance. Local calculates a route that uses local roads whenever possible.
The ferries setting indicates whether ferries should be included when your route is calculated. If you include ferries, the route will take you to the ferry terminal, but the total time for the route does not take into account the ferry schedule or time spent on the ferry.
The toll roads setting indicates whether you want to include or exclude toll roads when your route is calculated. If you include toll roads, those roads will be used if appropriate for the method you selected.
The carpool setting indicates whether or not you want to include carpool or high occupancy vehicle (HOV) restrictions in the calculation of your route.
The turns setting indicates whether or not you want to make more turns or less turns.
To set your route settings:
- Press The main menu appears.


- Tap Route Options. The Display Options screen appears.

- Tap your Method preference: Quickest, Major, Shortest, or Local.
- Tap your Ferries preference: Include or Exclude.
- Tap your Toll Roads preference: Include or Exclude.
- Tap your Carpool preference: Include or Exclude.
- Tap your Turns preference: Less or More.
- When you have finished choosing your options, tap OK.
Volume
You can set the volume used by your AUDIOVOX NVX226 system to the level most comfortable for you.
You can also mute the sound. You can toggle the mute on and off by pressing the down side of the wheel button. There is also a Mute button on the Volume screen.
To change the volume:
- Press The main menu appears.

- Tap Volume. The Volume screen appears.
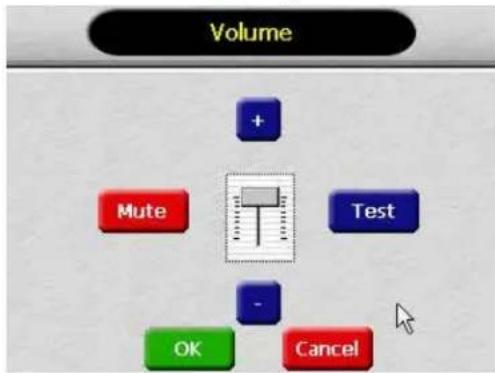
-
Tap on the volume setting you want, or tap on the Vol - or Vol + buttons.
-
To test the volume, tap Test.
-
To save your changes, tap OK. The Volume screen closes.
Localization
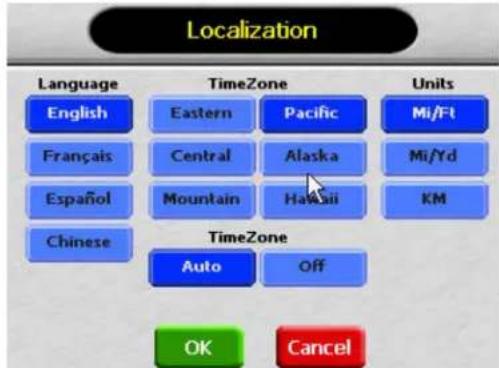
The localization options give you control over the settings affected by your location, including:
- Language
- Time zone
- Units
There are four language settings. When you change the language, all of the screen names and controls will be in the selected language.
There are six time zone settings for the United States.
There are three settings for units, which determine how the distance to your location is expressed. You can choose between Mi/Ft (miles and feet), Mi/Yd (miles and yards), or KM (kilometers).
To set your localization settings:

- Press The main menu appears.

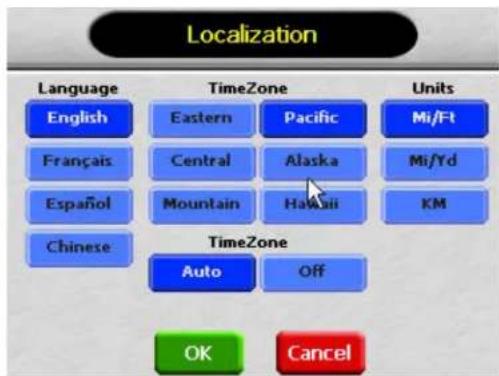
- Tap Localization. The Localization screen appears.
-
Tap your Language preference: English, François, Español, or Chinese.
-
Tap your Time Zone preference: Eastern, Central, Mountain, Pacific, Alaska or Hawaii.
-
Tap your Units preference: Mi/Ft, Mi/Yd, or KM.
-
When you have finished choosing your options, tap OK.
System specifications
The AUDIOVOX NVX226 has the following specifications:
- SiRF Star III GPS chipset
- Freescale M9328MX21 (ARM926EJ-S™) 266Mhz CPU
• 64 MB SDRAM + 8 MB NOR flash onboard
• 3.5-inch 26K Colors TFT LCD with touch panel - SD memory slot for map expansion
- Build-in 1 W speaker with external 3W speaker on cradle
• Build-in GPS antenna - USB 1.1 connector for Active Sync and map download
• WinCE.NET 4.2+ OS Kernel - Host Start: 1 sec., average
• Warm Start: 38 sec., average
• Cold Start: 42 sec., average - 193+ g Weight
- Dimensions: 120mm(L)*87mm(W)*21.5mm(T)
- Up to 4 hours Battery Life (Rechargeable Internal Lithium-polymer battery 1300 mA)

natural_image
Simple line drawing of a laptop with a triangular icon on the screen (no text or symbols)For Customer Service
Visit Our Website At
www.audiovox.com
Product Information, Photos,
FAQ's Owner's Manuals
820006 Audiovox Electronics Corporation, 150 Marcus Blvd., Hauppauge, New York 11788
NVX226 Owner's Manual
1287693
- AUDIOVOX®
- ELECTRONICS CORP.
- NVX226
- Navigation System
- User's Manual
- Contents
- Getting started 1
- Working with the map----8
- Planning your route---- 13
- Setting your options 40
- Getting started
- Charging the battery
- Starting the AUDIOVOX NVX226 system
- To start the AUDIOVOX NVX226 system:
- Warning
- Using the AUDIOVOX NVX226 system buttons
- Acquiring a GPS signal
- Entering data on the AUDIOVOX NVX226 system
- Moving through the screens
- Working with the m
- Map view
- Maneuver detail
- Panning the map
- Route list
- Main menu and set destination button
- Location and POI information
- To view location information:
- To view Point of Interest (POI) information:
- Setting a single destination
- Using an address as a destination
- To enter an address as a destination using Street First:
- To enter an address as a destination using City First:
- Using an intersection as a destination
- To enter an intersection as a destination using Street First:
- To enter an intersection as a destination using City First:
- Using a Point of Interest (POI) as a destination
- To select a nearby POI as a destination:
- To select from all POI in a region:
- Using a Favorite destination as a destination
- To select a favorite as a destination:
- Using a Recent destination as a destination
- To select a destination from your list of recent destinations:
- Using a City Center as a destination
- To select a nearby City Center as a destination:
- Press F. The Set Destination screen appears
- Tap City Center. The City Center screen appears.
- To select a nearby city center from an alphabetical list:
- To select from all City Centers in a region:
- Press The Set Destination screen appears
- To select a city center from all available in a region:
- Adding detours and stopovers
- Detours
- To create a detour:
- Stopovers
- To create a stopover:
- To cancel a stopover:
- Managing your favorites list
- To manage your favorites list:
- Setting your options
- Display options
- To set your display settings:
- Route options
- To set your route settings:
- Volume
- To change the volume:
- Localization
- To set your localization settings:
- System specifications
Brand : AUDIOVOX
Model : NVX226
Category : Browser