VMO 5020 V - Browser AUDIOVOX - Free user manual and instructions
Find the device manual for free VMO 5020 V AUDIOVOX in PDF.
Frequently Asked Questions - VMO 5020 V AUDIOVOX
User questions about VMO 5020 V AUDIOVOX
0 question about this device. Answer the ones you know or ask your own.
Ask a new question about this device
Download the instructions for your Browser in PDF format for free! Find your manual VMO 5020 V - AUDIOVOX and take your electronic device back in hand. On this page are published all the documents necessary for the use of your device. VMO 5020 V by AUDIOVOX.
USER MANUAL VMO 5020 V AUDIOVOX
"Made for iPod," and "Made for iPhone mean that an electronic accessory has been designed to connect specifically to iPod, iPhone, or iPad, respectively, and has been certified by the developer to meet Apple performance standards. Apple is not responsible for the operation of this device or its compliance with safety and regulatory standards. Please note that the use of this accessory with iPod or iPhone may affect wireless performance.
Bluetooth® is a trademark of Bluetooth Special Interest Group (SIG) Inc.
iGo Primo is a trademark of NNG Kft.


Made for

iPod iPhone
At the end of the product's useful life, please dispose of it at appropriate collection points provided in your country.
AF (Alternative Frequencies)
BLUETOOTH AUDIO-FUNCTION

Careful press and briefly hold styus on the center of the target. Repeat as the target moves around the screen.

New calibration settings have been measured.
Tap the screen to register saved data.
Wait for 30 seconds to cancel saved data and keep the current setting.
Time limit: 19 sec
Congratulations on your purchase of the Audiovox In-Dash Navigation Radio VMO 5020 V. Please read the instruction manual for this product before using. The documentation provided will allow you to fully enjoy all the features this unit has to offer. Please save this manual for future reference.
WARNING!
Never install this unit where operation and viewing could interfere with safe driving conditions.
WARNING!
To reduce the risk of a traffic accident (except when using for rear view video camera) never use the video display function while driving the vehicle. This is a violation of federal law.
WARNING!
To prevent injury from shock or fire, never expose this unit to moisture or water.
WARNING!
Never disassemble the unit.
WARNING!
Never use irregular discs.
WARNING!
To prevent damage to the mechanism inside this unit, avoid impact to the unit's monitor.
WARNING!
Using an improper fuse may cause damage to the unit and result in a fire.
CONTENTS
WARNING. 58
FEATURES 62
CONTROLS AND INDICATORS 64
Controls and Indicators 64
Media Link 66
Hands Free Microphone 66
DVD/CD Basics 67
Types of Discs Your System Will Play .67 DVD Region Code .67
QUICK START GUIDE 68
Turning the Unit ON or OFF 68
Playing a DVD/CD/MP3 Disc. 68
Selecting Audio/Video Sources, Navigation or System Settings . . . . . .68
Adjusting the Volume. 68
Muting the Audio 68
Adjusting Fade and Balance 69
Adjusting Equalizer Controls 69
Setting System Time 70
Resetting the System 71
MAIN MENU 72
Main Menu Screen 72
Tracklist Direct Entry Screen 75
MP3 Controls Screen 76
Folder Direct Entry Screen 77
DVD OPERATION 78
DVD Controls Screen. 78
On Screen Controls 80
Picture Adjustment Screen 81
Picture Adjustment Screen 86
Adjusting the Navigation Voice Volume 89
AV IN OPERATION 90
AV IN Screen. 90
Setup Screen 90
Picture Adjustment Screen 91
USB OPERATION 92
USB Screen. 92
7.93
To Adjust Your Call's Volume 95
Pairing Your Wireless Phone 96
To Pair a Wireless Phone to the Unit 96
To Pair the Unit to a Wireless Phone 97
To Delete Paired Wireless Phones 98
Making Outgoing Calls 98
To Dial Directly 98
To Make an Outgoing Call Using Your Contact List .99
Managing Incoming Calls 99
To Answer an Incoming Call 99
To Reject an Incoming Call. .99
Call Waiting 100
Device Screen 100
Bluetooth Settings Screen. 101
PIN Code Setting Screen 101
Contacts List Screen 101
Contacts Keyboard Screen 101
Call Log Screen 102
Bluetooth Music Function 103
SYSTEM SETTINGS. 104
First Settings Screen 104
Touch Screen Calibration 105
Information Screen 105
Second Settings Screen 106
System Time Set Screen 107
AUDIO/EQUALIZER CONTROLS 108
Audio Control Screen 108
Equalizer Screen 109
REARVIEWCAMERA 110
FEATURES
General
Built-in navigation
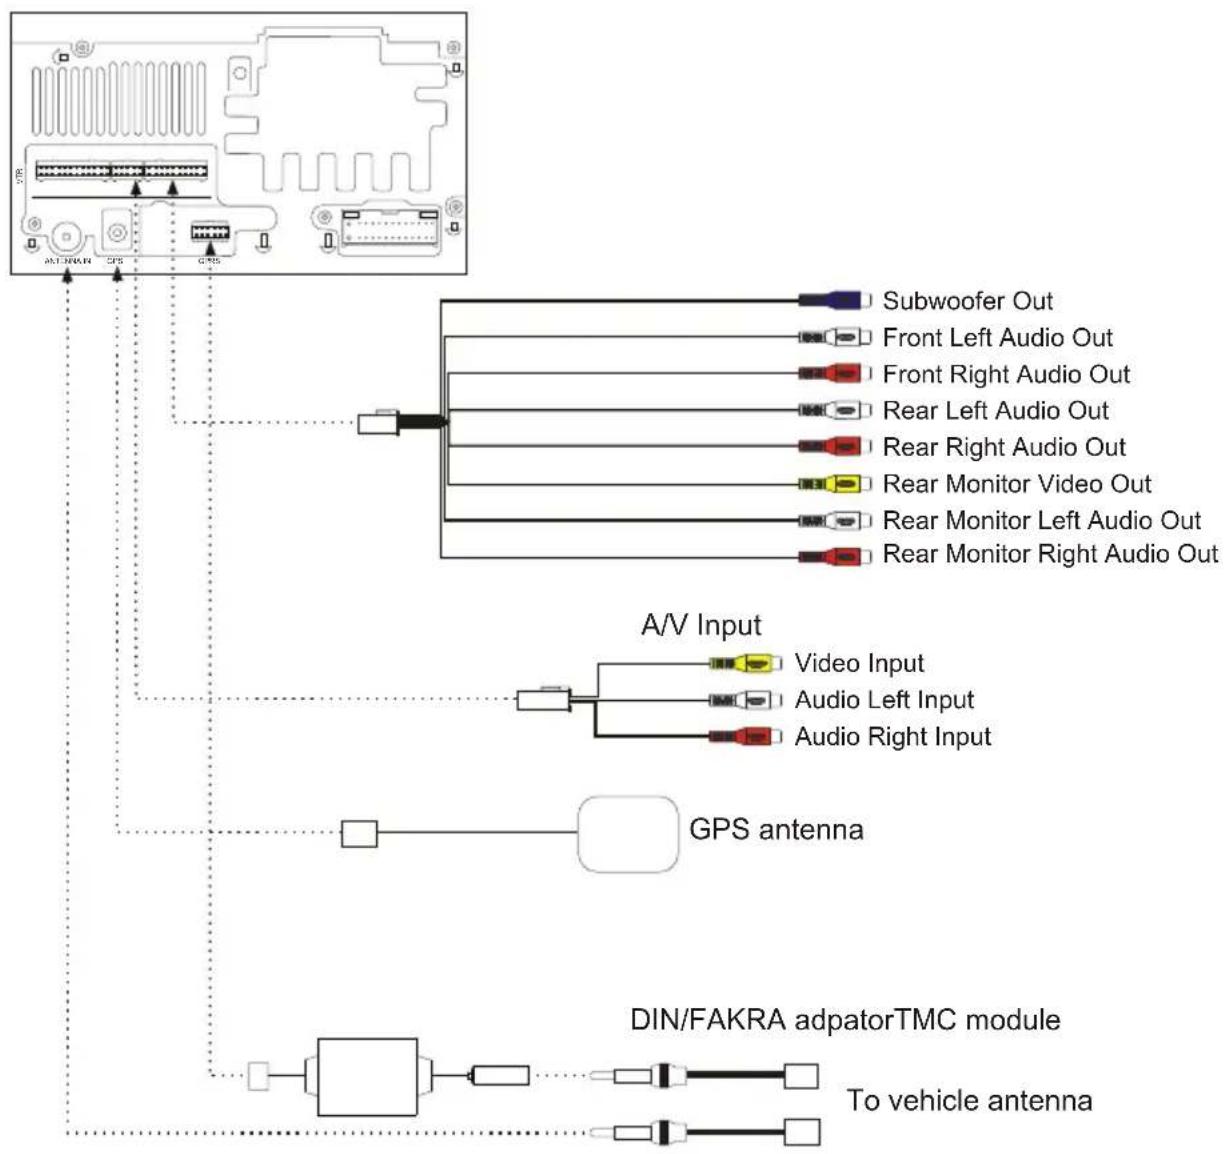
- Composite video outputs for additional screens
Audio/Video auxiliary input
- Rotary encoder audio control
- Nine-Band EQ with three preset and three user-defined EQ curves
- Subwoofer control
Rear camera input
DVD
- Aspect ratio - 16: 9 or 4: 3
- Fast forward, fast reverse
- Play, pause, stop, next chapter, and previous chapter
CD / MP3 / WMA
- Direct track access
Forward/Reverse track search - Random, repeat, and intro
- Play, pause, stop, next track, and previous track
AM-FM
- Station presets (12 FM, 6 AM)
- Auto stereo/mono
- Seek and scan
iPod/iPhone
- Access iPod/iPhone playlists, artists, albums, songs, and video (requires video iPod), and shows album art
- Power management charges iPod/iPhone while connected
Media
- USB - Supports most hard drives and flash memory drives
- 3.5 mm audio/video input
Navigation
- The mobile multimedia receiver provides turn-by-turn guidance with a large map and points-of-interest database.
Independent volume control
Bluetooth
- Bluetooth hands-free profile for safety / convenience and A2DP profile for streaming music from a PDA / PMP
- Call waiting and caller ID for call on hold
- Call automatically transferred to handset when vehicle is turned off
- Independent volume control
Rear Camera
- The in-dash navigation radio is "camera ready."
CONTROLS AND INDICATORS
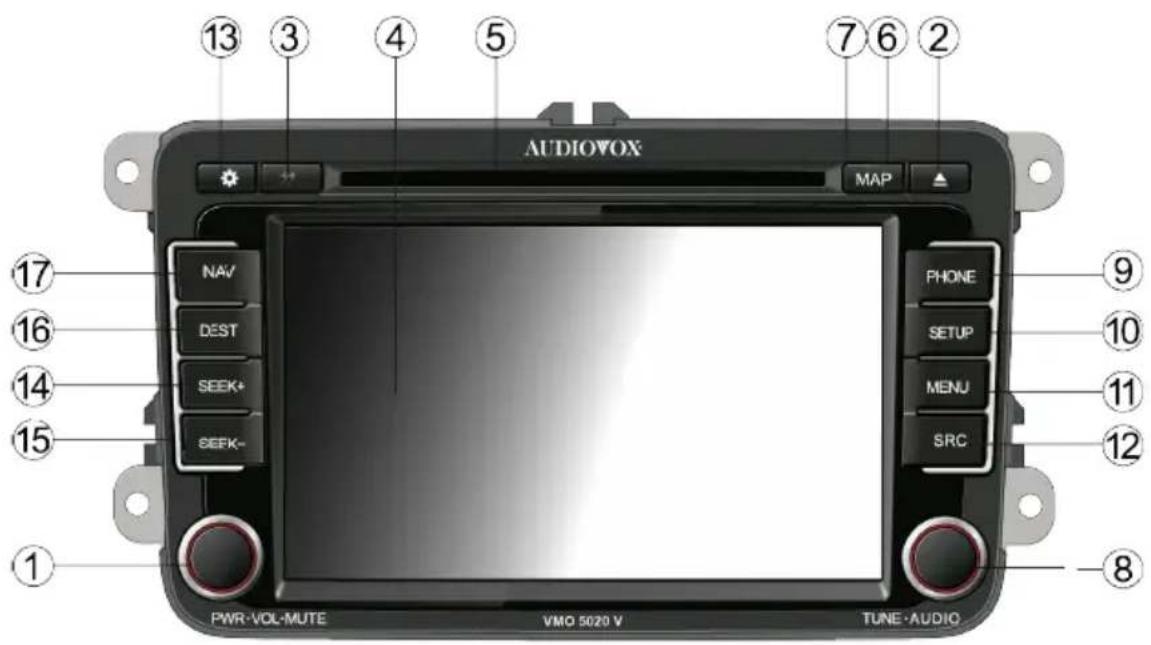
CONTROLS AND INDICATORS
1. Power, Volume, and Mute Control Knob
Press the knob to turn the unit on. Press and hold the knob for 2 seconds to turn the unit off. Rotate the knob to adjust the volume from 0 to 30. Press the knob momentarity to mute the audio. Press the knob again to restore the audio.
2. Eject ( Button
Press this button to eject a DVD/CD/MP3 disc. Disc play is stopped, the disc is ejected and the unit will change to radio operation. If the disc is not removed from the unit and the button is pressed again, the disc will be re-loaded. If the disc is not removed from the disc slot within 10 seconds of being ejected, it will be automatically re-loaded to prevent it from being accidentally damaged.
3. Not Used
Not used.
4. LCD Screen and Touch Screen
Press icons on this screen to access menus or control functions.
5. Disc Slot
Accepts DVD/CD/MP3 discs. If the unit is turned on, playback begins when a disc is inserted.
6. Reset Button
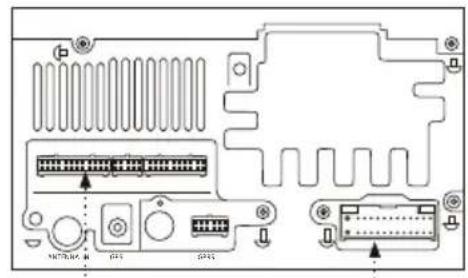
Press this button to reset the system to correct a system halt or other illegal operation. Use the tip of a pen to press the Reset button. The Reset button is located behind the MAP cover (7).
7. MAP Cover
Covers the Micro SD card slot. The Micro SD card slot is used for the Navigation Map only, not for music or other files. This may be used for firmware updates if required.
8. Tune/Audio Control Knob
When the unit is set to Radio mode, rotate this knob to acquire the next or previous available frequency. When the unit is set to MP3/USB player mode, rotate this knob to select a song. When the unit is set to the DVD mode, rotate this knob to select the next or previous chapter.
Press this knob to access the Audio Controls Screen. Press this knob again to exit.
9. PHONE Button
Press this button to access the Bluetooth touch screen menu.
10. SETUP Button
Press this button to access the Settings touch screen menu.
11. MENU Button
Press this button to access the Main touch screen menu.
12. SRC Button
Press this button to switch between the available audio/video sources applied to the unit.
13. Dimmer ( Button
Press this button to adjust the LCD screen brightness as follows: Screen Off, Dark, Soft or Bright.
14. SEEK + Button
When the unit is set to Radio mode, press this button to acquire the next available frequency. When the unit is set to iPod/iPhone/MP3/USB player mode, press this button to select the next song.
15. SEEK - Button
When the unit is set to Radio mode, press this button to acquire the previous available frequency. When the unit is set to iPod/iPhone/MP3/USB player mode, press this button to select the previous song.
16. DEST Button
Press this button to access the Navigation mode and enter a desired destination.
17.NAVButton
Press this button to switch between the Navigation mode and the current source being played. For example, you may switch from the radio to navigation and then back to the radio.
CONTROLS AND INDICATORS
NOTE: If your vehicle is equipped with steering wheel controls for the audio system, the controls may function differently than described in the vehicle owners manual. The AUDIOVOX In-Dash Navigation Radio system may function differently than the OEM radio due to added features and functions that the OEM radio did not support. This is normal operation.
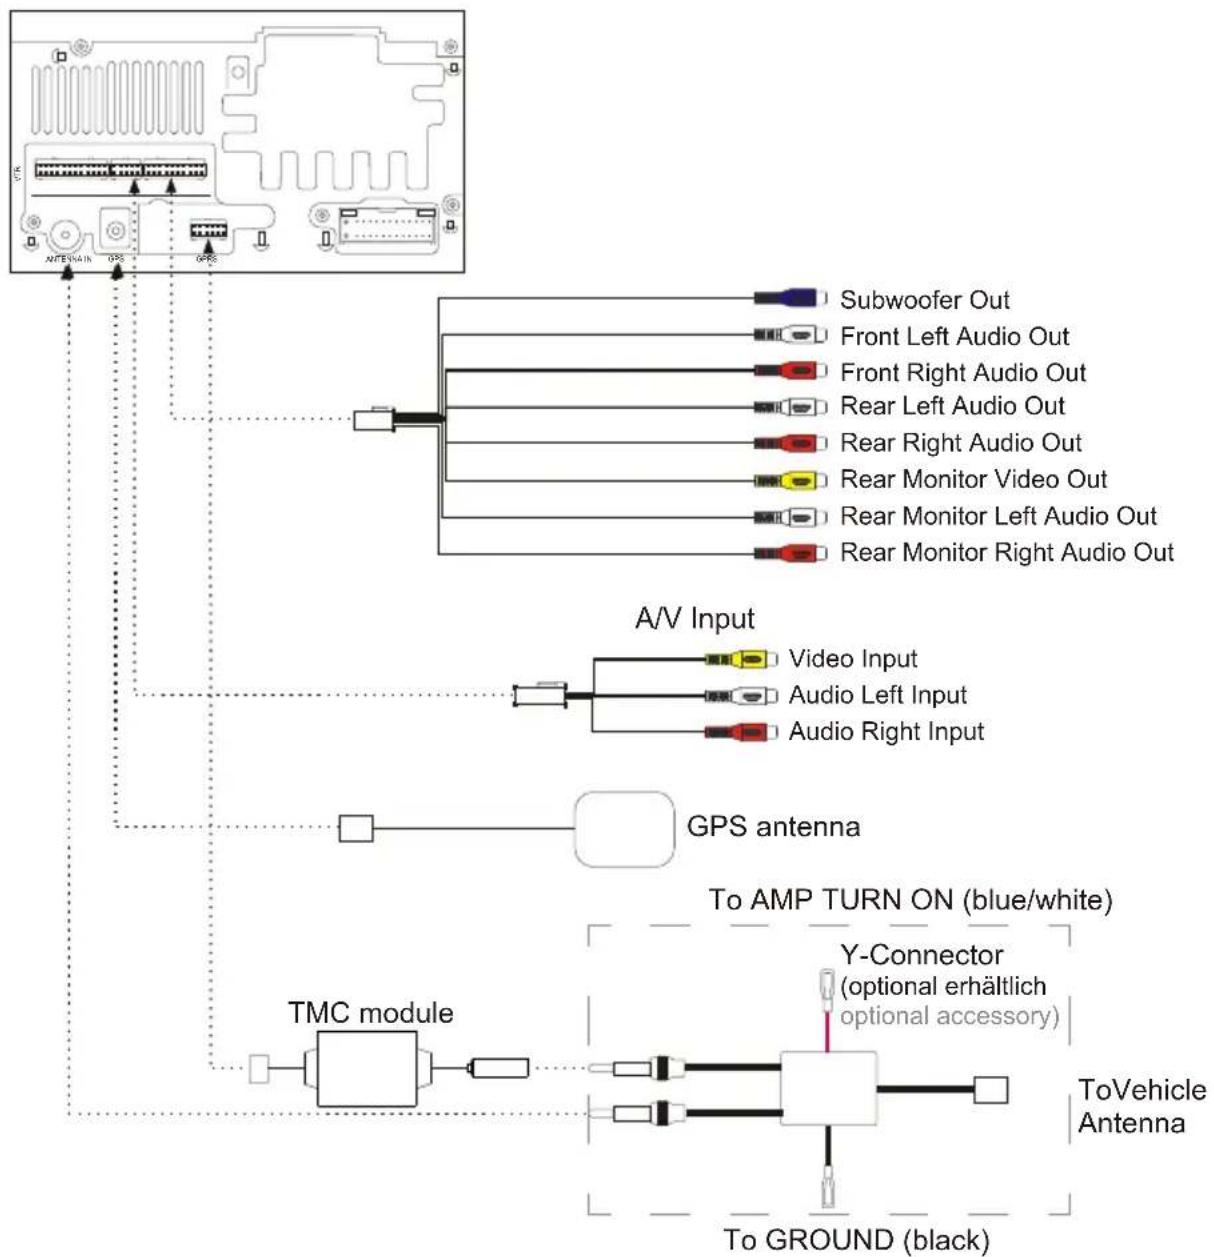
MEDIA LINK
The unit is supplied with a Media Link which can accept signals from various audio/video devices. The Media Link is installed and routed to an accessible vehicle location during installation.
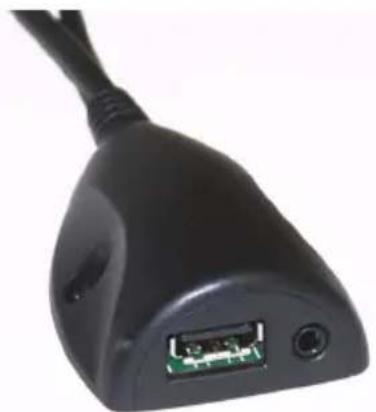
The media link will accept a USB device, a 3.5 mm jack, or an iPod/iPhone.
NOTE: For basic connectivity, your iPod/iPhone must be connected to the Media Link using the iPod/iPhone adapter cable that comes with your iPod/iPhone or is available separately. For iPod/iPhone video playback, use the Audiovox jLink4 cable.
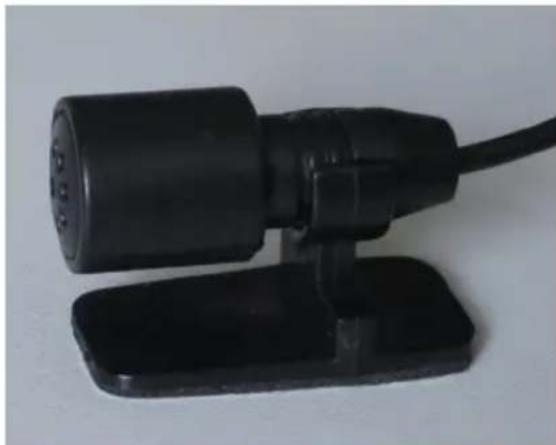
HANDS FREE MICROPHONE
The hands-free microphone is installed in your vehicle in an accessible location that provides optimum voice reception. For best reception, speak loudly and clearly.
DVD/CD BASICS
To get the optimum use out of your CD/DVD player, please read this section.
Types of Discs Your System Will Play
Your system will play the following types of discs:
DVD disc - DVD discs that contain audio and/or video.
- Audio discs - Audio CDs that contain musical or sound content only.
- MP3 discs - A disc that contains audio files (for example, a CD-R with downloaded MP3 files). MP3 discs can hold a maximum of 500 songs/folders per disc.
This unit is capable of playing most recordable DVD formats. However, due to the variety of disc manufacturers and software, playback can not be guaranteed for every disc.
DVD Region Code
Both the DVD-Player and discs are coded by region. These region codes must match in order for the disc to play. If the region codes do not match, the disc will not play. This DVD player is set to Region 2 (Europe) and will not play discs that have a region code different from Region 2.
QUICK START GUIDE
Turning the Unit ON or OFF:
Press the front panel Power/Volume/Mute control knob to turn the unit on. To turn the unit off, press and hold the front panel Power/Volume/Mute control knob for 2 seconds.
Playing a DVD/CD/MP3 Disc:
-
Turn the unit on.
-
Insert a DVD/CD/MP3 disc into the disc slot, label side up. Playback begins when a disc is inserted.
NOTE: When properly installed, DVD video can not be displayed on the front LCD screen unless the parking brake is applied.
Selecting Audio/Video Sources, Navigation or System Settings:
- Press the front panel MENU button or touch screen Menu icon to view the Main Menu Screen.
- Press the touch screen Disc, Radio, USB, iPod, Rear LCD, Navigation, AV IN, Bluetooth or Settings icon. The icon is gray if the source is not available.
Adjusting the Volume:
To increase or decrease the volume level, rotate the front panel Power/Volume/Mute control knob. The unit's front panel screen will display the volume level for 3 seconds. The volume level ranges from 0 to 30.
Navigation and Bluetooth volume can be adjusted independently of the radio volume by rotating the Power/Volume/Mute control knob. The navigation must be talking, and Bluetooth must be in a call, when making the volume adjustment. When exiting Navigation and Bluetooth, the volume will return to the previous source volume level.
Muting the Audio:
Press the front panel Power/Volume/Mute control knob to mute the audio from the unit. The Mute Indicator is displayed on the LCD screen. Press the Power/Volume/ Mute control knob again to restore the audio volume to its previous level. Adjusting the volume or using any of the audio setup features cancels the mute function.
Adjusting Fade and Balance:
- Press the front panel Tune/Audio control knob or the touch screen Audio icon to view the Audio Control Screen.
- Press the left (L) or right (R) icons to adjust the left/right balance, or press the front (F) or rear (R) icons to adjust the front/rear fade.
- Press the touch screen Back on to return to the current source.
Adjusting Equalizer Controls:
- Select an audio/video source.
- Press the touch screen EQ - Equalizer icon to view the Equalizer Screen.
- To adjust audio to meet the acoustical characteristics of your vehicle:
a. Press the 9-band graphic equalizer up or down cursors, or
b. Select a preset level by pressing the Classical, Pop or Flat icons, or
c. Select a user-defined setting by pressing the User 1, User 2 or User 3 icons.
- Press the touch screen Back on to return to the current source.
QUICK START GUIDE
Setting System Time:
- Press the front panel SETUP button or front panel Settings icon. A Settings Screen appears.
- Press the Next icon. A second Settings Screen appears.
- Press the Up (p) or Down (q) icon to select your time zone.
- Press the Time Set icon to view the Set System Time Screen.
- Press the Increase (p) icon or Decrease (q) icon to set the desired year, month, day, hour, minute or seconds value.
- Press the Back on to return to the previous screen.
If a GPS signal is received it will override the manual time setting.
Resetting the System:
To correct a system halt or other illegal operation, use the tip of a pen to press the reset button located on the front of your unit or press the System Reset icon on the Settings Screen.
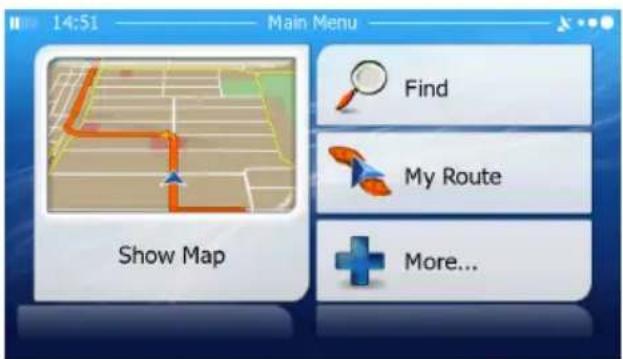
MAIN MENU
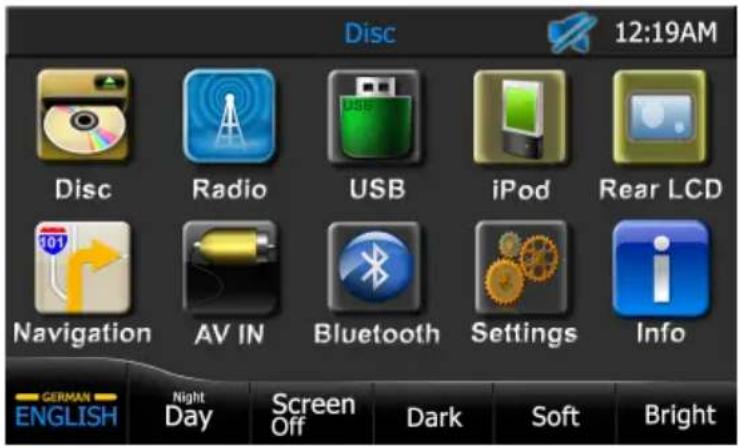
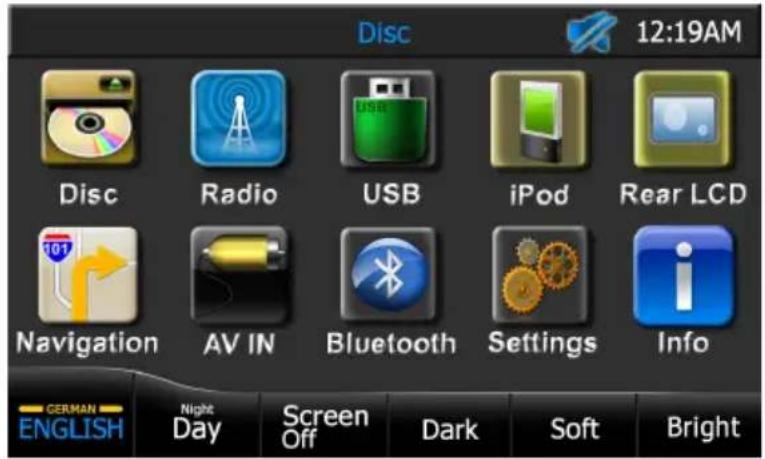
MAIN MENU SCREEN
The Main Menu Screen allows you to select an audio/video source for your vehicle's front and rear zone. In addition, you may access the Navigation or System Setup functions.
Mute Indicator:
This indicator is displayed when the volume is muted.
Time Display:
This indicator displays the time as entered by the user in the Settings Menu.
Disc Icon:
Press this icon to access the CD/DVD/ MP3 Controls Screens. The screen that appears depends on the type of disc that you have inserted. This icon is gray (not functional) if a CD/DVD/MP3 disc is not inserted.
Radio Icon:
Press this icon to access AM/FM Radio Screen.
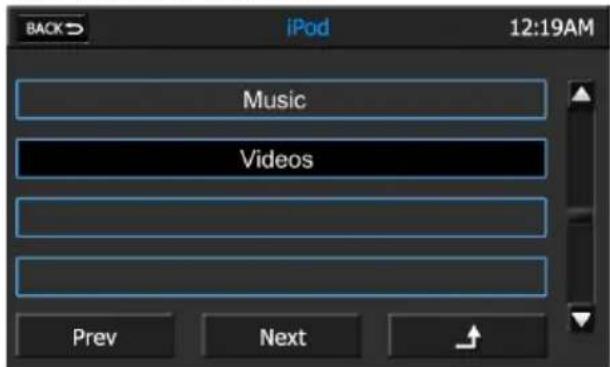
iPod Icon:
Press this icon to access the iPod/iPhone Screen. This icon is gray (not functional) if an iPod/iPhone is not connected to the Media Link.
Rear LCD Icon:
Press this icon to access the Rear LCD Screen. This screen allows a user to control DVD video in the rear of a vehicle equipped with rear monitors.
Navigation Icon:
Press this icon to access the Navigation Screen.
AVIN Icon:
Press this icon to access the Audio/Video Input Screen.
USB Icon:
Press this icon to access the contents of a USB device. This icon is gray (not functional) if a USB device is not connected to the Media Link.
Bluetooth Icon:
Press this icon to access the Bluetooth Screen.
Settings Icon:
Press this icon to access the Settings Screen.
Info Icon:
Press this icon to view system software and Bluetooth software version information.
Deutsch/English Icon:
Press this icon to switch between German and English display language.
NOTE: Video will turn off and audio will mute for approximately ten seconds as the unit switches between German and English display language.
Night/Day Icon:
Press this icon to dim or brighten the display. The display will dim when night mode is selected and brighten when day mode is selected. This icon is gray (not functional) when the Auto Dimmer setting is turned on in the settings menu.
Screen Off Icon:
Press this icon to turn the display off. Touch the screen to resume normal display.
Dark, Soft, and Bright Icons:
Press the Dark, Soft or Bright icons to adjust the screen brightness to suit your preferences.
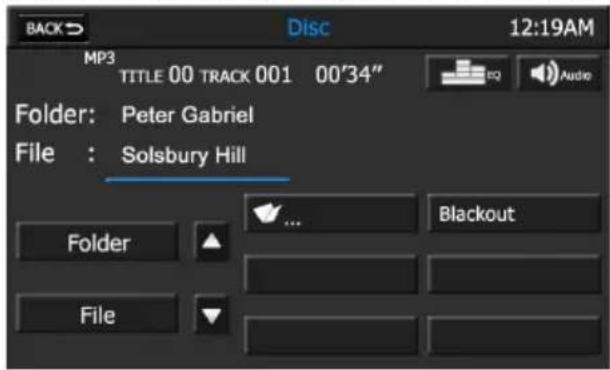
Upon inserting a compact disc, CD mode is entered and disc playback begins.
MENUClon:
Press this icon to return to the Main Menu Screen.

Mute Indicator:
This indicator is displayed when the volume is muted.
Time Display:
This indicator displays the time as entered by the user in the Settings Menu.
Playback Information Display:
Displays the type of disc currently inserted, title number, track number, elapsed time, file, folder, and stop/play/ pause status information.

EQ - Equalizer Icon:
Press this icon to access the equalizer controls.

Audio Icon:
Press this icon to access the audio controls.
Previous Icon:
Press this icon to play the previous track.
Fast Reverse Icon:
Press this icon to fast reverse playback.
Play/Pause Icon:
Press this icon to begin playback. Press this icon again to pause playback.
Stop Icon:
Press this icon to stop playback.
Fast Forward Icon:
Press this icon to fast forward playback.
Next Icon:
Press this icon to play the next track.
Mute Icon:
Press this icon to mute the audio output of the unit. The mute indicator will appear. Press this icon again to un-mute the volume. The mute indicator disappears.
Folder Icon:
When a CD is playing, this icon is gray, indicating that it can not be selected.
Tracklist Icon:
Press this icon to access the Tracklist Direct Entry Screen.
Repeat Icon:
Press this icon during playback to repeat playback of the current track. The icon will light and the track will repeat. Press this icon a second time cancel repeat. The icon will dim and playback of the remainder of the CD will resume.
Shuffle Icon:
Press this icon to play tracks in the directory in a random order.
Scan Icon:
When a CD is playing, this icon is gray, indicating that it can not be selected.
TRACKLIST DIRECT ENTRY SCREEN
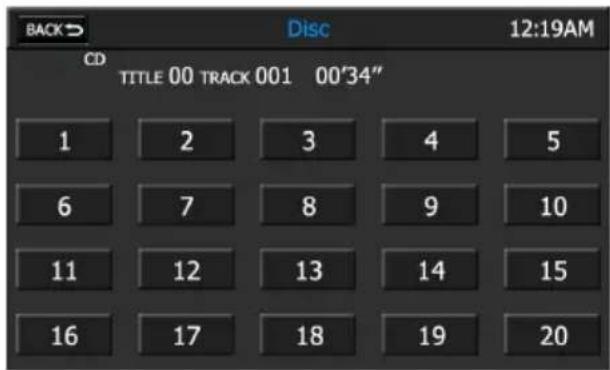
When the Tracklist icon is pressed, the Tracklist Direct Entry Screen appears. You can directly select a track by pressing the corresponding number icon. Title number, track number, and elapsed time information is displayed.
Back con:
Press this icon to return to the CD Controls Screen.
MP3 is a format for storing digital audio. An audio CD-quality song can be compressed into the MP3 format with very little loss of quality, while taking up much less space.
Upon inserting a MP3 disc, MP3 mode is entered and disc playback begins. The unit plays the songs in the order they were burned on to the disc. The unit will play a MP3 disc with up to 500 songs and/or 200 different folders.
MENUClon:
Press this icon to return to the Main Menu Screen.
Mute Indicator:
This indicator is displayed when the volume is muted.
Time Display:
This indicator displays the time as entered by the user in the Settings Menu.
Playback Information Display:
Displays type of disc currently inserted, title number, track number, elapsed time, file, folder, and stop/play/pause status information.
EQ - Equalizer Icon:
Press this icon to access the equalizer controls.
Audio Icon:
Press this icon to access the audio controls.
Previous Icon:
Press this icon to play the previous file.
Fast Reverse Icon:
Press this icon to fast reverse playback.
Play/Pause Icon:
Press this icon to begin playback. Press this icon again to pause playback.
Stop Icon:
Press this icon to stop playback.
Fast Forward Icon:
Press this icon to fast forward playback.
Next Icon:
Press this icon to play the next file.
Mute Icon:
Press this icon to mute the audio output of the unit. The mute indicator will appear. Press this icon again to un-mute the volume. The mute indicator disappears.
Folder Icon:
Press this icon to access the Folder Direct Entry Screen.
Tracklist Icon:
When a MP3 disc is playing, this icon is gray, indicating that it can not be selected.
Repeat Icon:
Press this icon during playback to repeat playback of the current track. The icon will light and the track will repeat. Press this icon a second time cancel repeat. The icon will dim and playback of the remainder of the folder will resume.
Shuffle Icon:
Press this icon to play files in the folder in a random order.
Scan Icon:
When a MP3 disc is playing, this icon is gray, indicating that it can not be selected.
FOLDER DIRECT ENTRY SCREEN
When the Folder icon is pressed, the Folder Direct Entry Screen appears.
Back con:
Press this icon to return to the MP3 Controls Screen.
Folder Icon:
Press this icon to view the list of folders burnt on to the disc. You can directly access the folder contents by pressing the corresponding folder name icon. The folder name icon is located on the right side of the screen.
NOTE: Depending on the amount of songs, type of CD, and recording method used, the file list may load slowly. Also, the information shown will reflect the information stored on the CD by your recording program. Not all recording programs will index the song data the same way.
File Icon:
Press this icon to view a list of MP3 files located in a directory. You can directly play back a file by pressing the corresponding file name icon. The file name icon is located on the right side of the screen. Title number, track number, and elapsed time information is displayed.
DVD OPERATION
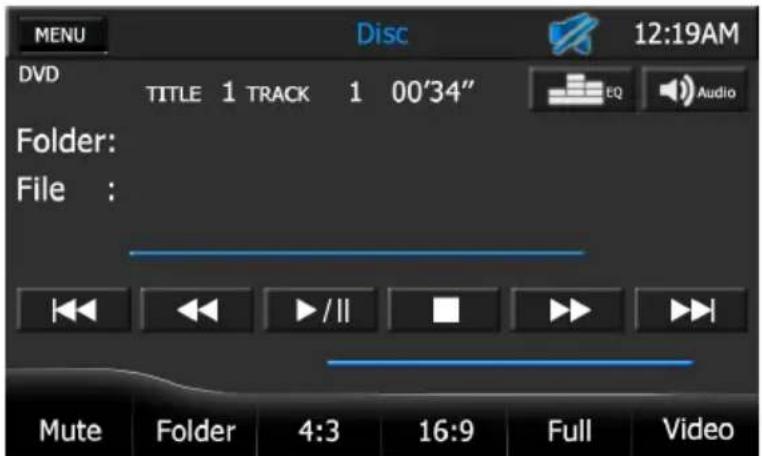

DVD CONTROLS SCREEN
Upon inserting a DVD disc, DVD mode is entered and disc playback begins.
NOTE: When properly installed, DVD video can not be displayed on the front LCD screen unless the parking brake is applied. Rear zone video outputs and rear video screens, if equipped, will operate normally.
MENUIcon:
Press this icon to return to the Main Menu Screen.
Mute Indicator:
This indicator is displayed when the volume is muted.
Time Display:
This indicator displays the time as entered by the user in the Settings Menu.
Playback Information Display:
Displays type of disc currently inserted, title number, track number, elapsed time, file, folder, and stop/play/pause status information.
EQ - Equalizer Icon:
Press this icon to access the equalizer controls.
Audio Icon:
Press this icon to access the audio controls.
Previous Icon:
Press this icon to play the previous chapter.
Fast Reverse Icon:
Press this icon to fast reverse video playback.
Play/Pause Icon:
Press this icon to begin playback. Press this icon again to pause playback.
Stop Icon:
Press this icon to stop playback.
Fast Forward Icon:
Press this icon to fast forward video playback.
Next Icon:
Press this icon to play the next chapter.
Mute Icon:
Press this icon to mute the audio output of the unit. The mute indicator will appear. Press this icon again to un-mute the volume. The mute indicator disappears.
Folder Icon:
When a DVD is playing, this icon is gray, indicating that it can not be selected.
4:3 Icon:
Press this icon to view a standard display image. The standard display image has a 4 to 3 ratio of horizontal to vertical, leaving a blank area on the right and left sides of the display.
16:9 Icon:
Press this icon to view a wide screen display image. The wide screen display image has a 16 to 9 ratio of horizontal to vertical, leaving a blank area on the top and bottom sides of the display.
Full Icon:
Press this icon to stretch the video to fill the entire screen.
Video Icon:
Press this icon to return to the video display.
DVD OPERATION
ON-SCREEN CONTROLS
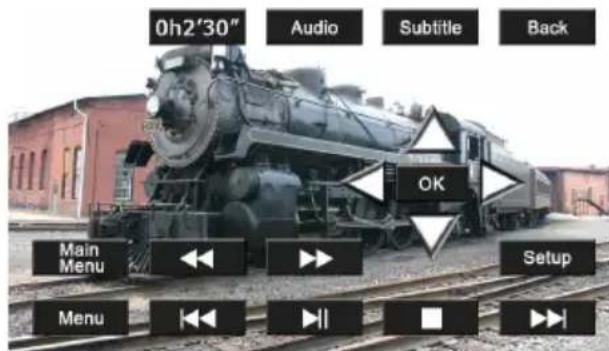
To access the on-screen controls, touch the screen while a DVD is playing.
NOTE: The On-Screen Controls will turn off automatically if no selection is made within four seconds or if any other button is pressed.
Elapsed Time Indicator:
This indicator displays the elapsed playing time of the current chapter.
Audio Icon:
Press this icon to select an audio language for DVD playback. The audio language depends on the information available on each disc.
Subtitle Icon:
Press this icon to select an the subtitle language to be shown on the screen. The subtitle language depends on the information available on each disc.
Back Icon:
Press this icon to return to the DVD Controls Screen.
, , , and OK Icons:
Press the , , or icons to navigate the DVD root menu. Press the OK icon to select an item.
Main Menu Icon:
Press this icon to view the DVD root menu.
Fast Reverse Icon:
Press this icon to fast reverse video playback.
Fast Forward Icon:
Press this icon to fast forward video playback.
Setup Icon:
Press this icon to access the Picture Adjustment Screen.
Previous Icon:
Press this icon to play the previous chapter.
Play/Pause Icon:
Press this icon to begin playback. Press this icon again to pause playback.
Stop Icon:
Press this icon to stop playback.
Next Icon:
Press this icon to play the next chapter.
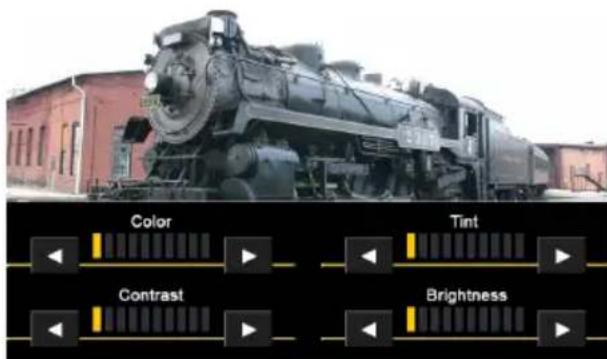
PICTURE ADJUSTMENT SCREEN
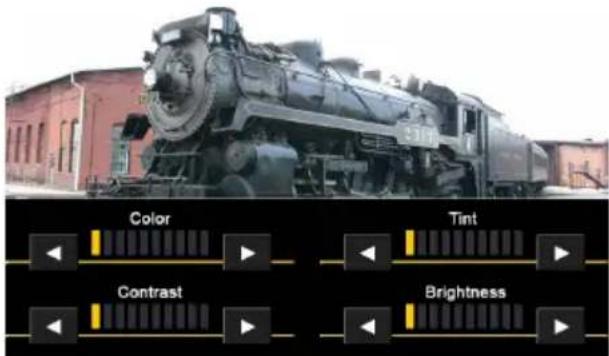
When watching a video, the color, tint, contrast or brightness levels can be adjusted to suit your preferences.
NOTE: The Picture Adjustment Screen will turn off automatically if no adjustment is made within four seconds or if any other button is pressed.
Adjustment Bar Icon:

Press the or cursor icons to decrease or increase the desired setting by one increment.
Press this icon to return to the Main Menu Screen.
Mute Indicator:
This indicator is displayed when the volume is muted.
Time Display:
This indicator displays the time as entered by the user in the Settings Menu. If a GPS signal is received it will override the manual time settings.
EQ - Equalizer Icon:
Press this icon to access the equalizer controls.
Audio Icon:
Press this icon to access the audio controls.
Previous Icon:
Press this icon to tune to the previous strong station in a lower frequency band.
Frequency Indicator:
Displays the frequency of the radio station that is currently playing.
Next Icon:
Press this icon to tune to the next strong station in a higher frequency band.
Preset Icons
Presets consist of stations that were stored into memory. The radio can store 12 FM (6 FM1 and 6 FM2) and 6 AM stations. The preset icon displays the RDS name.
To store a station:
- Tune to the desired station.
- Press and hold a preset icon for 2 seconds to store a station.
- Release the icon. The icon lights and the station's frequency appears.
To recall a station:
- Press FM1, FM2 or AM, as required.
- Press the preset icon to select the station.
TA Traffic Announcement
Press the TA icon to switch the priority for traffic announcements on or off.
The TA indicator lit up in blue color if the priority for traffic announcements is switched on.
The TA announcement will override the current audio source if the FM tuner is not selected as an audio source.
Important Note: While using the TA function, change the audio/video source only via the menue button. The TA does not work if you use the SRC button to toggle between the sources.
AF Alternative Frequencies
Press the AF icon to activate and deactivate automatic scanning for alternative frequencies.
The AF indicator lit up in blue color when the automatic scanning for alternative frequencies of an RDS broadcast station is activated (AF function).
Radio Text message bar
The Radio Text (RT) information is a part of the RDS signal which is supplied by the broadcaster.
This information will be shown at the lower bar.
Not all broadcaster support this additional information or all the time.
Mute Icon:
Press this icon to mute the audio output of the unit. The mute indicator will appear. Press this icon again to un-mute the volume. The mute indicator disappears.
FM1 Icon:
Press this icon to select the FM1 band and to view FM1 station presets. Up to six FM1 preset may be stored.
FM2 Icon:
Press this icon to select the FM2 band and to view FM2 station presets. Up to six FM2 preset may be stored.
AM Icon:
Press this icon select the AM band to view AM station presets. Up to six AM presets may be stored.
Scan Icon:
Press this icon to scan for the next strong station. The unit will pause for approximately four seconds at that station. Press Scan again to listen to that station. If Scan is not pressed, the unit will automatically seek the next station.
You can control your iPod/iPhone via the touch screen to access playlists, artists, albums, songs, videos, etc.
NOTE: For basic connectivity, your iPod/ iPhone must be connected to the Media Link using the iPod/iPhone adapter cable that comes with your iPod/iPhone or is available separately. For iPod/iPhone video playback, use the jLink4 cable.
MENUIcon:
Press this icon to return to the Main Menu Screen.
Mute Indicator:
This indicator is displayed when the volume is muted.
Time Display:
This indicator displays the time as entered by the user in the Settings Menu.
Playback Information Display:
Displays track, artist, album, and elapsed playing time information.
Preview Window:
Displays album art, if available.
EQ - Equalizer Icon:
Press this icon to access the equalizer controls.
Audio Icon:
Press this icon to access the audio controls.
Shuffle Icon:
Press this icon to play tracks in the directory in a random order. The Shuffle Indicator × 5 displayed when shuffle mode is active.
RPT Icon:
Press this icon during playback to repeat playback of the current track. Press this icon a second time to repeat all tracks in a directory. Press the icon once again to turn the repeat feature off. The Repeat Indicator is displayed when repeat mode is active.
Mute Icon:
Press this icon to mute the audio output of the unit. The mute indicator will appear. Press this icon again to un-mute the volume. The mute indicator disappears.
Previous Icon:
Press this icon to play the previous track in the directory.
Play/Pause Icon:
Press this icon to begin playback. Press this icon again to pause playback.
Next Icon:
Press this icon to play the next track in the directory.
Video Icon:
Press this icon to view full screen video. This icon is gray if a video is not currently selected for playback.
Search Icon:
Press this icon to view the Search Screen.
SEARCH SCREEN
The Search Screen allows you to search for music or video files stored in your iPod/iPhone. Press the Music List Box to search for music grouped by songs, albums, artists, genres or playlists. Press the Video List Box to view your video playlist.
Press a list box item to display more information about that item or begin playback of that item, as applicable. Press the Scroll Down (▼) icon to view the next page in the menu list or the Scroll Up (▲) icon to view the previous page.
Back con:
Press this icon to return to the iPod/ iPhone Screen.
Prev Icon:
Press this icon to view the previous page.
Next Icon:
Press this icon to view the next page.
Return Icon:
Press this icon to view the next higher level of the list hierarchy.
When full screen video is displayed, touch the LCD screen to view the Setup Screen.
NOTE: The Setup Screen will turn off automatically if no selection is made within four seconds or if any other button is pressed.
Back Icon:
Press this icon to return to the iPod/ iPhone Screen.
Setup Icon:
Press this icon to access the Picture Adjustment Screen.
PICTURE ADJUSTMENT SCREEN
When watching a video, the color, tint, contrast or brightness levels can be adjusted to suit your preferences.
NOTE: The Picture Adjustment Screen will turn off automatically if no adjustment is made within four seconds or if any other button is pressed.
Adjustment Bar Icon:

Press the or cursor icons to decrease or increase the desired setting by one increment.
REAR LCD OPERATION
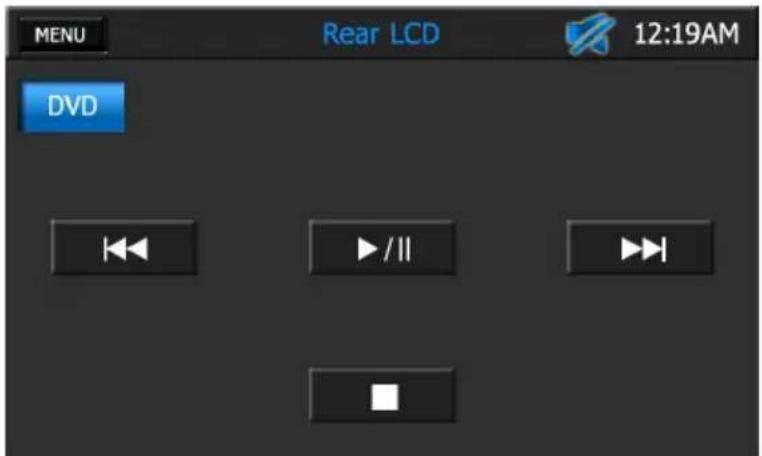
REAR LCD SCREEN
The unit allows two sources to be played simultaneously. For example, the unit's screen can be set to the radio function while the rear passengers can watch a DVD video using an optional rear monitor. The unit provides for connection of up to two additional monitors (sold separately) for rear passengers.
Perform the following to control the rear monitor(s):
- Turn on the rear monitor(s). Please refer to the owner's manual that came with your monitor(s) for instructions.
- Insert the media (DVD, CD etc) to be viewed into the unit.
- Access the Main Menu Screen and press the Rear LCD icon.
- Use the on screen controls to control rear zone playback.
NOTE: You cannot change or control the front zone source from the rear zone video screen.
MENUIcon:
Press this icon to return to the Main Menu Screen.
Mute Indicator:
This indicator is displayed when the volume is muted.
Time Display:
This indicator displays the time as entered by the user in the Settings Menu.
Previous Icon:
Press this icon to play the previous DVD chapter or CD track.
Play/Pause Icon:
Press this icon to begin playback. Press the icon again to pause playback.
Next Icon:
Press this icon to advance to the next DVD chapter or CD track.
Stop Icon:
Press this icon to stop disc playback. To resume playback, press the icon again.
NAVIGATION QUICK START
NAVIGATION SCREEN
The Navigation mode can be selected in a number of ways. Navigation can be accessed from the Main Menu. Navigation can also be selected by pressing the front panel NAV or DEST buttons.
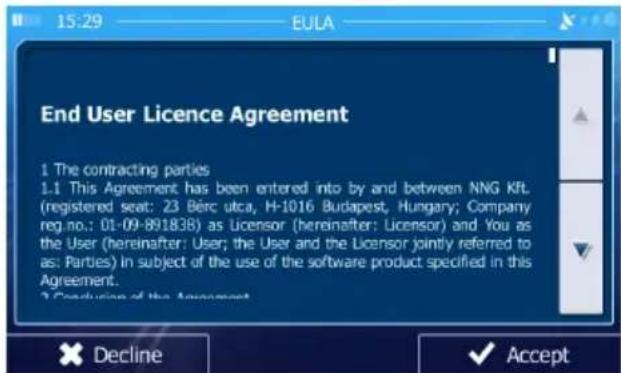
NOTE: Before operating your iGO Primo 2 software, please carefully read and follow the instructions provided in the Navigation Owner's Manual. Make sure that you are familiar with the system's features and know how to operate the system.
NAVIGATION QUICK START
The following procedure provides a quick overview of the Navigation mode.
Step 1 - Access the navigation function:
You can access the navigation function by pressing the front panel NAV/DEST button or by pressing the front panel MENU button.
Step 2 - Start Up/Access the Main Menu:
When using the navigation software for the first time, the initial setup process starts automatically. Do as follows:
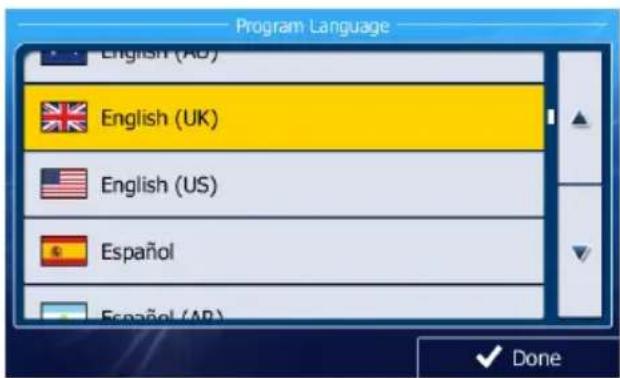
- Select the written language of the application interface.
- Read the End User Licence Agreement.
Press

Accept
e:
- You are now asked whether you allow the software to collect usage information and GPS logs that may be used for improving the application and the quality and coverage of maps.
Press

Yes
anonymous statistics or disable this function. Later you can turn them on or off individually in Log collection settings
- The Configuration wizard starts. Press

Next
to continue.
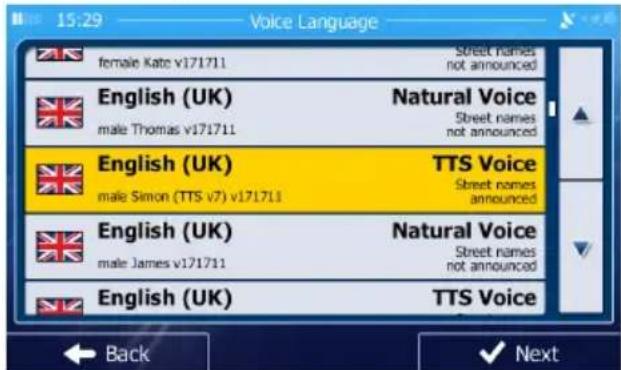
- Select the language and speaker used for voice guidance messages.
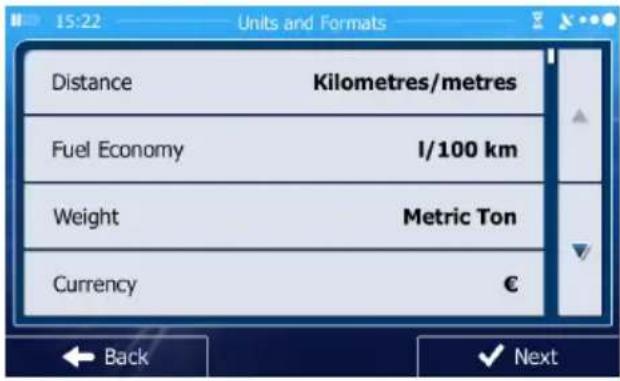
- If needed, modify the time format and the unit settings. You can also change them later in REGIONAL SETTINGS.
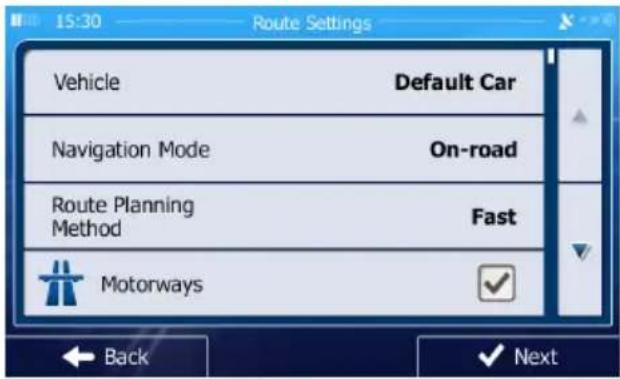
- If needed, modify the default route planning options. You can also change them later in ROUTE SETTINGS.
The Initial Setup is now complete. The Configuration wizard can be restarted later from the Settings menu.
- After the initial setup is completed, the Navigation menu appears:
Step 3 - Select a Destination:
You have many ways to select a destination. Select by touching screen:
Address: Tap FIND and then FIND ADDRESS. Travel to address entered using on-screen keypad.
Point of Interest: Press FIND and then FIND PLACES. Browse or search for point of interest.
History: Press FIND to see previous destinations.
Favourites: Press FIND and then FAVOURITES. Travel to favourite location.
Coordinates: Travel to a destination specified by coordinates. Press FIND, MORE, and then COORDINATE.
Place on Map: Press FIND and then FIND ON MAP. Browse the map to choose the destination and press the desired destination on the touchscreen. Press SELECT and the system will calculate a route to that destination.
Step 4 - Map/Guide Along Route
Proceed to the highlighted route and drive while the iGo primo 2 software provides guidance to your destination.
Step 5 - Arriving at Your Destination
When you are near your destination, the destination is indicated by a checkered flag symbol
ADJUSTING THE NAVIGATION VOICE VOLUME
While the Navigation is on and a route has been programmed, the Navigation will speak commands. While the Navigation is speaking, adjust the volume by turning the radio volume knob.
AV IN OPERATION
AV IN SCREEN
You can play back audio/video from an external device connected to the unit.
NOTE: Your audio/video device must be connected to the Media Link using an audio/video adapter cable that is available separately.
NOTE: The unit can not directly control external devices connected to the Media Link. Please refer to the owner's manual that came with your external device for instructions.
MENUIcon:
Press this icon to return to the Main Menu Screen.
Mute Indicator:
This indicator is displayed when the volume is muted.
Time Display:
This indicator displays the time as entered by the user in the Settings Menu.
EQ - Equalizer Icon:
Press this icon to access the equalizer controls.
Audio Icon:
Press this icon to access the audio controls.

SETUP SCREEN
When full screen video is displayed, touch the LCD screen to view the Setup Screen.
NOTE: The Setup Screen will turn off automatically if no selection is made within four seconds or if any other button is pressed.
Back Icon:
Press this icon to return to the Main Menu Screen.
Setup Icon:
Press this icon to access the Picture Adjustment Screen.
PICTURE ADJUSTMENT SCREEN
When watching a video, the color, tint, contrast or brightness levels can be adjusted to suit your preferences.
NOTE: The Picture Adjustment Screen will turn off automatically if no adjustment is made within four seconds or if any other button is pressed.
Adjustment Bar Icon:

Press the or cursor icons to decrease or increase the desired setting by one increment.
USB OPERATION

USB SCREEN
You can control a USB device via the touch screen to access audio files stored on that device.
NOTE: Your USB device must be connected to the Media Link.
NOTE: This unit is capable of playing most recordable media formats. However, due to the variety of media manufacturers, software, and recording methods, playback can not be guaranteed.
MENUIcon:
Press this icon to return to the Main Menu Screen.
Mute Indicator:
This indicator is displayed when the volume is muted.
Time Display:
This indicator displays the time as entered by the user in the Settings Menu.
Playback Information Display:
Displays the type of file currently playing, track, artist, album, elapsed time, and play/pause status information.
EQ - Equalizer Icon:
Press this icon to access the equalizer controls.
Audio Icon:
Press this icon to access the audio controls.
[ \text{Playlist Icon:} ]
Press this icon to access the Playlist Screen.
Mute Icon:
Press this icon to mute the audio output.. The mute indicator will appear. Press this icon again to un-mute the volume. The mute indicator disappears.
Previous Icon:
Press this icon to play the previous file.
Play/Pause Icon:
Press this icon to begin playback. Press this icon again to pause playback.
Next Icon:
Press this icon to play the next file.
>Shuffle Icon:
Press this icon to play tracks in the directory in a random order. Press this icon again to turn the shuffle feature off.
Repeat Icon:
Press this icon during playback to repeat playback of the current track. The icon will light and the track will repeat. Press this icon a second time cancel repeat. The icon will dim and playback of the remainder of the playlist will resume.
PLAYLIST SCREEN
The Playlist Screen allows you to search for music or video files stored in your USB device. Press a list box item to display contents of a directory or begin playback of that item, as applicable. Press the Scroll Down (▼) icon to view the next page in the menu list or the Scroll Up (▲) icon to view the previous page.
Back con:
Press this icon to return to the USB Screen.
Prev Icon:
Press this icon to view the previous page.
Next Icon:
Press this icon to view the next page.
BLUETOOTH OPERATION
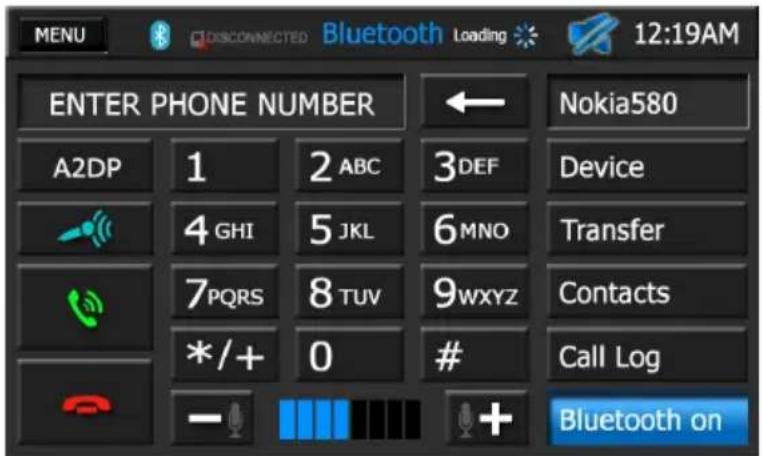
Paired Device Identifier
BLUETOOTH SCREEN
Bluetooth® technology has the capability to wirelessly synchronize and transfer data among devices. The Bluetooth audio capabilities can be used for wireless phones hands free applications. Before attempting to use the Bluetooth functions on the unit, please make sure your wireless phone supports Bluetooth functions.
We use the latest Parrot Bluetooth Technology in order to offer you the best connection, most features, and easiest pairing, but all phones operate differently. Please read your phone's owner's manual and familiarize yourself with its available Bluetooth features and functions. Not all features will work with all phones.
NOTE: The distance between this unit and your cellular phone must be 8 feet (2.4 meters) or less for sending and receiving voice and data via Bluetooth wireless technology.
MENU Icon:
Press this icon to return to the Main Menu Screen.
Bluetooth Indicator
This indicator is lit blue when Bluetooth is on and gray when off.
Connected/Disconnected Indicator.
Indicates if a Bluetooth device is connected/disconnected to the unit.
Loading Indicator
This indicator is displayed when the unit is downloading your wireless phone's call log and address book. NOTE: Not all wireless phones allow access to received, dialed, or missed calls and some will not allow uploading of your wireless phone's address book.
Mute Indicator:
This indicator is displayed when the volume is muted.
Time Display:
This indicator displays the time as entered by the user in the Settings Menu.
Device Icon:
Press this icon to access the Device Screen.
Transfer Icon:
Press this icon while talking to transfer audio from the unit back to the wireless phone. You can only transfer a call after it has been answered. Press the icon again to return the audio from the wireless phone to the unit.
Contacts Icon:
Press this icon to access the Contacts List Screen. The contacts feature is enabled only when paired with a wireless phone.
Call Log Icon:
Press this icon to access the Call Log Screen. The call log feature is enabled only when paired with a wireless phone.
Bluetooth On Icon:
Press this icon to turn on the autopair function. The unit will automatically search for a device in the discover mode.
A2DP Icon:
The Bluetooth Music feature is enabled only when paired with a wireless phone. Press the A2DP icon and four control functions will appear if the function is supported by the wireless phone. These are Previous, Next, Play/Pause and Stop.

Push-to-Talk Icon:
Press this icon to activate your wireless phone's voice commands (if equipped).
NOTE: Your vehicle's steering wheel controls (if equipped) will also activate your wireless phone's voice commands.

Dial Icon:
Press this icon to dial to phone number that you entered.

Hang Up Icon:
Press this icon to end a call or reject an incoming call.
Microphone Gain Icon:

Press the or itons to decrease or increase the desired microphone gain setting by one increment.
TO ADJUST YOUR CALL'S VOLUME
To adjust the volume while in a call, rotate the volume control knob. The call will remain at this volume for all future calls and return to your previous source volume when your call ends.
NOTE: If your volume seems too low, make sure your phone's volume is turned up to full while in a Bluetooth call. If it is not full, it will result in a low volume level. All phones operate differently; you may need to consult your phone's owner's manual.
BLUETOOTH OPERATION
PAIRING YOUR WIRELESS PHONE
Before using Bluetooth functions, you must pair your wireless phone and the unit. Pairing is a special process used when two devices connect for the first time. The pairing process is used to generate a link key that is used for authentication purposes for future Bluetooth connections between devices. The unit can pair five Bluetooth devices.
Your wireless phone can be paired with the unit in two manners. The unit can initiate the search for compatible devices and pair to the wireless phone or the wireless phone can initiate the search and pair to the unit. The following paragraphs describe both methods.
NOTE: The following procedures are generic. Procedures for pairing wireless phones vary slightly from phone manufacturer to phone manufacturer.
To Pair a Wireless Phone to the Unit:
- Press the front panel PHONE button or press the Main Menu Bluetooth icon to access the Bluetooth Screen.
- Turn Bluetooth on.
- Access the wireless phone Bluetooth function and set the Bluetooth function to on. (Please refer to the wireless phone's instruction manual to enter Bluetooth setup, turn Bluetooth on/off, and perform pairing).
- Use the wireless phone's add a new device feature. A device or devices will appear on your wireless phone display.
- A prompt to pair should appear on your wireless phone. Accept the request and initiate the process.
- A prompt to enter a PIN number or passkey for the unit should appear. The default passkey for the unit is "1234".
- At this point a prompt stating pairing successful should appear. The paired device identifier appears on the Bluetooth Screen. The wireless phone and the unit have paired.
To Pair the Unit to a Wireless Phone:
- Access the wireless phone Bluetooth function and set the Bluetooth function to on.
- Set your wireless phone Bluetooth discovery mode to on.
NOTE: Some discovery modes have a time limit before they are automatically turned off.
- Press the front panel PHONE button or press the Main Menu Bluetooth icon to access the Bluetooth Screen.
- Turn Bluetooth on.
- On the unit's Bluetooth Screen, press the Device icon. A screen appears showing a list of the mobile phones. The device is now ready to search for mobile phones:
- Press the Search icon to look for new phones if yours is not discovered by the unit. Upon completion of the search, the following screen appears:
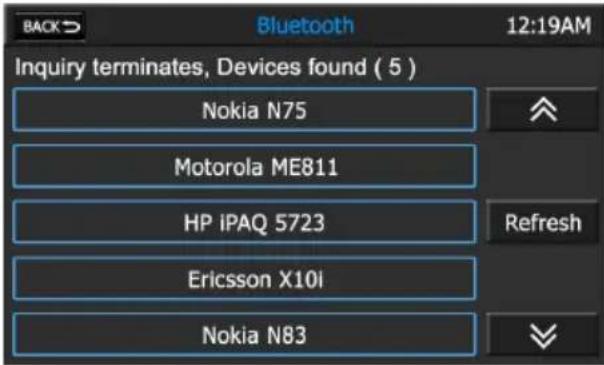
- Press the wireless phone identifier that you want to pair. The following screen appears:
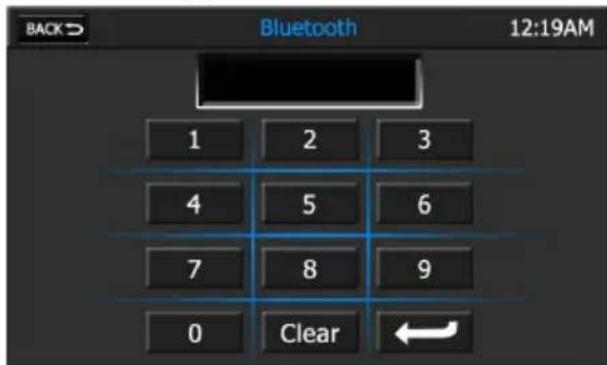
- Enter the passkey for the unit. The default passkey for the unit is "1234". Press the Enter ( ) icon.
- At this point the wireless phone will ask you to respond to a prompt similar to "Pairing request from Accept? Yes or No . You should answer Yes to the request.
- Enter the passkey for the unit. The default passkey for the unit is "1234". The wireless phone and the unit should pair.
BLUETOOTH OPERATION
To Delete Paired Wireless Phone(s):
- Press the front panel PHONE button or press the Main Menu Bluetooth icon to access the Bluetooth Screen.
- On the Bluetooth Screen, press the Device icon. The following screen appears:
- To delete a single device, press the Delete icon adjacent to the device, or
- To delete all devices, press the Delete All icon. The following screen appears:
- Press the Yes icon. The wireless phones are deleted from the unit.
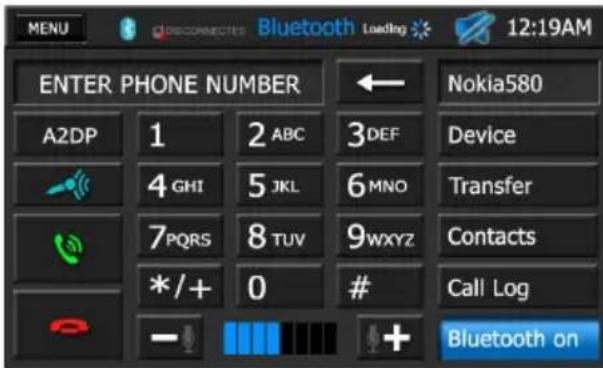
MAKING OUTGOING CALLS
Outgoing calls can be performed in two manners. The outgoing call can be direct dialed using the front panel keypad or the by pressing the Contacts icon, selecting a name and pressing the phone number.
To Dial Directly:
- Press the front panel PHONE button or press the Main Menu Bluetooth icon to access the Bluetooth Screen. The Bluetooth Screen appears:
- Use the 0-9, * / + , and # buttons to input the phone number. If necessary press the icon to clear the last digit or the entire number and start over.
- After entering the phone number, press the Dial (icon to dial the call. The Dial Frame Screen appears:
- To end the call, press the Hang Up (icon.
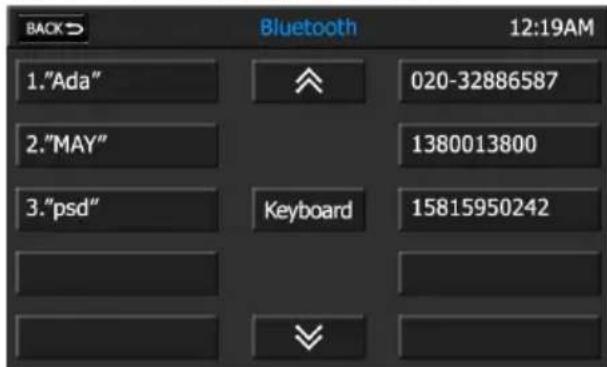
To Make an Outgoing Call Using Your Contact List:
- Press the front panel PHONE button or press the Main Menu Bluetooth icon to access the Bluetooth Screen. The Bluetooth Screen appears:
- Press the Contacts icon. The following screen appears:
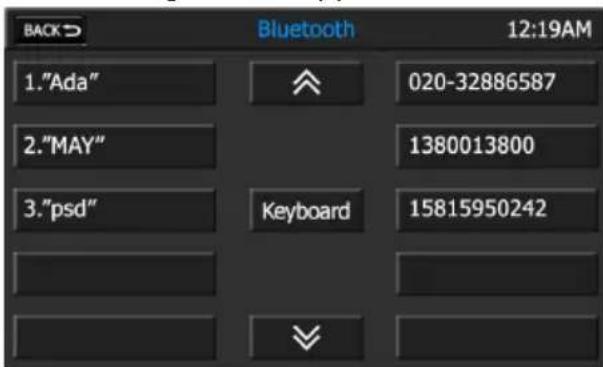
- Press the Scroll Up (A) or Scroll Down (V) icons to navigate to your desired contact or press the Keyboard icon to search alphabetically through the contact list.
- Press the contact to be dialed. A list displaying the contact's phone number(s) appears.
- Press the desired phone number icon. The Bluetooth Screen appears.
- Press the Dial (icon to dial the call. The Dial Frame appears.
- To end the call, press the Hang Up ( )icon.
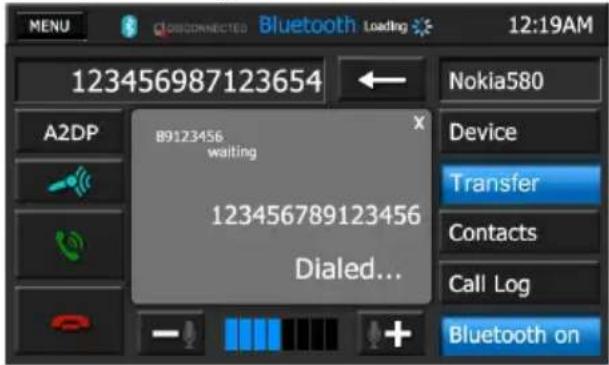
MANAGING INCOMING CALLS
When connected to a Bluetooth phone, the unit will mute audio output, pause DVD/CD play, and change to the Bluetooth Screen when a call is received.
The incoming phone number or assigned name for that number will appear in the middle of the screen. An audible tone will sound from the unit and a graphic display will appear on the front panel. If the incoming call has no caller ID, the TRANSFER button will be 9 in blue color.
To Answer an Incoming Call:
- To answer a call, press the Dial (icon.
- For best reception, speak loudly and clearly into the hand-free microphone. The hands-free microphone is installed in your vehicle in an accessible location that provides optimum voice reception.
- To end the conversation, press the Hang Up ( )icon.
To Reject an Incoming Call:
Press the Hang Up (icon to reject an incoming call. The call will revert to your wireless phone and be left for voice mail.
BLUETOOTH OPERATION
CALL WAITING
Call Waiting lets you know when another caller is trying to reach you while you are already on a call. You may put one call on hold while you answer the second one, then alternate between the two calls. The second caller or call on hold is identified in the upper left corner of the screen.
- When a second call is received, the Call Waiting Screen appears.
- Press the Dial (icon to transfer to the second call.
- Press the the Dial (icon at any time to transfer back to the first call. Press the Hang Up (icon to terminate the second call and return to the first call.
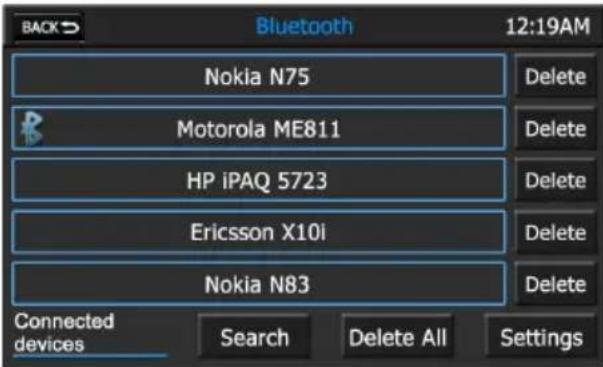
DEVICE SCREEN
| Back >Bluetooth 12:19AM | |||
| Nokia N75 | Delete | ||
| Motorola ME811 | Delete | ||
| HP iPAQ 5723 | Delete | ||
| Ericsson X10i | Delete | ||
| Nokia N83 | Delete | ||
| Connected devices | Search | Delete All | Settings |
This Device Screen is used to discover and add or delete paired devices from the unit.
Back con:
Press this icon to return to the previous screen.
Delete Icons:
Press this icon to delete individual Bluetooth devices
Settings Icon:
Press this icon to view the Bluetooth Settings Screen.
Delete All Icon:
Press this icon to delete all Bluetooth devices from the unit.
Search Icon:
Press this icon to search for Bluetooth devices.
BLUETOOTH SETTINGS SCREEN

The Bluetooth Settings screen allows you to configure Bluetooth settings.
Back con:
Press this icon to return to the previous screen.
Auto Connect Setting:
The Auto Connect setting will allow the unit to automatically connect to a previously paired Bluetooth device when it is in range. When Auto Connect option is set to off, you must initiate the pairing process with your wireless phone.
Pin Code Setting:
Press the Set PIN icon to to view the PIN Code Settings Screen.
PIN CODE SETTINGS SCREEN
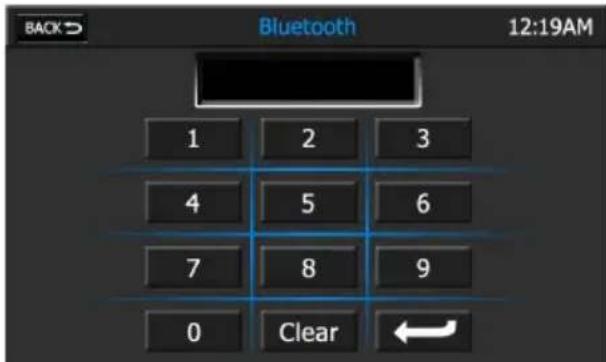
The PIN Code can be changed with up to any eight digits. Use the keyboard to select the digits and press Once the digits are selected and confirmed the new PIN Code will appear in the PIN Code on the Bluetooth Settings screen. The default Pin Code is 1234.
CONTACTS LIST SCREEN
The Contacts List Screen is a copy of the contact list on your wireless phone which contains a listing of your important names and phone numbers. The list is usually arranged in alphabetical order.
Back con:
Press this icon to return to the previous screen.
Scroll Up ( 空 ) and Scroll Down ( 空 ) icons
Press the Scroll Up ( ) or Scroll Down (念) icons to navigate to next or previous page of the list in groups of five.
Keyboard Icon:
Press this icon to view the Contacts Keyboard Screen.
CONTACTS KEYBOARD SCREEN
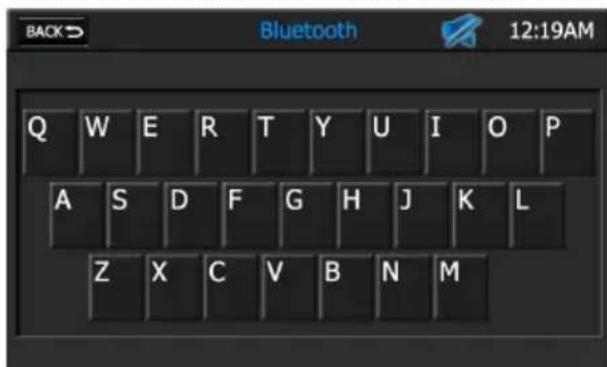
The Contacts List Screen is used is to search alphabetically through the contacts list. The contact list can hold up to 2000 names and numbers from any phone.
BLUETOOTH OPERATION
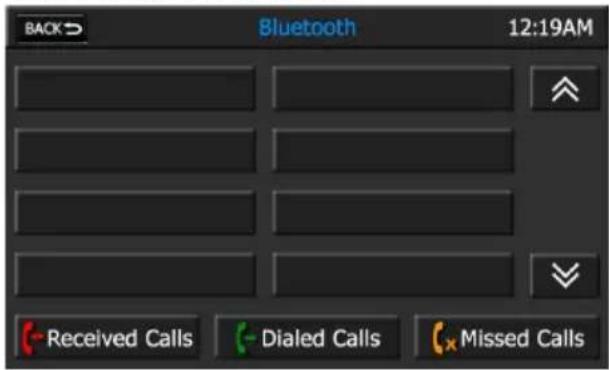
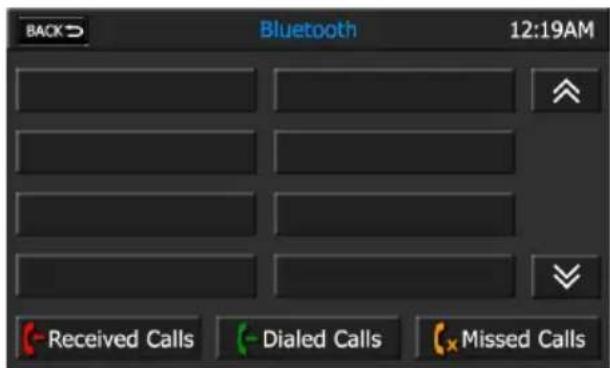
CALL LOG SCREEN
The Call Log Screen consists of received calls, dialed calls or missed calls.
NOTE: Not all wireless phones allow access to received, dialed, or missed calls and some will not allow uploading of your wireless phone's address book.
Back con:
Press this icon to return to the previous screen.
Scroll Up ( 假 ) and Scroll Down ( 假 ) icons
Press the Scroll Up ( ) or Scroll Down (念) icons to navigate to next or previous page of the list in groups of five.
Received Calls Icon
Press the this icon to view the Received Calls List. The Received Calls List retrieves the list of received numbers from your wireless phone. The last received number is the first number on the list.
Dialed Calls Icon
Press the this icon to view the Dialed Calls List. The Dialed Calls List retrieves the list of dialed numbers from your wireless phone. The last dialed number is the first number on the list.
Missed Calls Icon
Press the this icon to view the Missed Calls List. The Missed Calls List retrieves the list of missed numbers from your wireless phone. The last missed number is the first number on the list.
Bluetooth provides an Advanced Audio Distribution Profile (A2DP) profile for streaming music from a wireless phone or a Portable Multimedia Player (PMP), sometimes referred to as a MP3 player. The unit allows you to play back audio files from your wireless phone or a PMP using a Bluetooth connection. Before using an audio player, it may be necessary to enter the default passkey into the unit. The default passkey for the unit is "1234".
NOTE: Please quit A2DP mode before attempting to make a phone call, as unexpected results may occur depending on your wireless phone model.
The unit can control a Bluetooth audio player via Audio/Video Remote Control Profile (AVRCP). Bluetooth audio players (or Bluetooth adapters) compatible with these profiles can be connected to this unit. Functionality varies depending on the profile used.
A2DP:Stream audio from your Bluetooth compatible audio player and listen to the music through the unit.
- AVRCP: Play back, pause, select songs, etc. while streaming audio from your Bluetooth compatible audio player to the unit.
NOTE: Song information (e.g. elapsed playing time, song title, song index, etc.) cannot be displayed on this unit. Since there are a number of Bluetooth audio players available on the market, operations with your Bluetooth audio player using this unit vary greatly. Please refer to the instruction manual that came with your Bluetooth audio player.
When there is an incoming call, the song will be paused. After the incoming call is finished, the screen will return to the music function screen and playback will continue.
Back con:
Press this icon to return to the previous screen.
EQ - Equalizer Icon:
Press this icon to access the equalizer controls.
Audio Icon:
Press this icon to access the audio controls.
Previous Icon:
Press this icon to play the previous song.
Play/Pause Icon:
Press this icon to begin playback. Press this icon again to pause playback.
Next Icon:
Press this icon to play the next song.
Stop Icon:
Press this icon to stop playback.
SYSTEM SETTINGS
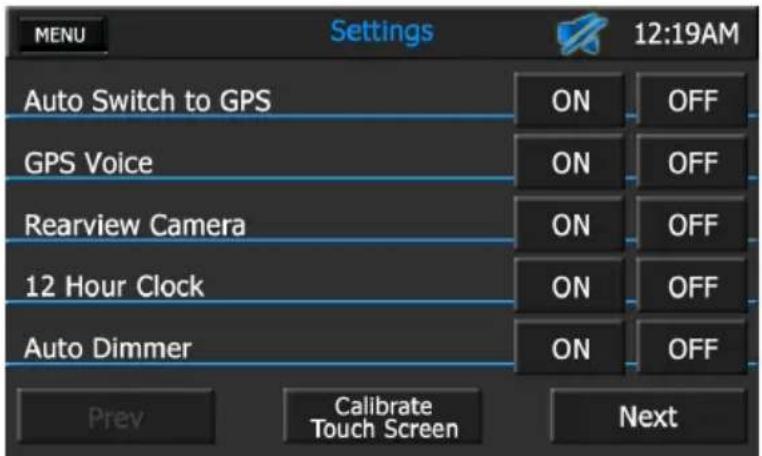
FIRST SETTINGS SCREEN
When using the in-dash navigation radio the first time, it is recommended that you customize the system settings to suit your preferences. You may also change the settings at any time.
Note: The settings do not effect the Map software. Please see the navigation software for setting user preferences for the maps.
MENUIcon:
Press this icon to return to the Main Menu Screen.
Mute Indicator:
This indicator is displayed when the volume is muted.
Time Display:
This indicator displays the time as entered by the user in the Settings Menu.
Auto Switch to GPS Setting:
Press the ON icon to select Navigation mode as a priority. If you access any other menu function, this setting will automatically return the unit to the Navigation mode after an approximately 10 second delay.
Press the OFF icon to override Navigation mode as a priority. You must manually switch back and forth between Navigation and any other menu function.
GPS Voice Setting:
Press the ON icon to hear turn-by-turn navigation instructions. This will override the settings in the Map setup. Press the OFF icon to turn GPS Voice off.
Rearview Camera Setting:
Press the ON icon to automatically display rearview camera video (if equipped) when the vehicle is put into reverse. Press the OFF icon to turn the rearview camera off.
12 Hour Clock Setting:
Press the ON icon to display time in a 12-hour (AM/PM) format. Press the OFF icon to display time in a 24-hour (military time) format.
Auto Dimmer Setting:
Press the ON icon to automatically dim the LCD screen when the vehicle's headlights are turned on. Press the OFF icon to turn the Auto Dimmer off.
Prev Icon:
Press this icon to view the First Settings Screen.
Calibrate Touch Screen Icon:
Press this icon to initiate the Calibrate Touch Screen function.
Next Icon:
Press this icon to view the Second Settings Screen.
The Touch Screen Calibration adjustment is used to set the parameters of the touch screen to ensure that when the screen is pressed, it corresponds to the feature that you are selecting.
NOTE: Never use a pen or sharp object to calibrate the touch screen as this will damage the panel.
To calibrate the touch screen:
- Press the Touch Screen Calibrate icon. The following screen will appear:
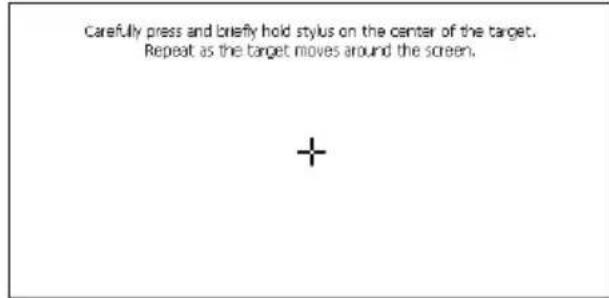
- Follow the instructions on the screen. Press and briefly hold your finger or a stylus to the center of the target. Repeat as the target moves to each corner of the screen and finally to the center. The following screen will appear:
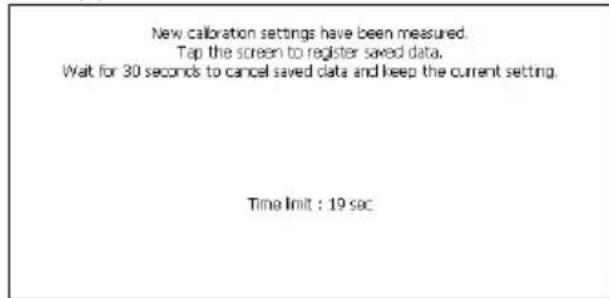
- If the screen is pressed, the new calibration parameters will be accepted. If the screen is not pressed within thirty seconds, the new parameters will be disregarded.
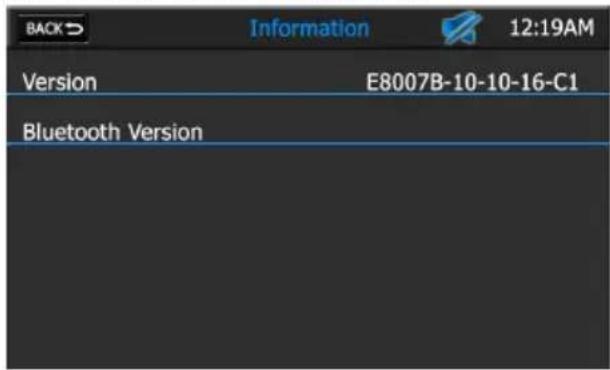
INFORMATION SCREEN
The Information Screen displays the unit's current software version and Bluetooth version numbers.
Back con:
Press this icon to return to the First Settings Screen.
SYSTEM SETTINGS
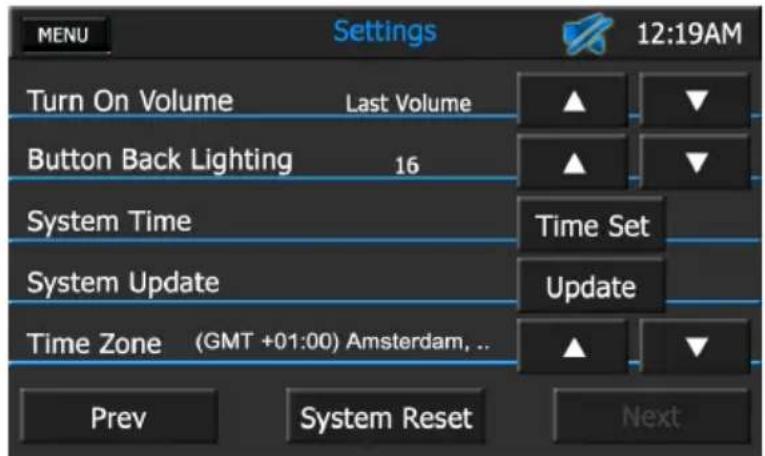
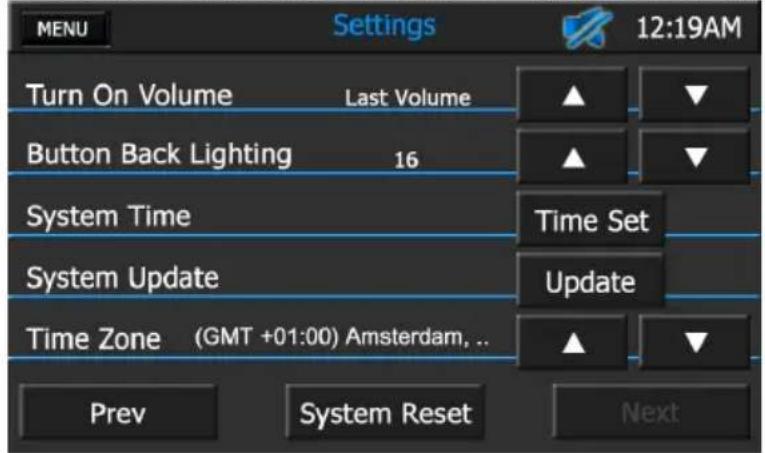
SECOND SETTINGS SCREEN
When using the in-dash navigation radio the first time, it is recommended that you customize the system settings to suit your particular preferences. You may also change the settings at any time.
MENUIcon:
Press this icon to return to the Main Menu Screen.
Mute Indicator:
This indicator is displayed when the volume is muted.
Time Display:
This indicator displays the time as entered by the user in the Settings Menu.
Turn On Volume Setting:
You may choose a preset volume level when turning on the unit. Values range from 0 to 30, or last level. Press the Increase (▲) icon to increase the volume level preset. Press the Decrease (▼) icon to decrease the volume level preset.
NOTE: The key must be removed from the ignition for this setting to take effect.
Button Back Lighting Setting:
You may manually preset the unit's button back lighting level from 0 to 20, or Auto. Press the Increase (▲) icon to increase the lighting level preset. Press the Decrease (▼) icon to decrease the lighting level preset.
System Time Setting:
Press this icon to access the System Time Set function.
System Update Icon:
The System Update function is used to update the unit's software. Please contact AUDIOVOX Technical Support for further information on how to update software.
Time Zone Setting:
Press the Up (▲) icon or Down (▼) icon to select your time zone.
Prev Icon:
Press this icon to view the First Settings Screen.
System Reset Icon:
Press this icon to restore the unit to its factory default settings.
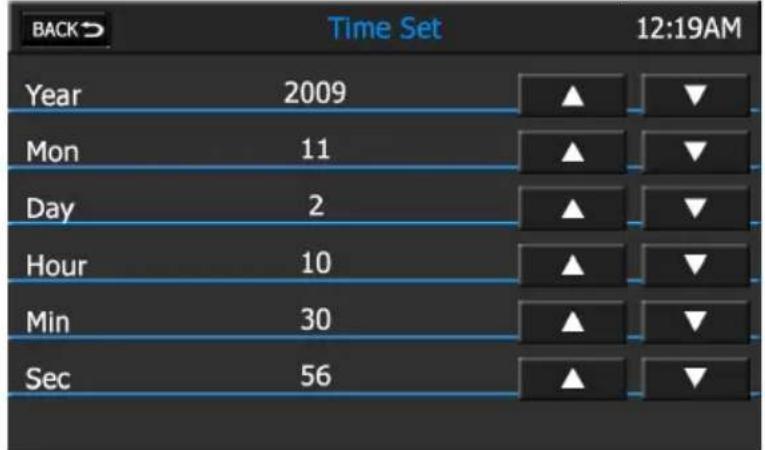
SYSTEMTIME SET SCREEN
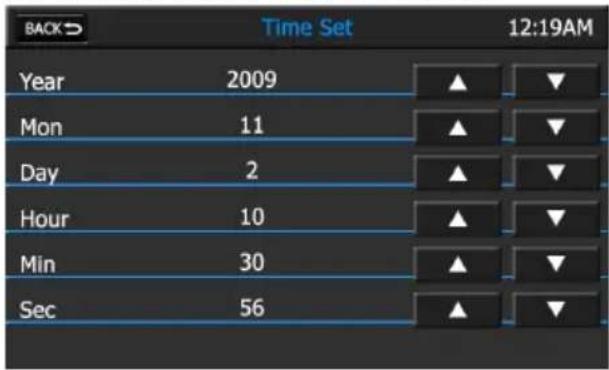
Press the Increase (▲) icon or Decrease (▼) icon to set the desired year, month, day, hour, minute or seconds value.
If a GPS signal is received it will override the manual time settings.
Back con:
Press this icon to return to the Second Settings Screen.
AUDIO/EQUALIZER CONTROLS
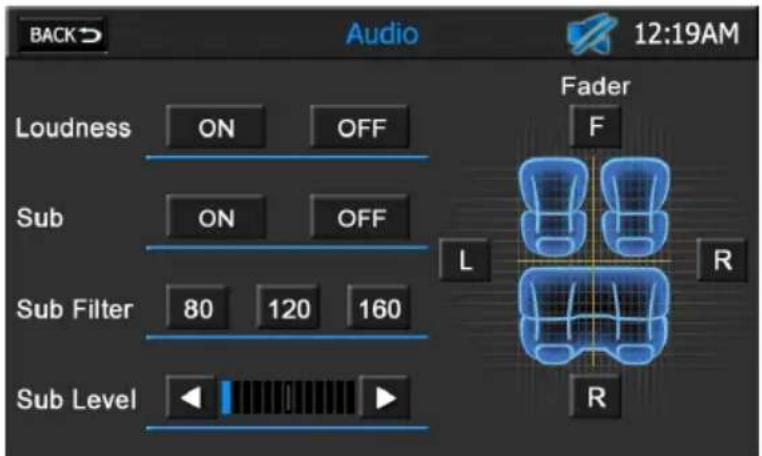
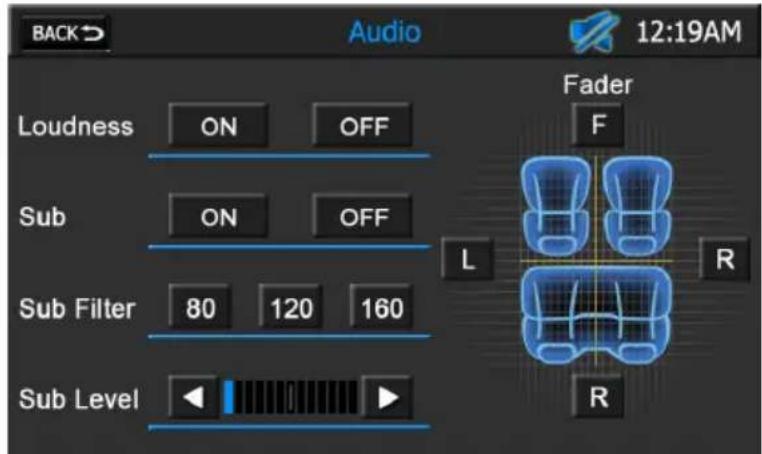
AUDIO CONTROL
SCREEN
The audio control screen allows you to easily adjust your audio system to meet the acoustical characteristics of your vehicle. The acoustical characteristics vary depending on the type of vehicle and measurements.
Back con:
Press this icon to return to the current source.
Mute Indicator:
This indicator is displayed when the volume is muted.
Time Display:
This indicator displays the time as entered by the user in the Settings Menu.
Loudness Control:
Loudness automatically alters the frequency response curve of audio to make it sound more natural when played at a lower volume level. Press the ON icon to turn Loudness compensation on. Press the OFF icon to turn Loudness compensation off.
Sub Control:
Press the ON icon to turn the vehicle's subwoofer on (if equipped). Press the OFF icon to turn the vehicle's subwoofer off.
Sub Filter Control:
This control changes the frequency response level of the subwoofer (if equipped). Depending on your preferences, press the 80, 120 or 160 icons to choose 80Hz 120Hz or 160Hz , respectively.
Sub Level Adjustment Bar Icon:

This control adjusts the subwoofer volume (if equipped). Press the or cursor icons to decrease or increase the desired setting by one increment.
Fader Controls:
Press the left (L) or right (R) icons to adjust the left/right balance, or press the front (F) or right (R) icons to adjust the front/rear fade.
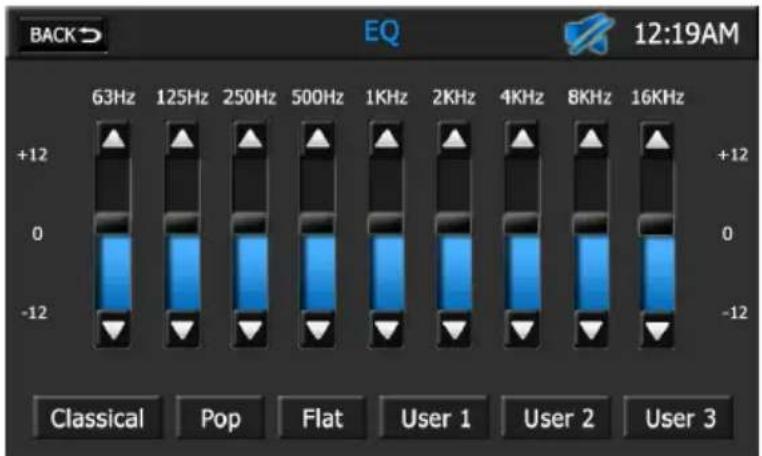
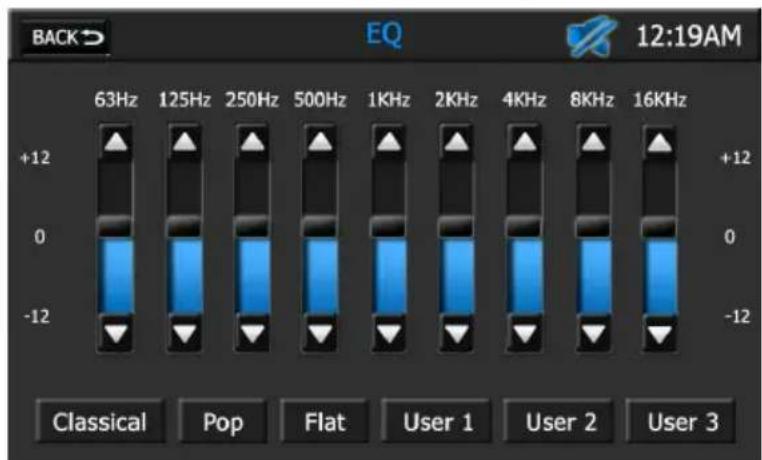
EQUALIZER SCREEN
The Equalizer Screen features a 9-band graphic equalizer that allows you to easily adjust your audio system to meet the acoustical characteristics of your vehicle. The acoustical characteristics vary depending on the type of vehicle and its measurements.
Back con:
Press this icon to return to the current source.
Mute Indicator:
This indicator is displayed when the volume is muted.
Time Display:
This indicator displays the time as entered by the user in the Settings Menu.
9-Band Graphic Equalizer:
You can manually adjust the 63Hz, 125Hz, 250Hz, 500Hz, 1KHz, 2KHz, 4KHz, 8KHZ or 18KHz frequency band audio levels. Press and hold the up or down cursor icons to move the highlight on the frequency to be adjusted to a positive or negative value. The audio level values range from -12 to +12.
Classical, Pop, and Flat Icons:
Press the Classical, Pop or Flat icons to apply a preset equalization level to the unit's audio output signal. When the equalizer is set to a preset level, the 9-Band Graphic Equalizer audio levels cannot be changed.
User 1, User 2, and User 3 Icons:
Press the User 1, User 2 or User 3 icons to apply a user-defined equalization level to the unit's audio output.
To set a user-defined level:
- Use the 9-Band Graphic Equalizer to adjust audio output levels.
- Press and hold the User 1, User 2 or User 3 icon until the icon lights.
- Release the icon. The user-defined value is now stored.
REARVIEW CAMERA
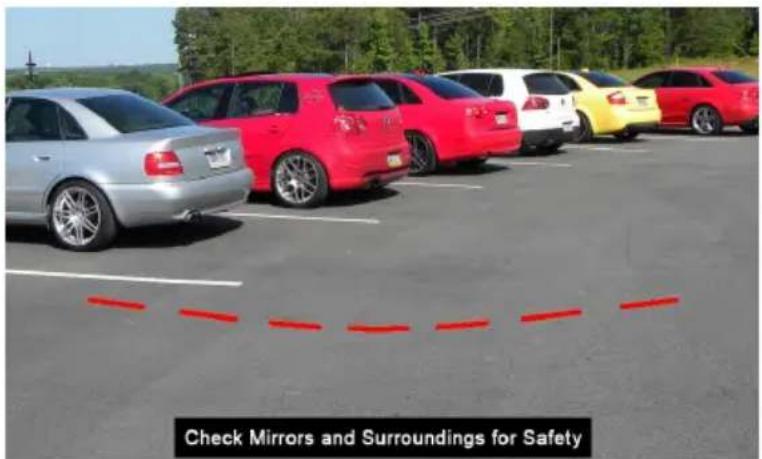
REARVIEW CAMERA
(if equipped)
The unit is "camera ready." Before accessing any camera features, you must install a rear video camera.
To view the rearview camera:
- Turn on the rearview camera in the System Settings.
- Place the vehicle's gear selector to reverse. When the camera is installed, the rear view image of what is behind the vehicle will automatically appear.
- When the gear selector is removed from the reverse position, the unit will return to the previous screen.
NOTE: If the camera is not installed and the function is accessed by the gear selector being placed in reverse, a "No signal detected, please check camera." message will appear, indicating the function is not available. Please turn off the Rearview camera in the System Settings.
INTRODUCTION
Bouton (Lecture/Pause):
Bouton Push-to-Talk:
ÉCRAN DU JOURNAL DES APPELS
Bouton(-Received Calls:
Carefully press and briefly hold styli on the center of the target. Repeat as the target moves around the screen.

New calibration settings have been measured.
Tap the screen to register saved data.
Wait for 30 seconds to cancel saved data and keep the current setting.
Time lmt : 19 sec
Bouton Turn On Volume:
Bouton System Update:
Option Loudness (Intensity) :
Incorrect wiring connections can damage the unit. Follow the wiring instructions carefully, or have the installation handled by an experienced technician.
DISCONNECT THE BATTERY
To prevent a short circuit, be sure to turn off the ignition and remove the negative (-) battery cable prior to installation.
ADAPTOR MAY BE REQUIRED
Third party adaptor may be required for amplified audio systems.
INSTALLATIONSANWEISUNG FÜR DIE STECKVERBINDER/ INSTALLATION GUIDE FOR HARNES CONNECTORS
Connect the multimedia system main harnesses to the vehicle harness.
| BLACK GROUND | |
| YELLOW BATTERY | |
| BROWN | IGNITION |
| BROW/BLACK | CAN (-) |
| GREEN/YELOW CAN (+) | |
| WHITE/BLACK LEFT FRONT SPEAKER (-) | |
| WHITE LEFT FRONT SPEAKER (+) | |
| GREY/BLACK RIGHT FRONT SPEAKER (-) | |
| GREY RIGHT FRONT SPEAKER (+) | |
| GREEN/BLACK LEFT REAR SPEAKER (-) | |
| GREEN LEFT REAR SPEAKER (+) | |
| PURPLE/BLACK RIGHT REAR SPEAKER (-) | |
| PURPLE | RIGHT REAR SPEAKER (+) |
For cars with double FAKRA antenna output
NOTE: After installation is complete, access the second page of the Settings menu and press and hold the SYSTEM RESET button until the radio shuts down. Allow the radio to reboot completely to ensure proper connection with all OEM CAN features.
INSTALLATIONSANWEISUNG FÜR DIE STECKVERBINDER/ INSTALLATION GUIDE FOR HARNES CONNECTORS
For cars with single FAKRA antenna output
NOTE: After installation is complete, access the second page of the Settings menu and press and hold the SYSTEM RESET button until the radio shuts down. Allow the radio to reboot completely to ensure proper connection with all OEM CAN features.

Congratulations! You have made a wise selection in becoming the owner of a AUDIOVOX Mobile Video equipment. Due to quality AUDIOVOX Mobile Video products have earned an excellent reputation through the western world. And this high standard enables us to grant a 2-years warranty for AUDIOVOX Mobile Video products.
The equipments are checked and tested continuously during the entire production process. In case you have problems with your AUDIOVOX HiFi equipment, kindly observe the following:
- The guarantee period commences with the purchase of the component and is applicable only to the original owner.
- During the guarantee period we will rectify any defects due to faulty material or workmanship by replacing or repairing the defective part at our discretion. Further claims, and in particular those for price reduction, cancellation of sale, compensation for damages or subsequent damages, are excluded. The guarantee period is not altered by the fact that we have carried out guarantee work.
- Unauthorized tampering with the equipment will invalidate this guarantee.
- Consult your authorized dealer first, if guarantee service is needed. Should it prove necessary to return the component to the factory, please insure that the component is packed in original factory packing in good condition • the quality control card has been filled out and enclosed with the component • your enclose your receipt as proof of purchase.
- Excluded from the guarantee are: - Illuminates - Wear parts - Shipping damages, either readily apparent or concealed (claims for such damages must be lodged immediately with forwarding agent, the railway express office or post office). - Scratches in cases, metal components, front panels, etc. (You must notify your dealer directly of such defects within three days of purchase.) - Defects caused by incorrect installation or connection, by operation errors (see operating instructions), by overloading or by external force. - Equipments which have been repaired incorrectly or modified or where the case has been opened by persons other than us. - Consequential damages to other equipments. - Reimbursement of cools, without our prior consent, when repairing damages by third parties - Batteries and battery packs.

No warranty without receipt!
AUDIOVOX