
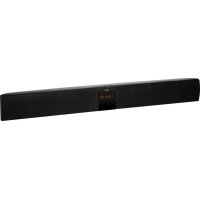
BSS 4805 - Soundbar AEG - Free user manual and instructions
Find the device manual for free BSS 4805 AEG in PDF.
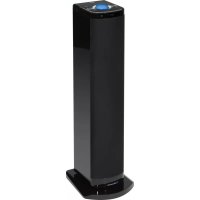


| Brand | AEG |
| Model | BSS 4805 |
| Product type | Soundbar |
| Power supply | 220-240 V ~ 50 Hz |
| Power consumption | 60 W |
| FM band | 87.5 - 108 MHz |
| Bluetooth | Version 2.0 + EDR |
| Bluetooth frequency | 2.4 GHz |
| Bluetooth protocols | A2DP, AVRCP |
| Bluetooth range | Approximately 15 meters |
| Audio inputs | USB, Audio (RCA), Bluetooth |
| FM radio | Yes, with wire antenna |
| Remote control | Yes, with CR2025 battery |
| Functions | Play/Pause, Next/Previous track, Stop, Search, Repeat, Random, Mute, Volume, Treble and bass adjustment |
| Auto standby | After 15 minutes without signal |
| Reset | RESET button on the back |
| Display | Digital screen |
| Maintenance | Soft, damp cloth, without detergent |
Frequently Asked Questions - BSS 4805 AEG
User questions about BSS 4805 AEG
0 question about this device. Answer the ones you know or ask your own.
Ask a new question about this device
Download the instructions for your Soundbar in PDF format for free! Find your manual BSS 4805 - AEG and take your electronic device back in hand. On this page are published all the documents necessary for the use of your device. BSS 4805 by AEG.
USER MANUAL BSS 4805 AEG
Bluetooth Sound System
Bluetooth sound system
Bluetooth audio system
Disposal. Page 25
Spanish
Contents
Location of Controls.. Page 3
Instruction Manual.. Page 40
Technical Specifications.. Page 45
Disposal.. Page 45
Polish
Table of Contents
Location of Controls
Location of Controls
Net weight approx. 7.20 kg
Radio
Range: approximately 15 meters
Cordless via Bluetooth
Thank you for choosing our product. We hope you will enjoy using the appliance.
Symbols in these Instructions for Use

WARNING:
Warns of dangers for your health and indicates potential risks of injury.

CAUTION:
Indicates potential dangers for the device or other objects.

NOTE:
Highlights tips and information for you.
General Safety Guidelines
Before using this device, carefully read this user manual and keep it together with the Warranty Certificate, cashier receipt and if possible, the original package inclusive its interior packing. If you hand on the device to any third person, include the user manual as well.
- To avoid the risk of fire or electric shock, you should not expose the device to rain or humidity. Do not use the device near water (e.g. bathroom, swimming pool, humid cellars).
- Do not use the unit in extremely hot, cold, dusty, or damp places. The unit is designed solely for private use and its intended purpose. This unit is not designed for commercial use. Make sure that the power cable is not bent, pinched, or comes into contact with heat sources. Make sure that the power cable is not a tripping hazard.
- Never touch the mains plug or the cord with wet hands.
- Always connect the unit to a properly installed plug socket. Be sure the device voltage corresponds to the grid voltage.
- The mains plug must always be easily accessible. Always install batteries in the correct direction.
- Avoid covering the device's vent openings.
- Never cover the vent holes with objects, such as magazines, tablecloths, curtains etc.
- This appliance shall not be exposed to dripping or splashing water and that no object filled with liquids such as vases shall be placed on apparatus.
- Open sources of fire, such as e.g. burning candles may not be placed onto the unit.
- Never open the device's case. Improper repairs can cause severe danger to the user. If the device or particularly the power cord is damaged, don't use the device any further and have it repaired by a qualified specialist. Check the power cord regularly for damages.
- To avoid any danger, a damaged power cord must be replaced only by the producer, its customer service or a similarly qualified person with an equal cord.
- If the device won't be used over an extended period of time, disconnect the power cord and remove the batteries.
These symbols may be found on the device and shall indicate the following:
The lightning symbol warns the user of dangerously high voltages inside the case.

The exclamation mark symbol points to important instruction or maintenance remarks in the accompanying guidelines.
Children and disabled persons
- For the safety of your children, keep any packing parts (plastic bags, cardboard, Styrofoam, etc.) out of their reach.

WARNING!
Don't let small children play with foils for danger of suffocation!
- This device is not intended for use by persons (including children) with reduced physical, sensory or mental capabilities, or lack of experience and/or knowledge unless they have been given supervision or instructions concerning the use of the device by a person responsible for their safety. Supervise children to ensure they do not play with the device.
Location of Controls
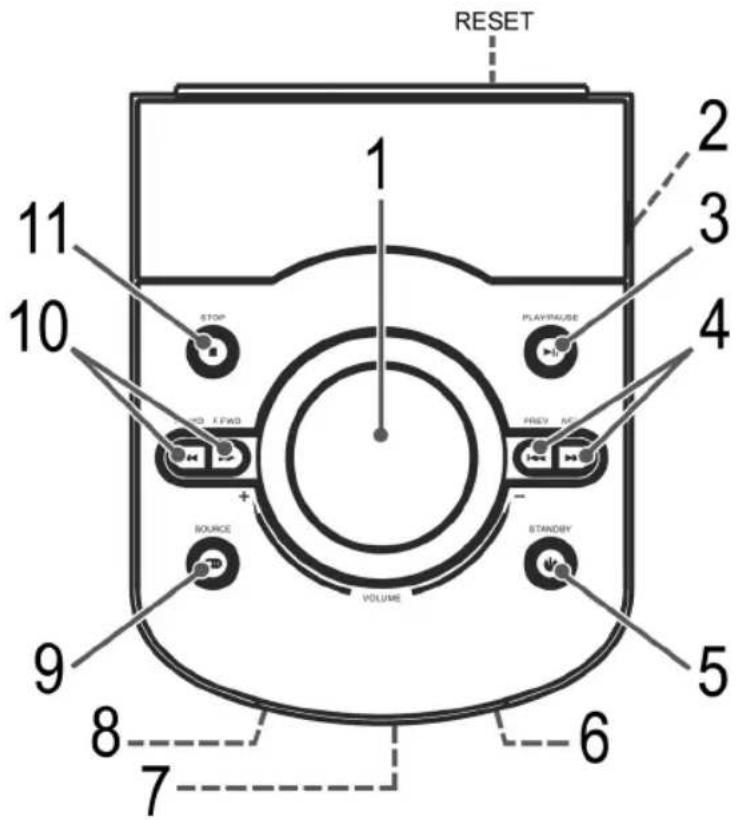
1 VOLUME control (Volume/control lamp) 2 USB port 3 PLAY/PAUSE button (play/pause) 4 NEXT/REV buttons (next/previous track) 5 STANDBY button (On/Standby) 6 IR receiver for remote control 7 Display 8 Standby indicator lamp 9 SOURCE button (select source) 10 FWD/RWD buttons (scan forward/back) 11 STOP button (Stop)
Back Side (not shown)
RESET button (reset)
AUDIO R/L jacks (2x RCA)
Wire antenna
Mains connection jack
POWER ON/OFF Mains switch
Remote Control
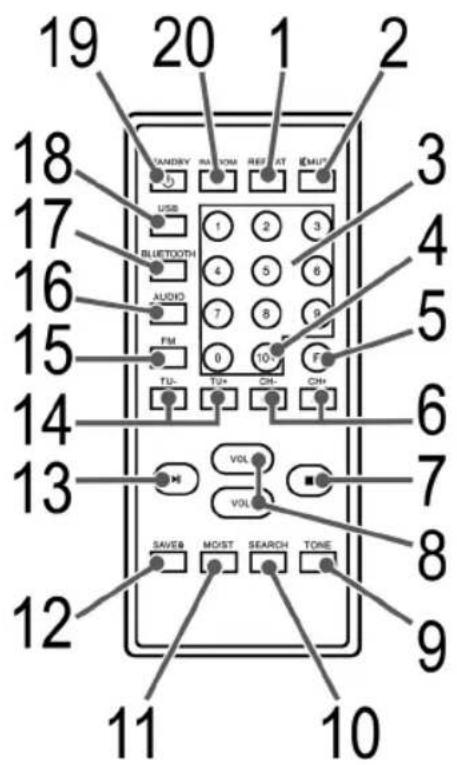
1 REPEAT (repeat) button 2 MUTE button 3 Number buttons 4 10+ button 5 "F" button 6 CH+CH- buttons (next/previous track / select preset radio stations) 7 button (Stop) 8 VOL+/VOL- buttons (volume) 9 TONE button 10 SEARCH button 11 MO/ST button (Mono/Stereo) 12 SAVE button 13 II (play/pause) button 14 FWD/RWD buttons (scan forward/back) 15 FM button (radio) 16 AUDIO button 17 BLUETOOTH button 18 USB button 19 STANDBY button (On/Off) 20 RANDOM button (random playback)
Special Safety Precautions for this device

WARNING:
Avoid hearing loss due to extreme volume.

CAUTION:
- Do not subject the speakers to extreme heat, cold or humidity.
- Do not operate the device on maximum volume. This can cause damage.
- Do not touch the speaker membranes with fingers or objects. This will cause damage to the membranes.
First Use of the Device/Introduction
iNC
Some buttons can be found both on the device and on the remote control. Identical buttons perform the same function.
- Select a proper place for the device. A dry, level and slip proof surface is suitable. Make sure the device is vented sufficiently!
- Remove the protective film from the device, if present.
Mount Pedestal
- Carefully place the left hand side of the speaker box onto a table.

TE:
Place a blanket under the speaker to avoid scratching the surface.
- Mount the bottom plate with four screws at the bottom of the speaker box. Now stand the speaker box on the floor again.
Power supply
- Connect the mains cable to the connector jack socket on the back of the device.
- Insert the grid plug into a properly installed three prong socket with 230 V, 50 Hz.
- Make sure the grid voltage corresponds to the figures on the rating plate.
NOTE:
Disconnect from mains power supply during longer periods of non-use.
Insert/Replace Battery in Remote Control
NOTE:
The lithium cell in the battery compartment of the remote control may have been safeguarded for transport with a piece of foil. This extends the life of the battery. Please remove this foil before the first use to make the remote control ready for operation.
- Open the battery compartment on the underside of the remote.
- Replace the cell by a battery of the same type (CR 2025). Check that the polarity is correct (see battery compartment).
- Close the battery compartment.
If the remote is not in use for a lengthy period of time, please remove the battery to prevent the battery acid from "leaking".
A
WARNING:
- Do not expose the batteries to intense heat, such as sunlight, fire or similar. Danger of explosion!
- Keep batteries out of the reach of children. They are not toys.
- Do not force batteries open.
- Avoid contact with metallic objects. (Rings, nails, screws etc.) Danger of short circuits!
- Short circuits may overheat or even ignite batteries. This may lead to combustion.
- When transporting the batteries, cover the terminals for your safety with an adhesive strip. If a battery leaks, do not rub the fluid into the eyes or the skin. If acid comes into contact with the eyes, rinse with purified water and seek medical advice if symptoms persist.
CAUTION:
Batteries must not be disposed of in the garbage. Please bring used batteries to competent collection centers or back to the dealer.
Restoring the factory defaults
Any errors during operation can be remedied by pushing the reset button.
- By using a wire or similar, press the reset button (RESET) on the back of the device to reset the electronics. The settings made by you will be lost in the process.
General Operation
Switch device on/off
- Turn the device on by setting the mains switch POWER on the back to the "ON" position.
- With the STANDBY button (5/19), you can switch the unit between standby and operating mode. In standby, the pilot lamp (8 on the device) lights red.
- To turn off the device, set the mains switch POWER on the back to the "OFF" position. To disconnect the unit completely from the mains, pull the mains plug from the socket.
NOTE: In BLUETOOTH, USB and AUDIO mode
After approx. 15 minutes without a signal, the device automatically switches to standby.
Volume
By pressing the VOL+ and VOL- buttons (8 on the remote control) you can adjust the desired volume.
To adjust the volume on the device, turn the VOLUME control (1).
Infrared Remote Control
For wireless control within a distance of 5 m. If the distance decreases, you should change the batteries. For proper operation, mind a clear view between the remote control and the sensor on the device.
Sound Settings
Press the TONE button (9 on the remote control) to adjust the settings for the treble (tr), the bass (bS), and the overall volume (VOL) in turn. You can normally adjust the settings with the VOL+ and VOL- buttons, or the VOLUME control.
NOTE:
If necessary, change the EQ setting in your playback unit to create the best sound. The settings for treble and bass will be reset to "00" each time you switch off the device.
MUTE (2 on the remote control)
For immediate muting of the volume. Press MUTE again to cancel the function.
NOTE:
When activating the function, the message "VL-OFF" will briefly be shown on the display. The activated function cannot be permanently shown on the display for technical reasons.
Radio mode
- Fully uncoil the wire antenna.
- Repeatedly press the SOURCE button (9), until "FM" is shown on the display. The indicator lamp (1) will light up red. Alternatively, you can also press the FM button (15 on the remote control).
3. Automatically search for radio stations:
Press the SEARCH button (10 on the remote control). The unit scans the complete frequency band for stations. The radio stations found are stored in ascending order of frequency. The sequence cannot be altered later. Preset radio stations are overwritten.
Manual scan for radio stations:
Briefly press the / buttons (10/14), until you have found the radio station which you are looking for. If you keep one of the buttons pressed, the device will scan to the next radio station.
Direct frequency entry:
If you know the frequency of the radio station you can enter it as follows.
- Press the "F" button (5 on the remote control). The indicator will appear on the display. Enter the frequency with the number buttons (3) of the remote control.
- If the reception is too weak and there is interference on the received station, try to improve the reception by altering the position and uncoiling or coiling the antenna. For FM stations, you can use the MO/ST button (11 on the remote control) to switch between mono and stereo reception. We recommend that you switch to mono in case of bad reception.
The activated stereo function is shown in the display through the symbol "O".
Manually storing stations
- Use the respectively the number buttons to select the preset location at which you want to store the radio station.
- Search for the desired radio station as described above under point 3, "Manually scan for radio station".
- Press the SAVE button (12 on the remote control) to preset the radio station.
Select the preset radio station
You have two options to select the preset radio stations.
- The preset radio stations can be selected by repeatedly pressing the button (4/6).
- Enter the desired preset location with the number buttons (3 on the remote control). With preset locations above 9, first press the 10+ button (4 on the remote control). Each time you push the 10+ button you will increase the entry by 10 more preset locations.
Playing back music files
You have three options to play back your own music files with the unit: hardwired, wireless via Bluetooth, or via the USB port.
By cable
- Connect the external device with a cinch cable (2x RCA) to the AUDIO R/L jacks on the back of the speaker. If required, use a suitable adapter (not included).
- Repeatedly press the SOURCE button (9) until "AUDIO" is shown on the display. The operating indicator light (1) will light up red. Alternately, you can also press the AUDIO button (16 on the remote control).
- Start the playback of your audio source. Listen to the sound playback via the speaker. You can adjust the volume with the VOL+/VOL- button (8 on the remote control) or the VOLUME control (1).
- For the further procedure, please refer to the user manual of the external audio source.
NC
If possible, adjust the volume of the external unit to a comfortable level.
Cordless via Bluetooth
Bluetooth involves a technology for wireless radio connection of devices over a short distance. Devices with Bluetooth standard are transmitting between 2.402 and 2.480 GHz in the ISM band (Industrial, Scientific and Medical). Interference can be caused for example by WLAN-networks, DAB radios, cordless phones, or microwave ovens which work on the same frequency band.
This device offers you the possibility to use a Bluetooth-enabled device. The functional radius is limited to approx. 15 metres depending on the surroundings and the unit used. If your playing device supports the A2DP profile (Advanced Audio Distribution Profile) and has a music-player function, then you can also wirelessly transfer music to the device. The A2DP profile involves a multi-vendor Bluetooth profile. By streaming, stereo-audio signals are wirelessly transferred between the playing device (source) and the receiving device. To remotely control the source, the playback device has to support the AVRCP profile (Audio Video Remote Control Profile).
Due to the different device manufacturers, models, and software versions, a full functionality cannot be guaranteed.
- Logging on devices (Pairing)
Before you listen to music via the unit, you must pair the devices.
- Ensure, that the Bluetooth function is activated in your player (e.g. mobile phone). For this, refer to the operation manual of your player.
- Press the SOURCE button (9) repeatedly, until "-bt -" is shown on the display. Alternatively, you can also press the BLUETOOTH button (17 on the remote control). The operating indicator lamp (1) will flash rapidly to show that the device is in pairing mode.
- Choose the Bluetooth menu in your player and register the device in your player. For this, refer to the operation manual of your player. The device "BSS 4805" will show in your player as a selection.
NOTE:
Only one playback unit can be connected to the speaker. If the speaker is already connected to another playback unit, the speaker will not appear in the BT selection menu.
- Now enter the password "0000" in your player, depending on the device manufacturer, model, and software version.
If pairing was done successfully, a beep will be heard and the indicator lamp will slowly flash blue. If the connection for the audio playback has been completely established, then a beep will sound again and the indicator lamp will light up blue.
For operation, please refer to the section "Description of the controls".
If possible, adjust the volume of the external unit to a comfortable level.
NOTE:
- Depending on the device manufacturer, you need to perform the registration (PAIRING) again to connect the devices.
- In case of problems during repairing of a playback device, deactivate the WiFi and mobile data function in your playback device.
- The Bluetooth compatibility cannot be ensured for devices (e.g. mobile phones) getting released in the future. To ensure an optimal connection, make sure that the battery of your player is completely charged.
- Some of the mobile phone brands have an energy-saving mode. Deactivate the energy-saving mode as it can otherwise result in problems during the data transfer through Bluetooth.
NOTE:
To be able to transfer audio data, Bluetooth needs to stay activated in your player. Observe the operation manual of your player. - If a mobile phone on which you are playing music receives a call, the music will be interrupted. The sound is played back by the speaker depending on the mobile phone. To transfer the conversation to your mobile telephone, please refer to the popup on the mobile phone display. After you have terminated the phone call, the devices will be connected to each other again. You may have to restart playback.
USB port (2)
This device has been developed in line with the latest technical advances in the USB field. The wide range of different USB storage devices of all types which are currently on the market, unfortunately, do not allow us to guarantee full compatibility with all USB storage devices. For this reason, in rare cases there may be problems in playing back files from USB storage devices. This is not a malfunction of the device.
- Press the SOURCE button (9) repeatedly until "LOAd" is shown on the display. The indicator lamp (1) will light up red. Alternatively, you can also press the USB button (18 on the remote control).
- Connect a USB storage device directly into the port. After a few seconds, the display "USb" will appear. Playback then begins. MP3, the current track and the elapsed playing time of the current track will be shown in the display.
For operation, please refer to the section "Description of the controls".
NOTE:
Always directly connect a USB storage medium to the USB port to prevent any malfunctions. The USB port is not designed for charging external devices.
CAUTION:
Before removing the USB storage device, switch the device to another mode using the SOURCE button (9).
Description of the controls
II(3/13)
You can pause and continue music playback. Press again to continue playback.
(4/6)
Press 1x = Restart of the song from the beginning. (Only in Bluetooth mode) Press 2x = Skip to the previous song. Press 3x = Skip to the song before the previous song.
NOTE:
The number of the current title is displayed briefly.
(4/6)
Press to skip to the next song and the following songs.
NOTE:
The number of the current title is displayed briefly.
10/14) (Only in USB mode)
Press 1x = A music scan is started.
Press 2x = The scan is stopped and normal playback is continued.
REPEAT (1 on the remote control) (Only in USB mode)
Activates the Repeat function.
Press 1x = The current title is played back repeatedly. The symbol "C" is shown.
Press 2x = All the tracks are continually played back. The message "ALL" will be shown.
NOTE:
If the function is activated, the individual tracks can be selected with the 146) buttons.
RANDOM (20 on the remote control)
Activates random playback. All titles are played back in a random sequence. The message "rANd", the current title and the elapsed play time are alternately shown on the display. To deactivate the function again, press the RANDOM button again. The message "OFF" will be briefly shown on the display.
NOTE:
The "RANDOM" function cannot be combined with the "REPEAT" function.
Cleaning
CAUTION:
Do not submerge the device in water.
Before cleaning disconnect from mains power supply. - Clean the device with a soft damp cloth without detergents.
Troubleshooting
This device has been tested according to all relevant current CE guidelines, such as electromagnetic compatibility and low voltage directives, and has been constructed in accordance with the latest safety regulations.
| Fault Cause Solution | ||
| Unit cannot be operated. | Unit crashes and "hangs". | Disconnect from the mains for around 5 seconds. Then switch the unit on again. |
| Perform a factory reset. ➔ see page 42 “Restoring the factory defaults” | ||
| No audio signal via the Bluetooth connection | Speaker is not paired to the audio source. | Check whether a connection exists. If necessary, pair the speaker again to the audio source. |
| Volume too low | Increase the volume on the speaker | |
| Increase the volume on the audio source. | ||
| Speaker cannot be connected | Pairing does not work | Check whether the audio source supports the A2DP protocol. |
| Audio source is switched off | Switch on the audio source | |
| Bluetooth is switched off at the audio source. | Switch on the Bluetooth function in the audio source. | |
| Bluetooth version is not supported. | Use a different playback unit. | |
| Music tracks are played back via USB in the wrong sequence. | Random playback is activated. | Press the RANDOM button. The “OFF” display is briefly shown on the display. |
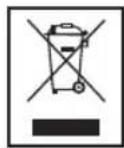
Disposal
Meaning of the "Wheelie Bin" Symbol
Take care of our environment, do not dispose of electrical appliances via the household waste.
Dispose of obsolete or defective electrical appliances via municipal collection points.
Please help to avoid potential environmental and health impacts through improper waste disposal.
You contribute to recycling and other forms of utilization of old electric and electronic appliances.
Your municipality provides you with information about collecting points
Technical Specifications
Model: BSS 4805
Power supply: 220-240 V~50 Hz
Power Consumption: 60W
Protection class:
Net weight: approx. 7.20 kg
Radio component Frequency range: FM 87.5 ~ 108 MHz
Bluetooth
Bluetooth support: V2.0 + EDR
Range: approx. 15 metres
Transmission frequency: 2.4 GHz
Protocols: A2DP, AVRCP
The right to make technical and design modifications in the course of continuous product development remains reserved.
10 Button F.WD/F.RWD (forward/reverse) 11 STOP button (stop)
Power button (not shown)
RESET button (reset)
AUDIO R/L jacks (2 x RCA)
Speakers
Power cord connection socket
Do not expose the remote control to extreme temperatures or humidity. Do not use the maximum volume of the device. This may cause damage. Do not touch the membrane of the remote control with fingers or any objects. This may cause damage to the membrane.
Using the device for the first time / Getting acquainted

NOTE.
The buttons on both the device and the remote control have the same functions. The corresponding buttons perform the same functions.
Choose a suitable location for the device. It should be a flat, dry surface. - Check that the device is connected securely! Remove the protective film from the device, if it is present.
Mounting/Installation
- Carefully place the remote control on the table with the buttons facing down.

NOTE.
Place the remote control on the carpet so as not to damage the surface.
- The device is designed for installation on the upper surface of the housing. Now install the device again on the base.
Operation
Connect the device to a power outlet of 230 V, 50 Hz. Make sure that the voltage matches the values on the technical data plate.

Note.
Disconnect the device from the power supply if you do not use it for a long time.
Installation/Replacement of the battery in the remote control

Note.
The lithium battery of the button cell type in the remote control may be sealed for transportation with a protective film. Observe the battery service life. Before using it for the first time, remove the film to activate the remote control.
Open the battery compartment on the back of the remote control. Replace the battery with a battery of the same type (CR 2025). Check the correct polarity (see diagram on the back). Close the battery compartment.
If the remote control is not used for a long time, remove the battery to prevent "leakage" of the battery.
Damage.
Avoid exposure to high temperatures, direct sunlight, moisture, and water on the battery. There is a risk of explosion! Keep the battery away from heat sources and fire. There are no exceptions. Do not open the battery by force. Avoid contact with metal objects (coins, keys, screws, etc.). There is a risk of short circuit! A short circuit can cause overheating or fire. This can cause damage. For safe transportation, tape the contacts with insulating tape. - If the battery leaks, make sure that the liquid does not get into the eyes or onto the skin. If acid gets into the eyes, rinse them with clean water and, if symptoms persist, consult a doctor immediately.
Attention.
Do not dispose of batteries with household waste. Dispose of used batteries at a collection point or return them to the point of sale.
Compliance with EU Directives
If the device is not in use, you can turn it off by pressing the STANDBY button.
Using a blunt object, press the RESET button on the rear panel to reset the electronic settings. After performing this operation, the settings will be restored.
General information about the device
Turning the device on/off
- Turn on the device by setting the POWER switch on the rear panel to the "ON" position. Using the STANDBY button (5/19), you can switch between standby mode and operating mode. In standby mode, the control lamp (8 on the device) lights up. To turn off the device, set the POWER switch on the rear panel to the "OFF" position. For complete disconnection from the power supply, unplug the device from the outlet.
NOTE: In BLUETOOTH, USB, and AUDIO modes
If the device does not receive a signal for approximately 15 minutes, it will automatically switch to standby mode.
Volume
The volume can be adjusted using the VOL+/VOL- buttons (8 on the device).
To adjust the volume on the device, turn the VOLUME control (1).
Remote control
Used for wireless control of the device at a distance of up to 5 meters. If the distance decreases, replace the batteries. For normal operation, it is necessary that there are no obstacles between the remote control and the device.
Sound adjustment
Press the TONE button (9 on the device) to adjust the high frequencies (treble), bass, and overall volume level (VOL). Usually, the parameters can be adjusted using the VOL+ and VOL- buttons or the VOLUME control.
NOTE.
When the device is turned on, the last selected EQ setting is restored. Each time the device is turned off, the high and bass settings are reset to "00".
MUTE (2 on the device)
To mute the sound, press the MUTE button once. To unmute, press it again.
Note.
After activating the function, the display will briefly show "VL-OFF". To deactivate the function, the display will show the current volume level.
Radio mode
- Fully extend the antenna.
- Press the SOURCE button (9), and the display will show the "FM" indicator. The indicator (1) will light up in blue. You can also press the FM button (15 on the device).
3. Automatic radio station search
Press the SEARCH button (10 on the device). The device will scan the entire radio frequency range. Found stations are stored in ascending order of frequency. The sequence cannot be changed. The stored stations will be overwritten.
62 Ukrainian
Manual radio station tuning.
Briefly press button 10/14 until the desired station is found. If you hold down one of the buttons, the device will switch to searching for the next station.
Direct frequency entry.
If you know the frequency of a radio station, you can enter it directly as described below.
Press the CH button (5 on the device). The display will show "-- --". Use the number buttons (3) and the CH button to enter the desired frequency.
- If the reception is poor, try to improve the antenna by changing its position or by extending/retracting it. For FM stations, between mono and stereo sound, use the MO/ST button (11 on the device). If reception is poor, it is recommended to switch to mono mode.
NOTE.
The stereo function is indicated by the symbol
Storing stations manually
- Using the number buttons, select the position for storing the station.
- Perform the search for the desired station as described above in section 3, part "Manual station search".
- To store the station, press the SAVE button (12 on the device).
Selecting a stored station
The stored station can be selected in two ways.
The stored station can be selected by pressing the 4/6 buttons. Using the number buttons (3 on the device), enter the desired number. If the station number is greater than 9, first press the 10+ button (4 on the device). Each time the 10+ button is pressed, the value for the storage position will increase by 10.
Playing music tracks
There are three ways to play music files using the device: wired, wireless via Bluetooth, or via the USB port.
Wired method
- Using the included cable (2x RCA), connect the external player to the AUDIO R/L inputs on the back of the device. If necessary, use a suitable adapter (not included).
- Press the SOURCE button (9) until the display shows "AUDIO". The operation indicator (1) will light up in the first color. You can also press the AUDIO button (16 on the device).
- Start playback from the audio source. The sound will be reproduced through the speaker. The volume level can be adjusted using the VOL+ and VOL- buttons (8 on the device) or the VOLUME control (1).
- Follow the instructions in the user manual of the external audio source.
NOTE.
If possible, set the volume level on the external device to a moderate level.
Wireless connection via Bluetooth
Bluetooth uses wireless radio technology for short-range communication with devices. Devices with Bluetooth function use frequencies between 2.402 and 2.480 GHz in the ISM band (Industrial, Scientific, and Medical). Interference may occur, for example, between WLAN networks, DAB radio, wireless telephones, and microwave ovens that operate in the same frequency range.
This device ensures the possibility of using other Bluetooth devices. The range is limited to approximately 15 meters, depending on the environment and the device used.
If your device supports the A2DP profile (Advanced Audio Distribution Profile) and has a music playback function, you can also transmit music files wirelessly to the device. The A2DP profile uses standard Bluetooth of various brands. Stereo audio streams are transmitted wirelessly between the playback device (source) and the receiving device. To control the source remotely, the playback device must support the AVRCP profile (Audio Video Remote Control Profile).
We cannot guarantee full functionality, as there are many versions of devices, models, and software versions.
Device registration (pairing)
Before you can listen to music on a trial basis, the device must be paired.
- Make sure that the Bluetooth function is enabled on the player (for example, on a mobile phone). Refer to the user manual of the player.
- Press the COO SOURCE button (9) until the indicator "- bt -" appears. Or you can press the BLUETOOTH button (17 on the device). The operation indicator (1) will flash quickly, indicating that the device is in pairing mode.
- Select the Bluetooth menu on the program and register the device on the program. Follow the device user manual. The device "BSS 4805" will appear on the program and be selected.
NOTE.
If it is impossible to turn on the device, the device may already be turned on. If it is already turned on, it will not appear in the selection menu.
- Enter the password "0000" on the program, taking into account the device model and software version.
If the pairing is successful, a sound signal will sound, and the indicator will light up solid blue. If the connection for audio output is established reliably, the sound signal will sound again, and the indicator will remain solid blue.
Information on the device's operating time is provided in the "Control Elements Description" section.
If possible, set the volume level on the external device.
NOTE.
Depending on the device model, the device may need to be re-paired. In case of problems, repeat the pairing procedure with the device. Turn off the WiFi and the mobile data transfer function on the device. We cannot guarantee compatibility with all Bluetooth devices (e.g., mobile phones) available on the market. To ensure optimal connection, make sure the program's battery is fully charged. Some mobile phone models have a power saving function. Disable this function, as it may cause problems with data transfer via Bluetooth. To transfer data, turn on Bluetooth on the program. Follow the program's user manual. If the mobile device on which the speaker is used receives a call, the playback will be interrupted. The speaker's operation with the mobile phone depends on the phone. To switch the call to the mobile phone, enable the additional functions on the mobile phone. After ending the call on the phone, the device will reconnect automatically. The speaker may need to be turned on again.
USB port (2)
The device is designed in accordance with the latest technical achievements in the field of USB device usage. Today, the market has a wide range of these types of USB data storage devices, which, unfortunately, does not allow us to guarantee full compatibility with all USB data storage devices. For this reason, some owners may have problems with playback from USB data storage devices, which is not a malfunction of the device.
- Press the SOURCE button (9) repeatedly until the "LOAD" indicator appears. The indicator (1) will light up red. Alternatively, you can press the USB button (18) on the device. 2. Connect the USB data storage device. After a few seconds, the "USB-" message will appear on the display, and the creation of a folder on the display will be indicated by the name of the current folder and the time of creation of that folder, which has elapsed.
Information about operation is provided in the "Description of Control Elements" section.
NOTE.
To avoid damage, remove the USB drive before disconnecting the USB port to prevent any malfunctions. The USB port is not intended for charging external devices.
WARNING.
Before removing the USB device, change the device mode using the SOURCE button (9).
Description of Control Elements
II (3/13)
Stop and repeat playback of the track. Press once to repeat playback.
(4/6)
1 press = start repeat playback from the beginning. (Only in repeat mode) 2 presses = skip to the previous track. 3 presses = skip to the next track.
NOTE.
Briefly displays the number of the current track.
(4/6)
Press to skip to the next track and subsequent tracks after it.
64
Ukraine

NOTE.
Briefly identify the model number of the device.
Troubleshooting
| Поминka в роботi | Прична Рішени | |
| Пристрии не пацоe. | 36iB в робoti пистою, Виаслдок уговын "Завис". | Ha 5 seskynd, Bi'd' endайся вд мерекух,在ьменя, a NOTIM yBI-MKHITb пистоий 3нову. |
| BiindobiTb задочкі на-lаштувань. => ДИВITСТОР. 61 "Bi'dновменя задочкі на-laшту-Вань" | ||
| Aydioсогнал не перадаевая чered Bluetooth | Гуномовець не с nanopено 3 джерелом aydioscigналу. | Перев配电_STAN 3' endahня. Рожиnotriб-но, посторс nocapутete ryномовець i,dжерello aydioscigналу. |
| Дуже Нзький рibeь Гунoc-Ti. | 36iIbшte pibeь Гуностi Ha ryномовци | |
| 36iIbшte pibeь Гунosti Ha джерelli aydioscigналу. | ||
| He bdaetbsяп'd' endatNi | He npaцoesc nanopelenno | Перев配电, уджерello aydioscigналу пidtrpymye npotoKoJ A2DP. |
| rhynomobeeь | Вимкино джерello aydioscigналу | YbimkhTb джерello aydioscigналу |
| Ha джерeli aydioscigналу Вимкино phyнczio Bluetooth. | YbimkhTb phyнczioBluetooth Ha джерelli aydioscigналу. | |
| HeniДтprimу-Вана ВерсяBluetooth. | Виорис可靠经ишй п pris-стriи Bi'dтворенья. | |
| Mузунни дo-pixkki BДТВО-PLOJOТья чered розроз USB в He nprabavilьни рослдовностi. | Ybimknessoфунцio BiDТВоренья у довьному подКу. | Ha tinchitb kHonky RANDOMM. Ha dinspnei kopOTko 3'яВиться по-biДOMленя "OFF". |
Technical specifications
Model: BSS 4805
Power source: 220-240 V~50 Hz
Power: 60 W
Protection class:
Net weight: approx. 7.7 kg
Radio
Indicates a possible danger to the device or other surrounding objects.

NOTE:
Provides advice or information.
06uNe yka3aHnNo TeXnKe 6e3OpacHOCTN
Ipeed Hauanom 3KcNpyatau npmbopa BHImaTeIbHnpoHTaIte npnaIraemyIO uHCTpykuIIO NO 3KcNpyatau mcoxpaHNTe ee B HAdEJKHom MeCTe, BMeCTe C rapaHTnHBmTAHOH, KACCOBbIM YekOM N, NO BO3MOXHOCTN, KAPTOHHOKo6koC yNaKOBOHTbM MaTePnAnOM. EcIN daTe KOMyJIbO nonoB30BaTbC np6OpOM, O83aTeNbHO daITBeBpndAhy dHaHHy IO hCTpykuIIO NO 3KcNpyatau m.
Дяустраени рпсka BOЗгорани ИлгУдара ЗелкТрнecKM TOKOM He NOДВергаNTe YcTpoiCTBO BO3-ДeINCTBnIO DoxJa N BnaIg. He npIMeHJIte Ye cTpoiCTBO B6Nl3N BOJbI (HaNPmEp, B BaHHoN KOMHaTe,бассeHNe, MOKpO nOДBaJIe). He npimehnTe yctpoiCTBO B3KCTpeMaIbHO ropHIX, XOLOhBIX, 3aNbJIeHHbIX ININ BIAxKHbIX MecTax. -ПльзунТсьпиборомTOЛькОЧаСТьIMОБразOMИHAЗHаЧЕНIO.Пибор He пpeДиЗИЧЕДЯКOMМерчECKOTOИСПльз3OBAHIN. - Y6eIntecb,уTO Ka6eJIb NITaHnHe NepeRHyT, He NOBpeKdE HIN He KOHTaKTInpyET C INCTOCHNkAMn TEIIa. - Y6eIITecb, yTO Ka6eJIb NITaHnHaJaEJXHO IOnKIIIOueH. He npikacaiTecb BnaXhbIM pykam K bInke u shHpy 3neKtpoNTAHn. - PódklouaTe 6Iok ToIbko K npabInbHo yctaHOBneHHo pO3eTKe. Y6eIntecB COrIacOBaHHocTHn HaprJxehn IITaHn yCTpOiCTBa n HAprrXeHn 3JIeKtpuecko CETn. BnIka CINIOBOrO nITaHnA DoJXHa 6bITb IeKoOcTynHOH. - PpN yCTaHOBKe 6aTapeeK co6JIIOdaIte NOpAHPoCtB. HeDonyckaIte nepeKpbITne BEHTINIAIOHHbIX OTBepCTNI yCTpOINCTBA. He nepekepbibaTe BeHTnlaHIOHHbIe OTBepCTNIOCTOPOHHMn PpeDMeTaMn, HAnpImep Ra3eToI, CkATEpTbIO, WTOPOI N.T.D.
He donyckaIte BO3deIcTBnHa yCTpoIcTBO npOIInTo IIN paCnblJHemO BDoJI, He CTaBbTe Ha yCTpoIcTBO COcyDbICBOIOHApIMepBa3bl. - NCTOCHNIKOTKpbITOROOTH,HaNPIMeRTOPAUHe CBEHN, He DOJXHBipacnoJaTaTbCAHa YCTPOIcTBe. He otKpbBaIte KopIyc yCTpoiCTBa. HenpaBnHbI peMOHT MoKET npNBecT N Cepbe3HOJ ONaCHOCTN noB3OBaTeJIIO. Pn IOBpeKJeHN YCTPOiCTBa IIN ero uHypa 3JIeKTPoNTAHNA (B aCtHOCTN) npeKpATNE NCIOJIb3OBaHHe YCTPOiCTBA INpeJaTIe ero dIra pEMoHTa KBaIIuΦUropOBaHHOMy CneuaJIACrty. PeryIarpHO npoBepaIte Ha NOBpeXDeHn UHyp 3JIeKTPoNTaHnI. Дя устраени Любол onachoctи NOBpeжdeHHbI шур зл ektpoNTaHЯ DOLЖeH 3amHeTbca N3ROTO- ВITEJEM, erg KJImeHTCKOJ ClyK6oN IIN aHaIOnuHbIM КвалфцИрOBaHHbIM LlUcOM Ha UdEHTuHbI ShHyp Зл ektpoNTaHЯ. - Ecnn yctpoiCTBO He 6ydtEN mnoIb3ObaTbca IInTeIbHbI cpoK,OTKIOUHTe UHyp 3JIeKTpONTaHnI IN3BJIeKNTe 6aTapeuKn.
JaHHbIe CIMBOJbl MOYr 6bITb yKa3aHbI Ha yCTPOIcTBa IINr O603HaHeHnCNeDyIOJIero:

CIMBOJMOHNI INpeDynpexJaet Nolb3ObaTeJI O6 ONACHOM BbICOKOM HAnpXKeHN BHyTpN KOpnyca.

CIMBOJ BOCKLIaTeIbHOrO 3HaKa OTMeHaET BaXHbIE INHCTpyKUIN IIN 3aMeHaHN O TEXnEeCKOM06CJIyXKNBaHN B pYKOoDCTBax N3 KOMnJIeKtAIOCTaBKN.
Teu n Iua HykaioueeB npncMOTpe
- Ⅰ3 coobpaqheni 6e0nacchoctn dIra deTeH He octabJIaIte JexKaTb ynaKOBky (IInactIKOBbie MeJki, KapToH, NeHonnact n T.D.) 6e3 npncMOTpa.

IPEyIPEXJEHNEI
He no3B0JnTe DeTAM nIgpaTb C nOIN3TNHeHOBOI nJIeHKO. OnachocTb ydyuBa!
This device is not intended for use by persons (including children) with reduced physical, sensory or mental capabilities, or lack of experience and knowledge, unless they have been given supervision or instruction concerning use of the appliance by a person responsible for their safety. Children should be supervised to ensure that they do not play with the device.
Location of Controls
1 VOLUME level control (volume/control lamp) 2 USB port
3 PLAY/PAUSE button (play/pause) 4 NEXT/REV button (next/previous track) 5 STANDBY button (on/standby) 6 IR receiver for remote control (N) 7 Display 8 Standby indicator lamp 9 SOURCE button (mode, source selection) 10 F.WB and F.RWD buttons (scan forward/backward) 11 STOP button (stop)
Rear panel (not shown)
RESET button (reset)
AUDIO output jacks (2x RCA)
Antenna
Mains power cord
POWER ON/OFF switch
Remote control
1 REPEAT button (repeat) 2 MUTE button (mute) 3 Numeric buttons 4 10+ button 5 "F" button 6 CH+/CH- buttons (next/previous preset radio station) 7 Stop button 8 VOL+/VOL- buttons (volume) 9 TONE button 10 SEARCH button 11 MO/ST button (mono/stereo) 12 SAVE button 13 Play/Pause button 14 TU+/TU- buttons (scan forward/backward) 15 FM button (radio) 16 AUDIO button 17 BLUETOOTH button 18 USB button 19 STANDBY button (on/off) 20 RANDOM button (play randomly selected tracks)
Special safety precautions for this device

WARNING:
Possible hearing loss due to excessively high volume levels.

BHIMAHINE:
Do not expose the device to excessive heat, cooling, or humidity. Do not use the device at maximum volume. Possible damage. Do not touch the membranes of the speakers with fingers or objects. This may damage the membranes.
Before first use of the device / Introduction

NOTE:
Some buttons have functions both on the device and on the remote control. The corresponding buttons perform the same function.
Select a suitable location for the device. Place it on a dry, flat, non-slip surface. - Make sure there is sufficient ventilation for the device! - Remove the protective film from the device, if present.
Mounting the stand
- Carefully place the left side of the speaker on the table.

NOTE:
Place a soft cloth under the speaker to avoid scratching the surface.
- Install the lower plate with the four screws on the bottom of the speaker. Then place the speaker back on the floor.
Power supply
- Connect the power cord to the AC input on the back of the device. Plug the power cord into a properly installed three-prong wall outlet of 230 V, 50 Hz.
- Make sure the mains voltage matches the value indicated on the rating plate.

NOTE:
The device is powered from the mains, if prolonged use is not planned.
Inserting/replacing the battery in the remote control

NOTE:
The battery element in the battery compartment may be protected by a piece of film. This is done to extend the service life of the element. Before first use, remove this piece of film.
68
Russian
- Open the battery compartment on the back of the remote control (RC). Use a CR2025 battery. Check the polarity (see the diagram in the battery compartment). Close the battery compartment.
If the remote control is not planned for prolonged use, please remove the batteries to prevent acid leakage.
#
WARNING:
Do not expose batteries to heat sources such as direct sunlight or radiators. Risk of explosion. Keep batteries out of reach of children. Batteries are not toys. Do not attempt to open the battery. Avoid contact with metal objects (rings, nails, screws, etc.). Risk of short circuit! A short circuit may cause overheating or even ignition of the batteries. This could lead to an explosion. When transporting, insulate the battery terminals to ensure safety. If battery leakage occurs, do not allow the acid to come into contact with eyes or skin. If acid contacts the eyes, rinse with plenty of water and seek medical help in case of injury symptoms.
#
ATTENTION:
Do not dispose of batteries with household waste. Please take used batteries to a collection point or return them to the retailer.
Restoring factory settings
During operation, it is possible to eliminate it by pressing the RESET button.
Using a wire or similar object, press the RESET button on the rear cover of the device to reset the electronics. During this process, all user settings will be lost.
General operating rules
Turning the device on/off
Turn on the device by setting the POWER switch to the "ON" position. The STANDBY button (5/19) switches the device between standby and operating modes. In standby mode, the control indicator (8 on the device) lights up red. To turn off the device, set the POWER switch to the "OFF" position. To completely disconnect the unit from the power supply, remove the plug from the socket.
in
NOTE: In BLUETOOTH, USB mode
If there is no signal for about 15 minutes, the device automatically switches to standby mode.
Volume level
Pressing the VOL+ / VOL- buttons (8 on the remote control) allows you to set the desired volume level.
Remote control
For remote control at a distance of up to 5 m. If the operating distance decreases, replace the batteries. For correct operation, ensure direct line of sight between the remote control and the sensor on the device.
Sound settings
Press the TONE button (9 on the remote control) to adjust the high frequencies (treble), low frequencies (bass), and overall volume (VOL) in sequence. In normal mode, you can adjust the volume using the VOL+ / VOL- buttons or the VOLUME control.
NOTE:
To avoid distortion, change the EQ setting (equalizer) on the playback device to increase the sound quality. The settings for high and low audio frequencies will be reset to "00" when the device is turned off.
MUTE (button)
For immediate sound muting. Press MUTE again to cancel muting and restore volume.
NOTE:
When the device is activated, the message "VL-OFF" may briefly appear. For technical reasons, the activated function cannot be displayed on the display permanently.
Radio operation
1. Fully extend the wired antenna. 2. Press the SOURCE button (9) several times until "FM" appears on the display. The indicator lamp (1) lights up red. Alternatively, you can press the FM button (15 on the remote control). 3. Automatic radio station search:
Press the SEARCH button (10 on the remote control). The device will start scanning the entire frequency range to search for radio stations. Found stations are saved
in order of increasing frequency. The sequence of radio stations cannot be edited. Previously tuned radio stations will be overwritten.
Manual radio station search:
Briefly press the / button (10) until the desired radio station is found. If you continue to hold one of the buttons, the device will start scanning to the next radio station.
Frequency input:
If the frequency is not available, you can set it as follows.
Press the F button (5 on the remote control). The indicator - - - - - will appear on the display. Enter the frequency using the numeric keys (3) on the remote control. If the reception is poor due to interference, try to improve reception by changing the position of the antenna for extending/retracting. For FM stations, you can use the MODE button (11 on the remote control) to switch between stereo and mono reception modes. We recommend switching to mono mode for better reception quality.
NOTE:
The activated stereo function is shown on the display with the symbol
Saving a preset station
- Use the corresponding numeric keys to select a preset memory location where you want to save the radio station.
- Tune to the desired radio station as described above in section 3 "Manual tuning".
- Press the SAVE button (12 on the remote control) to preset the radio station.
Selecting a preset station
There are two ways to select preset stations.
A preset station can be selected by pressing the numeric keys (3 on the remote control) to enter the desired preset number. For preset numbers greater than 9, press the 10+ button (4 on the remote control). Each press of the 10+ button increases the input by 10 preset numbers.
Playing audio sources
There are three ways to play music files on the device: via a wired connection, via a wireless Bluetooth connection, or via the USB port.
With a wired connection
- Connect the external device using the connection cable (2x RCA) to the right/left AUDIO inputs of the speaker. If necessary, use a suitable adapter (not included in the delivery set).
- Press the SOURCE button (9) repeatedly until the word "AUDIO" appears on the display. The indicator lamp (1) will light up red. You can also press the AUDIO button (16 on the remote control).
- Start playback of the audio source. Listen to the playback through the speakers. You can adjust the volume using the VOL+/VOL- buttons (8 on the remote control) or the VOLUME regulator (1). 4. For further instructions, please refer to the operating manual of the external audio source.
NOTE:
If possible, set the volume of the external device to a comfortable level.
Wireless Bluetooth connection
Bluetooth operates on the basis of a wireless radio connection between devices over a short distance. Devices supporting the Bluetooth standard transmit data at a frequency from 2.402 to 2.480 GHz, in the ISM band (Industrial, Scientific and Medical). Interference may be caused, for example, by wireless local area networks (LAN), radio stations, wireless telephones or microwave ovens operating in a similar frequency range.
This device allows you to connect with devices that support Bluetooth. The transmission range is limited to approx. 15 meters, depending on external conditions and the power supply used.
If the playback device supports the A2DP profile (Advanced Audio Distribution Profile) and has music player functions, you can transmit music to the speakers wirelessly. The A2DP profile ensures coordination of Bluetooth devices from different manufacturers. Through data streams, stereo audio signals are transmitted wirelessly between the playback device (source) and the receiving device. For remote control of the source, the playback device must support the AVRCP profile (Audio Video Remote Control Profile).
However, due to the incompatibility of devices from different manufacturers, models and software versions, the operation of all functions is not guaranteed.
Entering the device pairing mode (pairing)
Before listening to music on the device, it is necessary to ensure a paired connection mode between the devices.
- Check that the Bluetooth function is activated on the player (for example, on a mobile phone). For this, see the operating manual of this player. 2. Press the SOURCE button (9) repeatedly until "--bt-" appears on the display. You can also press the BLUETOOTH button (17 on the remote control). The indicator lamp (1) flashes quickly to show that the device is in synchronization mode.
- Enable Bluetooth on the player and register the dynamic in it. For this, see the player's operating manual. The device "BSS 4805" will be shown in the player as the selected source for the pair.
NOTE:
The dynamic can only be connected to one playback error. If the dynamic is already connected to a playback button, the dynamic will not appear in the selection menu for the BT protocol.
- Then enter the code "0000" on the player, depending on the manufacturer, model, or software version.
After successful synchronization, an audible signal sounds, and the indicator lamp slowly flashes blue. If the connection to the playback device was fully established, an audible signal sounds again, and the indicator lamp lights up blue.
Do not immerse the device in water.
- Before cleaning, disconnect from the mains power supply. Clean the device with a soft, damp cloth without using strong cleaning agents.
Long-term
| Hemcpapb-Hoctb | Прична Устене | |
| Усторicitва не равotasг. | Празишел крахи "3a- висанne". | Од��очite ot сete- BOGO злестопатни поимерно на 5 ceкуnd. 3atem choва Вкюочite усторicitва. |
| Проблемы ВОЗв rat KM 3abODSCIM Насторікам. → CM.сторцу 68 "Boc-становлене задорскин Насторж" | ||
| Нет сигнала щдno по coедиениbluetooth | Диhamнik He IMeET napNoI CBa3n C Источ-NHKOM aydino. | Пробегьte налише-coeingнения. Р pine He-обхodимоctи, сныа установITE napHyIO CBa3b CИсточником aydino. |
| Слшкови NGKANЯ ГROM-KOCTb. | Уber们ьte уровень ГROMKOCTN ДИнамнka. | |
| Уber们ьte уровень ГROM-KOCTN Источника aydino. | ||
| He удаetedяпдклочь динамнik | He paobotaet napHaB CBa3b. | Пробегьte, подиржи-baet Ли Источник aydinoПротokon A2DP. |
| Выкюуни Источник aydino. | ВкюочITE Источник aydino. | |
| РекиIM Bluetooth BBkюунь вИсточниke aydino. | ВкюочITE ФунkedиюBluetooth вИсточниke aydino. | |
| He подэр-jжевaitсданнaya Вercsna Bluetooth. | Исторystvo дугоусторystvo BOCPON3BE-дени. | |
72 Russian
Magnetic compatibility instructions for low-voltage
devices, and also developed according to the latest
safety standards.
-
1
WARRANTY CARD
- SPANISH
- CONTENTS
- POLISH
- TABLE OF CONTENTS
- CORDLESS VIA BLUETOOTH
- SYMBOLS IN THESE INSTRUCTIONS FOR USE
- WARNING
- CAUTION
- NOTE
- GENERAL SAFETY GUIDELINES
- CHILDREN AND DISABLED PERSONS
- LOCATION OF CONTROLS
- BACK SIDE (NOT SHOWN)
- REMOTE CONTROL
- SPECIAL SAFETY PRECAUTIONS FOR THIS DEVICE
- FIRST USE OF THE DEVICE/INTRODUCTION
- INC
- MOUNT PEDESTAL
- TE
- POWER SUPPLY
- INSERT/REPLACE BATTERY IN REMOTE CONTROL
- A
- RESTORING THE FACTORY DEFAULTS
- GENERAL OPERATION
- SWITCH DEVICE ON/OFF
- NOTE: IN BLUETOOTH, USB AND AUDIO MODE
- VOLUME
- INFRARED REMOTE CONTROL
- SOUND SETTINGS
- MUTE (2 ON THE REMOTE CONTROL)
- RADIO MODE
- AUTOMATICALLY SEARCH FOR RADIO STATIONS
- MANUAL SCAN FOR RADIO STATIONS
- DIRECT FREQUENCY ENTRY
- MANUALLY STORING STATIONS
- SELECT THE PRESET RADIO STATION
- PLAYING BACK MUSIC FILES
- BY CABLE
- NC
- LOGGING ON DEVICES (PAIRING)
- USB PORT (2)
- DESCRIPTION OF THE CONTROLS
- II(3/13)
- (4/6)
- ) (ONLY IN USB MODE)
- REPEAT (1 ON THE REMOTE CONTROL) (ONLY IN USB MODE)
- RANDOM (20 ON THE REMOTE CONTROL)
- CLEANING
- TROUBLESHOOTING
- DISPOSAL
- MEANING OF THE "WHEELIE BIN" SYMBOL
- TECHNICAL SPECIFICATIONS
- BLUETOOTH
- USING THE DEVICE FOR THE FIRST TIME / GETTING ACQUAINTED
- MOUNTING/INSTALLATION
- OPERATION
- INSTALLATION/REPLACEMENT OF THE BATTERY IN THE REMOTE CONTROL
- DAMAGE
- ATTENTION
- COMPLIANCE WITH EU DIRECTIVES
- GENERAL INFORMATION ABOUT THE DEVICE
- TURNING THE DEVICE ON/OFF
- NOTE: IN BLUETOOTH, USB, AND AUDIO MODES
- SOUND ADJUSTMENT
- MUTE (2 ON THE DEVICE)
- AUTOMATIC RADIO STATION SEARCH
- UKRAINIAN
- MANUAL RADIO STATION TUNING
- STORING STATIONS MANUALLY
- SELECTING A STORED STATION
- PLAYING MUSIC TRACKS
- WIRED METHOD
- WIRELESS CONNECTION VIA BLUETOOTH
- DEVICE REGISTRATION (PAIRING)
- DESCRIPTION OF CONTROL ELEMENTS
- II (3/13)
- UKRAINE
- UNE YKA3AHNNO TEXNKE 6E3OPACHOCTN
- TEU N IUA HYKAIOUEEB NPNCMOTPE
- IPEYIPEXJEHNEI
- REAR PANEL (NOT SHOWN)
- BHIMAHINE
- BEFORE FIRST USE OF THE DEVICE / INTRODUCTION
- MOUNTING THE STAND
- INSERTING/REPLACING THE BATTERY IN THE REMOTE CONTROL
- RUSSIAN
- RESTORING FACTORY SETTINGS
- GENERAL OPERATING RULES
- IN
- NOTE: IN BLUETOOTH, USB MODE
- VOLUME LEVEL
- MUTE (BUTTON)
- RADIO OPERATION
- MANUAL RADIO STATION SEARCH
- FREQUENCY INPUT
- SAVING A PRESET STATION
- SELECTING A PRESET STATION
- PLAYING AUDIO SOURCES
- WITH A WIRED CONNECTION
- WIRELESS BLUETOOTH CONNECTION
- ENTERING THE DEVICE PAIRING MODE (PAIRING)
- LONG-TERM
- WARRANTY CARD
Brand : AEG
Model : BSS 4805
Category : Soundbar