USER MANUAL Oscar ARGO
SETTING AIR FLOW DIRECTION 4
HOW TO DISCHARGE THE WATER TANKS 4
PORTHOLEKIT 5
ACCESSIONS (SUPPLIED ON REQUEST) 5
Air clean filter 5
CARE AND CLEANING 6
USEFUL ADVICE 6
PRODUCT IDENTIFICATION
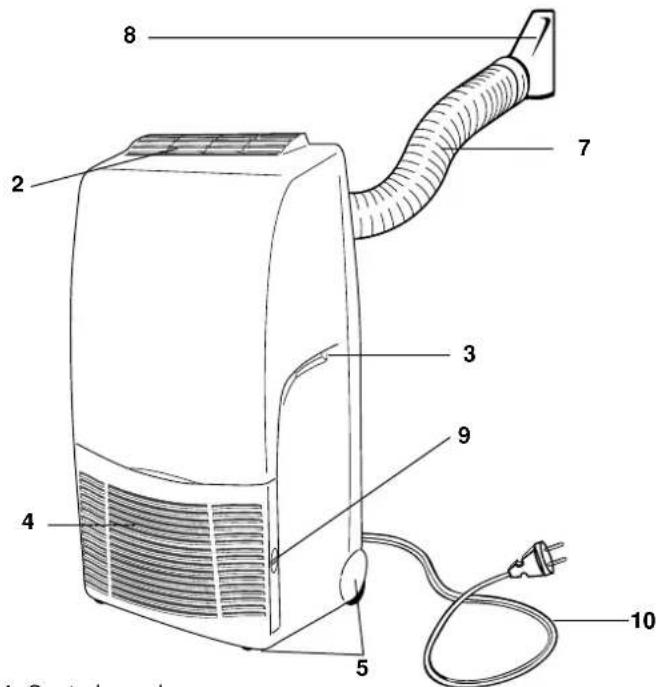
- Control panel
- Supply air deflector
- Transportation handle (both sides)
- Return air grille
- Transportation wheels
- Timer (if installed)
- Retractile flexible pipe
-
Terminal pipe fitting
-
Air filter (right side)
- Electric cable with plug
- Tube for condensate discharge (Main tank)
- Tube for condensate discharge (Secondary tank)
- Space for cable winding
This product is marked satisfies Directives:

as it
- Low voltage no. 73/23 EEC and 93/68 EEC.
Electromagnetic compatibility no. 89/336 EEC, 92/31 EEC and 93/68 EEC.
This declaration will become void in case of of misusage and/or non observance though partial of manufacturer's installation and/or operating instructions.

Operating limits:
Room Temperature:
Cooling: MIN: 15^ D.B. / 12°C W.B.
MAX: 35^ D.B. / 24°C W.B.
Dehumidification: MIN: 10^ D.B / 80% R.H.
MAX: 35^ D.B./80% R.H.
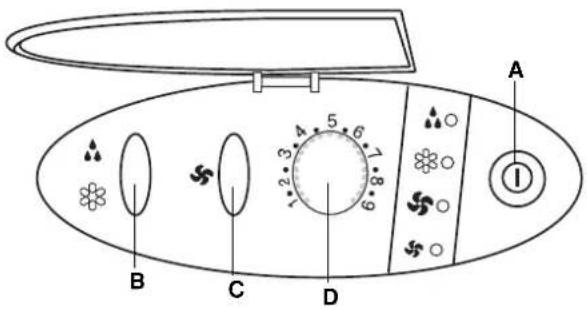
CONTROL PANEL
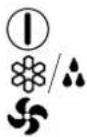
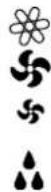
A. ON/OFF Push-button switch
B. Cooling / Dehumidification push-button
C. High / Low fan speed push-button
D. Electronic thermostat Knob
E. Cooling lamp
F. High fan speed lamp
G. Low fan speed lamp
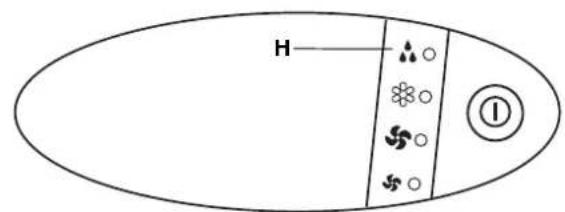
H. Light up lamp for dehumidification. Blinking lamp for full water tank.
1. Control panel cover

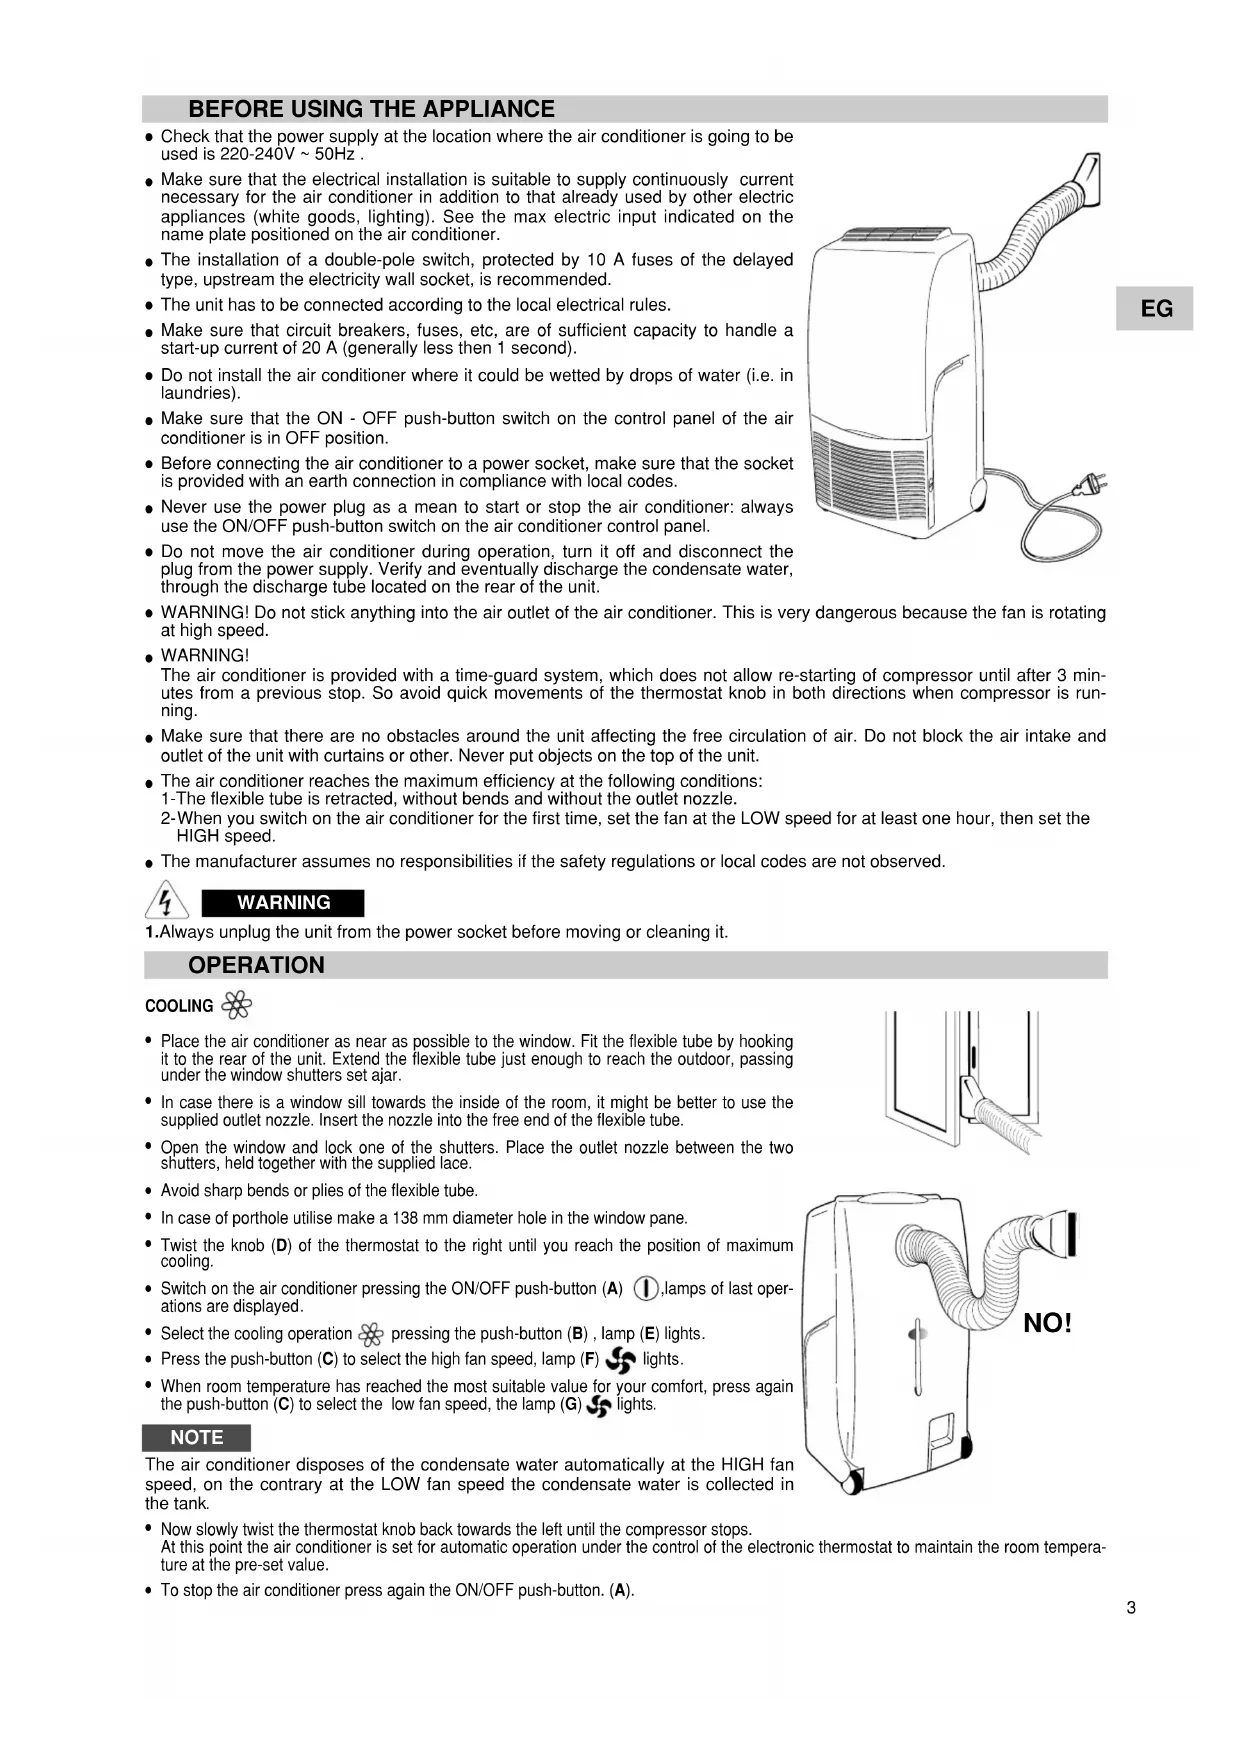
BEFORE USING THE APPLIANCE
- Check that the power supply at the location where the air conditioner is going to be used is 220 - 240V 50Hz .
- Make sure that the electrical installation is suitable to supply continuously current necessary for the air conditioner in addition to that already used by other electric appliances (white goods, lighting). See the max electric input indicated on the name plate positioned on the air conditioner.
- The installation of a double-pole switch, protected by 10 A fuses of the delayed type, upstream the electricity wall socket, is recommended.
- The unit has to be connected according to the local electrical rules.
- Make sure that circuit breakers, fuses, etc, are of sufficient capacity to handle a start-up current of 20 A (generally less than 1 second).
- Do not install the air conditioner where it could be wetted by drops of water (i.e. in laundries).
- Make sure that the ON - OFF push-button switch on the control panel of the air conditioner is in OFF position.
- Before connecting the air conditioner to a power socket, make sure that the socket is provided with an earth connection in compliance with local codes.
- Never use the power plug as a mean to start or stop the air conditioner: always use the ON/OFF push-button switch on the air conditioner control panel.
- Do not move the air conditioner during operation, turn it off and disconnect the plug from the power supply. Verify and eventually discharge the condensate water, through the discharge tube located on the rear of the unit.
- WARNING! Do not stick anything into the air outlet of the air conditioner. This is very dangerous because the fan is rotating at high speed.
WARNING!
The air conditioner is provided with a time-guard system, which does not allow re-starting of compressor until after 3 minutes from a previous stop. So avoid quick movements of the thermostat knob in both directions when compressor is running.
- Make sure that there are no obstacles around the unit affecting the free circulation of air. Do not block the air intake and outlet of the unit with curtains or other. Never put objects on the top of the unit.
The air conditioner reaches the maximum efficiency at the following conditions:
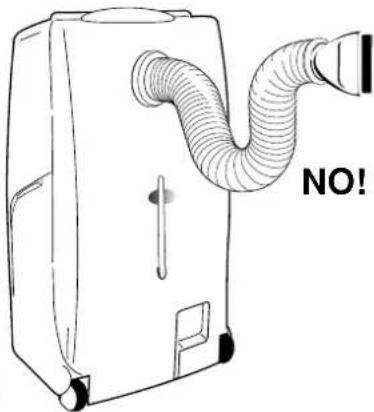
1-The flexible tube is retracted, without bends and without the outlet nozzle.
2-When you switch on the air conditioner for the first time, set the fan at the LOW speed for at least one hour, then set the HIGH speed.
- The manufacturer assumes no responsibilities if the safety regulations or local codes are not observed.

WARNING
- Always unplug the unit from the power socket before moving or cleaning it.
OPERATION
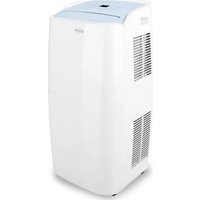
COOLING

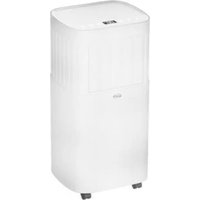
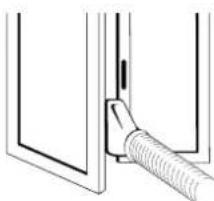
- Place the air conditioner as near as possible to the window. Fit the flexible tube by hooking it to the rear of the unit. Extend the flexible tube just enough to reach the outdoor, passing under the window shutters set ajar.
- In case there is a window sill towards the inside of the room, it might be better to use the supplied outlet nozzle. Insert the nozzle into the free end of the flexible tube.
- Open the window and lock one of the shutters. Place the outlet nozzle between the two shutters, held together with the supplied lace.
- Avoid sharp bends or plies of the flexible tube.
- In case of porthole utilise make a 138mm diameter hole in the window pane.
- Twist the knob (D) of the thermostat to the right until you reach the position of maximum cooling.
- Switch on the air conditioner pressing the ON/OFF push-button (A) ①, lamps of last operations are displayed.
- Select the cooling operation pressing the push-button (B), lamp (E) lights.
- Press the push-button (C) to select the high fan speed, lamp (F) lights.
- When room temperature has reached the most suitable value for your comfort, press again the push-button (C) to select the low fan speed, the lamp (G) lights.
NOTE
The air conditioner disposes of the condensate water automatically at the HIGH fan speed, on the contrary at the LOW fan speed the condensate water is collected in the tank.
- Now slowly twist the thermostat knob back towards the left until the compressor stops. At this point the air conditioner is set for automatic operation under the control of the electronic thermostat to maintain the room temperature at the pre-set value.
- To stop the air conditioner press again the ON/OFF push-button. (A).

DEHUMIDIFICATION (DRY)

When the air conditioner is in the dehumidification mode, it doesn't cool the room.
When you use the air conditioner in the dehumidification mode, you don't have to use the flexible tube. For maximum dehumidification efficiency leave the rear discharge outlet free to discharge directly into the room.
- Remove the flexible tube by grasping it at the attachment point on the air conditioner and twisting it until you release it from the blocking hooks.
Press the ON/OFF push button (A) ① to start the air conditioner.
- Select dehumidification mode pressing the push button (B) 3/4, lamp (H) lights up. The humidity of the room (condensate water) will be collected in the internal tank of the air conditioner.
- To stop the air conditioner press again the ON/OFF push-button. (A).
WARNING!
The air conditioner may be used as dehumidifier only if the room temperature is above 10^ . When the room temperature is below 10^ , the compressor stops and the dehumidification doesn't occur, while the fan goes on working.
ATTENTION:
the control causes a compressor starting delay of about three minutes each time buttons A, B and thermostat D are activated or when the plug of supply electric cable is took out and in.
SETTING AIR FLOW DIRECTION
To set the air flow direction, seize with both hands one of the deflector blades and pull towards you
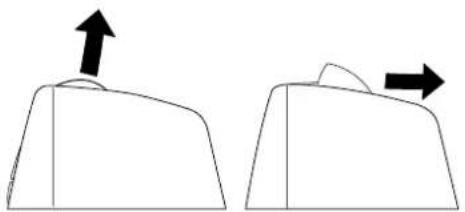
Vertical Flow
Horizontal Flow
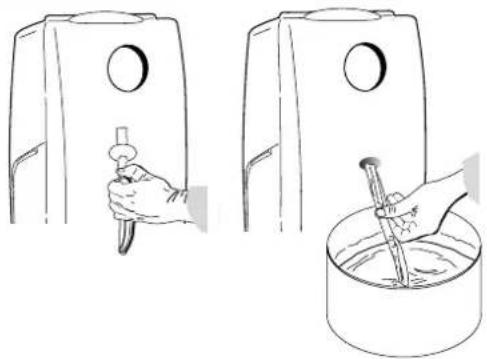
HOW TO DISCHARGE THE WATER TANKS
The air conditioner removes humidity of the air, collecting the condensate into the internal tank. The condensate water can be evacuated through the external discharge tube located on the rear of the unit.
- When the internal tank is full, the air conditioner will automatically stop and the water tank alarm begins flashing. The tank capacity allows approx. 6 hours operation.
- Verify the presence of water inside the air conditioner, looking at the rear external discharge tube.
- Press the ON/OFF push button to switch off the unit, then unplug the cable.
- Position a container under the discharge tube.
- Grasp the tube removing it from its seat on the rear of the air conditioner
- Close with the inch the open end of the tube and, tilting it towards the container, let the condensate water flow.
- At the end of the operations reinsert the discharge tube into its place.
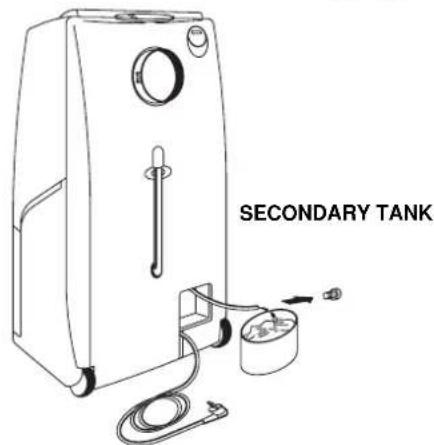
Every time you move the unit to another room or when you store it, discharge also the condensate water of the secondary tank, through the tube located inside the space for cable winding.
IMPORTANT
At the end of the operation close the tube with its stopper.

WARNING
- Always switch off the air conditioner before unplugging it from the power socket.
- Always unplug the air conditioner before discharging the condensate water collected inside.
SINGLE GLASS
DOUBLE GLASS
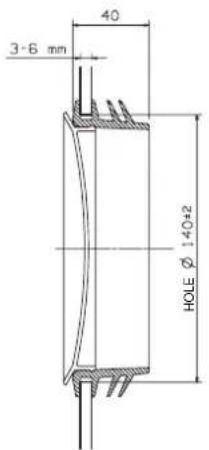

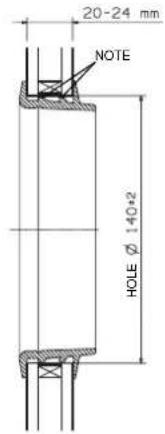
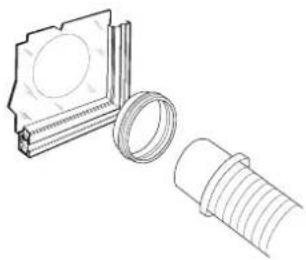
ASSEMBLING
Make a hole in the window pane.
- Insert the porthole without the plug.
- Remove the terminal pipe fitting of the warm air outlet from the retractile flexible pipe.
- Bring the air conditioner near the window and insert the air outlet in the porthole.
If you want to utilise the air conditioner in several rooms, it is possible to buy varies portholes for air discharge separately.
NOTE
Eliminate one or two membranes, cutting them with the scissors according to the thickness of the glass.
ACCESSORIES (SUPPLIED ON REQUEST)
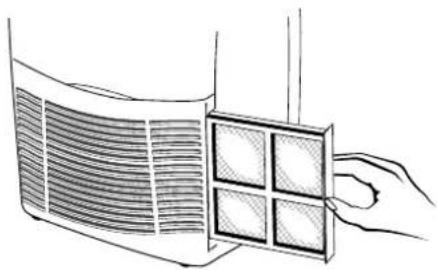
AIR CLEAN FILTER
- Read these instructions before starting replacement work.
- This "Air Clean Filter" collects dust as well as deodorizes.
NOTE
- This carton box contains an air clean filter, a spring and a label "Color gauge for filter replacement".
- Open the bag just before installing the air clean filter. If not, the deodorization effect durability of the filter may be decreased.
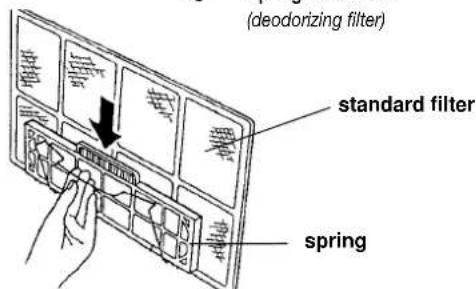
1 Filter installation procedure:
Take out the filter assembly.
Separate the standard filter from the handle
Stick the label "Color gauge for filter replacement" in an easy-to-see position (inside of control panel cover).
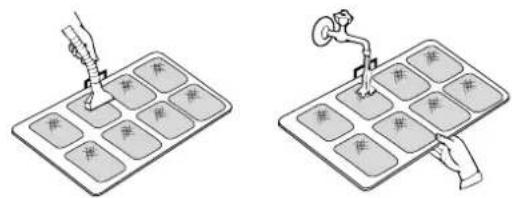
2 Attach the spring onto the standard filter:
Hook the spring onto the air filter from its rear side and engage it into the groove on the "FRONT" mark side (use of a standard screwdriver is recommended for easy setting).
3 Secure the "air clean filter" on to the standard filter by the spring attached before in step 2.
4 Hook the handle to the standard filter and reinsert the filter assembly in the unit with its "FRONT" mark towards you.
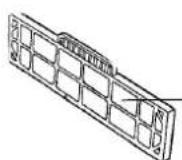
Replacement of air clean filter
The air clean filter is disposable.
- Do not throw away the filter frame and spring.
- The used filter cannot be reused even after cleaning up.
- Buy the air clean filter for replacement at your nearest dealer.
- Check the state of dirtiness at least once every two weeks and replace the filter when it changes to be so dirty as the colour of the label "colour gauge for filter replacement".

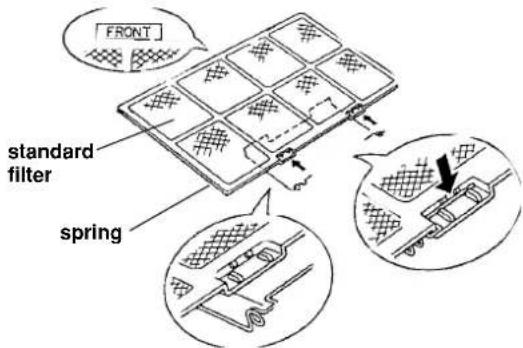
"Air clean filter standard filter side: white (dust collecting filter)
Spring side: black (deodorizing filter)
CARE AND CLEANING
WARNING! For safety's sake, be sure to turn the air conditioner OFF and also disconnect it from the power supply before cleaning it.
- Cleaning of the Air Filter.
The air filter must be checked at least once every two weeks operation. Operation with a dirty filter always causes a lower efficiency of the air conditioner and severe product damage. The filter is located at the back of the intake grille and shall be removed from the right side of the unit. Use a vacuum cleaner to remove light dust. If there is sticky dust on the filter, wash it with lukewarm soapy water, then rinse in clean, cold water and dry it before reinstallation.
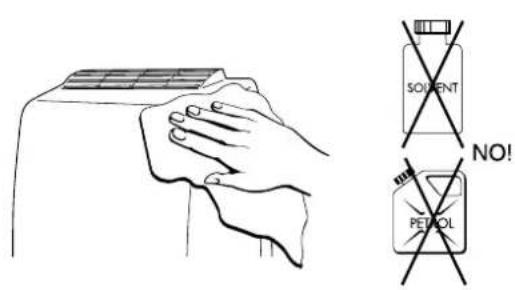
- Cleaning of casing and Grille.
To clean the air conditioner, wipe it with a clean soft cloth, lightly moisted. In case it is stained, moisten the cloth with soapy water. Never use solvents or harsh chemicals, nor very hot water. Do not pour water over the air conditioner to clean it: this will damage the internal components and cause an electric shock hazard.
- Storage.
If you are not going to make use of the air conditioner for a long period, before storing it away clean the air filter and verify that both the internal water tanks are empty. Always store the unit in the vertical position. Do not put heavy objects on top of the unit and protect it with a cloth or a plastic bag.
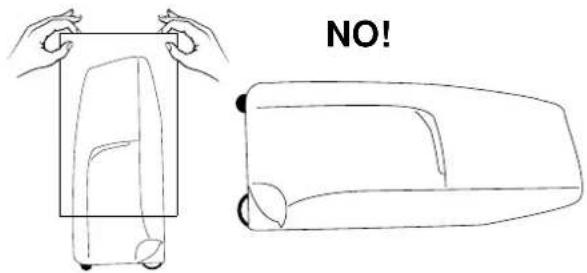
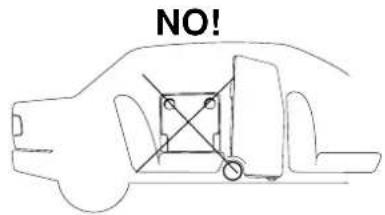
- Transport.
Preferably keep the air conditioner in the vertical position during transportation. If this is not possible, then lay it on one side; when at destination put the air conditioner back in the vertical position and wait at least 10 minutes before using it for cooling.
- For your safety care check periodically the conditions of the electric supply cable; the electrical connection of the unit is X type with cable prepared in a special way; in case you should notice any damage due to usage, call the nearest After Sale Service to get the cable replaced.
FILTER CLEANING
USEFUL ADVICE
If your air conditioner doesn't work properly, before requesting service, verify that:
- the plug is properly inserted into the power socket;
- the circuit breaker is in the ON position and fuses have not blown;
the air filter is not clogged;
- the flexible tube is correctly positioned without any sharp bends nor plies;
- the thermostat knob is in the proper position for the suitable temperature (twisting it clockwise verify the compressor restart, after the delayed time);
- the room temperature is above 15^ for cooling mode and 10^ for dehumidification mode;
- you have correctly carried-out the instructions contained in this manual.

ATTENTION
The blinking lamp , together with the stop of the air conditioner indicate that the condensate water tank is full.
INDICE
IL PRODOTTO 2
PANNELLO COMANDO E CONTROLLO 2
PRIMA DI USARE IL CLIMATIZZATORE 3
MODALITA D'USO
Raffreddamento 3
ACCESSORI (FORNITI SU RICHIESTA)
FILTRO ARIA PULITA
Deshumidification (dry) 4
REGLAGE DU FLUX D'AIR 4
COMME VIDER LES RESERVOIRS DE CONDENSAT 4
KIT HUBLOT 5
ACCESSIONS (FOURNIS SUR DEMANDE) 5
MAX: 35^ B.S./24°C B.H.
Deshumidification: MIN: 10^ B.S / 80% H.R.
MAX: 35^ B.S./80%H.R.
TABLEAU DE COMMANDES
ACCESSIONS (FOURNIS SUR DEMANDE)
FILTRDE PURIFICATION DE L'AIR
MAX: 35^ B.S./24°C B.H.
Deshumidificacion: MIN: 10^ B.S. / 80% H.R.
MAX: 35^ B.S. / 80% H.R.
PANEL DE MANDOS Y CONTROLES
A. Pulsador arranque-parada
B. Pulsador refrigeracion /
Deshumidificación
MAX: 35^ B.S./24°C B.U.
Dehumidification: MIN: 10^ B.S / 80% U.R.
MAX: 35^ B.S. / 80% U.R.
PAINEL DE COMANDO E CONTROLLO
A. Interruptor para ligar e desligar
B. Tecla "Refrigerar / desumidificar"
C. Botão regulator de temperatura (Maxima/Minima)
D. Termostato electrolyco
E. Luz de refrigeracao
F. Luz de Temperatura alta
G. Luz de temperatura baixa
H. Desumidificar: luz de controlo está acesa constanmente
- Programmed memory of up to 5 years without power supply due to Lithium battery
Display 24 hours
- Daily and weekly programming possibility
8 switching ON programs, 8 switching OFF programs
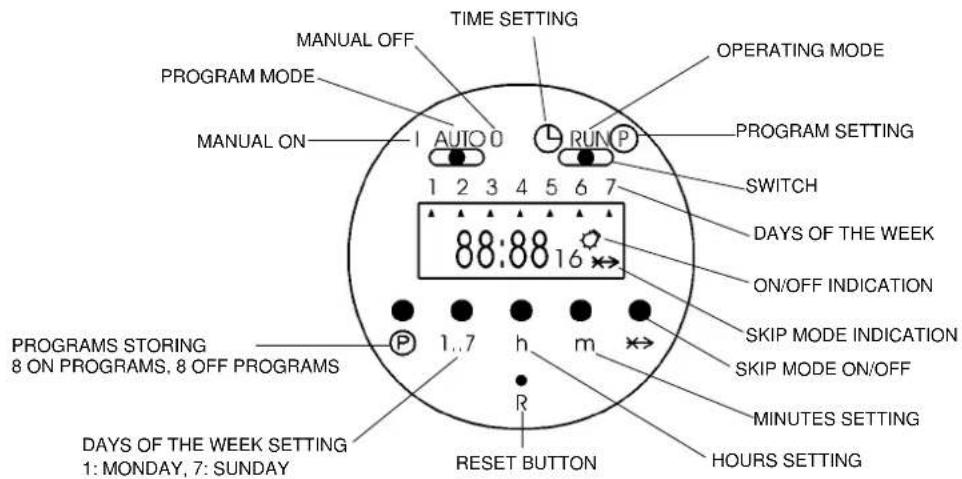
Operating modes of timer:
I: the air conditioner is permanently ON (use directly the ON/OFF push button of the air conditioner to switch it OFF)
AUTO: the timer will switch on and off the air conditioner according to the selected program
0: the air conditioner is permanently OFF (it can't be switched ON neither with the ON/OFF push button of the air conditioner)
OPERATING INSTRUCTIONS FOR THE TIMER
1. Reset of the timer:
Be sure that the switch is in the RUN position and press down the reset button R with the tip of a pencil (the display will begin blinking).
2. Setting the current time and day:
Slide the switch into position, press down the button 1...7 until you set the day of the current week (indicated by an arrow on the display), press down the button h to set the current hour, press down the button m to set the minutes. Slide again the switch into RUN position.
3. Selection of the days or the blocks of days to be set:
It is possible to set each single day and the following blocks of days, pressing the button 1...7:
1-2-3-4-5 (from Monday to Friday)
6-7 (Saturday and Sunday)
1-2-3-4-5-6 (from Monday to Saturday)
1-2-3-4-5-6-7 (from Monday to Sunday)
4. Programming the switching times:
- Slide the switch into P position (the time indication on the display begins blinking, the bulb symbol and the number 1 of the first switching time are visualised).
Press down the button 1...7 until you set the day of the week or the block of days to be stored (an arrow corresponding to the selected day or many arrows if you set a block of days will appear on the display).
Press down the button h and then the button m to set the switching ON hour.
Press the button P to set the switching OFF hour (the time indication on the display begins blinking again, the symbol of the bulb disappears and the number 2 appears).
- Confirm the day with the button 1...7 and set the switching OFF hour with the buttons h and m.
Repeat these operations sequentially up to 8 switching ON and 8 switching OFF programs maximum, divided among the days you want to set.
At the end of programming slide the switches into RUN and AUTO position.
NOTE: During the non set days the air conditioner will be OFF.
5. SKIP mode:
The SKIP mode (program override) can be set only during the automatic mode of the timer (AUTO) + (RUN); by pressing the skip button x, the timer will be switched into the opposite functional mode (from ON to OFF and vice versa); this mode remains activated up to the following set program.
When the skip mode is activated the skip symbol appears on the display.
Pressing the SKIP button again will cancel the skip mode.
6. Visualisation, correction or deletion of the stored programs:
You can visualise the stored programs, during operation, sliding the switch into P position and pressing many times the P button.
In this way, you can modify the switching ON and OFF hours with the buttons h and m and delete one or more programs, pressing contemporary the buttons P and .
ELECTRONIC BUILT-IN-TIMER 24 HOURS
Technical data
- Programmed memory without power supply: 150 hours
-Display 24 hours
- Daily and weekly programming possibility
- 6 switching ON programs, 6 switching OFF programs
EG
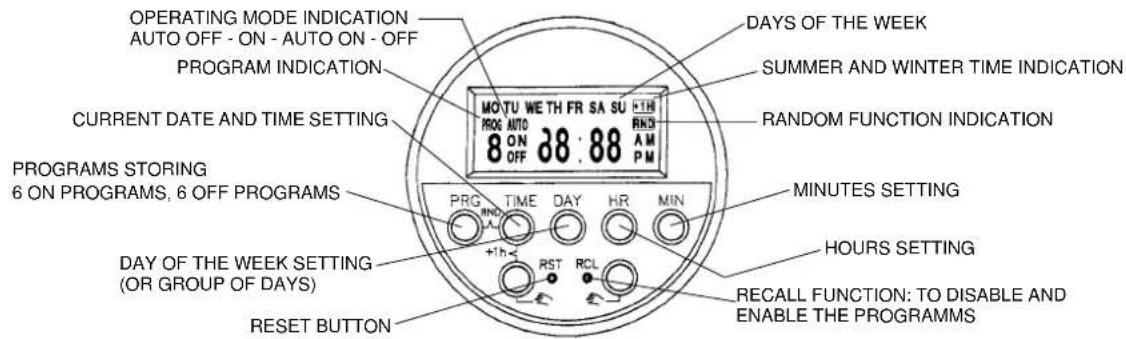
OPERATING INSTRUCTIONS FOR THE TIMER
1. Reset of the timer:
Press down the RST (reset) button with the tip of a pencil.
2. Setting the current day and time:
Keep pressed down the TIME button while you are setting the current time or correcting it; press down the DAY button to set the current day (shown by the english abbreviation on the display), press down the HR button to set the current hour, press down the MIN button to set the current minutes.
3. Selection of the days or the groups of days to be set:
Press down PRG (programming) button once: you will see "PROG 1 ON" on the display which indicates the switch-on time command to be entered.
Press the DAY button and the display will show you in sequence (each time you press if) the following groups of days or single days:
MO-TU-WE-TH-FR-SA-SU (group of days from Monday to Sunday)
MO-TU-WE-TH-FR-SA-SU (each day of the week, one by one)
MO-TU-WE-TH-FR (group of days from Monday to Friday)
SA-SU (Saturday and Sunday)
MO-TU-WE-TH-FR-SA (group of days from Monday to Saturday)
MO-WE-FR (Monday, Wednesday and Friday)
TU-TH-SA (Tuesday, Thursday and Saturday)
4. Programming the switching times:
After having pressed down the PRG button and then the DAY button until you set the day or the group of days to be stored (see section 3)
- Press down the HR button and then the MIN button to set the switching ON hour.
Press the PRG button again to set the switching OFF hour (you will see "PROG 1 OFF" on the display which indicates the switch-off time command to be entered).
- Confirm the day or group of days with the DAY button and set the switching OFF hour with the HR and MIN buttons.
Repeat these operations in sequence up to 6 switching ON and 6 switching OFF programs maximum, divided among the days you want to set.
At the end of programming press the TIME button to switch to the current time, otherwise these switching times will not be executed. (However, the display will be switched to current time mode automatically if no button is pressed within about 2 minutes).
NOTE: During the non set days the air conditioner will be OFF.
5. Visualise, correct, disable and enable the stored programs:
You can visualise the stored programs, during operation, pressing many times the PRG button.
In this way, you can modify the switching ON and OFF hours with the HR and MIN buttons and disable or enable one or more programs, pressing the RCL button (see RECALL function, section 6).
6. RECALL function:
The RECALL function allows you to disable a switching time of a program, without losing preset memory:
Press the PRG button until the preset memory you want to disable is present
Press RCL button, using the tip of a pencil (the set time disappears and the display shows 一 - 一 for the hours and minute, indicating that the specified memory location will not be executed).
Press the TIME button to switch to the current time
You can enable again the switching time, following the same procedure and pressing again the RCL button.
7. SUMMER/WINTER TIME change-over:
To change from winter time to summer time, keep TIME button pressed while pressing one of the button (the display will indicate the ^+ 1h sign and the current time will be advanced one hour).
To change from summer time to winter time simply perform the step before (the ^+ 1hr sign will disappear from the display and the current time will retard one hour).
8. RANDOM function:
The programmed memories you have preset will be executed in a random delay from 2 to 32 minutes, in case of current interruption, using this function.
- Keep the TIME button pressed while pressing PRG button (the display will indicate RND sign).
Press again the TIME and PRG button to cancel the random mode (the RND sign will disappear from the display).
9. Manual operation:
If you press one of the buttons, you can set the timer manually; the display will show in the sequence: AUTO OFF-ON-AUTO ON-OFF
AUTO: the air conditioner is controlled by the timer (it is possible to change from AUTO ON to AUTO OFF or vice versa, if you want to switch on or off the air conditioner without losing the control of the timer that will go on executing the other set programs).
ON: the air conditioner is permanently ON (use directly the ON/OFF push button of the air conditioner to switch it OFF)
OFF: the air conditioner is permanently OFF (it can't be switched ON neither with the ON/OFF push button of the air conditioner)