USER MANUAL RTN53 ASUS
RT-N53 Dual-band Wireless-N Router
Quick Start Guide
Q6780 / First Edition / July 2011
English 3
Espanol. 16
Francais. 29
Portugues do Brasil 42
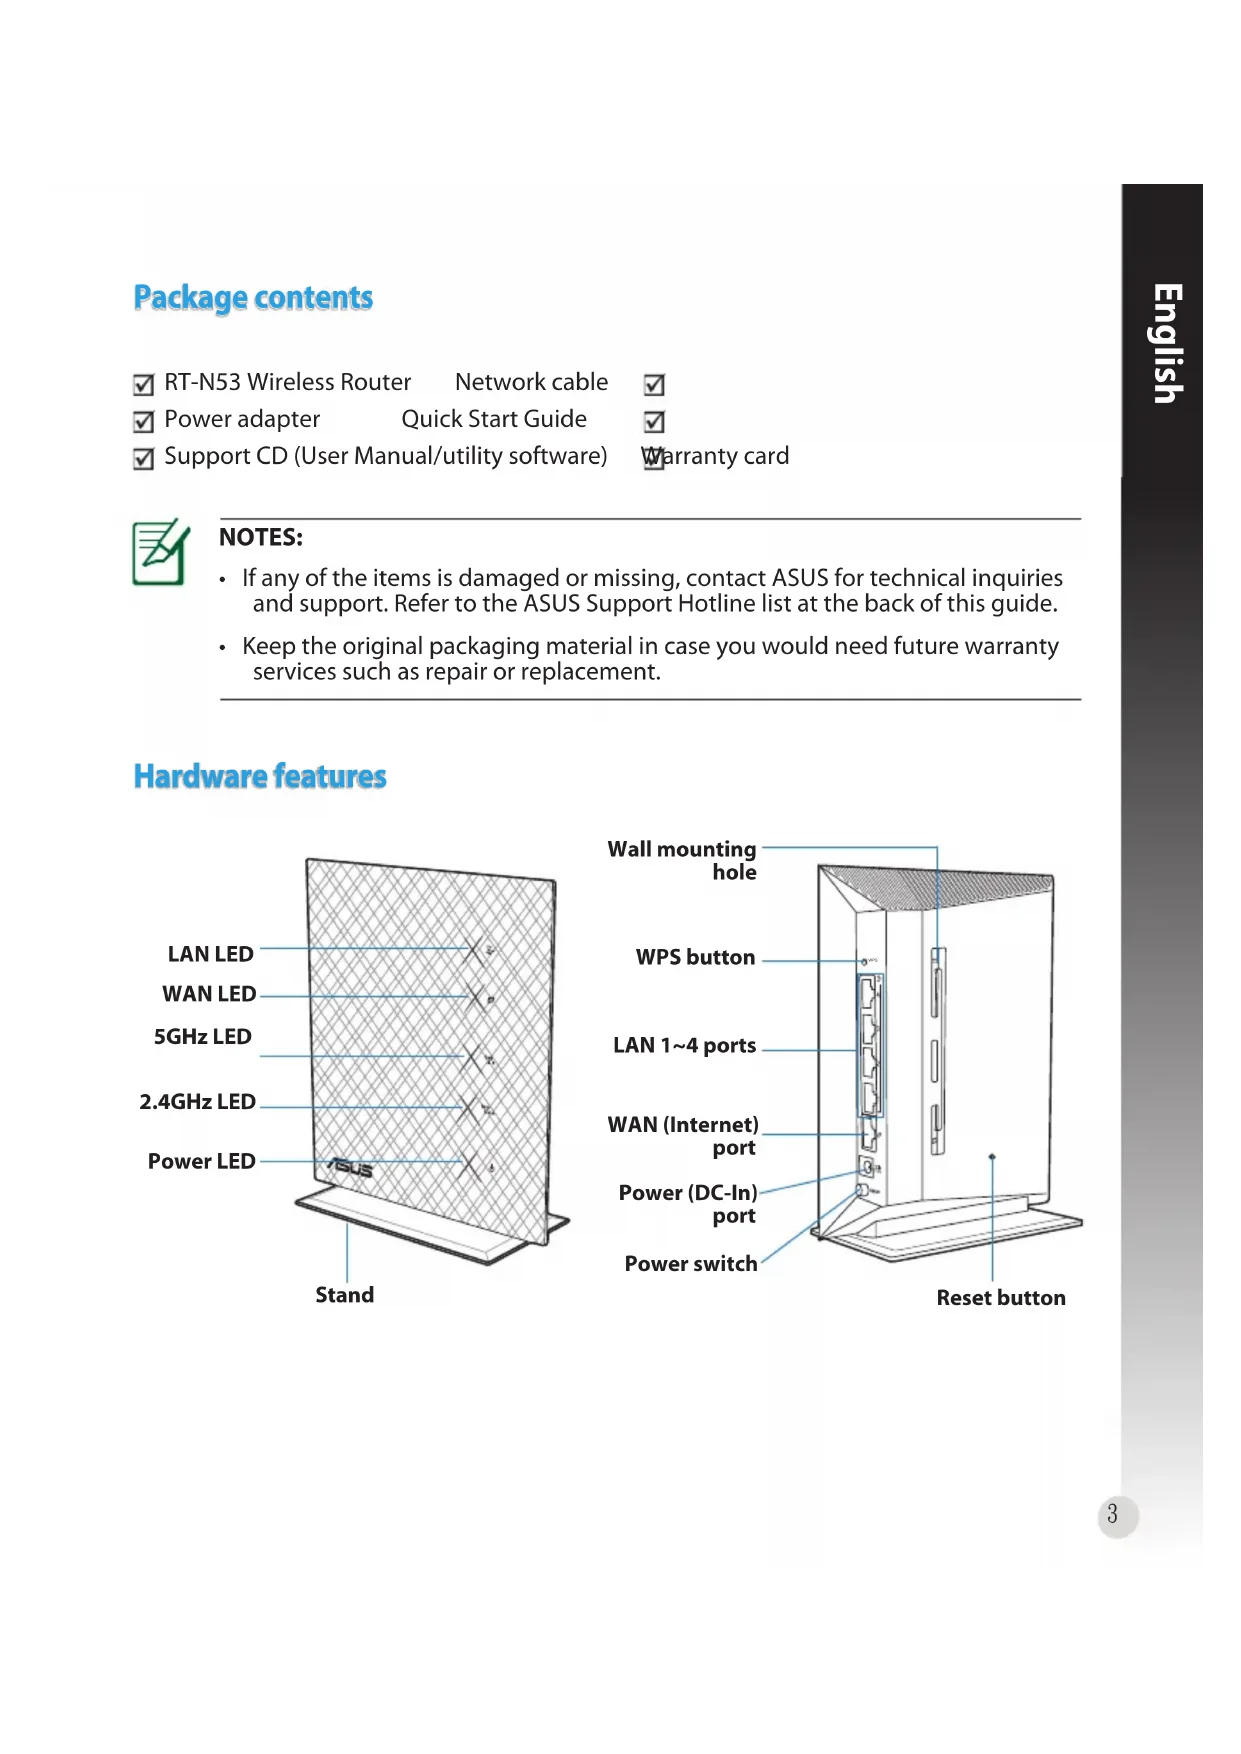
Package contents
RT-N53 Wireless Router
Network cable

Power adapter
Quick Start Guide

Support CD (User Manual/utility software)
Warranty card

NOTES:
- If any of the items is damaged or missing, contact ASUS for technical inquiries and support. Refer to the ASUS Support Hotline list at the back of this guide.
- Keep the original packaging material in case you would need future warranty services such as repair or replacement.
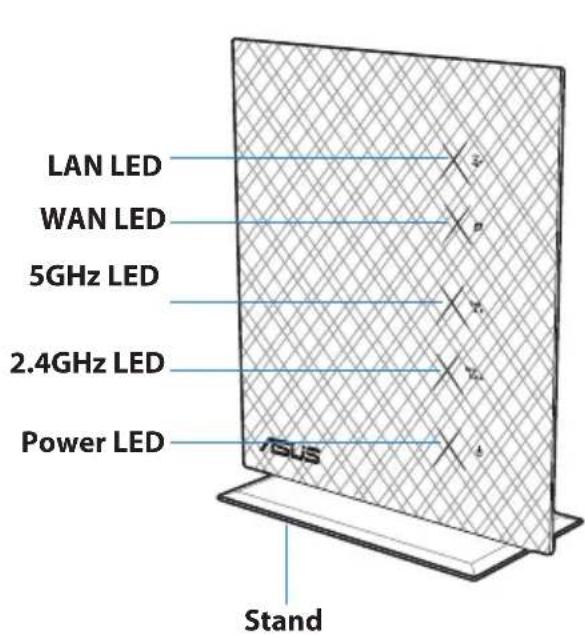
Hardware features
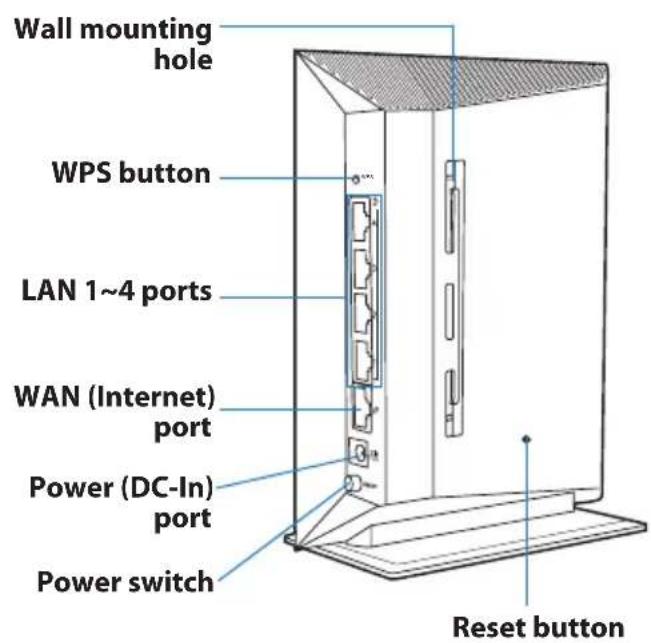
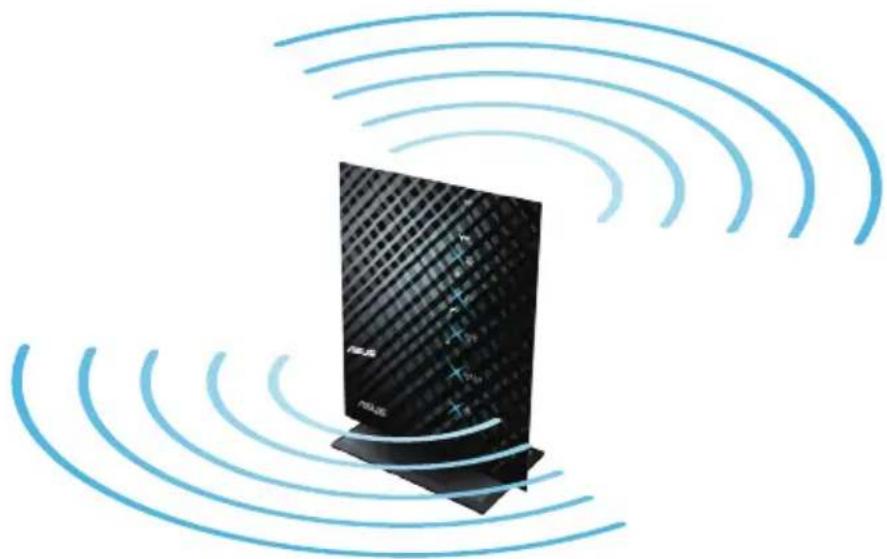
Positioning your wireless router
For the best wireless signal transmission between the wireless router and the network devices connected to it, ensure that you:
- Place the wireless router in a centralized area for a maximum wireless coverage for the network devices.
- Keep the device away from metal obstructions and away from direct sunlight.
- Keep the device away from 802.11g or 20MHz only Wi-Fi devices, 2.4GHz computer peripherals, Bluetooth devices, cordless phones, transformers, heavy-duty motors, fluorescent lights, microwave ovens, refrigerators, and other industrial equipment to prevent signal interference or loss.
- For the best front-to-rear coverage, place the wireless router in an upright position.
- For the best up-and-down coverage, place the wireless router in an inclined position.
- Always update to the latest firmware. Visit the ASUS website at http://www.asus.com to get the latest firmware updates.
Mounting options
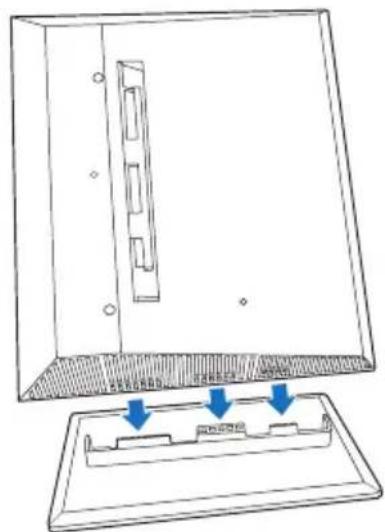
Mounting to the stand
- Locate the mounting holes at the bottom of the wireless router.
- Align and insert the stand's mounting hooks to the wireless router's mounting holes.
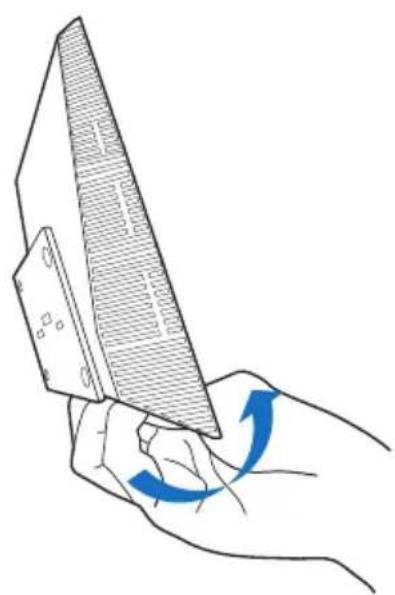
Dismount from the stand
- Hold the wireless router with one hand on the upside and the other hand under the stand, ensuring that the I/O ports facing you.
- Follow the direction of the arrow shown below to apply force and remove the stand.

NOTE:
It's normal if you hear squeaking while dismounting the RT-N53 from the stand.

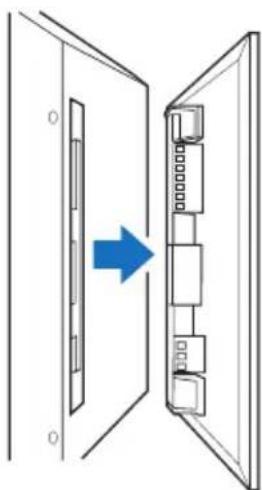
Mounting on the wall
- Locate the two holes on the stand and secure the stand to the wall with screws.

- Locate the mounting holes at the back of the wireless router.
- Align and insert the stand's mounting hooks to the wireless router's mounting holes.
Dismount from the wall
- Hold the edge of the front cover (near the I/O ports).
- Follow the direction of the arrow shown below to apply force and dismount the RT-N53.
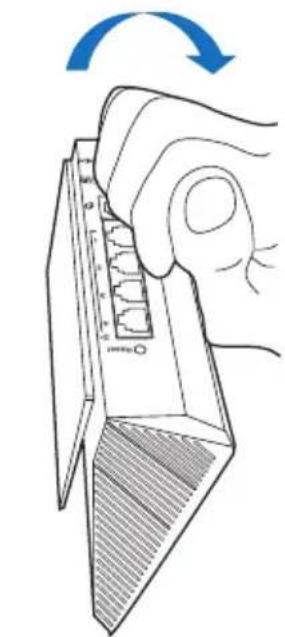
or
Before you proceed
- Unplug and disconnect the wires/cables from your existing modem setup and release your computer's outmoded IP address.
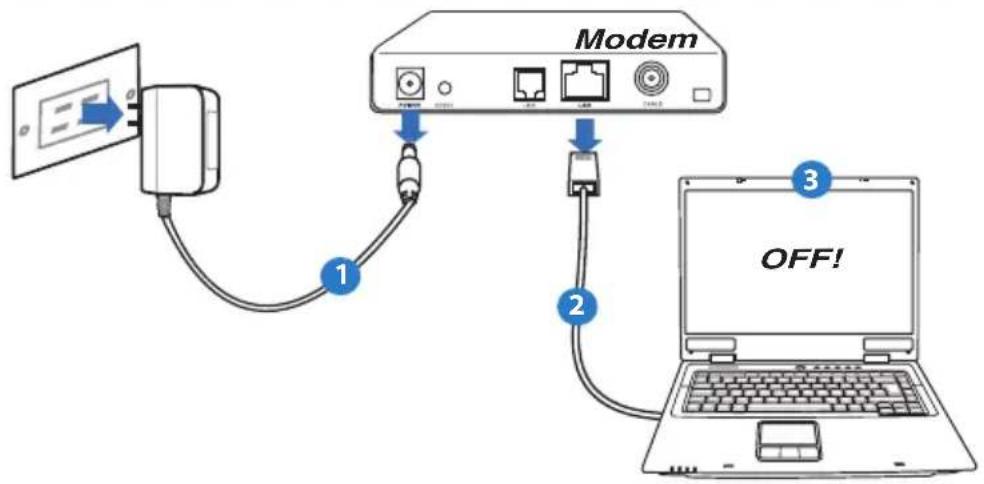
- Unplug the AC adapter from the power outlet and disconnect it from your cable/ADSL modem.
- Disconnect the network cable from your cable/ADSL modem.
- Reboot your computer (recommended).

WARNING! Before disconnecting the wires/cables, ensure that your cable/ADSL modem has been turned off for at least two minutes. If your modem has a backup battery, remove it as well.
2. Set up your wireless environment.
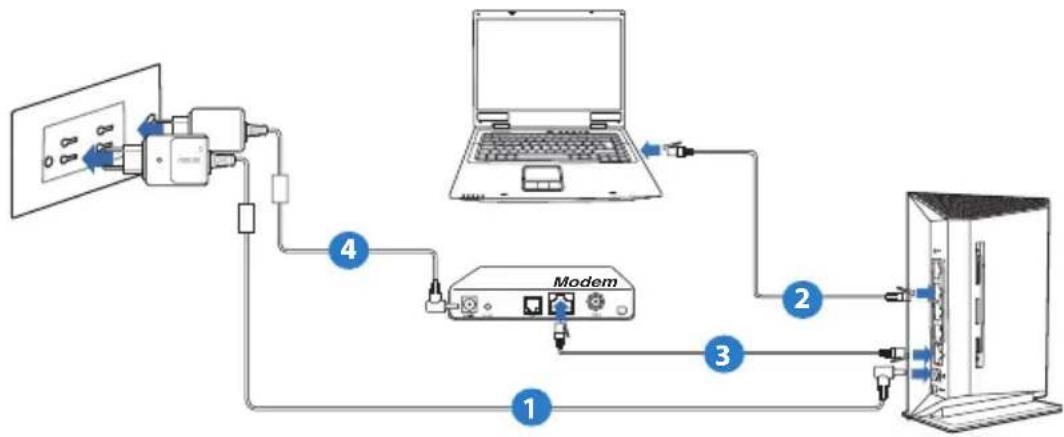
- Insert your wireless router's AC adapter to the DC-In port and plug it to a power outlet.
- Using the bundled network cable, connect your computer to your wireless router's LAN port.

IMPORTANT! Ensure that the WAN and LAN LEDs are blinking.
- Using another network cable, connect your modem to your wireless router's WAN port.
- Insert your modem's AC adapter to the DC-In port and plug it to a power outlet.
3. Disable some settings on your computer.
A. Disable the proxy server, if enabled.
B. Set the TCP/IP settings to automatically obtain an IP address.
C. Disable the dial-up connection, if enabled.

NOTE: For more details on disabling your computer settings, refer to Frequently Asked Questions (FAQs).
Getting started
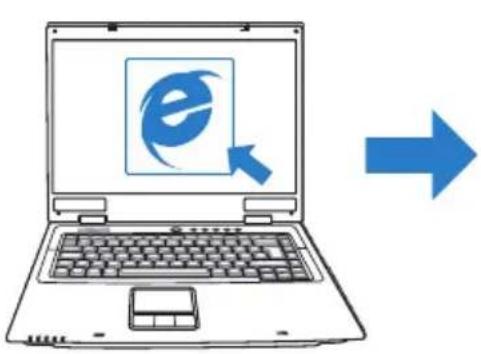
- Configure your wireless settings via the wireless router's web graphics user interface (web GUI).
a. Launch your web browser such as Internet Explorer, Firefox, Google Chrome, or Safari.

NOTE: If QIS does not launch automatically, follow these steps to manually launch QIS:
- On your web browser, key in http://192.168.1.1. Use the default username admin and password admin to log into the user interface.
- Click GO in the Quick Internet Setup field under Internet status in the Network Map page.
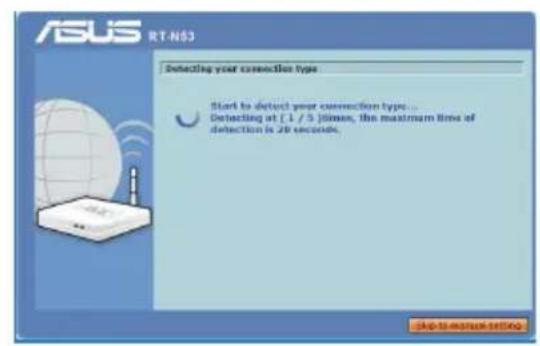
b. The wireless router's Quick Internet Setup (QIS) feature automatically detects if your ISP connection type is Dynamic IP, PPPoE, PPTP, L2TP, and Static IP. Key in the necessary information for your connection type.

NOTES:
- The auto-detection of your ISP connection type takes place when you configure the wireless router for the first time or when your wireless router is reset to its default settings.
- If QIS does not detect your Internet connection type, click Skip to manual setting and manually configure your connection settings.

IMPORTANT! Obtain the necessary information about your Internet connection type from your Internet Service Provider (ISP).
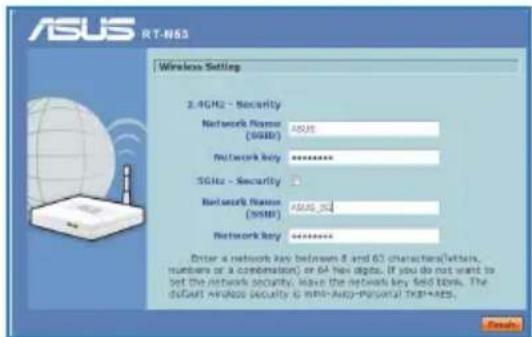
c. Assign the network name (SSID) and security key for your 2.4GHz and 5GHz wireless connection.
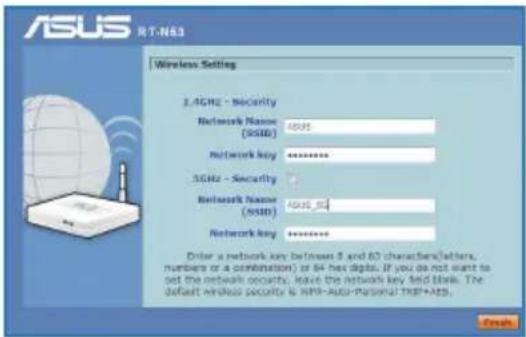

NOTE: You can assign a network name with up to 32 characters.
d. Internet connection and wireless setup are completed.
2. Write down your router's settings.

IMPORTANT! Keep this information in a secure location.
| 2.4GHz Wireless Settings |
| Network Name (SSID): | |
| Security Key: | |
| 5GHz Wireless Settings |
| Network Name (SSID): | |
| Security Key: | |
| Router Settings |
| Username: | |
| Password: | |
Frequently Asked Questions (FAQs)
After following the steps, I still cannot access the wireless router's web graphics user interface (web GUI) to configure the wireless router settings.
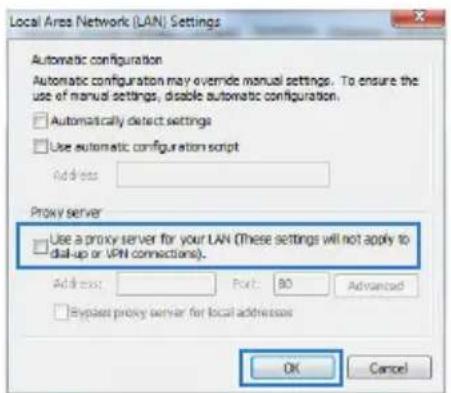
A. Disable the proxy server, if enabled.
Windows® 7
- Click Start > Internet Explorer to launch the web browser.
- Click Tools > Internet options > Connections tab > LAN settings.
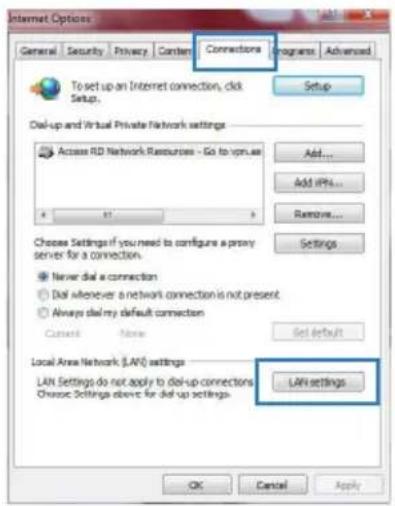
- From the Local Area Network (LAN) Settings screen, untick Use a proxy server for your LAN.
- Click OK when done.
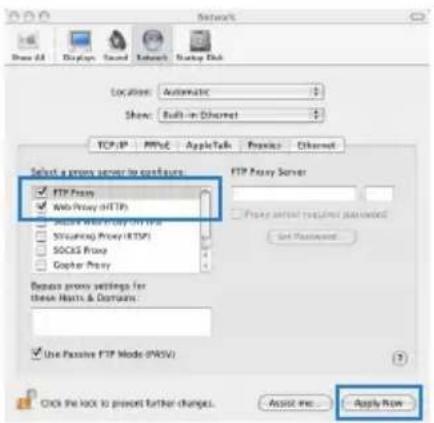
MACOS
- From your Safari browser, click Safari >Preferences > Advanced > Change Settings...
- From the Network screen, deselect FTP Proxy and Web Proxy (HTTP).
- Click Apply Now when done.

NOTE: Refer to your browser's help feature for details on disabling the proxy server.
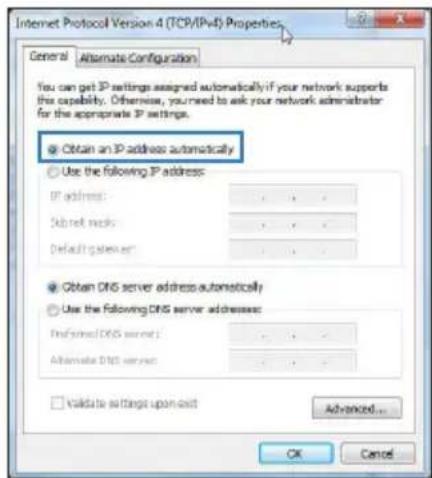
B. Set the TCP/IP settings to automatically obtain an IP address.
Windows® 7
- Click Start > Control Panel > Network and Internet > Network and Sharing Center > Manage network connections.
- Select Internet Protocol Version 4 (TCP/IPv4), then click Properties.
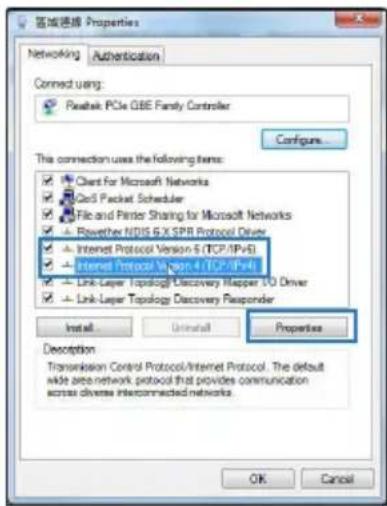
- To obtain the IPv4 IP settings automatically, tick Obtain an IP address automatically.
- Click OK when done.
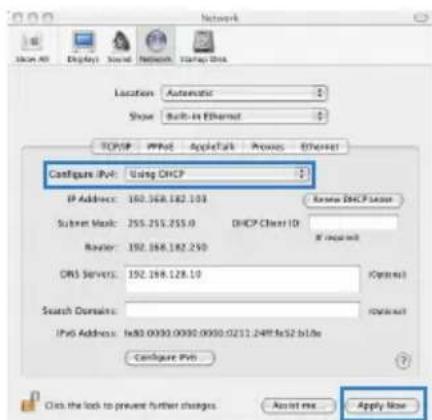
MAC OS
- Click the Apple icon located on the top left of your screen.
- Click System Preferences > Network > Configure...
- From the TCP/IP tab, select Using DHCP in the Configure IPv4 dropdown list.
- Click Apply Now when done.

NOTE: Refer to your operating system's help and support feature for details on configuring your computer's TCP/IP settings.
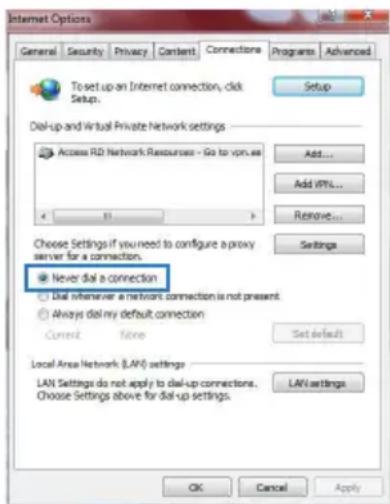
C. Disable the dial-up connection, if enabled.
Windows 7
- Click Start > Internet Explorer to launch the browser.
- Click Tools > Internet options > Connections tab.
- Tick Never dial a connection.
- Click OK when done.

NOTE: Refer to your browser's help feature for details on disabling the dial-up connection settings.
D. Close all running web browsers.
The client cannot establish a wireless connection with the router.
Out of Range:
- Put the router closer to the wireless client.
- Try to change the channel settings.
Authentication:
- Use wired connection to connect to the router.
- Check the wireless security settings.
- Press the Reset button at the rear panel for more than five seconds.
Cannot find the router:
- Press the Reset button at the rear panel for more than five seconds.
- Check the setting in the wireless adapter such as SSID and encryption settings.
Cannot access the Internet via wireless LAN adapter.
- Move the router closer to the wireless client.
- Check whether the wireless adapter is connected to the correct wireless router.
- Check whether the wireless channel in use conforms to the channels available in your country/area.
- Check the encryption settings.
- Check if the ADSL or Cable connection is correct.
- Retry using another Ethernet cable.
If the ADSL "LINK" light blinks continuously or stays off, Internet access is not possible - the Router is unable to establish a connection with the ADSL network.
- Ensure that all your cables are all properly connected.
- Disconnect the power cord from the ADSL or cable modem, wait a few minutes, then reconnect the cord.
- If the ADSL light continues to blink or stays OFF, contact your ADSL service provider.
Network name or encryption keys are forgotten.
- Try setting up the wired connection and configuring the wireless encryption again.
- Press the Reset button of the wireless router for more than five seconds.
Factory default settings:
| User name / Password:
admin / admin | IP address:
192.168.1.1 | SSID: OSUS |
- User Manual in the support CD
- Online FAQ site: http://support.asus.com/faq
- Technical Support site: http://support.asus.com/techserv
- Customer Hotline: Refer to the Support Hotline in this Quick Start Guide
| SUPPORT HOTLINE |
| Area Hotline Number Support | Languages | Availability |
| USA/Canada 1-812-282-2787 English Mon. to Fri. | 8:30-12:00am EST
(5:30am-9:00pm PST)
Sat. to Sun.
9:00am-6:00pm EST
(6:00am-3:00pm PST) |
| Brazil 4003 0988 (Capital) Portuguese Mon. to Fri. | 9:00am-18:00 |
| 0800 880 0988
(demais localidades) | | |

We, the undersigned,
| Manufacturer: | ASUSTEK COMPUTER INC. |
| Address, City: | No. 150, LTER D., PERTO U, TAPE E1 112, TAMAIAN R.O.C. |
| Country: | TAMAIAN |
| Authorized representative in Europe: | ASUS COMPUTER GmbH |
| Address, City: | HARKO RT STR. 21-23, 408SD RATINO EN |
| Country: | GERMANY |
declare the following apparatus:
| Produat name : | Dual-b and Vitrile co-N Pulsor |
| Model name : | RT-MSS |
conform with the essential requirements of the following directives:
2004/108/EC-EMC Directive
| EN 55022:2005+A1:2007 | EN 55022:1998+A1:2001+A2:2003 |
| EN 61000-3-2:2006 | EN 61000-3-3:2008 |
| EN 61000+2:2005 | EN 61000+3:2006+A1:2008 |
| EN 61000+4:2004 | EN 61000+6:2009 |
| EN 61000+5:2006 | EN 61000+11:2004 |
| EN 55013:2001+A1:2003+A2:2008 | EN 55020:2007 |
1999/5/EC-R &TTE Directive
| EN 300 328 V/1.7.1(2006-10) | EN 301 +39-1: V/1.2.1 (2008-04) |
| EN 301 508-2 V/2.2.1(2007-05) | EN 301 +39-17: V/2.1.1 (2009-05) |
| EN 301 893 V/1.5.1(2008-12) | EN 301 +39-2+1: V/1.4.1(2007-05) |
| EN 503 602001 | EN 302 326-2 V/1.2.2(2007-05) |
| EN 503 7112002 | EN 302 326-3 V/1.3.1(2007-05) |
| EN 523 112008 | EN 301 357-2 V/1.3.1(2006-05) |
| EN 503 852002 | |
2006.85/EC-LVD Directive
| EN 609-50-1:2001+A11:2004 | EN 60065-2002+A1:2005 |
| EN 609-50-1:2006 | EN 608-50-1:2009+A11:2009 |
2009/125/EC-ErP Directive
| Regulation (EC) No. 1275/2008
EN 62301:2005
Regulation (EC) No. 6+3/2009
EN 62301:2005 | Regulation (EC) No. 278/2009
EN 62301:2005 |
CE marking

(EC conifomity maring)
Position: CEO
Name: Jerry Shen
Declaration Date: Aug.5, 2011
Year to begin affixing CE marking:2011

Signature:
Notices
ASUS Recycling/Takeback Services
ASUS recycling and takeback programs come from our commitment to the highest standards for protecting our environment. We believe in providing solutions for you to be able to responsibly recycle our products, batteries, other components, as well as the packaging materials. Please go to http://csr.asus.com/english/Takeback.htm for the detailed recycling information in different regions.
REACH
Complying with the REACH (Registration, Evaluation, Authorisation, and Restriction of Chemicals) regulatory framework, we published the chemical substances in our products at ASUS REACH website at http://csr.asus.com/english/REACH.htm
Federal Communications Commission Statement
This equipment has been tested and found to comply with the limits for a Class B digital device, pursuant to Part 15 of the FCC Rules. These limits are designed to provide reasonable protection against harmful interference in a residential installation. This equipment generates, uses and can radiate radio frequency energy and, if not installed and used in accordance with the instructions, may cause harmful interference to radio communications. However, there is no guarantee that interference will not occur in a particular installation. If this equipment does cause harmful interference to radio or television reception, which can be determined by turning the equipment off and on, the user is encouraged to try to correct the interference by one of the following measures:
- Reorient or relocate the receiving antenna.
- Increase the separation between the equipment and receiver.
- Connect the equipment into an outlet on a circuit different from that to which the receiver is connected.
- Consult the dealer or an experienced radio/TV technician for help.
This device complies with Part 15 of the FCC Rules. Operation is subject to the following two conditions: (1) This device may not cause harmful interference, and (2) this device must accept any interference received, including interference that may cause undesired operation.
FCC Caution: Any changes or modifications not expressly approved by the party responsible for compliance could void the user's authority to operate this equipment.
For operation within 5.15 5.25GHz frequency range, it is restricted to indoor environment.
IEEE 802.11b or 802.11g operation of this product in the U.S.A. is firmware-limited to channels 1 through 11.
IMPORTANT NOTE:
FCC Radiation Exposure Statement:
This equipment complies with FCC radiation exposure limits set forth for an uncontrolled environment. This equipment should be installed and operated with minimum distance 20cm between the radiator & your body.
This transmitter must not be co-located or operating in conjunction with any other antenna or transmitter.

WARNING! The use of a shielded-type power cord is required in order to meet FCC emission limits and to prevent interference to the nearby radio and television reception. It is essential that only the supplied power cord be used. Use only shielded cables to connect I/O devices to this equipment. You are cautioned that changes or modifications not expressly approved by the party responsible for compliance could void your authority to operate the equipment.
(Reprinted from the Code of Federal Regulations #47, part 15.193, 1993. Washington DC: Office of the Federal Register, National Archives and Records Administration, U.S. Government Printing Office.)
The following items were completed and are considered relevant and sufficient:
Essential requirements as in [Article 3]
- Protection requirements for health and safety as in [Article 3.1a]
- Testing for electric safety according to [EN 60950]
- Protection requirements for electromagnetic compatibility in [Article 3.1b]
- Testing for electromagnetic compatibility in [EN 301 489-1] & [EN 301] & [EN 301 489-33]
- Effective use of the radio spectrum as in [Article 3.2]
- Radio test suites according to [EN 302 065]
CE Mark Warning
This is a Class B product, in a domestic environment, this product may cause radio interference, in which case the user may be required to take adequate measures.
Industry Canada statement:
This device complies with RSS-210 of the Industry Canada Rules. Operation is subject to the following two conditions: (1) This device may not cause harmful interference, and (2) this device must accept any interference received, including interference that may cause undesired operation.
Radiation Exposure Statement:
This equipment complies with IC radiation exposure limits set forth for an uncontrolled environment. This equipment should be installed and operated with minimum distance 20cm between the radiator & your body.
Caution:
The device for the band 5150-5250 MHz is only for indoor usage to reduce potential for harmful interference to co-channel mobile satellite systems.
High power radars are allocated as primary users (meaning they have priority) of 5250-5350 MHz and 5650-5850 MHz and these radars could cause interference and/or damage to LE-LAN devices.