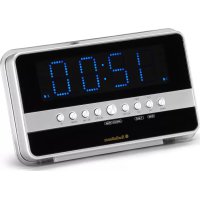
CL1482 - Radio AudioSonic - Free user manual and instructions
Find the device manual for free CL1482 AudioSonic in PDF.


| Product Type | Clock radio with alarm, AM/FM radio, infrared sensor, indoor temperature display |
| Brand | AudioSonic |
| Model | CL1482 |
| Power Supply | AC mains (power cord) with CR2032 3V backup battery (not included) |
| Radio Bands | AM and FM |
| Main Functions | Time and calendar setting, two alarms (AL1 and AL2) with radio or buzzer option, snooze function (9 minutes), sleep function (15 to 90 minutes), indoor temperature display, infrared sensor for display activation and sleep/snooze mode, brightness adjustment (low/high/auto off) |
| Approximate Dimensions | 20 x 12 x 8 cm |
| Approximate Weight | 0.5 kg |
| FM Antenna | Telescopic retractable antenna |
| AM Antenna | Built-in directional antenna |
| Backup Battery | CR2032 (3V) – not included |
| Display | LCD screen with backlight, adjustable brightness |
| Infrared Sensor | Allows activation of display, sleep mode, and snooze mode without touching buttons |
| Maintenance | Clean with a soft, dry cloth. Do not use abrasive products or solvents. Avoid moisture. |
| Safety | Do not expose to water or excessive humidity. Use only the supplied AC adapter. Observe battery polarity. |
| Common Spare Parts | CR2032 battery, FM antenna (reference on request) |
| Repairability | Reset button accessible at the back (with a pen). For any other intervention, contact after-sales service. |
| General Information | Compact clock radio suitable for bedside. Retains time and alarm settings in case of power outage (thanks to backup battery). |
Frequently Asked Questions - CL1482 AudioSonic
User questions about CL1482 AudioSonic
0 question about this device. Answer the ones you know or ask your own.
Ask a new question about this device
Download the instructions for your Radio in PDF format for free! Find your manual CL1482 - AudioSonic and take your electronic device back in hand. On this page are published all the documents necessary for the use of your device. CL1482 by AudioSonic.
USER MANUAL CL1482 AudioSonic
INSTRUCTION MANUAL
GEBRUIKERSHANDLEIDING
BEDIENUNGSANLEITUNG
MODE D'EMPLOI
MANUAL DE INSTRUÇÕES
ENGLISH
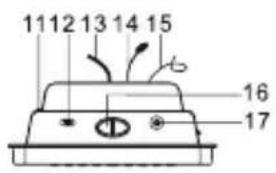
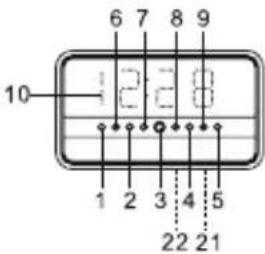
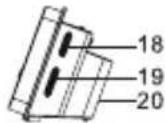
- AM/FM BAND BUTTON
-
| / Y-M-D / DST BUTTON
- SNOOZE / SLEEP BUTTON
- ALARM SET BUTTON
- ON / OFF BUTTON
- |<< / TEMP / °C/°F BUTTON
- ALARM 1 RADIO / BUZZ BUTTON
- ALARM 2 RADIO / BUZZ BUTTON
- MODE BUTTON
- LED DISPLAY
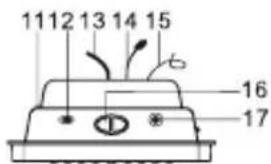
- RESET BUTTON
-
DISPLAY AUTO OFF / LOW / HIGH DIMMER
-
AC POWER CORD
- TEMPERATURE SENSOR (IN DOOR)
- FM ANTENNA
- INFRARED SENSOR
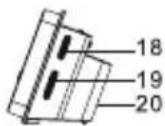
- LINE IN JACK
- VOLUME KNOB
- TUNE KNOB
- SPEAKER
- RATING LABEL
- BATTERY DOOR
POWERCONNECTION
Plug the AC power cord to a household outlet AC source. This unit is equipped with a battery back up system, it requires a 3V CR2032 flat lithium battery (not included). Insert the battery in the battery compartment, making certain that the positive and negative (+ and -) battery terminals are attached to the corresponding terminals on the plate in the battery compartment. If an AC power failure occurs, the clock automatically switches to the battery power supply, the clock and timer memory continue running. When the AC power resumes, the clock switches back to AC again.
1. TIMEANDCALENDARSETTING
A. Setting Time and Calendar – press mode set button (9) in normal mode and keep depress over 2 seconds to enter time set mode, after enter the setting mode, press mode set button (9) to change the mode cycle as follows.
Normal → Year → Month → Day → 12/24 H → RTC Hour → RTC Min → Normal
Action(duringdataadjustment):
- Press |<< / TEMP / °C / °F button (6) to adjust data backward
- Press >>| / Y-M-D / DST button (2) to adjust data forward
- Keep depress |<< or >>| button for 2 seconds to enable auto forward.
B. Setting Alarm 1 and Alarm 2 – press alarm set button (4) during normal mode and keep depress over 2 seconds to enter alarm set mode, after enter the setting mode, press alarm set button (4) to change the mode cycle as follows :
Normal → AL 1 Hour → AL 1 Min → AL 1 weekend Alarm → AL 2 Hour → AL 2 Min → AL 2 weekend alarm → Normal
Action(duringdataadjustment):
-Press|<</TEMP/°C/°Fbutton(6)toadjustdatabackward
-Press>>|Y-M-D/DSTbutton(2)toadjustdatabackward
- Keep depress |<< or >>| button for 2 seconds to enable auto forward.
2. SETTINGALARMOUTPUTANDALARMON/OFF
A. Change the alarm output
Press AL 1 (7) / AL 2 (8) button to Music Position to select wake up by Radio, set to Buzzer position to select wake up by Buzzer, set to Alarm off position to disable all alarm.
Select the Display Auto Off / Low / High dimmer switch (12) to the Auto off Mode. Alarm wake up the time display is auto turn on.
3. ALARMDURATIONANDSNOOZEFUNCTION
Alarm Duration – Buzzer alarm or radio alarm will continue output for 30 minutes if no key press, then it will stop automatically and wait for same alarm time on next day.
ActionforSnooze:
- During alarming, press Snooze / Sleep button (3) will enable snooze function, Buzzer alarm or Radio alarm will stop.
- Snooze interval is 9 minute (not include second offset)
- Snooze will continue unless press On / Off button (5) to alarm off of Buzzer alarm or Radio alarm stop automatically after 30 minutes.
- Select the Display Auto Off / Low / High dimmer switch (12) to the auto off mode. During alarming display auto turn on. Press Snooze / Sleep button (3) will enable snooze function, buzzer alarm or radio / display will stop & off.
4.CHANGEDISPLAYCONTENT
A. Press >>| / Y-M-D / DST button (2) during normal can switch to display YEAR / MONTH / DAY, after 5 seconds timeout and return back to display time.
B. Press |<</TEMP / °C / °F button (6) during normal can switch to display in door temperature, after 5 second timeout and return back to display time.
C. Press |<</TEMP / °C / °F button during normal can switch to display in door temperature and hold for 3 seconds change temperature unit °C / °F
5.SLEEPFUNCTION
During radio on mode, press Snooze / Sleep button (3) to turn on Sleep mode, the sleep time will keep flashing by 5 second, within 5 seconds and press Sleep button can change the duration from 90 min – 15 min. Press On/Off button (5) to cancel sleep function.
DST-Daylightsavingtime
Press >>| / Y-M-D / DST button and hold for 3 seconds to toggle on and off DST function. (For one hour summer&wintertimedifference)
RADIOOPERATION
- Press the On / Off button (5) to turn radio on.
- Select AM/FM band press the AM/FM band button (1).
- Select the station using the Tune knob (19).
- Turn the volume knob (18) to adjust volume as required.
- Press the On / Off button (5) to turn radio off.
Note:
- The AM band use an internal directional aerial, rotate the radio for best reception.
- Ensure that the FM antenna (15) is completely unrolled and extended for best FM reception.
RESET
- The reset button (11) is located on the back of unit. Use a ballpoint pen to press it whenever you change the batteries, or unit is not performing as expected. This will return all settings to default value, and you will lose any stored data (alarm and clock settings).
INFRAREDSENSORFUNCTION
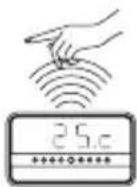
- The radio Off mode, infrared display in door temperature
- Hand on top of sensor (16) within 1 second to show the in door temperature
- The radio On mode, use the infrared sensor to turn sleep function On
- Hand on top of sensor (16) within 2 seconds to turn the sleep on, the word 'Slp' showing on the LED display. Sleep time from 10-90 minutes. (Refer to page 4 for require sleep time adjustment). Press On/Off button (5) to cancel sleep function.
- The alarm On mode, use the infrared sensor to turn snooze function On
- Hand on top of sensor (16) within 1 second snooze off for 9 minutes.
- The radio On mode, use the infrared display radio frequency and in door temperature
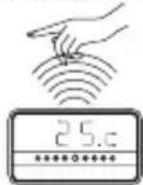
- Hand on top of sensor (16) within 1 second to show the indoor temperature
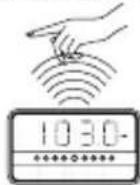
- Hand on top of sensor (16) within 1 second to show the radio frequency.
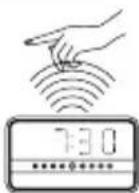
- The radio OFF mode, select the Display Auto Off / Low / High dimmer switch (12) to the auto off mode, the time display will automatically off in 15 seconds.
- Hand on top of sensor (16) within 1 second to turn the display on. - Press all key button to turn display on.
Instructions on environment protection
Do not dispose of this product in the usual household garbage at the end of its life cycle; hand it over at a collection point for the recycling of electrical and electronic appliances. The symbol on the product, the instructions for use or the packing will inform about the methods for disposal.
The materials are recyclable as mentioned in its marking. By recycling, material recycling or other forms of re-utilization of old appliances, you are making an important contribution to protect our environment.
Please inquire at the community administration for the authorized disposal location.
NEDERLANDS

- TOETS VOOR AM/FM-BAND
-
| / J-M-D / ZT-TOETS
- SLUIMER- / SLAAPTOETS
- INSTELTOETS ALARM
- AAN / UITTOETS
- |<< / TEMP / °C/°F TOETS
- ALARM 1 RADIO / ZOEMERTOETS
- ALARM 2 RADIO / ZOEMERTOETS
- STANDENKEUZETOETS
- LED-SCHERM
- HERINSTELTOETS
- DIMMER SCHERM AUTOM.
UIT/DONKER/HELDER
- NETSNOER
- TEMPERATUURSENSOR (IN KLEP)
- FM-ANTENNE
- INFRAROODSENSOR
- LIJN INGANG
- VOLUMEKNOP
- AFSTEMKNOF
- LUIDSPREKER
- CLASSIFICATIELABEL
- BATTERIJDEKSEL
VOEDINGSAANSLUITING
Normal → Year → Month → Day → 12/24 H → RTC Hour → RTC Min → Normal
1.AJUSTEDEALARMADESALIDAYALARMON/OFF
- ENGLISH
- POWERCONNECTION
- TIMEANDCALENDARSETTING
- Action(duringdataadjustment):
- SETTINGALARMOUTPUTANDALARMON/OFF
- ALARMDURATIONANDSNOOZEFUNCTION
- ActionforSnooze:
- 4.CHANGEDISPLAYCONTENT
- 5.SLEEPFUNCTION
- DST-Daylightsavingtime
- RADIOOPERATION
- Note:
- RESET
- INFRAREDSENSORFUNCTION
- Instructions on environment protection
- NEDERLANDS
- VOEDINGSAANSLUITING
- 1.AJUSTEDEALARMADESALIDAYALARMON/OFF
Brand : AudioSonic
Model : CL1482
Category : Radio