A-S500, AS500 - Audio Amplifier YAMAHA - Free user manual and instructions
Find the device manual for free A-S500, AS500 YAMAHA in PDF.

| Product Type | Stereo Integrated Amplifier |
| Brand | Yamaha |
| Model | A-S500 |
| Dimensions (W × H × D) | 435 × 151 × 382 mm |
| Weight | 10.9 kg |
| Power Supply | AC 220-240 V, 50/60 Hz (depending on model) |
| Power Consumption | 260 W (max 650 W on some models) |
| Output Power | 90 W + 90 W (8 Ω, 20 Hz-20 kHz, 0.019% THD) |
| Frequency Response | 0 ± 0.5 dB (20 Hz-20 kHz, CD DIRECT AMP ON) |
| Special Features | CD DIRECT AMP, PURE DIRECT, LOUDNESS, BASS/TREBLE/BALANCE controls |
| Inputs | PHONO (MM), CD, TUNER, LINE 1, LINE 2, LINE 3 |
| Outputs | Speakers A/B, headphones, REC (LINE 2/LINE 3), AC outlets |
| Impedance Selector | HIGH (6 Ω min.) / LOW (4 Ω min.) |
| Remote Control | Infrared, AA batteries included |
| Maintenance | Clean, dry cloth; no solvents |
| Safety | Do not expose to moisture, ensure good ventilation (30 cm above, 20 cm sides) |
| Supplied Accessories | Power cord, remote control, batteries (×2) |
| Warranty | 2 years (parts and labor) |
| Repairability | Contact an authorized Yamaha service center |
Frequently Asked Questions - A-S500, AS500 YAMAHA
User questions about A-S500, AS500 YAMAHA
0 question about this device. Answer the ones you know or ask your own.
Ask a new question about this device
Download the instructions for your Audio Amplifier in PDF format for free! Find your manual A-S500, AS500 - YAMAHA and take your electronic device back in hand. On this page are published all the documents necessary for the use of your device. A-S500, AS500 by YAMAHA.
USER MANUAL A-S500, AS500 YAMAHA
1 To assure the finest performance, please read this manual carefully. Keep it in a safe place for future reference.
2 Install this sound system in a well ventilated, cool, dry, clean place - away from direct sunlight, heat sources, vibration, dust, moisture, and/or cold. Allow ventilation space of at least 30cm (11-13/16 in) on the top, 20cm (7-7/8 in) on the left and right, and 20cm (7-7/8 in) on the back of this unit.
3 Locate this unit away from other electrical appliances, motors, or transformers to avoid humming sounds.
4 Do not expose this unit to sudden temperature changes from cold to hot, and do not locate this unit in an environment with high humidity (i.e. a room with a humidifier) to prevent condensation inside this unit, which may cause an electrical shock, fire, damage to this unit, and/or personal injury.
5 Avoid installing this unit where foreign objects may fall onto this unit and/or this unit may be exposed to liquid dripping or splashing. On the top of this unit, do not place:
- Other components, as they may cause damage and/or discoloration on the surface of this unit.
- Burning objects (i.e. candles), as they may cause fire, damage to this unit, and/or personal injury.
- Containers with liquid in them, as they may fall and liquid may cause electrical shock to the user and/or damage to this unit.
6 Do not cover this unit with a newspaper, tablecloth, curtain, etc. in order not to obstruct heat radiation. If the temperature inside this unit rises, it may cause fire, damage to this unit, and/or personal injury.
7 Do not plug in this unit to a wall outlet until all connections are complete.
8 Do not operate this unit upside-down. It may overheat, possibly causing damage.
9 Do not use force on switches, knobs and/or cords.
10 When disconnecting the power cable from the wall outlet, grasp the plug; do not pull the cable.
11 Do not clean this unit with chemical solvents; this might damage the finish. Use a clean, dry cloth.
12 Only voltage specified on this unit must be used. Using this unit with a higher voltage than specified is dangerous and may cause fire, damage to this unit, and/or personal injury. Yamaha will not be held responsible for any damage resulting from use of this unit with a voltage other than specified.
13 To prevent damage by lightning, keep the power cable disconnected from a wall outlet or the unit during a lightning storm.
14 Do not attempt to modify or fix this unit. Contact qualified Yamaha service personnel when any service is needed. The cabinet should never be opened for any reasons.
15 When not planning to use this unit for long periods of time (i.e. vacation), disconnect the AC power plug from the wall outlet.
16 Install this unit near the AC outlet and where the AC power plug can be reached easily.
17 Be sure to read the "TROUBLESHOOTING" section in the owner's manual on common operating errors before concluding that this unit is faulty.
18 Before moving this unit, press POWER to turn off this unit and then disconnect the AC power plug from the wall outlet.
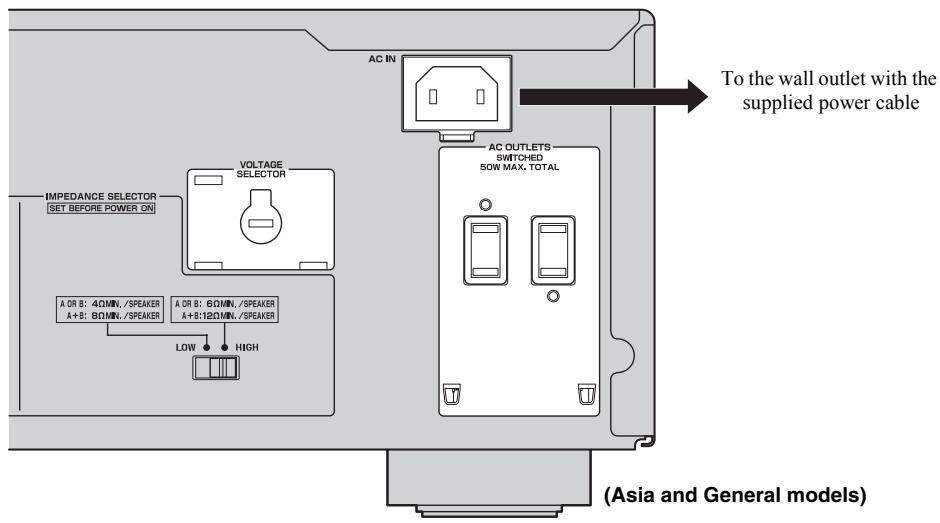
19 VOLTAGE SELECTOR (Asia and General models only) The VOLTAGE SELECTOR on the rear panel of this unit must be set for your local main voltage BEFORE plugging into the wall outlet. Voltages are: Asia model.. AC 220/230-240 V, 50 / 60Hz General model.. AC 110/120/220/230-240 V, 50 / 60Hz
20 The batteries shall not be exposed to excessive heat such as sunshine, fire or like.
21 Excessive sound pressure from earphones and headphones can cause hearing loss.
As long as this unit is connected to the wall outlet, it is not disconnected from the AC power source even if you turn off this unit by POWER or set it to the standby mode by button on the remote control.
WARNING
TO REDUCE THE RISK OF FIRE OR ELECTRIC SHOCK, DO NOT EXPOSE THIS UNIT TO RAIN OR MOISTURE.
This unit enters the standby mode when you press POWER inward to the ON position and then press button on the remote control. In this state, this unit is designed to consume a very small quantity of power.
CONTENTS
INTRODUCTION
FEATURES. 1
SUPPLIED ACCESSORIES. 1
CONTROLS AND FUNCTIONS 2
Front panel 2
Remote control. 3
Installing batteries in the remote control 4
Using the remote control 4
Rear panel 5
PREPARATION
CONNECTIONS 6
Connecting speakers and other components 6
Connecting the supplied power cable. 8
OPERATION
PLAYING AND RECORDING. 9
Playing a source 9
Adjusting the tonal quality 10
Recording a source 11
ADDITIONAL INFORMATION
TROUBLESHOOTING 12
SPECIFICATIONS. 15
About this manual
- indicates a tip for your operation.
- Some operations can be performed by using either the buttons on the main unit or on the remote control. In cases when the button names differ between the main unit and the remote control, the names of the buttons on the remote control are given in parentheses.
- This manual is printed prior to production. Design and specifications are subject to change in part as a result of improvements, etc. In case of differences between the manual and the product, the product has priority.
FEATURES
Highly dynamic power, low impedance drive capability
Continuously variable loudness control
CD DIRECT AMP switch used to obtain the highest sound quality of compact discs
PURE DIRECT switch used to reproduce the purest source sound
Minimum RMS output power
90W + 90W (8) , 0.019% THD, 20Hz to 20kHz
REC OUT selector independent of input source selection
Remote control capability
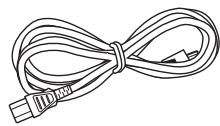
SUPPLIED ACCESSORIES
Please check that you received all of the following parts:
Remote control
Batteries (× 2) (AA, R6, UM-3)
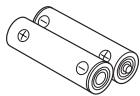
Power cable
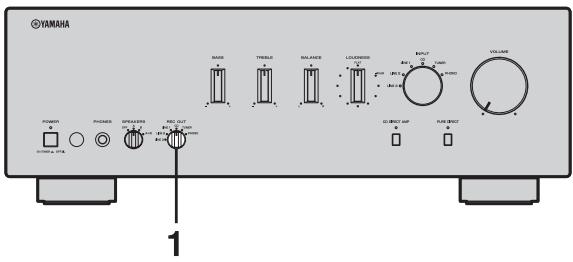
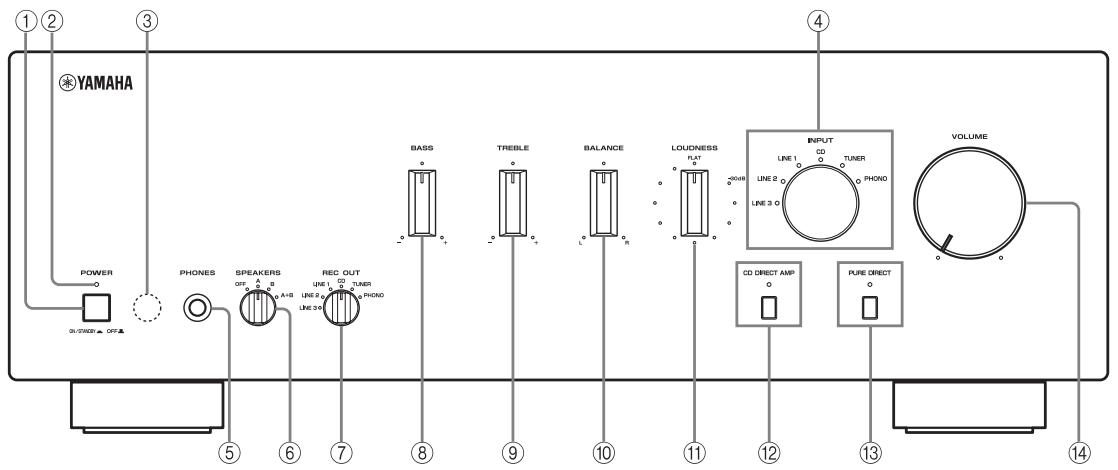
Front panel

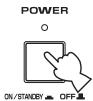
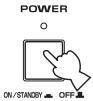
① POWER
Press inward to the ON position to turn on the power of this unit. You can set this unit to standby mode by pressing button on the remote control or turn on the unit by pressing I button on the remote control when this unit is turned on.
Press again to release it outward to the OFF position to turn off this unit.
Note
Even when this unit is turned off, this unit consumes a small amount of power to preserve the memory.
② POWER on indicator
Lights up as follows:
ON: Bright
Standby mode: Dark
OFF: Off
③ Remote control sensor
Receives signals from the remote control.
④ INPUT selector and indicators
Select the input source you want to listen to.
The input source indicators light up when the corresponding input sources are selected.
#
The input source names correspond to the names of the connection jacks on the rear panel.
Note
The input setting is retained for about 1 week after the power cable is unplugged.
⑤ PHONES jack
Connect headphones for private listening.
Rotate the SPEAKERS selector on the front panel to the OFF position to turn off the sound from the speakers.
⑥ SPEAKERS selector
Turn on or off the speaker set connected to the SPEAKERS A and/or B terminals on the rear panel each time the corresponding SPEAKERS selector is set to A, B or A + B
⑦ REC OUT selector
Select a source for recording independently of the INPUT selector setting, allowing you to record the selected source while listening to another source.
See page 11 for details.
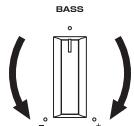
(8) BASS
Increase or decrease the low frequency response.
See page 10 for details.
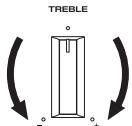
(9) TREBLE
Increase or decrease the high frequency response.
See page 10 for details.
10 BALANCE
Adjust the sound output balance of the left and right speakers. See page 10 for details.
⑪ LOUDNESS
Retain a full tonal range at any volume level.
See page 11 for details.
CD DIRECT AMP and indicator
Reproduces CD sound in the highest signal quality regardless of the INPUT selector setting.
The indicator above it lights up when this function is turned on. See page 10 for details.
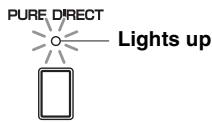
PURE DIRECT and indicator
Reproduces any input source in the purest sound possible.
The indicator above it lights up when this function is turned on. See page 10 for details.
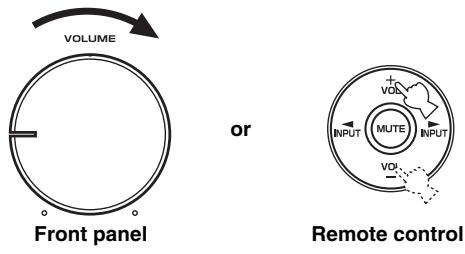
14 VOLUME
Control the sound output level.
This does not affect the REC level for recording.
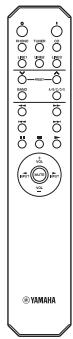
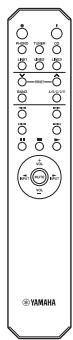
Remote control
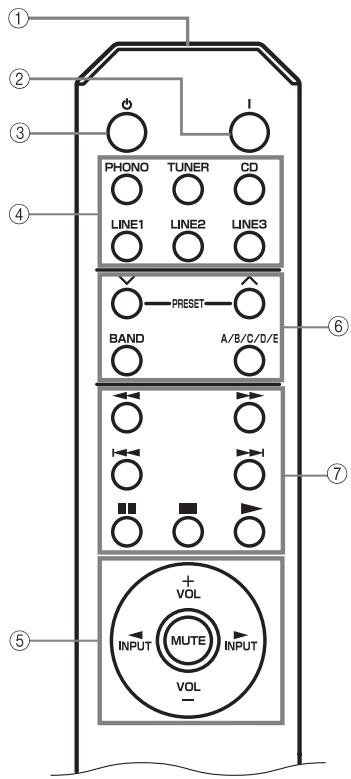
Controlling this unit
① Infrared signal transmitter
Sends signals to the main unit.
② POWER (1)
Turn on the unit.
Note
This button is operational only when POWER on the front panel is pressed inward to the ON position.
③ STANDBY (O)
Set this unit to the standby mode.
Notes
- This button is operational only when POWER on the front panel is pressed inward to the ON position.
- In the standby mode, this unit consumes a small amount of power in order to receive infrared-signals from the remote control.
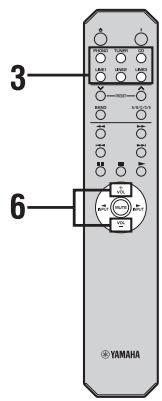
④ Input selector buttons
Select the input source you want to listen to.
⑤ Amplifier control buttons
INPUT<1/>
Select the input source you want to listen to.
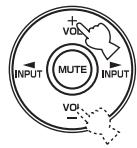
VOL +/-
Control the sound output level.
This does not affect the REC level for recording.
MUTE
Mute the sound output. Press MUTE again to resume the audio output. Selected Input indicator blinks when the sound is muted.
Controlling other components
The functions of the buttons to control other Yamaha components are the same as those of the corresponding buttons on those components. Refer to the components' instruction manuals for details.
Yamaha tuner control buttons
Control various functions of Yamaha tuner. Refer to the owner's manual of your tuner for details.
Note
Not all Yamaha tuners or functions can be controlled by this remote control.
⑦ Yamaha CD player control buttons
Control various functions of Yamaha CD player. Refer to the owner's manual of your CD player for details.
Note
Not all Yamaha CD players or functions can be controlled by this remote control.
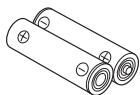
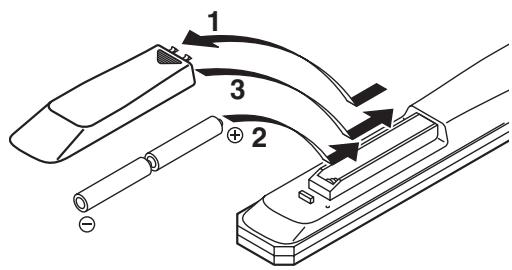
Installing batteries in the remote control
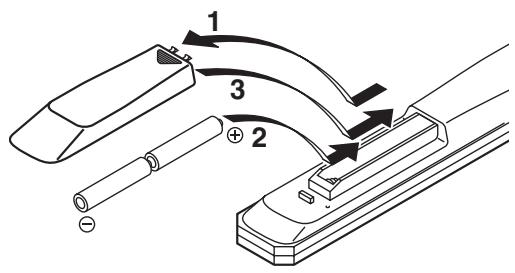
1 Press the part and slide the battery compartment cover off.
2 Insert two supplied batteries (AA, R6, UM-3) according to the polarity markings (+ and -) on the inside of the battery compartment.
3 Slide the cover back until it snaps into place.
Notes on batteries
- Change both batteries when the operation range of the remote control decreases.
- Use AA, R6, UM-3 batteries.
- Make sure that the polarities are correct. See the illustration inside the battery compartment.
- Remove the batteries if the remote control is not to be used for an extended period of time.
- Do not use old batteries together with new ones.
- Do not use different types of batteries (such as alkaline and manganese batteries) together. Read the packaging carefully as these different types of batteries may have the same shape and color.
- If the batteries have leaked, dispose of them immediately. Avoid touching the leaked material or letting it come into contact with clothing, etc. Clean the battery compartment thoroughly before installing new batteries.
- Do not throw away batteries with general house waste; dispose of them correctly in accordance with your local regulations.
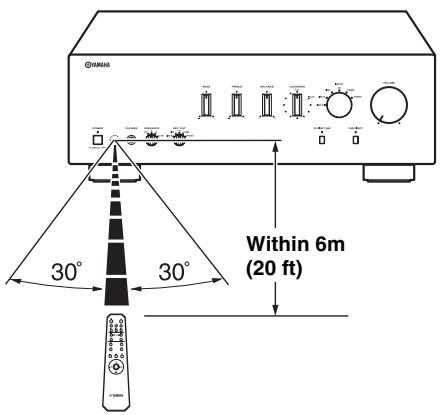
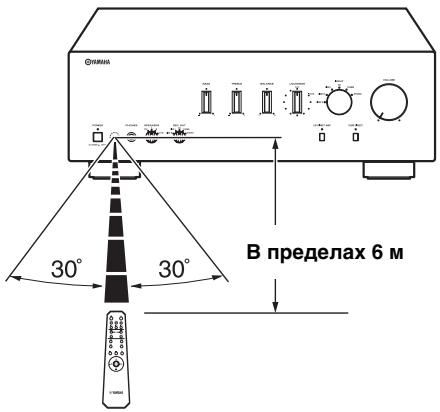
Using the remote control
The remote control transmits a directional infrared beam. Be sure to aim the remote control directly at the remote control sensor on the front panel of this unit during operation.
Handling the remote control
- The area between the remote control and this unit must be clear of large obstacles.
- Do not spill water or other liquids on the remote control.
- Do not drop the remote control.
-
Do not leave or store the remote control in the following types of conditions:
-
high humidity, such as near a bath
- high temperature, such as near a heater or a stove
extremely low temperatures -
dusty places
-
Do not expose the remote control sensor to strong lighting, in particular, an inverter type fluorescent lamp; otherwise, the remote control may not work properly. If necessary, position the unit away from direct lighting.
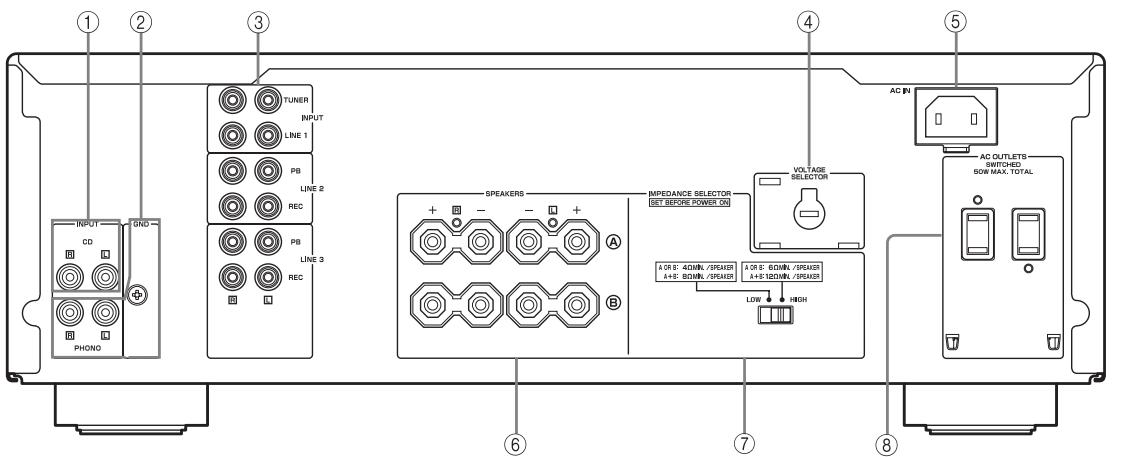
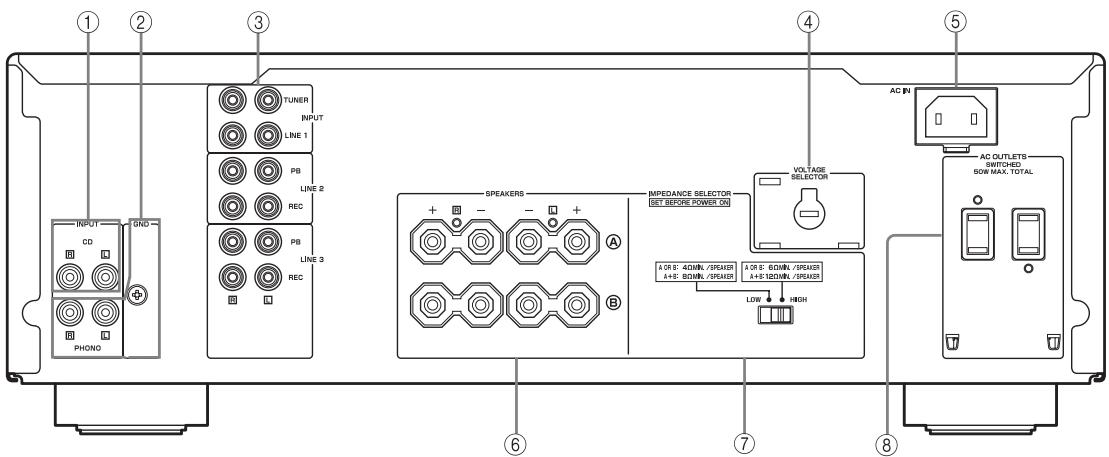
Rear panel
(Asia and General models)
① CD input jacks
Connect a CD player.
See page 6 for connection information.
② PHONO jacks and GND terminal
The PHONO jacks are designed to connect a turntable with an MM cartridge.
See page 6 for connection information.
③ Audio input/output jacks
Connect external components, such as a tuner, etc.
See page 6 for connection information.
④ VOLTAGE SELECTOR
(Asia and General models only)
The VOLTAGE SELECTOR must be set to your local main voltage before plugging the supplied power cable into the wall outlet.
See page 8 for details.
⑤ AC IN
Use to plug in the supplied power cable.
See page 8 for connection information.
⑥ SPEAKERS terminals
Connect one or two speaker sets.
See page 6 for connection information.
⑦ IMPEDANCE SELECTOR switch
See IMPEDANCE SELECTOR switch on this page.
⑧ AC OUTLET(S)
Use to supply power to your other audio/video components.
See page 8 for details.
■ IMPEDANCE SELECTOR switch
CAUTION
Do not change the IMPEDANCE SELECTOR switch while the power of this unit is turned on, as doing so may damage the unit.
If the unit fails to turn on, the IMPEDANCE SELECTOR switch may not be fully slid to either position. If this is the case, slide the switch all the way to either position when this unit's power supply is completely cut off.
Select the switch position (LOW or HIGH) according to the impedance of the speakers in your system.
| Switch position | Impedance level |
| HIGH | ·If you use one set (A or B), the impedance of the speaker must be 6 Ω or higher. ·If you use two sets (A and B) simultaneously, the impedance of each speaker must be 12 Ω or higher. (Except for U.S.A and Canada models) ·If you make bi-wire connections, the impedance of the speaker must be 6 Ω or higher. See page 7 for details. |
| LOW | ·If you use one set (A or B), the impedance of the speaker must be 4 Ω or higher. ·If you use two sets (A and B) simultaneously, the impedance of each speaker must be 8 Ω or higher. ·If you make bi-wire connections, the impedance of the speaker must be 4 Ω or higher. See page 7 for details. |
Connecting speakers and other components
CAUTION
- Do not connect this unit or other components to the main power until all connections between components are complete.
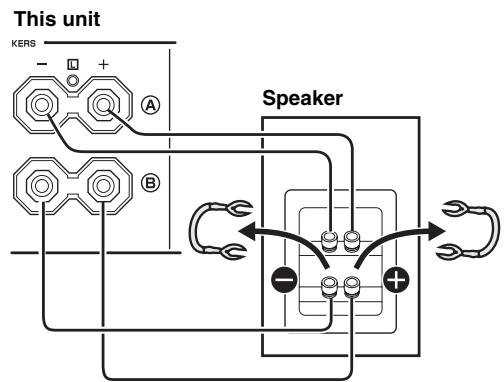
- All connections must be correct: L (left) to L, R (right) to R, “+” to “+” and “-” to “-”. If the connections are faulty, no sound will be heard from the speakers, and if the polarity of the speaker connections is incorrect, the sound will be unnatural and lack bass. Also, refer to the owner's manual for each of your components.
- Use RCA stereo cable for audio units except speakers.
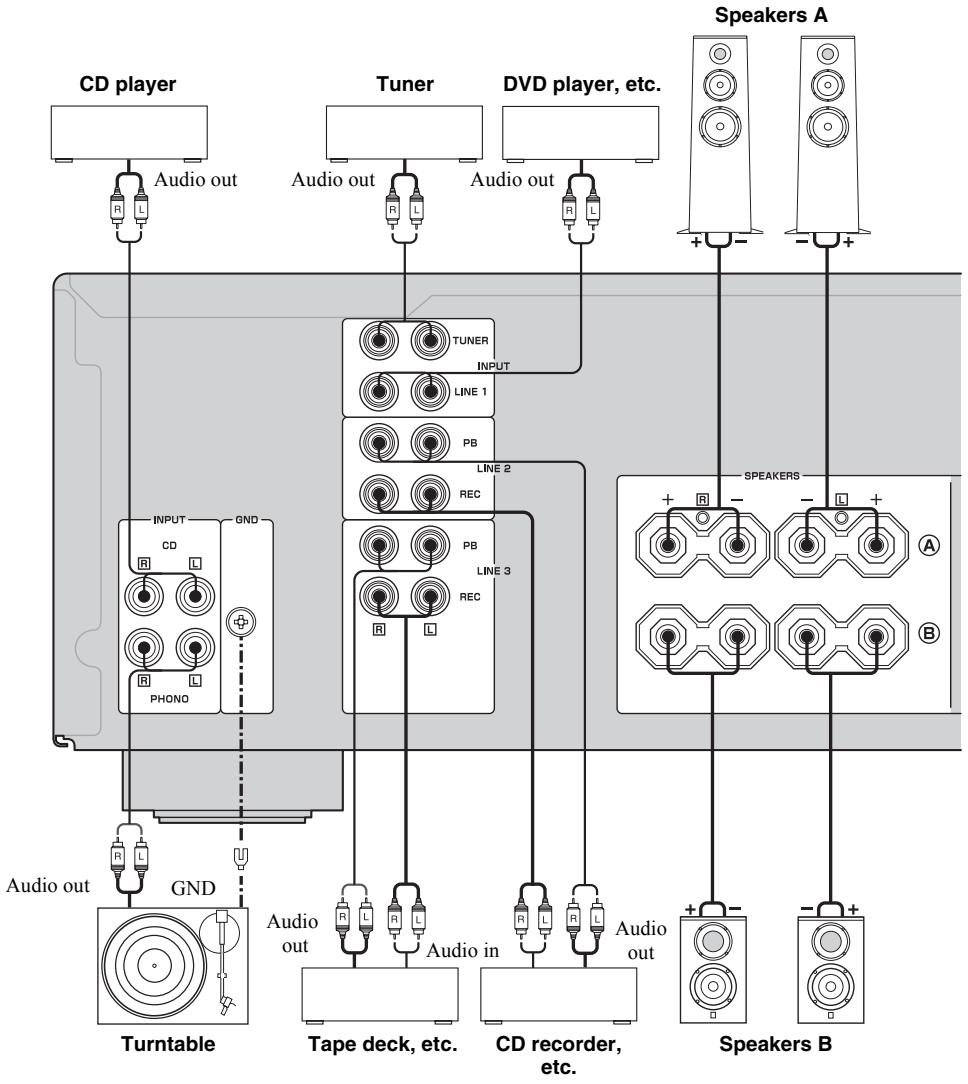

- The PHONO jacks are designed to connect a turntable with an MM cartridge.
- Connect your turntable to the GND terminal to reduce noise in the signal. However, you may hear less noise without the connection to the GND terminal for some turntable(s).
CAUTION
- The IMPEDANCE SELECTOR must be set to the appropriate position before connecting one or two speaker sets. See page 5 for details.
- Do not let the bare speaker wires touch each other or do not let them touch any metal part of this unit. This could damage this unit and/or the speakers.
- Do not connect this unit or other components to the main power until all connections between components are complete.
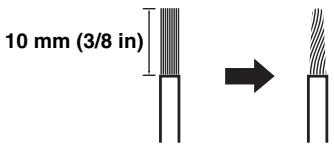
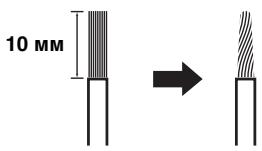
1 Remove approximately 10mm (3/8 in) of insulation from the end of each speaker cable and twist the exposed wires of the cable together to prevent short circuits.
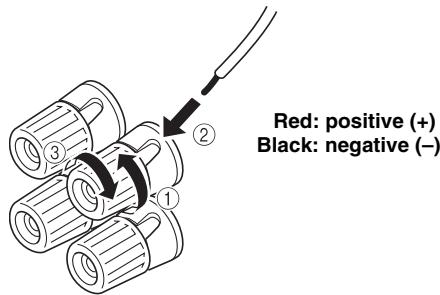
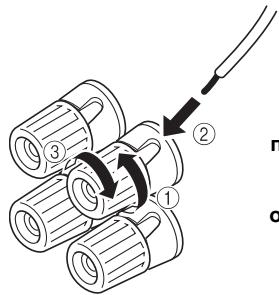
2 Connect the speaker cable.
① Unscrew the knob.
② Insert one bare wire into the hole in the side of each terminal.
③ Tighten the knob to secure the wire.
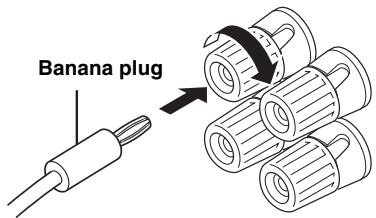
- Connecting via banana plug (Except for Asia, Korea, U.K. and Europe models)
First, tighten the knob and then insert the banana plug into the end of the corresponding terminal.
Note
One or two speaker sets can be connected to this unit.
Bi-wire connection
The bi-wire connection separates the woofer from the combined midrange and tweeter section. A bi-wire compatible speaker has four binding post terminals. These two sets of terminals allow the speaker to be split into two independent sections. With these connections, the mid and high frequency drivers are connected to one set of terminals and the low frequency driver to another set of terminals.
Connect the other speaker to the other set of terminals in the same way.
CAUTION
When making bi-wire connections, set the IMPEDANCE SELECTOR switch to HIGH or LOW depending on the impedance of your speakers:
6 Ω or higher: HIGH
4 Ω or higher: LOW
See page 5 for IMPEDANCE SELECTOR switch.
Note
When making bi-wire connections, remove the shorting bridges or cables on the speaker.

To use the bi-wire connections, switch the SPEAKERS selector to the A + B position.

Connecting the supplied power cable
VOLTAGE SELECTOR
(Asia and General models only)
The VOLTAGE SELECTOR on the rear panel of this unit must be set for your local main voltage BEFORE plugging the supplied power cable into the wall outlet.
Improper setting of the VOLTAGE SELECTOR may cause damage to this unit and create a potential fire hazard.
Rotate the VOLTAGE SELECTOR clockwise or counterclockwise to the correct position using a straight slot screwdriver.
Voltages are as follows:
Asia model.. AC 220/230-240 V, 50 / 60Hz
General model.....AC 110/120/220/230-240 V, 50 / 60Hz
AC OUTLET(S) (SWITCHED)
U.K. and Australia models 1 outlet
Korea model None
Other models 2 outlets
Use these outlets to connect the power cables from your other components to this unit. The power to the AC
OUTLET(S) is controlled by POWER on the front panel of this unit (or on the remote control). The outlet(s) supply power to any connected component whenever the power of this unit is turned on. For information on the maximum power (total power consumption of components), see "SPECIFICATIONS" on page 15.
Note
Do not connect components with a built-in amplifier, such as a subwoofer, etc.
- Connecting the supplied power cable
Plug the supplied power cable into the AC IN on the rear panel of this unit and then, plug the power cable into the wall outlet after all other connections are complete.
Playing a source
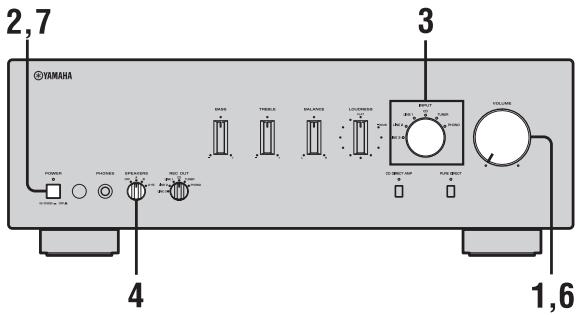
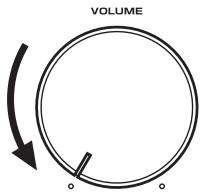
1 Rotate VOLUME on the front panel to the extreme counterclockwise position.
2 Press POWER on the front panel inward to the ON position.
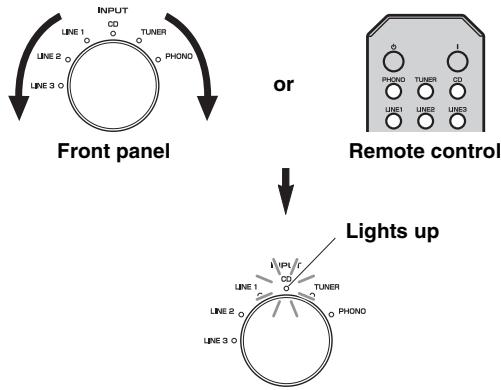
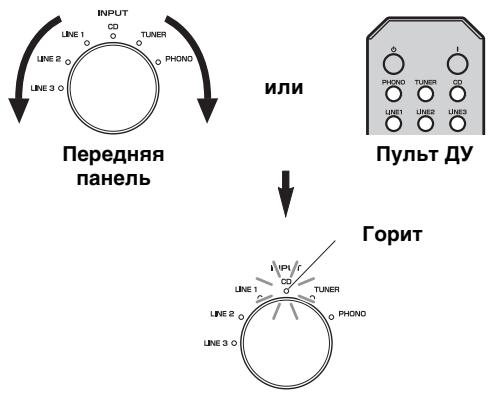
3 Rotate the INPUT selector on the front panel (or press one of the input selector buttons on the remote control) to select the input source you want to listen to.
The indicator of the selected input source lights up.
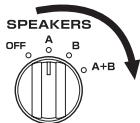
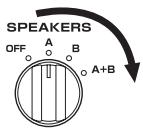
4 Rotate the SPEAKERS selector on the front panel to select SPEAKERS A, B or A+B.
Notes
- Switch the SPEAKERS selector to the A+B position when making bi-wire connections, or when using two sets of speakers simultaneously (A and B).
- If you listen with headphones, rotate the selector to the OFF position.
5 Play the source.
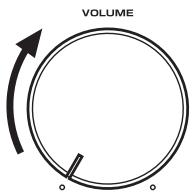
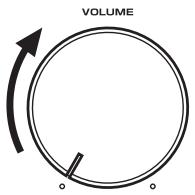
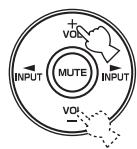
6 Rotate VOLUME on the front panel (or press VOL +/- on the remote control) to adjust the sound output level.
Front panel
or
Remote control
中
You can adjust the tonal quality by using the BASS, TREBLE, BALANCE and LOUDNESS controls, the CD DIRECT AMP switch, or the PURE DIRECT switch on the front panel.
7 After using, press POWER on the front panel to turn off the power.
中
You can turn on the power by pressing the I button on the remote control if you set this unit to standby mode by pressing the 口 button on the remote control.
Adjusting the tonal quality
Using the CD DIRECT AMP switch
Routes input signals directly to the power amplifier from your CD player, regardless of the INPUT selector setting. As a result, the input signals bypass the INPUT selector and the BASS, TREBLE, BALANCE and LOUDNESS controls. The gain is also adjusted appropriately for CD so that the purest possible sound is reproduced without any alterations to the CD signals.

Notes
- The BASS, TREBLE, BALANCE, LOUDNESS controls and INPUT selector do not function while the CD DIRECT AMP switch is turned on.
- Be sure to connect the CD player to the CD input jacks if you use the CD DIRECT AMP switch.
Using the PURE DIRECT switch
Routes input signals from your audio sources. As a result, the input signals bypass the BASS, TREBLE, BALANCE and LOUDNESS controls, thus eliminating any alterations to the audio signals to produce more direct and high-grade sound from all input sources.
Note
The BASS, TREBLE, BALANCE and LOUDNESS controls do not function while the PURE DIRECT switch is turned on.
Adjusting the BASS and TREBLE controls
Adjust the high and low frequency response. The center position produces a flat response.
BASS
When you feel a lack of bass sound, rotate clockwise to boost. When you feel excessive bass sound, rotate counterclockwise to suppress.
Control range: -10dB to +10dB (20 Hz)
TREBLE
When you feel a lack of treble sound, rotate clockwise to boost. When you feel excessive treble sound, rotate counterclockwise to suppress.
Control range: -10dB to +10dB (20 kHz)
Adjusting the BALANCE control
Adjust the sound output balance of the left and right speakers to compensate for sound imbalance caused by speaker locations or listening room conditions.

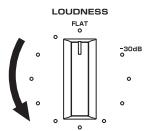
Adjusting the LOUDNESS control
Retain a full tonal range at any volume level, thus compensating for the human ears' loss of sensitivity to high and low-frequency ranges at low volume.
CAUTION
If the CD DIRECT AMP switch (or the PURE DIRECT switch) is turned on with the LOUDNESS control set at a certain level, the input signals bypass the loudness control, resulting in a sudden increase in the sound output level. To prevent your ears or the speakers from being damaged, be sure to press the CD DIRECT AMP switch (or the PURE DIRECT switch) AFTER lowering the sound output level or AFTER checking that the LOUDNESS control is properly set.
1 Set the LOUDNESS control to the FLAT position.
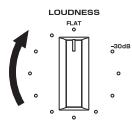
2 Rotate VOLUME on the front panel (or press VOL +/- on the remote control) to set the sound output level to the loudest listening level that you would listen to.
3 Rotate the LOUDNESS control until the desired volume is obtained.
中
After setting the LOUDNESS control, enjoy listening to music at your preferred volume level by controlling VOLUME. If the effect of the loudness control is too strong or weak, readjust the LOUDNESS control.
Recording a source
Notes
- The audio signals are not output via the LINE 2 REC or LINE 3 REC output jacks when LINE 2 or LINE 3 is selected with the REC OUT selector.
The audio signals are output at both LINE 2 REC and LINE 3 REC output jacks if you select PHONO, TUNER, CD or LINE 1. - The VOLUME, BASS, TREBLE, BALANCE and LOUDNESS controls and the CD DIRECT AMP switch (and the PURE DIRECT switch) have no effect on the source being recorded.
- Check the copyright laws in your country to record from records, CDs, radio, etc. Recording copyright-protected material may infringe on copyright laws.
1 Rotate the REC OUT selector on the front panel to select the source you want to record.
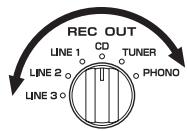
2 Play the source and begin recording on recording device connected to the REC output jacks (LINE 2 and/or LINE 3) on the rear panel. See page 6.
#
- If you select the same source with the INPUT selector as you select with the REC OUT selector, you can monitor the recording.
- To listen to another input source without affecting the current record out signal, select the source with the INPUT selector.
TROUBLESHOOTING
Refer to the chart below if this unit does not function properly. If the problem you are experiencing is not listed below or if the instructions below do not help, set this unit to the standby mode, disconnect the power cable, and contact the nearest authorized Yamaha dealer or service center.
General
| Problems | Possible Causes | Solutions | Refer to page |
| Pressing the POWER switch on the front panel does not turn on this unit. The POWER on indicator also does not light up. | The supplied power cable is not connected or the cable is not completely inserted. | Connect the supplied power cable firmly. | 8 |
| The POWER (I) button is pressed on the remote control while this unit is turned off. | Press POWER on the front panel to ON. | 3 | |
| There is a problem with the internal circuitries of this unit. | Disconnect the AC power cable and contact the nearest authorized Yamaha dealer or service center. If an unusual odor or noise is generated from the unit, do not turn on the power, disconnect the AC power cable, and contact a service center for repair. | — | |
| The power of this unit is turned off suddenly and the POWER on indicator blinks.This unit is turned off after several seconds of turning on, and the POWER on indicator blinks. | The speaker wires are touching each other or shorting out against the rear panel. | Connect the speaker cables properly and press the power button ON again. The VOLUME is decreased automatically and this unit is turned on after the INPUT indicator blinks for about 15 seconds.Confirm normal sound output from speakers by increasing the volume gradually, then you can operate this unit normally. | 7 |
| The speaker is a malfunction. | Replace the speaker set and press the power button ON again. The VOLUME is decreased automatically and this unit is turned on after the INPUT indicator blinks for about 15 seconds. Confirm normal sound output from speakers by increasing the volume gradually, then you can operate this unit normally. | — | |
| The protection circuitry has been activated because of excessive input or excessive volume level. | Rotate the VOLUME control on the front panel to decrease the volume level and then turn the power on again. | — | |
| The protection circuitry has been activated due to excessive internal temperature. | Allow about 30 minutes for the temperature inside this unit to decrease, rotate the VOLUME control on the front panel to lower the volume and then turn the power on again. Set the unit in a place where heat can readily dissipate from the unit. | — | |
| The IMPEDANCE SELECTOR switch may not be fully slid to either position. | Turn the power off and slide the IMPEDANCE SELECTOR switch all the way to either position. | 5 | |
| The impedance setting is incorrect. | Set the impedance to match your speakers. | 5 | |
| This unit has been exposed to a strong external electric shock (such as lightning or strong static electricity). | Set this unit to the standby mode, disconnect the power cable, plug it back in after 30 seconds, then use it normally. | — | |
| There is a problem with the internal circuitries of this unit. | Disconnect the AC power cable and contact the nearest authorized Yamaha dealer or service center. If an unusual odor or noise is generated from the unit, do not turn on the power, disconnect the AC power cable, and contact a service center for repair. | — | |
| No sound | Sound is muted. | Press MUTE on the remote control to resume the audio output. | 3 |
| Incorrect cable connections. | Connect the stereo cable for audio units and the speaker wires properly. If the problem persists, the cables may be defective. | 6 | |
| No appropriate input source has been selected. | Select an appropriate input source with the INPUT selector on the front panel (or one of the input selector buttons on the remote control). | 9 | |
| The SPEAKERS selector is not set properly. | Set the corresponding SPEAKERS selector to A, B or A+B position. | 9 | |
| The sound suddenly goes off. | The protection circuitry has been activated because of a short circuit, etc. | Check that the IMPEDANCE SELECTOR setting is correct. | 5 |
| Check that the speaker wires are not touching each other or shorting out against the rear panel of this unit, and then turn the power of this unit back on. | 6 | ||
| Only the speaker on one side can be heard. | Incorrect cable connections. | Connect the cables properly. If the problem persists, the cables may be defective. | 6 |
| Incorrect setting for the BALANCE control. | Set the BALANCE control to the appropriate position. | 10 | |
| There is a lack of bass and no ambience. | The + and - wires are connected in reverse at the amplifier or the speakers. | Connect the speaker wires to the correct + and - phase. | 6 |
| A “humming” sound can be heard. | Incorrect cable connections. | Connect the audio plugs firmly. If the problem persists, the cables may be defective. | 6 |
| No connection from the turntable to the GND terminal. | Make the GND connection between the turntable and this unit. | 6 | |
| The volume level is low while playing a record. | The turntable is connected to the jacks other than the PHONO jacks. | Connect the turntable to the PHONO jacks. | 6 |
| The record is being played on a turntable with an MC cartridge. | Use a turntable equipped with an MM cartridge. | — | |
| The volume level cannot be increased, or the sound is distorted. | The component connected to LINE 2 REC or LINE 3 REC terminals of this unit is turned off. | Turn on the power of the component. | — |
| The sound is degraded when listening with the headphones connected to the CD player or the tape deck connected to this unit. | The power of this unit is turned off, or this unit is set to the standby mode. | Turn on the power of this unit. | 9 |
| The sound level is low. | The LOUDNESS control is functioning. | Set the LOUDNESS control to the FLAT position. | 11 |
| The input source cannot be changed although the INPUT selector is rotated. | The CD DIRECT AMP switch is turned on. | Turn off the CD DIRECT AMP switch. | 10 |
| Using the BASS, TREBLE, BALANCE and LOUDNESS controls does not affect the tonal quality. | The CD DIRECT AMP switch or the PURE DIRECT switch is turned on. | The CD DIRECT AMP switch or the PURE DIRECT switch must be turned off to use those controls. | 10 |
Remote control
| Problems | Possible Causes | Solutions | Refer to page |
| The remote control does not work nor function properly. | The remote control is too far away or tilted too much. | The remote control will function within a maximum range of 6 m (20 ft) and no more than 30 degrees off-axis from the front panel. | 4 |
| Direct sunlight or lighting (from an inverter type of fluorescent lamp, etc.) is striking the remote control sensor of this unit. | Reposition this unit or lightning. | — | |
| The batteries are weak. | Replace all batteries. | 4 |
SPECIFICATIONS
POWER SECTION
Minimum RMS output power (8Ω, 20 Hz to 20 kHz, 0.019% THD) 90 W + 90 W (6Ω, 20 Hz to 20 kHz, 0.03% THD) 105 W + 105 W
- Dynamic Power (IHF) (8/6/4/2) 135/160/200/240 W
Maximum Output Power [Europe model only] (1 kHz, 0.7% THD, 4 Ω) 160 W [Asia and General models only] (JEITA) (1 kHz, 10% THD, 8/6 Ω) 140/160 W
- IEC Output Power [Europe model only] (1 kHz, 0.019% THD, 8 Ω) 105 W
Power Band Width (0.03% THD,50W,8) 10 Hz to 50kHz
Damping Factor 1 kHz, 8 Ω 240 or more
Maximum Input Signal PHONO (1 kHz, 0.019% THD) 70 mV or more CD, etc. (1 kHz, 0.019% THD) 2.2 V or more
Frequency Response CD,etc. (20Hz to 20kHz) 0±0.5 dB CD DIRECT AMP ON (10 Hz to 100 kHz) 0±1.0 dB
RIAA Equalization Deviation PHONO. ± 0.5 dB
Total Harmonic Distortion PHONO to OUT (REC) (20Hz to 20kHz,3V) 0.008% or less CD, etc. to SP OUT (20Hz to 20kHz,50W,8) 0.012% or less
- Signal to Noise Ratio (IHF-A Network)
PHONO (5 mV input shorted) 87 dB or more
CD DIRECT AMP (200 mV input shorted) 110 dB or more
- Residual Noise (IHF-A Network)
CD DIRECT AMP ON 30 μV
PURE DIRECT ON 110 μV
- Gain Tracking Error (0 to -60 dB) 2 dB or less
CONTROL SECTION
- Input Sensitivity/Input Impedance
PHONO 3.0 mV/47 kΩ
CD, etc. 200 mV/47 kΩ
Output Level/Output Impedance REC level 200 mV/1.2 kΩ or less - Headphone Output/Impedance
(Input 1 kHz, 200 mV, 8 Ω, 0.015% THD)
CD, etc. 0.47 V/470 Ω - Channel Separation CD, etc. (5.1 kΩ input shorted, 1/10 kHz) 65/50 dB or more
- Tone Control Characteristics
BASS
Boost/Cut (20 Hz) ±10 dB
Turnover Frequency 350 Hz
TREBLE
Boost/Cut (20 kHz) ±10 dB
Turnover Frequency 3.5 kHz
Continuous Loudness Control Attenuation (1 kHz) -30 dB
GENERAL
- Power Supply
[U.S.A. and Canada models] AC 120 V, 60 Hz
[Asia model] AC 220/230-240 V, 50/60 Hz
[General model] AC 110/120/220/230-240 V, 50/60 Hz
[China model] AC 220 V, 50 Hz
[Korea model] AC 220 V, 60 Hz
[Australia model] AC 240 V, 50 Hz
[U.K. and Europe models] AC 230 V, 50 Hz
Power Consumption [U.S.A. and Canada models] 260 W, 360 VA [Other models] 260 W - Standby Power Consumption 0.1 W
Maximum Power Consumption [General model only] (6 Ω, 1 kHz, 10% THD) 650 W - AC Outlets
[U.K. and Australia models] 1 (Total 100 W maximum)
[Korea model] None
[General model] 2 (Total 50 W maximum)
[Other models] 2 (Total 100 W maximum) - Dimensions (W × H × D) 435 × 151 × 382 mm (17-1/8 in × 5-15/16 in × 15-1/16 in)
Weight 10.9 kg (24 lbs.)
Specifications are subject to change without notice.
Limited Guarantee for European Economic Area (EEA) and Switzerland
Thank you for having chosen a Yamaha product. In the unlikely event that your Yamaha product needs guarantee service, please contact the dealer from whom it was purchased. If you experience any difficulty, please contact Yamaha representative office in your country. You can find full details on our website (http://www.yamaha-hifi.com/ or http://www.yamaha-uk.com/ for U.K. resident).
The product is guaranteed to be free from defects in workmanship or materials for a period of two years from the date of the original purchase. Yamaha undertakes, subject to the conditions listed below, to have the faulty product or any part(s) repaired, or replaced at Yamaha's discretion, without any charge for parts or labour. Yamaha reserves the right to replace a product with that of a similar kind and/or value and condition, where a model has been discontinued or is considered uneconomic to repair.
Conditions
- The original invoice or sales receipt (showing date of purchase, product code and dealer's name) MUST accompany the defective product, along with a statement detailing the fault. In the absence of this clear proof of purchase, Yamaha reserves the right to refuse to provide free of charge service and the product may be returned at the customer's expense.
- The product MUST have been purchased from an AUTHORISED Yamaha dealer within the European Economic Area (EEA) or Switzerland.
- The product must not have been the subject of any modifications or alterations, unless authorised in writing by Yamaha.
- The following are excluded from this guarantee:
a. Periodic maintenance and repair or replacement of parts due to normal wear and tear.
b. Damage resulting from:
(1) Repairs performed by the customer himself or by an unauthorised third party.
(2) Inadequate packaging or mishandling, when the product is in transit from the customer. Please note that it is the customer's responsibility to ensure the product is adequately packaged when returning the product for repair.
(3) Misuse, including but not limited to (a) failure to use the product for its normal purpose or in accordance with Yamaha's instructions on the proper use, maintenance and storage, and (b) installation or use of the product in a manner inconsistent with the technical or safety standards in force in the country where it is used.
(4) Accidents, lightning, water, fire, improper ventilation, battery leakage or any cause beyond Yamaha's control.
(5) Defects of the system into which this product is incorporated and/or incompatibility with third party products.
(6) Use of a product imported into the EEA and/or Switzerland, not by Yamaha, where that product does not conform to the technical or safety standards of the country of use and/or to the standard specification of a product sold by Yamaha in the EEA and/or Switzerland.
(7) Non AV (Audio Visual) related products. (Products subject to "Yamaha AV Guarantee Statement" are defined in our website at http://www.yamaha-hifi.com/ or http://www.yamaha-uk.com/ for U.K. resident.)
- Where the guarantee differs between the country of purchase and the country of use of the product, the guarantee of the country of use shall apply.
- Yamaha may not be held responsible for any losses or damages, whether direct, consequential or otherwise, save for the repair or replacement of the product.
- Please backup any custom settings or data, as Yamaha may not be held responsible for any alteration or loss to such settings or data.
- This guarantee does not affect the consumer's statutory rights under applicable national laws in force or the consumer's rights against the dealer arising from their sales/purchase contract.
Information for Users on Collection and Disposal of Old Equipment and Used Batteries


Pb
These symbols on the products, packaging, and/or accompanying documents mean that used electrical and electronic products and batteries should not be mixed with general household waste.
For proper treatment, recovery and recycling of old products and used batteries, please take them to applicable collection points, in accordance with your national legislation and the Directives 2002/96/EC and 2006/66/EC.
By disposing of these products and batteries correctly, you will help to save valuable resources and prevent any potential negative effects on human health and the environment which could otherwise arise from inappropriate waste handling.
For more information about collection and recycling of old products and batteries, please contact your local municipality, your waste disposal service or the point of sale where you purchased the items.
[Information on Disposal in other Countries outside the European Union]
These symbols are only valid in the European Union. If you wish to discard these items, please contact your local authorities or dealer and ask for the correct method of disposal.
Note for the battery symbol (bottom two symbol examples):
This symbol might be used in combination with a chemical symbol. In this case it complies with the requirement set by the Directive for the chemical involved.
ATTENTION : VEUILLEZ LIRE CE QUI SUIT AVANT D’UTILISER L’APPAREIL.
ACCESSIONES FOURNIS. 1
COMMANDES ET FONCTIONS 2
Panneau avant 2
Télécommande 3
Collegamento bi-wire
BO3MOXHbIe HENCIIPABHOCTN I CIOCObI INx YCTPAHEHnI.12
TEXHINUCKHEXAPAKTEPHCTUKN....15
06 3tOM pyKOBoDCTBe
- CHMBOJI -O6O3Haayet COBET IO IOBOy OIIepaIIH.
- HeKOTOpbIe OIIepaINHMOKHO BbIIIOJIHNb KaC IIOMOIIbIO KHOIIOK CaMOrO aIIIapTa, TaK I C IIOMOIIbIO KHOIIOK IIyJIbTa DY. EcJIN KHOIIKN Ha aIIIapAte N IIyJIbTe DY IMeIOT pa3HbIe Ha3BaHHa, To KHOIIKN IIyJIbTa DY IIpHBOJrTcBCKo6kax.
- ΘTo pyKOBoIcTBO OTIIeYaTaHO IIO IPOIN3BOIcTBA aIIIapata. KOHCTpyKIIuN H TeXHHueCHe xapaKTepHCTHKN MOrTy 6bITb YactHNo H3MeHeBb IB pe3yJIbTaTe yCOBepHHeCTBOBaHn N T.I. B cIyuae pa3JIuHm MeJdy pyKOBoIcTBOM H aIIIapaTOM IIpHOpHTe HMeet aIIIapat.
ФУHKЦИОHAЛьнBLE BO3MOЖHOCTN
BbICOKa JINHAMUeCKa MOIHCObTb, HN3Koe COIIPOTBJIeHHe
KoHTPOJIb rPOMKOCTHc IIaBHOpeRyJINpOBKOJ
ПереклочатJBCDIRECT AMPиJOJIb3yetcЯДЯ IOCTнжehmaKCHMaJIbHOrO KaueCTBa 3ByuHaHHaKOMIaKT-ДИСКOB
IpekeJIIOuateJIb PURE DIRECT HcIOJIb3yeTcraIIBAOIIpON3BeJeHnIy NcTOrO 3ByKa HcTOUHnKa
MHHMaJIbHoe cpeIHeKBAIpaTHYeCKoe BbIXOJHoe HApJxKeHne
90 B T + 90 B T (8 Ω), 0,019% OHN, 20 Γι - 20 κ Γι
CeJIeKTop RECOUT, He 3aBncaIIN OTo BbI6paHHO nCTOuHnKa BBOda
Bo3MOxHocTb HnCTaHnHOHHoY npabJeHHa
ПРИЛАЕМБIE ПИнадлжховп.
Y6eIHTecb HaJIINHII IpeuHcJIeHHbIX HnKe KOMHOHEHTOB:
Iybld
BaTapeiKn (x 2) (AA, R6, UM-3)
Ka6eJb PntTAHNA

Передна панень.
① POWER
HaKMMTe 3Tu KHOIIKy, YTO6bI yTOINITb ee B IIOLOJKeHne ON IIra BKJIIOUeHn IINTaHn aIIIapata. IaHHbI aIIIapAT MOxH0 IpeBecTH B peXHM OxHdAHHa, Haxab KHOIIKy 一 Ha IIyIbTe IY INI KHOIIKy | IIpr BKKJIIOUeHHOM aIIIapate. HaKMITE KHOIIKy eIe pa3, YTO6bI OTKaTb ee B IIOLOJKeHne OFF IIra BBIKJIIOUeHn aIIIapata.
PpmeaHne
Дажев ВьikluoyeHOM COCTOHHI NaHHbI aIIIapAT IOTpe6JIaTe He6OJIbIIOE KOJIyuceTBO 3HePHi, HeoXoIHMOe JIA CoXpaHEnHII IaMByTH.
Pnem CnHaJIOB OT NylbTa DY.
④ CenekTop u HndkaTOpbl INPUT
Bb6op HcToUHnKa BBOJa, KOTOpbI Tpe6yeTcA IIpOcJIyIaTb.
HnHKaTOpbI HcTOUHNKa BBOJa 3aTropaIoTc np H bI6ope COOTBeTCTBMyIOxN HcTOUHNKOB BBOJa.
#
Ha3BaHnI HCTOuHKnOB BBOda COOTBeTCTBYOT Ha3BaHnI M rHe3I IIOKJIIOUeHnHa 3aJHe IaHeJIn.
PnmeuHne
Hactpoika BVOda coxpaHaeTc oKOIo 1 HeJeJIn IocJIe OTKJIIOUeHnKa6eJIIITaHn.
⑤ THe3do PHONES
ПОДКЛЮЧЕНЕ HAYIHHKOB ДДЯ ИНДИВДУАЛьНО ПОСЛУПИVBAHЯ. ПовернITE сеJIЕКТOP SPEAKERS HA ПЕРДЕМ ПАHEЛ В ПОJOЖЕНDE OFF, YTOББI OTKЛIOUHTb 3BYK KOJIOHOK.
He n3MeHnE rypoBeHb REC 3aIINcH.
MUTE
Пиглушени 3Byka.Чтобь BOCCTaHOBHTB bIBOД 3Byka,нжмITE KHOIIKу MUTE eii pe3.
Bb6paHHbI HnDnKaTOp BXOJa MmraeT, KOrJa 3ByK OTKJIIOUeyH.
UnpaBHeHne DpyrMMKOMNoHEtAmN
Функин KHOIIOK yIpaBJIeHЯpyHMKOMIOHEHTamYamaha aHaJIOrnHbI ΦyHKIINMCOOTBeTCTByIOIIx KHOIIOK Ha 3THX KOMIOHeHTax.ПоДрбпссм.ИНСТPyКИИ ПО 3KcIIJyaTaIIINCOOTBeTCTByIOIIx KOMIOHeHTOB.
⑥ KhoNkynpabJIeHnTIOHePOMYamaha
YIpaBJIeHHe pa3JIHcHbIMn cyHKIIJMaM NTOhepa
YamaHa. IIOJpO6Hee cm.pyKOBOcTBO IOJIb3OBaTeJI
HCIOJIb3yEmoTTOhepa.
PpmeaHne
C IIOMOIbIy DAHHORO Iy MoKHO ynpabJIaTb He BcEMH cyHKIIaMn HTOHepaMn Yamaha.
⑦ KHONKYNypaBJIeHNAIPOINrPbIBaTeJeNEM KOMNaKT-ДИСКOBYamaha
YIpaBJIeHHe pa3JIHcHbIMN yHKUHMn IIOHNpBIBaTeJIA KOMIIaKT-JINCKOB Yamaha. IIOJPO6Hee cm. pyKOBOICIbTO IIOLJB3OBaTeJIA HcIOJIb3yEmOro IIOHNpBIBaTeJIA KOMIIaKT-JINCKOB.
PpmeuHne
C I NOMOIIbIy IaHHOrO IyIbTa IY M0KHO yIpaBJIaTb He BcEMH ΦyHKIIaMn H IIPOHRpIbAteJIaMn KOMIIaKT-DINCKOB Yamaha.
YcTaHOBka 6aTaapeeK B NyIbT dY
1 HaxmTe yactb KpbIshK oTceKa dJa 6aTaapeek n CdBnHbTe ee.
2 BcTaBbTe 2 npnlaeraembie 6aTapeeKn (AA, R6, UM-3) co6JIIOdAn nOJIrpHocTb (+N-), yKa3aHHyU Ha BVHTpeHHei Yactn OTceKa dJa 6aTapeek.
3 CdBnHbTe KpbIshky Ha MeCTo.
■Приимechиюбатеркax
-ПиумehbileHn pa6OчeroДиаIa3OHa IyJIbTa JY 3amEnTe o6e 6aTapeKn.
- IcnoJIb3yIte 6aTaapeKn AA, R6, UM-3.
Y6eINTEcB B CO6JIIOJEHHIIOJIaPHOCTH.CM. pHCyHOK Ha BHyTpeHHe Yactn OTceKa IJIa 6aTaapeek.
EcINIpyJIbT IY He 6yIeT HcIOJIb3OBAbTcB TeYeHHe IJIHTeJIbHO BpeMeHH, H3BJIeKInTe 6aTaapeKeKn.
He hCIOJIb3yIte cTapyU 6aTapeKy BMeCTe C HOBOJ.
He hIOJb3yIte pa3JIuHbIe TIIbI bIaTapeek OJHOBpeMeHHO (HaIprHMEp, IeJIoUHbIe H MapraHIIeBO-IIIHKOBbIe). BHNMaTeJIbHO O3HAKOMbTEcB c HnΦOpMaIneH Ha yIIaKOBKe, IIOCKOJIbKy 3TN pa3HbIe TNIbI bATapeek MOrYT HmEtb OINHaKOByO φOpMy IIbET.
- EcJIN 6aTapeKn IIpoTeKJIIn, HeMeJJIeHNO yTHJIN3HpyIte Hx. He IprHKacaiTecb K IIpoTeKIIeMy BeIeCTBy H He IOnIyscKaIte erO KOHTaKTa c OJeXJIOH T.I. IpePd YcTaHOBKOH HObIX 6aTapeek TIIaTeJIbHo OYNCHTe OTceK IJIa 6aTapeek.
He BbI6paBbIaBte 6aTaapeHKn BmEcTe C 6bITOBbIMN OTXOJaMn; yTHJIN3HpYNe HX B COOTBeTCTBHH C IIOCTaHOBJEHNMa MEcTHbIX opraHOB yIIpaBJIeHN.
IcnoJb3OBaHne npJbTa Dv
IyIbT Iy Ipeepaet HappaJIeHHbIe HHppaKpaChbIe JIyH.
Pn ynpabJIeHHN c IIOMOIbIy IIJbTa YO6BaTeJIbHO HaIIpaBJIaIe ero Ha ceHcop Y, paIOJOxKeHHbI Ha IIpeEHN IIaHeJIIn daHHoro aIIIapata.
O6paueHnecnyltomDy
MexyIyJIbTOMIYNaHHbIMaIIIapaTOM He J0JXHO6bITbIpeIIrTCTBn.
- I36eIaTe IonoIaHnH BOIbI IJIN IpyTHX KIIKOCTe H aIyIbT Y.
He poHnIte IyJIbT IY.
He xpaHHTe H He ocTbJIaIte IyIbT IY B cJeIyIOIIHX MeCTax:
-MecTax C BBICOKO BJIaXHOCTbIO, HApHmep, pIOM C BaHHoH
-MecTax C BbICOKO TEmIIepaTyPOH,HaIIpHMeP, pIOM C O6OrpeBaTeJIeM HJIN IIeYbIO
- BoyeHb XOJIOnIbIX MecTax
- B 3aIIbJIeHHbIX MecTAX
He IIOBepraTe ceHcOp IY BO3JeIcTBHIO apKOro CBeta, B YAcTHOcTH, BO3JeIcTBHIO cBeTa IyopeceHTbIX JAmII HHBepTOHOro TnIIa. To MoKeT IIpHBecTN K HeIIpaBbHbHO pa6Ote IIyJIbTa IY. IIpn HeO6XODMOCTn paCIOJIOKeTe aIInapaT Ha paccToHHN OT IIpyMOrO cBeTa.
3aДнЯ панель
(MoJIeI IJIa A3nn n o6uJe MoJIeI)
① BxoDhbIe rHe3da IJn npOnrpBbIbATEJI CD
IcIOJIb3yIOTcIJIIIOIKJIIOUeHnI IPOINrPbIBaTeJI KOMIIaKT-ⅡNCKOB.
HΦopMaunIO O IIOKJIIOueHHcM. Ha cTp.6.
③ THe3daaydnoOBXoOoB-/BbIXoOoB
NcIIOJIb3yIOTcI JIII IOIKJIOUeHnB HHeIIHHX KOMIOHOHTOB, HAIIpHMeP, TIOHepa I T.I.
(ToIbKO IJIa MoDeJIeN IJIa A3nn N o6uNX moDeJIeN)
IpeepIIIOKJIIOUeHnEMIprHlaeraMOrO Ka6eJIa IIHTaHHK p03eTke VOLTAGE SELECTOR Heo6XoIMHOpeKeJIOuHTb BIOJOxKeHne, COOTBeTCTByIOIue MeCTHOMy HAnPjaKeHHIO. IOnpO6Hee cm. cTp.8.
(5) AC IN
IcnoJIb3yUte IJIa IOKJIIOUeHnI IIpHJaRaemoro Ka6eJII\PHTAHnI.
INΦopMaIHHO O IIOKJIIOUeHNN cM. cTp.8.
⑥ Pa3beMbl SPEAKERS
CM. "IpepeKJIIOUaTeJIb IMPEDANCE SELECTOR" Ha 3ToI cTpaHnIe.
⑧ AC OUTLET(S)
IpaHna HpyHe ayNo-/BnEOKMOHEHTbI.
Poiop06Hee cm. ctp.8.
■ipepeknouateIb IMPEDANCE SELECTOR
NPEyPPEXDEHNE
He n3MeHnTe IIOJIOxEHn IepeKJIIOuTaTeJI IMPEDANCE SELECTOR IIpH BkJIIOUeHHOM IIHTaHH anIIapapa, IOCKOJIbKY 3TO MOKeT IIpNBecTH K eRO IIOBpeKJDeHHIO.
EcJH BKJIIOUHTb aIIIapaT He yJaetc, IpeKJIIOUaTeJIb IMPEDANCE SELECTOR MoKeT He IIIOJIHOCTbIO HaxOJIHTbcra B OINHom H3 IIIOJOKeHH. B 3TOM CJIyuae OTKJIIOUHTe aIIIapaT OT 3JIeKTpHuecKO cETn H IIIOJIHOCTbIO CIBINbTe IpeKJIIOUaTeJIb B KaKOE-JIbO H3 IIIOJOKeHH.
Bb6epHTe IIOJIOXeHHe IpeKJIIOuAteJIa (LOW HIIH HIGH) B 3aBHCIMOCTH OT COIPOITNBJIeHHN KOJOHOK CnCTeMBI.
| Положения пескlioател | Уровь соротинеця н�� |
| HIGH | · Пpr И сюлбзоваший одноугКOMПліектадиhamNKOB(A Или B) пОЛhoeсоportнвлісяп ДИнамиka ДОЛжносоставлій6 Θ Или 6ОЛee. · Пpr OДнOBремEHOM И сюлбзоваший DBухКOMПліекТВ(A ИВ) сОротнвлісяп КжДоуKOLOHКДОЛЖHOСOSTавлійt612 Θ Или 6ВIIII. (3a ИскЛючEHМ moJIeJoi IIЯ США И КанДы) · Пpr И сюлбзоваший DBуxП ropOBODHOrOПОДКЛюЧЕНЯ ПОЛhoeсоportнвлісяп ДИнамиka ДОЛжносostавлій6 Θ Или 6ОЛee. ПОДрбHee cm.ст.7. |
| LOW | · Пpr И сюлбзоваший OДноугКOMПліектадиhamNKOB(A Или B) пОЛhoeсоportнвлісяп ДИнамиka ДОЛжносostавлій4 Θ Или 6ОЛee. · Пpr OДнOBремEHOM И сюлбзоваший DBуx KomПліекТВ(A ИВ)сОрOTнвлісяп КжДоуKOLOHКДОЛЖHOСOSTавлійt68 Θ Или 6ВIIII. · Пpr И сюлбзоваший DBуxП ropOBODHOrOПОДКЛючEHМпОЛhoeсоportнвлісяп ДИнамиka ДОЛжносostавлій6 Θ Или 6ОЛee. ПОДрбHee cm.ст.7. |
CoeDInHeHne KOJOhOK u dpyrnx KOMNoHeTOb
PNEyPPEXDEHNE
He IIOIcoeINHnIte 3OT aIIIapat HJN dpyTne KOMIOHEHTbIK HCTOuHHky FJIaBHORO IIHTaHH, IOKa He 6yUT 3aBepIIeHb BCE COeINHHeHNa KOMIOHEHTOB.
Bce coeINHeHnI IOJIKbI 6bIT IbpaBbIbHbIM: L (JeBbI) K L, R (IIpaBbI) K R, “+” K “+” n “-” K “-”. EcJIN coeINHeHnB bIIIOJIHeHb I HeHaJIeXaIIHM O6pa3OM, I3 KOJOHOK He 6yIDet BBIOJNTbcr 3Byk, a ecJIN He co6JIIOJEHa IOJIAPHOCTb KoJOHOK, 3Byk 6yIDet HeecTeCTBeHHbIM C IOHNKeHHbIM ypOBHEm HnKHX YacTOT. KpOme TOrO, cM. pyKOBOJCTBO IOJIb3OBAteJIa KaKJIOTO H3 KOMIIHOHETOB.
- IcnoJb3yIte cTepeofoHNueckn Ka6eJIb RCA IIJa aYIOKOMIOHOHTOB, 3a HCKJIIOUHHeM KOJOHOK.
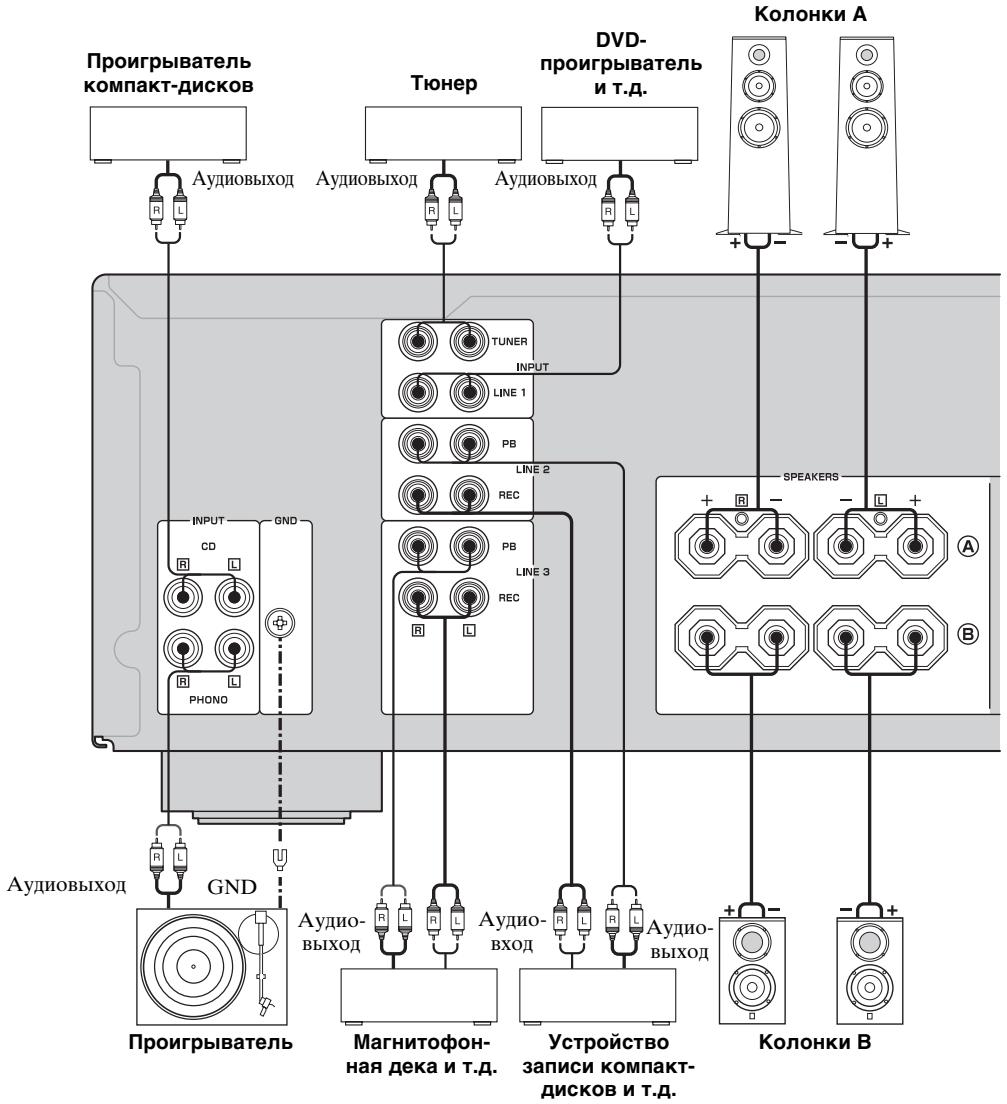
- THe3da PHONO IpeHa3HaueHbI IJII IOKIIIOUeHnI IPOINrPBbATEJcO 3ByKoCHMaIOSeI RoJIOBkoM MM.
IIOJIcoeIHHTe IPOHrPbIBaTeJIb K pa3bemy GND IIJy UMeHbIIeHHN IIYMOB cHHaJa. OJHaKo IIpH NcIIOBaHHN HeKOtOpbIX IPOHrPbIBaTeJIe 3ByK 6yET BbIOINbTcC MeHbIIHN yPoBHm 6e3 IIOJCOeIHHeHHN K pa3bemy GND.
PNEyPPEXJENHE
- IpeepiIOIcoeINHHeHem OJHOro HJIIN DByx Ha6OpOB KOJOHOK IMPEDANCE SELECTOR Heo6xoHMO yCTaHOBnTB B COOTBeTCTByIOJIee IOJIOKeHne. JIA IOJIyuEHnI JOIOJIHNTeJIbHOI INHΦopMaIIIN cm. cTp. 5.
- I36eRaIte coIprHKoCHOBeHHN OOrJIeHHbIX YacTei Ka6eJIy dpyr C dpYrOM HJIN C MeTaJIHueCKHM N KOMIOHeHTAMn IIprH6opa. B IIpoTIBHOM cIyuae 3TO MoKET cTaTB IIprUHHOII NOBpeXJeHHN aIIIapaTa H/IIIN KOJOHOK.
He IIOIcoeINHnTe 3OT aIIIapat HJIN dpyTne KOMIOHEHTbIK HCTOuHHky FJIaBHOrO IIHTaHH, IOKa He 6yIyT 3aBepIIEHb BCE coeINHHeHNa KOMIOHEHTOB.
1 Chmmte okono 10 MM n3oJauCn c KOHca Ka6eJn KaKdoN KOLOHKn, 3aTeM cKpyTnte orOJIeHHbIe KOHcbl Ka6eJn, YTO6bl npEDoTbpaTbKOpOTKe 3aMbIkaHHe.
2 PoiocoeunHnte Ka6bI K0JOnHok.
① Ocna6bTe pyky.
② BcTaBbTe OOrJIeHHbI KOHeU npOBoa B OTBepCTne, pacNoJoxKeHHoe Ha 6oKOBoi NOBepxHOCTn KaKdOrO pa3bema.
③ 3aKpyTnTe pyUKy, yTO6bI HaJdeXHo 3aKpeNtB npoBOd.
Kpacna: NOLOXHTIELbHbI KOHTAKT (+) Yepha: OTPMUATEbHbIKoHTAKT (-)
IpoDcoeHHeHne c NOMOu bIO uTeKepa c npoJoIbHbIMN pOJnpUxHnBaIOuMm KOHTaTAMN (KpOME MoJeIe JIra A3nn, Kopen, BeNIko6PrtAHn n EBrponbl)
CnaJaI 3aBepHnTe pyKy, 3aTeM BCTaBBte IIITeKepe C IIPOIOJIbHbIMN IIOIIpyXHHHbAOIIHM N KOHTaKTAMN B KOHeI COOTBeTCTBYIOIeRo pa3'beMa.

PpMeyaHne
K daHOMy aIIIapaTy MOxHO IIOJCOeINHHt b OINH HIN IBa Ha6opa KOJIOHOK.
■Подключене сnomоцью ka6eЯ Bi-wire
IIpi IIOJKIIOUeHHN C IIOMOUIbIO Ka6eJIa Bi-wire 3ByK KaHaJa HIN3KOuAcTOHoro DInHaAMnKa OTJeJIeH OT coeIHHeHHORO KaHaJa cpeIHeuAcTOTHO N BbICOKOyAcTOTHO DInHaAMnKOB. KoJIOHKN, IIOJIepXJBAIOUHe IIOJKLIIOUeHHne C IIOMOUIbIO Ka6eJIa Bi-wire, HMeIOT YeTBIpE pa3'beMa C KJIeMMaMn. C IIOMOUIbIO 3THX DByx Ha6OpOB pa3'beMOB 3BYK KOJOHOK MOXHO BBIOINTb IIO JbYM He3aBNCMbIM KaHaJIaM. C IIOMOUIbIO 3THX coeIHHeHH DInHaAMnKn CpeIHNx N BbICOKHX YaCTOT MOXHO IIOJKIIOUHTb K OJHO My Ha6Opy pa3'beMOB, a DInHaAMNK HIN3KHX YAcTOT - K JpyTOMy Ha6Opy pa3'beMOB.
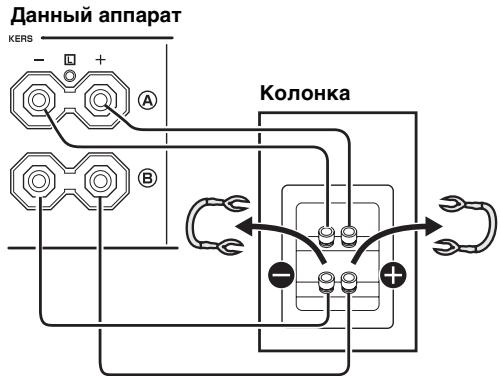
AHAIOIURHbIM CIOOC6OM IIOKJIIOUHTe IpyrYO KOJIOHKy K IpyROMy Ha6Opy pa3bEmOB.
NPEyPPEXDEHNE
При Вьллгенни-coeннehи bi-wire yctaHOBHTe
IpeKJIIOUaTeJIb IMPEDANCE SELECTOR B IOJIOKeHHe
HIGH IIN LOW B 3aBHCmOCTH OT COIIpoTHBJIeHnK KOJOHOK:
6 Ω IIN BblIe: HIGH
4 Ω IIN BblIe: LOW
Инфорmaцю O IpeKJIIOUaTeJIb IMPEDANCE
SELECTOR cm. Na cTp. 5.
PpMueaHne
PnIOKJIIOUeHHN C IOMOIIbIO Ka6eJIa Bi-wire cHIMnTe IepemblcN HJIN Ka6eJIH KOJOHKn.
#
IIJIHIOJIb3OBAHHIIOIKJIOUeHHIIOMOIbI Ka6JIaBi-wire IIEpeKJIIOUHTe ceJIeKTop SPEAKERS B IOJOKeHne A+B.

3aropntc HnHnKaTOp BbI6paHHoro HcToHnKa BBOJa.
4 C nOmoUc ceJIeKTopa SPEAKERS Ha nepeDnei panHeN BbIbepTe SPEAKERS A, BnA+A+B.
PpmeuHn
-Пи ПОДКЛЮЧЕн cIПОМIOБИ КабELЯ bi-wire Илп ПИР OДНOBРЕМEHOM ИСПОЛБЗВАнн INByX KOMПЛIEKTOB KOJILOHOK (AиВ)пeревдTe ceJIeKTop SPEAKERS B IПОJOKEHne A+B.
- IIpnIpiocJIyIIHHaHHN C IIOMOIbIHO HayIIHHKOB IpeBeBdITe ceJIeKTop B IIOJIOKeHHe OFF.
5 Nauchnite Bocnpon3BedeHne nCTouHnka.
6ДЯнactpoRKN ypoBnrgpOMKocTn 3ByKa nCnoJIb3yItepeRyIaTOpVOLUMEHa nepeDnei naHeN (HJNKONKy VOL + / - Ha npJIbTe D).
IpeednnaheB
N
Iybld

Moxho BbIIOJIINb HAcTpoIKN TeM6pa C IOMOIIbOp
peyIaTOPoB BASS, TREBLE, BALANCE N LOUDNESS,
IepeKJIIOUaTeJc CD DIRECT AMP IIIN IpepeKJIIOuTaTeJIa
PURE DIRECT Na IpepeIHei IaHeJI.
BO3MOXHbIE HENCINPABHOCTN IN CIOCObIX
YCTPAHEHNA
EcJH 3OT aIIIpaT pa6OaET HeIpaBnJIbHO, cM. Ta6JIuY HnKe. EcJH IIPO6JIeMa, c KOTOpO Bbl CTOJIKHJINCb, OTCyTCTByET B 3TOM cIINcKe IIN IIpIbeIeHHBe IHCTpyKIIHN He IIOMAIoT, IIpeBeIHTe aIIIpaT B pexIM OxIHJaHHa, OTKJIIOHTe Ka6JIb II INtAHn H o6paTHTeCb K aBTOPn3OBAHHOMy IIIEpy Yamaha IIN B cepBnCHbI ueHtp.
O6uHe npo6JIembl
BO3MOXHbIE HENCPABHOCTN U CNTOCObI VX YCTPAHEHIA
IynbT dy
TEXHUNCHECKNE XAPAKTEPNUCTUKN
PA3ДЕЛ MОЦHOCТИ
MHHMaJIbHa cpeIHeKBaIpaTHuecka BbIXOHa MaIOHocTb (8Ω,20Γι-20κΓι,0,019% OHN) 90BT+90BT (6Ω,20Γι-20κΓι,0,03% OHN) 105BT+105BT
-Динhamчecкая мошноctь (IHF) (8/6/4/2Ω). 135/160/200/240 Bt
MakcmaJIbHaB BbIXOJHaa MOIHHocTb [ToJIbKO MoJIeJI IN I EByoIIbl] (1 KΓU, 0,7% OHN, 4 Ω) 160 Bt [ToJIbKO MoJIeJI IN I A3IN N o6Ie MoJIeIN] (JEITA) (1 KΓU, 10% OHN, 8/6 Ω) 140/160 Bt
BbIXOJHa MAIOHOCtB IEC [ToJIbKO MOJeIIN JIA EBPOIIb] (1KΓι, 0,019% OHN, 8Ω) . 105 Bt
-ДианэзOHMOIHCHTN (0.03% OHN,50Bt,8Ω) 10Γι-50KΓι
Ko3ΦΦHnHeHT 3aTyXaHHa1 1 ,8 240 Hn6oJIee
- MaKcHMaJIbHbI BxOJHOH cNTHaJI PHONO (1 KΓι, 0,019% OH) ......... 70 MB ΙΙΙΝ 6ΟJIe ΠροΥΓPBbIbATEJIb KOMΠaKT-ДИСΚΟВ I T.I. (1 KΓι, 0,019% OH) ......... 2,2 B ΙΙΙΝ 6ΟJIe
- ChactonTnaXapaKTepeHCTnKa
ПронгьВаTeЛь кOMпАКТ-ДИСКOB И.T.I. (20 ГИ - 20 кГИ)
............................................ 0 ± 0,5 NB
CD DIRECT AMP ON (10 ГИ - 100 кГИ)............................................ 0 ± 1,0 NB
- BbIpaBHHBaHHe OTKJIOHeHHa RIAA PHONO ... ±0,5 JB
- O6IIee HeJIHHHeHoe HCKaJKeHHe PHONO - OUT (REC) (20 _-20_,3B ) 0,008% HIN MeHee IIpOINpIbAteJIb KOMIIaKT-JIckOB N T.I.-SP OUT (20 _-20_,50BT,8) 0,012% HIN MeHee
- CoOTHOIIeHHe cHHaJI/IIyM (CeTb IHF-A) PHONO (5 MB yKOpOeHHbI TpaKT cHHaJIa) 87 Ib HIn 60Jee CD DIRECT AMP (200 mB yKOpOeHHbI TpaKT cHHaJIa) 110 IB HIn 60Jee
- OctaToHbI IIyM (CeTb IHF-A) CD DIRECT AMP ON 30 kKB PURE DIRECT ON 110 kKB
-Погршноctь ДИнамческого ИЗмерейна услеленя (0-60ДБ) 2ДБ ИПМeHee
PA3DEJI YNPABJIENHA
- UyBCTBHTeJIbHOCtI IIpHEMa/BXOДHoe COIIpOTHBJIeHHe PHONO 3,0 MB/47 KΩ IpoIHrPbIBaTeJIb KOMIIaKT-ДИСКOB H T.I. 200 MB/47 KΩ
- YpoBeHbBIXOa/BbIXOJIHOe COIIPOTHBJIeHHe
YpoBeHb REC 200 MB/1,2 KΩ HJIH MeHee
BbIXoJ/COIIpOTnHBJIeHHeIJIHaHayIHHKOB (BxoJ 1 KΓI,200 MB,8Ω,0.015% OH) IpoHrpBbATEJIbKOMIIaKT-DIcKOB H.T.I. 0,47 B/470 Ω
Pa3JeJIeHHe KaHaJa IpnHrpbIbATEJIb KOMIIaKT-ⅡNcKOB H T.I. (5,1 KΩ ykopOueHHbI TpaKT cHrHaJa, 1/10 KΓI) 65/50 Ib HIN 60JIee
XapakTepeHcTKn peyJInpOBKn TeM6pa BASS YcnJIeHHe/cpe3 (20Γι) ...±10πB Yactota IepexoJa 350ΓI TREBLE YcnJIeHHe/cpe3 (20KΓι) ...±10πb Yactota IepexoJa 3,5KΓι
KoHTPOJIb rpoMkOcTH c IIaBHOJ peRyJIInpOBKOJ OcJIa6JIeHne (1 KΓI) -30 JB
OBsI PA3DEI
-Питаннe [МоеллдЯСИАиКанады] 120ВпеременHorToTOka,60Γ[МоеллдяA3и] 220/230-240ВпеременHorToKa,50/60Γ[ОБинeMoelл] 110/120/220/230-240ВпеременHorToKa,50/60Γ[МоеллдяКотая] 220ВпеременHorToKa,50Γ[МоеллдяKорей] 220ВпеременHorToKa,60Γ[МоеллдяAbстрали] 240ВпеременHorToKa,50Γ[МоеллдяBeJIHKOBpHTaHHIиЕврпьI] 230ВпеременHorToKa,50Γ
3HeprnoIOTpe6JIeHne [MoJIeJI INJIa CIIIA H KaHaJIbI] 260 Bt, 360 BA [JpyrHe MoJeJIH] 260 Bt
-3HeprnoIOTpe6JIeHneBpeXHMeOxHuaHn .0,1BT
-MakcHMaJIbHoe 3HeprnoIOTpe6JIeHne[ToJIbKOДЯOBuNX MoJeIe] (6Ω,1KΓι,10%OHN). 650BT
- Po3eTkn IIITaHnI IepemEHHOrO ToKa [MoJIJI NII BBeJIbKO6pHTaHnI N ABcTpajnn] 1 (cymMapHOe He 6oJee 100 Bt) [MoJIb IIJa KOpEn] . . . . . . . . . . . . . . . . . . . . . . . . . . . . . . . . . . . . . . . . . . . . . . . . . . . . . . . . . . . . . . . . . . . . . . . .. HET [O6IIHe MoJIeIN] 2 (cymMapHOe He 6oJee 50 Bt) [IpyrHe moJIeIN] 2 (cymMapHOe He 6oJee 100 Bt)
- Ra6apHTbI (III × B × Γ) 435 × 151 × 382 MM
- Bec 10,9 Kt
TexHHueckHe xapaKTepeHCTHKMOrTy H3MeHrTbc86e3 yBeJOMJIeHHI.
HΦopMaζηДЯ NOIb3OBaTeJIeN NO c6Opy N yTnJIb3aζIiN CTapOJ annapaTypbl NcNoJIb3OBaHHbIX 6aTapeek

3n 3n KaHn a HnnapaType, ynaKOBkax n B COIIPOBOINTEJbHBIX DOKUMeHTax yka3bIbAOT Ha TO, YTO IIepKaHHBie 3JIeKtpuYeCKne H 3JIeKTPoHHBie Ipi6Opbl H 6aTapeiKN He IOJIxHbI BB6paCbIBaTbc BMeCTe C O6bUHbIM DOMaIHHM MycopOM.
IIJIIpaBnJIbHOn 6Opa60TKn, XpaHeHHN H yTHJIN3aIHIN CTapO aIIIpaTpybI H cIIIOJIb3OBaHHbIX 6aTaapeek IIOXaJIyNCTa CdaBaHTe Hx B COOTBeTCTByIOJIne C6OpHbIe IyHKtBi, COJIaCHO BaIIHEMy HAIOHOJIbHOMy 3aKOHOaTeJIbCTBy H dIpeKTHB 2002/96/EC n 2006/66/EC.

Пи паиьньом OTДЕЛЕнн эТХ TOВарOB И 6aTapeeK, BBI ПИМОгаTe COxpaHЯТь ΠeHHbIe PECUPсИ И ПпEDOTВРаПИАТВ ВрEDHoe BIIINHHe Na 3ДОРБе ЛДОЕ И OKpykaIOUуЮ сpeДY, KOTOpoe MOKeT BO3HNKHyTB H3-3a HeCOOOTBeTCTBYIOIeTO OБраIЕннС O TXOДamH.

3a 60JIe IIOIpo6Hoi HnΦopMaIInei O c6ope n yTHJIN3aIIIN CTapbIX TOBAPOB N 6aTapeek IIOJaIyIcTa O6paIaIIaTeCb B BAIIy IOKaJIbHyIO aIMHHNCTpaIIIO, B BAIII IIpHEMbI IyHKT HJIH B MaRa3HN rIe BBI IIpHO6peJIH 3TN TOBApBI.
[Информацьnoутллзацьвдругхстрахза ппебелампЕвронckoro Coю3a]
3TH 3HaKn IeCTBHTeJbHbI TOJIbKO Ha TeppHTOpHN EByoIIeCKORO CoHO3a. EcIN BbIXOTHTe H36aBHtbcr O T3NX IIpeIMTeOB, IOXaJIyHcTa O6paTHTecb B BaIIy JIOKaJIbHyIO aDMHHcTpaIHIO HJIN IIpoDAuH y CnPoCHte O IpaBHLbHom cIOOC6e yTHJIN3aIHN.
06paTte BnMaHne Ha 3HaK dJa 6aTaapeek (Ba 3HaKa Ha 3aDHei CTopoHe):
3TOT 3HaK MOKeT HcIOJIb3OBAbTcB KOM6HHaIIH CO 3HaKOM yKa3bIBaIOIIHM O cOpeJkaHH XMHKAJIH. B 3TOM cIyueae 3TO yIOBJIeTBOpAe Tpe6ObaHnM yCTaHOBJeHHbIMN IHepeKTBOI IO HCIOJIb3OBAHnIO XMHKAJIH.