
NC4533 REVOLUTION 5 PRO - Headphones Nacon - Free user manual and instructions
Find the device manual for free NC4533 REVOLUTION 5 PRO Nacon in PDF.

| Product Type | Wireless controller for PlayStation 5, PlayStation 4 and PC |
| Brand | Nacon |
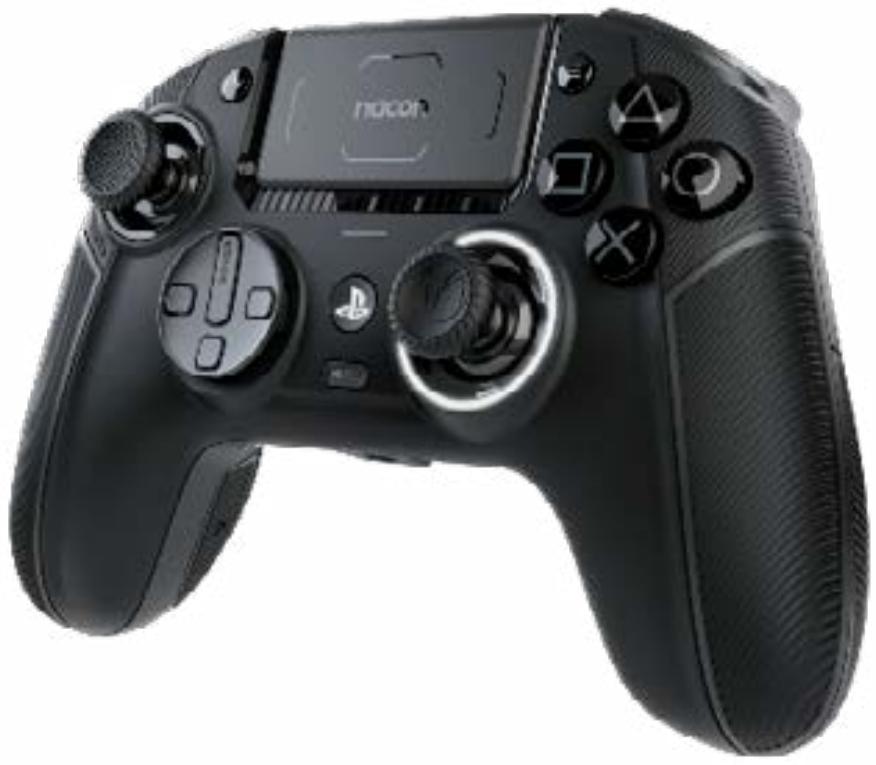
| Model | Revolution 5 Pro (NC4533) |
| Dimensions | 190 x 189 x 89 mm |
| Weight | Approximately 308 g |
| Power supply | Rechargeable lithium-ion battery, 5 V ⎓ 500 mA |
| Connectivity | Wired (USB-C), 2.4 GHz RF wireless, Bluetooth 5.2 |
| Cable length | 3 m |
| Stick and trigger technology | Anti-drift magnetic Hall effect |
| Main features | 4 customizable profiles, adjustable triggers, shortcut buttons, touchpad, audio control, equalizer |
| Physical customization | Interchangeable joysticks (convex, tall), 4/8-way directional pad, removable weights (10g, 14g, 16g), 30°/38° metal rings |
| LED indicators | LEDs for profile, player number, battery level, microphone status |
| Audio | 3.5 mm jack for wired headset, Bluetooth headset support (audio only) via BT 5.2, built-in microphone with mute |
| Platform compatibility | PlayStation 5, PlayStation 4, PC (Windows 10/11 and macOS) |
| Firmware update | Via dedicated PC application (Nacon Revolution 5 Pro App) |
| Care and cleaning | Use a soft, damp cloth, do not use detergents |
| Safety | Do not expose to moisture, shocks, extreme temperatures. Battery: do not open, do not throw into fire, recycle at approved center |
| Spare parts and repairability | Interchangeable weights and joystick heads. For any other repairs, contact Nacon support |
| General information | Manufactured by Nacon, 396-466 Rue de la Voyette, CRT2, 59273 Fretin, France. Support: support.fr@nacongaming.com |
Frequently Asked Questions - NC4533 REVOLUTION 5 PRO Nacon
User questions about NC4533 REVOLUTION 5 PRO Nacon
0 question about this device. Answer the ones you know or ask your own.
Ask a new question about this device
Download the instructions for your Headphones in PDF format for free! Find your manual NC4533 REVOLUTION 5 PRO - Nacon and take your electronic device back in hand. On this page are published all the documents necessary for the use of your device. NC4533 REVOLUTION 5 PRO by Nacon.
USER MANUAL NC4533 REVOLUTION 5 PRO Nacon
EN. When this crossed-out wheeled bin symbol is attached to a product it means that the product is covered by the European Directive 2002/96/EC. Please inform yourself about the local separate collection system for electrical and electronic products. Please act according to your local rules and

do not dispose of your old products with your normal household waste. Correct disposal of your old helps to prevent potential negative consequences for the environment and human health.
Removal of the rechargeable lithium ion battery, in this product, should only be conducted by a qualified professional
Li-ion

1124 8th Street, Kirkland, WA 98033, USA
Email: Support.US@nacongaming.com
For Australia
146A Sussex, Pascoe Vale,
VIC, AUSTRALIA, 3044
support.us@nacongaming.com
www.nacongaming.com
MANUFACTURER / Fabricant :
NACON - 396 - 466 Rue de la Voyette, CRT2 59273 Fretin, France
10400 NE 4th Street, Suite 500, Bellevue, WA
98004 USA
Nacon Pty. Ltd.
Level 2/20 Bond Street, Sydney NSW 2000 Australia
FABRIQUÉ EN CHINE / MADE IN CHINA
www.nacongaming.com
SUPPORT
UK, support@nacongaming.com
Tel.: +44 08081010970
BELGIQUE, support.be@nacongaming.com
NEDERLAND, support.nl@nacongaming.com
ESPAÑA, support.es@nacongaming.com
Tel.: +34 900993359
ITALIA, support.it@nacongaming.com
Tel.: +39 800172494
USA/CANADA, support.us@nacongaming.com
AUSTRALIA, support.us@nacongaming.com
MEXICO, soporte@nacongaming.com
©2023 NACON - 396-466 Rue de la Voyette CRT2 59273 Fretin
06.2023
Made in China/Fabriqué en Chine
REGULATORY COMPLIANCE INFORMATION
INFORMATIONS DE CONFORMITÉ RÉGLEMENTAIRE
1 - FCC DECLARATION OF CONFORMITY

EN. FCC: Declaration of Conformity
This product complies with Part 15 of the FCC Rules. Operation is subject to the following two conditions: (1) this device may not cause harmful interference, and (2) this device must accept any interference received, including interference that may cause undesired operation.
Warning: Changes or modifications to this unit not expressly approved by the party responsible for compliance could void the user's authority to operate the equipment.
Note: This equipment has been tested and found to comply with the limits for a Class B digital device, pursuant to Part 15 of the FCC Rules. These limits are designed to provide reasonable protection against harmful interference in a residential installation. This equipment generates uses and can radiate radio frequency energy and, if not installed and used in accordance with the instructions, may cause harmful interference to radio communications. However, there is no guarantee that interference will not occur in a particular television reception, which can be determined by turning the equipment off and on, the user is encouraged to try to correct the interference by one or more of the following measures:
- Reorient or relocate the receiving antenna.
- Increase the separation between the equipment and receiver.
- Connect the equipment into an outlet on a circuit different from that to which the receiver is connected.
- Consult the dealer or an experienced radio/TV technician for help.
2 - IC STATEMENT
This device contains licence-exempt transmitter(s)/receiver(s) that comply with Innovation, Science and Economic Development Canada's licence-exempt RSS(s). Operation is subject to the following two conditions:
-
This device may not cause interference.
-
This device must accept any interference, including interference that may cause undesired operation of the device.
3 - EIRP/ DECLARATION OF CONFORMITY (UK + EU)
EN. EIRP STATEMENT
The EIRP power values and the Frequency bands relating to this product, identified in the list below, comply with the requirements of Directive 2014/53/EU:
EIRP: NC4533 REVOLUTION 5 PRO wireless controller
- <13dBm
Frequency band: (2,402 \~ 2,480) GHz
EU DECLARATION OF CONFORMITY
Nacon hereby declares that the radio equipment type NC4533 REVOLUTION 5 PRO wireless controller complies with Directive 2014/53/EU. The full text of the EU declaration of conformity is available at the following web address: https://my.nacongaming.com/support.
Link to the full product declaration : https://my.nacongaming.com/support
UK DECLARATION OF CONFORMITY
UK RE Regulation 'Informal DoC' statement
NC4533 REVOLUTION 5 PRO wireless controller
Hereby Nacon declares that this product is in compliance with the relevant statutory requirements. For details please access the following web address: https://my.nacongaming.com/fr-FR/support
The frequencies used by the wireless networking feature of this product are the 2.4GHz and/or Bluetooth ^® range. Wireless frequency band and maximum output power:
Frequency Band: 2.402GHz \~ 2.480Ghz
Maximum Output Power: < 13dBm / 20mW
FR. DÉCLARATION EIRP
EU DECLARATION DE CONFORMITÉ
EIRP: NC4533 REVOLUTION 5 PRO Wireless Controller
- <13dBm
Frequenzband : (2,402 \~ 2,480) GHz
EIRP: NC4533 REVOLUTION 5 PRO controllore wireless
- <13dBm
EN. Your product contains batteries covered by the European Directive 2006/66/EC, which cannot be disposed with normal household waste. Please inform yourself about the local rules on separate collection of batteries because correct disposal helps to prevent negative consequences for the environmental and human health.
natural_image
Black PlayStation 1 controller with visible app interface and control buttons (no readable text or symbols beyond branding)REVOLUTION 5 PRO
Quick Start Guide
"LP", "PlayStation", "PS5", "PS4" and "PlayStation Shapes Logo" are registered trademarks or trademarks of Sony Interactive Entertainment Inc. All other trademarks are the property of their respective owners. Manufactured and distributed under license by Sony Interactive Entertainment.
© 2023 NACON
Made in China

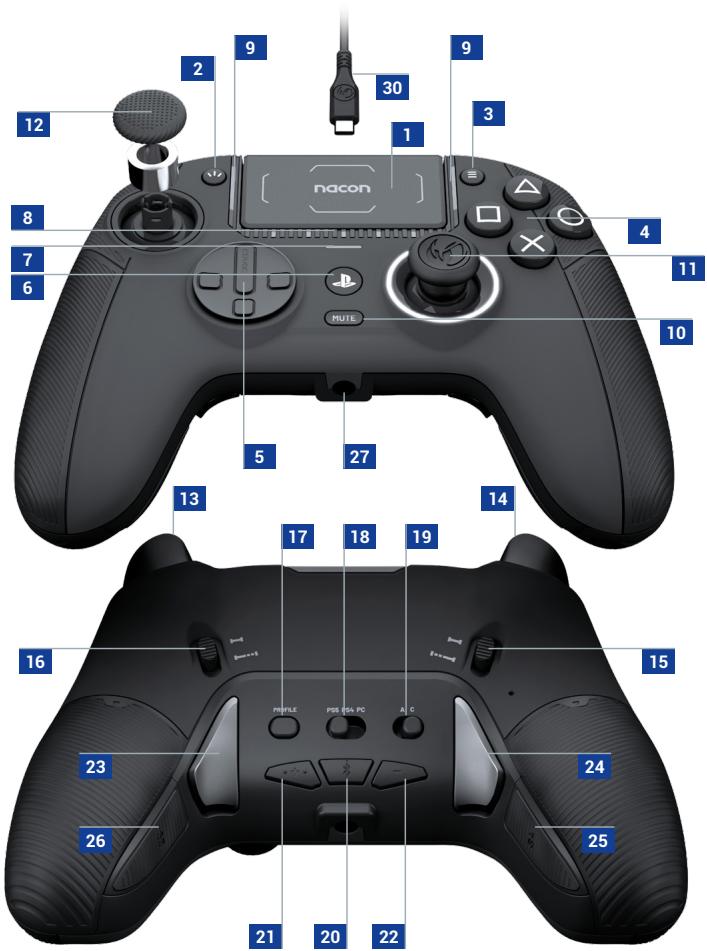
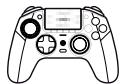
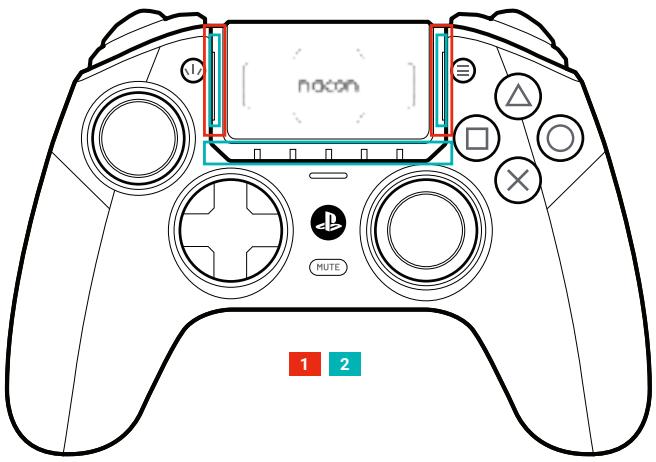
1 Touch pad
2 Share button
3 Options button
4 Action buttons
5 D-pad
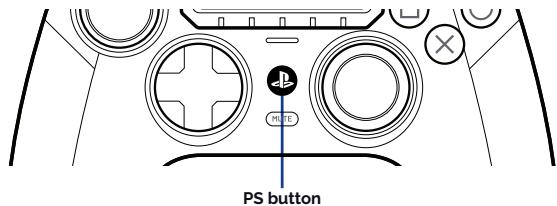
6 PS home button
7 PS4™ LED player status indicator
8 PS5™ LED player status indicators
9 4 x Profile LEDs (active in Advanced mode only)
10 Microphone Mute button
11 Right joystick
12 Left Joystick
13 R2 trigger
14 L2 trigger
15 L2 trigger stopper
16 R2 trigger stopper
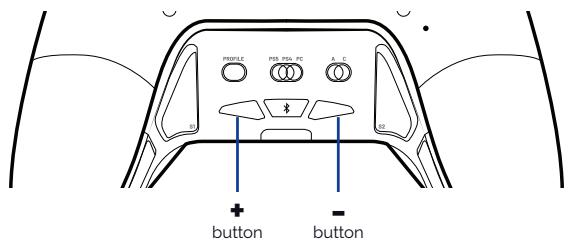
17 Profile button
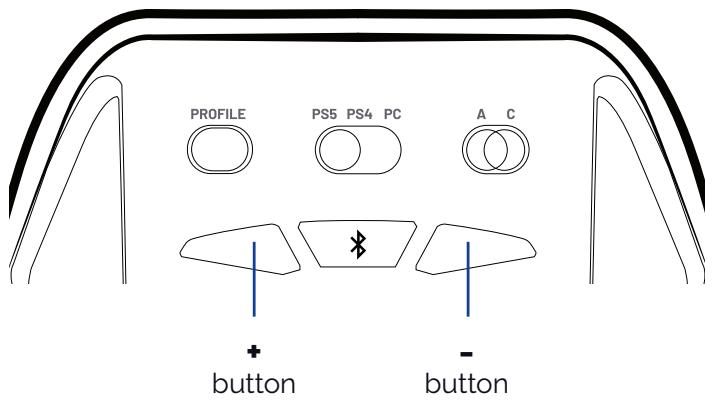
18 Format selector (PS5™, PS4™, PC*)
19 Classic & Advanced setting selector
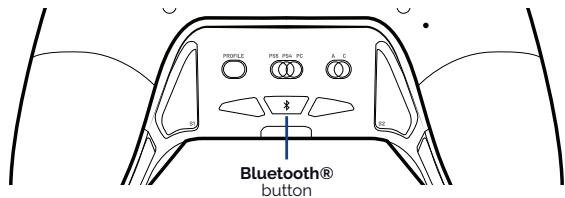
20 Bluetooth® button
21 Volume up button
22 Volume down button
23 S1 shortcut button
24 S2 shortcut button
25 S4 shortcut button
26 S3 shortcut button
27 3.5mm Jack socket
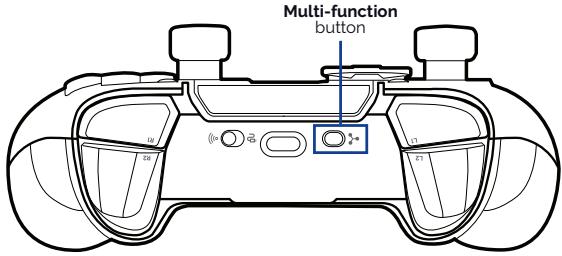
28 Multi function button
29 Wired, wireless mode button
30 USB-C connector
31 USB-C input
THANK YOU FOR YOUR PURCHASE!
This guide will help you to get started with your Revolution 5 Pro controller. A complete manual is available on the Nacon website at: My.nacongaming.com/en-GB/support
For technical support please contact Consumer Service at:
My.nacongaming.com/en-GB/support
I Packaging contents
| 1x Revolution 5 Pro | 2x Convex Joystick Heads |
| 1x 3m connection cable | 2x High Convex Joystick Heads |
| 1x Quick Start Guide | 1x Mic jack |
| 2x 10g weights | 1x 4-way D-Pad |
| 2x 14g weights | 1x Metal ring set 30^ |
| 2x 16g weights | 1x Metal ring set 38^ |
| 1x 2.4GHz RF Receiver | 1x Protective and transport pouch |
I Additional information
Dimensions: 190 x 189 x 89 mm
Weight: approx. 308kg
Power: 5V = 500mA
===: Continuous current power supply
I Charging the Battery
To charge the battery connect the USB cable to the console and to the controller. Make sure that the controller is powered OFF as this will charge the battery in the shortest time.
If you want to use the controller, and charge at the same time, then the battery will 'trickle' charge and the time will be extended.
Refer to Section 4 `LED indications' for information on the battery level indication.
NOTE: Only use the cable provided and always connect it to the console.
I Application
ADVANCED MODE
To customize the profiles available in the advance mode please download the Revolution 5 Pro App from Nacongaming.com for free.
You will be able to customize and set-up the 12 profiles (4 per platform) to your own requirements
Nacon develop the App to be compatible for PC and Mac to enable you to customize your Revolution 5 Pro controller with over 40 points of customization to create custom profiles to remap your controller define your own joystick curves, define your audio equalizer, RGB light effect and much more.
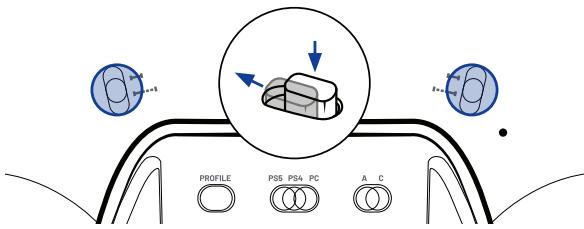
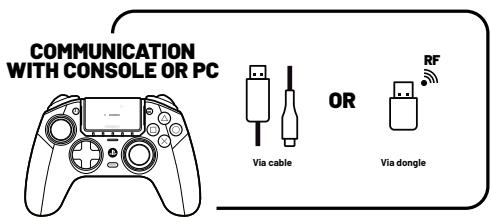
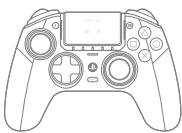
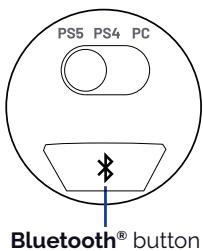
I 1 - Wired / Wireless connection
I 2 - Format selection
I 3 - How to connect to a PlayStation® console
FOR WIRED CONNECTION
- Select the connection method, as shown in section 1.
- Select the format, as shown in section 2.
- Connect the USB-C to USB-A cable to your controller and to your PlayStation® console.
• Power on your PlayStation® console. - Press the PS button, on the controller, to power it on. You are ready to play.
FOR WIRELESS CONNECTION
- Select the connection method, as shown in section 1.
- Select the format, as shown in section 2.
- Plug the USB dongle into a USB-A port on your PlayStation® console.
• Power on your PlayStation® console. - Press the PS button, on the controller, to Power it on. You are ready to play.
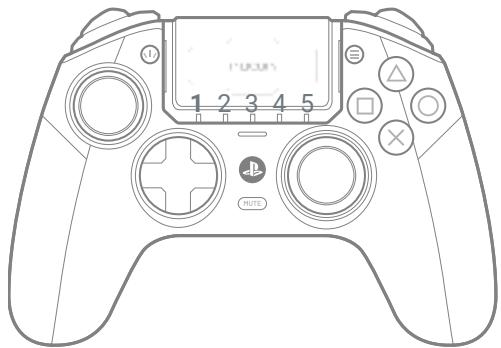
I 4 - LED indications
WHEN THE CONTROLLER IS IN PS5™ FORMAT
The light bar (1 RGB LED) is used to indicate connection with the USB dongle.

natural_image
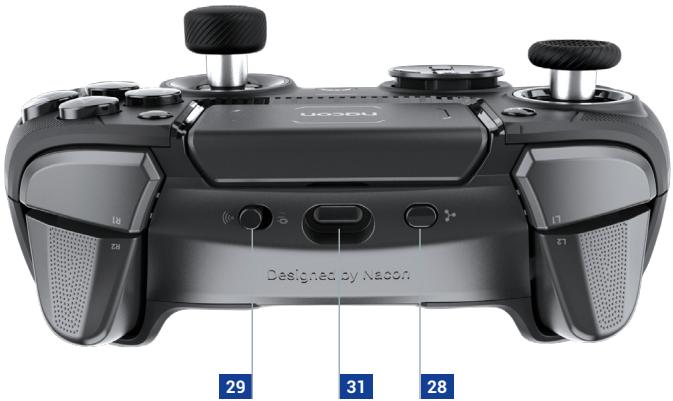
Diagram of a game controller with labeled buttons and circular components (no readable text or symbols)Halo ring: White when the controller is in PS5 ^™ format.
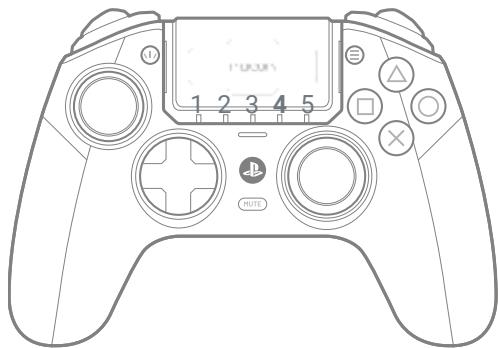
WHEN THE CONTROLLER IS IN PS4™ FORMAT
The Light bar (1 RGB LED) is used to indicate the player number and also connection with the USB dongle.
natural_image
Diagram of a game controller with circular buttons and a mute icon, no readable text or symbols present.Halo ring: Blue when the controller is in PS4 ^™ format.
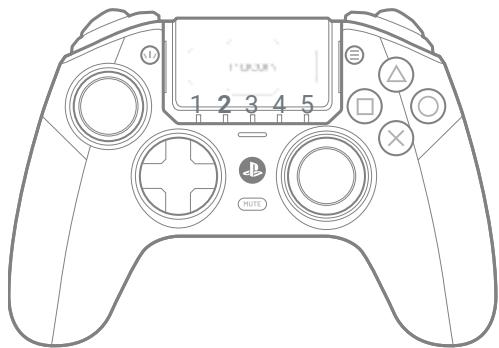
WHEN THE CONTROLLER IS IN PC\* FORMAT
The light bar (1 RGB LED) is used to indicate connection with the USB dongle.
natural_image
Top-down schematic of a game controller with no text or symbolsHalo ring: Purple when the controller is in PC* mode.
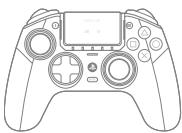
I 5 - Audio functions
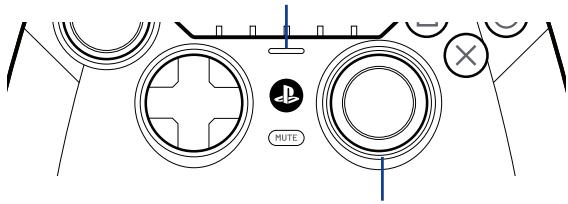
VOLUME CONTROL
When an audio device is connected to the controller, press the " + " button to increase the volume and press the " - " button to decrease the volume.
BLUETOOTH® PAIRING
To pair the controller to a Bluetooth® true wireless earbuds/Headset follow these steps:
- Put the controller and true wireless earbuds/Headset next to each other.
- Put the Bluetooth® true wireless earbuds/Headset in to pairing mode.
-
Press and hold the Bluetooth® button, on the controller, for 6secs.
-
The controller will go in to pairing mode and the halo ring will flash blue.
- When the controller is paired the halo ring will stop flashing.
- Future connections, of the same true wireless earbuds/Headset, will happen automatically.
THE CONTROLLER HAS PRE-SET EQ LEVELS
To activate the EQ levels short press the multi-function button and use the touch pad to cycle through the EQ levels.
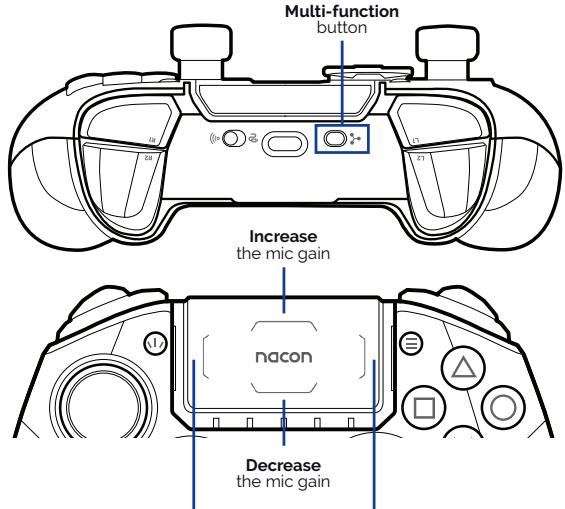
Press Left or Right to switch between the different EQ pre-set levels
I 6 - Shortcut mapping
IN CLASSIC MODE
- Press and hold the multi-function button for 3s.
- The halo ring will flash white in PS5™ format, Blue in PS4™ format and purple in PC* format.
- Then press the shortcut button, that you want to map, followed by the button that you want to assign to that shortcut.
- Repeat the process for each shortcut.
- To finish the mapping do a short press on the multi-function button.
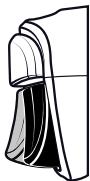
I 7 - Trigger Stopper
TO ACTIVATE / DEACTIVATE THE TRIGGER STOPPER
- Press down the button to unlock it.
- Keep pressing down and then slide up or down activate / deactivate the stopper.
I 8 - Reducing Trigger Data Range
The trigger stop is a completely mechanical feature. For increase the reactivity of your triggers you can proceed by two manners:
IN CLASSIC MODE
Press and hold the Pofile button then press the trigger. Rumble engine will vibrate one time to indicate the short range and 2 time for the long range. Repeat the operation to switch from one another.
IN ADVANCED MODE
Use the Revolution 5 Pro App.
natural_image
Technical line drawing of a mechanical component or bracket (no text or symbols)I 9 - Vibration
The controller is equipped of rumble engine which is only compatible with PS4 and PC* games, In PS5™ mode on PS5™ games played on the PS5™ consoles you will not have any vibrations.
I Sony statement
1) This controller uses 2.4GHz radio frequency range, so when PS5 ^™ and other products uses the same radio frequency range, it may give negative influence mutually.
(2) Nacon validated operability between PlayStation®5 (CFI-1000 series) and this controller.
(3) It is recommended to insert the USB dongle into the USB port at the front of PlayStation®5 (CFI-1000 series).

natural_image
Abstract black and white circular logo with stylized bird-like elements (no text or symbols)nacon
WWW.NACONGAMING.COM
natural_image
Black PlayStation 1 controller with a Gaia console and controllers (no visible text or symbols)REVOLUTION 5 PRO
START GUIDE
" ", "PlayStation", "PS5", "PS4" and "PlayStation Shapes Logo" are registered trademarks or trademarks of Sony Interactive Entertainment Inc. All other trademarks are the property of their respective owners. Manufactured and distributed under license by Sony Interactive Entertainment.
© 2023 NACON
Made in China

Thank you for purchasing this NACON® product.
This product has been designed to enhance your gaming experience. Please keep this user manual in a safe place for future reference.
Contents
Revolution 5 Pro

Storage case

Accessory storage box


2 D-pads

Metal joystick rings (2x 30°, 2x 38°)
6 Weights
(2x 10g, 2x 14g, 2x 16g)
6 Joystick heads (2 concave, 4 convex)

3m USB-C cable

USB dongle

Quick Start Guide
I Additional information
Dimensions: 190 x 189 x 89 mm
Weight: 308g approx.
Consumption: 5V = 500mA
Please note: As we aim to continually improve your gaming experience, we are likely to publish firmware updates (also called micro-software) via the Revolution 5 Pro application. Regularly check the application for the latest updates.
I Controller elements
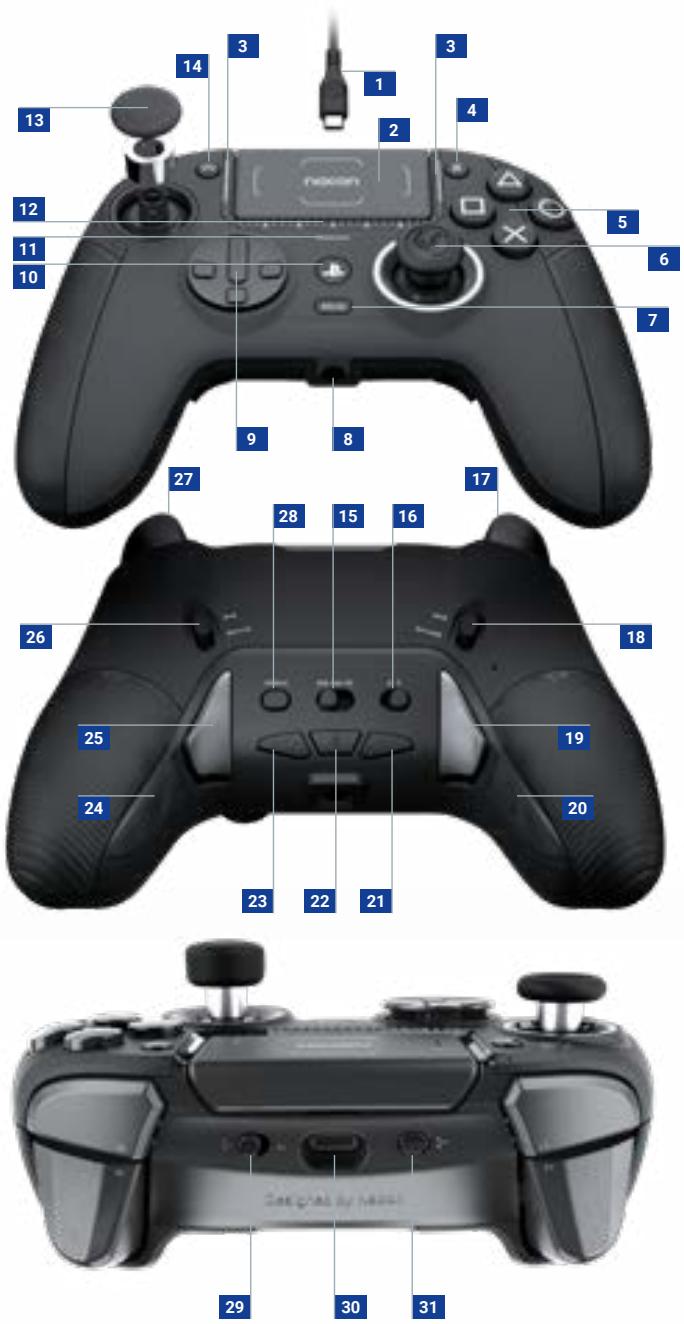
- USB-C connector
2 Touch pad
3 4x Profile LEDs (active in Advanced mode only)
4 Options button
5 Action buttons
6 Right joystick
7 Microphone Mute button
8 3.5mm Jack socket
9 D-pad
10 PS home button
11 PS4™ LED player status indicator
12 PS5 ^® LED player status indicators + battery level indication
13 Left joystick
14 Share button
15 Format selector (PS5 ^ , PS4 ^TM , PC ^* )
16 Classic & Advanced setting selector
17 L2 trigger
18 L2 trigger stopper
19 S2 shortcut button
20 S4 shortcut button
21 Volume down button
22 Bluetooth® button
23 Volume up button
24 S3 shortcut button
25 S1 shortcut button
26 R2 trigger stopper
27 R2 trigger
28 Profile button
29 Wired, wireless mode button
30 USB-C input
31 Multi-function button
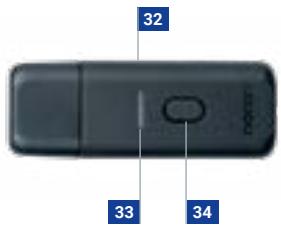
32 USB dongle
33 Pairing LED
34 Pairing button
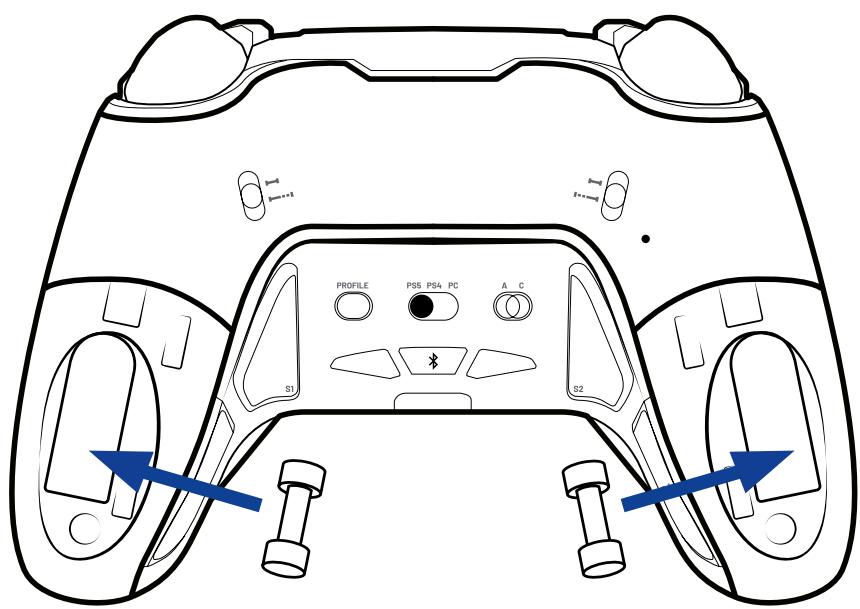
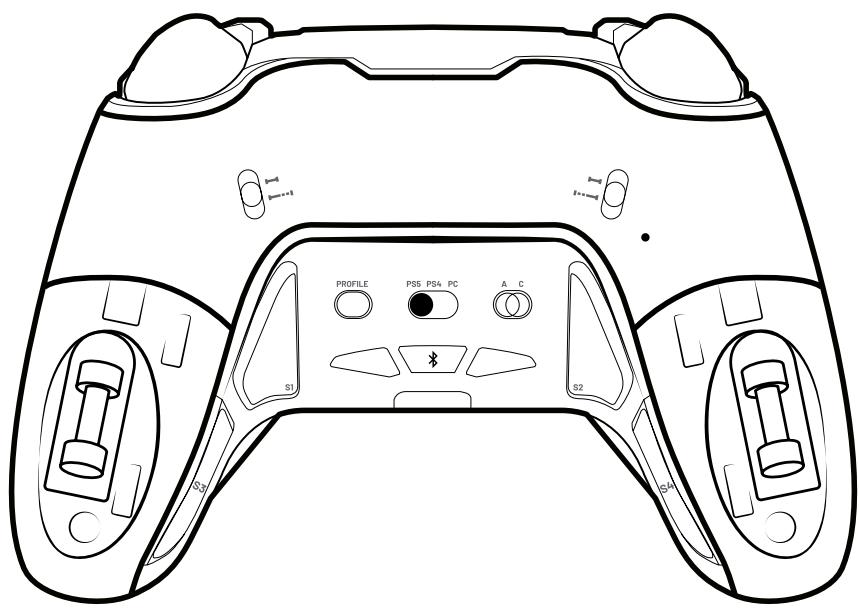
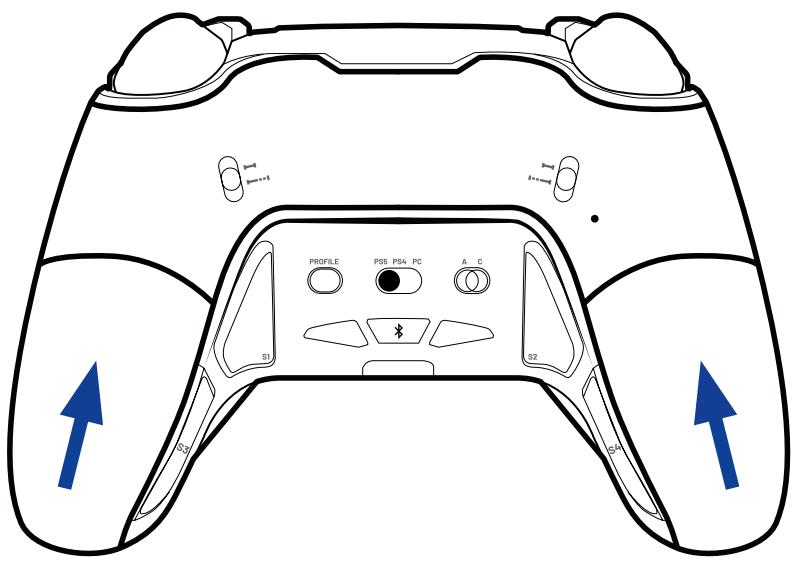
Joysticks, D-Pad and Hand grips
Customize your controller with a range of accessories:
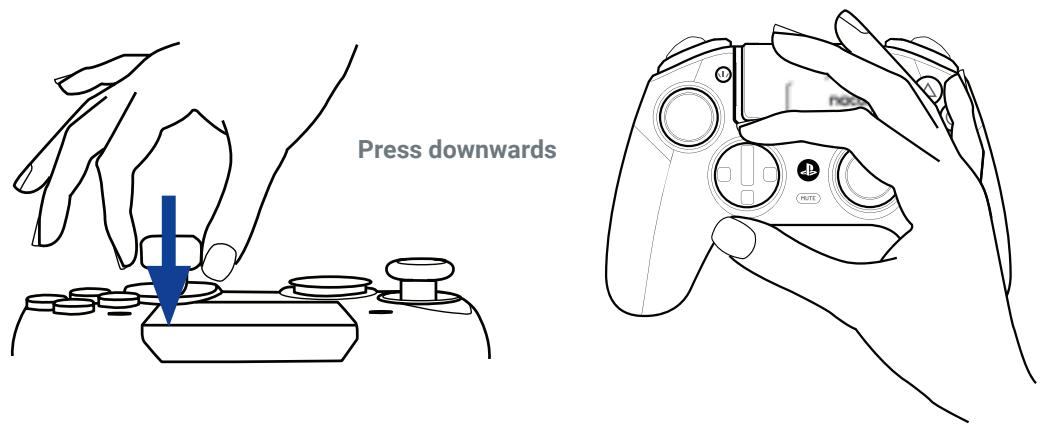
- Remove the joystick head or directional cross (as shown below): Grasp the directional cross or joystick head two fingers and pull.
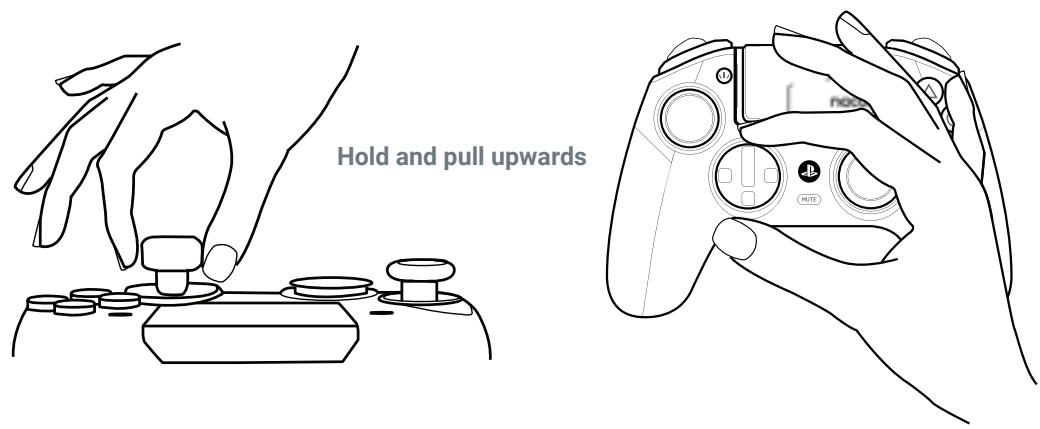
- Installation of a new joystick head or directional cross: Position the head or cross on its dedicated slot and press until the part engages and you hear a «click».
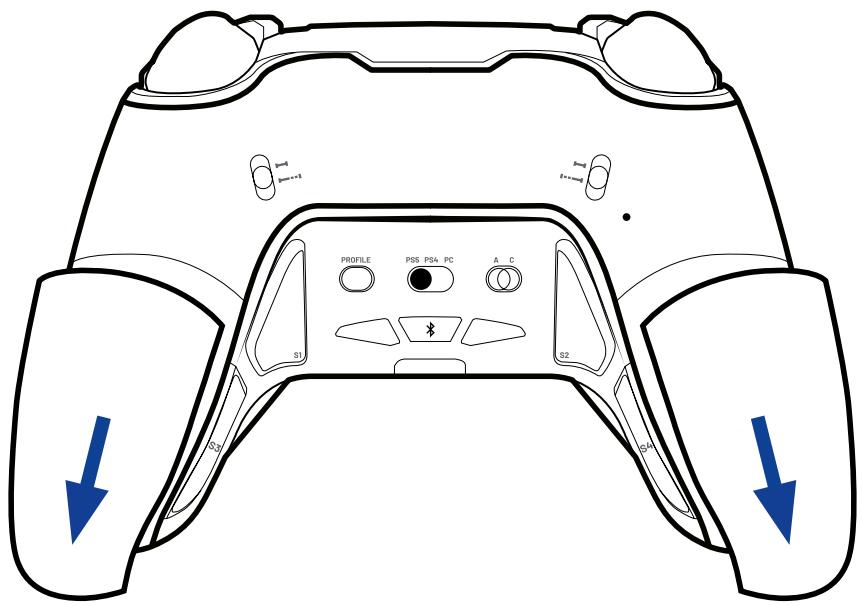
- Changing the hand grip weights: To replace the weights push and slide the hand grip covers to remove them. Insert the required weight and slide the cover back in to position until you hear a "click".
Using your controller on a PlayStation®5 console

Make sure that the format selector button is set to PS5 ^® .
If you are playing in Wired Mode:

Make sure that the Wired/Wireless mode button is in the Wired icon position (as shown above).
Using the USB-A to USB-C cable provided connect your controller to your console. Press the PS home button and your controller is ready to use.
If you are playing in Wireless Mode:

Make sure that the Wired/Wireless mode button is in the Wireless icon position (as shown above).
Make sure that your USB dongle is properly connected to the console.
Press the PS home button and your controller is ready to use.
Using your controller on a PlayStation®4 console

Make sure that the format selector button is set to PS4 ^™ .
If you are playing in Wired Mode:

Make sure that the Wired/Wireless mode button is in the Wired icon position (as shown above).
Using the USB-A to USB-C cable provided, connect your controller to your console.
Press the PS home button and your controller is ready to use.
If you are playing in Wireless Mode:

Make sure that the Wired/Wireless mode button is in the Wireless icon position (as shown above).
Make sure that your USB dongle is properly connected to the console.
Press the PS home button and your controller is ready to use.
I Using your controller on a PC\*

Make sure that the format selector button is set to PC*.
If you are playing in Wired Mode:

Make sure that the Wired/Wireless mode button is in the Wired icon position (as shown above).
Using the USB-A to USB-C cable provided, connect your controller to your PC.
Your controller will be auto-detected and is ready to use.
If you are playing in Wireless Mode:

Make sure that the Wired/Wireless mode button is in the Wireless icon position (as shown above)
Make sure your USB dongle is properly connected to the PC*.
Press the PS home button and your controller is ready to play.
I Trigger Stopper
To activate or deactivate the trigger stopper, follow these steps:
- Press down the button to unlock it.
- Press and hold the button, and then slide up or down to activate/deactivate the stopper.

I Reduced trigger data range
The trigger stopper is a completely mechanical function. You can increase the reactivity of your triggers in two ways:
- IN CLASSIC MODE:The controller will vibrate once, to indicate that the short range travel is selected, and will vibrate twice to indicate that the long range travel is selected.
- IN ADVANCED MODE: Use the application and save this setting in one of your profiles.

natural_image
Technical line drawing of a mechanical component or housing (no text or symbols)Information about wireless communication
This controller uses 2.4GHz radio frequency range, so you may notice some issues if other products use the same radio frequency range.
Nacon validated operability between the PlayStation®5 console (CFI-1000 series) and this controller.
It is recommended to insert the USB dongle into the USB port at the front of your PlayStation®5 console (CFI-1000 series).
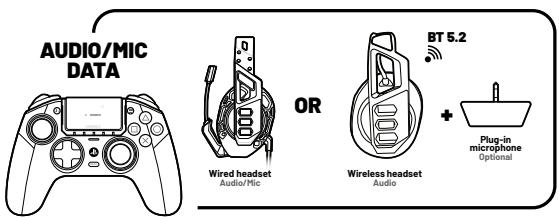
The controller uses Bluetooth 5.2 technology to communicate with Bluetooth® in-ear audio devices or other wireless headsets. In this situation, Bluetooth and RF communication operate simultaneously without interference. It is also possible to connect the external microphone to the 3.5mm jack port for data transmission from the microphone. If headphones are connected to the jack, audio and microphone data will only be transmitted via the audio jack and Bluetooth will be disabled.
If a wired headset is connected to the 3.5mm jack port, it is not possible to connect or pair a Bluetooth® headset or in-ear headphones to the controller. If you try, the light ring, around the Right joystick, will flash Red for 5 seconds to indicate that this action is not recognised.
If n-ear audio devices are connected to the jack port, it will not be possible to pair or connect in-ear headphones or wireless headphones.
I The Magnetic Hall Effect
By creating a magnetic field, which prevents friction and mechanical wear on key components, the lifespan is greatly increased compared to traditional mechanisms.
In addition Hall Effect technology does not suffer prom joystick `drift' that is associated with conventional mechanisms.
I Vibration
The controller is equipped with a vibration engine which is only compatible with PC* and PS4™ games. In PS5® mode on PS5® games played on the PS5® console, the controller will not vibrate.
Classic & Advanced modes
Classic mode: your controller will act as a classic PS5 ^® , PS4 ^TM or PC controller.
You can access the following customization options `on the fly' without the need for any App:
- Mapping of the 4 rear shortcut buttons.
- Trigger travel data range, via the trigger stopper position.
- Audio control, via the touchpad.
Advanced mode: can be accessed by using the Revolution 5 Pro App and gives you the full customization experience.
Download the App at https://nacongaming.com/revolution-5-pro and follow the tutorial. Enjoy!
Your controller is pre-loaded with 4x profiles so you can experience the range of features.
Profile 1: Racing – adapted for driving and racing games.
Profile 2: FPS – adapted with a reactive curve on your Left joystick for quick movement and a progressive curve on the Right joystick for precision aiming.
Profile 3: Arcade fighting – adapted with an instant curve on the Left and Right triggers for a quicker reaction time.
Profile 4: Infiltration – adapted with an ultra reactive curve on the Left joystick for quick movement and a delay on the Right joystick for precision actions.
Using the App you can create and share your profiles with your friends and the gaming community.
You will need to use the dedicated application to customize the shortcuts, as these settings will need to be linked to one of the 4 profiles available.
• IN CLASSIC MODE
- Press and hold the Multi-function button for 3 seconds. The light-ring, around the Right joystick, will start to flash;
- Now press the rear shortcut button that you want to program;
- The Profile LED, which is linked to the selected rear shortcut, will light up – see image below
- Then press the button that you want to associate with the shortcut;
- The profile LED will flash 3 times to indicate that the mapping was applied to the selected shortcut.
- Repeat these steps for each shortcut or if you want to change an existing setting.
- Apply a short press, on the Multi-function button, to leave this mode and save your settings. The light-ring will stop flashing.

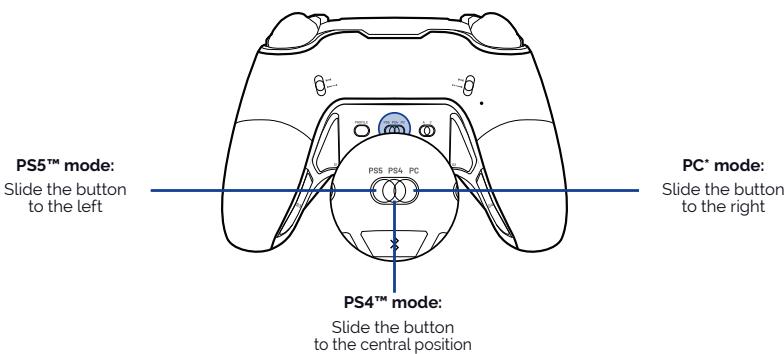
natural_image
Line drawing of a PlayStation controller with labeled buttons and a central screen (no text or symbols beyond standard icons)S1 is being mapped
Profile LED 3 is in:
White (PS5 mode)
or
Blue (PS4 mode)
or
Purple (PC mode),
the other LEDs are OFF.
natural_image
Line drawing of a PlayStation controller with labeled buttons and a central screen (no text or symbols beyond standard icons)S2 is being mapped
Profile LED 1 is in:
White (PS5 mode)
or
Blue (PS4 mode)
or
Purple (PC mode),
the other LEDs are OFF.
natural_image
Line drawing of a PlayStation controller with labeled buttons and a central screen (no text or symbols beyond standard icons)S3 is being mapped
Profile LED 4 is in:
White (PS5 mode)
or
Blue (PS4 mode)
or
Purple (PC mode),
the other LEDs are OFF.
natural_image
Line drawing of a PlayStation controller with labeled buttons and a central screen (no text or symbols beyond standard icons)S4 is being mapped
Profile LED 2 is in:
White (PS5 mode)
or
Blue (PS4 mode)
or
Purple (PC mode),
the other LEDs are OFF.
Advanced mode settings via the dedicated PC application (APP)
Up to 4 fully customizable profiles via the dedicated PC application available on the nacongaming.com website. The application (APP) is compatible with Windows 10, 11 and MAC.
Once you've installed the application, you can customize your controller and have fun testing and optimizing your settings for your favorite games.
Please note: Up to 4 custom profiles can be saved.
I Features of the Application
- Customize the amplitude of the left and right joysticks and their dead zones.
- Reassign functions to the joystick buttons (with the exception of the Share, Options and PS buttons).
- Modify the dead zones on the left and right triggers.
- Customize the intensity of the joystick vibrations.
- Choose between the different D-pads available: 8 directions or 4 directions.
- Customize shortcuts.
- Controller firmware updates.
- Mode change tutorial: Classic/Advanced.
I Launching the application (APP)
Once you have downloaded the application make sure that the controller is connected to your PC before opening the application. Also make sure that:
- The Mode selection button is on the in wired mode.
- The format button in PS5 ^® or PS4 ^™ .
- The Classic/Advanced mode switch is in Advanced mode.
Now you are ready, you can start the application and follow the on-screen instructions to personalize your profile.
Once you have personalized your profile and closed the application, you can switch from one mode to the other by pushing the switch to the «C» marking for Classic mode or to the «A» marking for Advanced mode. You can switch from one profile to another by pressing the profile button.
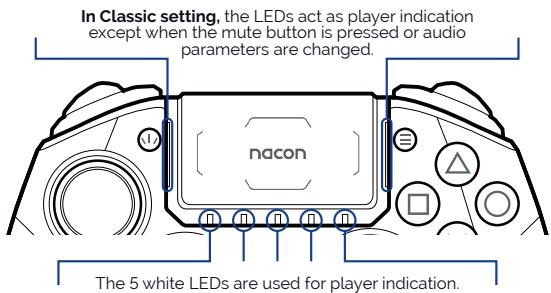
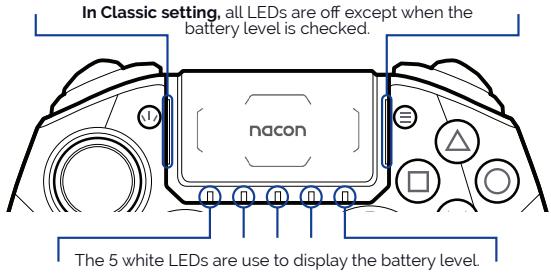
Indicator LEDs
- Player profile + Audio/Microphone settings + Mute status
- PS5 ^® player number + Battery level on demand (PS4 ^™ /PC ^* ) + Battery charging in OFF mode.
- System Mode (PS5®/PS4™/PC*) + Multifunction + Bluetooth® pairing.
- In PS5® Mode:
Classic Mode: LEDs on = microphone muted, either volume up/down or microphone return, profile number indicated.
Advanced Mode: Muted microphone, Profile number indicator.

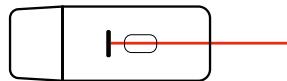
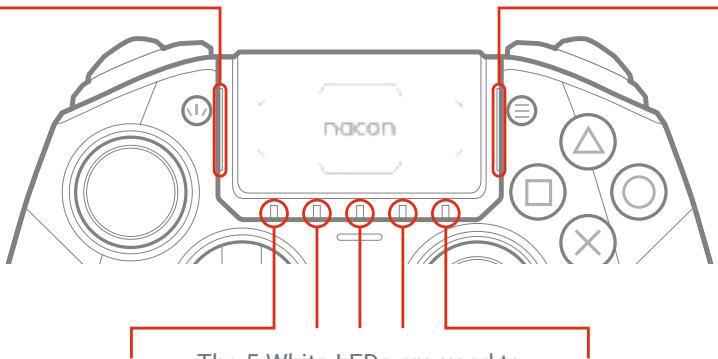
The 5 White LEDs are used to indicate the player number
natural_image
Simple line drawing of a rectangular object with a vertical line and a horizontal red line extending from its right side (no text or symbols)The RGB LED on the USB dongle indicates that pairing is in progress.
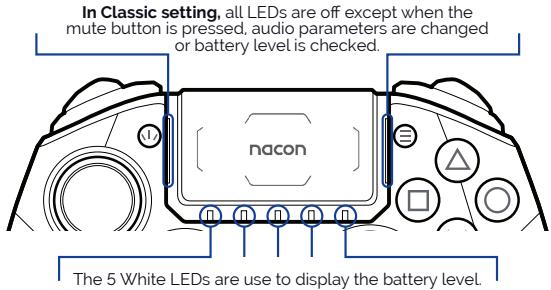
- In PS4™ Mode:
Classic Mode: The LEDs remain off except to indicate activation of the mute or increase/decrease of the microphone volume or gain.
Advanced Mode: These 4 LEDs indicate the profile number.
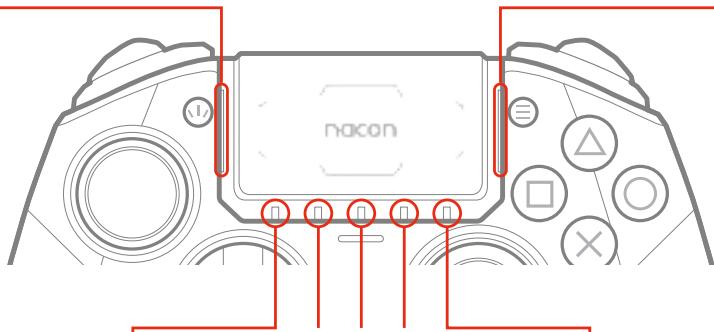
The 5 White LEDs are used to indicate battery level on request.

The RGB LED on the USB dongle indicates that pairing is in progress.
- In PC\* Mode:
Classic Mode: The LEDs stay off.
Advanced Mode: These 4 LEDs are used to indicate the profile.
The 5 White LEDs are used to indicate battery level on request
I Audio control via the touchpad
The sound equalizer (also called an “EQ”) is an audio filter that isolates certain frequencies and either boosts them, lowers them, or leaves them unchanged.
With the multifunction button, you can use your touchpad to adjust your audio settings.
- CLASSIC MODE
Increase or decrease headset microphone feedback:
Press up to increase the microphone feedback, down to decrease it.
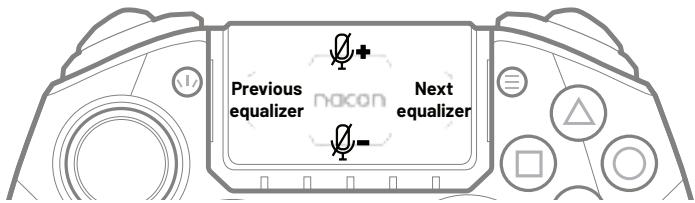
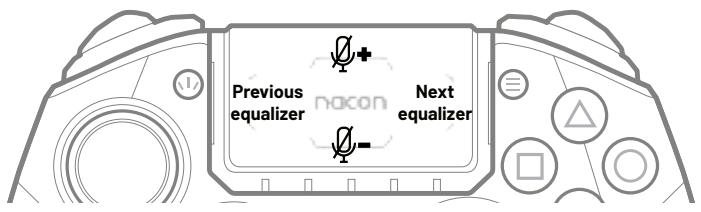
Equalizer:
To select a equalizer profile, short press on the multifunction button and use the touchpad to scroll through the Sound equalizer by pressing left/right on it. You can now navigate between the 4 different profiles of audio equalizers as illustrated below:
| Frenquency (Hz) | 62 | 250 | 1000 | 4000 | 8000 | |
| Q=f/delta f | 1 | 2 | ||||
| NO EQ | NO EQ | 0 | 0 | 0 | 0 | 0 |
| EQ 1 | Racing - sports | 6 | 3 | 0 | 0 | 3 |
| EQ 2 | FPS | 0 | 0 | 2 | 2 | 0 |
| EQ 3 | Arcade - Fighting | 6 | 3 | 0 | 0 | 0 |
| EQ 4 | Chat | -6 | 0 | 0 | -4 | 0 |
 |  |  |  |  |
| No EQ | EQ 1 | EQ 2 | EQ 3 | EQ 4 |
| All the LEDs are OFF. | The LED 1 is in White, the other LEDs are OFF. | The LED 1 and LED 2 are in White, the other LEDs are OFF. | The LED 1, LED 2 and LED 4 are in White, the other LEDs are OFF. | All the LEDs are in White. |
Sound equalizer: Activation/deactivation.
To activate/desactivate the equalizer, short press on the multifunction button and use the touchpad by pressing left/right on it.
To custom your own equalizer use the Revolution 5 Pro App.
While in this mode, the light ring around the Right-hand joystick will flash continuously in White - Blue - Purple - White - Blue - Purple until you have finished using these microphone gain and equalizer functions.
Audio functions
Volume control
When an audio device is connected to the controller, press ‘+’ to increase the volume and ‘-’ to decrease it.
Bluetooth® pairing
To pair the controller to Bluetooth ^® true wireless earbuds or headset follow these steps:
- Put the controller and true wireless earbuds/headset next to each other.
- Put the Bluetooth® true wireless earbuds/headset in to pairing mode.
- Press and hold the Bluetooth® button on the controller for 6 seconds.
- The controller will go in to pairing mode and light ring around the Right joystick will flash blue.
- When the controller is paired, the halo ring will stop flashing.
- Future connections of the same true wireless earbuds/headset, will pair automatically.
NOTE: The controller cannot connect to the console, via Bluetooth.
How to charge your Revolution 5 pro controller
- The Revolution 5 pro controller contains a Lithium Ion battery.
- To charge the battery connect the USB-A to USB-C cable to your PS5 ^® , PS4 ^TM or PC and then to the controller. For the shortest charge time make sure your controller is powered OFF. If you wish to use the controller, and charge at the same time, then the battery will 'trickle' charge and the charge time will be extended
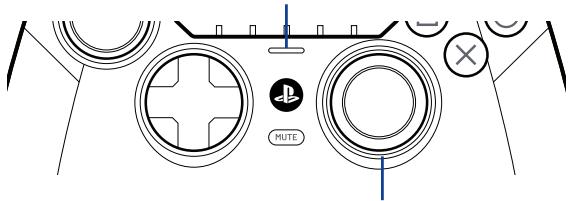
- To check the battery capacity in PS5 ^® mode, when you are connected via the cable, tap the back of the controller twice and the White LEDs, below the Touchpad, will light up. There are 5x LEDs and they indicate the capacity as follows:
$$ \begin{array}{l} 5x \text{LEDs} = 100 - 80\% \ 4x \text{LEDs} = 80 - 60\% \ 3x \text{LEDs} = 60 - 40\% \ 2x \text{LEDs} = 40 - 20\% \ 1 \times \text { LED } = 20 - 10 \% \ \end{array} $$
NOTE: When the battery capacity is below 10% then the 1x LED will start to flash. You need to immediately charge the battery.
To check the battery capacity in PS5 ^® mode, when you are connected via the USB dongle, then go to the PS5 ^® on-screen menu and you will see the battery level in the bottom left of your TV/Monitor screen.
To check the battery capacity, in PS4 ^TM and PC modes, tap the back of the controller twice and the White LEDs, below the Touchpad, will light up. There are 5x LEDs and they indicate the capacity as follows:
$$ \begin{array}{l} 5x \text{LEDs} = 100 - 80\% \ 4x \text{LEDs} = 80 - 60\% \ 3x \text{LEDs} = 60 - 40\% \ 2x \text{LEDs} = 40 - 20\% \ 1 \times \text { LED } = 20 - 10 \% \ \end{array} $$
NOTE: When the battery capacity is below 10% then the 1x LED will start to flash. You need to immediately charge the battery.
REMARK: Battery life is influenced by the features you have activated and the games you are playing. The more features you have activated the quicker your battery life will be used.
To optimise play time you can use the Revolution 5 Pro App to disable certain features such as LED's and vibration.
Recycling

This symbol on the product or on its packaging indicates that this product shall not be treated as household waste. Instead it should be taken to an applicable collection point for the recycling of electrical and electronic equipment. By ensuring that this equipment is disposed of correctly you will help prevent potential negative consequences for the environment and human health, which could otherwise be caused by inappropriate waste handling of this product. The recycling of materials will help to conserve natural resources. For more information please contact your local council or waste disposal service. EU, UK and Turkey only.
Turkey
If you require further information about this legislation please click on the link http: www.tukcev.org.tr/assets/yonetmelikler/AEEEYonetmeligi.pdf
I Important precautions
1/ This product is designed for indoor use only. Do not expose it to direct sunlight or bad weather.
2/ Do not expose the product to splashes, rain, drips or moisture. Do not immerse it in a liquid.
3/ Do not expose to dust, high levels of humidity, extreme temperatures or mechanical shocks.
4/ Do not use and do not open if the equipment is damaged. Do not attempt to repair it.
5/ When cleaning the outside, only use a soft, clean and damp cloth. Detergents can damage the finish and get inside the product.
6/ Do not carry the product while holding it by the cable.
7/ This product is not designed for people (including children) suffering from a physical, sensory or mental disability, or for users without the necessary and relevant experience or knowledge (unless they have been given advice and instructions on how to use the device from a person responsible for the user).
Do not leave the product unattended, do not leave this product within the reach of children. Not suitable for children under 7 (the cable can get wrapped around the neck).
This product shall not be connected to power supply source exceeding 15W. rated 5VDC 500mA.
I Precautions for use regarding the battery
WARNING: If your product has a built-in, non-replaceable battery, do not attempt to open the product or remove the battery, as you may damage the product and/or injure yourself. If your product has a built-in replaceable battery, only use the type of battery supplied by Nacon/RIG. Used batteries should be removed promptly and taken to appropriate collection centres. RECYCLING: The product battery should be recycled or disposed of in the proper manner. Contact your local recycling centre for instructions on battery removal and disposal. The battery has a limited lifespan. Battery charge duration gradually increases with repeated usage and age. Battery life also varies depending on the storage method, usage state, environment and other factors. Charging may not be as effective when performed in other environments. Battery duration may vary depending on the usage condition and environmental factors. When not in use: When the controller is not used for an extended period of time, it is recommended that you fully charge it at least once a year in order to maintain its functionality.
WARNING: Risk of fire, explosion and burns. Do not leave your charged battery for an extended period without the product being used. Prevent metal objects such as keys or coins from coming into contact with a battery or its holder.
Do not attempt to open or damage the battery. It may contain corrosive products which are dangerous if they come into contact with eyes or skin and are toxic if ingested.
Never put a battery in your mouth. If ingested, contact a doctor or poison control centre.
If the product contained in the battery comes into contact with your clothes, skin or eyes, please wash thoroughly with clear water and contact your doctor immediately.
Always keep batteries out of the reach of children.
Never throw a battery into a fire or oven; crushing or cutting a battery may cause an explosion;
A battery should not be subjected to extremely high or low temperature, low air pressure at high altitude during use, storage or transportation, as this may cause an explosion or leakage of flammable liquid or gas
I Ergonomics
Keeping your hand in the same position for a prolonged period of time can result in pain. If this happens repeatedly, please consult your doctor.
As a precaution, take a 15-minute break every hour.
I Technical support
For any information you can contact a hotline. Before calling, make sure you have gathered as much information as possible about the problem and the product.
UK
Email: support@nacongaming.com
Tel.: (+44)08081010970
Australia
Email: support.us@nacongaming.com
Email: support@nacongaming.com
US/Canada email
(English/French)
Email: support.us@nacongaming.com
(Spanish)
Email: soporte@nacongaming.com
US/Canada Phone Support
(English/French/Spanish)
Tel.: 1-833-622-6687
I EU Declaration of Conformity
Product: REVOLUTION 5 PRO for PS5®
Manufacturer: Nacon
Nacon declares that this product is in compliance with the Union harmonisation legislation:
• Directive 2014/30/EU for Electromagnetic Compatibility
- Directive 2011/65/EU the restriction of the use of certain hazardous substances in electrical and electronic equipment
The full text, of the EU Declaration of Conformity, is available at the following website: my.nacongaming.com/en-GB/support
I UK Declaration of Conformity
Product: REVOLUTION 5 PRO for PS5®
Manufacturer: Nacon
Nacon declares that this product is in compliance with the United Kingdom legislation:
• Electromagnetic Compatibility Regulations 2016
- The restriction of the use of certain hazardous substances in electrical and electronic equipment regulations 2012
The full text, of the UK Declaration of Conformity, is available at the following website: my.nacongaming.com/en-GB/support
I FCC: Declaration of Conformity
United states
This product complies with Part 15 of the FCC Rules. Operation is subject to the following two conditions: (1) this device may not cause harmful interference, and (2) this device must accept any interference received, including interference that may cause undesired operation.
Warning: Changes or modifications not expressly approved by the party responsible for compliance could void the user's authority to operate the equipment.
Note: This equipment has been tested and found to comply with the limits for a Class B digital device, pursuant to part 15 of the FCC Rules. These limits are designed to provide reasonable protection against harmful interference in a residential installation. This equipment generates, uses and can radiate radio frequency energy and, if not installed and used in accordance with the instructions, may cause harmful interference to radio communications. However, there is no guarantee that interference will not occur in a particular installation. If this equipment does cause harmful interference to radio or television reception, which can be determined by turning the equipment off and on, the user is encouraged to try to correct the interference by one or more of the following measures:
- Reorient or relocate the receiving antenna.
- Increase the separation between the equipment and receiver.
- Connect the equipment into an outlet on a circuit different from that to which the receiver is connected.
- Consult the dealer or an experienced radio/TV technician for help.
This equipment complies with FCC radiation exposure limits set forth for an uncontrolled environment.
ICES
This equipment complies with IC radiation exposure limits set forth for an uncontrolled environment.
ICES statement: This device complies with Industry Canada's license - exempt RSSs. Operation is subject to the following two conditions: (1) this device may not cause harmful interference, and (2) this device must accept any interference received, including interference that may cause undesired operation."
MANUFACTURER / FABRICANT :
NACON - 396 - 466 Rue de la Voyette, CRT2 - 59273 Fretin, France
1124 8TH Street, Kirkland, WA 98033 USA
Nacon Pty. Ltd.
Level 2/20 Bond Street, Sydney NSW 2000 Australia
SUPPORT :
UK, support@nacongaming.com
Tel.: +44 08081010970
BELGIQUE, support.be@nacongaming.com
NEDERLAND, support.nl@nacongaming.com
ESPAÑA, support.es@nacongaming.com
Tel.: +34 900993359
ITALIA, support.it@nacongaming.com
Tel.:+39 800172494
USA/CANADA, support.us@nacongaming.com
AUSTRALIA, support.us@nacongaming.com
MEXICO, soporte@nacongaming.com

natural_image
Abstract black and white circular logo with stylized leaf-like shapes (no text or symbols)nacon
WWW.NACONGAMING.COM

@NaconGaming

Nacongaming

Nacon International
natural_image
Black PlayStation 3.0 controller with controllers and a central screen (no visible text or symbols)REVOLUTION 5 PRO
GUIDE DE DÉMARRAGE
" ", "PlayStation", "PS5", "PS4" and "PlayStation Shapes Logo" are registered trademarks or trademarks of Sony Interactive Entertainment Inc. All other trademarks are the property of their respective owners. Manufactured and distributed under license by Sony Interactive Entertainment.
© 2023 NACON
Made in China

natural_image
Two sets of black curved lines on white background, no text or symbols presentnatural_image
Technical line drawing of a mechanical component or bracket (no text or symbols)Informations relatives au support technique
Email : support.be@nacongaming.com
Site Internet : www.nacongaming.com
I UK Declaration of Conformity
Product: Revolution 5 Pro for PS5™
Manufacturer: Nacon
Nacon declares that this product is in compliance with the United Kingdom legislation:
• Electromagnetic Compatibility Regulations 2016
- The restriction of the use of certain hazardous substances in electrical and electronic equipment regulations 2012
The full text, of the UK Declaration of Conformity, is available at the following website: my.nacongaming.com/en-GB/support
I FCC: Declaration of Conformity
United states
This product complies with Part 15 of the FCC Rules. Operation is subject to the following two conditions: (1) this device may not cause harmful interference, and (2) this device must accept any interference received, including interference that may cause undesired operation.
Warning: Changes or modifications not expressly approved by the party responsible for compliance could void the user's authority to operate the equipment.
Note: This equipment has been tested and found to comply with the limits for a Class B digital device, pursuant to part 15 of the FCC Rules. These limits are designed to provide reasonable protection against harmful interference in a residential installation. This equipment generates, uses and can radiate radio frequency energy and, if not installed and used in accordance with the instructions, may cause harmful interference to radio communications. However, there is no guarantee that interference will not occur in a particular installation. If this equipment does cause harmful interference to radio or television reception, which can be determined by turning the equipment off and on, the user is encouraged to try to correct the interference by one or more of the following measures:
- Reorient or relocate the receiving antenna.
- Increase the separation between the equipment and receiver.
- Connect the equipment into an outlet on a circuit different from that to which the receiver is connected.
- Consult the dealer or an experienced radio/TV technician for help.
This equipment complies with FCC radiation exposure limits set forth for an uncontrolled environment.
ICES
1124 8TH Street, Kirkland, WA 98033 USA
Nacon Pty. Ltd.
Level 2/20 Bond Street, Sydney NSW 2000 Australia
SUPPORT :
UK, support@nacongaming.com
Tel.: +44 08081010970
BELGIQUE, support.be@nacongaming.com
NEDERLAND, support.nl@nacongaming.com
ESPAÑA, support.es@nacongaming.com
Tel.: +34 900993359
ITALIA, support.it@nacongaming.com
Tel.:+39 800172494
USA/CANADA, support.us@nacongaming.com
AUSTRALIA, support.us@nacongaming.com
MEXICO, soporte@nacongaming.com

natural_image
Abstract black and white circular logo with stylized leaf-like shapes (no text or symbols)nacon
WWW.NACONGAMING.COM

@NaconGaming

Nacongaming

Nacon International
Licensed for sale in the European Union, United Kingdom, Australia, New Zealand, United States, Canada. Manufactured by Nacon. - Licencié pour la vente en Union européenne, Royaume-Uni, Australie, Nouvelle-Zelande, États-Unis, Canada. Fabrique par Nacon. - Lizenziert für den Verkauf in der Europäischen Union, Großbritannien, Australien, Neuseeland, den USA und Canada. Hergestellt von Nacon. - Verkoopvergunning voor de Europese Unie, het Verenigd Koninkrijk, Australie. Nieuw-Zeeland, de Verenigde Staten en Canada. Vervaardigd door Nacon. - Autorizado para la venta en la Unión Europea, Reino Unido, Australia, Nueva Zelanda, Estados Unidos y Canada. Fabricado por Nacon. - Autorizzato alla vendita in Unione Europea. Regno Unito, Australia, Nuova Zelanda, Stati Uniti e Canada. Prodotto da Nacon. - Licenciado para venda na União Europeia, Reino Unido, Austrália, Nova Zelândia, Estados Unidos, Canada. Fabricado pela Nacon.
BATTERY POWERED PRODUCT
PRECAUTIONS FOR USE REGARDING THE BATTERY
- If your product has a built-in, non replaceable battery, do not attempt to open the product or remove the battery as you may damage the product and/or injure yourself.
- If your product has a built-in replaceable battery only use the type of battery supplied by Nacon. Used batteries should be removed promptly and taken to the appropriate collection centre.
- RECYCLING: The product, and/or battery, should be recycled or disposed of in the proper manner. Contact your local authority or recycling centre for instructions on battery and product disposal.
BATTERY LIFE AND DURATION
The battery has a limited lifespan. Battery charge duration gradually decreases with repeated use and age. Battery life also varies depending on the storage method, usage state, environment and other factors. Charging may not be as effective when performed in other environments.
WHEN THE PRODUCT IS NOT IN USE
When not in use for an extended period of time, it is recommended that you fully charge at least once per year in order to maintain its functionality.
WARNING: GENERAL BATTERY SAFETY
Battery fluid is corrosive and may be toxic. It can cause burns and may be harmful or fatal if swallowed.
To reduce the risk of injury and to use the product in a safe way:
- Keep batteries out of the reach of children
- Charge rechargeable batteries only with the charger/cable provided with your device. Using an improper charging method may result in fire or explosion.
- Do not disassemble, crush, open, puncture, short external contacts or circuits, expose to temperatura above 40^ (104°F), or dispose of batteries in fire or water.
- Unplug your charging cable during lightning storms
- Do not recharge batteries near a fire or in extremely hot conditions.
- Do not leave battery powered products, in direct sunlight, for an extended period.
- Dropping your device, especially on a hard Surface, can damage the device and its battery. We recommend that you seek professional help to inspect your device if you believe damage has occurred.
If the device has a removeable or replaceable battery then:
- Remove the batteries, from your device, before storing it for extended periods.
- Carfeully remove all old batteries by reversing the battery installation instructions provided with your device.
- Do not allow metal objects to touch the battery terminals. They can become hot and cause burns.
- Do not directly connect batteries to wall sockets or car power sockets.
- Never use a damaged battery. If the casing has any cracks or deformities immediately stop using it and dispose of it properly. Use of a damaged battery can cause electrical short circuits, overheating and other component failures.
SAFETY, PRECAUTIONS & WARNINGS
IMPORTANT NOTICES – PLEASE READ TO ENSURE SAFE OPERATION,
USE, CLEANING, AND STORAGE OF THIS PRODUCT
EN. CONTROLLERS
WARNING
RADIO WAVES WHEN USING WIRELESS PRODUCTS
Radio waves may affect electronic equipment or medical devices, (for example pacemakers), which may cause malfunctions and possible injuries. If you use a pacemaker or other medical device, consult your doctor/physician or the manufacturer of your medical device before using the wireless networking feature (Bluetooth and 2.4GHz). Do not use the wireless networking feature in the following locations: Areas where wireless network use is prohibited, such as in hospitals. Abide by medical institution regulations when using wireless devices on their premises. Areas near fire alarms, automatic doors and other types or automated equipment.
MAGNETS WHEN USING CONTROLLERS WITH VIBRATION FEATURE
This product has magnets which may interfere with pacemakers, defibrillators and programmable shunt valves or other medical devices or persons who use such medical devices. Consult your doctor/physician before using this product if you use such medical devices.
PRECAUTIONS
SAFETY
This product has been designed with the highest concern for safety. However, any electrical device, if used improperly, has the potential for causing fire, electrical shock or personal injury. To help ensure accident-free operation, follow these guidelines:
Observe all warnings, precautions, and instructions. If you are unsure about any information in this manual contact the appropriate Nacon / RIG consumer service which can be found in the Warranty booklet.
- Stop use and disconnect immediately if the device functions in an abnormal manner, produces unusual sounds or smells or becomes too hot to touch.
- Avoid playing when you are tired or need sleep.
- Avoid trailing any cables that could present a tripping hazard.
- This product shall not be connected to power supply source exceeding 15W. rated 5VDC 500mA.
USING THE VIBRATION FEATURE OF A CONTROLLER
- If the controller is sitting on a flat surface the vibration, during gameplay, may cause it to fall causing injury or malfunction.
- Do not use the vibration or trigger effect function (where supported) if you have any ailment or injury to the bones, joints or muscles of your hands or arms. If you have an ailment or injury do not play games with these features using the controller unless have set those functions to 'OFF'.
PHOTOSENSITIVE SEIZURE WARNING
A very small percentage of people may experience a seizure when exposed to certain visual images, including flashing lights or patterns that may appear in video games. Even people who have no history of seizures or epilepsy may have an undiagnosed condition that can cause these "photosensitive epileptic seizures" while playing video games.
Immediately stop playing and consult a doctor if you experience any symptoms.
These seizures may have a variety of symptoms, including lightheadedness, altered vision, eye or face twitching, jerking or shaking of arms or legs, disorientation, confusion, or momentary loss of awareness. Seizures may also cause loss of consciousness or convulsions that can lead to injury from falling down or striking nearby objects.
Parents should watch for or ask their children about the above symptoms.
Children and teenagers are more likely than adults to experience these seizures.
You may reduce risk of photosensitive epileptic seizures by taking the following precautions:
- Play in a well-lit room.
- Do not play if you are drowsy or fatigued.
If you or any of your relatives have a history of seizures or epilepsy, consult a doctor before playing video games.
SMALL CHILDREN
Keep this product out of reach of small children. Small children may swallow small parts or wrap the cables around themselves which may cause injury, an accident or malfunction.
USE AND HANDLING
BREAKS
- Avoid prolonged use of your gaming system/console. Take a 15-minute break during each hour of play.
- Stop using the product immediately if you begin to feel tired or if you experience discomfort or pain in your hands or arms while operating a controller. If symptoms persist consult a doctor/physician.
- If you experience any of the following health conditions discontinue use of the controller immediately. If symptoms persist, consult a doctor/physician:
- Dizziness, nausea, fatigue or symptoms similar to motion sickness.
- Discomfort or pain in a part of the body, such as eyes, ears, hands or arms.
STATIC SHOCK
When using controllers, particularly in dry air conditions, you may sometimes experience a small and quick (static) shock. This is a result of static electricity accumulated in the body and is not a malfunction of your controller.
MOTION SENSOR (WHERE SUPPORTED)
- When using the motion sensor function, of a controller, be cautious of the following points. If the controller hits a person, or object, it may cause accidental injury or damage.
- Before using the motion sensor function make sure you have enough space to move around.
- Firmly grip the controller to prevent it from slipping out of your hands and causing damage or injury.
- If using a controller, that is connected to a console with a USB cable, make sure there is enough space for the cable so that the cable will not hit a person or object.
LED INDICATORS (WHERE SUPPORTED)
Do not stare at the LEDs, on the product, when they are blinking/flashing. If you experience discomfort or pain anywhere in or on your body from light simulation, discontinue use immediately.
PLACING AND HANDLING
- Do not place the product on surfaces that are unstable, tilted or subject to vibration.
- Do not place the product on the floor or in a place where it may cause someone to trip or stumble.
- Do not allow liquid or small particles to get into the product.
- Do not touch the product with wet hands.
- Do not touch the product during an electrical storm.
- Do not throw or drop the product or subject it to strong physical shock.
- Do not stand on or put objects on the product.
- Do not touch the ports or insert any foreign objects into the product.
- If there are pieces of dust or foreign objects into the product, never disassemble or modify the product.
• The product and its parts are made from metal and plastic materials. When disposing of the product, follow local regulations for the proper disposal of such materials.
CLEANING
Follow the instructions below to help prevent the product exterior from deteriorating or becoming discoloured.
- Wipe with a soft dry cloth.
- Do not apply insecticides or other volatile substances.
- Do not place any rubber or vinyl materials on the product exterior for an extended period of time.
- Do not use solvents or other chemicals. Do not wipe with a chemically treated cleaning cloth.
STORAGE CONDITIONS
- Do not expose the product or battery to high temperatures, high humidity or direct sunlight during operation, transportation or storage.
- Do not leave the product in a car with the windows closed, particularly in hot weather.
- Do not expose the product to dust, smoke or steam.
- For Australia
- MANUFACTURER / Fabricant :
- REGULATORY COMPLIANCE INFORMATION
- - FCC DECLARATION OF CONFORMITY
- FCC: Declaration of Conformity
- - IC STATEMENT
- - EIRP/ DECLARATION OF CONFORMITY (UK + EU)
- EIRP STATEMENT
- EU DECLARATION OF CONFORMITY
- UK DECLARATION OF CONFORMITY
- UK RE Regulation 'Informal DoC' statement
- DÉCLARATION EIRP
- EU DECLARATION DE CONFORMITÉ
- REVOLUTION 5 PRO
- Quick Start Guide
- THANK YOU FOR YOUR PURCHASE!
- I Packaging contents
- I Additional information
- I Charging the Battery
- I Application
- ADVANCED MODE
- I 1 - Wired / Wireless connection
- I 2 - Format selection
- I 3 - How to connect to a PlayStation® console
- FOR WIRED CONNECTION
- FOR WIRELESS CONNECTION
- I 4 - LED indications
- WHEN THE CONTROLLER IS IN PS4™ FORMAT
- WHEN THE CONTROLLER IS IN PC\* FORMAT
- I 5 - Audio functions
- VOLUME CONTROL
- BLUETOOTH® PAIRING
- THE CONTROLLER HAS PRE-SET EQ LEVELS
- I 6 - Shortcut mapping
- IN CLASSIC MODE
- I 7 - Trigger Stopper
- TO ACTIVATE / DEACTIVATE THE TRIGGER STOPPER
- I 8 - Reducing Trigger Data Range
- IN ADVANCED MODE
- I 9 - Vibration
- I Sony statement
- nacon
- START GUIDE
- Thank you for purchasing this NACON® product.
- Contents
- Joysticks, D-Pad and Hand grips
- Using your controller on a PlayStation®5 console
- If you are playing in Wired Mode:
- If you are playing in Wireless Mode:
- Using your controller on a PlayStation®4 console
- I Using your controller on a PC\*
- I Trigger Stopper
- I Reduced trigger data range
- Information about wireless communication
- I The Magnetic Hall Effect
- I Vibration
- Classic & Advanced modes
- • IN CLASSIC MODE
- Advanced mode settings via the dedicated PC application (APP)
- I Features of the Application
- I Launching the application (APP)
- Indicator LEDs
- - In PS5® Mode:
- - In PS4™ Mode:
- - In PC\* Mode:
- I Audio control via the touchpad
- - CLASSIC MODE
- Equalizer:
- Sound equalizer: Activation/deactivation.
- Audio functions
- How to charge your Revolution 5 pro controller
- Recycling
- Turkey
- I Important precautions
- I Precautions for use regarding the battery
- I Ergonomics
- I Technical support
- I EU Declaration of Conformity
- I UK Declaration of Conformity
- I FCC: Declaration of Conformity
- United states
- ICES
- SUPPORT :
- GUIDE DE DÉMARRAGE
- Informations relatives au support technique
- BATTERY POWERED PRODUCT
- PRECAUTIONS FOR USE REGARDING THE BATTERY
- BATTERY LIFE AND DURATION
- WHEN THE PRODUCT IS NOT IN USE
- WARNING: GENERAL BATTERY SAFETY
- SAFETY, PRECAUTIONS & WARNINGS
- CONTROLLERS
- WARNING
- RADIO WAVES WHEN USING WIRELESS PRODUCTS
- MAGNETS WHEN USING CONTROLLERS WITH VIBRATION FEATURE
- PRECAUTIONS
- SAFETY
- USING THE VIBRATION FEATURE OF A CONTROLLER
- PHOTOSENSITIVE SEIZURE WARNING
- Immediately stop playing and consult a doctor if you experience any symptoms.
- SMALL CHILDREN
- USE AND HANDLING
- BREAKS
- STATIC SHOCK
- MOTION SENSOR (WHERE SUPPORTED)
- LED INDICATORS (WHERE SUPPORTED)
- PLACING AND HANDLING
- CLEANING
- STORAGE CONDITIONS
Brand : Nacon
Model : NC4533 REVOLUTION 5 PRO
Category : Headphones