USER MANUAL RJMK25 RockJam
RJMK25 25-Key MIDI Keyboard Controller
Be sure to follow the following information so as not to harm yourself or others or damage this instrument or other external equipment. Keep this user guide for future reference.
USB Charge Cable:
- Do not place the USB charge cable near to any source of heat such as radiators or other heaters.
- To avoid damaging the USB cable, please ensure that heavy objects are not placed on it and that it is not subject to stress or over bending.
- Do not insert or unplug the USB charge cable with wet hands.
Do not open the body of the MIDI keyboard:
- Do not open the MIDI keyboard or try to disassemble any part of it. If the keyboard is not functioning correctly, please stop using it and send it to a qualified service agent for repair.
Use of the MIDI keyboard:
- To avoid damaging the appearance of the MIDI keyboard or damaging the internal parts please do not place the MIDI keyboard in a dusty environment, in direct sunlight or in places where there are extremely high or low temperatures.
- Do not place the MIDI keyboard on an uneven surface. To avoid damaging internal parts do not place any vessel holding liquid onto the electronic keyboard as spillage may occur.
Maintenance:
To clean the body of the MIDI keyboard wipe it with a dry, soft cloth only.
During operation:
- Do not place heavy objects onto the keyboard or press the keyboard with undue force.
- The packaging should be opened by a responsible adult only and any plastic packaging should be disposed of appropriately.
Specification
- Specifications are subject to change without notice.
Contents
Important Information 2
Introduction 4
Box Contents: 4
Battery Information: 4
Device Setup: 4
Recommended DAWs: 5
BluetoothMIDI: 5
Example - Setting up the MIDI Controller with Garageband: 6
Controls and External Connections 8
Front and Rear Panel 8
Arpeggiator Settings 11
Standard MIDI Control CC Messages 12
Default Settings. 13
Troubleshooting 14
Technical Specification 15
FCC Compliance Statement 16
Product Disposal Instructions (EU and UK) 17
EU and UK Regulatory Compliance 17
Introduction
Box Contents:
1 x RJMK25 MIDI Controller
1 x USB C Charging Cable
1 x User Guide
The MIDI keyboard contains a non user serviceable rechargeable Lithium Ion battery. Under no circumstances should this be replaced by the user. At the end of the product life the battery should be recycled at a local electrical waste recycling facility. The battery should not be incinerated or be disposed with general waste.
Device Setup:
To select the MIDI keyboard as a controller for your Digital Audio Workstation (DAW) or Software Synthesiser:
- Connect the controller to your computer using Bluetooth or with the USB cable supplied. If you are connecting to a USB hub, then make sure it is a powered hub.
- Open your DAW or Synth application.
- Open your DAW or Synth Settings, Options, or Device Setup, select RockJam BT MIDI as your hardware controller, and then close that window. Your controller is now able to communicate with your software.
Recommended DAWs:
Your RockJam MIDI controller has been designed to work with the following DAWs and most others.

GARAGEBAND

FLSTUDIO 20
LOGIC PRO X

BEATS
ABLETON
DAWs can be downloaded from the websites of the various developers. DAWs give you a visual and intuitive way to compose music using the MIDI messages sent from the MIDI controller.
Bluetooth MIDI:
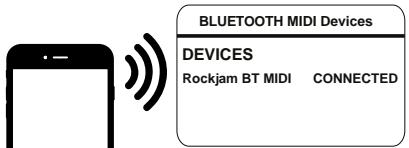
Switch on the MIDI keyboard (the Bluetooth function will switch on automatically) and then open the DAW app that supports Bluetooth MIDI operation such as 'Gargeband'. Search and connect "RockJam BT MIDI" from the APPs settings or advanced function. Press any of the keyboard keys and sound should be heard to indicate the device has been connected successfully.
Note: Do not try and connect via the standard Bluetooth Settings of the Phone or Tablet device as that will not work.
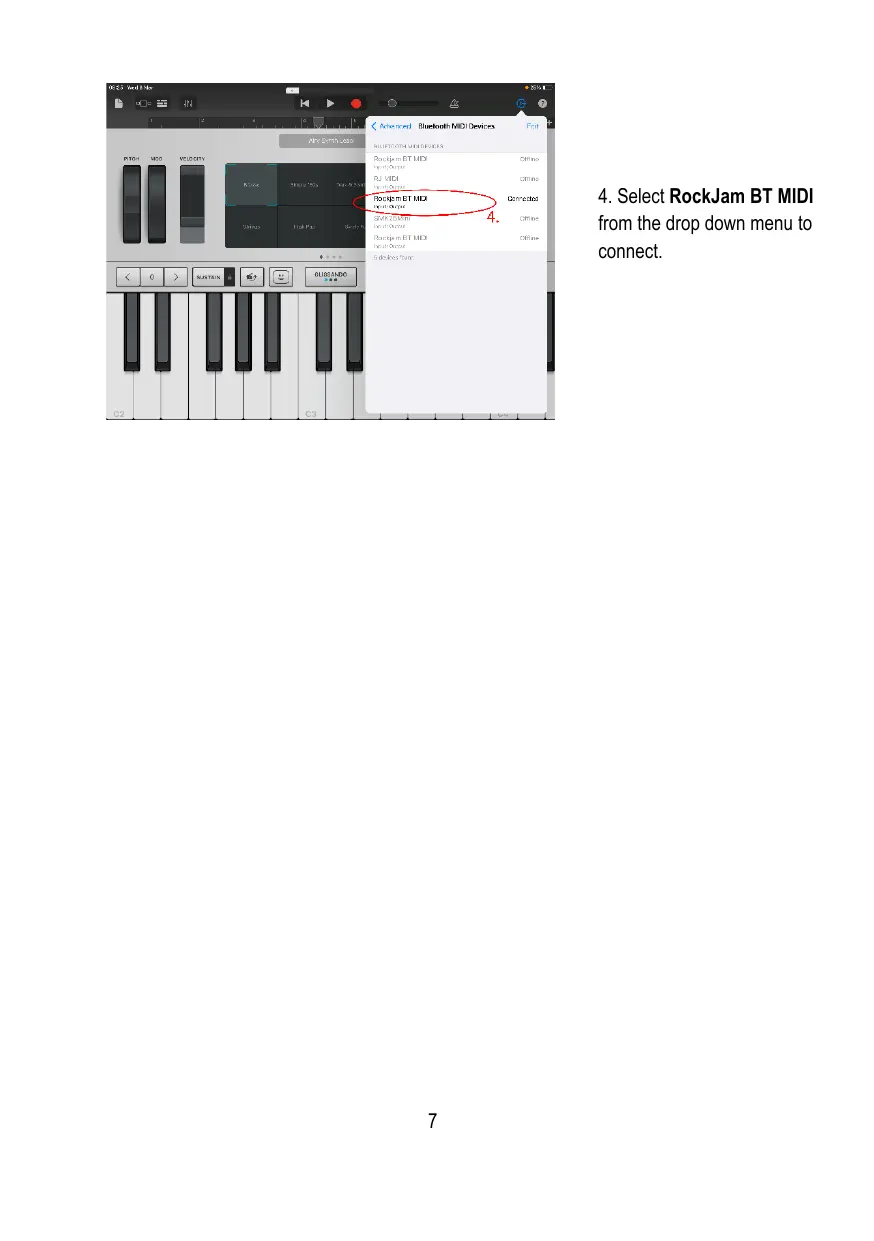
Example - Setting up the MIDI Controller with Garageband:
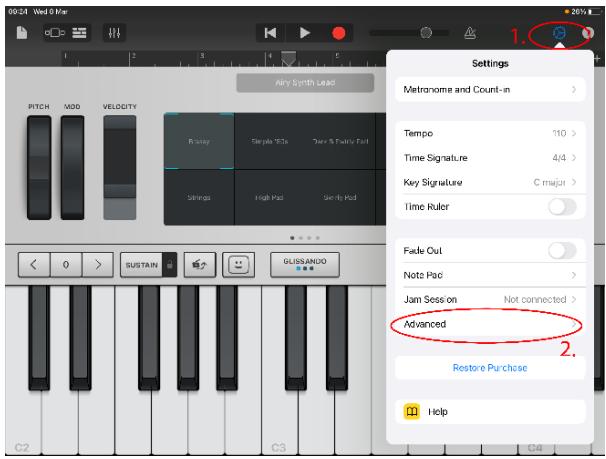
- Go to the Settings Icon
-
Select Advanced from the drop down menu.
-
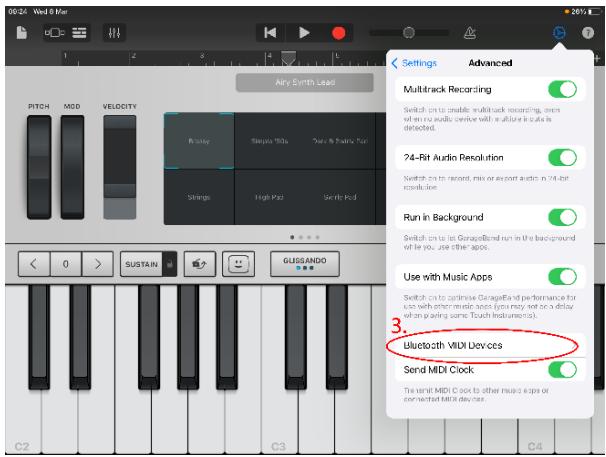
Select Bluetooth MIDI Devices.
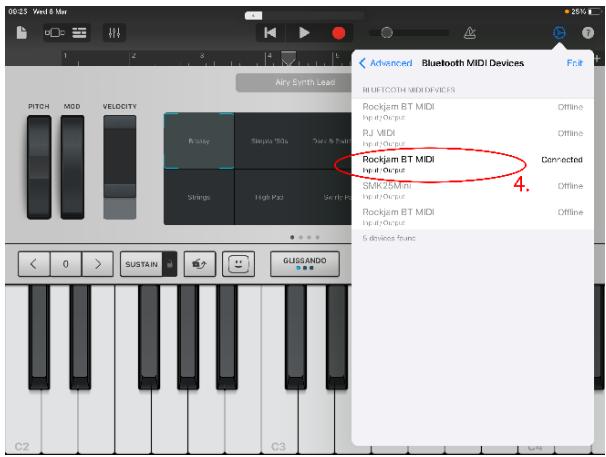
- Select RockJam BT MIDI from the drop down menu to connect.
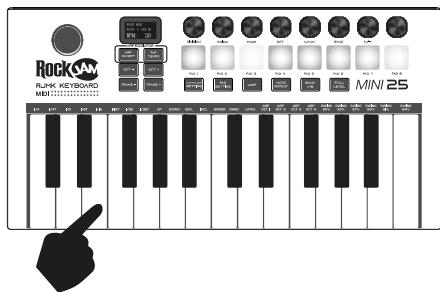
Controls and External Connections

Front and Rear Panel
- X-Y Controller: Use this 2-axis thumb stick to send MIDI Pitch Bend and Modulation (MIDI CC #001) messages.
- Display: The display shows the controller's settings. The default screen shows the currently selected programme and BPM.
- ARP On/Off: Press this button to turn the Arpeggiator on or off. Pressing it during a latched arpeggio will stop the arpeggio.
Hold down the ARP On/Off to change the arpeggior settings. The settings can be changed using the keyboard keys or the controller knobs. The arpeggior functions are written above the keys and below the control knobs.
- Tap Tempo: Tap this button at the desired rate to determine the tempo of the Arpeggiator, Note Repeat or Loop function. Press and hold the TAP TEMPO button to turn off.
Note: This button is disabled if the Arpeggiator is synced to an external clock.
- Octave Down / Up: Use these buttons to shift the keyboard's range up or down (up to three octaves in either direction). When you are higher or lower than the centre octave, the corresponding Octave button will light.
- Transpose Down / Up: Pressing the transpose buttons alters the musical scale of the note being played. You can adjust the scale by 6 levels upwards or 5 levels downwards.
- Assignable Control Knobs: Each endlessly rotatable knob sends a MIDI CC message. The Control knobs can also be used for Arpeggiator control when the ARP On/Off button is pressed and held..
- Assignable Pads: The pads can be used to trigger drum hits or other samples in your DAW software. The pads are velocity-sensitive, which makes them very responsive and intuitive to play. The MIDI message each pad sends can be adjusted using the Pad Setting function.
- Controller Setting: Each of the eight control knobs can be configured to output a specific MIDI CC message. This function is used to match the MIDI controller to a specific DAW software that is expecting a certain MIDI CC message.
Press and hold the Controller Setting button and it will light up red to indicate that the Control Knobs are in edit mode. Rotate one or more of the Control Knobs until the desired MIDI CC message number is shown on the display. When the knobs have been configured, release the Controller Setting button to exit the edit mode.
10: Pad Setting: Each of the 16 PADs (8 in each Bank A or B) can be configured to output a specific MIDI Note message. This function is used to match the MIDI controller to a specific DAW software that is expecting a certain MIDI Note message. Press and hold the PAD Setting button and it will light up red to indicate that the PADs are in edit mode. Select PAD Bank A or B as desired. Rotate the Control Knob above the relevant PAD until the desired MIDI Note message number is shown on the
display. When all the PADs have been configured, release the PAD Setting button to exit the edit mode.
- Loop: Press and hold the Loop button while playing some notes. When the Loop button is released the notes will start to Loop repeatedly.
- Note Repeat: Press this button to enter Note Repeat mode. Striking a pad and then holding it will cause the pad to retrigger at a rate based on the current Tempo and Time Division settings. Press and hold the Note Repeat button to make changes to the Tempo, Time Division and Swing settings, using the control knobs or the keys.
- Bank A/B: Press this button to switch pads between Pad Bank A or Pad Bank B.
- Full Level: Press this button to activate or deactivate Full Level Mode in which the pads always play at a maximum velocity (127), no matter how hard or soft you hit them.
- Keyboard: This keyboard has 25 velocity-sensitive keys and in conjunction with the Octave Down / Up buttons, can control a ten-octave range.
- Sustain Pedal Input: Connect an optional 6.35 mm TS sustain pedal to this input. NOTE: Connect the pedal first before powering on the MIDI controller to ensure correct operation.
- MIDI Out: Plug a 3.5mm TRS cable (not supplied) into the back of the MIDI controller for use with external synthesisers. This controller uses the Type A MIDI connection standard.
- On/Off: Slide the ON/OFF switch to turn the power on and again to turn the power off. The display will light up to indicate power on.
- USB: Unwind the USB power cable to its full length; connect one end to the USB C Socket on the back of the MIDI controller. Connect the other end to a USB power adapter or PC USB port. The charge indicator LED on the back of the MIDI will light up red to indicate charging and will go green when fully charged. Charge for at least 3 hours before first use. Also use for a USB MIDI connection to a host computer or tablet device.
- DIVISION: 1/4 note, 1/4 note triplet (1/4T), 1/8 note, 1/8 note triplet (1/8T), 1/16 note, 1/16 note triplet (1/16T), 1/32 note, or 1/32 note triplet (1/32T).
- SWING: 50% (no swing), 55% , 57% , 59% , 61% , or 64% ( 50 - 75% using the control knob).
- MODE: The mode setting determines how the arpeggiated notes are played back.
UP - Notes will sound from the lowest to the highest.
DOWN - Notes will sound from the highest to lowest.
INCL (Inclusive) - Notes will sound from the lowest to the highest, and then back down. The lowest and highest notes will sound twice at the directional change.
EXCL (Exclusive) - Notes will sound from the lowest to the highest, and then back down. The lowest and highest notes will sound only once at the directional change.
ORDER - Notes will sound in the order they were pressed.
RAND (Random) - Notes will sound in a random order.
- OCT: Arpeggiator octave range. Select 1, 2, 3 or 4 octaves.
LATCH:
ON - The Arpeggiator will continue to arpeggiate the notes even after you lift your fingers.
OFF - The Arpeggiator will stop playing the notes as soon as you lift your fingers off the keys.
While holding down the keys, you can add more notes to the arpeggiated chord by pressing down additional keys. If you press the keys, release them, and then press down a new combination of notes, the Arpeggiator will memorize and arpeggiate the new notes.
- SYNC: Used to select internal or external synchronisation.
- +/-: For Tempo control.
Standard MIDI Control CC Messages
| NO | Parameter | NO | Parameter |
| 000 | Bank Select | 067 | Soft pedal (On/Off) |
| 001 | Modulation Wheel | 068 | Legato Footswitch (On/Off) |
| 002 | Breath Control | 069 | Hold2 (On/Off) |
| 003 | N/A | 070 | Sound Variation |
| 004 | Foot Pedal | 071 | Harmonic Intensity |
| 005 | Portamento Time | 072 | ReleaseTime |
| 006 | Data Entry | 073 | Attack Time |
| 007 | Volume Level | 074 | Brightness |
| 008 | Balance | 075-079 | |
| 009 | N/A | 080-083 | General Purpose Controller |
| 010 | Pan | 084 | Portamento Controller |
| 011 | Expression | 085-090 | N/A |
| 012-015 | N/A | 091 | Reverb Level |
| 016-020 | General Purpose Controller | 092 | Tremolo Level |
| 021-031 | N/A | 093 | Chorus Level |
| 032 | Bank Select (Fine) | 094 | Celeste Level |
| 033 | Modulation Wheel (Fine) | 095 | Phaser Level |
| 034 | Breath Controller (Fine) | 096 | Data Increment (Data Entry +1) |
| 035 | N/A | 097 | Data Decrement (Data Entry -1) |
| 036 | Foot Pedal (Fine) | 098 | Non-registered Parameter (Fine) |
| 037 | Portamento Time (Fine) | 099 | Non-registered Parameter (Coarse) |
| 038 | Data Entry (Fine) | 100 | Registered Parameter (Fine) |
| 039 | Volume Level (Fine) | 101 | Registered Parameter (Coarse) |
| 040 | Balance (Fine) | 102-119 | N/A |
| 041 | N/A | 120 | |
| 042 | Pan (Fine) | 121 | All Controllers Off |
| 043 | Expression (Fine) | 122 | Local Control |
| 044 | Effect Control1 (Fine) | 123 | All Note Off |
| 045 | Effect Control2 (Fine) | 124 | Omni Off |
| 046-063 | N/A | 125 | Omni On |
| 064 | Sustain Pedal (On/Off) | 126 | Mono On |
| 065 | Portamento (On/Off) | 127 | Poly On |
| 066 | Sostenuto (On/Off) | | |
Default Settings
The MIDI keyboard is supplied from the factory with output settings for the Control Knobs and PADs as below that are suitable for use with Garageband, MPC Beats, Ableton Live, Logic Pro X and Chroma Pads.
CONTROL Knobs - CC Messages
| Knob 1 | Knob 2 | Knob 3 | Knob 4 | Knob 5 | Knob 6 | Knob 7 | Knob 8 |
| 70 | 71 | 72 | 73 | 74 | 75 | 76 | 77 |
PADs - Note Messages
| Bank A Pad 1 | Bank A Pad 2 | Bank A Pad 3 | Bank A Pad 4 | Bank A Pad 5 | Bank A Pad 6 | Bank A Pad 7 | Bank A Pad 8 |
| 36 | 37 | 38 | 39 | 40 | 41 | 42 | 43 |
In order to revert to the default settings then first power off the keyboard. Then proceed as follows:
To reset the PADS - Press and hold the PAD Setting key while switching on the keyboard. The display will show 'PAD RESET'.
To reset the CONTROL Knobs - Press and hold the CONTROLLER Setting key while switching on the keyboard. The display will show 'CC RESET'.
To reset the PADS and CONTROL knobs - Press and hold both the PAD and CONTROLLER Setting keys while switching on the keyboard. The display will show 'CC RESET' followed by 'PAD RESET'.
Troubleshooting
| Problem | Possible Reason / Solution |
| The MIDI controller behaves erratically or its output becomes intermittent. | This could happen if the internal battery is running low. Please recharge the device for an hour or so to resume consistent operation. |
| When used with a hardware synthesiser as a controller, the hardware synthesiser does not respond to key presses. | Use of incorrect MIDI cable.
Make sure that the MIDI cable being used is the correct type for the synthesiser as there are two connection standards, type A and type B. |
| The MIDI output messages from the controller are not as required and you have lost track of the controller and PAD settings. | Follow the procedure to reset to default settings for the Controllers and/or PADs and then start the customisation again. |
| The APP running on the tablet device does not respond to the key presses on the MIDI controller. | Try exiting or force closing the APP.
Restart the APP and then make the MIDI connection again either via the Bluetooth settings in the APP or with a wired connection. |
| Bluetooth MIDI cannot be connected from Bluetooth settings of the mobile phone or tablet. | This is not a fault. The Bluetooth MIDI connection needs to be made from the APP that supports Bluetooth MIDI such as 'Garageband'. It cannot be made from Bluetooth Settings. |
| The MIDI controller does not respond correctly to the sustain pedal input. | The sustain pedal was plugged in while the MIDI control was already switched on.
Power off the MIDI controller.
Disconnect and reconnect the sustain pedal. Repower the MIDI controller. |
Technical Specification
MIDI
Wired and Wireless MIDI
TFT Hi-Res Back-Lit Display
25 Velocity Sensitive
PADs
8 Physical (16 with Bank A/B Switch), User Assignable
Control Knobs
8,User Assignable
X-Y Controller for Pitch Bend and Modulation
Octave Shift, Transpose, Tempo
Enhanced Features
Arpeggiator, Loop Mode, Internal and External Sync, Tap Tempo, Full Level and Note Repeat (for PADs)
External Jacks
USB C Power input, MIDI output (3.5mm TRS Type A MIDI Standard), Sustain Pedal Input (6.35mm TS)
Weight
0.795 kg
34.6 cm x 17.7 cm x 5.1 cm
Power Requirement
5V DC @ 2A, USB Type C
Battery Operation
Inbuilt 500mAh Rechargeable 3.7V Lithium-Ion battery
USB Type C Power Cable, User guide
FCC Compliance Statement
FCC Class B Part 15
This device complies with Part 15 of the Federal Communications Commission (FCC) Rules. Operation is subject to the following two conditions:
This device may not cause harmful interference.
This device must accept any interference received, including interference that may cause undesired operation.
CAUTION:
Changes or modifications to this unit not expressly approved by the party responsible for compliance could void the user's authority to operate this equipment.
This equipment has been tested and found to comply with the limits for a Class B digital device, pursuant to Part 15 of the FCC Rules. These limits are designed to provide reasonable protection against harmful interference in a residential installation.
This equipment generates, uses, and can radiate radio frequency energy and, if not installed and used in accordance with the manufacturer's instructions, may cause interference harmful to radio communications.
There is no guarantee, however, that interference will not occur in a particular installation. If this equipment does cause harmful interference to radio or television reception, which can be determined by turning the equipment off and on, the user is encouraged to try to correct the interference by one or more of the following measures:
Reorient or relocate the receiving antenna.
Increase the separation between the equipment and receiver.
Connect the equipment to an outlet on a circuit different from that to which the receiver is connected.
Consult the dealer or an experienced radio or TV technician for help.
Product Disposal Instructions (EU and UK)
The symbol shown here and, on the product, means that the product is classed as Electrical or Electronic Equipment and should not be disposed with other household or commercial waste at the end of its working life. The Waste Electrical and Electronic Equipment (WEEE)
Directive (2012/19/EU) has been put in place to encourage the recycling of products using best available recovery and recycling techniques to minimise the impact on the environment, treat any hazardous substances and avoid the increase of landfill. When you have no further use for this product, please dispose of it using your local authority's recycling processes. For more information, please contact your local authority or the retailer where the product was purchased.
EU and UK Regulatory Compliance
PDT Ltd. As manufacturer declares that the radio equipment described within is in compliance with Directive 2014/53/EU (Radio Equipment) and bears the CE and UKCA marks in accordance with that directive.
The full text of the EU declaration of conformity is available at the following internet address: https://pdtuk.com/declaration-of-conformity-library/
European Distributor and Authorised Representative:
AVESTA, 33 Avenue du Maréchal - de - Latte - de - Tassigny, 94120 Fontenay-sous-Bois, France


Designed and manufactured by:
PDT Ltd. Unit 4B, Greengate Industrial Estate, White Moss View, Middleton,
Manchester, M24 1UN, United Kingdom - info@pdtuk.com - Copyright PDT Ltd.
© 2023
Octave Shift, Transpose, Tempo
Use of the MIDI keyboard:
8 Physical (16 with Bank A/B Switch), User Assignable
Perillas de control
PDT Ltd. Unit 4B, Greengate Industrial Estate, White Moss View, Middleton,
Manchester, M24 1UN, United Kingdom - info@pdtuk.com - Copyright PDT Ltd.
© 2023
Zalecane programy DAW:
| Bank A Pad 1: | Bank A Pad 2: | Bank A Pad 3: | Bank A Pad 4: | Bank A Pad 5: | Bank A Pad 6: | Bank A Pad 7: | Bank A Pad 8: |
| 36 | 37 | 38 | 39 | 40 | 41 | 42 | 43 |
| Bank B Pad 1: | Bank B Pad 2: | Bank B Pad 3: | Bank B Pad 4: | Bank B Pad 5: | Bank B Pad 6: | Bank B Pad 7: | Bank B Pad 8: |
| 44 | 45 | 46 | 47 | 48 | 49 | 50 | 51 |