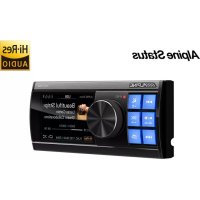
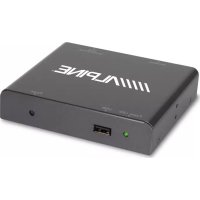
IVE-W560BT - Car stereo ALPINE - Free user manual and instructions
Find the device manual for free IVE-W560BT ALPINE in PDF.
User questions about IVE-W560BT ALPINE
0 question about this device. Answer the ones you know or ask your own.
Ask a new question about this device
Download the instructions for your Car stereo in PDF format for free! Find your manual IVE-W560BT - ALPINE and take your electronic device back in hand. On this page are published all the documents necessary for the use of your device. IVE-W560BT by ALPINE.
USER MANUAL IVE-W560BT ALPINE
Operating Instructions
WARNING
WARNING 4
CAUTION 4
NOTICE 5
Discs Playable on This Unit 6
Getting Started
Accessory List 10
Location of Controls. 10
Touch Operation 10
Initial System Start-Up 11
Setting the Clock. 11
Preparing a BLUETOOTH Device. 11
Radio
Listening to the Radio. 12
Storing and Receiving Stations. 12
Tuning 12
Presetting Stations Automatically 12
Preseting Stations Manually 12
Using Radio Data System (RDS) 13
Playback
Playing a Disc 14
Playing an iPod/USB Device 14
Playing a BLUETOOTH Device 15
Searching and Playing Tracks 15
Available Options 16
Picture EQ. 16
Aspect. 16
DVD Audio Level 16
Useful Function
Using Siri Eyes Free 16
Handsfree Calling
Receiving a Call. 17
Making a Call 17
Available Operations During a Call. 17
Call Data Management 17
Phone Option Menu 17
Settings
General Settings. 18
Sound Settings 19
Screen Settings. 20
Visual Settings 20
Additional Devices
Auxiliary Audio/Video Equipment 21
Rear View Camera 21
Information
Language Code List 22
Troubleshooting 23
Specifications 27
Installation and
Connections
Warning 28
Caution 28
Precautions 28
Installation 29
Installing the Microphone 29
Connections 30
Operating Instructions
WARNING

WARNING
This symbol means important instructions. Failure to heed them can result in serious injury or death.
INSTALL THE PRODUCT CORRECTLY SO THAT THE DRIVER CANNOT WATCH TV/VIDEO UNLESS THE VEHICLE IS STOPPED AND THE PARKING BRAKE IS APPLIED.
It is dangerous for the driver to watch TV/Video while driving a vehicle. Installing this product incorrectly enables the driver to watch TV/Video while driving. This may cause a distraction, preventing the driver from looking ahead, thus causing an accident. The driver or other people could be severely injured.
DO NOT WATCH VIDEO WHILE DRIVING.
Watching the video may distract the driver from looking ahead of the vehicle and cause an accident.
DO NOT OPERATE ANY FUNCTION THAT TAKES YOUR ATTENTION AWAY FROM SAFELY DRIVING YOUR VEHICLE.
Any function that requires your prolonged attention should only be performed after coming to a complete stop. Always stop the vehicle in a safe location before performing these functions. Failure to do so may result in an accident.
KEEP THE VOLUME AT A LEVEL WHERE YOU CAN STILL HEAR OUTSIDE NOISES WHILE DRIVING.
Excessive volume levels that obscure sounds such as emergency vehicle sirens or road warning signals (train crossings, etc.) can be dangerous and may result in an accident. LISTENING AT LOUD VOLUME LEVELS IN A CAR MAY ALSO CAUSE HEARING DAMAGE.
MINIMIZE DISPLAY VIEWING WHILE DRIVING.
Viewing the display may distract the driver from looking ahead of the vehicle and cause an accident.
DO NOT DISASSEMBLE OR ALTER.
Doing so may result in an accident, fire or electric shock.
USE ONLY IN CARS WITH A 12 VOLT NEGATIVE GROUND.
(Check with your dealer if you are not sure.) Failure to do so may result in fire, etc.
KEEP SMALL OBJECTS SUCH AS SCREWS OUT OF THE REACH OF CHILDREN.
Swallowing such items may result in serious injury. If swallowed, consult a doctor immediately.
USE THE CORRECT AMPERE RATING WHEN REPLACING FUSES.
Failure to do so may result in fire or electric shock.
DO NOT BLOCK VENTS OR RADIATOR PANELS.
Doing so may cause heat to build up inside and may result in fire.
USE THIS PRODUCT FOR MOBILE 12V APPLICATIONS.
Use for other than its designed application may result in fire, electric shock or other injury.
DO NOT PLACE HANDS, FINGERS OR FOREIGN OBJECTS IN INSERTION SLOTS OR GAPS.
Doing so may result in personal injury or damage to the product.

CAUTION
This symbol means important instructions. Failure to heed them can result in injury or property damage.
STOP USING IMMEDIATELY IF A PROBLEM OCCURS.
Failure to do so may cause personal injury or damage to the product. Return it to your authorized Alpine dealer or the nearest Alpine Service Center for repair.
KEEP FINGERS AWAY WHILE THE MOTORIZED FRONT PANEL OR MOVING MONITOR IS IN MOTION.
Failure to do so may result in personal injury or damage to the product.
For safety, be sure to install this unit in the dashboard of the car as the rear side of the unit becomes hot during use. For details, see "Installation and Connections" (page 28)
This product is classified as a Class 1 Laser product under IEC 60825-1:2007.
Laser Diode Properties
-
Emission Duration: Continuous
-
Laser Output: Less than 46.8 W
(This output is the value measured at a distance
of 70~mm from the objective lens surface on the optical pick-up block with 7mm aperture.)
The nameplate indicating operating voltage, etc., is located on the bottom of the chassis.
Product Cleaning
Use a soft dry cloth for periodic cleaning of the product. For more severe stains, please dampen the cloth with water only. Anything else might dissolve the paint or damage the plastic.
Temperature
Check that the temperature inside the vehicle is between +40^ (+104^) and 0^ (+32^) before turning your unit on.
Moisture Condensation
You may notice the disc playback sound wavering due to condensation. If this happens, remove the disc from the player and wait about an hour for the moisture to evaporate.
Damaged Disc
Do not attempt to play cracked, warped, or damaged discs. Playing a faulty disc could severely damage the playback mechanism.
Maintenance
If the unit appears faulty, do not attempt to repair it yourself. Return it to your Alpine dealer or the nearest Alpine Service Station for servicing.
Never Attempt the Following
Do not grip or pull out the disc while it is being pulled back into the player by the automatic reloading mechanism.
Do not attempt to insert a disc into the unit when the unit power is off.
Inserting Discs
Your player accepts only one disc at a time for playback. Do not attempt to load more than one disc.
Make sure the label side is facing up when you insert the disc.
"Disc error" will be displayed on your player if you insert a disc incorrectly. If "Disc error" continues to be displayed even though the disc has been inserted correctly, push the RESET switch with a pointed object such as a ballpoint pen.
Playing a disc while driving on a very bumpy road may result in skips, but this will not scratch the disc or damage the player.
Irregular Shaped Discs
Be sure to use round shaped discs only for this unit and never use any specially shaped discs.
Use of specially shaped discs may cause damage to the mechanism.

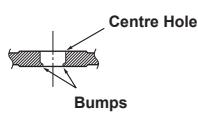
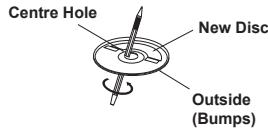
New Discs
To prevent the disc from jamming, "Disc error" is displayed if discs with irregular surfaces are inserted or if discs are inserted incorrectly. When a new disc is ejected immediately after initial loading, use your finger to feel around the inside of the centre hole and outside edge of the disc. If you feel any small bumps or irregularities, this could inhibit proper loading of the disc. To remove the bumps, rub the inside edge of the hole and outside edge of the disc with a ballpoint pen or other such instrument, then insert the disc again.
Installation Location
Make sure the IVE-W560BT/IVE-W560BT-R is not installed in a location subject to:
- Direct sun and heat
High humidity and water - Excessive dust
- Excessive vibrations
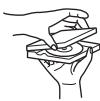
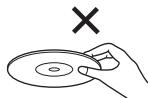
Correct Handling
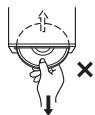
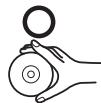
Do not drop the disc during handling. Hold the disc so you do not leave fingerprints on the surface. Do not affix tape, paper, or gumed labels to the disc. Do not write on the disc.
INCORRECT
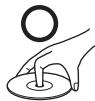
CORRECT
CORRECT
Disc Cleaning
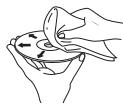
Fingerprints, dust, or dirt on the surface of the disc could cause the DVD player to skip. For routine cleaning, wipe the playing surface with a clean, soft cloth from the centre of the disc to the outer edge. If the surface is very dirty, dampen a clean, soft cloth in a solution of mild neutral detergent before cleaning the disc.
Disc Accessories
There are various accessories available on the market for protecting the disc surface and improving sound quality. However, most of them will influence the thickness and/or diameter of the disc. Using such accessories can cause operational problems. We recommend not using these accessories on discs played in Alpine DVD players.

Transparent Sheet

Disc Stabilizer
Operation of some of the functions of this unit is very complex. Because of this, it was considered necessary to place these functions within a special screen. This restricts operation of these functions to times when the vehicle is parked. This ensures the focus of the driver's attention will be on the road and not on the IVE-W560BT/IVE-W560BT-R. This has been done for the safety of driver and passengers.
The car must be parked and the parking brake must be engaged for the procedure described in the Owner's Manual to be valid. The warning "Can't operate while driving", will be displayed if any attempts are made to perform these operations while driving.
- The IVE-W560BT/IVE-W560BT-R draws minimal current even when its power switch is turned off. If the switched power (ignition) lead of the IVE-W560BT/IVE-W560BT-R is connected directly to the positive (+) terminal of the vehicle's battery, the battery may be discharged. An SPST (Single-Pole, Single-Throw) switch (sold separately) can be added to prevent this. Then, you can simply turn the SPST switch off when you leave the vehicle. Turn the SPST switch back ON before using the IVE-W560BT/IVE-W560BT-R. If the power (ignition) lead does not include a SPST switch, it must be disconnected from the battery post should the vehicle be left unused for an extended period of time.
Discs Playable on This Unit
Playable discs and file types
Discs
| DVD* | DVD VIDEO |
| DVD-R/DVD-R DL/DVD-RW | |
| (Video mode) | |
| DVD+R/DVD+R DL/DVD+RW | |
| VCD | Video CD (Ver. 1.0/1.1/2.0) |
| CD | Audio CD |
| CD-ROM/CD-R/CD-RW |
- "DVD" may be used in these Operating Instructions as a general term for DVD VIDEOs, DVD-Rs/DVD-RWs, and DVD+Rs/DVD+RWs.
File types
For details on compression formats, see page 7.
| Audio | MP3 file, WMA file |
| Video | Xvid file, MPEG-4 file |
| Photo | jpeg file (.jpg) |
Note on playback operations of DVDs and VCDs
Some playback operations of DVDs and VCDs may be intentionally set by software producers. Since this unit plays DVDs and VCDs according to the disc contents the software producers designed, some playback features may not be available. Also, refer to the instructions supplied with the DVDs or VCDs.
Notes on DATA CDs, DATA DVDs and USB playback
- Some DATA CDs/DATA DVDs (depending on the equipment used for its recording, or the disc condition) may not play on this unit.
- Finalization is required for some discs (page 7).
- The unit is compatible with the following standards.
For DATA CDs
ISO 9660 level 1/level 2 format, Joliet/Romeo in the expansion format
For DATA DVDs
- UDF Bridge format (combined UDF and ISO 9660)
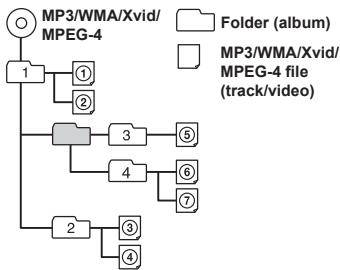
The maximum number of:
- folders (albums): 256 (including root and empty folders).
- files (tracks/videos/photos) and folders contained in a disc: 2,000 (if folder/file names contain lots of characters, this number may fall below 2,000).
— displayable characters for a folder/ file name: 32.
- Compatible codecs are MP3 (.mp3), WMA (.wma), JPEG (.jpg), Xvid (.avi), and MPEG-4 (.avi).
- DRM (Digital Rights Management) files cannot be played.
Notes on finalizing discs
The following discs are required to be finalized to play on this unit.
DVD-R/DVD-R DL (in video mode)
DVD-RW in video mode
DVD+R/DVD+R DL
CD-R
CD-RW
DVD+RW can be played without finalization. The disc is automatically finalized.
For details, refer to the manual supplied with the disc.
Playback order of MP3/WMA/Xvid/MPEG-4 files
About WMA files
WMA*1 files meeting the following requirements can be played.
Playback is not guaranteed for all WMA files meeting the requirements.
Codec
Media File format: ASF file format
- File extension: .wma
- Bit rate: 48 to 192 kbps (supports variable bit rate (VBR))*2
Sampling frequency*3: 44.1 kHz
About MP3 files
MP3 files meeting the following requirements can be played.
Playback is not be guaranteed for all MP3 files meeting the requirements.
Codec
Media File format: MP3 (MPEG-1 Layer3) file format
- File extension:.mp3
Bit rate: 48 to 192 kbps
(supports variable bit rate (VBR))^*2
Sampling frequency*3: 32, 44.1, 48 kHz
About Xvid files
Xvid files meeting the following requirements can be played.
Playback is not be guaranteed for all Xvid files meeting the requirements.
Codec
Media File format: Xvid file format
- File extension:.avi
- Profile: MPEG-4 Advanced Simple Profile
- Bit rate: max. 8 Mbps
- Frame rate: max. 30 fps (30p/60i)
Resolution: max. 720 × 576^*4
About MPEG-4 files
MPEG-4 files meeting the following requirements can be played. Playback is not be guaranteed for all MPEG-4 files meeting the requirements.
Codec
Media File format: AVI file format
- File extension:.avi
Video codec: MPEG-4 Simple Profile
Audio codec: MP3
- Bit rate: max. 8 Mbps
- Frame rate: max. 30 fps (30p/60i)
Resolution: max. 720× 576^*4
About JPEG files
JPEG* ^5 files meeting the following requirements can be played.
Playback is not be guaranteed for all JPEG files meeting the requirements.
Codec
Media File format: Compatible with DCF 2.0/Exif 2.21 file format
- File extension: .jpg
- Profile: Baseline Profile
Number of pixels: max. 6,048× 4,032 pixels (24,000,000 pixels)
1 Copyright protected WMA file cannot be played back.
2 Non-standard bit rates or non-guaranteed bit rates are included depending on the sampling frequency.
3 Sampling frequency may not correspond to all encoders.
4 These numbers indicate the maximum resolution of playable video, and do not indicate the player's display resolution. The display resolution is 800 × 480 .
*5 Some photo files cannot be played back, depending on their file formats.
About iPod
- You can connect the following iPod models. Update your iPod devices to the latest software before use.
Compatible iPhone/iPod models.
| Compatible Model | USB |
| iPhone 6 Plus | ○ |
| iPhone 6 | ○ |
| iPhone 5s | ○ |
| iPhone 5c | ○ |
| iPhone 5 | ○ |
| iPhone 4s | ○ |
| iPhone 4 | ○ |
| iPhone 3GS | ○ |
| iPod touch (5th generation) | ○ |
| iPod touch (4th generation) | ○ |
| iPod touch (3rd generation) | ○ |
| iPod classic | ○ |
| iPod nano (7th generation) | ○ |
| iPod nano (6th generation) | ○ |
| iPod nano (5th generation) | ○ |
- "Made for iPod" and "Made for iPhone" mean that an electronic accessory has been designed to connect specifically to an iPod or iPhone respectively, and has been certified by the developer to meet Apple performance standards. Apple is not responsible for the operation of this device or its compliance with safety and regulatory standards. Please note that the use of this accessory with iPod or iPhone may affect wireless performance.
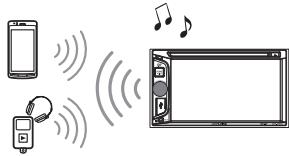
About BLUETOOTH
What is BLUETOOTH technology?
- BLUETOOTH wireless technology is a short-range wireless technology that enables wireless data communication between digital devices, such as a mobile phone and a headset. BLUETOOTH wireless technology operates within a range of about 10m (about 33 feet). Connecting two devices is common, but some devices can be connected to multiple devices at the same time.
- You do not need to use a cable for connection since BLUETOOTH technology is wireless, neither is it necessary for the devices to face one another, as is the case with infrared technology. For example, you can use a BLUETOOTH device in a bag or pocket.
- BLUETOOTH technology is an international standard supported and used by millions of companies all over the world.
About BLUETOOTH communication
- BLUETOOTH wireless technology operates within a range of approximately 10m .
Maximum communication range may vary depending on obstacles (person, metal, wall, etc.) or the electromagnetic environment.
The following conditions may affect the sensitivity of BLUETOOTH communication.
There is an obstacle such as a person, metal object or wall between this unit and BLUETOOTH device.
A device using 2.4 GHz frequency, such as a Wi-Fi device, cordless telephone, or microwave oven, is in use near this unit.
-
Because BLUETOOTH devices and Wi-Fi (IEEE802.11b/g/n/ac) use the same frequency, microwave interference may occur and result in communication speed deterioration, noise, or invalid connection if this unit is used near a Wi-Fi device. In such as case, perform the following.
-
Use this unit at least 10m away from the Wi-Fi device.
- If this unit is used within 10m of a Wi-Fi device, turn off the Wi-Fi device.
-
Install this unit and the BLUETOOTH device as close to each other as possible.
-
Microwave emission from a BLUETOOTH device may affect the operation of electronic medical devices. Turn off this unit and other BLUETOOTH devices in the following locations because they may cause an accident.
where inflammable gas is present, in a hospital, train, aircraft, or petrol station
- near automatic doors or a fire alarm
- This unit supports security capabilities that comply with the BLUETOOTH standard to provide a secure connection when the BLUETOOTH wireless technology is used, but security may not be adequate depending on the setting. Be careful when communicating using BLUETOOTH wireless technology.
-
We do not accept any responsibility for the leaking of information during BLUETOOTH communication.
-
Connection with all BLUETOOTH devices cannot be guaranteed.
- A device featuring BLUETOOTH function is required to conform to the BLUETOOTH standard specified by BLUETOOTH SIG, and be authenticated.
Even if the connected device conforms to the above mentioned BLUETOOTH standard, some devices may not connect or work correctly, depending on the features or specifications of the device. - While talking on the phone handsfree, noise may occur, depending on the device or communication environment.
- Depending on the connecting device, it may require some time to start communication.
Others
- The BLUETOOTH device may not function with mobile phones depending on radio wave conditions and the location where the equipment is being used.
- If you experience discomfort while or after using the BLUETOOTH device, stop using the BLUETOOTH device immediately. Should any problem persist, consult your nearest Alpine dealer.
If you have any questions or problems concerning your unit that are not covered in these Owner's Manual, consult your nearest Alpine dealer.
Maintenance
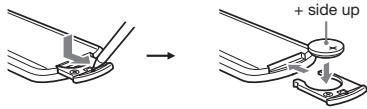
Replacing the lithium battery of the remote control
Under normal conditions, the battery will last approximately 1 year. (The service life may be shorter, depending on the conditions of use.) When the battery becomes weak, the range of the remote control becomes shorter. Replace the battery with a new CR2025 lithium battery. Use of any other battery may present a risk of fire or explosion.
Notes on the lithium battery
- Do not expose the battery to excessive heat such as direct sunlight, fire etc.
- Keep the lithium battery out of the reach of children. Should the battery be swallowed, immediately consult a doctor.
- Wipe the battery with a dry cloth to assure a good contact.
- Be sure to observe the correct polarity when installing the battery.
- Do not hold the battery with metallic tweezers, otherwise a short-circuit may occur.
WARNING
Battery may explode if mistreated.
Do not recharge, disassemble, or dispose of in fire.
Copyright
US and foreign patents licensed from Dolby Laboratories.
- MPEG Layer-3 audio coding technology and patents licensed from Fraunhofer IIS and Thomson.
DOLBY DIGITAL
Manufactured under license from Dolby Laboratories.
Dolby and the double-D symbol are trademarks of Dolby Laboratories.
- Windows Media is either a registered trademark or trademark of Microsoft Corporation in the United States and/or other countries.
- This product is protected by certain intellectual property rights of Microsoft Corporation. Use or distribution of such technology outside of this product is prohibited without a license from Microsoft or an authorized Microsoft subsidiary.
- DVDVIDEO,“DVD-R,“DVD-RW,“DVD+R,” and “DVD+RW” are trademarks.
- The Bluetooth word mark and logos are registered trademarks owned by Bluetooth SIG, Inc. and any use of such marks by Alpine Electronics, Inc. is under license. Other trademarks and trade names are those of their respective owners.
- iPhone, iPod, iPod classic, iPod nano, iPod touch, and Siri are trademarks of Apple Inc., registered in the U.S. and other countries.
THIS PRODUCT IS LICENSED UNDER THE MPEG-4 VISUAL PATENT PORTFOLIO LICENSE FOR THE PERSONAL AND NON-COMMERCIAL USE OF A CONSUMER FOR DECODING VIDEO IN COMPLIANCE WITH THE MPEG-4 VISUAL STANDARD("MPEG-4 VIDEO") THAT WAS ENCODED BY A CONSUMER ENGAGED IN A PERSONAL AND NONCOMMERCIAL ACTIVITY AND/OR WAS OBTAINED FROM A VIDEO PROVIDER LICENSED BY MPEG LA TO PROVIDE MPEG-4 VIDEO. NO LICENSE IS GRANTED OR SHALL BE IMplied FOR ANY OTHER USE. ADDITIONAL INFORMATION INCLUDING THAT RELATING TO PROMOTIONAL, INTERNAL AND COMMERCIAL USED AND LICENSING MAY BE OBTAINED FROM MPEG LA, LLC. SEE HTTP://WWW.MPEGLA.COM - All other trademarks are trademarks or their respective owners.
- This product uses data owned by Monotype Imaging Inc. Such font data shall be used solely in connection with product.
Getting Started
Accessory List
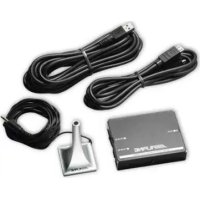
- IVE-W560BT/IVE-W560BT-R
Power cable 1 - Mounting sleeve 1
- Bracket key 2
- Countersunk screw (M5x8) 6
Front panel 1
Remote control 1 - Steering remote cable 1
- Microphone 1
Owner's Manual 1 set
Location of Controls
(1) HOME
Open the HOME menu.
When pressed during disc, iPod or USB playback, playback is paused and there is no sound. To resume playback, touch.
-DSPL (display)
Press and hold to open the display menu.
The monitor off function is set on the display menu. When the monitor off function is activated, the monitor is turned off. Touch anywhere on the display to turn back on.
-VOICE
Press and hold to activate the voice command function. To assign the voice command function to the HOME button, select [Voice] in [HOME Key Function] (page 19).
(2) SOURCE
Turn on the power.
Change the source. Each press displays a selectable source in a popup on the current display.
-OFF
Press and hold for 1 second to exit the source. Press and hold for more than 2 seconds to turn off the unit. When the unit is turned off, remote control operation is not available.
-Volume control dial
Rotate to adjust the volume.
③ USB port
Open the cover to connect a USB device.
④ Reset button
⑤ AUX terminal
⑥ Receiver for the remote control
⑦ Disc slot
(8) (disc eject)
⑨ Display/touch panel
Remove the insulation film before use.

10 MONITOR OFF
11) POSITION
This button is not supported.
(12) ^ (return)
Return to the previous display/return to the menu on a Video CD (VCD).
(13) EQ (equalizer) Select an equalizer curve.
14 Number buttons (0 - 9)
15 CLEAR
16 MUTE
Mute the sound. To cancel, press again or press VOL+.
(17) (play/pause)
(previous/next)
19 DVD playback setting buttons
20 P.SCAN (page 12)
(2) / / / / (cursor)/ENTER
2 MODE
Select the radio band.
23 VOL (volume) +/-
② Press and hold for 1 second to exit the source.
Press and hold for more than 2 seconds to turn off the unit.
25 Change the source. Each press displays a selectable source in a popup on the current display.
Touch Operation
You can operate the system by using the touch panel on the screen.
- Only to touch the onscreen button lightly with the pad of your finger to protect the display.
- If you touch a button and there is no reaction, remove your finger from the display once, and try again.
- Onscreen buttons that cannot be operated appear dull in colour.
Initial System Start-Up
Press the RESET switch when using the unit for the first time, after changing the car battery, etc.
1 Turn off the unit power.
2 Press RESET switch with a ballpoint pen or similar pointed object.
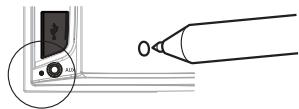
RESET switch
Note Pressing the reset button will erase the clock setting and some stored contents.
Setting the Clock
1 Press HOME, then touch [Settings].
2 Touch then touch [Clock Adjust]. The setting display appears.
3 Touch / to set the hour and minute.
4 Touch [Set]. The setting is complete.
To activate/deactivate the CT function (page 13), touch [Clock Time].
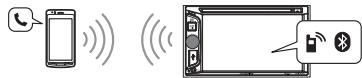
Preparing a BLUETOOTH Device
You can enjoy music, or perform handsfree calling, by connecting a suitable BLUETOOTH device (mobile phone, audio device, etc.). For details on connecting a BLUETOOTH device, refer to the operating instructions supplied with the device. Before connecting, turn down the volume of this unit; otherwise, loud sound may result.
Pairing and connecting with a BLUETOOTH device
When connecting a BLUETOOTH device for the first time, mutual registration (called "pairing") is required. Pairing enables this unit and other devices to recognize each other.
1 Press HOME, then touch [Settings].
2 Touch
3 Touch [Bluetooth Connection], then set the signal to [ON]. The BLUETOOTH signal of this unit is activated and 8 appears on the status bar.
4 Touch [Pairing]. The unit enters pairing standby mode.
5 Perform the pairing procedure on the BLUETOOTH device to detect this unit.
6 Select "IVE-W560" shown in the display of the BLUETOOTH device.
7 If passkey input is required on the BLUETOOTH device, input [0000].
Passkey may be called "passwd," "PIN code," "PIN number," "password," etc., depending on the BLUETOOTH device.
8 Select this unit on the BLUETOOTH device to establish the BLUETOOTH connection. or lights up when the connection is made.
Note
While connected to a BLUETOOTH device, this unit cannot be detected by another device. To enable detection, terminate the current connection.
Connecting with a paired BLUETOOTH device
This chapter explains how to connect manually to registered BLUETOOTH devices.
1 Make sure that the BLUETOOTH signals both on this unit (page 19) and the BLUETOOTH device are activated. On the status bar indicates that the BLUETOOTH signal on this unit is on.
2 Operatethe BLUETOOTH device to connect to this unit. or appears.
When the ignition is turned to on with the BLUETOOTH signal activated, this unit searches for the last-connected BLUETOOTH device, and if possible connection is made automatically.
Note
If this unit cannot detect the last-connected BLUETOOTH device, touch [Reconnect] to search for the last-paired device again. If the problem is not solved, follow the pairing procedure.
To install the microphone
To capture your voice during handsfree calling, you need to install the microphone (included). For details on how to connect the microphone, refer to the supplied "Installation/Connections" guide.
Listening to the Radio
To listen to the radio, press HOME then touch [Tuner].
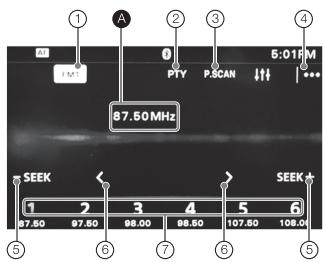
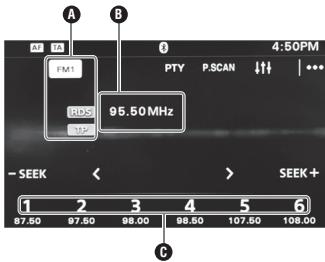
Reception controls/indications
Reception controls (1 to 7)
| ① | Current band icon Opens the band list. |
| ② | [PTY] (Programme Types) (FM only) Opens the PTY list (page 13). |
| ③ | P. SCAN Helps to find a desired station by listening to preset stations for a few seconds. |
| ④ | |… Opens the tuner option menu. |
| ⑤ | -SEEK/ SEEK+ Tunes in automatically. |
| ⑥ | < / > Tunes in manually. Touch and hold to continuously skip frequencies. |
| ⑦ | [1] to [6] Selects a preset station. Touch and hold to store the currently displayed frequency in that preset. |
Reception indications (A)
Frequency
Storing and Receiving Stations
Caution
When tuning to stations while driving, use Automatic Tuning Memory (A.MEMO) to prevent an accident.
Tuning
1 Touch the current band. The band list appears.
2 Touch the desired band ([FM1], [FM2], [FM3], [AM1], or [AM2]).
3 Perform tuning.
To tune automatically
Touch - SEEK/SEEK+
Scanning stops when the unit receives a station.
Repeat this procedure until the desired station is received.
To tune manually
Touch / repeatedly until the desired frequency is received.
To skip frequencies continuously, touch and hold /
Presetting Stations Automatically
1 Select the desired band ([FM1], [FM2], [FM3], [AM1], or [AM2]).
2 Touch...
3 Touch [A.MEMO], then [Search]. The unit stores the first six available stations in presets ([1] to [6]).
Presetting Stations Manually
1 While receiving the station that you want to store, press and hold the desired preset number ([1] to [6]).
Receiving Preset Stations
1 Select the band.
2 Touch the desired preset number ([1] to [6]).
Searching for the desired station from preset stations (Tuner Preset Scan)
Tuner Preset Scan helps you to find a desired station by listening to preset stations for a few seconds.
1 While listening to radio, touch P. SCAN.
Tuner Preset Scan starts, and subsequent stations are received in sequence.
2 Touch P. SCAN again when the desired station is received.
Using Radio Data System (RDS)
Display items
Band name, RDS1, TP2
Program service name, frequency, RDS data
Preset number
1 During RDS reception.
2 During traffic program reception.
RDS services
This unit automatically provides RDS services as follows:
AF (Alternative Frequencies)
Selects and returnes to the station with the strongest signal in a network. By using this function, you can continuously listen to the same program during a long-distance drive without having to retune to the same station manually.
TA (Traffic Announcement)/TP (Traffic Program)
Provides current traffic information/programs. Any information/ program received will interrupt the currently selected source.
PTY (Program Types)
Displays the currently received program type.
Also searches for a designated program type.
CT (Clock Time)
The CT data from the RDS transmission sets the clock.
Setting AF
1 Press HOME, then touch [Tuner].
2 Touch the desired band ([FM1], [FM2] or [FM3]).
3 Touch , then [AF (Alternative Frequencies)] to set [ON].
Setting TA
1 Press HOME, then touch [Tuner].
2 Touch the desired band ([FM1], [FM2] or [FM3]).
3 Touch , then [TA (Traffic Announcement)] to set [ON].
To store RDS stations with the AF and TA setting
You can preset RDS stations along with the AF/TA setting. Set AF/TA, then store the station with BTM or manually. If you preset manually, you can also preset non-RDS stations.
To receive emergency announcements
With AF or TA on, emergency announcements will automatically interrupt the currently selected source.
To stay with one regional program (Regional)
When the AF and Regional functions are on, you will not be switched to another regional station with a stronger frequency. If you leave this regional program's reception area, touch! [Regional] [OFF] during FM reception. This function does not work in the UK and some other areas.
Selecting programme types (PTY)
1 During FM reception, touch [PTY]. To scroll the list, touch / .
2 Touch the desired programme type. The unit searches for a station broadcasting the selected programme type.
To close the PTY list, touch
Type of programs
News (News), Current Affairs (Current Affairs), Information (Information), Sport (Sports), Education (Education), Drama (Drama), Cultures (Culture), Science (Science), Varied Speech (Varied), Pop Music (Pop Music), Rock Music (Rock Music), Easy Listening (M.O.R. Music), Light Classics M (Light classical), Serious Classics (Serious classical), Other Music (Other Music), Weather & Metr (Weather), Finance (Finance), Children's Progs (Children's program), Social Affairs (Social Affairs), Religion (Religion), Phone In (Phone In), Travel & Touring (Travel), Leisure & Hobby (Leisure), Jazz Music (Jazz Music), Country Music (Country Music), National Music (National Music), Oldies Music (Oldies Music), Folk Music (Folk Music), Documentary (Documentary)
Note
You cannot use this function in countries/regions where no PTY data is available.
PLAYBACK
Playing a Disc
Depending on the disc, some operations may be different or restricted.
Refer to the operating instructions supplied with the disc.
1 Insert the disc (label side up), then playback starts.
If a DVD menu appears
Touch the desired item in the DVD menu.
You can also use the menu control panel, which can be displayed by touching the screen anywhere except the DVD menu items. Touch
/ to move the cursor, then touch [ENTER] to confirm.
If the menu control panel does not appear by touching the display, use the remote control.
Example of playback indications (DVD)
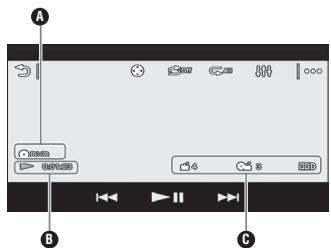
Current source icon, format
Playback status, elapsed playback time
Chapter/title number, audio format
Touch the display if the indications are not displayed.
For audio discs, some indications are always displayed during playback.
Using PBC (playback control) functions
The PBC menu interactively assists with operations while a PBC-compatible VCD is played.
1 Start playing a PBC-compatible VCD. The PBC menu appears.
2 Touch. The menu control panel appears.
3 Touch the number keys to select the desired item, then touch [ENTER].
4 Follow the instructions in the menu for interactive operations. To return to the previous display, touch
To deactivate PBC functions, set [Video CD PBC] to [OFF] (page 20).
Notes
- During PBC playback, the track number, playback item, etc., do not appear on the playback display.
- Resume playback is unavailable during playback with PBC.
Configuring audio settings
To change the audio language/format
When playing a DVD Video, the audio language can be changed if the disc is recorded with multilingual tracks. You can also change the audio format when playing a disc recorded in multiple audio formats (e.g., Dolby Digital).
During playback, touch the screen and then
Touch _ repeatedly until the desired audio language/format appears.
Example: Dolby Digital 5.1 ch
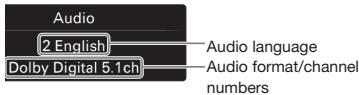
If the same language is displayed two or more times, the disc is recorded in multiple audio formats.
To change the audio channel
When playing a VCD, you can listen to both left and right channels, right channel only or left channel only, via both right and left speakers.
During playback, touch LR repeatedly until the desired audio channel appears.
The options are indicated below.
Stereo: Standard stereo sound (default)
[Left] : Left channel sound (monaural)
[Right] : Right channel sound (monaural)
Playing an iPod/USB Device
In these Operating Instructions, "iPod" is used as a general reference for the iPod functions on the iPod and iPhone, unless otherwise specified by the text or illustrations.
For details on the compatibility of your iPod, see "About iPod" (page 8) or visit the support site on the back page.
MSC (Mass Storage Class) and MTP (Media Transfer Protocol) type USB devices (such as a USB flash drive, digital media player, Android phone) compliant with the USB standard can be used. Depending on the digital media player or Android phone, setting the USB connection mode to MSC or MTP is required.
1 Reduce the volume on this unit. If the device is turned off, turn it on.
2 Connect the iPod or the USB device to the USB port. Playback starts automatically. If an iPod/USB device is already connected, to start playback, press HOME, then touch [iPod/USB].
To stop playback
Press and hold OFF for 1 second.
To remove the device
Stop playback, then disconnect.
Do not disconnect during playback, as data in the device may be damaged.
Caution for iPhone
When you connect an iPhone via USB, telephone volume is controlled by the iPhone itself. In order to avoid sudden loud sound after a call, do not increase the volume on the unit during a call.
About resume mode
When the iPod currently playing is connected to the dock connector, the mode of this unit changes to resume mode and playback starts in the mode set by the iPod.
In resume mode, repeat/shuffle play are not available.
Playing a BLUETOOTH Device
You can play contents on a connected device that supports BLUETOOTH A2DP (Advanced Audio Distribution Profile).
1 Make BLUETOOTH connection with the audio device (page 11).
2 Reduce the volume on this unit.
3 Press HOME, then touch [BT Audio].
4 Operatethe audio device to start playback.
5 Adjust the volume on this unit.
Playback controls
If the BLUETOOTH device supports AVRCP (Audio Video Remote Control Profile), you can control playback via this unit in the same way as disc playback.
To match the volume level of the BLUETOOTH device to other sources
You can reduce the volume level differences between this unit and the BLUETOOTH device.
During playback, touch 1.
Select a level from -10 to +15 .
Searching and Playing Tracks
Using repeat play and shuffle play
1 During playback, touch (repeat) or (shuffle) repeatedly until the desired option appears.
Repeat or shuffle play starts.
Available play modes differ depending on the selected sound source.
Note
Repeat play and shuffle play are not available for version 2.0 VCD with PBC function.
Using direct search play
1 During disc or USB playback, press the number buttons on the remote control to enter an item (track, chapter, etc.) number, then press ENTER. Playback starts from the beginning of the selected point.
Note
During VCD playback, this function is available only when playing a VCD without PBC functions.
Searching for a file from the list screen
1 During disc or USB playback, touch The list screen from the currently played item appears.
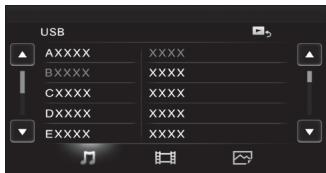
Furthermore, touch or to list up by the file type (audio/video/photo).
2 Touch the desired item.
Playback starts.
Available Options
Various settings are available in each source by touching The available items differ depending on the situation.
Picture EQ
Adjusts the picture to suit the interior brightness of the car. This setting is available only when the parking brake is applied. Source: USB (Xvid/MPEG-4/Photo), Disc (DVD/ VCD/Xvid/MPEG-4/ Photo), AUX (Available only when [AUX] is set to [Rear], and [AUX Input] is set to [Video] or [Auto].)
| Option | Purpose |
| Dynamic (●), Standard, Theater, Sepia | To select the picture quality. |
Aspect
This setting is available only when the parking brake is applied. Source: USB (Xvd/MPEG-4/Photo), Disc (DVD/VCD/Xvid/MPEG-4/ Photo), AUX (Available only when [AUX] is set to [Rear], and [AUX Input] is set to [Video] or [Auto].)
| Option | Purpose |
| Normal | To display a picture with 4:3 aspect ratio (regular picture). |
| Wide | To display a picture with 4:3 aspect ratio enlarged to the left and right edges of the screen, with overflowing parts of the top and bottom cut off to fill the screen. |
Full () To display a picture with 16:9 aspect ratio.

| Zoom | To display a picture with 4:3 aspect ratio enlarged to the left and right edges of the screen. |
DVD Audio Level
Source:Disc
| Option | Purpose |
| - | To adjust the audio output level between -10 and +10 for a DVD recorded in Dolby Digital format, to balance the volume level between discs. |
USEFUL FUNCTION
Siri Eyes Free allows you to use an iPhone handsfree by simply speaking into the microphone. This function requires you to connect an iPhone to the unit with BLUETOOTH Auto Pairing. Availability is limited iPhone 4s or later. Make sure that your iPhone is running the latest iOS version. You must complete BLUETOOTH registration and connection configurations for the iPhone with the unit in advance. For details, see "Preparing a BLUETOOTH Device" (page 11).
Using Siri Eyes Free
Make sure that [HOME Key Function] is set to [Voice] (page 19).
1 Activate the Siri function on the iPhone. For details, refer to the operating instructions supplied with the iPhone.
2 Press and hold HOME. The voice command display appears.
3 Speak into the microphone after the beep. The iPhone beeps again and Siri Eyes Free is activated.
To deactivate Siri Eyes Free
Touch [Close].
Notes
- The iPhone may not recognize your voice depending on usage conditions. (For example, if you are in a moving car.)
- Siri may not function properly, or the response time may lag in locations where iPhone signals are difficult to receive.
- Depending on the iPhone's operating condition, Siri may not function properly, or may quit.
- If you play back a track with an iPhone using the BLUETOOTH audio connection, when the track starts playback via BLUETOOTH, the Siri function automatically quits and the unit switches to the BLUETOOTH audio source.
- When Siri is activated during audio playback, the unit may switch to the BLUETOOTH audio source even if you do not specify a track to play back.
- When connecting the iPhone to the USB port, Siri may not function properly, or may quit.
- When connecting the iPhone to the unit, do not activate Siri with the iPhone. Siri may not function properly, or may quit.
- There is no audio sound while Siri Eyes Free is activated.
HANDSFREE CALLING
Before handsfree calling, make sure that a and b are in the display. If the indications do not appear, perform the BLUETOOTH connection procedure (page 11).
Receiving a Call
1 Touch when a call is received.
The phone call starts.
Note
The ringtone and talker's voice are output only from the front speakers.
To adjust the ringtone volume
The level of ringtone volume will be stored into memory, independently from the regular volume level. Rotate the volume control dial while receiving a call.
To reject/end a call
Touch
Making a Call

1 Press HOME, then touch [Phone].
2 Touch one of the icons on the BLUETOOTH phone
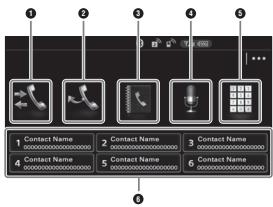
1 (call history) *1 Select a contact from the call history list. The unit stores the last 20 calls.
(2) (redial) Make a call automatically to the last contact you made.
(3) (phonebook)*1 Select a contact from the name list/number list in the phonebook. To search the desired contact by alphabetical order in the name list, touch.
(4) (voice command) ^*2 * 3 Say a voice tag stored on the mobile phone.
- (phone number input) Enter the phone number.
Preset number Touch a preset number ([1] to [6]). The unit stores up to 6 contacts in the list. For details on how to store, see "Presetting phone numbers" (page 17).
1 The mobile phone needs to support PBAP (Phone Book Access Profile).
2 Do not use the voice command function on the mobile phone while it is connected to this unit.
*3 Voice command may not work depending on the recognition specification of the mobile phone.
For details, visit the support site on the back page.
3 Touch
The call is made and the calling display appears until the other party answers.
Available Operations During a Call
To adjust the talker's voice volume
The level of the talker's voice volume will be stored into memory, independently from the regular volume level. Rotate the volume control dial during a call.
To transfer the current call to the mobile phone
Touch
To transfer back to handsfree calling, touch again.
Available options
During a handsfree call, press |...
[MIC Gain]
Adjusts the microphone volume for the other party: [Low], [Middle], [High].
Call Data Management
Presetting phone numbers
Press HOME, then touch [Phone]. The BLUETOOTH phone display appears.
2 Touch The phonebook appears.
3 Select the contact to store in the preset dial.
1 In the name list, touch the name of the contact. To search the desired contact by alphabetical order, touch , then select alphabet.
In the number list, touch the phone number. The contact confirmation display appears.
4 Touch [Preset], then the desired preset number ([1] to [6]).
The contact is stored to the selected preset number.
To change the registration of the preset dial
Follow the procedure above and overwrite a registered preset dial.
Phone Option Menu
1 Press HOME, then touch [Phone].
2 Touch |... The phone option menu appears.
[Auto Answer]
Answers an incoming call automatically.
- [OFF]: to not answer automatically.
- [ON]: to answer automatically.
SETTINGS
Select [Settings] in the HOME menu when you need to change the settings of the unit.
"●" in the table below indicates the default setting.
1 Press HOME, then touch [Settings].
2 Touch one of the setup category icons.
:General Settings (page 18)
Sound Settings (page 19)
1:Screen Settings (page 20)
: Visual Settings (page 20)
3 Touch / to select the desired item.
To return to the previous display, touch
To switch from the HOME screen to the playback
screen, touch
General Settings
Language
Unit status: Any status
| Option | Purpose |
| English (●), Français, Deutsch (IVE-560BT) | To select the display language. |
| Italiano, РécSEL (IVE-560BT-R) |
Time Format
Unit status: Any status
| Option | Purpose |
| 12-hour, 24-hour (●) | To change the time format. |
Clock Time
Unit status: Any status
| Option | Purpose |
| OFF (●), ON | To activate the CT function. |
Clock Adjust
Unit status: Any status
| Option | Purpose |
| - | To set the clock. (Available only when [Clock Time] is set to [OFF].) |
Beep
Unit status: Any status
| Option | Purpose |
| OFF, ON (●) | To activate the operation sound. |
Touch Panel Adjust
Unit status: Any status
| Option | Purpose |
| - | To adjust the touch panel calibration if the touching position does not correspond with the proper item. |
Dimmer
Unit status: Any status
| Option | Purpose |
| OFF | To deactivate the dimmer. |
| Auto (●) | To dim the display automatically when you turn lights on. (Available only when the illumination control lead is connected.) |
| ON | To dim the display. |
Dimmer Level
Unit status: Any status
| Option | Purpose |
| (-5 - +5) | To select the brightness level when the dimmer is activated. |
| :0 |
Output Colour System
Unit status: No source selected
| Option | Purpose |
| NTSC, PAL (●) | To change the colour system according to the connected monitor. (SECAM is not supported.) |
Camera Input
Unit status: Any status
| Option | Purpose |
| OFF | To deactivate the input. |
| Normal (●) | To display the picture from the rear view camera. |
| Reverse | To flip the picture from the rear view camera horizontally. |
Steering Control
You can operate the unit with buttons on the steering wheel.
For safety, park your car before changing this setting.
Unit status: Any status
| Option | Purpose |
| Custom | To display the instruction and panel for steering wheel control. |
| Preset (●) | To deactivate steering wheel control. To use rotary commander control. |
User Defined
This setting is available only when [Steering Control] is set to [User].
The steering button panel appears.
1 Press and hold the button you want to assign to the steering wheel. The button on the panel lights up (standby).
Press and hold the button on the steering wheel you want to assign the function to. The button on the panel changes to blue (registration complete).
3 To register other buttons, repeat steps 1 and 2.
Unit status: Any status
| Option | Purpose |
| - | To display the instruction and control panel. |
Notes
- If an error occurs while registering, all the registered information is cleared. Restart registration from the beginning.
- If the setting menu is left and settings are reconfigured, all registered information are cleared and the registration process starts from beginning.
- This function may not be available on some vehicles. For details on the compatibility of your vehicle, visit the support site on the back page.
HOME Key Function (hold 2 sec push)
Unit status: Any status
| Option | Purpose |
| Voice, DSPL (●) | To assign the voice command function or the display menu to the HOME button. |
Bluetooth Connection
Unit status: Any status
| Option | Purpose |
ON, OFF (●) To activate the BLUETOOTH signal.
Bluetooth Device Info
Unit status: Any status
| Option | Purpose |
| - | To display the device connecting to the unit by touching [Open]. (Available only when [Bluetooth Connection] is set to [ON].) |
Bluetooth Reset
Unit status: Any status
| Option | Purpose |
| - | To initialize all BLUETOOTH-related settings such as pairing information, call history, preset dial, history of connected BLUETOOTH devices, etc. |
Sound Settings
Rear/Sub Out
Switches the audio output between the rear speakers and subwoofer.
Unit status: Any status
| Option | Purpose |
| Rear | To output audio signals to the rear speakers (amplifier). |
Subwoofer () To output audio signals to the subwoofer.
Sound Adjust
Selects 3 BAND EQ and adjusts subwoofer level, balance/fader level or crossover filter.
Unit status: Any status
| Option | Purpose |
| 3BAND EQ | |
| Flat (●), Pop, Rock, News, Jazz, Electronic, Hip Hop, Easy list., Country, Classical Custom | To select the equalizer curve; customize the equalizer curve. When setting [Custom], selects the equalizer settings: [Low], [Mid], [High]. |
| Subwoofer: (MUTE, -10 - +10)●: 0 | To adjust the volume level of the subwoofer. (Available only when [Rear/Sub Out] is set to [Subwoofer].) |
| Balance: (L 15 - 0 - R 15)●: 0 | To adjust the sound balance between left and right speakers. |
| Fader: (Front 15 - 0 - Rear 15)●: 0 | To adjust the sound balance between front and rear speakers. |
| HPF: 80 Hz, 100 Hz, 120 Hz, 140 Hz, 160 Hz, OFF (●) | To select the cut-off frequency of the front/rear speakers. |
| LPF: OFF (●), 80 Hz, 100 Hz, 120 Hz, 140 Hz, 160 Hz | To select the cut-off frequency of the subwoofer. (Available only when [Rear/Sub Out] is set to [Subwoofer].) |
Screen Settings
Demo
Unit status: Any status
Option
Purpose
OFF,ON(●)
To activate the demonstration.
Visual Settings
DVD Menu Language
Unit status: No source selected
Option
Purpose
English ()
To select the default language for the disc's
Chinese,
menu.
German,
French, Italian,
Spanish,
Portuguese,
Dutch, Danish,
Swedish,
Finnish,
Norwegian,
Russian, Other
DVD Audio Language
Unit status: No source selected
Option
Purpose
English () To select the default language for the soundtrack.
Chinese.
German,
French, Italian,
Spanish,
Portuguese,
Dutch, Danish,
Swedish.
Finnish,
Norwegian,
Russian, Other
DVD Subtitle Language
Unit status: No source selected
Option
Purpose
English ()
To select the default subtitle language for DVD.
Chinese,
German,
French, Italian,
Spanish,
Portuguese,
Dutch, Danish,
Swedish.
Finnish,
Norwegian,
Russian, Other
Monitor Type
Selects an aspect ratio suitable for the connected monitor.
(The screen aspect ratio of this unit also changes.)
Depending on the disc, [Letterbox] may be selected automatically instead of [Pan Scan], and vice versa.
Unit status: No source selected
Option
Purpose
16:9 (●)

To display a wide picture. Suitable when connecting to a wide-screen monitor or a monitor with a wide mode function.
Letterbox

To display a wide picture with bands on the upper and lower positions of the screen. Suitable when connecting to a 4:3 screen monitor.
Pan Scan

To display a wide picture on the entire screen and automatically cut off the portions that do not fit.
Video CD PBC
Unit status: No source selected
Option
Purpose
OFF,ON(●)
To play a VCD with PBC functions.
ADDITIONAL DEVICES
Auxiliary Audio/Video Equipment
You can connect up to an optional device, such as a portable media player, game console, etc., to the AUX terminal on the unit.
Selecting an auxiliary device
Press HOME, then touch [AUX]. The AUX playback display appears.
Adjusting the volume level
Be sure to adjust the volume for the connected device before playback.
1 Reduce the volume on the unit.
2 Press HOME, then touch [AUX]. The AUX playback display appears.
3 Touch to open the menu, then touch [Input Level].
4 Set your usual listening volume on the unit.
5 Touch - / + repeatedly to adjust the level. The level is adjustable in single steps, between -10 and +15
Setting the type of device
By setting the type (video or audio) of each connected device, the background screen can be switched accordingly.
1 Press HOME, then touch [AUX].
2 Touch [Front] or [Rear]. [Front] is available only for audio.
3 When selecting [Rear], touch to open the menu, then touch [AUX Input].
4 Touch [Audio], [Video] or [Auto]. The default setting is [Auto].
To return to the previous display, touch
Rear View Camera
By connecting the optional rear view camera to the CAMERA IN terminal, you can display the picture from the rear view camera.
The picture from the rear view camera appears when:
- the back lamp lights up (or the gear lever is set to the R (reverse) position).
you press HOME then touch [Rear Camera].
you press and hold DSPL then touch [Rear Camera].
Language Code List
Language code list
The language spellings conform to the ISO 639: 1988 (E/F) standard.
| Code | Language | Code | Language | Code | Language | Code | Language |
| 1027 | Afar | 1183 | Irish | 1347 | Maori | 1507 | Samoan |
| 1028 | Abkhazian | 1186 | Scots Gaelic | 1349 | Macedonian | 1508 | Shona |
| 1032 | Afrikaans | 1194 | Galician | 1350 | Malayalam | 1509 | Somali |
| 1039 | Amharic | 1196 | Guarani | 1352 | Mongolian | 1511 | Albanian |
| 1044 | Arabic | 1203 | Gujarati | 1353 | Moldavian | 1512 | Serbian |
| 1045 | Assamese | 1209 | Hausa | 1356 | Marathi | 1513 | Siswati |
| 1051 | Aymara | 1217 | Hindi | 1357 | Malay | 1514 | Sesotho |
| 1052 | Azerbaijani | 1226 | Croatian | 1358 | Maltese | 1515 | Sundanese |
| 1053 | Bashkir | 1229 | Hungarian | 1363 | Burmese | 1516 | Swedish |
| 1057 | Byelorussian | 1233 | Armenian | 1365 | Nauru | 1517 | Swahili |
| 1059 | Bulgarian | 1235 | Interlingua | 1369 | Nepali | 1521 | Tamil |
| 1060 | Bihari | 1239 | Interlingue | 1376 | Dutch | 1525 | Telugu |
| 1061 | Bislama | 1245 | Inupiak | 1379 | Norwegian | 1527 | Tajik |
| 1066 | Bengali; | 1248 | Indonesian | 1393 | Occitan | 1528 | Thai |
| Bangla | 1253 | Icelandic | 1403 | (Afan)Oromo | 1529 | Tigrinya | |
| 1067 | Tibetan | 1254 | Italian | 1408 | Oriya | 1531 | Turkmen |
| 1070 | Breton | 1257 | Hebrew | 1417 | Punjabi | 1532 | Tagalog |
| 1079 | Catalan | 1261 | Japanese | 1428 | Polish | 1534 | Setswana |
| 1093 | Corsican | 1269 | Yiddish | 1435 | Pashto; | 1535 | Tonga |
| 1097 | Czech | 1283 | Javanese | Pushto | 1538 | Turkish | |
| 1103 | Welsh | 1287 | Georgian | 1436 | Portuguese | 1539 | Tsonga |
| 1105 | Danish | 1297 | Kazakh | 1463 | Quechua | 1540 | Tatar |
| 1109 | German | 1298 | Greenlandic | 1481 | Rhaeto- | 1543 | Twi |
| 1130 | Bhutani | 1299 | Cambodian | Romance | 1557 | Ukrainian | |
| 1142 | Greek | 1300 | Kannada | 1482 | Kirundi | 1564 | Urdu |
| 1144 | English | 1301 | Korean | 1483 | Romanian | 1572 | Uzbek |
| 1145 | Esperanto | 1305 | Kashmiri | 1489 | Russian | 1581 | Vietnamese |
| 1149 | Spanish | 1307 | Kurdish | 1491 | Kinyarwanda | 1587 | Volapük |
| 1150 | Estonian | 1311 | Kirghiz | 1495 | Sanskrit | 1613 | Wolof |
| 1151 | Basque | 1313 | Latin | 1498 | Sindhi | 1632 | Xhosa |
| 1157 | Persian | 1326 | Lingala | 1501 | Sangho | 1665 | Yoruba |
| 1165 | Finnish | 1327 | Laothian | 1502 | Serbo- | 1684 | Chinese |
| 1166 | Fiji | 1332 | Lithuanian | Croatian | 1697 | Zulu | |
| 1171 | Faroese | 1334 | Latvian; | 1503 | Singhalese | ||
| 1174 | French | Lettish | 1505 | Slovak | |||
| 1181 | Frisian | 1345 | Malagasy | 1506 | Slovenian | 1703 | Not specified |
Troubleshooting
If there are any problems with your unit/mobile device, make sure your car is parked in a safe place before investigating any issues.
The following checklist will help you remedy problems you may encounter with your unit.
Before going through the checklist below, check the connection and operating procedures.
For details on replacing the fuse and removing the unit from the dashboard, refer to the installation/connections manual supplied with this unit.
If the problem is not solved, visit the support site on the back page.
General
No power is being supplied to the unit.
Check the fuse.
The connection is not correct.
- Connect the yellow and red power supply leads.
There is no beep sound.
An optional power amplifier is connected and you are not using the built-in amplifier.
The contents of the memory have been erased.
The power supply lead or battery has been disconnected or it is not connected properly.
Stored stations and correct time are erased.
The fuse has blown.
The unit makes a noise when the position of the ignition is switched.
The leads are not matched correctly with the car's accessory power connector.
The display disappears from/does not appear on the monitor.
The dimmer is set to [ON] (page 18).
→ The display disappears if you press and hold OFF.
- Press OFF on the unit until the display appears.
The monitor off function is activated (page 10).
- Touch anywhere on the display to turn the display back on.
The display does not respond to your touch correctly.
Touch one part of the display at a time. If two or more parts are touched simultaneously, the display will not operate correctly.
Calibrate the touch panel of the display (page 18).
Touch the pressure sensitive panel firmly.
The rear monitor cannot be operated. Icons displayed on the rear monitor are disabled.
Menu items cannot be selected.
Unavailable menu items are displayed in grey.
Radio reception
The stations cannot be received.
The sound is hampered by noises.
The connection is not correct.
- Connect the REM OUT lead (blue/white striped) or accessory power supply lead (red) to the power supply lead of a car's antenna (aerial) booster (only when your car has built-in radio antenna (aerial) in the rear/side glass).
- Check the connection of the car antenna (aerial).
- If the auto antenna (aerial) will not extend, check the connection of the power antenna (aerial) control lead.
Preset tuning is not possible.
The broadcast signal is too weak.
RDS
PTY displays [PTY not found.].
The current station is not an RDS station.
RDS data has not been received.
The station does not specify the programme type.
Picture
There is no picture/picture noise occurs.
A connection has not been made correctly.
- Check the connection between this unit and other equipment, and set the input selector of the equipment to the source corresponding to this unit.
→ The disc is defective or dirty.
Installation is not correct.
-
Install the unit at an angle of less than 45^ in a sturdy part of the car.
-
The parking cord (light green) is not connected to the parking brake switch cord, or the parking brake is not applied.
The picture does not fit in the screen.
The aspect ratio is fixed on the DVD.
There is no picture/picture noise occurs in the rear monitor.
A source/module which is not connected is selected. If there is no input, no picture appears in the rear monitor.
The colour system setting is incorrect.
- Set the colour system to [PAL] or [NTSC] according to the connected monitor (page 16).
The picture of the rear view camera is displayed on this unit.
- No picture appears in the rear monitor if the picture of the rear view camera is displayed on this unit.
Sound
There is no sound/sound skips/sound crackles.
A connection has not been made correctly.
Check the connection between this unit and the connected equipment, and set the input selector of the equipment to the source corresponding to this unit.
The disc is defective or dirty.
Installation is not correct.
- Install the unit at an angle of less than 45^ in a sturdy part of the car.
→ The MP3 file sampling rate is not 32, 44.1, or 48 kHz.
The WMA file sampling rate is not 44.1kHz
→ The MP3 file bit rate is not 48 to 192 kbps.
→ The WMA file bit rate is not 48 to 192 kbps.
The unit is in pause/reverse/fast-forward mode.
The settings for the outputs are not made correctly.
→ The DVD output level is too low (page 15).
The volume is too low.
The ATT function is activated.
The format is not supported (such as DTS).
- Check if the format is supported by this unit (page 21).
Sound is noisy.
Keep leads and cables away from each other.
Disc operation
The disc does not play.
The disc is defective or dirty.
The disc is not playable.
The DVD is not playable due to the region code.
The disc is not finalized (page 7).
The disc format and file version are incompatible with this unit (page 9).
Press to remove the disc.
MP3/WMA/Xvid/MPEG-4 files do not play.
Recording was not performed according to the ISO 9660 level 1 or level 2 format or the Joliet or Romeo expansion format (DATA CD), or the UDF Bridge format (DATA DVD) (page 9).
The file extension is incorrect (page 7).
Files are not stored in MP3/WMA/Xvid/MPEG-4 format.
If the disc contains multiple file types, only the selected file type (audio/video) can be played.
- Select the appropriate file type using the list (page 15).
MP3/WMA/Xvid/MPEG-4 files take longer to play than others.
The following discs take a longer time to start playback.
- a disc recorded with a complicated tree structure.
- a disc to which data can be added.
Certain functions cannot be performed.
Depending on the disc, you may not be able to perform operations such as stop, search, or repeat/shuffle play. For details, refer to the manual supplied with the disc.
The soundtrack/subtitle language or angle cannot be changed.
Use the DVD menu instead of the direct selection button on the remote control (page 13).
Multilingual tracks, multilingual subtitles, or multi-angles are not recorded on the DVD.
The DVD prohibits changing.
The operation buttons do not function.
The disc will not eject.
Press the reset button (page 10).
USB playback
Items cannot be played via a USB hub.
Connect iPod/USB devices to this unit without USB hub.
Items cannot be played.
Reconnect the USB device.
The USB device takes longer to play.
The USB device contains large-sized files or files with a complicated tree structure.
The sound is intermittent.
The sound may be intermittent at a high bit rate of more than 320 kbps.
BLUETOOTH function
The other BLUETOOTH device cannot detect this unit.
Set [Bluetooth Connection] to [ON] (page 19).
While connecting to a BLUETOOTH device, this unit cannot be detected by another device. Terminate the current connection and search for this unit from the other device. The disconnected device can be reconnected by selecting from the list of registered devices.
Connection is not possible.
Check the pairing and connection procedures in the manual of the other device, etc., and perform the operation again.
The name of the detected device does not
appear.
Depending on the status of the other device, it may not be possible to obtain the name.
There is no ringtone.
Increase the volume while receiving a call.
The talker's voice volume is low.
Increase the volume during a call.
The other party says that the volume is too low or high.
Adjust the [MIC Gain] level (page 17).
Echo or noise occurs during call conversations.
Reduce the volume.
If ambient noise other than the phone call sound is loud, try reducing this noise.
- Shut the window if road noise is loud.
- Lower the air conditioner if the air conditioner is loud.
The phone sound quality is poor.
Phone sound quality depends on the reception conditions of the mobile phone.
- Move your car to a place where you can enhance the mobile phone's signal if the reception is poor.
The volume of the connected BLUETOOTH device is low or high.
Volume level will differ depending on the BLUETOOTH device.
- Reduce the volume level differences between this unit and the BLUETOOTH device (page 14).
The sound skips during audio streaming.
Reduce the distance between the unit and the BLUETOOTH device.
If the BLUETOOTH device is stored in a case which interrupts the signal, remove the case while using the device.
Several BLUETOOTH devices or other devices which emit radio waves are being used nearby. -Turn off the other devices.
- Increase the distance between the unit and other devices.
Playback sound stops momentarily when this unit is connecting to a mobile phone. This is not a malfunction.
You cannot control the connected BLUETOOTH device during audio streaming.
Check that the connected BLUETOOTH device supports AVRCP.
Some functions do not work.
Check that the connecting device supports the functions in question.
A call is answered unintentionally.
The connecting phone is set to start a call automatically.
[Auto Answer] of this unit is set to [ON] (page 17).
Pairing failed due to time out.
Depending on the connecting device, the time limit for pairing may be short. Try completing the pairing within the time by setting a single digit passkey.
The BLUETOOTH function cannot be operated.
Exit the source by pressing and holding SOURCE for 1 second, then turn on the unit.
No sound is output from the car speakers during a handsfree call.
If the sound is output from the mobile phone, set the mobile phone to output the sound from the car speakers.
Siri Eyes Free is not activated.
Perform the handsfree registration for an iPhone that supports Siri Eyes Free.
Set the Siri function on the iPhone to on.
Cancel the BLUETOOTH connection with the iPhone and the unit, and reconnect.
Error displays/messages
Bluetooth Connection Error
An error has occurred between this unit and the BLUETOOTH phone.
- Check the BLUETOOTH signal is set to on for this unit or the BLUETOOTH phone.
Try pairing again.
- Reconnect the BLUETOOTH phone.
Bluetooth device is not found.
The unit cannot detect a connectable BLUETOOTH device.
- Check the BLUETOOTH setting of the connecting device.
No device is in the list of registered BLUETOOTH devices.
- Perform pairing with a BLUETOOTH device (page 11).
Call Data Error
An error has occurred while accessing phonebook data via PBAP or call history from the BLUETOOTH phone.
- Reconnect the BLUETOOTH phone.
Data Listing Error
An error has occurred while displaying phonebook data via PBAP or call history from the BLUETOOTH phone.
Reconnect the BLUETOOTH phone.
Disc Error
The unit cannot read the data due to a problem.
The data is damaged or corrupted.
The disc is corrupted.
The disc is incompatible with this unit.
The disc is not finalized.
The disc is dirty or inserted upside down. Clean or insert the disc correctly.
A blank disc has been inserted.
The disc cannot play due to a problem. Insert another disc.
The disc is not compatible with this unit. Insert a compatible disc.
Press to remove the disc.
Handsfree device is not available.
A mobile phone is not connected.
- Connect a mobile phone (page 11).
Hubs not supported.
USB hubs are not supported on this unit.
No Playable Data
The disc does not contain playable data.
The iPod has no playable data.
- Load music data/files into the iPod.
Overcurrent Caution on USB
→ The USB device is overloaded.
- Disconnect the USB device, then change the source by pressing the SOURCE button.
- Indicates that the USB device is out of order, or an unsupported device is connected.
Playback prohibited by region code.
The DVD's region code differs from the unit's region code.
Device no response:
The unit does not recognize the connected USB device.
- Reconnect the USB device.
- Check that the USB device is supported by the unit.
Specifications
Monitor section
Display type: Wide LCD colour monitor
Dimensions: 6.2 inches
System: TFT active matrix
Number of pixels:
1,152,000 pixels (800× 3 RGB) × 480)
Colour system:
PAL/NTSC/SECAM/PAL-M automatic select
Tuner section
FM
Tuning range: 87.5 - 108.0 MHz
Antenna (aerial) terminal:
External antenna (aerial) connector
Intermediate frequency: 150kHz
Usable sensitivity: 10 dBf
Selectivity: 70 dB at 400 kHz
Signal-to-noise ratio: 70 dB (mono)
Separation at 1 kHz: 30 dB
Frequency response: 20 - 15,000 Hz
AM
Tuning range: 531 - 1,602 kHz
Antenna (aerial) terminal:
External antenna (aerial) connector
Intermediate frequency:
9,267 kHz or 9,258 kHz/4.5 kHz
Sensitivity: 44 V
DVD/CD Player section
Signal-to-noise ratio: 80 dB
Frequency response: 20 - 20,000Hz
Wow and flutter: Below measurable limit
Harmonic distortion: 0.05%
Region code: Labeled on the bottom of the unit
USB Player section
Interface: USB (Full-speed)
Maximum current: 1 A
Wireless Communication
Communication System:
BLUETOOTH Standard version 3.0
Output:
BLUETOOTH Standard Power Class 2 (Max. +4 dBm)
Maximum communication range:
Line of sight approx. 10m (33 ft)*1
Frequency band:
2.4 GHz band (2.4000 - 2.4835 GHz)
Modulation method: FHSS
Compatible BLUETOOTH Profiles *2:
A2DP (Advanced Audio Distribution Profile) 1.2
AVRCP (Audio Video Remote Control Profile) 1.4
HFP (Handsfree Profile) 1.6
PBAP (Phone Book Access Profile)
OPP (Object Push Profile)
SPP (Serial Port Profile)
*1 The actual range will vary depending on factors such as obstacles between devices, magnetic fields around a microwave oven, static electricity, reception sensitivity, antenna's performance, operating system, software application, etc.
*2 BLUETOOTH standard profiles indicate the purpose of BLUETOOTH communication between devices.
Power amplifier section
Outputs: Speaker outputs
Speaker impedance: 4 - 8 ohms
Maximum power output: 50W× 4 (at 4 ohms)
General
Outputs:
Video output terminal (rear)
Audio output terminals (front, rear/sub switchable)
Power antenna (aerial)/Power amplifier control
terminal (REM OUT)
Inputs:
Illumination control terminal
Remote controller input terminal
Antenna (aerial) input terminal
Microphone input terminal
Parking brake control terminal
Reverse input terminal
Camera input terminal
AUX audio input terminal (Front)
AUX Audio/Video input terminal (Rear)
USB port
External input terminal
Power requirements:
12 V DC car battery (negative ground (earth))
Dimensions:
Approx. 178mm× 101.5mm× 169mm
Mounting dimensions:
Approx.178 mm ×100 mm ×165 mm
Mass:
Approx. 1.7kg
Package contents:
Main unit (1)
Remote control (1): RUE-4233
Parts for installation and connections (1 set)
Microphone (1)
Design and specifications are subject to change without notice.
Region code
The region system is used to protect software copyrights. The region code is located on the bottom of the unit, and only DVDs labeled with an identical region code can be played on this unit.

can also be played.
If you try to play any other DVD, the message [Playback prohibited by region code.] will appear on the monitor screen. Depending on the DVD, no region code may be labeled even though playing the DVD is prohibited by area restrictions.
Due to continuous product improvement, specifications and design are subject to change without notice.
The LCD panel is manufactured using an extremely high precision manufacturing technology. Its effective pixel ratio is over 99.99% . This means that there is a possibility that 0.01% of the pixels could be either always ON or OFF.
Installation and Connections
Before installing or connecting the unit, please read the following and pages 4 to 9 of this manual thoroughly for proper use.

Warning
MAKE THE CORRECT CONNECTIONS
Failure to make the proper connections may result in fire or product damage.
USE ONLY IN CARS WITH A 12 VOLT NEGATIVE GROUND.
(Check with your dealer if you are not sure.) Failure to do so may result in fire, etc.
BEFORE WIRING, DISCONNECT THE CABLE FROM THE NEGATIVE BATTERY TERMINAL.
Failure to do so may result in electric shock or injury due to electrical shorts.
DO NOT ALLOW CABLES TO BECOME ENTANGLED IN SURROUNDING OBJECTS.
Arrange wiring and cables in compliance with the manual to prevent obstructions when driving. Cables or wiring that obstruct or catch on locations such as the steering wheel, gear lever, brake pedals, etc. can be extremely hazardous.
DO NOT SPLICE INTO ELECTRICAL CABLES.
Never cut away cable insulation to supply power to other equipment. Doing so will exceed the current carrying capacity of the wire and result in fire or electric shock.
DO NOT DAMAGE PIPES OR WIRING WHEN DRILLING HOLES.
When drilling holes in the chassis for installation, take precautions as not to contact, damage or obstruct pipes, fuel lines, tanks or electrical wiring. Failure to take such precautions may result in fire.
DO NOT USE NUTS OR BOLTS IN THE BRAKE OR STEERING SYSTEMS TO MAKE GROUND CONNECTIONS.
Nuts and bolts used for the brake or steering systems (or any other safety-related system), or tanks should NEVER be used for installations or ground connections. Using such parts could disable control of the vehicle and cause fire etc.
KEEP SMALL OBJECTS SUCH AS BOLTS OR SCREWS OUT OF THE REACH OF CHILDREN.
Swallowing them may result in serious injury. If swallowed, consult a doctor immediately.
DO NOT INSTALL IN LOCATIONS WHICH MIGHT HINDER VEHICLE OPERATION, SUCH AS THE STEERING WHEEL OR GEAR LEVER.
Doing so may obstruct forward vision or hamper movement etc. and results in serious accident.

Caution
ONLY TO BE INSTALLED BY A QUALIFIED ELECTRICIAN OR VEHICLE TECHNICIAN.
The wiring and installation of this unit requires special technical skill and experience. To ensure safety, always contact the dealer where you purchased this product to have the work done.
USE SPECIFIED ACCESSORY PARTS AND INSTALL THEM SECURELY.
Be sure to use only the specified accessory parts. Use of other than designated parts may damage this unit internally or may not securely install the unit in place. This may cause parts to become loose resulting in hazards or product failure.
ROUTE THE WIRING SO IT IS NOT CRIMPED OR PINCHED BY A SHARP METAL EDGE.
Route the cables and wiring away from moving parts (like the seat rails) or sharp or pointed edges. This will prevent crimping and damage to the wiring. If wiring passes through a hole in a metal component, use a rubber grommet to prevent the wire's insulation from being cut by the metal edge of the hole.
DO NOT INSTALL IN LOCATIONS WITH HIGH MOISTURE OR DUST.
Avoid installing the unit in locations with a high level of moisture or dust. Moisture or dust that penetrates into this unit may result in product failure.
Precautions
- Disconnect the cable from the (-) battery terminal before installing your IVE-W560BT/IVE-W560BT-R. This will reduce any chance of damage to the unit in the event of a shortcircuit.
- Be sure to connect the colour coded leads according to the diagram. Incorrect connections may cause the unit to malfunction or damage the vehicle's electrical system.
- When making connections to the vehicle's electrical system, be aware of the factory installed components (e.g. on-board computer). Do not tap into these leads to provide power for this unit. When connecting the IVE-W560BT/IVE-W560BT-R to the fuse box, make sure the fuse for the intended circuit of the IVE-W560BT/IVE-W560BT-R has the appropriate amperage. Failure to do so may result in damage to the unit and/or the vehicle. If in doubt, consult your ALPINE dealer.
- The IVE-W560BT/IVE-W560BT-R uses female RCA-type jacks for connection to other units (e.g. amplifier) having RCA connectors. You may need an adapter to connect other units. If so, please contact your authorized ALPINE dealer for assistance.
- Be sure to connect the speaker (-) leads to the speaker (-) terminal. Never connect left and right channel speaker cables to each other or to the vehicle body.
- The Display must be completely retracted in the casing when installing. If not, problems may occur.
- When installing in vehicles, make sure the display can open/ close without coming in contact with the gear lever.
IMPORTANT
Please record the serial number of your unit in the space provided below and keep it as a permanent record. The serial number plate is located on the bottom of the unit.
SERIAL NUMBER:
INSTALLATION DATE:
INSTALLATION TECHNICIAN:
PLACE OF PURCHASE:
Installation
Caution
Do not block the unit's heat sink, thus preventing air circulation. If blocked, heat will accumulate inside the unit and may cause a fire.
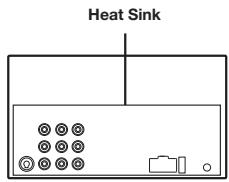
Rear of the unit
The main unit must be mounted within 45 degrees of the horizontal plane, back to front.
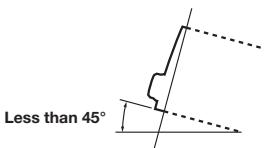
1
Remove the mounting sleeve from the main unit. Slide the mounting sleeve into the dashboard and fix it with the metal shackles.
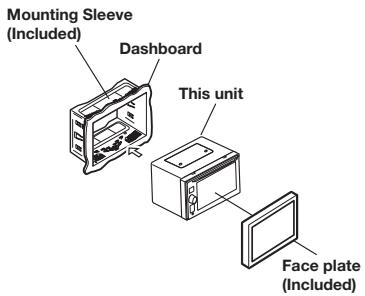
2
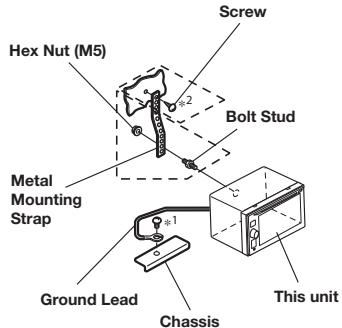
Reinforce the head unit with the metal mounting strap (not supplied). Secure the ground lead of the unit to a clean metal spot using a screw (*1) already attached to the vehicle's chassis.
- For the screw marked “*2”, use an appropriate screw for the chosen mounting location.
Connect each input lead coming from an amplifier or equalizer to the corresponding output lead coming from the left rear of the IVE-W560BT/IVE-W560BT-R. Connect all other leads of the IVE-W560BT/IVE-W560BT-R according to details described in the CONNECTIONs section.
3
Slide the IVE-W560BT/IVE-W560BT-R into the dashboard until it clicks. This ensures that the unit is properly locked and will not accidentally come out from the dashboard.
Installing the Microphone
For safety reasons install the microphone in the following location.
In a stable and secure location.
- In a location that does not inhibit safe driving of the vehicle.
- Install the microphone in a location where the driver's voice can easily be picked up.
Requiring the driver to move towards the microphone for audibility causes a distraction that could be dangerous.
Connections
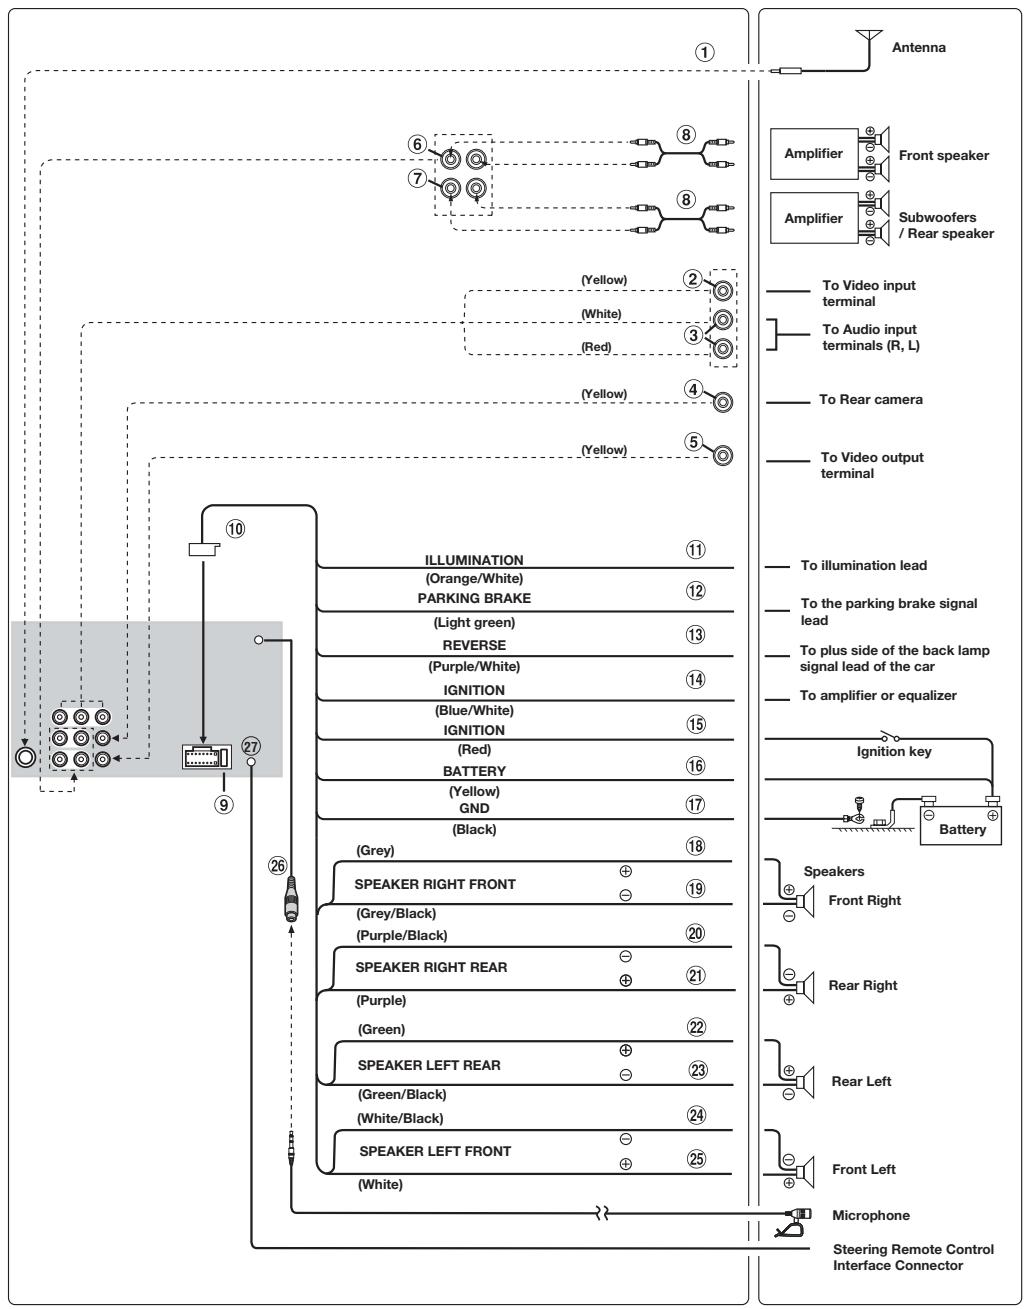
① Radio Antenna Receptacle
② Video Input Connector (AUX IN) (Yellow)
Input of AUX video.
③ Audio Input Connector (AUX IN)
④ CAMERA Input Connector
For optional Rearview Camera with RCA Connector.
⑤ Video Output Connector (AUX OUT) (Yellow)
⑥ Front Output RCA Connectors RED is left and WHITE is right.
⑦ Subwoofer/Rear Output RCA Connectors RED is left and WHITE is right.
⑧ RCA Extension Cable (sold separately)
Fuse Holder (10A)
10 Power Supply Connector
Illumination Lead (Orange/White)
Connect this lead to the vehicle's instrument cluster illumination lead. This will allow the backlighting of this unit to dim whenever the vehicle's lights are turned on.
12 Parking Brake Lead (Light green)
Connect this lead to the power supply side of the parking brake switch to transmit the parking brake status signals to the IVE-W560.
13 Reverse Lead (Purple/White)
Connect to the plus side of the car's reverse lamp. This lamp illuminates when the transmission is shifted into reverse (R). With this lead properly wired, the video picture automatically switches to the Rearview camera whenever the car is put into reverse (R).
14 Remote Turn-On Lead (Blue/White)
Connect this lead to the remote turn-on lead of your amplifier or signal processor.
Switched Power Lead (Ignition) (Red)
Connect this lead to an open terminal on the vehicle's fuse box or another unused power source which provides (+) 12V only when the ignition is turned on or in the accessory position.
16 Battery Lead (Yellow)
Connect this lead to the positive (+) post of the vehicle's battery.
⑦ Ground Lead (Black)
Connect this lead to a good chassis ground on the vehicle. Make sure the connection is made to bare metal and is securely fastened using the sheet metal screw provided.
Right Front (+) Speaker Output Lead (Grey)
19 Right Front (-) Speaker Output Lead (Grey/Black)
Right Rear (-) Speaker Output Lead (Purple/Black)
Right Rear (+) Speaker Output Lead (Purple)
22 Left Rear (+) Speaker Output Lead (Green)
23 Left Rear (-) Speaker Output Lead (Green/Black)
24 Left Front (-) Speaker Output Lead (White/Black)
25 Left Front (+) Speaker Output Lead (White)
MIC Input Connector
To Microphone (Included).
Steering Remote Control Interface Connector To Steering Remote Control Interface Box.
Inhaltsverzeichnis
Bedienungsanleitung
WARNING
WARNING. 4
VORSICH 4
HINWEIS. 5
Dimmer Level (Dimmer Level)
Bluetooth Connection (Bluetooth-Verbinding)
Bluetooth Connection Error
Bluetooth device is not found.
Handsfree device is not available.
A2DP (Advanced Audio Distribution Profile) 1.2
AVRCP (Audio Video Remote Control Profile) 1.4
HFP (Handsfree Profile) 1.6
PBAP (Phone Book Access Profile)
OPP (Object Push Profile)
SPP (Serial Port Profile)
③ Audioeingang (AUX IN)
④ KAMERA-Eingang
Installation et raccordements
Avertissement 28
Attention 28
Precautions 28
Installation 29
Installation du microphone 29
Raccordements. 30
Mode d'emploi
AVERTISSEMENT

AVERTISSEMENT
You could use the album to record music and dance. You could also use the album to record your favourite music. You could also use the album to record your favourite music. You could also use the album to record your favourite music. You could also use the album to record your favourite music. You could also use the album to record your favourite music. You could also use the album to record your favourite music. You could also use the album to record your favourite music. You could also use the album to record your favourite music. You could also use the album to record your favourite music. You could
Touch Panel Adjust (Alignment Ecran tactile)
Output Colour System (Format Image)
Bluetooth Connection (Bluetooth Active)
Monitor Type (Format Image)
Norme BLUETOOTH version 3.0
Sortie :
Installation et raccordements
Designed by Alpine Electronics (Europe) GmbH
Printed in China
ALPINE ELECTRONICS MARKETING, INC.
1-7, Yukigaya-Otsukamachi, Ota-ku,
Tokyo 145-0067, JAPAN
Phone:03-5499-4531
ALPINE ELECTRONICS OF AMERICA, INC.
19145 Gramercy Place, Torrance,
California 90501, U.S.A.
Phone 1-800-ALPINE-1 (1-800-257-4631)
ALPINE ELECTRONICS OF CANADA, INC.
777 Supertest Road, Toronto,
Ontario M3J 2M9, Canada
Phone 1-800-ALPINE-1 (1-800-257-4631)
ALPINE ELECTRONICS OF AUSTRALIA PTY. LTD.
161-165 Princes Highway, Hallam
Victoria 3803, Australia
Phone 03-8787-1200
ALPINE ELECTRONICS GmbH
Wilhelm-Wagenfeld-Str. 1-3, 80807 München, Germany
Phone 089-3242640
ALPINE ELECTRONICS OF U.K. LTD.
Alpine House
Fletchamstead Highway, Coventry CV4 9TW, U.K.
Phone 0870-33 33 763
ALPINE ELECTRONICS FRANCE S.A.R.L.