
HDS990 - Car stereo ALPINE - Free user manual and instructions
Find the device manual for free HDS990 ALPINE in PDF.

| Product Type | Car Radio |
| Brand | Alpine |
| Model | HDS990 |
| Dimensions (main unit) | 178 x 143.6 x 50 mm |
| Net Weight | 0.77 kg |
| Supply Voltage | 9 - 16 V |
| Output Power | 25 W RMS × 4 (4 Ω, 14.4 V, 10% THD) |
| Signal-to-Noise Ratio (RCA) | ≥ 98 dB |
| Frequency Response | 20 Hz - 40 kHz (±1.5 dB) |
| Supported Audio Formats (USB) | MP3, WMA, AAC, M4A, WAV, FLAC, APE, DSD (DSF/DFF) |
| Bluetooth Formats | AAC, SBC, aptX HD, LDAC |
| System Sampling Frequency | 192 kHz / 32 bit |
| Inputs | High level 4 channels, USB (3 ports), Bluetooth, AUX |
| Outputs | High level 4 channels, RCA 6 channels, optical/coaxial |
| Main Functions | Preset and parametric equalizer, active filter (X-Over), time correction, adjustable subwoofer, mixing mode (ALPINE Direct / AUX Mix) |
| Connectivity | Bluetooth, USB 2.0 (up to 2 TB, FAT32/NTFS/exFAT) |
| Display | Screen controller, Hi-Res indicator, manual/auto dimming |
| Maintenance and Cleaning | Soft dry cloth; do not use solvents |
| Safety | Do not use while driving, stop the vehicle for any manipulation; use correct fuse value |
| Spare Parts and Repairability | Contact an authorized Alpine dealer; do not repair yourself |
| General Information | 12 V compatibility, automotive use only; firmware update possible |
Frequently Asked Questions - HDS990 ALPINE
User questions about HDS990 ALPINE
0 question about this device. Answer the ones you know or ask your own.
Ask a new question about this device
Download the instructions for your Car stereo in PDF format for free! Find your manual HDS990 - ALPINE and take your electronic device back in hand. On this page are published all the documents necessary for the use of your device. HDS990 by ALPINE.
USER MANUAL HDS990 ALPINE
Points for Safe Use 1
Copyright Notice 4
Preparation work 5
Accessory List 5
Connections and Functions ......6
Connections and Functions ......7
Location of Button 8
Power On or Off 8
Starting the System for the First
Time 8
Controller Display 8
Play 9
Search for the Song 9
Volume Adjustment 10
Decrease th e Volume Quickly .....10
Switch Audio Source 10
Set the Mixing Mode 10
Remote Sen sing 11
Setup 11
Setup O peration 11
Preset EQ Settings 11
Sound Settings 12
Treble/Bass Setting 12
Subwoofer Settings 12
Turn on/Off the Subwoofer ..12
Setting the Subwoofer Phase 13
Setting the Subwoofer Level 13
Parametric EQ Setting 13
Select Band 13
Left and Right Balance Setting of
Speaker Output 13
Front and Rear Balance Settings of
Speaker Output 14
Input Source Vol. Setting 14
Select USB Audio ....14
Select BT Audio 14
Select Hi-Level Audio 14
Select AUX 14
Select USB Audio ....14
Time Correction Settings .....14
X-Over Settings 15
Frequency Switching 15
2-way Frequency 15
3-way frequency .....16
Sound me mory 16
Dealer Settings ....16
User Settings 16
Defeat Settings 17
Bluetooth 17
General Settings ......17
Mix Source Settings ......17
Main Source Attenuation ..... 18
Mix Source Selection ......18
Language Settings ....18
Artwork di splay 18
Dimmer Control 18
Dimmer 19
Dimmer level 19
Blackout Settings 19
Alpine System 19
External Power AMP Switch .19
Master Volume 19
Main Source 19
Mix Source 19
Subwoofer 19
Sound Effect 19
Steering wheel control 20
Built-in AMP 20
SPDIF/Opt Settings 20
Sampling Rate Settings 21
Clear all Settings 21
About 21
DIAG Mode 21
About the X-Over 22
About Time Correction 23
USB memory (optional) 24
About USB Playback Format .....24
Bluetooth operation ......24
About Bluetooth 24
Connect Bluetooth 25
Bluetooth Music 25
Information 25
About the Formats Supported by
this N nit 25
About
MP3/WMA/AAC/M4A/WAV/FLA
C/APE/DSD 25
When Something goes Wrong ..... 28
When this Messag e A ppears .....29
Specifications 32
Instr uctions
Warning
Points for Safe Use
- Please read this manual carefully before using the machine and system components. This manual contains instructions on how to use this product safely and effectively. If failure to follow the instructions in this is manual causes malfunctions, Alpine will not assume any responsibility.
- This manual uses various icons to explain how to use this product safely, and reminds you to pay attention to the dangers that may be caused by improper connection and operation. The meaning of these icons will be explained below. A complete understanding of the meaning of these icons is very important for the correct use of this manual and the system.

Warning
- It is very dangerous to operate th is system while e driving. Th e user should stop before operating the software.
- Road conditions and laws take precedence over the information displayed on the map: When driving, you should abide by a textual traffic restrictions and conditions.
- Th is software is specially designed for this machine and cannot be used in

Warning
This symbol indicates important instructions. Failure to heed these instructions can result in serious injury or even death.
Do not use any features that will d istract you while d riving
Any function that affects your concentration should only be used after t he car h as come to a complete stop. To use these functions, please
park your vehicle in a safe place first. Otherwise, an accident may result.
Do not disasse mble or modi fy Otherw ise, it may cause an accident, fire or electric shock.
The volum e must be mainta ined at a level where t he noise outside t he c ar c an be hea rd while d riving
Inaudible emergency vehicle sirens and road warning signals (train in intersections, etc.) are very dangerous and may cause accidents. In addition, excessive volume may cause hearing loss.
This product is only suitable for cars with 12 V negative grounding
Otherwise, it may cause a fire and other accidents.
Smal l obje cts s uc h as bo lts or sc rews s hould b e kept o ut of the reach o f child ren
Swallowing small objects may cause serious injury. Once swallowed by mistake, please immediately medical.
When replacing the fuse, you must choose a fuse with the correct amp ere value Otherwise, it may cause a fire or electric shock.
Do not block the ventilation holes or heat sink. Otherw ise, it may cause internal heat build-up and may cause a fire.
This product can only be used in 12V mobile applications
If used in n on-designed application s, it may cause fire, electric shock or other injuries.
Make the correct connection
If it is not connected properly, it may cause fire or product damage.
Before wiring, disconnect the cable from the negative terminal of the battery
Otherw ise, it may cause electric shock or injury due to electrical short circuit.
Do not let the cable be entang led with sur rounding objects
Arrange the wires and cables in accordance with the requirement s of the manu al to prevent them from becoming obstructive while e driving. Cables or wires that obstruct or hang on the steering wheel, s hift lever, brake pedal, etc. are extremely dangerous.
Do not sp lice cables
Do not cut the cable insulation to supply power to other equipment. Other wise, the current carrying capacity of the wire will be exceeded, resulting in fire or electric shock.
Do not dama ge the pipe or wir ing w hen drillin g When drilling holes in the chassis for installation, be careful not to touch, damage or obstruct t he pipes, fuel lines, fuel tanks or wires. If you don't pay attention, it can cause fire.
Do not use b olts or nuts in b rakes o r steering systems for grou n ding conn c tions
Never use bolts or n uts used in brakes or steering systems (or any other safety-related systems) or fuel tanks for installation or grounding connections. The use of such parts will cause the car controller to fail, resulting in fire and so on.
Do not install on the steering wheel or gear leve r, etc., which may h under the operation of the c ar
Otherw ise, it will obstruct the front line of sight or obstruct moving parts, etc., causing serious accidents.

Notice
This symbol indicates important instructions. Failure to heed the ese instructions may result in injury or major property damage.
When there is a problem, p lease stop u sing i t imme diately
Otherwise, it may cause personal injury or damage to the product. Please return this product to an authorized Alpine dealer or the
nearest Alpine service center for repair.
As k pr ofessionals for wiring and installation The wiring and installation of this product require professional skills and experience. For safety reasons, please contact the dealer where you purchased the product for installation.
Use d esig nated accessories and install secu rely Make sure to use only designated accessories.
The use of n on-designated parts may cause internal dama ge to the devi ce, or it may not be securely installed in place. This can cause parts to loosen and cause danger or product failure.
Arrange the wires to avoid crimping or being sq ueezed by s har p metal ed ges
The arrangement of wires and cables should be far away from moving parts (such as seat tracks) or sharp edges or corners. This will a void crimping and damage to the wires. If the wiring passes through a metal hole, a rubber gasket should be used to prevent the wire insulation from being cut by the edge of the metal hole.
Do not install in high humidity or dusty location s
Avoid installing the device in a location with high humidity or dust. Moisture or dust invades the device and can cause product failure.

Precautions
Product cleaning
Please use a dry soft cloth to clean the product regularly. If the dirt is difficult to remove, soak a soft cloth with water only. Any other solvent may dissolve.
temperature
Before turning on the machine, please make sure that the temperature in the car is between +60°C and -20°C.
Maintai n
If you encounter a problem, do not repair it yourself. Please return this product to an authorized Alpine dealer or the nearest Alpine service center for repair.
Installation location
- This machine cannot be installed in any of the following places:
- Near direct sunlight and heat sources
- Places with high humidity and near water sources
- Dusty places
- Locations subject to severe vibration
Protect the U SB conn ector
- The machine provides three front and rear USB ports to support the connection and use of USB storage. When the front and rear ports are connected to the charging device at the same time, the normal operation of the machine cannot be guaranteed.
- Only USB storage can be connected to the USB terminal of this unit. The use of other USB products cannot guarantee normal use.
- If you use a USB connector, be sure to use the USB extension cable (included).
- Depending on the connected USB memory device, this unit may not work or some functions may not be performed.
- The file system supported by this machine is FAT16/32, NTFS, exFAT.
- Please make sure that the number of songs in the connected USB storage (the maxim um number of songs that can be played in the front and rear USB) does not exceed 10,000, otherwise it will not play normal ly.
- The audio file format that this ma chi ne can play is MP 3/W MA /AAC/M4 A/ WAV/FLAC /A PE/DSD.
- It can display performer's name/son g name/song album, etc. Some special characters may not be displayed correctly.

Notice
Alpine is not responsible for lost data, etc., even if it occurs while using this product.
Abo ut using USB storage
- In order to prevent malfunction or damage, please pay attention to the following points.
- Please read the user manual of the USB
memory thoroughly.
- Do not touch the terminals with your hands or metal.
- Do not subject the USB memory to severe vibrations.
- Do not bend, drop, disassembl e, modi fy, or immerse in water.
- Avoid using or storing in the following situations.
- In a car exposed to direct sunlight or high temperature.
- There may be places with high humidity or corrosive objects.
- Install the USB memory in a location where it will not hinder the driver's operation.
- USB stora ge may not work properly in high or low temperat ure places.
- Only use approved USB memory. Please note that even if it is an approved USB memory, it may not work properly depending on its type or status.
- The function of the USB memory cannot be guaranteed. Please use USB storage in accordance with the e terms of the a greement.
- Depending on the USB memory type, memory status or en coding software settings, this unit may not be a ble to play or display correctly.
- Files that are copy-protected (copyright protection) cannot be played.
- The USB memory may take some time to start playing. If there are special files other than audio in the USB storage, it may take longer before the file is played or searched for.
- This unit can play files with "mp3", "wma", "acc", "m4a", "wav", "flac", "a pe", "dsd" ("dff" and "dsf") extensions.
- Do not add the above extensions to non-audio data. Such non -audio data cannot be recognized. The playback result may contain noise that can damage speakers and/or amplifiers.
- It is recommended to back up important data on a personal computer.
- Do not remove the USB device during playback. Change SOURCE to something other than USB, and then remove the USB device to prevent damage to its memory.
Copyright Notice
The Bluetooth® word mark and logo are registered trademarks held by Bluetooth SIG, Inc. Alpine Electronics has obtained permission to use the word mark and logo, and other trademarks and trade names belong to their respective owners.
This product is conformed to High-Resolution Audio standard defined by Japan Audio Society. Alpine Electronics has been authorized to use the High-Resolution Audio logo from Japan Audio Society.
Preparati on work
Accessory List
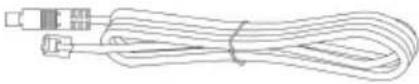
| Power cable | High Level Input cable | USB Extension cable (1.5 m) |
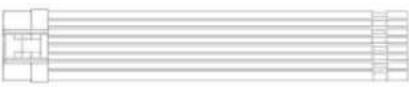 |  |  |
| Commander Extension cable (2.5 m) | Multiple Line cable | Mounting Brackets ×4 |
 |  | 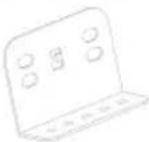 |
| Self-tapping Screw×20 | Machine Screw×8 | Commander case |
 |  | [kHK6] |
| Commander | Main unit | Alpine system communication cable |
 | 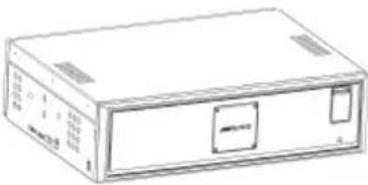 |  |
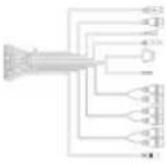
Connections and Functions
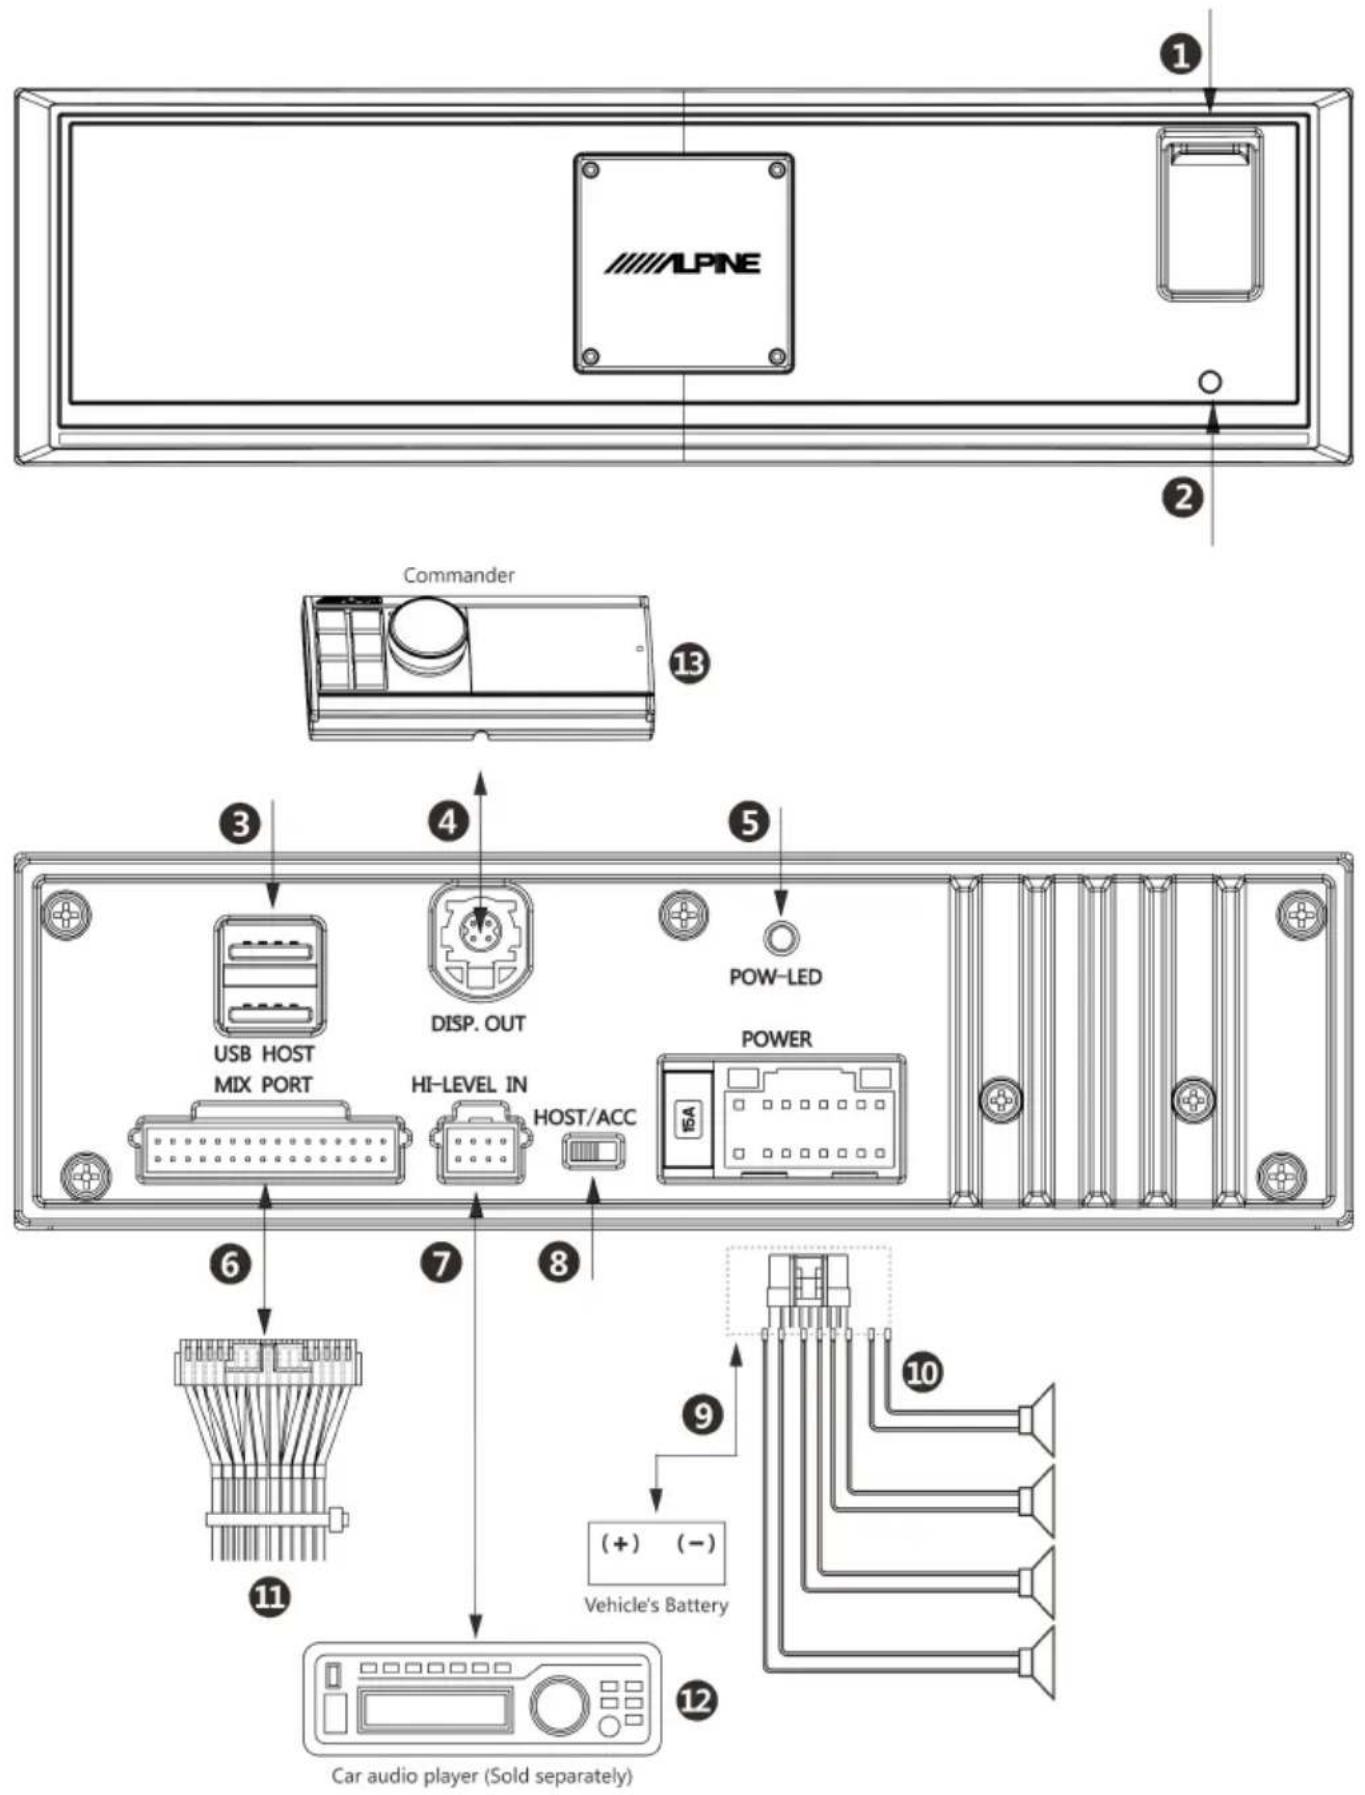
text_image
ALPNE Commander USB HOST MIX PORT DISP. OUT HI-LEVEL IN HOST/ACC POW-LED POWER 6 7 8 9 (+) (-) Vehicle's Battery 10 11 12 Car audio player (Sold separately)Connections and Functions
① Front USB Connector
Used to connect U disk, mobile hard disk or USB HUB.
② Re set B utton
Press and hold for 3 seconds to restart the host.
③ Rear Double USB Connector
Connect the USB or mobile hard disk through the attached USB extension wire.
④ C omma nder C onne ctor
It can be connected to the controller for play control, volume adjustment, and audio source selection.
⑤ Power Indicator
The power-on light is always on, and the power-off light is off.
⑥ Mu ltip le Line Conne ctor
Including 1 set of 3.5mm socket audio in put,
3 s ets of RCA audi o output, optical ou tput,
coaxial output interface, steering control
interface, Alpine system matching in terrace (for DSP product connection) and USB audio input.
⑦ H igh Le vel Input conn ector Connect to the power output of the car audio player.
⑧ Input Select Sw itch When dialed to the "ACC" end, ACC starts the machine; when dialed to the "HOST" end, the high level input signal FL-/FL+ starts the e mac hine.
⑨ Power Output C onne ctor Connect the car battery.
⑩ Sp eaker Outp ut Connect an speakers.
⑪ Mu ltip le Line External function expansion interface.
⑫ C ar A udio Player (Sold se parately) Connect the car audio player.
⑬ C omma nder
To prevent external noise from entering the audio system.
- The installation position of the machine and the wiring arrangement should be at least 10cm away from the automobile wiring harness.
- Try to keep the battery power cord a way from other wires.
- Securely connect the ground wire to the bare metal contacts of the car chassis (remove any paint, dirt or grease if n necessary).
- If you want to attach an optional noise suppressor, please try to keep it away from the machine when connecting. Your Alpine dealer h as various types of noise suppressors, please contact them for details.
- Your Alpine dealer is proficient in noise prevention methods, please consult your dealer for details.
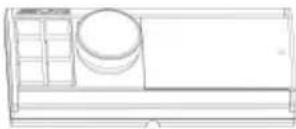
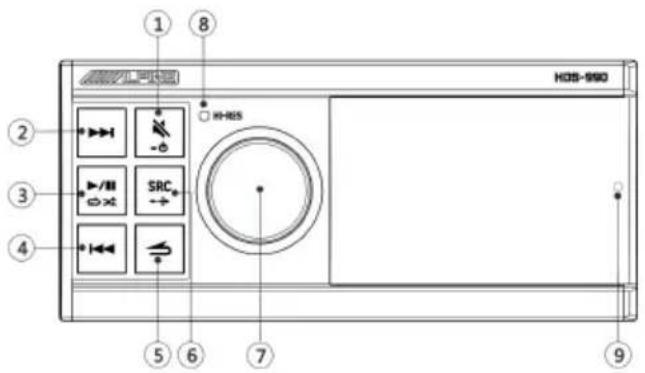
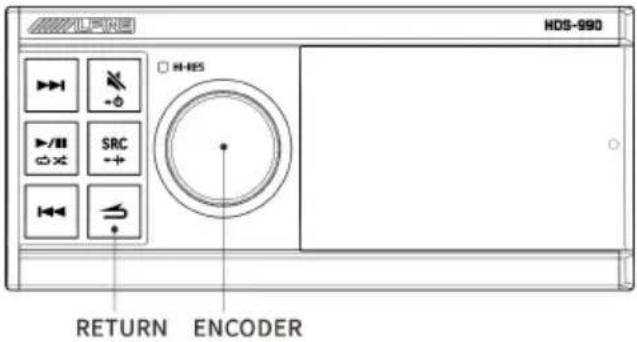
Location of Button
text_image
H3B-960 H3B-960 ① ⑧ ② ③ ④ ⑤ ⑥ ⑦ ⑨① Key
Short press to mute; long press for more than 2 seconds to s hut down.
*You can press any key to boot.
② Key
USB: Short press to select the next song; long press for more than 2 seconds to fast forward.
Bluetooth audio: select the next song.
③ Key
Short press to switch pause/play; long press for more than 2 seconds to switch random play/single cycle.
④ Key
USB: Short press to select the previous song; long press for more than 2 seconds to rewind.
Bluetooth audio: select the previous song
⑤ Key
Return to the previous level.
⑥ Key
Short press to s elect th e main aud io source: USB, Bluetooth audio, high level , AUX or USB Audio ( Default USB ) ; long press for more than 2 seconds to t urn on/off the mixing mode.
⑦ Knob Key
Main interface: Rotate left and right to adjust the volume; short press to enter the song list; long press for more than 2 seconds to enter the Set up mode.
Song list or Setup mode: Short press to confirm the selection.
⑧ H i-Res in dicator
The light is only on when the Hi-Res format song is currently playing, and the light is not on in other formats.
⑨ Re mote co ntrol se nsor
Power On or Off
Press any button on the controller to turn on the unit.
Press and hold for at least 2 seconds to turn off the unit.
- When the power is turned on for the first time, t he volum e starts from level 12.
Starting the System for the First Time
Press and hold the RESET switch for 3 seconds to restart t he host.
1 Turn off the power of this unit.
2 Press RESET with a ballpoint pen or simila r pointed object.
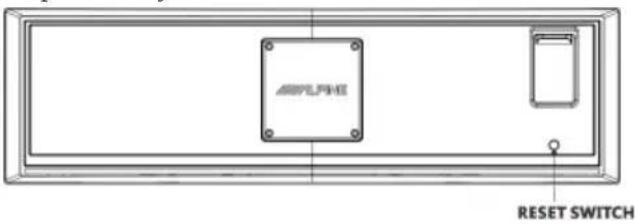
text_image
ASFLPHE RESET SWITCHController Display
■ USB source screen
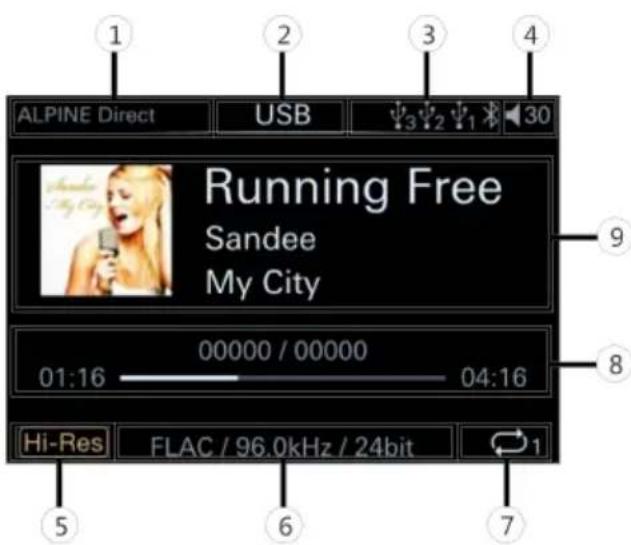
text_image
ALPINE Direct USB Running Free Sandee My City 01:16 00000 / 00000 04:16 Hi-Res FLAC / 96.0kHz / 24bit 7 5 6 8 9 30① Display the status of Mix source.
ALPINE Direct: Turn off the mix source. BT Audio: The mix source is BT Audio. High.Level: The mix source is High.Level. AUX: The mix source is AUX. USB Audio: The mix source is USB Audio.
② Displa y the current audio source. USB, BT Audio, high level, AUX, USB Audio.
③ Input audio source icon
| Input audio source | USB1 | USB2 | USB3 | Bluetooth |
| Icon |
④ Total volume icon. Display the current volume value.
⑤ Hi-Res icon. Indicates that Hi-R es format songs are currently playing.
⑥ Displa y the current music format.
⑦ Play mode icon.
| Icon | Description |
 | Only the current song is played in a loop. |
 | Only the files in a folder are played in a loop. |
 | The folders are played randomly. |
 | All songs are played randomly. |
⑧ Show total song duration, playback progress and current t rack number/total number of songs.
⑨ Show song information: song title, singer, lyrics, etc.
Play
1 Press to select the USB mode by default. 2 Press or to select the desired track (file). Long press or to rewind or fast forward.
3 Press ▶/III/*☆☆ to switch between pause and play.
4 Turn the knob to adjust the volume, increase the volume clockwise and decrease the
volume counterclockwise. Press the knob to enter the t rack search interface, you can choo se USB1, USB2, USB3, etc. to select songs to play, or turn the knob to enter the search list to search for the song you want to play.
5 Press to return to the previous level.
- Depending on the files stored in the USB, it may take some time to start playing.
- The format of the file to be played will be displayed on the screen during g playback.
- When playing Hi-Res files, the HR i con will be displayed on the screen.
- Any file protected by DRM (Digital Rights Management) copy protection cannot be played on this machine.
- When playing VBR (variable bit rate) recorded documents, the playback time may not be displayed correctly.
- If there is tag information, the song name/artist name/album name will be displayed.
- Unsupported characters are displayed with "☐" instead.
Search for the Song
The USB memory can h old many songs.
Quickly find the song you want by searching.
1 Press the knob to enter the song list in terrace, and select "Search" to start the search mode.
2 Turn the knob to select the category list "Artists", "Albums", "Songs", "Format", "Date" or "Size".
1.1 Select Artists ^*1 , short press to enter the artist list, turn t he knob to select the desired artist, short press to enter t he song list.
1.2 S elect Albums ^1 , short press to enter the album list, turn the knob to select the desired album, short press to enter the song list.
1.3 Select Songs ^1 , short press to enter the song list.
1.4 Select Format ^*1 , short press to enter the file format list, turn the knob to select the desired file format, short press to enter the son g list.
1.5 Select Date ^*2 , short press to enter the song list.
1.6 Select Size ^*3 , short press to enter the song list.
*1 Sort by numbers 0 → 9, A → Z alphabetically (first by numbers, then by letters, uppercase and lowercase letters are indistinguishable).
*2 T he date is arranged in the order of new → old of the act ual modification ion date of the file, and th ere is no rule for the same time.
*3 File sizes are arranged in the order of largest → s malle st occu pied storage s pace, and th ere are no rules for th e same size.
3 Under the song list, turn the knob to select the desired song, and short press to start playing the selected song.
- Press to return to the previous level.
- Empty files or files with no valid play files will not be displayed.
- When there are a lot of songs stored in the USB, the search may be s lower.
Volume Adjustment
Turn the knob until you get the desired volume. Volume: 0\~35
Decrease the Volume Quickly
The mute function can instantly reduce the volume to 0.
1 Press the (M ute) button to activate the mute mode. The volum e will be 0.
2 Press the (Mute) button again to restore the previous volume.
Switch Audio Source
Short press SRC/→ to switch the sign al sou rce.
USB ^1 (default audio source) BT Audio ^2 High level AUX USB Audio ^*3
*1 When three USB storage devices are connected to this unit, the audio files in them will be combined and played in the same USB audio source.
*2 Only displayed when "Blu etooth" is connected, see "Connecting to Bluetooth".
*3 USB Audio and BT Audio are mutually exclusive and cannot be superimposed, otherwise the auxiliary source will be invalid.
Set the Mixing Mode
This machine is preset with a high-quality audio processing chip. You can choose A LPINE Direct mode to enjoy the high-quality signal source of this unit, and you can also choose AUX Mix mode to listen to the sound of the original car equipment (such as na vibration) while enjoying the signal source of this unit.
Long press SRC/→ to switch the mixing mode, take AUX Mix as an example:
AUX Mix ALPINE Direct
AUX Mix :
When the machine is playing music, t he music that the original car audio is playin g, the navigation prompt s ound, etc. are mixed and played together.
ALPINE Direct :
Only enjoy the high-quality music brought to you by HDS-99 0.
- When the same sound source is superimposed, the auxiliary sound source is invalid. That is, when the current signal source is AUX, the AUX mixing mode is invalid.
- Before using this function, you need to correctly connect the audio output of the original car audio to the AUX IN i nterface of the unit.
Remote Sensing
Use the optional remote control for control.
Point the remote control transmitter to the remote control sensor window.
natural_image
Pure technical line drawing of a mechanical part with no text, numbers, or symbolsRemote control sensor window
Can be connected to the remote control interface box. Through the optional Alpine steering wheel remote control interface box, the vehicle steering wheel controller can be used to control the machine. Please contact your Alpine dealer for details.
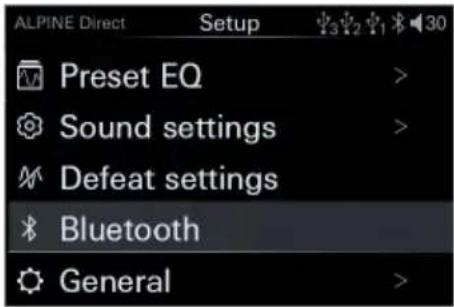
Setup
Setup Operation
text_image
HDS-990 HI-HES RETURN ENCODER| setup |
| Preset E.O |
| Sound settings |
| Defeat settings |
| Bluetooth |
| General |
1 Long press the encoder for at least 2 seconds to enter the setting interface.
text_image
ALPINE Direct Setup Preset EQ > Sound settings > Defeat settings Bluetooth General >2 Turn the encoder to select the setting item, and then short press the encoder to enter the next layer.
3 Press ≈ to return to the previous menu mode.
4 Press to release the setting mode.
Preset EQ Settings
Select [Preset EQ] from the main settings page. Refer to step 2 of "Setup Operation" (page 12).
| Preset E.O | |
| Flat | |
| Pop | |
| Rock | |
| News | |
| Jazz | |
| Electronics | |
| Hip hon | |
| Easy L listening | |
| Country | |
| Classical |
■ Preset EQ page

text_image
ALPINE Direct Preset EQ 3D Flat Pop Rock News Jazz 1 2 3① Display the current sound.
② List of sound.
③ Scroll up and down to select sound.
1 On the preset EQ page, rotary encoder to select the desired EQ preset;
2 Short press the encoder to recall the EQ preset.
10 kinds of typical equalizer settings are preset at the factory for a variety of audio sources.
• After adjusting the bass/treble or the
parametric equalizer, the "Custom" item will be displayed.
- Only one preset sound effect can be selected at a time.
Sound Settings
Select [Sound Settings] from the main settings page. Refer to step 2 of "Setup Operation" (page 11).
| Sound settings |
| Treble |
| Bass |
| Subwoofer |
| Parametric EO |
| Balance |
| Fader |
| Input source volume |
| Time correction |
| X-Over |
| Sound memory |
■ Sou nd setting page
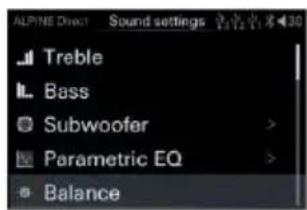
text_image
ALPINE Direct Sound settings Treble Bass Subwoofer > Parametric EQ > Balance
text_image
ALPINE CHINE Sound settings Fader Input source vol. Time correction X-Over Sound memoryThe following steps 1 to 3 are common to each "setting item" in the "sound effect setting".
1 R otate the encoder up and down to select the target item, th en short press the encoder to select the target item to adjust.
2 Press to return to the previous menu mode.
SRC/→
3 Press to release t he setting mode.
Treble/Bass Setting
Select [Treble or Bass] from the sound setting page. Refer to step 1 of "Sound Settings" (page
11).
■ Treble/bass page
text_image
Sound settings Treble 1 Parametric EQ Balance1 Turn the en coder to the left to select [<] to decrease the level, and turn the encoder to the right to select [>] to increase the level. You can select the treble or bass adjustment level according to your preferences.
Setting item: treble/bass
Setting content: -7 \~ +7 (initial value: 0)
Subwoofer Settings
Select [Subwoofer] from the sound setting page. Refer to step 1 of "Sound Settings" (page 11).
| Subwoofer |
| ON/OFF |
| Phase |
| Level |
■ Subwoofer page
text_image
ALPINE Direct Subwoofer Subwoofer ON Phase 0° Level +131 R otate the encoder to select t he target item, then short press the encoder to select th e target item to adjust.
2 Turn the encoder to the left to select [<] operation, and turn the encoder to the right to select [>] operation.
Turn on/Off the Subwoofer
When the subwoofer is turned on, you can adjust the phase output level of the subwoofer. Setting items: heavy bass
Setting content: O FF/ON (initial setting)
Setting the Subwoofer Phase
The subwoofer phase is set to 0^ (normal phase) or 180^ (reverse phase). To adjust the phase, turn the k nob.
Setting items: subwoofer phase
Setting content: 0°(in itial setting)/180°
Setting the Subwoofer Level
When the subwoofer is turned on, you can adjust the output level of the subwoofer.
Setting item: s ubwoofer level
Setting content: 0 \~ +15 (initial value: 9)
Parametric EQ Setting
Select [Parametric EQ] from the sound setting page. Refer to step 1 of "Sound Settings" (page 11).
■ Parametric EQ page
text_image
ALPINE Direct Parametric EQ Band 1 Band 2 Band 3 Band 4 Band 5
text_image
ALPINE Duct Band 1 Frequency 20000Hz Q value 2.515 Gain 0dB1 Rotate the encoder to select the target i tem, then short press the encoder to select the target item to adjust.
2 Turn the encoder to the left to select [<] operation, and turn the encoder to the right to select [>] operation.
3 If you need to adjust another band, press to return to band selection, and then turn the knob to select a band.
You can modify the equalizer settings to make the response curve more in line with your preferences.
Select Band
Setting content: Band 1 → Band 2 → ... → Band 9/Band 10 → Band 1
Adjust frequency
Rotate the encoder, select "Frequency", and then press the knob momentarily.
Adjustable frequency band: 20H \~ 20kHz
Band1: 20Hz \~ 63Hz (31Hz)
Band2: 31Hz \~ 125H z(63Hz)
Band3: 63Hz \~ 315H z(125Hz)
Band4: 125Hz \~ 50 0Hz(250Hz)
Band5: 250Hz \~ 1kHz (500Hz)
Band6: 500Hz \~ 2kHz (1kHz)
Band7: 1kHz \~ 4kHz(2 kHz)
Band8: 2kHz \~ 7.2kHz (4kHz)
Band9: 5.8kHz \~ 12kHz(8kHz)
Rotate the encoder, select "Q value", and then short press the knob.
Setting content:0.404\~28.85 (Initial value: 3.056)
Adjust the gain
Rotate the en coder, select "Gain", and then press the knob momen tarily.
Setting content:-12dB \~ +1 2dB (Initial value :0)
- The frequency setting value of each band cannot exceed the frequency value of adjacent bands.
- When adjusting the parametric equalizer, the frequency response of the connected speakers should be considered.
- When adjusting the parametric equalizer, the preset equalizer t hat has been adjusted will be invalid.
- After a djusting the pa rametric equalizer, the preset equalizer displays "Custom".
Left and Right Balance Setting of Speaker Output
Select [Balance] from the sound setting page.
Refer to step 1 of "Sound Settings" (page 11).
■ Left and right balance page
text_image
Sound settings All Treble 1 Parametric EQ Balance1 Turn the encoder to the left to select [<] operation, and turn the encoder to the right to select [>] operation.
Setting item: left and right balance
Setting content: L15 \~ 0 \~ R15 (initial value: 0)
Front and Rear Balance Settings of Speaker Output
Select [Balance] from the sound setting page.
Refer to step 1 of "Sound Settings" (page 11).
■ Front and back balance page
text_image
Sound settings All Treble 1 Parametric EQ Balance1 Turn the encoder to the left to select [<] operation, and turn the knob to the right to select [>] operation.
Setting item: front and back balan ce
Setting content: L15 \~ 0 \~ R15 (initial value: 0)
Input Source Vol. Setting
Select [Input source vol.] from the sound setting page. Refer to step 1 of "Sound Settings" (page 11).
| Input source vol. | |
| USB | |
| BT Audio | |
| High level | |
| AUX | |
| USB A udio | |
■ Input audio source volume page
text_image
ALPINE Direct Input source vol. -5dB USB BT Audio 0dB Hi.Level 0dB AUX 0dB USB Audio 0dB1 Rotate the encoder to select the target item, then short press the encoder to select the target item to adjust.
2 Urn the encoder to the left to select [<] operation, and t urn the encoder to the right to select [>] operation.
Select USB Audio
Setting content:-60dB \~ 0dB(initial value: 0dB)
Select BT Audio
Setting content:-60dB \~ 0dB(initial value: 0dB)
Select Hi-L evel Audio
Setting content:-60dB \~ 0dB(initial value: 0dB)
Select AUX
Setting content:-60dB \~ 0dB(initial value: 0dB)
Select USB Audio
Setting content:-60dB \~ 0dB(initial value: 0dB)
Time Correction Settings
Select [Time Correcti on] from the sound setting page. Refer to step 1 of "Sound Settings" (page 12).
| Time correction | |
| Front left speaker (F-L) | |
| Front right speaker (F-R) | |
| Rear left speaker (R-L) | |
| Rear right speaker (R-R) | |
| Left subwoofer (SW-L) | |
| Right subwoofer (SW-R) | |
■ Time correction page
text_image
ALPINE Direct Time correction 30 F-L F-R 0.000 0.000 R-L R-R 0.000 0.000 SW-L SW-R 0.000 0.000 ms1 Rotate the encoder to select the target item, then short press the encoder to select the target item to adjust.
2 Turn the encoder to the left to select [<] operation, and turn the encoder to the right to select [>] operation.
Setting content: Delay/delay unit
Adjust the del ay
Turn the encoder to select the speaker to be adjusted, and then press the encoder s hortly.
Setting items:
Front left speaker (F-L)/front right speaker (F-R)/rear left speaker (R-L)/rear right speaker (R-R)/left subwoofer (SW-L)/right subwoofer (SW-R)
Setting content:
Milliseconds:0.000ms \~ 10.000ms
(0.01ms/set up)
Centimeter:0 \~ 346cm (0.3cm /setup)
Inch:0 \~ 136inch (0.1inch /setup)
Turn the encoder to adjust the distance or time correction unit of the selected speaker, then press the encoder shortly.
Setting items:
Delay unit
Setting content:
Milliseconds/centimeter/inch
- When the subwoofer mode is turned off, the left/right subwoofer cannot be adjusted.
- The sum of the adjustment distances of all speakers should be less than 510 cm/201 inches/15 milliseconds.
- The time correction un it that can be s elected: ms (milliseconds)/cm (centimeters)/inch (inches)
X-Over Settings
Before performing the following steps, refer to "About Frequency Dividers".
Select [X-Over] from the sound setting page.
Refer to step 1 of "Sound Settings" (page 12).
| X-over settings | |
| 2-wav | |
| 3-wav | |
■ Frequency divider switch page
text_image
2-way 3-way Please press "Play" Key to finish this setup.1 Press a nd h old a song, play/pause, and the previous song to call out the crossover switch, turn the encoder to select, and then short press t he encoder to enter the selected crossover page.
Setting content:
Divider switch 2-way/3-way
Frequency Switching
Setting items: Divider switching
Setting content:2-way/3-way
2-way Frequency
■ 2-way frequency page
text_image
ALPINE Direct X-Over 30 Front (HPF) Rear (HPF) Subwoofer (LPF)Setting items:
Front speakers/rear speakers/subwoofer
Setting content: Frequency/slope
3-way frequency
■ 3-way page

text_image
ALPINE Direct X-Over 30 High (HPF) Mid high (LPF) Mid low (HPF) Low (LPF)Setting items: Treble/Mid High Pass/Mid Low Pass/Bass
Setting content: Frequency/slope
2 After selecting the corresponding frequency division, t urn t he kn ob to sele ct t he target item, then short press t he k nob to select the target item to adjust, and enter the frequency division and slope.
■ adjustment page.
text_image
ALPINE Direct Front (HPF) 30 Frequency 40Hz Slope 12dB/Oct3 Turn the encoder to the left to select [<] operation, and turn the encoder to the right to select [>] operation.
Adjust frequency
2-way frequency
Setting content:
Frequency:20/25/32/4 0/50/63/80( initial
setting)/100/125/160 /200 (Hz)
3-way frequency
Setting content:
Woofer/Mid-range low-pass speaker*:
20/25/32/40/50 /63/80/10 0/125/160/2 00/250/
315/400/500 (initial setting)/630/800 (Hz)
Mid-range high-pass speaker:
20/25/32/40/50 /63/80/10 0/125/160/2 00/250/
315/400/500/6 30/800/1k/
1.2k/1.6k/2k/ 2.5k/3.2k/4 k/5k (initial setting)/
6.3k/8k/10k/1 2.5k/16k/20 k (Hz)
Tweeter:
1k/1.2k/1.6k/ 2k/2.5k/3 .2k/4k/5k(in itial setting)/6.3k/8k/10k /12.5k/16k/ 20k (Hz)
Adjust the slope
Setting content: 6/12 (initial setting)/18/24/30/36/42 /48 (dB/Oct.) or off.
- When the subwoofer mode is turned off, the subwoofer cannot be adjusted.
- The cut-off frequency setting value of the mid-woofer speaker cannot be higher than that of the mid- and tweeter speaker.
Sound memory
Select [Sound memory] from the sound setting page. Refer to step 1 of "Sound Settings" (page 11).
| Sound memory | |
| Dealer settings | |
| User settings |
■ Sound settings storage page
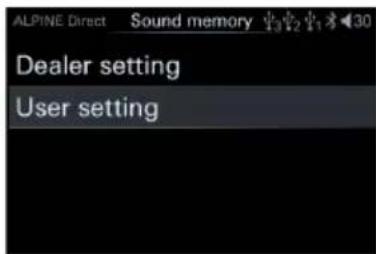
text_image
ALPINE Direct Sound memory 30 Dealer setting User settingSetting content:
Dealer settings/User settings
Dealer Settings
After purchasing and in stalling this product at the designated Alpine authorized dealer, professional technicians will debug and store the parameters related to the sound setting to the "Dealer settings" for you.
1 Turn the encoder to select "Dealer Settings", and then short press the encoder to recall the adjusted sound setting parameters.
User Settings
In addition to "Dealer settings", if you have
your own settings preferences.
1 After setting the preset equalizer, bass, treble, crossover settings and other sound parameters, select "User Settings".
2 Press and hold t he encoder for more than 2 seconds to store the adju sted soun d parameters to the "User settings".
3 Turn the encoder to select "Dealer Settings", and then short press the encoder to recall the adjusted sound setting parameters.
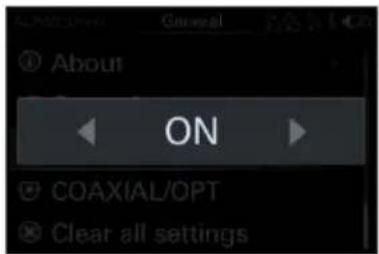
Defeat Settings
Select [Defeat settings] from the main settings page. Refer to step 2 of "Setup Operation" (page 11).
■ Defeat page

text_image
About ON COAXIAL/OPT Clear all settingsWhen this option is turned on, the settings related to sound effects such as the default equalizer will be invalid. Turn off t his option to restore t he previous sound settings.
Setting items: Sound effect clear settings Setting content: OFF (Initial setting)/ON
Bluetooth
Select [Bluetooth] from the main settings page. Refer to step 2 of "Setup Operation" (page 12).
■ Bluetooth connection page

text_image
ALPINE Direct Bluetooth ConnectedSetting items: connect and disconnect operations.
Setting content: Connect/Disconnect (Initial
setting)
General Settings
Select [General] from the main settings page.
Refer to step 2 of "Setup Operation" (page 11).
| General | |
| Mix sour rce | |
| Language | |
| Artwork display | |
| Dimmer | |
| Alpine system | |
| Steering wheel control | |
| Built-in AMP | |
| SPDIF/Opt | |
| Sampling Rate | |
| Clear all settings | |
| About |
■ General page
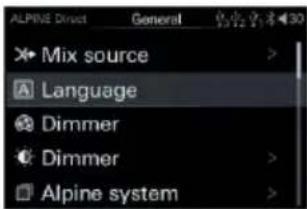
text_image
ALPINE Driver General 0.0 0.1 0.2 0.3 Mix source > Language Dimmer Dimmer > Alpine system >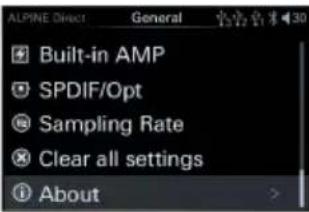
text_image
ALPINE Direct General 30 Built-in AMP SPDIF/Opt Sampling Rate Clear all settings About >The following steps 1 to 3 are common to each "setting item" in "General".
1 Rotate the encoder up and down to select the target item, then short press the encoder to select the target item to adjust.
2 Press to return to the previous menu mode.
3 Press SRC/→ to release the setting mode.
Mix Source Settings
Select [Mix source] from the common page.
Refer to step 1 of "General Settings" (page17).
| Mix source | |
| Main source attenuation | |
| Mix source selection | |
■ Mix source page
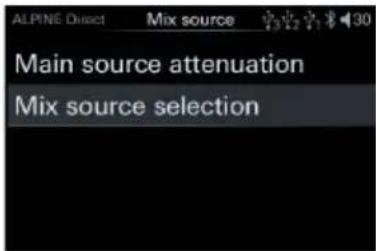
text_image
ALPINE Direct Mix source 30 Main source attenuation Mix source selection1 Rotate the encoder to select the target item, then short press the encoder to select the target item to adjust.
Setting content:
Main source attenuation/Mix source selection
Main Source Attenuation
You can select the attenuation amount of the main source according to your needs.
Setting items: Main source attenuation
Setting content: 0/30%/50% (initial setting) /80%/100%
Mix Source Selection
The Mix source can be selected according to your needs.
Setting items: Mix source selection
Setting content: BT A udio/High.Level/
AUX/USB Audio/OFF
Language Settings
Select [Language] from the common page.
Refer to step 1 of "General Settings" (page 17).
| language |
| English |
| Chinese |
■ Language setting page
text_image
Mix source 简体中文 ① About Accessibility1 Turn the encoder to the left to select [<] operation, and turn the encoder to the right
to select [>] operation.
Setting content: Chinese/ English
Artwork display
Select [Artwo rk display] from the general page.
Refer to step 1 of "General Settings" (page 17).
■ [Artwork display page
text_image
Mix source OFF Dimmer Alpine systemTurn off this item to not show the artwork on the USB source screen.
Setting items: Artwork display switch
Setting content:OFF/ON (initial setting)
Dimmer Control
Select [Dimmer] from the general page. Refer to step 1 of "General Settings" (page 17).
| Dimmer |
| Dimmer |
| Dimmer level |
| Blackout |
■ Dimmer page
text_image
ALPINE Direct Dimmer 30 Manual Dimmer level Blackout ON1 Rotate the encoder to select the target item, then short press the encoder to select the target i tem to a djust.
2 Turn the encoder to the left to select [<] operation, and t urn the en coder to the right to select [>] operation.
Setting content: Dimmer/Dimmer
level/blackout setting
When the dimmer is set to "Manual", the dimming level can be adjusted. The dimmer is
set to "Auto", which can reduce the lighting brightness of t he host controller when the car's headlights are ON. This mode is very useful if you feel that the backlight of the host controller is too bright at night.
Dimmer
Setting items: Dimmer
Setting content: Auto/Manual (initial setting)
Dimmer level
Setting items: Dimmer level
Setting content: Level 1 / Level 2 / Level 3
(Initial setting)
Blackout Settings
Setting items: Blackout
Setting content: OFF (Initial setting)/ON
Alpine System
Select [Alpine System] from the general page.
Refer to step 1 of "General Settings" (page18).
| Alpine sv stem matching | |
| External DSP: ON/OFF (initial setting) | |
| Master volume | |
| Main source | |
| Mix source | |
| Subwoofer | |
| Sound effect | |
■ Alpine system matching
text_image
ALPINE Direct Alpine system i 30 External DSP ON Master volume 5 Main source AUX Mix source Bluetooth Subwoofer 0dB1 R otate the encoder to s elect the target item, then short press the encoder to select the target item to adjust.
2 Turn the encoder to the left to select [<] operation, and turn the encoder to the right to select [>] operation.
Setting content: OFF(Initial setting)ON/
Master volume / Main source / Mix source /
Subwoofer / Sound effect
It can be connected to A lpine car DSP, and only supports products that can be connected to the controller interface.
External Power AMP Switch
Setting items: External power amplifier switch
Setting content: OFF (Initial setting)/ON
Master Volume
Setting items: Total volum e
Setting content: 0 \~ 35 (Initial value: 27)
Main Source
Setting items: Main source
Setting content: Digital/High Level/
Bluetooth/AUX
Mix Source
Setting items: Mix source
Setting content: Digital/High Level/
Bluetooth/AUX/OFF
Subwoofer
Setting items: Subwoofer
Setting content: -60dB \~ 0dB (initial value:
0dB)
Sound Effect
The Mix source can be selected according to needs.
Setting items: Sound effect
Setting content: 6 groups of preset sound effects can be called
- Refer to the e setting of connecting PXE-0850X for the above external DSP. For details, please contact your Alpine dealer.
Steering wheel control
Select [Steering wheel control] from the general page. Refer to step 1 of "General Settings" (page 18).
| Steering wheel control | |
| Volume+ | |
| Volume- | |
| Last song | |
| Next song | |
| Play / Pause | |
| Mute | |
| SRC | |
| SWC-type | |
■ Steering wheel control page
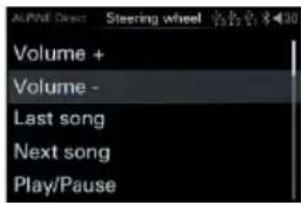
text_image
ALPINE DIRECT Steering wheel 132 134 135 Volume + Volume - Last song Next song Play/Pause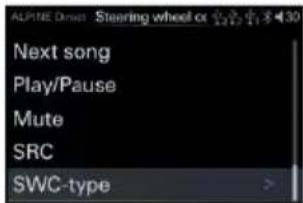
text_image
ALPINE Driver Steering wheel or 32 Next song Play/Pause Mute SRC SWC-type >1 Rotate the encoder to select the target item, then short press the encoder to select the target item to adjust.
Setting content:
According to the actual wiring of different car models, after connecting the host, learn the steering wheel of t he car through the controller, short press "volu me +", "volume -", "Last song", "Next song", "play/pause" ", "Mute", etc., wait for the car steering wheel button to be pressed to complete t he learning and realize the controller's control of the car steering wheel.
Steering wheel control connection page:
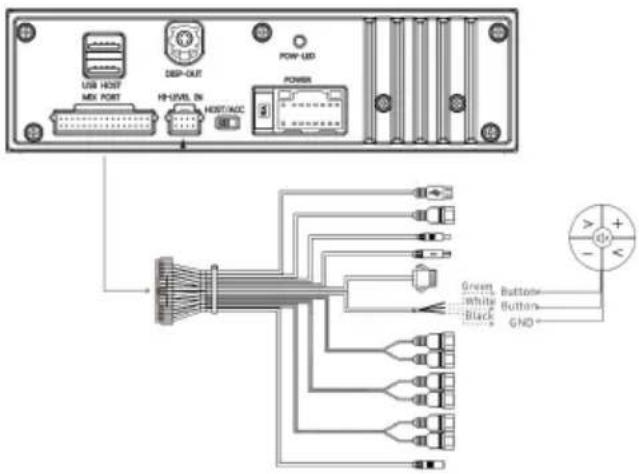
text_image
USB HOST MIX PORT DEEP-OUT HI-LEVEL EN HOST/DAC POWER-LED POWER Green white Black Button Button GND- Green and white are connected to the button line of the car steering wheel, and black is connected to the ground. Please connect according to the actual model. For details, please contact your Alpine dealer.
Built-in AMP
Select [Built-in AMP] from the general page. Refer to step 1 of "General Settings" (page 18).
■ Built-in AMP switch page
text_image
About ON COAXIAL/OPT Clear all settings1 Turn the encoder to the left to select [<] operation, and turn the encoder to the right to select [>] operation.
Setting items: Built-in power amplifier switch
Setting content: OFF/ON (Initial setting)
- When "Built-in AMP" is set to "OFF", the system will not output sound.
SPDIF/Opt Settings
Select [SPDIF/Opt] from the general page. R refer to step 1 of "General Settings" (page 18).
■ SPDIF/Opt switch page

text_image
Accessibility ON SPDIF/Opt Clear all settings1 Turn the encoder to the left to select [<] operation, and turn the encoder to the right to select [>] operation.
Setting items: SPDIF/Opt switch
Setting content: OFF/ON (Initial setting)
Sampling Rate Settings
Select [Sampling Rate] from the general page.
Refer to step 1 of "General Settings" (page 18).
■ System sample rate settings page
text_image
Built-in AMP 192kHz Clear all settings About1 Turn the encoder to the left to select [<] operation, and turn the encoder to the right to select [>] operation.
Setting items: System sample rate setting selection
Setti ng conten t: 192k Hz (In it ia l settin g)/ 44. 1kHz
- After switching the system sample rate, the system will restart.
Clear all Settings
Select [Clear a ll Settings] from the g eneral page.
Refer to step 1 of "General Settings" (page 18).
■ Clear all settings page

text_image
Are you sure you want to restore to the factory settings? You can't undo this action.After the factory settings are restored, all the setting i tems will be restored to the factory default settings except for the debugged "Dealer Settings" mode.
About
Select [About] from the general page. Refer to step 1 of "General Settings" (page 18).
■ About page

text_image
ALPINE Direct About 23 24 25 26 27 28 29 30 Software version: LPAP-YV1.01(Release) Device version: MPAP-YV1.00 Model: HDS-990Here you can confirm the version of the machine and other information. After selecting "About", you can view the following g information.
Software version/device version/machine name
DIAG Mode
Select [DIAG mode] from the general page. Refer to step 1 of "General Settings" (page 18).
| DIAG mo de | |
| Firmware undate | |
| Dealer setting | |
| Serial number | |
■ DIAG mode page
text_image
AL PINE Direct DIAG mod 30 Firmware update Dealer setting Serial numberAfter the factory settings are restored, all the setting i tems will be restored to the factory default settings except for the debugged "Dealer Settings" mode.
Setting items:
In the setting interface, long press, long press the knob, and long press to call out the DIAG mode.
Setting content:
Firmware update: Enter the firmware update interface, select the firmware update file, and then short press to confirm to update the version.
Dealer setting: Short press to save dealer settings.
Serial number: You can view the serial number of the machine.
About the X-Over
Frequency divider (X-Over):
This machine is equipped with an active frequency divider. The frequency divider can limit the frequency that reaches each output.
Each channel can be controlled individually.
Therefore, each pair of speakers can be driven with a n optimized frequency.
The frequency divi der can adjust the HPF (high pass filter) or LPF (low pass fil ter) of each band, and the slope (t he speed of the filter to t he h igh point or low point).
Should be adjusted according to the reproduction characteristics of the speaker.
Depending on the speakers, it may not be necessary to use a passive network. If you are not sure about this, please consult an authorized Alpine dealer.
Active 2-way:
| Cut-off frequency(The level difference is 1/3 octave band) | Slope | |||
| HPF | LPF | HPF | LPF | |
| Subwoofer speaker | ---- | 20Hz-800Hz | ---- | 6/12/18/24/30/36/42/48dB/oc t. |
| Rear (high frequency) speakers | 20Hz-80 0Hz | 20Hz-2 0kHz | 6/12/18/24/30/36/42/4 8dB/oct. | 6/12/18/24 /30/36/42/ 48dB/oct. |
| Front (high frequency) speakers | 1kHz-20 kHz | ---- | 6/12/18/24/30/36/42/4 8dB/oct. | ---- |
text_image
L.P.F H.P.F(Different from the actual display)
Active 3-way:
| Cut-off frequency(The level difference is 1/3 octave band) | Slope | |||
| HPF | LPF | HPF | LPF | |
| Woofer speaker | ---- | 20Hz-800Hz | ---- | 6/12/18/24/30/36/42/48dB/oct |
| Mid-range high-pass speaker | 20Hz-800Hz | 20Hz-20kHz | 6/12/18/24/30/36/42/48dB/oc t. | 6/12/18/24/30/36/42/48dB/oct. |
| Mid-range low-pass speaker | 20Hz-800Hz | 20Hz-20kHz | 6/12/18/24/30/36/42/48dB/oc t. | 6/12/18/24/30/36/42/48dB/oct. |
| Tweeter speaker | 1kHz-20kHz | ---- | 6/12/18/24/30/36/42/48dB/oc t. | ---- |
flowchart
graph TD
    A["L.P.F"] --> B["M.P.F"]
    B --> C["H.P.F"]
    C --> D["End"]
(Different from the actual display)
text_image
Level adjustment 0-12dB Output frequency range Slope is standard Slope adjustment Different from the actual displayHPF Cut-off frequency LPF Cut-off frequency
- HPF (High Pass Filter): intercepts lower frequencies and allows higher frequencies to pass.
- LPF (low pass filter): intercepts higher frequencies and allows lower frequencies to pass.
- Slope: the level change of one-octave frequency change (dB).
- The larger the slope value, the steeper the slope.
- Do not use tweeters that have not set HPF to on or have been set to low frequencies, otherwise the speakers may be damaged due to low frequency content.
- The frequency of the divider cannot be adjusted to be higher than HPF or lower than LPF.
- It should be adjusted according to the recommended crossover frequency of the connected speakers. Please determine the recommended crossover frequency of the speaker. Adjusting beyond the recommended frequency range may damage the speakers.
- We are not responsible for speaker damage or malfunction caused by using a crossover beyond the recommended value.
About Time Correction
The distance between the listener and the speakers in the car can vary greatly due to the complex speaker placement. This difference in distance between the speaker and the listener will cause deviations in the sound image and frequency characteristics. This phenomenon is caused by the time delay for the sound to reach the listener's right and left ears.
To solve this problem, this unit can delay the audio signal sent to the speaker close st to the listener. This can effectively create a feeling of extended distance for th ese speakers. The e distance between the listener and the left and right speakers can be equal to obtain th e best results. Each speaker will be a djusted with 3.4cm as a step difference.
Examples of listening positions are as follows:
Example 1: Front left seat
Adjust the time correction level of the left front speaker to a larger value, and adjust the right rear speaker to zero or a smaller value.
text_image
0.5m 2.25m 5.1mshe distance between the listening position and each speaker is different, so the sound is unbalanced.
The distance difference between the front left speaker and the rear right speaker is 1.75m (68-7/8").
Here we will calculate the time correction value of the left front speaker in the figure above.
condition:
The farthest speaker-listening position: 2.25m (88-9/16")
Left front speaker-listening position: 0.5m (19-11/16")
Calculation: L=2.25m-0.5m=1.75m (68-7/8")
Time correction=1.75÷343*×1000=5.1(ms)
* Speed of sound: 343m/s (765mph) at 20°C In other words, setting the time correction value of the front left speaker to 5.1m s can make the distance between it and the listener seem to be the same as the distance between the listener and the farthest speaker. Time correction can elimin ate the time difference required for the sound to reach the listening position.
The time of the left front speaker is corrected by 5.1ms, so that its sound will reach the listening position at the same time as the
sound of other speakers.
Example 2: All seats
Adjust the time correction level of each speaker to be almost the same.
1 Sit in the listening position (driving position, etc.) and measure the distance (meters) between the head and each speaker.
2 Calculate the difference between the distance correction values of the farthest speaker and other speakers.
L= (distance from the farthest speaker)- (distance from other speakers)
These values are the time correction values of different speakers. By setting these values, each sound can reach the listening position at the same time a s the sound of other s peakers.
Time correction value list
| 延迟编号 | 时间差(ms) | 距离(cm) | 距离(inch) | 延迟编号 | 时间差(ms) | 距离(cm) | 距离(inch) |
| 0 | 0.00 | 0.00 | 0.00 | 32 | 0.32 | 11.07 | 4.32 |
| 1 | 0.01 | 0.34 | 0.10 | 33 | 0.33 | 11.41 | 4.45 |
| 2 | 0.02 | 0.69 | 0.24 | 34 | 0.34 | 11.76 | 4.59 |
| 3 | 0.03 | 1.03 | 0.37 | 32 | 0.32 | 11.07 | 4.32 |
| 4 | 0.04 | 1.38 | 0.51 | 33 | 0.33 | 11.41 | 4.45 |
| 5 | 0.05 | 1.72 | 0.64 | 34 | 0.34 | 11.76 | 4.59 |
| 6 | 0.06 | 2.07 | 0.78 | 35 | 0.35 | 12.10 | 4.72 |
| 7 | 0.07 | 2.42 | 0.92 | 36 | 0.36 | 12.45 | 4.86 |
| 8 | 0.08 | 2.76 | 1.05 | 37 | 0.37 | 12.80 | 5.00 |
| 9 | 0.09 | 3.11 | 1.19 | 38 | 0.38 | 13.14 | 5.13 |
| 10 | 0.10 | 3.45 | 1.32 | 39 | 0.39 | 13.49 | 5.27 |
| 11 | 0.11 | 3.80 | 1.46 | 40 | 0.40 | 13.83 | 5.40 |
| 12 | 0.12 | 4.15 | 1.60 | 41 | 0.41 | 14.18 | 5.54 |
| 13 | 0.13 | 4.49 | 1.73 | 42 | 0.42 | 14.53 | 5.68 |
| 14 | 0.14 | 4.84 | 1.87 | 43 | 0.43 | 14.87 | 5.81 |
| 15 | 0.15 | 5.18 | 2.00 | 44 | 0.44 | 15.22 | 5.95 |
| 16 | 0.16 | 5.53 | 2.14 | 45 | 0.45 | 15.56 | 6.08 |
| 17 | 0.17 | 5.88 | 2.28 | 46 | 0.46 | 15.91 | 6.22 |
| 18 | 0.18 | 6.22 | 2.41 | 47 | 0.47 | 16.26 | 6.36 |
| 19 | 0.19 | 6.57 | 2.55 | 48 | 0.48 | 16.60 | 6.49 |
| 20 | 0.20 | 6.91 | 2.68 | 49 | 0.49 | 16.95 | 6.63 |
| 21 | 0.21 | 7.26 | 2.82 | 50 | 0.50 | 17.29 | 6.76 |
| 22 | 0.22 | 7.61 | 2.96 | 51 | 0.51 | 17.64 | 6.90 |
| 23 | 0.23 | 7.95 | 3.09 | 52 | 0.52 | 17.99 | 7.04 |
| 24 | 0.24 | 8.30 | 3.23 | 53 | 0.53 | 18.33 | 7.17 |
| 25 | 0.25 | 8.64 | 3.36 | 54 | 0.54 | 18.68 | 7.31 |
| 26 | 0.26 | 8.99 | 3.50 | 55 | 0.55 | 19.02 | 7.44 |
| 27 | 0.27 | 9.34 | 3.64 | 56 | 0.56 | 19.37 | 7.58 |
| 28 | 0.28 | 9.68 | 3.77 | 57 | 0.57 | 19.72 | 7.72 |
| 29 | 0.29 | 10.03 | 3.91 | 58 | 0.58 | 20.06 | 7.85 |
| 30 | 0.30 | 10.37 | 4.04 | 59 | 0.59 | 20.41 | 7.99 |
| 31 | 0.31 | 10.72 | 4.18 | 60 | 0.60 | 20.75 | 8.12 |
USB memor v (optional)
text_image
HDS-990 □ 线-RES ▶/■ ○× SRC +/-- When the mac hine is connected to three USBs at the same time, the system will automatically combine the contents of the three USBs to play in the same USB audio source.
- Do not connect two or more charging devices to the USB port of this unit at the same time, otherwise normal operation cannot be guaranteed.
- If you connect a USB storage to this unit, you can p lay MP 3/W MA /AAC /M4 A /WA V/FL AC/APE/DSD files.
About USB Playback Format
Support playback format : MP3/ WMA/AAC/ M4A/WAV/FLAC/APE/DSD.
Maximum number of playa ble files/folders: 10,000 files/700 folders.
Supported memory : FAT16/32, NTFS, exFAT.
Bluetooth operation
About Bluetooth
Bluetooth is a wireless technolog y t hat enables short-distance communication between mo bile devices or personal computers. This enables data transfer between Bluetooth compatible
devices. If the distance between the devices is within 10 meters, Bluetooth transmission can be carried out in the unlicensed 2.4GHz spectrum.
- Depending on the Bluetooth version,
Bluetooth compatible devices may not be able to communicate with this unit. - It is not guaranteed that this machine can be used with all Bluetooth compatible devices. For the operation of Bluetooth compatible devices, please consult your Alpine dealer or visit the Alpine website.
- Depending on the environment, the
Bluetooth wireless connection may be unstable.
- Depending on the connected Bluetooth compatible device, this function may be different. Please also refer to the user manual of the connected device.
- When using the mobile phone Bluetooth to search for this unit, the search name is "HDS-9 90-XXXXXX".
Connect Bluetooth
When the host is powered on for the first time and the Blu etooth is not connected to any device, you need to wait for the pairing connection on the mobile phone. Directly search for "HDS-990-XXXXXX" through the mobile phone background to connect. XXXXXX is a 6-digit random code, for example: HDS-990-A00414.
1 Turn on the Bluetooth function of the mobile phone.
2 Search for pairable devices in the background of the mobile phone, and select "HDS-990-XXXXXX" for pairing.
3 After the pairing is successful, long press the knob to enter the setting interface → General → Bluetooth (refer to "Sound Settings" for detailed operation). Press "Bluetooth" to enter the interface and display "Connected".
4 To disconnect the Bluetooth connection, short press the knob "Connected" to prompt
the user to "confirm to disconnect Bluetooth", sh ort press again to confirm the disconnection, and d display "Not connected" after disconnection. After disconnection, if you need to connect again, you need to go to step 2.
- Only one Bluetooth-compatible device can be paired, and two Bluetooth-compatible devices cannot be connected at the same time.
Bluetooth Music
1 Press SRC/→ to select Bluetooth audio.
2 Press to select the previous song.
3 Press ▶▶▶ to select the next song.
4 Press ▶/□□/—□□□ to switch between pause and play.
- This operation differs depending on the connected device.
- This machine has an independent memory function for the volume adjustment of the Bluetooth music signal source.
Information
About the Formats Supported by this Nnit
For a list of playback formats supported by USB, please refer to "About USB playback formats" (page 24).
About MP3/WMA/AAC/M4A/WAV/FLAC/APE/DSD
Notice
Except for personal use, copyright laws and international conventions prohibit copying audio data (including MP3/WMA/AAC/M4A/WAV/FLAC/APE/DSD data), or distributing, transmitting or copying without the permission of the copyright owner, Regardless of free or
What is MP3?
MP3, whose official name is "MPEG Audio Layer 3", is a compression standard specified by MP EG, a joint executive body under ISO (International Organization for Standardization) and IEC. MP3 file s contain compressed audio data. MP3 encoding can compress audio data at an extremely high ratio, reducing the size of music files to one-tenth of the origin al size. At the same time, t he sound quality remains close to t he level of CD. The MP3 format achieves such a high compression rate by removing sounds that cannot be heard by the human ear or that are masked by other sound s.
What is WMA?
WMA or "Wind ows Media™ Audio" is compressed audio data. WMA is similar to MP3 audio data.
What is AAC?
AAC is the abbreviation of "Advanced Audio Coding", which is a basic audi o compression format adopted by MPEG2 or MPEG4.
What is M4A?
M4A is the file extension of the MPEG-4 audio standard, and M4A files contain compressed audio data.
What is WAV?
WAV is a sound file format developed by Microsoft. It conforms to the RIFF (Resource Interchange File Format) file specification. It is used to save audio information resources on the Wind ows platform and is widely supported by the Wind ows platform and its applications. It also supports a variety of compression algorithms such as MSAD PCM, CCITT A LAW, and supports multiple audio numbers, sampling frequencies and channels. The standard formatted WAV file is the same as the CD format. It also has a sampling frequency of 44.1kHz and a 16-bit quantized number. The quality of sound files is almost the same as that of CD! It is the closest to lossless music format, so the file size is relatively large.
What is FLAC?
FLAC Ch inese can be interpreted as lossless audio compression coding. FLAC is a
well-known set of free audio compression coding, which is characterized by lossless compression. Unlike other lossy compression codes such as MP3 and AAC, it will not destroy any original audio information.
What is APE?
APE is one of the popular lossless compression formats for digital music. Unlike lossy compression formats such as MP3, which irreversibly delete data (insensitive to human hearing) to reduce the size of the source file, lossless compression formats such as APE use a more refined recording method to reduce the volume. The source file is the same, thus ensuring the in integrity of the file.
What is DSD?
The DSD music format is a format of lossless music. Because its encoding method is different from the ordinary encoding method, it is a digital encoding, so it has become a niche and special music format.
How to create
MP3/WMA/AAC/M4A/WAV/FLAC/APE/DSD files Audio data is compressed using g software with
MP3/WMA/AAC/M4A/WAV/FLAC/APE/DSD codec. About creating MP3/W MA/AAC/ For detailed information about /M4A/WAV /FLAC/APE/DSD files, please refer to the software user manual. MP 3/WMA/AAC/M4 A/WAV/FLAC/APE/DSD files that can be pl ayed by this unit have the following file extensions.
MP3 : "mp 3"
WMA : "wma"
AAC : “m4a”
M4A : “m4a”
WAV : "wav"
FLAC : "flac"
APE : “a pe”
Files without extension can not be played. It does not support WMA Lossless, WMA Professional, protected files, or original AAC files (with ".aac" as the extension).
There are many different versions of the AAC format. Confirm t hat th e software used conforms to the above acceptable format.
Even if the extension is valid, it may be a format that cannot be played.
Supports playback of AAC files encoded with iTunes. APE decoding only corresponds to APE v2 tags.
Supported playback sampling frequency and bit rate
MP3
Sampling
frequency:48kHz,44.1kHz,32kHz,24kHz,22.0
5kHz,16kHz,12kHz,11.025kHz,8kHz
Bit rate:8-320kbps
WMA
Sampling
frequency:48kHz, 44.1kHz, 32kHz, 22.05kHz, 1
6kHz,11.025kHz,8kHz
Bit rate:12-192kbps(stereo)
0-128kbps(m ono)
AAC
Sampling
frequency:48kHz,44.1kHz,32kHz,24kHz,22.0
5kHz,16kHz,12kHz,11.025kHz,8kHz
Bit rate:8-320kbps
M4A
Sampling frequency: 48k Hz, 44.1kHz,
32kHz, 24kHz, 22.05kHz, 16 kHz, 12kHz, 11.025 kH,
8kHz
Bit rate: 8-500kbps
WAV
Sampling frequency: 192 kHz, 176.4 kHz,
96kHz,88.2kHz,48kHz,44.1kHz,32kHz,24kHz
,
22.05kHz,16kHz
Quantization bits:8bit,16 bit,24bit
FLAC
Sampling frequency: 192 kHz, 176.4 kHz,
96kHz,88.2kHz,48kHz,44.1kHz,32kHz,24kHz
,
22.05kHz,16kHz,12kHz,11.025kHz,8kHz
Quantization bits:8bit,16 bit,24bit
APE
Sampling frequency: 192 kHz, 176.4 kHz,
96kHz,88.2kHz,48kHz,44.1kHz,32kHz,24kHz
,
22.05kHz,16kHz,12kHz,11.025kHz,8kHz
Quantization bits:16bit,24bit
DSD
Sampling frequency:DSD64
2.8224MHz, DSD 128 5.6448MHz, DSD 256
11.290MHz
Depending on the sampling frequency, this unit may not be able to play back correctly. In USB mode, when playing VBR (variable bit rate) recorded files, the playback time may not be displayed correctly.
Play MP3/WMA/AAC/M4A/WAV/FLAC/APE/DSD
Prepare MP3/WMA/AAC/M4A/WAV/FLAC/The APE/DSD file is then stored to the USB storage.
Maximum number of files/folders that can be played USB storage: 10,000 files/700 folders (including the root folder)
- The maximum nested folder depth is 5 (including the root folder).
If the USB storage exceeds the above limit, playback may not be possible.
Do not let the file playback ti me exceed 1 hour.
RSA Data Security, Inc. MD5 Message-Digest Algorithm.
Supported media
This unit can play USB memory.
Corresponding file system
This mac hine supports FAT16/32, NTFS, exFAT USB storage.
File order
The files are played in the order in which the files/folders are stored in the USB storage.
Therefore, the playback order may be different from what you expected. The playback sequence of folders and files is as follows:
flowchart
graph TD
    A["Root directory folder"] --> B["1"]
    A --> C["2"]
    A --> D["4"]
    A --> E["5"]
    B --> F["1"]
    C --> G["2"]
    D --> H["3"]
    E --> I["4"]
    E --> J["5"]
    F --> K["2"]
    G --> L["3"]
    H --> M["4"]
    I --> N["5"]
    J --> O["6"]
    K --> P["folder"]
    L --> Q["folder"]
    M --> R["folder"]
    N --> S["folder"]
    O --> T["folder"]
    U["MP3/WMA/AAC/MAA/WAY/FLAC/APE/DSD"]
- If there is no valid playing file or empty folder in the folder, the folder number/folder name will not be displayed.
The term
Bit rate
This is the "sound" compression ratio specified for encoding. The higher the bit rate, the better the sound quality, but the larger the file size.
Sampling frequency
This value indicates the number of times t he data is sampled (recorded) per second. For example, a music CD uses a sampling frequency of 44.1kHz, so the sound is sampled (recorded) 44,100 times per second. The high her t he sampling g frequency, the better the sound quality, but the larger the amount of data.
coding
Convert mu sic CDs, WAVE (AIFF) files and other sound files into the specified audio compression format.
mark
Write song information of MP3/WMA/A AC/M4A/WA V/FLAC/APE /DSD files, such as song, album, file form at, artist, date, file size.
Root folder
The root folder (or root directory) can be found at the top of the file system. The root folder include all folders and file s.
When Something goes Wrong
If you encounter problems, t urn off the power, a nd then turn it on again. If the machine still does not work normally, please check the items i n th e table bel ow. If the machine fails, this manu al will h elp you solve the problem. Ot herwis e, please make sure your system is connected correctly or consult your A lpine auth orized dealer.
common problem
The functi on cannot be used or t here is no screen display.
- =The ignition switch of the car is off. - If you connect as instructed, the mac hine will not operate with the car's ignition switch turned off.
- The power cord (red) and the battery cord (yellow) are not connected correctly. - Check the connection of the power cord and battery cord.
- The fuse is burned ou t. - Check the fuse of the mac hine, if necessary, replace the fuse with a suitable specification. - The internal microcomputer malfuncti ons due to interference noise, etc. - Use a ballpoint pen or other point ed object to press t he RESET switch.
MP3/WMA/ACC/M4A/WAV/FLAC/APE/DSD
Cannot play MP3/WMA/ACC/M4A/WAV/FLAC/APE/DSD°
- A write error occurred. MP3/WMA/ACC/M4A/WAV/FLAC/APE/DSD format is not compatible. - Make sure that MP3/WMA/ACC/M4A/WAV/FLAC/APE/DSD is written in a supported format. Refer to "About MP3/WMA/ACC/M4A/WAV/FLAC/APE/DSD", and then rewrite i n a format supported by this unit.
Audio
The sound is not output from the speakers.
- The built-in amplifier is not outputting a signal.
The bu ilt-in power amp lifier switch has been switched to "On".
When th is Message Appears
During operation, various information will be displayed on the screen. In addition to telling you the current status or providing information on the next step of the operation guide, there are also the following error prompts. If one of the error prompts is displayed, the operation instructions given in the solution column should be carefully executed.
USB transfer error
- Communication failure or start-up failure, etc.
-The problem can be solved by closing/ope ning ACC.
Device does not support
- A USB device that is not supported by this machine is connected.
- Conne ct USB devices supported by this machine, such as U disk, mobile hard disk or USB HUB.
No response from the device
• The USB device does not respond.
- Please plug and unplug the USB again.
Please in sert th e USB
• The USB storage is not connected.
- Make sure that the USB storage is properly connected and the cable is not bent excessively.
No song
- There are no son gs (files) stored in the USB memory.
- Conne ct the USB memory devi ce after storing the son g (file).
This file format is not supported
- A file that is not supported by th is mach ine is used.
- Use files sup ported by this unit, such as "mp3", "wma", "acc", "m4a", "wav", "flac", "ape", "dsd" ("dff" and "dsf") extensions Name of the file.
Protected file
- Played a copy-protected WMA file.
- Only files without copy protection can be played.
Device not connected
• The Blu etooth device is n ot connected.
- Conne ct Bluetooth devices.
No song
• There is no song in the Bluetooth device.
- Please download the song to the Bluetooth device.

natural_image
Simple line drawing of a trash bin with crossed lines indicating no waste or prohibition (no text or symbols)
natural_image
Simple line drawing of a trash bin with two crossed lines indicating no waste or prohibition (no text or symbols)
Information on the disposal of waste electrical and electronic equipment and batteries (applicable to countries that at adopt a garbage collection system) If you want to dispose of this product, do not mix it with general household waste. In accordance with regulations that require proper disposal, recycling and recycling, there is a separate collection system for waste electronic products. Please contact your local authorities to find the location of the recycling facility closest to you. Proper recycling and waste disposal help conserve resources while preventing harmful effects on human health and the environment.
Specifications
| Performance | ||
| Power Output | Rated: 4Ω, 14.4V, 10%THD | 4CH×25W |
| THD+N | RCA: 1W into 4Ω | ≤0.03% |
| S/N | RCA: A-wt | >98dB |
| Input Voltage | High level | 32Vpp |
| RCA | 6Vpp | |
| Output Voltage | High level | 28Vpp |
| RCA | 12Vpp | |
| Frequency Response | 1W, 4Ω | 20Hz ~ 40kHz(+1.5dB) |
| General | ||
| Inputs | 4ch High-level2ch AUXUSB AudioBluetooth Audio | |
| Outputs | 4ch High-level6ch RCAOptical / Coaxial Digital Signal | |
| Input Impedance | High level | 240Ω |
| RCA | 10kΩ | |
| System Sampling Rate | 192kHz/32bit | |
| Operating Voltage | 9~16V | |
| Standby Power Consumption | ≤0.1W | |
| REM Start Input | High level (FL-/FL+) 'ACCOptional | |
| REM Start Output | 12V (0.2A) | |
| Weight | 0.77kg | |
| Dimensions (Main Unit) | Width | 178mm |
| Width | 143.6mm | |
| High | 50mm | |
| Music player | ||
| interface | USB 2.0 | |
| Storage Capacity | Maximum support 2TB | |
| Maximum power consumption | 1.5A | |
| File system | EAT16/32, NTFS, exFA T | |
| The maximum number of songs | 10000 songs | |
| MP3decoding | Sampling frequency: 48kHz, 44.1kHz,32kHz,24kHz,22.05kHz,16kHz,12kHz,11.025kHz,8kHzBit rate: 8-320kbps | |
| WMA decoding | Sampling frequency: 48kHz, 44.1kHz,32kHz,22.05kHz,16kHz,11.025kHz,8kHzBit rate: 12-192kbps(stereo), 0-128kbps(mono) | |
| AAC decoding | Sampling frequency: 48kHz, 44.1kHz,32kHz,24kHz,22.05kHz,16kHz,12kHz,11.025kHz,8kHzBit rate: 8-320kbps | |
| MP4 d encoding | Sampling frequency: 48kHz, 44.1kHz,32kHz,24kHz,22.05kHz,16kHz,12kHz,11.025kHz,8kHzBit rate: 8-500kbps | |
| WAV decoding | Sampling frequency: 192kHz,176.4kHz,96kHz,88.2kHz,48kHz,44.1kHz,32kHz,24kHz,22.05kHz,16kHzQuantization bits: 8bit,6bit,24bit | |
| FLAC decoding | Sampling frequency: 192kHz,176.4kHz,96kHz,88.2kHz,48kHz,44.1kHz,32kHz,24kHz,22.05kHz,16kHz,12kHz,11.025kHz,8kHzQuantization bits: 8bit·16bit·24bit | |
| APE decoding | Sampling frequency: 192kHz,176.4kHz,96kHz,88.2kHz,48kHz,44.1kHz,32kHz,24kHz,22.05kHz,16kHz,12kHz,11.025kHz,8kHzQuantization bits: 16bit·24bit | |
| DSD decoding | Sampling frequency: DSD64 2.8224MHz.DSD128 5.6448MHz.DSD256 11.290MHz | |
| Bluetooth supports audio for mats | AAC/SBC/APTX-HD/LDAC | |
Table des m atières
Instructions
Instructions 1
Avertissement 1
MP3/WMA/AAC/M4A/WAV/FLA
C/APE/DSD 28
natural_image
Pure geometric lines forming a right angle with a small circle at the center (no text or symbols)text_image
ALPINE Direct Setup 30 Preset EQ > Sound settings > Defeat settings Bluetooth General >text_image
EPAC Direct Sound soundings 1 Treble 1 Parametric EQ Balancetext_image
2-way 3-way Please press "Play" Key to finish this setup.text_image
ALPINE Direct X-Over 30 Front (HPF) Rear (HPF) Subwoofer (LPF)text_image
ALPINE Direct X-Over 30 High (HPF) Mid high (LPF) Mid low (HPF) Low (LPF)text_image
ALPINE Direct Front (HPF) 30 Frequency 40Hz Slope 12dB/Octtext_image
ALPINE Direct Sound memory 30 Dealer setting User settingtext_image
About ON COAXIAL/OPT Clear all settingstext_image
ALPINE Direct Bluetooth 30 Connectedtext_image
ALPINE Close General Built-in AMP SPDIF/Opt Sampling Rate Clear all settings Abouttext_image
ALPINE Direct Mix source 30 Main source attenuation Mix source selectiontext_image
ALABE Directs General Mix source OFF Dimmer Alpine systemtext_image
ALPINE DIRECT Steering wheel Volume + Volume - Last song Next song Play/Pause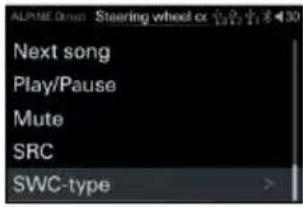
text_image
ALPINE Drive Steering wheel cc 1342 17 30 Next song Play/Pause Mute SRC SWC-type >text_image
About ON COAXIAL/OPT Clear all settingstext_image
Accessibility ON SPDIF/Opt Clear all settingstext_image
Built-in AMP 192kHz Clear all settings Abouttext_image
Are you sure you want to restore to the factory settings? You can't undo this action.text_image
ALPINE Direct About 30 Software version: LPAP-YV1.01(Release) Device version: MPAP-YV1.00 Model: HDS-990text_image
0.5m 2.25m 5.1mstext_image
HOB-990 □ HOB5 SRCMP3/WMA/AAC/M4A/WAV/FLAC/APE/DSD
kHz, 32 kHz, 24 kHz, 22,05 kHz, 16 kHz, 12
kHz, 11,025 kHz, 8 kHz
Débit binaire: 8-320 kbps
WMA
kHz, 32 kHz, 22.05 kHz, 16 kHz, 11.02 5 kHz, 8 kHz
Débit binaire: 12-192 kbps (stéréo) 0-128 kbps (mo no)
AAC
kHz, 32 kHz, 24 kHz, 22.05 kHz, 16 kHz, 12
kHz, 11.025 kHz, 8 kHz
Débit binaire: 8-320 kbps
M4A
kHz, 32 kHz, 24 kHz, 22.05 kHz, 16 kHz, 12 kHz, 11.025 kHz, 8 kHz
Débit binaire: 8-500 kbps
WAV
176.4 kHz, 96 kHz, 88.2 kHz, 48
kHz, 44.1 kHz, 32 kHz, 24 kHz, 22.05 kHz, 16 kHz
Bits de quantification: 8 bits, 16 bits, 24 bits
FLAC
176.4 kHz, 96 kHz, 88.2 kHz, 48
kHz, 44.1 kHz, 32 kHz, 24 kHz,
22.05 kHz, 16 kHz, 12 kHz, 11.025 kHz, 8 kHz
Bits de quantification: 8 bits, 16 bits, 24 bits
APE
Fréquence d'échantillonnage: 192 kHz, 176.4 kHz, 96 kHz, 88 .2 kHz, 48 kHz, 44 .1 kHz, 32 kHz, 24 kHz, 22.05 kHz, 16 kHz, 12 kHz, 11.025 kHz, 8 kHz
Bits de quant ification: 16 bits, 24 bits
DSD
MP3/WMA/AAC/M4A/WAV/FLAC/APE/DSD
MP3/WMA/ACC/M4A/WAV/FLAC/APE/DSD
Les fichiers
natural_image
Simple line drawing of a trash bin with crossed lines indicating no waste or prohibition (no text or symbols)
natural_image
Simple line drawing of a trash bin with two crossed lines indicating no waste or discharge (no text or symbols)
MP3/WMA/AAC/M4A/WAV/FLA
C/APE/DSD 26
natural_image
Pure architectural line drawing of a window frame with no text or symbolsRemote control sensor window
text_image
ALPINE DIRECT Setup Preset EQ > Sound settings > Defeat settings Bluetooth General >text_image
2-way 3-way Please press "Play" Key to finish this setup.text_image
ALPINE Direct X-Over 30 Front (HPF) Rear (HPF) Subwoofer (LPF)Elemento de ajuste : A ltavoces delan teros / Altavoces traseros / S ubgraves
text_image
ALPINE Direct X-Over 30 High (HPF) Mid high (LPF) Mid low (HPF) Low (LPF)altos/Medios pa sos ba jos/Graves
text_image
ALPINE Direct Front (HPF) 30 Frequency 40Hz Slope 12dB/Octtext_image
ALPINE Direct Sound memory 30 Dealer setting User settingtext_image
About ON COAXIAL/OPT Clear all settingstext_image
ALPINE Direct Bluetooth 30 Connectedtext_image
ALPINE DIRECT General Built-in AMP SPDIF/Opt Sampling Rate Clear all settings Abouttext_image
ALPINE Direct Mix source 30 Main source attenuation Mix source selectiontext_image
Mix source OFF Dimmer Alpine systemtext_image
ALPINE Cheet Steering wheel Volume + Volume - Last song Next song Play/Pause
text_image
ALPINE Cheet Steering wheel at 30 Next song Play/Pause Mute SRC SWC-typetext_image
Diagram of an electronic device rear panel with labeled ports and wiring connectionstext_image
About ON COAXIAL/OPT Clear all settingstext_image
Accessibility ON SPDIF/Opt Clear all settingstext_image
Built-in AMP 192kHz Clear all settings Abouttext_image
Are you sure you want to restore to the factory settings? You can't undo this action.text_image
ALPINE Direct About 32 1 30 Software version: LPAP-YV1.01(Release) Device version: MPAP-YV1.00 Model: HDS-990text_image
0.5m 2.25m 5.1mstext_image
LPG HOB-990 HRES /II SRC ← →Memorias compatibles :FAT16/32 ,NTFS ,exFAT.
MP3/WMA/AAC/M4A/WAV/FLAC/APE/DSD
MP3/WMA/ACC/M4A/WAV/FLAC/APE/DSD
No se pue de reproducir MP3/WMA/ACC/M4A/WAV/FLAC/APE/DSD.
natural_image
Simple line drawing of a trash bin with crossed lines indicating no waste or prohibition (no text or symbols)
natural_image
Simple line drawing of a trash bin with two crossed lines indicating no waste or discharge (no text or symbols)
MP3/WMA/AAC/M4A/WAV/FLA
C/APE/DSD 21
出现问题时 23
出现此信息时 23
规格参数 26
操作说明
警告
安全使用要点
text_image
AMPLPHG RESET SWITCH线控器显示
■ USB 主模式音源页面
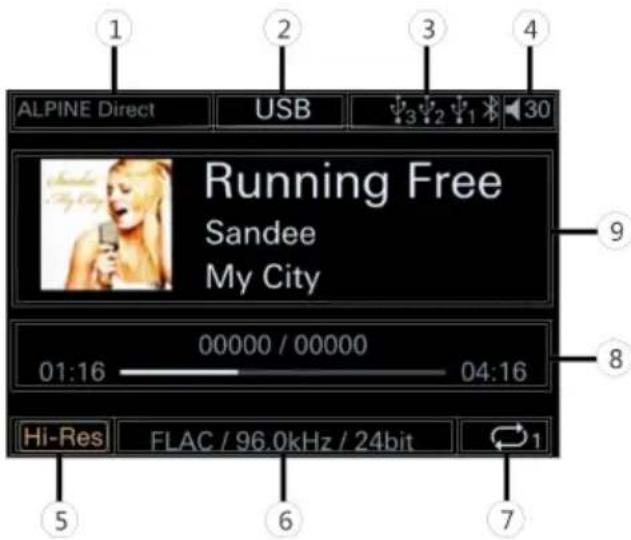
text_image
ALPINE Direct USB Running Free Sandee My City 01:16 00000 / 00000 04:16 Hi-Res FLAC / 96.0kHz / 24bit 7 5 6 7 9 8 30① 显示 辅助音源状态。
text_image
Remote control sensor window可连接至遥控接口盒
text_image
ALPINE Direct Setup 30 Preset EQ > Sound settings > Defeat settings Bluetooth General >text_image
2-way 3-way Please press "Play" Key to finish this setup.text_image
ALPINE Direct X-Over 30 Front (HPF) Rear (HPF) Subwoofer (LPF)text_image
ALPINE Direct X Over 30 High (HPF) Mid high (LPF) Mid low (HPF) Low (LPF)text_image
ALPINE Direct Front (HPF) 30 Frequency 40Hz Slope 12dB/Octtext_image
ALPINE Direct Sound memory 30 Dealer setting User setting设定内容:经销商设置/自定义设置
经销商设置
text_image
About ON COAXIAL/OPT Clear all settingstext_image
ALPINE Direct Bluetooth 30 Connected设定项目:蓝牙连接和断开操作
设定内容:已连接/未连接(初始设定)
通用设置
text_image
ALPINE Direct General Built-in AMP SPDIF/Opt Sampling Rate Clear all settings Abouttext_image
ALPINE Direct Mix source 30 Main source attenuation Mix source selection设定内容:0/30%/50%(初始设定)/80%/100%
辅助音源选择
可以根据需求 选择辅助音源。
设定项目:辅助音源选择
设定内容:蓝牙音乐/高电平/AUX/USB Audio/关闭
语言设置
text_image
ALPINE General Mix source OFF Dimmer Alpine system关闭此项后,可开启子模式播放界面。
设定项目:艺术显示开关
设定内容:关/开(初始设定)
调光器控制
text_image
ALPINE Direct Steering wheel Volume + Volume - Last song Next song Play/Pause ALPINE Direct Steering wheel cc Next song Play/Pause Mute SRC SWC-type >text_image
About ON COAXIAL/OPT Clear all settingstext_image
Accessibility ON SPDIF/Opt Clear all settingstext_image
Are you sure you want to restore to the factory settings? You can't undo this action.text_image
ALPINE Direct About Software version: LPAP-YV1.01(Release) Device version: MPAP-YV1.00 Model: HDS-990text_image
0.5m 2.25m 5.1ms22.05kHz '16kHz '12kHz '11.025kHz '8kHz
比特率:8-320kbps
WMA
22.05kHz '16kHz '12kHz '11.025kHz '8kHz
比特率:8-320kbps
M4A
采样频率:48kHz '44.1kHz '32kHz '24kHz '22.05kHz '16kHz '12kHz '11.025kHz , 8kHz
比特率:8-500kbps
WAV
MP3/WMA/ACC/M4A/WAV/FLAC/APE/DSD
natural_image
Simple line drawing of a trash bin with crossed lines indicating no waste or prohibition (no text or symbols)
natural_image
Simple line drawing of a trash bin with crossed lines indicating no waste or discharge (no text or symbols)Auburn Hills, Michigan 48 326, U.S.A.
Phone 1-800-ALPINE-1 (1-800-257-4631)
ALPS ALPINE EUR OPE GmbH
Ohmstrasse 4.85716 Unterschleissheim, Germany
Phone: +49 (0) 89-32 42 640
For contact information on your respective country,
please visit www.alpine-europe.com.
ALPS ALPINE EUR OPE GmbH
Aurora House, Deltic Avenue, Rooksley, Milton Keynes,
MK13 8LW, United Kingdom
Phone: 0345-313-1640
ALPINE E LECTRONICS OF AUSTRALIA PTY., LTD.
161-165 Princes Highway,
Hallam Victoria 3803, Australia
Phone 03-8787-1200
阿尔卑斯(中国)有限公司
The 9th Towers, Tower B, 24th Floor, Unit TNBO 1-03,
33/4 Rama 9 road, Huay Kwang, Bangkok, 10310, Thailand
Phone +66 (2) 090 959 6
アルバインマーケティング株式会社