
Hiker 400 - Power station 70mai - Free user manual and instructions
Find the device manual for free Hiker 400 70mai in PDF.
| Product Type | Power Station |
| Brand | 70mai |
| Model | Hiker 400 |
| Battery Capacity | 378 Wh (18V/21Ah) |
| Dimensions (L × W × H) | 22 × 17.7 × 19.7 cm |
| Weight | 3.9 kg |
| Charging Temperature | 0 °C to 40 °C |
| Discharge Temperature | -10 °C to 40 °C |
| DC Input | 12-24V, 8A max (120W max) |
| Type-C PD Input | 5V/9V/12V/15V/20V, up to 5A (100W max) |
| AC Output | 400W (surge 800W), 110V, 50/60Hz, pure sine wave, 2 outlets |
| USB-A Output | 3 ports, 5V 2.4A per port (max 18W on QC port) |
| Type-C PD Output | 5V/9V/12V/15V/20V, up to 5A (100W max) |
| DC Output (cigarette lighter + 5521) | 13.6V, 10A max (total) |
| Connectivity | Bluetooth 5.0 |
| Features | LCD display, LED light (SOS incl.), ECO mode, timer, 70mai app |
| Maintenance | Clean with a dry cloth; fully recharge every 3 months |
| Safety | Overload, temperature, short-circuit protection; built-in fan |
| Package Contents | Power station, car charging cable, AC adapter, manual |
Frequently Asked Questions - Hiker 400 70mai
User questions about Hiker 400 70mai
0 question about this device. Answer the ones you know or ask your own.
Ask a new question about this device
Download the instructions for your Power station in PDF format for free! Find your manual Hiker 400 - 70mai and take your electronic device back in hand. On this page are published all the documents necessary for the use of your device. Hiker 400 by 70mai.
USER MANUAL Hiker 400 70mai
70mai Power Station Hiker 400 User Manual
Product: Power Station
zomai
Contents
English 01
Espanol 12
Portugues 22
Français 32
日本語 42
Please read this manual carefully before using the product and keep it in a safe place for future reference.
IMPORTANT SAFETY INSTRUCTIONS
WARNING: The following safety precautions should be followed when using this product. Improper handling may cause damage to the product or personal property, or even cause serious personal injury. The Company shall not be liable for any damage caused by incorrect operation.
- Before using this product, please read the manual to ensure correct and safe use.
- To reduce the risk of injury, close attention is required when using this product near children.
- Do not put fingers, palms, or any part of the body into the product to avoid personal injury.
- Do not use non-origina or third-party accessories, as this may result in product incompatibility, product damage or even personal injury.
- To avoid damage to the product, if it is required to disconnect the power input of the product, unplug the power cable from the power socket first.
- Do not use modified or damaged batteries, as this may cause fire, explosion, or other personal injuries.
- Do not use this product with a damaged power cable, plug or output cable as this may pose a risk of electric shock.
- Do not disassemble the product by yourself, otherwise it may cause fire or electric shock. If a fault occurs during the use of this product, stop using it and contact the service center.
- If the product malfunctions, unplug the power cable of the product from the socket to reduce the risk of electric shock.
Safety use
- Please use the product in a dry and ventilated environment. The product is not waterproof. Do not expose the product to any liquid. Do not use the product in a humid environment as this may cause a short circuit, electric shock, fire, or even explosion.
- Use the product in a temperature range of 14^ to 104^ (-10^ to 40^)
- Do not use the product in a strong electrostatic or electromagnetic environment, as this may cause the product to malfunction.
- Do not disassemble or puncture the product, as this may cause battery leakage, fire, or even explosion.
- If the product suffers a strong impact or falls from a high place, do not use it again.
- If the product falls into the water during use, place it in a safe, open area and let it air dry. Do not use the product again even after it has dried.
- Do not place the product in a microwave oven or any pressurized container.
- Do not put foreign metal objects into the product to avoid short-circuiting the battery.
- Avoid colliding the product against other hard objects. Do not place any heavy objects on the product.
- In extreme cases, the product may eject liquid. Avoid direct contact with the ejected liquid. In case of accidental contact with skin, rinse immediately with plenty of water. If the liquid comes into contact with the eyes, seek medical attention immediately. The liquid ejected from the battery may irritate or burn the skin.
- Do not connect the product output to a power grid.
- If the groove beneath the handle is covered with water, wipe it with a dry, soft cloth. Do not tilt or turn over the product to drain away water. Water may flow into the inside of the product through the ventilation holes on both sides and cause damage to the product.
Charging safety
- Charge the product in a temperature range of 32^ to 104^ (0^ to 40^) . Ensure the environment is dry and ventilated. Charging voltage should not exceed the
specified voltage range. Keep away from inflammable materials when charging
- Use a standard car charging cable, AC power adapter, and other accessories to charge the product. Use of non-standard accessories may result in fire, electric shock, or other personal injuries.
- After a long period of use, the product temperature may rise. Do not charge the product immediately and let the product cool to room temperature before charging.
Air safety
- Do not carry this product onto an airplane.
Transportation or storage instructions
- The weight of the product is 3.9kg , beware of falling off and hitting when moving the product.
- Store the product in a temperature range of -4^ to 113^(-20^ to 45^) . The place where the product is stored should be kept dry and ventilated. The product should not be exposed to direct sunlight, fire, or any similar heat source.
Maintenance
- Do not use chemicals or detergents to clean this product. If the surface or port of the product is dirty, wipe it with a piece of dry, soft cloth.
- To maximize the service life of the product, it is recommended to fully charge the product every 3 months.
- The product and its accessories may contain some small parts. Please keep the product and its accessories out of the reach of children. Children may inadvertently damage the product and its accessories, or swallow small parts, causing suffocation or other safety hazards.
- Please scan the QR code on the product label to activate the warranty within 14 days upon receiving the product. The warranty period starts from the date of purchase by the original purchaser. The sales receipt from the original purchaser, or any other valid documentary proof, is required in order to establish the start date of the warranty period.
SAVE THESE INSTRUCTIONS
Packing list
Power station
Car charging cable
AC power adapter

User manual
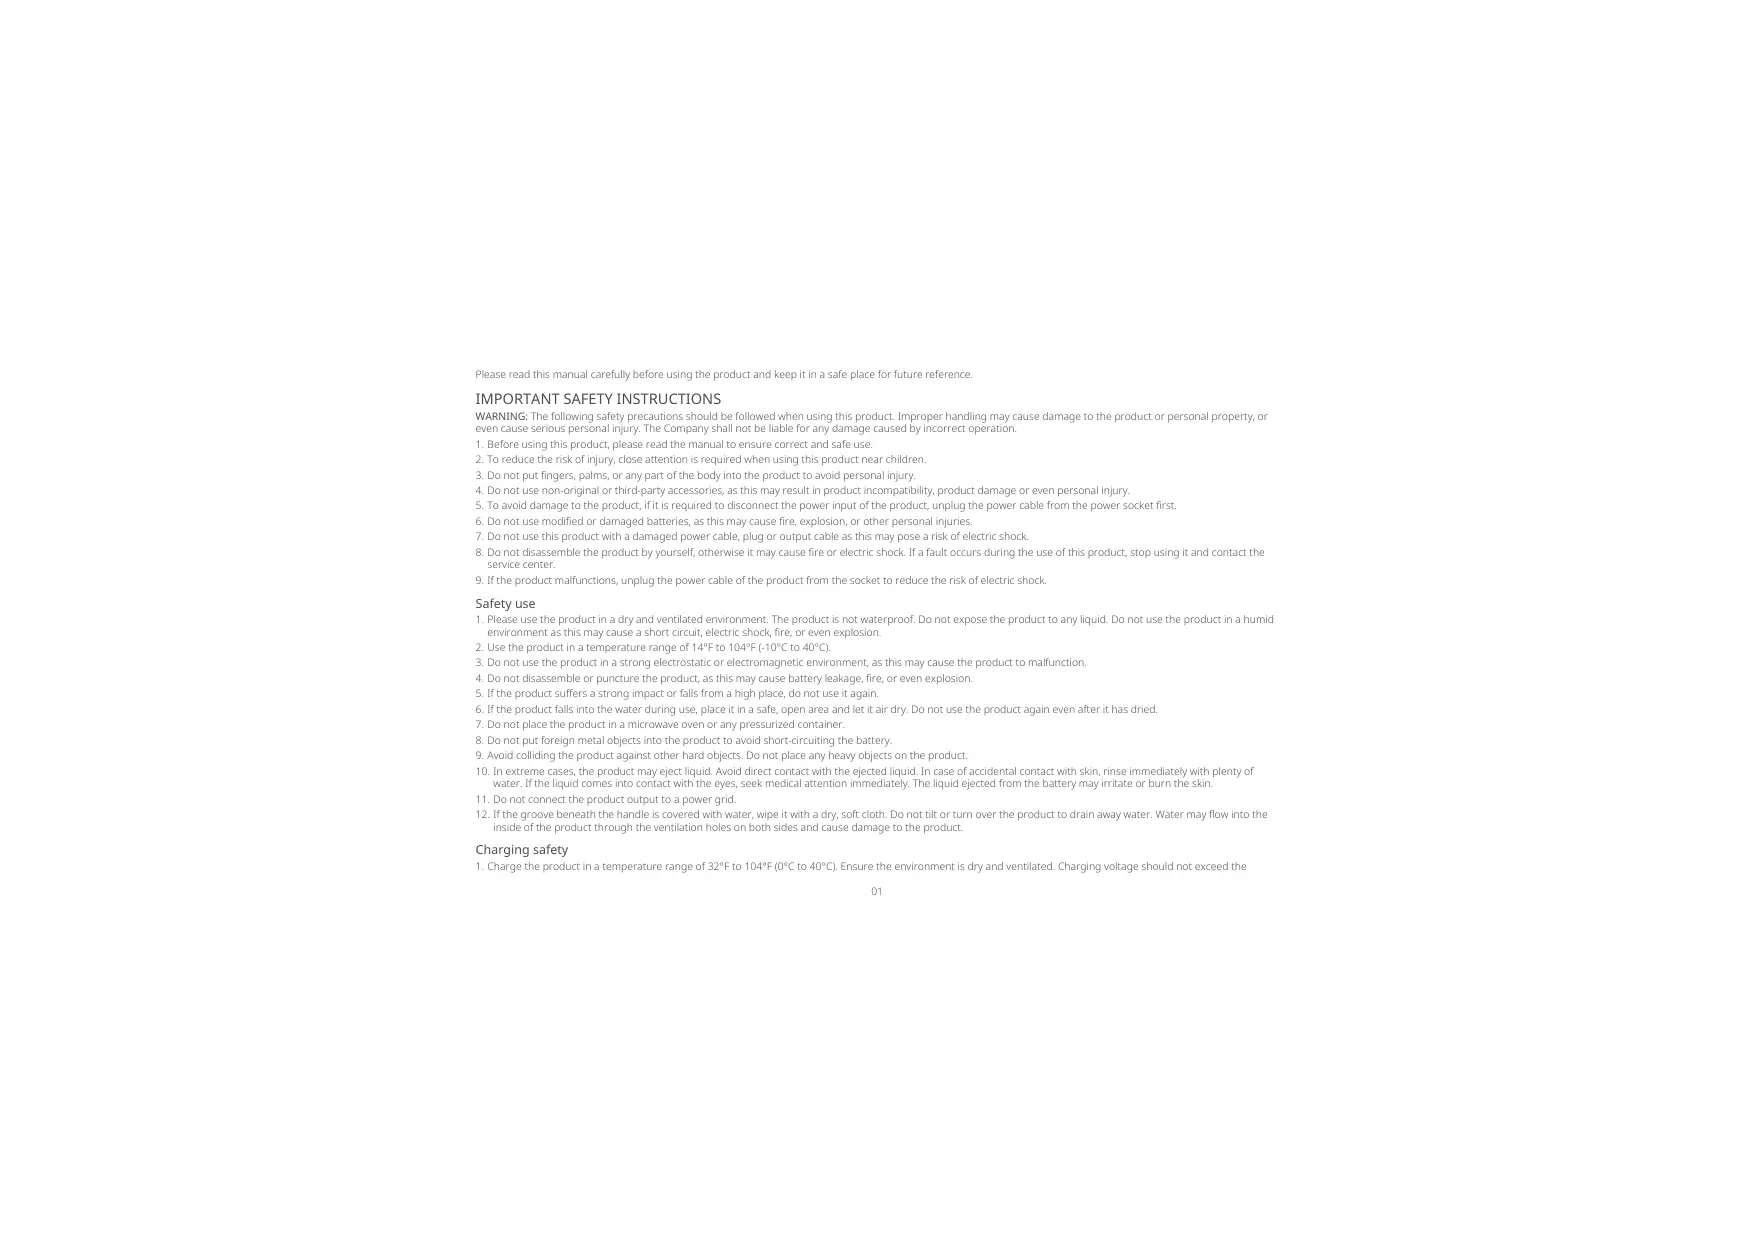
Product overview
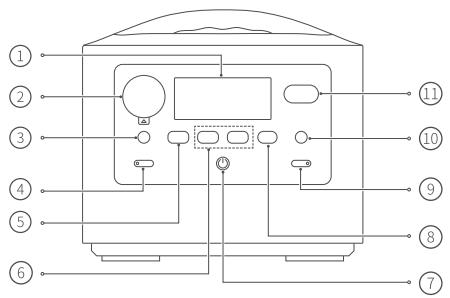
① LCD display
② Car port
③ 5521 output port
④ DC output button & DC output indicator
⑤ QC USB-A output port
⑥ USB-A output ports
⑦ Power button
⑧ Type-C port (Input/output)
(9) Function button & Indicator
DC input port (5525)
(1) Anderson port
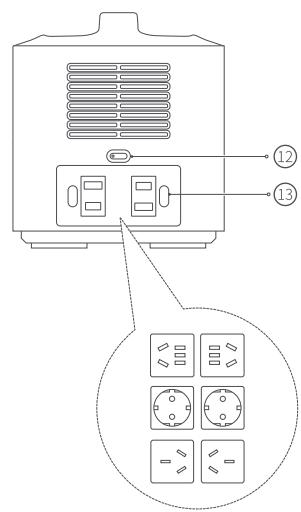
12 AC output button & AC output indicator
13 AC output ports*
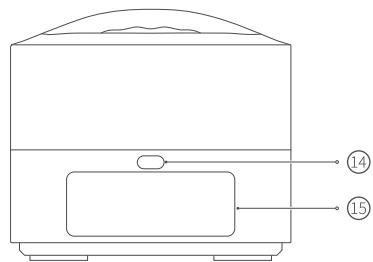
14 LED light button
15 LED light
*We have designed different AC output ports in accordance with the local regulations of different countries and regions.
Note: The illustrations of products, accessories, user interface, etc. in the manual are all schematic diagrams and are for reference only. Due to product updates and upgrades, the actual product may be slightly different from the diagrams. Please refer to the actual product.
1. LCD display
When the power station is turned on, the LCD display automatically lights up. By default, the display screen turns off automatically after 30 seconds without any button operation. The display auto-off time can be set via the 70mai app.
2. Car port
Applicable to general car electrical appliances, with a maximum output current of 10A.
3. 5521 output port
Applicable to devices charged through 5521 port.
4. DC output button & DC output indicator
This button controls output of the car port, 5521 port and all the USB-A ports.
- When the power station is running, press this button to enable/disable the DC output. The indicator will turn on/off accordingly.
5. QC USB-A output port
-
Applicable to devices charged through USB-A port and supports up to 18W quick charge. Devices connected to this port that do not support quick charge are still charged at standard speed.
-
When this port is used jointly with other USB-A ports, it no longer supports quick charge but outputs at a power same to other USB-A ports.
6. USB-A output ports
Applicable to devices charged through USB-A port, such as mobile phones and tablets.
7. Power button
-
Press and hold this button to turn on/off the power station.
-
When power station is running, press this button to light up/turn off the LCD display.
8. Type-C port (Input & output)
- Input: Connect Type-C charging cable to this port and connect a PD power adapter to the power socket to recharge the power station. Supports a maximum input power of 100W.
Output: Applicable to devices charged through Type-C port and supports up
to 100W quick charge. Devices connected to this port that do not support
quick charge are still charged at standard speed.
Turn on the power station first when using the Type-C port as input or output.
9. Function button & Indicator
- When power station is running, press this button to enable/disable ECO (Auto turn off output for no load) function, and the indicator will turn on/off accordingly.
- When power station is running, press and hold this button to enter the Bluetooth discoverable mode.
- During the Bluetooth pairing, press this button to confirm the authorization.
- When power station is running, press this button 5 times in a row to restore the factory settings.
10. DC input port (5525)
- Connect AC power adapter to this port, with the other end connecting to the power socket to recharge the power station.
- Connect car charging cable or solar charging cable to this port to recharge the power station.
11. Anderson port
Connect the Anderson connector of the solar charging cable to this port to recharge the power station.
12. AC output button & AC output indicator
- When power station is running, press this button to enable/disable the AC output. The indicator will turn on/off accordingly.
- Within 10 seconds after the AC output is enabled, press and hold this button for about 3 seconds to switch AC output working frequency.
13. AC output port
Applicable to devices with rated power less than 400W and surge power less than 800W.
14. LED light button
-
When power station is running, press this button to circularly switch the LED light among Low brightness, Medium brightness, High brightness and Off modes.
-
When power station is running, press this button twice in a row to enter SOS mode. Press again to exit the mode.
15. LED light
LED light can be used for illumination or sending SOS signal. The brightness and color temperature can be set in the app.
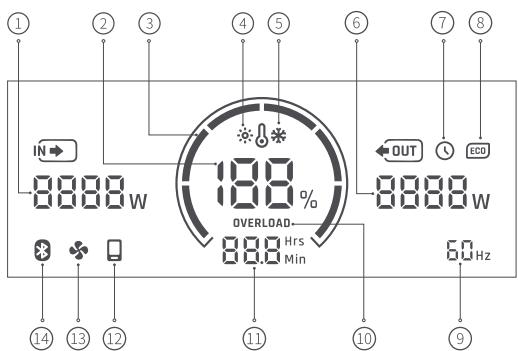
LCD display
- Current input: Total power of input.
- Remaining battery power: Current remaining battery power.
- Battery level ring: Indicates the current battery level. If the battery level is lower than 10% , all segments will turn off. In this case, recharge the power station immediately.
- High temperature alarm: Indicates that the battery temperature of power
station is too high. All output and input work will stop. Leave the power station to cool to room temperature and then restart it.
- Low temperature alarm: Indicates that the battery temperature of power station is too low. All output and input work will stop. Move the power station to a warm place and wait until it returns to the operational temperature and then restart it.
- Current output: Total power of output.
- Timing icon: When AC/DC ON or OFF timer is set in the app, this icon displays.
- ECO (Auto turn off output for no load): Indicates that this function is enabled. The output ports (excluding Type-C port) of the power station will automatically turn off when the output is idle or at low load*.
This function can be disabled by pressing the function button or via the app. You can set the duration of no load or low load according to your usage in the app.
When the power station is turned on by accident or not turned off in time after completion of normal use, it will continue to run, which may cause continuous consumption of battery power or even depletion of power, please keep this function on if you want to avoid such circumstances.
Disable this function if you have a low-load device ready to work continuously for a long time.
- AC output working frequency: Within 10 seconds after the AC output is enabled, press and hold the AC output button for about 3 seconds to change to appropriate AC output working frequency according to the actual situation of the country and region.
- Output overload alarm: When the output power of any output port exceeds the maximum limitation, this icon displays and output will be turned off. In this case, disconnect the supplied electrical equipment from the output port and then restart the power station.
- Recharging/discharge time: The remaining working time or recharging time for the power station. The value is determined based on the remaining battery power and total output/output power. If an error occurs, troubleshooting code will display in this position.
-
Mobile icon: Indicates that the power station is connected to the Bluetooth of the mobile phone.
-
Fan icon: When the ambient temperature of the power station is too high or the load is too large, the temperature-controlled electric fan inside the power station is turned on and this icon will be shown.
- Bluetooth: Bluetooth is always on by default. When the Bluetooth is discoverable, this icon flashes.
- Low load indicates the case when AC output is lower than 10W or DC output (car port or 5521 port) is lower than 2W and USB-A port is lower than 100mA. The default low load duration is 1 hour.
Turning on/off
Press and hold the power button to turn on/off the power station.
The power station automatically turns off in the following situations:
- If no button action, no charging or discharging operation, LED light is off, and timing function is disabled, and such operation condition lasts for 10 minutes, the power station will then automatically turn off.
- If the built-in battery power is low, the power station will automatically turn off.
How to use
- When power station is turned on, press the DC or AC output button. The corresponding output indicator lights up and the output port is turned on.
- Connect the power supply cable of the electrical equipment to the output port of the power station.
When using the AC output port, check the AC output working frequency on the LCD display. If it complies with the local regulations, the port can be used directly, otherwise, press and hold the AC output button for about 3 seconds within 10 seconds after AC output is enabled to change to appropriate AC
output working frequency.
3. After using the power station, press the DC or AC output button to turn off the output port and the corresponding output indicator turns off.
Notes:
- The Type-C port can be used directly after the power station is turned on. After using this port, unplug the Type-C cable directly.
- Battery power may be slightly lost during transportation and storage. Before using the power station for the first time, it is recommended to fully charge the power station.
Downloading 70mai App
This product can be used with 70mai app. Please search for "70mai" in the app store or scan the QR code to download and install the app.
The firmware version of the product will be updated through the 70mai app. It will take a few minutes for the product to complete the update. Please make sure the battery level is above 20% during the update process.

Troubleshooting guide
When a fault code is displayed on the LCD display, please refer to the Online Troubleshooting Guide by scanning the QR code or via 70mai app to identify the fault phenomenon and find the corresponding solution.

Charging the power station
Power station comes with 3 ports for recharging:
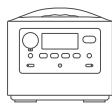
DC input port (5525): Can be connected to car charging cable, AC power adapter, or the 5525 connector of the solar panel.
- Andersen port: Can be connected to Anderson connector of the solar panel.
- Type-C port: Can be connected to Type-C charging cable.
You can use the Type-C port for recharging jointly with the DC input port (5525) or the Anderson port.
Notes:
- The DC input port (5525) and Andersen port cannot be connected simultaneously.
-
While charging, do not plug and unplug the charging cable continuously in a short period of time. Plug the charging cable back after a 10 second interval after unplugging it.
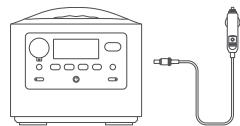
-
Connect the car charging cable to the DC input port (5525) and attach the other end to the cigarette lighter of the car.
-
The power station can be charged when car is started and the car's cigarette lighter port is energized.
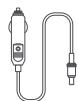
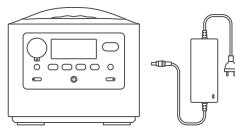
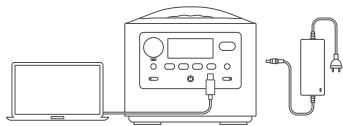
- Connect the output cable of the AC power adapter to the DC input port (5525).
- Connect the two-pin plug to the power socket.
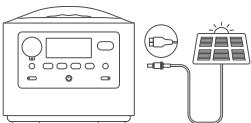
-
Select to connect to either the DC input port (5525) or the Anderson port according to the shape of the solar panel's output interface.
-
The open-circuit voltage of the solar panel should be between 12 and 24V
-
Supports up to two 70mai portable solar panels in parallel.
- Connect the Type-C charging cable to the Type-C port.
- Connect the Type-C charging cable to a standard PD power adapter purchased from a qualified manufacturer.
- The maximum power supported by the power adapter is PD 100W.
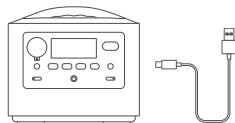
Note: Please turn on the power station when using the Type-C port to recharge the power station.
Recharging and discharging simultaneously
When the power station is recharging, its output ports are available to supply power to other electronic equipment.
Specifications
| General specifications | Output |
| Product: Power Station | USB-A output (×3): 5V ≦ 2.4A (per port) or 18W Max. when the QC USB-A port is used alone. |
| Model: PN0430A | DC output (5521 × 1 and car port × 1): Total 13.6V ≦ 10A Max. |
| Capacity: 18V/21Ah/378wh | AC output (×2): Total 400W (surge 800W), 110V~, 50/60Hz (Pure Sine Wave) |
| Weight: 8.6lbs (3.9kg) | Type-C PD (Input/Output) (×1): 5V ≦ 3A, 9V ≦ 3A, 12V ≦ 3A, 15V ≦ 3A, 20V ≦ 5A (100W Max.) |
| Size: 8.7 × 7 × 7.8inch (22 × 17.7 × 19.7cm) | |
| Charge temperature: 32°F to 104°F (0°C to 40°C) | Input |
| Discharge temperature: 14°F to 104°F (-10°C to 40°C) | DC input: 120W Max.,12-24V ≦ 8A Max. |
| Wireless connectivity: Bluetooth® 5.0 |
Typical troubleshooting
| Issue | Possible cause | Solution |
| Power station cannot be recharged | AC power adapter has no output, or the AC power adapter is not well connected to the DC input port. | ·Check if the AC power adapter (including the cable and the plug) is broken or deformed. ·Ensure the power station and the AC power adapter are well connected. ·Ensure the two-pin plug is connected to the power socket. |
| PD power adapter has no output, or the Type-C cable is not well connected to the Type-C port. | ·Check if the cable or the PD power adapter is broken or deformed. ·Ensure the power station, Type-C cable and PD power adapter are well connected. ·Ensure the PD power adapter is connected to the power socket. | |
| The connection between the car charging cable and the DC input port or car cigarette lighter is loose. | ·Check if the cable is broken or loose. ·Ensure the car charging cable, the car cigarette lighter and the power station are well connected. ·Clean away any dust or dirt on the contact points of the car cigarette lighter. | |
| The engine has not been turned on, so there is no power to the car cigarette lighter. | ·Start the engine of the car. | |
| There is no power in the output port of solar panel. | ·Check if the cable or connector is broken or loose. ·Ensure that the connection is tight and secure. | |
| Other causes | ·Contact the service center. | |
| Power station has no output | The power cable of the electrical device is not connected to the output port of the power station. | ·Check if the power cable or the port of the electrical device is broken or deformed. ·Ensure that the connection is tight and secure. |
| The DC/AC output switch is not turned on. | ·Turn on the DC/AC output switch. | |
| Other causes | ·Contact the service center. | |
| Power station output is interrupted | The ECO (Auto turn off output for no load) function is triggered because the load device is in low load or idle state for a long time. | ·Disable ECO (Auto turn off output for no load) function by pressing the function button or through the app. ·Set a longer no load or low load duration in the app. |
| The AC/DC OFF timer is set and the AC/DC output turns off when the time expires. | ·Disable or adjust the AC/DC OFF timer through the app. | |
| Other causes | ·Contact the service center. |
FCC compliance statement
This device complies with Part 15 of the FCC Rules. Operation is subject to the following two conditions: (1) this device may not cause harmful interference, and (2) this device must accept any interference received, including interference that may cause undesired operation. Changes or modifications not expressly approved by the party responsible for compliance could void the user's authority to operate the equipment.
This equipment has been tested and found to comply with the limits for a Class B digital device, pursuant to Part 15 of the FCC Rules. These limits are designed to provide reasonable protection against harmful interference in a residential installation. This equipment generates, uses and can radiate radio frequency energy and, if not installed and used in accordance with the instructions, may cause harmful interference to radio communications. However, there is no guarantee that interference will not occur in a particular installation.
If this equipment does cause harmful interference to radio or television reception, which can be determined by turning the equipment off and on, the user is encouraged to try to correct the interference by one or more of the following measures:
--Reorient or relocate the receiving antenna. --Increase the separation between the equipment and receiver.
-- Connect the equipment into an outlet on a circuit different from that to which the receiver is connected.
-- Consult the dealer or an experienced radio/TV technician for help.
FCC Radiation Exposure statement
This equipment complies with FCC radiation exposure limits set forth for an uncontrolled environment. This equipment should be installed and operated with minimum distance 20cm between the radiator and your body. This transmitter must not be co-located or operating in conjunction with any other antenna or transmitter. FCC ID: 2AOK9-PN0430A
Refer to the SN Coding Rules to obtain the production date of this product. The 10th to 12th digits of the Serial Number represent the year, the month, and the day. The rules are as follows:
Year: Take the last digit of the year, for example, 2022 is represented by 2.
Month: The digit 1-9 represents the month from January to September. October(A), November(B), December(C).
Day: The digit 1-9 represents the days from 1st-9th. The rest of the days are represented by upper case letters in a alphabetical order(A-Z), but exclude the letters I, O, U, V. For example, in the SN "xxxxxxxxBxxxxxx", "2BW" means that the product was produced on November 28th, 2022.
ISED compliance statement
This device contains licence-exempt transmitter(s)/receiver(s) that comply with Innovation, Science and Economic Development Canada's licence-exempt RSS(s). Operation is subject to the following two conditions:
ISED Radiation Exposure statement
USE AS DIRECTED IN MANUAL. KEEP OUT OF REACH OF
CHILDREN. DO NOT DISASSEMBLE. CRUSH OR INCINERATE: RISK OF SHOCK, FIRE EXPLOSION AND BURNS. MISUSE MAY RESULT INVoidING WARRANTY INJURY OR DEATH.

ADVERTENCIA:
USELO COME SE INDICA EN EL MANUAL. MANTENGALO FUERAD AL CALANCE DE LOS NINOS. NO LO DESANMIBLE, NI LO APLASTE NI LO INICHERIE: RISOGO DE CHOQUE, EXPLOSIONE DE FUGUEY O QUE MADURAS. EL MAL USO PUEDE OCCARIOAN THAT SE ANULE LA GARANITY A TÁMBIEN LESIONES OL A MUERTE.
Service: help-powerstation@70mai.com
For further information, please go to www.70mai.com
Manufacturer: 70mai Co., Ltd.
Address: Room 2220, Building 2, No. 588, Zixing Road, Minhang District, Shanghai, China
Servico: help-powerstation@70mai.com
Endereço: Room 2220, Building 2, No. 588, Zixing Road, Minhang District, Shanghai, China
Service: help-powerstation@70mai.com
Adresse: Room 2220, Building 2, No. 588, Zixing Road, Minhang District, Shanghai, China
- Contents
- IMPORTANT SAFETY INSTRUCTIONS
- Safety use
- Charging safety
- Air safety
- Transportation or storage instructions
- Maintenance
- SAVE THESE INSTRUCTIONS
- Packing list
- Product overview
- LCD display
- Car port
- 5521 output port
- DC output button & DC output indicator
- QC USB-A output port
- USB-A output ports
- Power button
- Type-C port (Input & output)
- Function button & Indicator
- DC input port (5525)
- Anderson port
- AC output button & AC output indicator
- AC output port
- LED light button
- LED light
- Turning on/off
- How to use
- Downloading 70mai App
- Troubleshooting guide
- Charging the power station
- Recharging and discharging simultaneously
- FCC compliance statement
- FCC Radiation Exposure statement
- ISED compliance statement
- ISED Radiation Exposure statement
- ADVERTENCIA:
Brand : 70mai
Model : Hiker 400
Category : Power station