
12ID2-25.1A - 20ID3-60BL.2A - Cordless drill driver DEXTER - Free user manual and instructions
Find the device manual for free 12ID2-25.1A - 20ID3-60BL.2A DEXTER in PDF.
| Product type | Cordless drill/driver |
| Brand | DEXTER |
| Models | 12ID2-25.1A (12 V) and 20ID3-60BL.2A (18 V) |
| Rated voltage | 12 V (12V model) / 18 V (20V model, max 20 V) |
| No-load speed | 0-400 / 0-1500 rpm (12V); 0-500 / 0-2000 rpm (20V) |
| Impact rate | 6000-22500 bpm (12V); 8000-32000 bpm (20V) |
| Chuck size | 10 mm (12V) / 13 mm (20V) |
| Max drilling diameter - Wood | 25 mm (12V) / 45 mm (20V) |
| Max drilling diameter - Metal | 8 mm (12V) / 20 mm (20V) |
| Max drilling diameter - Concrete | 6 mm (12V) / 18 mm (20V) |
| Weight | 0.92 kg (12V) / 1.24 kg (20V) |
| Power source | Li-ion battery (compatible with UP20) |
| Battery capacity | 2.0 Ah or 4.0 Ah depending on model |
| Charger | UAOC-01: input 200-240 V~, 50-60 Hz, 24 W; output 12.9 V 1.5 A |
| Main functions | Drilling, screwdriving, hammer |
| Lighting | Work LED |
| Rotation direction | Forward/Reverse reversible |
| Speed control | Yes, by trigger and dial |
| Safety | Double insulation; stall stop; overload protection |
| Maintenance | Clean with a dry cloth; do not use water or chemicals |
| Spare parts | Full list in the manual; replaceable brushes (brushed model) |
| Warranty | 60 months on tool; 36 months on battery and charger |
| Standards | CE, EAC, compliance with European directives |
Frequently Asked Questions - 12ID2-25.1A - 20ID3-60BL.2A DEXTER
User questions about 12ID2-25.1A - 20ID3-60BL.2A DEXTER
0 question about this device. Answer the ones you know or ask your own.
Ask a new question about this device
Download the instructions for your Cordless drill driver in PDF format for free! Find your manual 12ID2-25.1A - 20ID3-60BL.2A - DEXTER and take your electronic device back in hand. On this page are published all the documents necessary for the use of your device. 12ID2-25.1A - 20ID3-60BL.2A by DEXTER.
USER MANUAL 12ID2-25.1A - 20ID3-60BL.2A DEXTER
PpOeTeC, pOeIbOoiHoeic aOaFaeiaC
- Anepepyoioe aoeow to nAekpkiO epyaiae eav to epyaiae eo apapoynC mIoakpei. Na eioe npoetouaepoi yu oynan potn optncn ou npokae iKotmaa. To epyaiae eo apapuynC mIoakapei otav pkaapei 0toeayiaoc npot to naekpkiO epyaiae utepopvtuvetai.
-Kpatote to nEeKtpiK epyaleio e aaoaia. Otaov ophiye tka xalapwve teic bisec va etep npoeotuaouevoi yia npoowpiva uynn porn otpeync.
Aopaiot to teuxio epyaoic. Eva teayio epyoiaac nou stepeuwetai uoukeuec ouphiicn oevyevn ouypateitai ueyalutepn aoaaleia an' o t xepi.
Xpnouonoiote kataaannouc avxveute yia va diamotwete av unapxovkpuocpapmuic npoxuv coivnc wpealeiac ntn peioxynepaiaac kakote tnu tonik etaipciaoivnc wpealeiac yia botheia. H enaoh me nektpiokcu aywouc mtopei va npokaloei avphielen kai nktponlanfia. H poklonn cniuac oe aywoe aeplou mtopei va npokaloei ekpnE. H dielosuan oawhva ubpeuocn npokaleuiukiec cniuec n mopel va npokalaei nkektonanla. - Epipéveté návta va σαμηθει ενελις to ηεκτρό εργαλεio πιν to tonοθεητε κατω. To εργαλεio εφαρούης μπορείνα πλοκαρεί καινα σαένειν αχασετε τοῦ ἐλεγχο του ηεκτρόιδεργαλείου.
-KoatnoTe to nEeKtpiK epyaieio otaBepa kai te a 60 xepia kai BepaWBeite ot EETe otaBepo nataJmu. O eipiooc tou nEeKtpiKou epyaieoi npayatooieitai me yeyalutep anphialeia xpnoiOnowvntac kai ta 60 xepia. - Ia va anofoyete nV akouoiia evpyonoinn tou nektpikou epyaieoi, cekleidwve navta nV aofaia oTo koumi. Ia va to kaVE auto, pntote via liyo tov diakontn On/Off.
-Ta epyaEiaeapuoync mnpoe i u nepepuaovb ov kata tn letoupyia. YnApxie kivduoc ykaauatow kata tnv aalayntou epaaleio eapuoync. Xpoaonoiote npootateutika yavtia vla va aopaedeet to epyaEio eapuoync.
-Ta nsiia kai ta aubvaga atopa dev npenei va xnpoionoiuov auto to epyaio. Ta nsiia npenei va enippovtai avnda stuyun oepintwnou bpiakovta oto onu xpnoioitei to epyaio.
Eiva tionc enitaktn avaykn va tpeite touc kavoviaouc npolnqnc atuxnatw nou ioxouv otnv nepioxnaoc.
YIIOAEIINOMENOIKINADYNOI
Aokn kal otav to epyaleio xonouoietai oumuva me tic obnyiec, dev iival duvatov va ealaeifou v ooi ol uolneioevoi napayovtec kivsbouv.
Oi akolouoI kivduov Ievexetai va npokuov oe oxeon me tvkatakeun kai tov oxediaaou tou epyaleiou:
B. ΕYNTHPHΞH TOY KINHTHPA
OBEPTAHH BIIPEJ/HA3A
- Д�� обертынна Впецд (за говинниковоюстриковою) Встановып лим положенna.
- Дя обетаннаи ha3aД (прOTи rOdINHнКоВОi CTpIKN) BCTaHOBiT bpeMnKaU y npabe noLoXeHHN. He3BaXaIOu Na Te, LTO MEXaHIm 3bOKyBaHn 3aNo6iRa c 3MiH nHaPmKy o6eTaHnH iHCTpyMeHTa NiJ qac pO6OTn DVBryHa, nepUI HIX 3MiHOBaTn HAnpRmOK o6eTaHnH, doQueKaItec r NobHOi 3ynHNKn npInnaNy.

PONEPENKENHRA: KUIO nepemukau oepTaHHBpepHa3aBCTaHOBHeBO BcHTpaJIbHOMY PNOJKeHNi, pINJaD He BMnKaeTbcra.
BbIPPEKIMyUdAPY/CBEPDJIHHA
Bn6ip pexmy ynapy/cbeplinna 3diicnoctbca BiDnoBidno do Tnny Heo6xioi i. IHctpymeH Ma e Dba peKIMN:
- Pexim CbepnIHn:ДЯ CbepnIHn OTBopIB y DepeBnHi mTe TaHapTHi Cbepnla.
- Pexim yapy:Дя CBepnHЯ OTbopiB y KaMeHi n cergni. BnkOpncToByTe cbepda nna 6eToHy.

ПОЕРДЖЕнг: 3abKd npebEpiaTe, lo6n JxNbIeHn BiDnobIaNo 3NaueHHIO, aKe Bka3aHe Na 3aOoDbki Ta6muci iHcTpymenta.
Ley iHcTpymENT OCHaIeHNI FyHKJIeIO peryIyIOBaHNr IbIKoCTi o6epTaHHraKa Da e MoKJIINBicTb 36IbIbUByTu WbNkICtB 3abJn 36IbIbWeHHIO TnCKy Ha cnYcKOBI rayOK.
LbNdkicTbpeyIIOEtbcCnIOHOHaNTCKaHHeHa CnyckOBn RaOHK.
CbITIOJIOHa lamHa BMKAeTbcA BtOMaTHUHO, kUcIo HaTNCHTn Ha CNYCKOBn rauOK.
ПИД�OTOBКAO CBEPДПИНЯ
Lio6 3aynctnIn iHctpmeH, HATNCHtB Ha cnyckOBn rayok peyIIOBAHHa 8uNkOCTi o6epTaHH. Lio6 3yINHTn iHcTpmeH, BiDnycttB cnyckOBn rayok.
CBEPINHHOTBOPIB
Jkuo noTpi6HNo pOcBepdIHTn OTbip BENIKoro diAmeTpα, iHOJI BAPTO noaTn 3i CBePdJa MeHJOro po3Mipy, a notim po3UnpInTu OTbip Do nOtpi6HOro po3Mipy. Lc 3anobirae nepeBaHTaKeHHIO dpnla.

PIONEДЖЕHЯ: Barato Heuacnix BInaKIB BiD6yBaTbCyape3 Henepe6auehi CHTyaui. PAm'raTne, lo BCvBepdIIOBAHHa HEBENKOTo OTBOpY, OcO6NBO B MeTani, MoKe npu3BeCTn Do 3aTnCKaHHa CBepda.
-Пд ac BnCbePdIbOHaBnHr rIb6Knx OTbOpIB BnKOpuctObyTe MeToD 3aRn6JIeHHra I BnMaHHcBepda, lO6 BnDaIaTn CTpyKky 3 OTbOpY.
- JI CbePdno 3acTpRnO, cIiH HeaHb BmKHyTn dpInb, IIO6 yHnKHyTn NOrO cepNo3Horo ykoJKeHH.
- Lio6 BvBilbHnTn CBepdIIO, Cnpo6yTe 3miHnTn HappMok Noro o6eptaHHN.
-BuipBnIe CBepnlo B OTbopi. BIeai CBepnlo MaE BXOHTN B 3aOTOBky NiID pIpyMM KytOM. JkUO PiIq Yac CBepDnIHnKyt 3MiHnBCr, To CBepnlo MOKe 3JaMaTnCry, 3aCTpRHyTn B OTbopi I HABiTb 3aBdATn TpaBMn.
- 3MeHsItb Tnck, KOIIN CbePdIO 6yIe 6JIu3bKO IO KpaIO MaTepiany, B yKOMy BnCbePdIIHOETbcra OTBip.
- He TnchItb HaДрИь. lHcTpymeHT MaE npaIobAtu y BlaChOMy TeMII.
- CπiДκуǐ Te 3a Tm, ζιο6 cБερДλa 6υπιν rοςτριm.
CBEPJIINHJ DEPEBUNH
Дяготриманн hyкрацю pe3ультау пд чac CBepdniHь ВELIKnx OTbopib y DepeBnHi BKNOPUCTOByTe cnipalbhi abo nepobi CBepdna.
- IpepeBeiMbIhCTpyMeHT y peKIM npnli.
-Почиайтсевдпинязmaолшвдкостс,юбпonepeДиТЗICKOB3yBaHнСевды поаTKobii TOnuci.36ilbшуTeшвдкICTbmyIpYtorO,ЯксевлнВxoДNTbуdepeBHy.
6. TEXHIUHE OBCIyROBVAHHHBnIYHA
B. ORIIyIbHnx LITOK (TINbKN IJIy MoJeIeI 3I IITKOBIM DBNYHOM)
Y DnBHy Ni BKnOpICTOByOTbcra ByrInbHi 1iTk, kci E BVtnpaTHmM MATEpianAm. OckIbKn CnIbHO 3HoJHeA ByrInbHa 1iTkMAOe CNPmHHTN 360j y pOoTI dBNyHa, 3aMiHbT II iDeHTMuHO, KOJI BOHA 6yde NoBHCTIO ao MaJKe NOBHCIO 3O hOHeJA. KpIM TORO, ByrInbHi 1iTk Heo6xIDHO yTPmUyBaTn Y uCtOTi Ta nepeBiprTa Nn BOHN BiNbHO pyXaOTbcra y 1iTkKOTpMaqi.
UCYHEHHH HECIPABHOCTEI
TapaTia He nooHnpuToBcra Ha HecnpaBHOCTi, NOB'3aHI 3 He npabunbHM BnKOpNCtAHm a60 HopMaIbHM 3HOCOM IHCTpyMeHTa.
Lc,30kpeMa,CTocyeTbc3Hocny nepemnkaiv,3anobixKHKIV Ta DnBHyHb.
Дя розгларуnpeteнзiira rapaHTIEMO MAOTb 6tNdoTpmaHITaki yMOBn:
-Пдтвердженидати Куновлі вигларіКВИТацii;
- Kɔŋdi CTOpOHHi Ooc6n He npoBODnIpeMOHT Ta/a60 3amHy DeTaJIe;
-Пюблема He NOB'Язан 3прироДнIM 3HOCOM;
- IHCTpymEHT BnKOpNCTOBvBaCBy npaBnIbHo (He 6yIIO npeBaHTaxKeHHY iHCTpyMeHTa a60 He BnKOpNCTOBvBaIoc HEDOZBOJIeH ePnIaIaIaI;
- Heo6xidihi p060Tn 3 TexHiyHoro 06cnyroBvBaHHa Ta peMoHTy 6yJIi BnKoHaHi HaNExKHIM YHOM;
- He 6yIIO BnIaIcKIB nepeBaHtAxeHH, HnepaBnIbHorO NOBoJxHeHH, HecaHKcIOHOBaHOro BnKOpNCtAHN a60 noUkOJKeHb;
- Hemae nouKoJKeHb BiД II 3OBHIhIX YHHNKiB a60 CTOpOHhIX npeDmetiB, HanpIKnad, nicky a60 kAmHHa;
- Hemae nouKoJxHeB yHacnIIOK HeIoTpMaHnI peKoMeHdaui i3 6e3neKn Ta IHcTpyKci 3 eknnyataui;
-3HaIoro60ky HeMaεKoDnHxΦOpc-MaXOpHnxObCTaBnH;
- He 6yIoo BVOKOpncTaHO JKOdHOI HeBIDIOBIDHOI DeTani, DeTani, BnroTOBNeHOI He KOMpaHieO Dexter, RaIoo 6yIe DOBeDeHO, Ioo CaMe BOHN BnRABbINcR npNHyO IO nOripSeHHra CTAHy;
- IpebeyBaHHI hCTpyMeHrA/kMyIaTopa/3apraHOrO npicTpoU y BOnoromy cepeobu (poca, D0u, 3aHypenHry BODy TOLIo);
- OncsckaprNdoJaetbcra.
YMOBn rapaHTi3aCTOCOByIObC B NOeHdHaHHI 3 HaUSHM yMOBaMn npoDaKy IIOCTaBKn.
Hecnpabhi IHcTpymEnTn, 10 niIyraIbT nobepHeHHIO KOMnaH Dexter uee3 npedCTabHka Dexter, 6dytB npinHrti IInue ToDi, KOIN TObap 6ye HaneKHM YHOM yNAKObaHNI.
KcHecnpabhi TOBapn BiDnpabJIOTbc 6e3nocepEnbO B KOMpaHIO Dexter, Dexter 3moKe o6oBuTu Ce BiDnpabHeHHr TlkbN B TOMy BInpAky, kIoo BiDnpabHKn CnPaTb TpaHcnpTHi BNTpaTn.
Dexter He npiMae TOBapn, kYi npaKoBaHi HeHaJIeXHmN CHINOM.
12ID2-25.1A
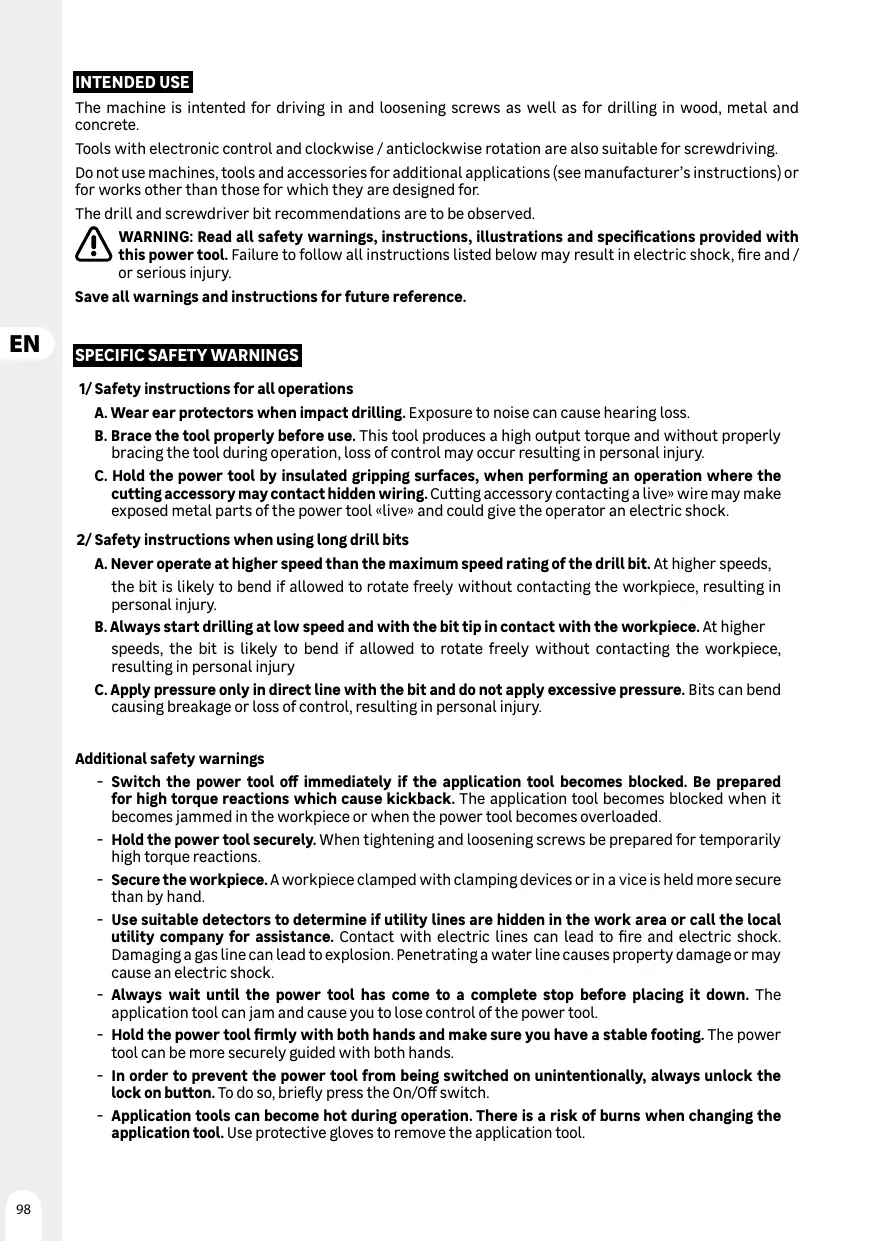
The machine is intended for driving in and loosening screws as well as for drilling in wood, metal and concrete.
Tools with electronic control and clockwise / anticlockwise rotation are also suitable for screwdriving.
Do not use machines, tools and accessories for additional applications (see manufacturer's instructions) or for works other than those for which they are designed for.
The drill and screwdriver bit recommendations are to be observed.

WARNING: Read all safety warnings, instructions, illustrations and specifications provided with this power tool. Failure to follow all instructions listed below may result in electric shock, fire and/or serious injury.
Save all warnings and instructions for future reference.
SPECIFIC SAFETY WARNINGS
1/ Safety instructions for all operations
A. Wear ear protectors when impact drilling. Exposure to noise can cause hearing loss.
B. Brace the tool properly before use. This tool produces a high output torque and without properly bracing the tool during operation, loss of control may occur resulting in personal injury.
C. Hold the power tool by insulated gripping surfaces, when performing an operation where the cutting accessory may contact hidden wiring. Cutting accessory contacting a live» wire may make exposed metal parts of the power tool «live» and could give the operator an electric shock.
2/ Safety instructions when using long drill bits
A. Never operate at higher speed than the maximum speed rating of the drill bit. At higher speeds, the bit is likely to bend if allowed to rotate freely without contacting the workpiece, resulting in personal injury.
B. Always start drilling at low speed and with the bit tip in contact with the workpiece. At higher speeds, the bit is likely to bend if allowed to rotate freely without contacting the workpiece, resulting in personal injury
C. Apply pressure only in direct line with the bit and do not apply excessive pressure. Bits can bend causing breakage or loss of control, resulting in personal injury.
Additional safety warnings
- Switch the power tool off immediately if the application tool becomes blocked. Be prepared for high torque reactions which cause kickback. The application tool becomes blocked when it becomes jammed in the workpiece or when the power tool becomes overloaded.
- Hold the power tool securely. When tightening and loosening screws be prepared for temporarily high torque reactions.
- Secure the workpiece. A workpiece clamped with clamping devices or in a vice is held more secure than by hand.
- Use suitable detectors to determine if utility lines are hidden in the work area or call the local utility company for assistance. Contact with electric lines can lead to fire and electric shock. Damaging a gas line can lead to explosion. Penetrating a water line causes property damage or may cause an electric shock.
- Always wait until the power tool has come to a complete stop before placing it down. The application tool can jam and cause you to lose control of the power tool.
- Hold the power tool firmly with both hands and make sure you have a stable footing. The power tool can be more securely guided with both hands.
- In order to prevent the power tool from being switched on unintentionally, always unlock the lock on button. To do so, briefly press the On/Off switch.
-
Application tools can become hot during operation. There is a risk of burns when changing the application tool. Use protective gloves to remove the application tool.
-
Children and frail people must not use this tool. Children should be supervised at all times if they are in the area in which the tool is being used. It is also imperative that you observe the accident prevention regulations in force in your area.
RESIDUAL RISKS
Even when the tool is used as prescribed it is not possible to eliminate all residual risk factors.
The following hazards may arise in connection with the tool's construction and design:
- Risk of electrocution if electric cables are drilled into - Always grasp the tool by designated handles, do not touch the drill bits.
- Damage to the respiratory system - Wear respiratory protection masks containing filters appropriate to the materials being worked. Ensure adequate workplace ventilation. Do not eat, drink or smoke in the work area.
- Damage to hearing - Always wear effective hearing protection and limit exposure to noise.
- Damage to eyes from flying dust and debris particles – Always wear suitable eye protection.
- Injury caused by vibration - Hold the tool by designated handles and limit exposure to vibration. See "RISK REDUCTION".
- Injury caused by dust - Dust created by operating the product can cause respiratory injury. wear an appropriate dust control mask with filters suitable for protecting against particles from the material being worked on.
RISK REDUCTION

WARNING: the vibration emission and noise emissions during actual use of the power tool can differ from the declared total value depending on the ways in which the tool is used, especially what kind of work piece is processed; Identify safety measures to protect the operator that are based on an
estimation of exposure in the actual conditions of use (taking account of all parts of the operating cycle such as the times when the tool is switched off and when it is running idle in addition to the trigger time). Depending on the actual use of the product the vibration values can differ from the declared total! Adopt proper measures to protect yourself against vibration exposures! Take the whole work process including times the product is running under no load or switched into consideration! Proper measures include among others regular maintenance and care of the product and application tools, keeping hands warm, periodical breaks and proper planning of work processes!
This tool may cause hand-arm vibration syndrome if its use is not adequately managed. Helping to minimise your vibration and noise exposure risk :
- Always use sharp chisels, drills and blades.
- Maintain this tool in accordance with these instructions and keep well lubricated (where appropriate).
- If the tool is to be used regularly then invest in anti vibration and noise accessories.
- Plan your work schedule to spread any high vibration tool use across a number of days.
It's recommended to wear ear protection during operation with this machine.
| Read instruction manual carefully | |
| CE | This device complies with the applicable European directives and an evaluation method of conformity for these directives was done. |
| EAC | Single mark of circulation of products on the market of the Member States of the Customs Union |
| This device complies with applicable Ukraine technical regulations | |
| Waste electrical products must not be disposed of with household waste. Please recycle where facilities exist. Check with your local authorities or retailer for recycling advice. | |
| Recyclable products subject to extended producer responsibility. Observe the associated sorting instructions. | |
| Safety glasses mandatory | |
| Ear protection mandatory | |
| Protection gloves mandatory | |
| Dust mask mandatory | |
| This danger notice warns of damage to the appliance or others properties, or may cause physical injuries. | |
| For indoor use only, do not expose to rain. | |
| T2A T3.15A | For the UP20, if the current of the charger is higher than 3.15A, the current to the outlet will be stopped by the fuse. For the 12V, if the current of the charger is higher than 2A, the current to the outlet will be stopped by the fuse. |
| Read the instruction handbook and follow all warnings and safety instructions. | |
| Protection Class II | |
| MAXIMUM | Use and store the battery within an temperature below 45°C |
| Do not disassemble, crush, heat above 100°C; Never expose the battery to microwaves or high pressures. | |
| Li-on battery. This product has been marked with a symbol relating to 'separate collection' for all battery packs and battery packs. It will then be recycled or dismantled in order to reduce the impact on the environment. Battery packs can be hazardous for the environment and for human health since they contain hazardous substances. |
| Always unplug the device after use or before maintenance | |
| To reduce the risk of electric shock, do not expose to water |
UP20 Universal: compatible only with Sterwins UP20, Lexman UP20, and Dexter UP20
TECHNICAL DATA
| MODEL | 12ID2-25.1A | 20ID3-60BL.2A | |
| RATED VOLTAGE | 12V d.c | 18V d.c.(Max.20V D.C.) | |
| SPEED n0 | 0-400/0-1500/min | 0-500/0-2000/min | |
| IMPACT RATE | 6000-22500 bpm/min | 8000-32000 bpm/min | |
| CHUCK CAPACITY | Ø10mm | Ø13mm | |
| MAX DRILLING DIAMETER | Wood | 25mm | 45mm |
| Metal | 8mm | 20mm | |
| Concrete | 6mm | 18mm | |
| WEIGHT | 0.92kg | 1.24kg | |
| SOUND PRESSURE Lpa | 75dB(A) | 79.6dB(A) | |
| SOUND POWER Lwa | 83dB(A) | 87.6dB(A) | |
| UNCERTAINTY Kpa, Kwa | 5dB(A) | 5dB(A) | |
| VIBRATION TOTAL VALUE Drilling in metal ah,D | 2.5m/S2 | 2.5m/S2 | |
| VIBRATION TOTAL VALUE Impact drilling in concrete ah,ID | 3.49m/S2 | 5.6m/S2 | |
| UNCERTAINTY K | 1.5m/S2 | 1.5m/S2 | |
| BATTERY PACK AND CHARGER INFORMATIONS | Model no for battery pack:MLC3H-202(SJ20):12V d.c. 2.0Ah; 24Wh; 3 Li-ion cells12BA2-40L1:12V d.c.;4.0Ah;48Wh,10 Li-ion cells; INR18650-2000;Model no for charger:UAOC-01Input: 200-240VAC, 50-60Hz, 24WOutput: 12.9V d.c. 1.5A | Compatible with all UP20 batteriesCompatible with all UP20 chargers | |

WARNING:
The vibration and noise emissions during actual use of the power tool can differ from the declared values depending on the ways in which the tool is used especially what kind of workpiece is processed;
The emissions value need to identify safety measures to protect the operator that are based on an estimation of exposure in the actual conditions of use (taking account of all parts of the operating cycle such as the times when the tool is switched off and when it is running idle in addition to the trigger time).
-
The declared vibration total value and the declared noise emission value have been measured in accordance with a standard test method and may be used for comparing one tool with another.
-
The declared vibration total value and the declared noise emission value may also be used in a preliminary assessment of exposure.
-
Evitati riscurile associate vibrantiilor
-
Avoid vibration risk.
Suggestion:
1) wear glove during operation
2) limit operating time and shorten trigger time
OPERATION

WARNING : The device should be disconnected from the mains before putting into operation
BIT INSTALLATION
When selecting a drill bit, use the right type for your job. For best performance, always use a sharp drill bit.
- To open the chuck jaws, hold its collar while turning the sleeve in the counter clockwise direction. Insert the drill bit deeply into the chuck, and then center the bit in the chuck jaws.
- To close the chuck jaws, hold the collar while turning the sleeve in the clockwise direction.Tighten securely.
- Remove the drill bit in reverse order.
NOTE: The chucks of reversible drills are always fixed by a screw with a left hand thread. The screw must be loosed before the chuck can be removed if necessary. To loosen the screw, turn it in a clockwise direction.
FORWARD / REVERSE ADJUSTMENT
- For forward (clockwise) rotation, push the forward /reverse switch to the left position.
- For reverse (counterclockwise) rotation, push the forward/reverse switch to the right position. Although an interlock prevents reversing the tool while the motor is running, allow it to come to a full stop before reversing.

WARNING: If the forward / reverse switch is in the central position, the tool can not be switched on.
SELECTING THE IMPACT/DRILL MODE
The impact/drill switch should be set according to the type of action required.
The tool has two settings:
- Drill mode: For drilling into wood and metal. Use standard drill bits.
- Impact mode: For drilling into stone and masonry. Use masonry drill bits.
VARIABLE SPEED TRIGGER SWITCH

WARNING: Always check that the power supply is the same as that indicated on the nameplate of the tool.
This tool has a variable speed switch which can reach higher speed with increased trigger pressure. Speed is controlled by the pressure to the switch trigger. The variable speed feature is particularly useful when starting drilling. It also enables you to select the best speed for a particular application.
To limit the maximum speed of the tool, rotate the dial on the front of the trigger until the desired setting is achieved. Turn the dial to the "+ direction to increase the speed and to the " - direction to decrease the speed.
NOTE: It is recommended to use the variable speed feature for a short time only. Do not continuously operate the tool at different speeds. It may damage the switch.
LED WORKLIGHT
The tool has a LED light to illuminate the work area and improve vision when working in areas with insufficient lights.
The LED light will switch on automatically while the trigger switch is depressed
START DRILLING
Start the tool by squeezing the variable speed trigger switch. Release the trigger to stop the tool.
HOLE DRILLING
When attempting to drill a large diameter hole, it is sometimes best to start with a smaller drill bit then work up to the required size. This prevents overloading the drill.

WARNING: Many accidents occur because of unforeseeable situations. Please pay attention that drilling-out a small hole may cause the drill bit to jam in the hole, especially when drilling metal.
- Remember to use a "wood-pecker" action on deep holes to allow the swarm to be ejected from the hole.
- If the drill bit snags, switch off immediately to prevent permanent damage to the drill.
- Try running the drill in reverse to remove the bit.
- Keep the drill in line with the hole. Ideally, the drill bit should enter at right angles to the work. If the angle is
changed during drilling, this could cause the bit to snap off, blocking the hole and perhaps causing injury.
- Reduce pressure as the drill is about to break through the item being drilled.
- Don't force the drill, let it work at its own pace.
- Keep the drill bit sharp.
DRILLING WOOD
For maximum performance when drilling larger holes, use auger bits or spade bits for wood drilling.
- Set the tool to the drill mode.
- Begin drilling at a very low speed to prevent the bit from slipping off the starting point. Increase the speed as it bites into the wood.
- When drilling through holes, place a block of wood behind the work piece to prevent ragged or splintered edges on the back of the hole.
DRILLING METAL
For maximum performance, use HSS drill bits for metal drilling.
- Set the tool to the drill mode.
- Mark off the center of the hole using a center punch.
- Use a suitable lubricant for the material you are working on.
- Begin drilling at a very low speed to prevent the bit from slipping off the starting point.
- Always clamp sheet metal. Support thin metal with a block of wood to avoid distorting it.
DRILLING CONCRETE
For maximum performance, use high quality carbide-tipped masonry drill bits when drilling holes in brick, tile, concrete etc.
- Use the drilling mode initially then revert to the impact mode once the holes are established.
- Apply light pressure and medium speed for best results in brick.
- Apply additional pressure and high speed for hard materials such as concrete.
- When drilling holes in tile, practice on a scrap piece to determine the best speed and pressure.
NOTE : Reverse rotation during impact drilling may damage the drill and drill bit.
SPECIAL SAFETY INSTRUCTIONS FOR BATTERY PACK AND CHARGER
a) This appliance can be used by children aged from 8 years and above and persons with reduced physical, sensory or mental capabilities or lack of experience and knowledge if they have been given supervision or instruction concerning use of the appliance in a safe way and understand the hazards involved.
b) Children shall not play with the appliance. Cleaning and user maintenance shall not be made by children without supervision.
c) Before the use of the charger and the battery pack, read the instruction manual for it carefully.
d) During the charge process, the current used should correspond to the current of the battery charger.
e) Never let moisture, rain or splashed water reaches the charging location.
f) The ambient temperature must not exceed 50^ . Never expose the device to direct insulation.
g) Only switch off the current when the battery pack has been inserted into the box or has been pulled out of the box.
h)Storage-battery pack, which are defective or damaged or can no longer be recharged, must be disposed of as hazardous waste. Hand them over at a special collection point Never harm our environment.Do not throw unusable storage-battery pack away into the domestic waste,into free or into water.
i) If the electrical cable is damaged, the wire may only be replaced by the supplier or by his repair workshop. Have repairs carried out only by an authorized specialist only.
j) Use only storage-battery pack, which have been produced by the original manufacturer.
k) Always keep the surface of the charger free from dust and dirt.
l) Insert the battery pack into the charger. Follow the guidelines provided concerning polarity.
m) Always remove battery pack before working on the machine.
n) When the battery pack is outside the drill, cover the contacts to avoid short circuits (e.g. from tools)
0) Do not throw Li-ion batteries into water or fire, risk of explosion!
p)Protect the battery pack from impacts, and don't open it.
q)Never discharge the battery pack completely and recharge occasionally if not used for a prolonged period.
r) Do not recharge non-rechargeable batteries, as they can overheat and break.

RESIDUAL RISKS: Even when the tool is used as prescribed it is not possible to eliminate all residual risk factors. The following hazards may arise in connection with the tool's construction and design:
- Damage to lungs if an effective dust mask is not worn.
- Damage to hearing if effective hearing protection is not worn.
- Health defects resulting from vibration emission if the power tool is being used over longer period of time or not adequately managed and properly maintained.

WARNING: This machine produces an electromagnetic field during operation. This field may under some circumstances interfere with active or passive medical implants. To reduce the risk of serious or fatal injury, we recommend persons with medical implants to consult their physician and the local implant manufacturer before operating this machine.
MAINTENANCE

WARNING: Do not allow brake fluids, gasoline, petroleum-based products penetrating oils, etc... come in contact with plastic parts. They contain chemicals that can damage, weaken or destroy the housing, thus compromising the integrity of of the double insulation.

WARNING: Always disconnect the device before performing any adjustment or maintenance operation. If the supply cord is damaged, it must be replaced by the manufacturer or its service agent in order to avoid a hazard. Disconnect from the power supply immediately if the supply cord is
damaged. Take care not to expose this tool to the rain. If the carbon brushes need to be replaced, have this done by a qualified repair person (always replace the two brushes at the same time) Your power tool requires no additional lubrication or maintenance. Never use water or chemical cleaners to clean your power tool. Wipe clean with a dry cloth. Always store your power tool in a dry place. Keep the motor ventilation slots clean. Keep all working controls free of dust. Occasionally you may see sparks through the ventilation slots. This is normal and will not damage your power tool. The ambient temperature range for this tool use is 0^ - 40^ . The relative humidity of the area must be not more than 80% without direct exposure to rain and excessive dust content of the air. There are some user serviceable parts in your power tool.
Please refer to the list of spare part list of the manual.
A. INSPECTING THE MOUNTING SCREWS
Regularly inspect all mounting screws and ensure that they are properly tightened. Should any of the screws be loose, tighten them immediately. Failure to do so could result in serious injuries
B. MAINTENANCE OF THE MOTOR
The motor unit winding is the very "heart" of the power tool. Exercise due care to ensure the winding does not become damaged and /or wet with oil or water
C. INSPECTION OF THE CARBON BRUSHES (for brushed model only)
The motor employs carbon brushes which are consumable parts. Since excessively worn carbon results in motor trouble, replace the carbon brush with an identical part when it becomes worn to or near the limit. In addition, always keep carbon brushes clean and ensure that they slide freely within the brush holder.
TROUBLE SHOOTING
| PROBLEM | POSSIBLE CAUSE | SOLUTION |
| PRODUCT DOES NOT START | Not connected to power supply | Connect to power supply |
| Other electrical defect to the product | Check by a specialist electrician | |
| The battery is low power | Need to charge the battery pack before operating | |
| THE MACHINE STOPS WORKING AFTER ROTATING SLOWLY | Air vents are blocked | Clean the air vents |
| The battery is low power | Need to charge the battery pack before operating | |
| UNUSUAL VIBRATION DURING USE | Bit is not well assembled | Disassembly and assembly the drill bit by strictly following instructions |
| SPARKING-visible THROUGH THE HOUSING AIR VENTS | A small amount of sparking may be visible through the housing vents | This is normal and does not indicate a problem |
| UNSATISFACTORY RESULT | Drill bit is worn or not adapted to the material to drill | Replace with new bit or check the compatibility between drill bit and material to drill |
STORAGE AND TRANSPORTATION CONDITION
STORAGE
This product :
- must be stored in a dry place
- must be stored away from sources of high temperatures and exposure to sunlight
- must avoid sudden temperature changes during storage
- must be stored without packaging is not allowed
- must be stored in the manufacturer's packaging in warehouses at an ambient temperature of +0 to +40^ . Humidity should not exceed 80% .
TRANSPORTATION
This product :
- must be transported in closed vehicles in accordance with the rules for the carriage of goods in force on
this type of transport.
- during transportation and handling operations, the packaging with the product should not be subjected to sharp impacts and the effects of precipitation.
- when unloading / loading, it is not allowed to use any type of equipment that works on the principle of clamping the package
- must be transported at ambient temperature from -20^ to +50^ . Relative air humidity should not exceed 90% .
- after transporting the device in winter conditions, it is necessary to keep it at room temperature for at least 2 hours until the moisture is completely dry.
PROTECT OUR ENVIRONMENT
CAUTION! This product has been marked with a symbol relating to removing electric and electronic waste. This means that this product shall not be discarded with household waste but that it shall be returned to a collection system which conforms to the European WEEE Directive. Contact your local authorities or stocks for advice on recycling. It will then be recycled or dismantled in order to reduce the impact on the environment. Electric and electronic equipment can be hazardous for the environment and for human health since they contain hazardous substances.
WARRANTY
Dexter & UP20 products are designed to the highest DIY quality standards. We offer a 60-month warranty for DEXTER product (tool), and a 36-month warranty of UP20 products (charger & battery) from the date of purchase. This warranty applies to all material and manufacturing defects which may arise. No further claims are possible, of whatever nature, direct or indirect, relating to people and/or materials. Dexter products are not intended for professional use.
In the event of a problem or defect, you should first always consult your Dexter dealer. In most cases, the Dexter dealer will be able to solve the problem or correct the defect.
Repairs or the replacement of parts will not extend the original warranty period.
Defects which have arisen as a result of improper use or wear are not covered by the warranty. Amongst other things, this relates to switches, protective circuit switches and motors, in the event of wear.
Your claim upon the warranty can only be processed if:
- Proof of the purchase date can be provided in the form of a receipt.
- No repairs and/or replacements have been carried out by third parties.
- The issue is not a matter of normal wear and tear.
- The tool has not been subjected to improper use (overloading of the machine or fitting non-approved accessories).
- The required maintenance and repair works have been performed correctly.
- There has been no forcing, improper handling, unauthorized use, or accidents.
- There is no damage caused by external influences or foreign bodies such as sand or stones.
- There is no damage caused by non-observation of the safety instructions and the instructions for use.
- There is no force majeure on our part.
- No incorrect parts have been used, parts not made by Dexter, whereas they prove to be the cause of deterioration.
- The tool / battery / charger have been in a wet environment (dew, rain, submerged in water, ...).
- A description of the complaint is enclosed.
The warranty stipulations apply in combination with our terms of sale and delivery.
Faulty tools to be returned to Dexter via Dexter dealer will be collected by Dexter as long as the product is properly packaged. If faulty goods are sent directly to Dexter by the consumer, Dexter will only be able to process these goods if the consumer pays the shipping costs.
Products which are delivered in a poorly packaged condition will not be accepted by Dexter.
12ID2-25.1A
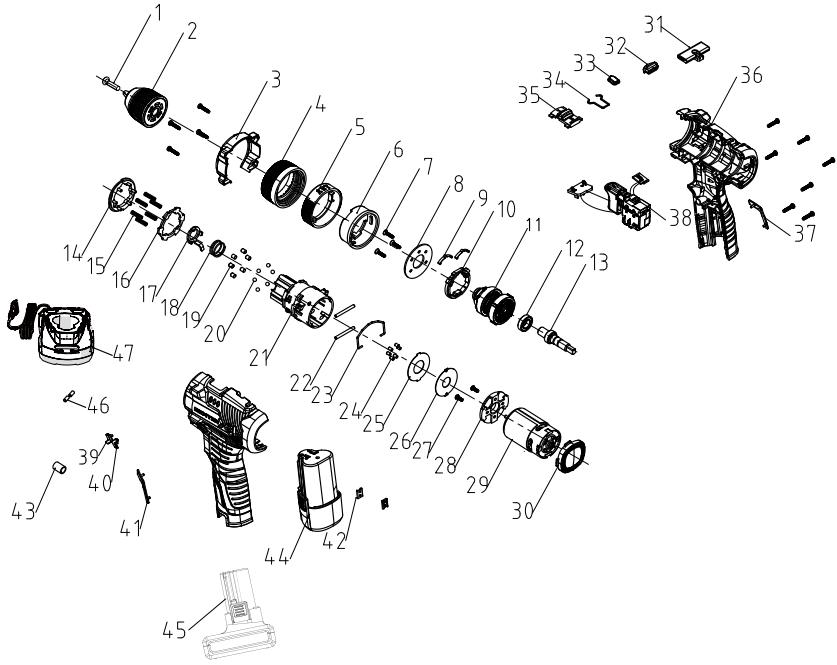
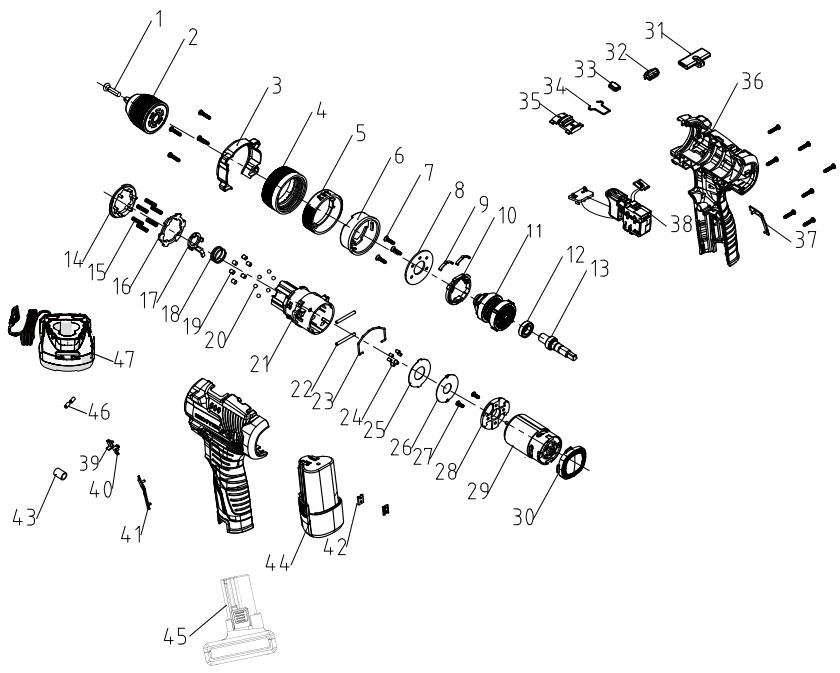
| n° | Description | n° | Description | n° | Description | n° | Description |
| 1 | Screw M5X22 T type | 15 | (No.21) Torque spring | 29 | Motor | 43 | Magnetic ring 9X5.2X12 |
| 2 | Chuck | 16 | Gasket for torque sleeve | 30 | Back cover | 44 | Tube battery pack |
| 3 | Head shell | 17 | Block | 31 | Push rod | 45 | Heat shrinkable tube |
| 4 | Torque sleeve | 18 | Reset spring (Gearbox No. 40) | 32 | Transparent lampshade | 46 | L shape Battery pack |
| 5 | Adjusting ring | 19 | Round pin | 33 | Lampshade for Power indicator | 47 | Charger |
| 6 | Adjusting inner ring | 20 | Steel ball | 34 | No.10 Elastic steel wire | ||
| 7 | Screw ST3*14(T type) | 21 | Gearbox housing (with inserts) + bushing | 35 | Speed adjustment button | ||
| 8 | Cover plate | 22 | Inner ring side pin | 36 | Housing | ||
| 9 | No 12 Tuning fork | 23 | Shift gear steel wire -7 | 37 | Right decorative part | ||
| 10 | Pressing plate | 24 | Self-lock pin | 38 | Switch assembly | ||
| 11 | No. 30 powder metallurgy assembly | 25 | Gasket | 39 | Left arrow | ||
| 12 | Deep groove ball bearing | 26 | Big gasket | 40 | Right arrow | ||
| 13 | Output shaft | 27 | Mechanical screw M3X6 | 41 | Left decorative part | ||
| 14 | Internal thread | 28 | Motor end cap | 42 | Metal card |
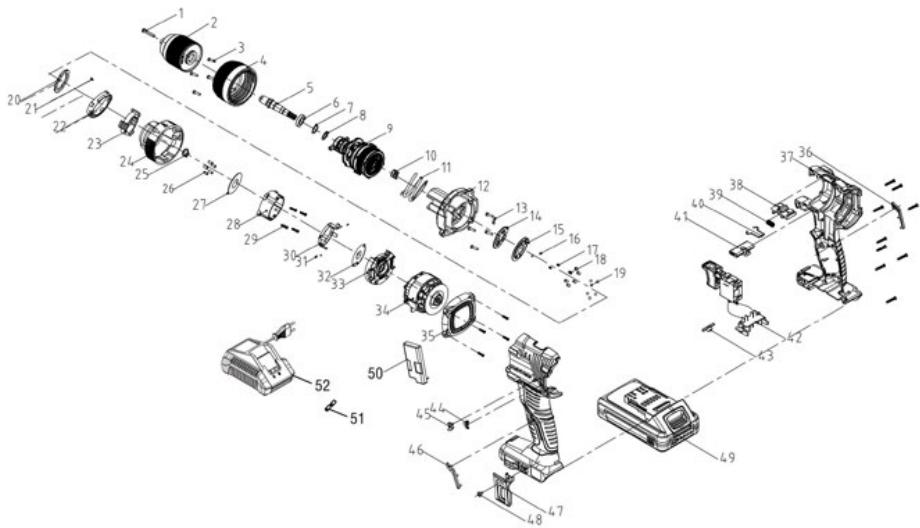
| n° | Description | n° | Description | n° | Description | n° | Description |
| 1 | Screw M6X24T type | 16 | Steel ball | 31 | Inner ring side pin | 46 | Left decorative part |
| 2 | Chuck | 17 | Sound spring | 32 | Big gasket | 47 | Belt hook No3 |
| 3 | Screw ST3*14(T type) | 18 | Torque needle roller | 33 | Motor end cap | 48 | Screw M4X8 |
| 4 | Torque sleeve | 19 | Steel ball | 34 | Motor and pcb assembly | 49 | Battery pack |
| 5 | Output shaft | 20 | Gasket for torque sleeve | 35 | Back cover | 50 | Protection board and support assembly |
| 6 | Deep groove ball bearing | 21 | Screw 2.5*8 T type | 36 | Right decorative part | 51 | Heat shrink tube |
| 7 | Steel ball | 22 | Toggle ring | 37 | Housing | 52 | Charger |
| 8 | Small gasket | 23 | Internal thread | 38 | Speed adjustment button | ||
| 9 | No.62 powder metallurgy assembly | 24 | Indicating ring | 39 | Spring for speed adjustment button | ||
| 10 | Impact spring | 25 | Circlip | 40 | No.7 elastic steel wire | ||
| 11 | Torque spring | 26 | Self-locking pin | 41 | Push rod | ||
| 12 | Front housing for gear box (Built-in moving teeth disk) | 27 | Gasket | 42 | Switch assembly | ||
| 13 | No 11 Tuning fork | 28 | Back shell for gear box | 43 | Transparent lampshade | ||
| 14 | Sound gasket | 29 | Srew ST2.8*12(T type) | 44 | Left arrow | ||
| 15 | Cover plate | 30 | Toggle support | 45 | Right arrow | ||
809568
Name and address of the manufacturer or his authorised representative|Nom et adresse du fabricant ou de son mandataires|Nombre y direction del fabricante o de su representante autorizzato|Nome e endereço do fabricante ou do seu représentante autorizzato
ADEO Services, 135 Rue Sadi Carnot - CS 00001 59790 RONCHIN - France
This declaration of conformity is issued under the sole responsibility of the manufacturer|La presente déclaration de conformité est établie sous la seule responsabilité du fabricant|La presente déclaration de conformidad se expide bajo la exclusiva responsabilidad del fabricante|Esta declaración de conformidade é emitida sob a exclusiva responsabilité do fabricante.
Industrial Type Design Reference: 20ID3-60BL.2A
Product Brand|Marque Produkt|Produkto demarca|Marca do produits
DEXTER
International Project Quality Leader
809568 - EAN Code: 3276007530186
Industrial Type Design Reference: 20ID3-60BL.2A
Marca del prodotto|Marka produits|Mópka προίόντος|Marcà a produsului:
DEXTER
Codistica del numero多项i|Kodowanie numero sery[nego]KwokikoToInojn oapiakou apriβou|Cod de numero de série
SN SSSSSS XX DDMMYY nn PPPPPP (SN: Serial No., SSSSSS : Supplier code, XX :Factory ID, DDMMYY: Production date, nn: number of version of product, PPPPPP : Incremental number)
IEC 62321-7:2020
IEC 62321-8:2017
EN IEC 63000:2018
Complata, firmato in vece e perconto diJOracowano, podisano w imieniu[Σuváxθκε, Σuovρaφίγι και εξ oνμαος[Complat, semnat de si in numele]
Eric LEMOINE
International Project Quality Leader
Luogo e data del rilascio|Data wydia i是我国Tótroc και μημερηγία δδοσης
Ronchin France
28/09/2023

FR Ce produit est recyclable. S'il ne peut plus etre utiliseveuillez apporter dans un centre de recyclage des dechets.
Este producto es recicable. Si ya no se possible usar, levelo a un centro de recicaje de residuos.
Eeste prodeto e reciclavel. Se deixar de outilizar, entrega-o num centro de reciclagem de residuos.
Il Questo prodotto può essere reciclato. Se deve essere smaltitto, portalo presso un centro de reciclaggio.
Auto to npioov eivai avakukwaiu. Eav sev mopei paoov va xpoaonoi8ei, metapepet Tnv oe kanoio kevtro avakukwong anoppuutuv.
TL Ten produkt poddawany jest recyklingowy, kiedy przystaje być uzyteczny daneź do dostarczy go do punktu zbiórki odpadów.
1A Lle npoyk Moje nepepeobnca. JaLIO BOHO 6IbIe He e pnpaTHe IINBOKOpNCTyBaHnHa, 3daIte NOrO Byttni3auiHmI cHTp.
Aceast produs estre reciclabil. Dacu mu ma poate fi folosit, va rugam sa l aduceci intr-un centru de reciclare a deseurilor.
EN This product is recyclable. If it cannot be used anymore, please take it to waste recycling centre.
S/N:


FR. Machine Garantie 5 ans, batterie garantie 3 ans, chargeur Garantie 3 ans / ES. Maquina garantia 5 ans, batteria garantia 3 ans, cargador garantia 3 ans / PT. Maquina 5 ans de garantia, batteria 3 ans de garantia, carragador 3 ans de garantia / IT. Macchina 5 anni di garanzia, batteria 3 anni di garanzia, caricabatterie 3 anni di garanzia / EL. Mxovn 5 xovv eyyon, umatapia 3 xovv eyyon, FOPTIOIc 3 xovv eyyon / PL. Maszyna 5 lat garancj, batteria 3 lata garancj, tadowarka 3 lata gwarancj/ RU. Tarapanthna Ha maunhy N 5et, raptantha Ha akkymnyTop 3 roda, raparthna Ha zapardhoe yctpoctbo 3 roda / UA. Tarapanthra Ha maunhy 5 pokib, raptantha Ha akmyyTOp 3 poki, raptantha Ha zapardnh np Tp KZ. MauninaHbN Keinindiri 5 kbln, akkymnyToppDhN Keninindir 3 kbln, zapardhaBtBn Keinindiri 3 kbln / RO. Maina 5 ani garantie, batterie 3 ani garantie, incarcator 3 ani garantie/ EN. Machine 5-year guarantee, battery 3-year guarantee, charger 3-year guarantee
ADEO Services - 135 Rue Sadi Carnot - CS 00001
59700 RONCHIN - France
Imported by Adeo South Africa (PTY) LTD T/A Leroy Merlin, Hosted in Leroy Merlin Fourways Store 35 Roes Street, Witkoppen Ext 97, Sandton, 2191 Johannesburg, Gauteng, South Africa
Tel: +27 10 493 8000 Email: contact@leroymerlin.co.za
Fabrique en Chine \ Made in China \ CenanoB KItae \ KItaiJa JxacanraH \ BurotoBneoB KItai \ Origim:China
Imnoptep:TOB"IpeyaMpenehYkpaHaiA,04201YkaHaiA,M.KmIB,yuN.
IponaTHA7+380444984600.ImnpertprnIMMAncpeTeh3iBid
cnojmbaHbU 5OIO ToBapar, a TAKO npobodmtb Ioro pemOH,TexHHue i
rapaHTINHe o6CnTyOBaBHAA
- YIIOAEIINOMENOIKINADYNOI
- ΕYNTHPHΞH TOY KINHTHPA
- OBEPTAHH BIIPEJ/HA3A
- BbIPPEKIMyUdAPY/CBEPDJIHHA
- ПИД�OTOBКAO CBEPДПИНЯ
- CBEPINHHOTBOPIB
- CBEPJIINHJ DEPEBUNH
- TEXHIUHE OBCIyROBVAHHHBnIYHA
- ORIIyIbHnx LITOK (TINbKN IJIy MoJeIeI 3I IITKOBIM DBNYHOM)
- UCYHEHHH HECIPABHOCTEI
- SPECIFIC SAFETY WARNINGS
- 1/ Safety instructions for all operations
- 2/ Safety instructions when using long drill bits
- Additional safety warnings
- RESIDUAL RISKS
- Even when the tool is used as prescribed it is not possible to eliminate all residual risk factors.
- RISK REDUCTION
- WARNING:
- OPERATION
- WARNING : The device should be disconnected from the mains before putting into operation
- BIT INSTALLATION
- FORWARD / REVERSE ADJUSTMENT
- SELECTING THE IMPACT/DRILL MODE
- VARIABLE SPEED TRIGGER SWITCH
- WARNING: Always check that the power supply is the same as that indicated on the nameplate of the tool.
- LED WORKLIGHT
- START DRILLING
- HOLE DRILLING
- DRILLING WOOD
- DRILLING METAL
- DRILLING CONCRETE
- SPECIAL SAFETY INSTRUCTIONS FOR BATTERY PACK AND CHARGER
- MAINTENANCE
- INSPECTING THE MOUNTING SCREWS
- MAINTENANCE OF THE MOTOR
- TROUBLE SHOOTING
- STORAGE AND TRANSPORTATION CONDITION
- STORAGE
- TRANSPORTATION
- PROTECT OUR ENVIRONMENT
- WARRANTY
- 809568
- ADEO Services, 135 Rue Sadi Carnot - CS 00001 59790 RONCHIN - France
- DEXTER
- Eric LEMOINE
Brand : DEXTER
Model : 12ID2-25.1A - 20ID3-60BL.2A
Category : Cordless drill driver